
:max_bytes(150000):strip_icc():format(webp)/GettyImages-944229088-5bd1f61e46e0fb0026fdf2f0.jpg)
Updated Melodic Compilation A Comprehensive Guide to Exclusive Online Sites for Video Tune Libraries
“Melodic Compilation: A Comprehensive Guide to Exclusive Online Sites for Video Tune Libraries”
FREE Top 10 Best Websites to Download Sound Clips for Videos

Liza Brown
Mar 27, 2024• Proven solutions


Are you working on animation , video, game, music, or maybe some other media file? Sound is a vital factor for all. It is the effect of the sound that can make or break a project.
But it can be difficult to find perfect and quality free sound clips. There are thousands of software for creating excellent videos, adding sounds , titles, overlays, tracks, and more. But what if you don’t wish to create a piece for just jazzing up your already existing video?
Free sound clips are great resources to download for videos if you don’t want to create sound effects.
Many people want to know the source of high-quality free audio for videos. These free sound samples are easy to find on the Internet.
In this article, you will get to know the 10 best websites to download free sound clips.
10 Best Free Sound Samples to Use
1. Freesound
Licensed under the Creative Commons License , the Freesound comprises of a large sound database. You can choose from the huge collection of sounds and decide which one is free and which sound needs attribution.
You can ensure if the sound can be used in commercial products or not. If you are not a professional and just need free sound samples for personal use, you may use free sound download from any site. The features of Freesound include-
- You can search for sounds or browse by tags or geotags
- The pack feature helps you to find a bunch of similar sounds very easily
- Preview the sound without logging in
- For downloading the sound, you need to log in
- Add your audio samples to contribute to the database
- You get 5 free sound clips download
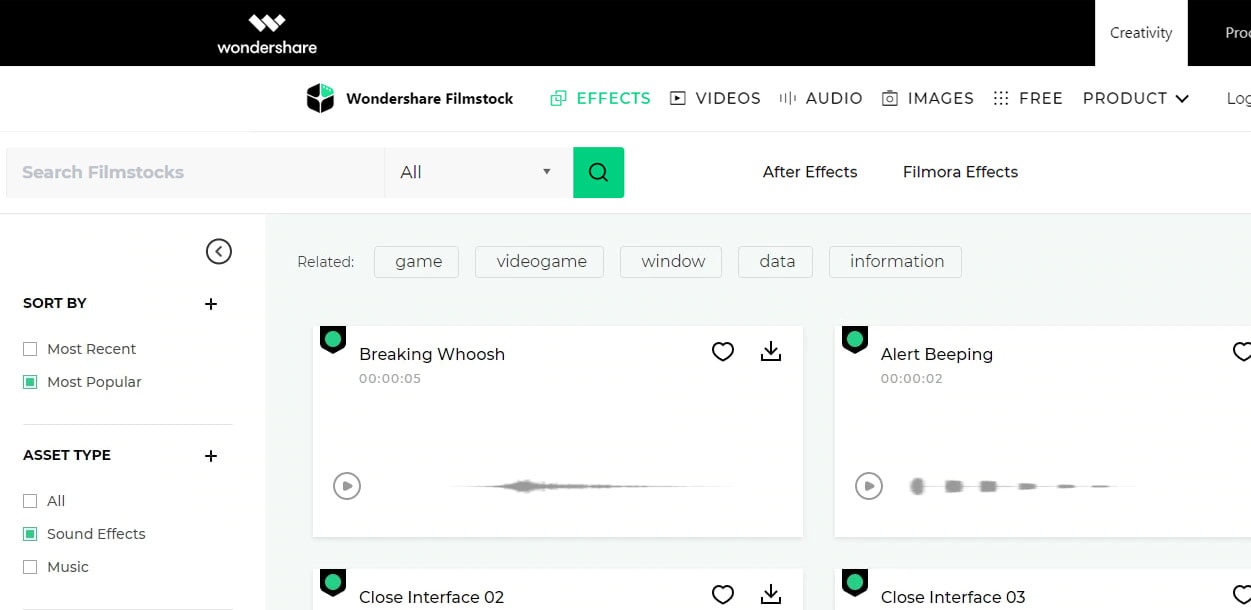
2. Filmstock
Filmstock from the house of Wondershare is one of the greatest libraries for free sound clips.
Any budget filmmaker would love to have this invaluable resource not just for free audio clips for videos but also for royalty-free sound clips.
You can bring your cinematic video to life from the Filmstock free-stuff one-stop-shop. The features of Filmstock include-
- Royalty-free video effects, audio, and stock media
- There are genres like science fiction, sci-fi, ufo, technology games
- Huge selection of curated quality stock images
- Filmstock library is continuously updated
- No attribution required for any project on Filmstock
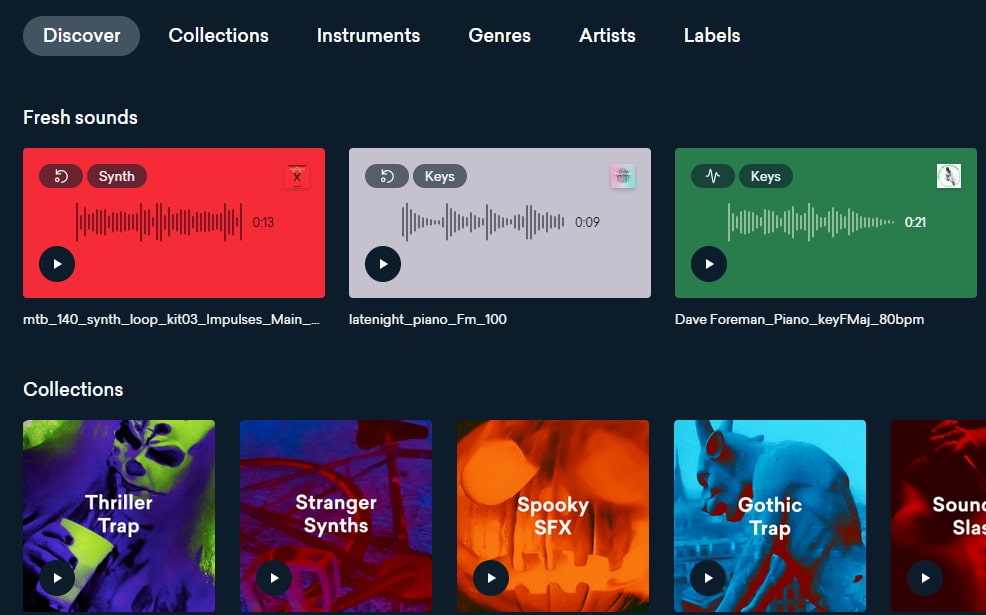
3. Landr
With a simple interface, Landr offers the best loops, packs, and samples to you. Make use of powerful Artificial Intelligence (AI) and you can spend lesser time searching and browsing. The features of Landr includes-
- You can browse free sound clips from the various collection of instruments
- Quickly find the right sound from the millions of free sound samples
- Get access to Selector tool powered by AI to make your browsing session faster
- Nourish your ideas with the curated collection and smart browsing
- The filter sounds by instrument, mood, BPM or key
- Go pro with your sampling
- Royalty-free sounds from today’s best artists, producers, and labels
4. Audio Micro
Audio Micro is one of the best tools for downloading horror-based free sound clips. Once you register with Audio Micro, you can easily download free audio clips for videos.
For downloading sound for commercial uses like TV or mass reproduction, you must be a paid subscriber. The features of Audio Micro are-
- Get access to the collection of royalty-free music and 2000 free good quality sound effects
- High-quality audio content for commercial use, available at competitive prices without any hidden cost
- Research, locate, purchase, and download stock audio
- Easy and fast search option with free sound collection visible from the navigation bar on the homepage
5. Audio Blocks
It is an intuitive platform to download loops, sound effects, and music. It has a low-cost subscription model and the content is constantly updated based on the search results. The features of Audio Blocks are-
- Unlimited royalty-free audio
- Loop, sound effects, and music download
- Low-cost subscription offers more content at a nominal price
- There are flexible plans for every budget
- Use content multiple times for commercial and personal projects
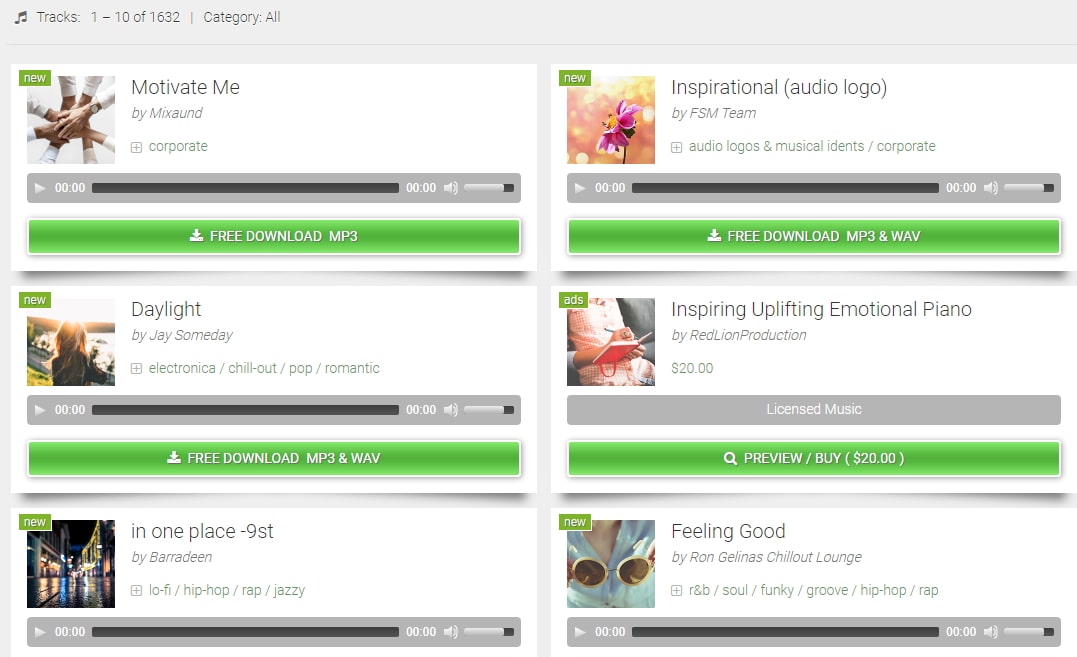
6. Free Stock Music
Whether YouTube project or your personal Vlog, Free Stock Music offers royalty-free music for a range of media platforms.
For any non-copyrighted sound clips free download, always feel free to reach Free Stock Music. The features are-
- Free access to non-copyrighted music
- Just put the attribution in credits to use the sound clips
- Unlimited royalty-free music in all moods, lengths, tempos, and categories
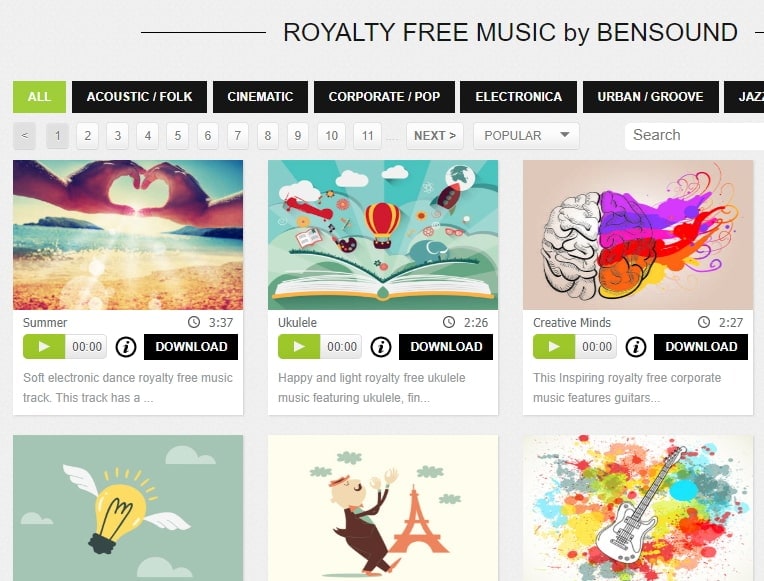
7. Bensound
Available under the Creative Common License, Bensound is used for multimedia projects like web applications or videos.
You can use the free tracks available with Bensound stock music in the various website background score, animations, web adverts, slideshows, etc. The features of Bensound include-
- Royalty-free stock music in various genres like electronica, urban, cinematic, jazz, rock, etc.
- Download free sound clips from the huge collection and add attributions in credits
- If you don’t wish to give credits and use the high-quality premium tracks, get the Bensound Pro License
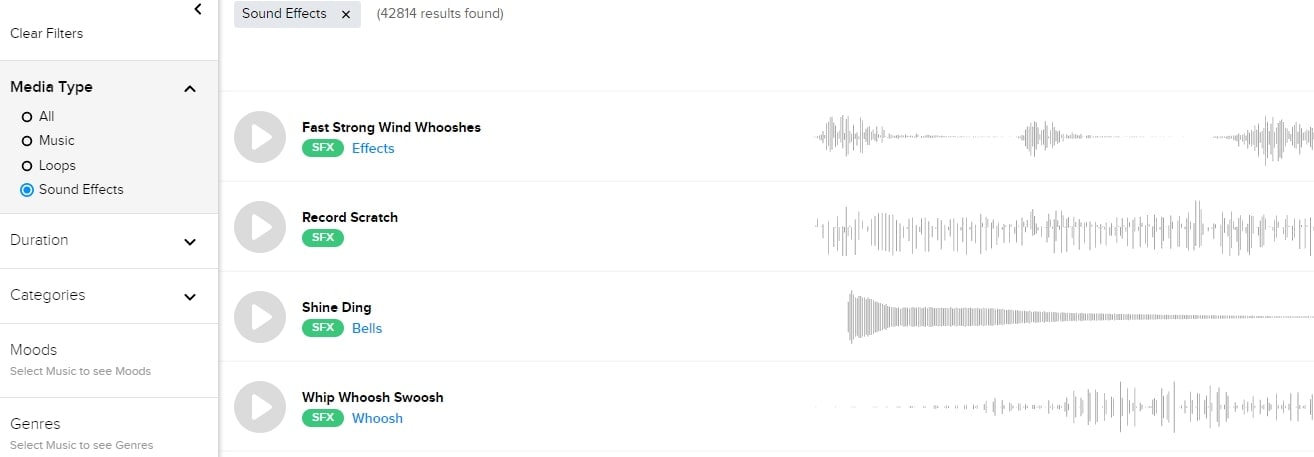
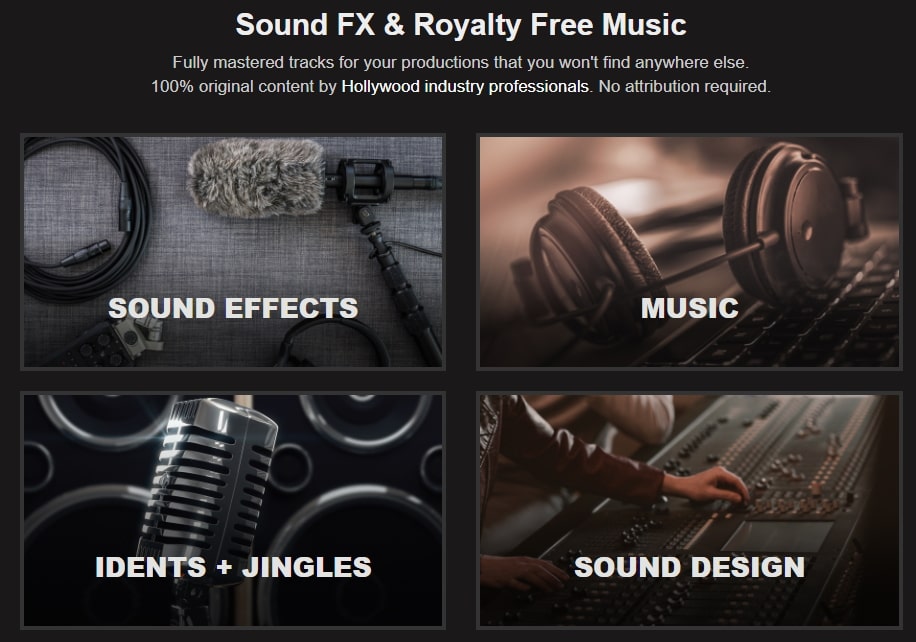
8. Sounds Crate
Are you looking for the best soundtrack for your video? Sounds Crate offers some of the best royalty-free music and sound FX.
With the tracks completely mastered for your production, Sound Crate offers 100% quality content created by industry professionals from Hollywood. The Sound Crate features include-
- Sound FX for electricity, gun, explosion, weapons, sci-fi, vehicles, movements, etc.
- Royalty-free music in diverse genres
- You can also use idents for corporate, news jingles, holiday idents, etc.
- Download and use the royalty-free sound clips easily
- Over 10000 plus HD assets
- No attribution required
- Browse from unlimited music, sound effects, etc.
9. ZapSlat
Do your audio and video editing projects need some cool soundtracks to jazz it up? Look no further. ZapSlat is one of the best free sound download sites to make your project successful. The features of ZapSlat are-
- Comprises over 54,000 professional free sound effects and royalty-free music files
- Variety of free sound effect packs
- Download royalty-free music from a variety of genres
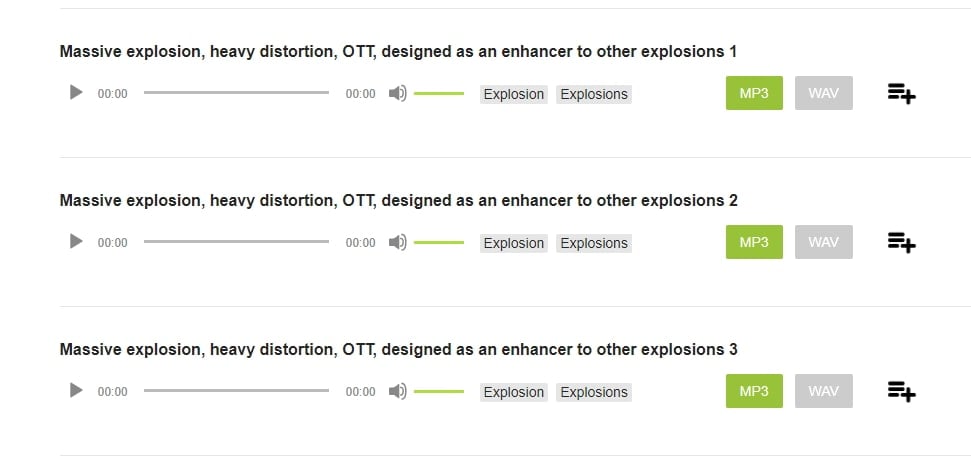
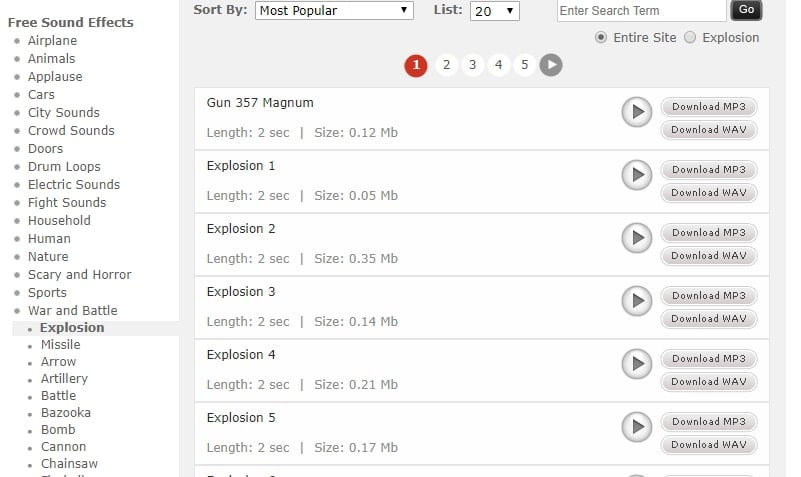
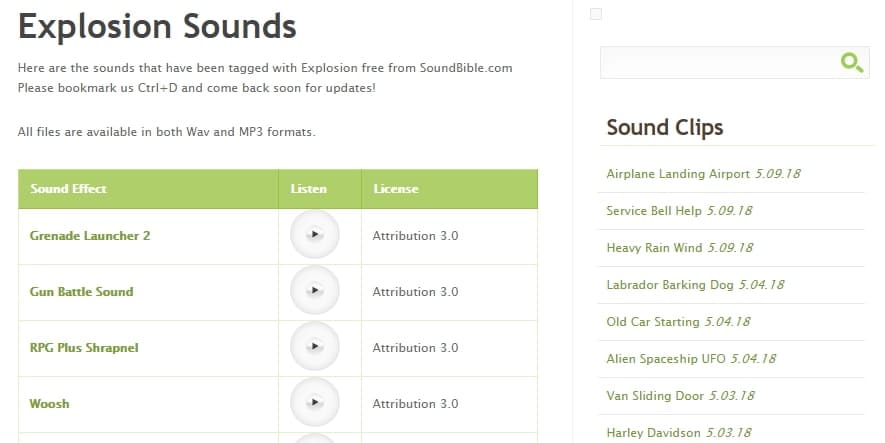
10. Sound Bible
Choose the best from 2000 free sound clips licensed under Creative Commons. To use the sound effect for commercial video, you can select from the royalty-free sounds. The features of SoundBible are-
- Download free sound clips without logging in or creating an account
- 2000 free sounds
- Copyright-free sound resources are weekly updated
Conclusion
Now that you know the best 10 free sound clip download sites, make use of it in your videos. Without worrying about the expense, you can use these sites to download free sound clips.
Liza Brown
Liza Brown is a writer and a lover of all things video.
Follow @Liza Brown
Liza Brown
Mar 27, 2024• Proven solutions
Are you working on animation , video, game, music, or maybe some other media file? Sound is a vital factor for all. It is the effect of the sound that can make or break a project.
But it can be difficult to find perfect and quality free sound clips. There are thousands of software for creating excellent videos, adding sounds , titles, overlays, tracks, and more. But what if you don’t wish to create a piece for just jazzing up your already existing video?
Free sound clips are great resources to download for videos if you don’t want to create sound effects.
Many people want to know the source of high-quality free audio for videos. These free sound samples are easy to find on the Internet.
In this article, you will get to know the 10 best websites to download free sound clips.
10 Best Free Sound Samples to Use
1. Freesound
Licensed under the Creative Commons License , the Freesound comprises of a large sound database. You can choose from the huge collection of sounds and decide which one is free and which sound needs attribution.
You can ensure if the sound can be used in commercial products or not. If you are not a professional and just need free sound samples for personal use, you may use free sound download from any site. The features of Freesound include-
- You can search for sounds or browse by tags or geotags
- The pack feature helps you to find a bunch of similar sounds very easily
- Preview the sound without logging in
- For downloading the sound, you need to log in
- Add your audio samples to contribute to the database
- You get 5 free sound clips download
2. Filmstock
Filmstock from the house of Wondershare is one of the greatest libraries for free sound clips.
Any budget filmmaker would love to have this invaluable resource not just for free audio clips for videos but also for royalty-free sound clips.
You can bring your cinematic video to life from the Filmstock free-stuff one-stop-shop. The features of Filmstock include-
- Royalty-free video effects, audio, and stock media
- There are genres like science fiction, sci-fi, ufo, technology games
- Huge selection of curated quality stock images
- Filmstock library is continuously updated
- No attribution required for any project on Filmstock
3. Landr
With a simple interface, Landr offers the best loops, packs, and samples to you. Make use of powerful Artificial Intelligence (AI) and you can spend lesser time searching and browsing. The features of Landr includes-
- You can browse free sound clips from the various collection of instruments
- Quickly find the right sound from the millions of free sound samples
- Get access to Selector tool powered by AI to make your browsing session faster
- Nourish your ideas with the curated collection and smart browsing
- The filter sounds by instrument, mood, BPM or key
- Go pro with your sampling
- Royalty-free sounds from today’s best artists, producers, and labels
4. Audio Micro
Audio Micro is one of the best tools for downloading horror-based free sound clips. Once you register with Audio Micro, you can easily download free audio clips for videos.
For downloading sound for commercial uses like TV or mass reproduction, you must be a paid subscriber. The features of Audio Micro are-
- Get access to the collection of royalty-free music and 2000 free good quality sound effects
- High-quality audio content for commercial use, available at competitive prices without any hidden cost
- Research, locate, purchase, and download stock audio
- Easy and fast search option with free sound collection visible from the navigation bar on the homepage
5. Audio Blocks
It is an intuitive platform to download loops, sound effects, and music. It has a low-cost subscription model and the content is constantly updated based on the search results. The features of Audio Blocks are-
- Unlimited royalty-free audio
- Loop, sound effects, and music download
- Low-cost subscription offers more content at a nominal price
- There are flexible plans for every budget
- Use content multiple times for commercial and personal projects
6. Free Stock Music
Whether YouTube project or your personal Vlog, Free Stock Music offers royalty-free music for a range of media platforms.
For any non-copyrighted sound clips free download, always feel free to reach Free Stock Music. The features are-
- Free access to non-copyrighted music
- Just put the attribution in credits to use the sound clips
- Unlimited royalty-free music in all moods, lengths, tempos, and categories
7. Bensound
Available under the Creative Common License, Bensound is used for multimedia projects like web applications or videos.
You can use the free tracks available with Bensound stock music in the various website background score, animations, web adverts, slideshows, etc. The features of Bensound include-
- Royalty-free stock music in various genres like electronica, urban, cinematic, jazz, rock, etc.
- Download free sound clips from the huge collection and add attributions in credits
- If you don’t wish to give credits and use the high-quality premium tracks, get the Bensound Pro License
8. Sounds Crate
Are you looking for the best soundtrack for your video? Sounds Crate offers some of the best royalty-free music and sound FX.
With the tracks completely mastered for your production, Sound Crate offers 100% quality content created by industry professionals from Hollywood. The Sound Crate features include-
- Sound FX for electricity, gun, explosion, weapons, sci-fi, vehicles, movements, etc.
- Royalty-free music in diverse genres
- You can also use idents for corporate, news jingles, holiday idents, etc.
- Download and use the royalty-free sound clips easily
- Over 10000 plus HD assets
- No attribution required
- Browse from unlimited music, sound effects, etc.
9. ZapSlat
Do your audio and video editing projects need some cool soundtracks to jazz it up? Look no further. ZapSlat is one of the best free sound download sites to make your project successful. The features of ZapSlat are-
- Comprises over 54,000 professional free sound effects and royalty-free music files
- Variety of free sound effect packs
- Download royalty-free music from a variety of genres
10. Sound Bible
Choose the best from 2000 free sound clips licensed under Creative Commons. To use the sound effect for commercial video, you can select from the royalty-free sounds. The features of SoundBible are-
- Download free sound clips without logging in or creating an account
- 2000 free sounds
- Copyright-free sound resources are weekly updated
Conclusion
Now that you know the best 10 free sound clip download sites, make use of it in your videos. Without worrying about the expense, you can use these sites to download free sound clips.
Liza Brown
Liza Brown is a writer and a lover of all things video.
Follow @Liza Brown
Mastering Rapid Audio Playback: Adjusting Pace with Ease
If you have a music file, and you notice that it is a bit slow or fast, making the entire ambiance kind of dull or overly exciting respectively, you can change audio speed to get the track right as per your mood. However, when you make any such adjustments, some unwanted effects can be experienced, such as format limitations while exporting, changes in the pitch of the sound, etc.
That said, here, you will learn how to change audio speed with the least adverse effects using some of the most popular and highly recommended tools.
How to Change Audio Speed in Filmora
Being a lightweight and less resource-intensive post-production tool, Filmora is admired by several professionals across the globe and is many times preferred over other editing programs like Adobe Premiere Pro and Final Cut Pro X. Easy-to-understand UI and large-sized, clearly visible options and buttons are what make Filmora extremely popular among those who are new to the industry and don’t have a computer with a powerful processor, gigantic memory, and enormous GPU.
For Win 7 or later (64-bit)
For macOS 10.12 or later
You can follow the steps given below to learn how to change audio speed with Wondershare Filmora:
Step 1: Import Audio and Add to Filmora Timeline
Launch Filmora on your Windows or Mac computer, make sure that the Media icon is selected from the standard toolbar at the top, click the + icon in the Media (also referred to as Library here) window (on Mac) or anywhere in the Media window itself (on Windows) from the upper-left corner of the interface, and import the audio file that you want to manage the playback speed of. Next, drag the media file from the Library to the timeline.

Step 2: Increase or Decrease Audio Speed
Ensure that the audio track is selected in the timeline. Click the Speedometer icon from the timeline toolbar at the upper section, hover mouse to the Slow option from the menu, and click your preferred value form the submenu to reduce the sound speed. Likewise, hover the mouse to the Fast option, and choose a value from the submenu to increase it.

Note: Usually, the audio pitch wouldn’t change as long as you pick the values anywhere between 0.5x and 5x. However, if you select any option beyond this range, you may experience variations in the pitch according the value you selected.
Step 3: Set Custom Speed or Reverse the Audio
Click the Speedometer icon from above the timeline, and click Custom Speed from the menu. Use the slider to slow down (move to the left) or speed up (move to the right) the audio on the Custom Speed box. Alternatively, you can manually enter your preferred value in the available field for granular control. In addition, you can also check the Reverse Speed box to reverse the audio if need be.

Step 4: Export the Output
Click EXPORT from the top-center area of the interface, go to the Local tab on the Export box that opens next, select your preferred audio format from the Format list in the left, make necessary customizations from the right pane, and click EXPORT from the bottom-right corner of the box to export the audio with the modified speed.

How to Change the Speed of Audio with Video in Filmora
The process to change audio speed that also has a video is identical to what is explained in the previous section. The only additional step required in this case is separating the audio track from that of video.
You can learn how to get this done by following the instructions given below:
Step 1: Import File to Media Window and then Add to Timeline
Use the method explained in Step 1 of the previous section to import a file to Filmora, drag the media to the timeline, and click MATCH TO MEDIA when the Project Setting box appears and prompts for confirmation. Note: Except for the Project Setting box, the rest of the process for adding audio and video files to the timeline is the same.
Step 2: Separate Audio from Video
Select and then right-click the video track with audio in the timeline, and click Detach Audio from the context menu.

Step 3: Adjust the Audio Speed
After the audio is detached, you can select the audio track and follow the method explained in the previous section to adjust its speed as needed. As for the video, you can use the trimming and cropping options to adjust its duration and size and export the entire project as explained in Step 4 of the previous section. Note: To export the project as video, all you need to do is, choose a video format like MP4 or something similar to that when on the Export box.
How to Change Audio Speed without Changing Pitch in Audacity for Free
One of the most downloaded, used, and admired applications, Audacity, is an open-source and free audio editing software available for Windows, Mac, and Linux computers in both x32 and x64 variants. The software has all the professionals’ tools for basic to advanced sound editing to produce industry-standard outputs.
You can follow the steps given below to learn how to change audio speed with Audacity without changing the pitch of the sound:
- Launch Audacity
- Click File
- Go to Import > Audio

- Import the audio you want to speed up or slow down
- Press Ctrl + A on the keyboard to select the whole audio track
- Go to the Effect menu
- Click Change Tempo

- In the Percent Change field, enter a value with or without minus (-) to reduce or increase the tempo of the audio respectively.

- Click OK
- Go to file> Export
- Select your preferred option from the submenu to export the modified audio as needed
Note: Changing the tempo usually doesn’t change the pitch of the audio up to some extent. However, you can expect some variations in the pitch if the new tempo value is too high or too low.
Conclusion
You may want to slow down or speed up audio if the existing one is not up to the mark, and you wish to manage the ambiance with the help of the music track either while playing a video or when merely a soundtrack is to be played during some event. In either case, the best tool for all your needs is Wondershare Filmora, and if you are looking for a program dedicated to audio only, Audacity is something worth trying.
Versatile Video Editor - Wondershare Filmora
An easy yet powerful editor
Numerous effects to choose from
Detailed tutorials provided by the official channel
For Win 7 or later (64-bit)
For macOS 10.12 or later
You can follow the steps given below to learn how to change audio speed with Wondershare Filmora:
Step 1: Import Audio and Add to Filmora Timeline
Launch Filmora on your Windows or Mac computer, make sure that the Media icon is selected from the standard toolbar at the top, click the + icon in the Media (also referred to as Library here) window (on Mac) or anywhere in the Media window itself (on Windows) from the upper-left corner of the interface, and import the audio file that you want to manage the playback speed of. Next, drag the media file from the Library to the timeline.
Step 2: Increase or Decrease Audio Speed
Ensure that the audio track is selected in the timeline. Click the Speedometer icon from the timeline toolbar at the upper section, hover mouse to the Slow option from the menu, and click your preferred value form the submenu to reduce the sound speed. Likewise, hover the mouse to the Fast option, and choose a value from the submenu to increase it.
Note: Usually, the audio pitch wouldn’t change as long as you pick the values anywhere between 0.5x and 5x. However, if you select any option beyond this range, you may experience variations in the pitch according the value you selected.
Step 3: Set Custom Speed or Reverse the Audio
Click the Speedometer icon from above the timeline, and click Custom Speed from the menu. Use the slider to slow down (move to the left) or speed up (move to the right) the audio on the Custom Speed box. Alternatively, you can manually enter your preferred value in the available field for granular control. In addition, you can also check the Reverse Speed box to reverse the audio if need be.
Step 4: Export the Output
Click EXPORT from the top-center area of the interface, go to the Local tab on the Export box that opens next, select your preferred audio format from the Format list in the left, make necessary customizations from the right pane, and click EXPORT from the bottom-right corner of the box to export the audio with the modified speed.
How to Change the Speed of Audio with Video in Filmora
The process to change audio speed that also has a video is identical to what is explained in the previous section. The only additional step required in this case is separating the audio track from that of video.
You can learn how to get this done by following the instructions given below:
Step 1: Import File to Media Window and then Add to Timeline
Use the method explained in Step 1 of the previous section to import a file to Filmora, drag the media to the timeline, and click MATCH TO MEDIA when the Project Setting box appears and prompts for confirmation. Note: Except for the Project Setting box, the rest of the process for adding audio and video files to the timeline is the same.
Step 2: Separate Audio from Video
Select and then right-click the video track with audio in the timeline, and click Detach Audio from the context menu.
Step 3: Adjust the Audio Speed
After the audio is detached, you can select the audio track and follow the method explained in the previous section to adjust its speed as needed. As for the video, you can use the trimming and cropping options to adjust its duration and size and export the entire project as explained in Step 4 of the previous section. Note: To export the project as video, all you need to do is, choose a video format like MP4 or something similar to that when on the Export box.
How to Change Audio Speed without Changing Pitch in Audacity for Free
One of the most downloaded, used, and admired applications, Audacity, is an open-source and free audio editing software available for Windows, Mac, and Linux computers in both x32 and x64 variants. The software has all the professionals’ tools for basic to advanced sound editing to produce industry-standard outputs.
You can follow the steps given below to learn how to change audio speed with Audacity without changing the pitch of the sound:
- Launch Audacity
- Click File
- Go to Import > Audio
- Import the audio you want to speed up or slow down
- Press Ctrl + A on the keyboard to select the whole audio track
- Go to the Effect menu
- Click Change Tempo
- In the Percent Change field, enter a value with or without minus (-) to reduce or increase the tempo of the audio respectively.
- Click OK
- Go to file> Export
- Select your preferred option from the submenu to export the modified audio as needed
Note: Changing the tempo usually doesn’t change the pitch of the audio up to some extent. However, you can expect some variations in the pitch if the new tempo value is too high or too low.
Conclusion
You may want to slow down or speed up audio if the existing one is not up to the mark, and you wish to manage the ambiance with the help of the music track either while playing a video or when merely a soundtrack is to be played during some event. In either case, the best tool for all your needs is Wondershare Filmora, and if you are looking for a program dedicated to audio only, Audacity is something worth trying.
Versatile Video Editor - Wondershare Filmora
An easy yet powerful editor
Numerous effects to choose from
Detailed tutorials provided by the official channel
“Embark on Free Filmmaking with Musical Elements”
Versatile Video Editor - Wondershare Filmora
An easy yet powerful editor
Numerous effects to choose from
Detailed tutorials provided by the official channel
Customizing the videos as per your desires is a quite challenging task. You require a sophisticated tool to perform the edits on your video. The Filmora is an awesome program that helps you to create a video with music using the in-built library sources. You would have come across many video editors in the digital market. Here, you will find in-built libraries carrying numerous customizable files to create outstanding effects on the media files. Quickly surf the below content for better edits on your videos using the Filmora video editor application.
Create videos with music using the Filmora Video Editor
In this section, you will learn about the tips and tricks associated with the optimal utilization of the Filmora Video editor. Follow the guidelines carefully and create videos with music precisely.
The Filmora application is a sophisticated tool that has a wide range of editing features to result in the desired customization of memorable clicks. This working space provides an effortless import option to load the media files into the timeline to make further edits. There are options to include filter effects, transitions, add sound effects and edit the background music professionally. You can merge quality audio tracks along with the video using this creative tool. This program helps you to unleash imagination beyond boundaries. It has a simple interface and encourages the users to work on this platform comfortably.
Another interesting fact on Filmora is that you can have a preview of the edited video before exporting it to any desired platform. During the export option, you can modify the file size, resolution, and file formats to overcome the compatibility features. The simple environment of this app inspires even newbie users to handle this tool effortlessly. Few clicks are sufficient to create desired changes on your videos. Step into this app and enjoy the flavors of the video without compromising on any factors.
The key features of Filmora Video Editor.
● The Filmora has in-built features like sound effects, filters, transitions to make your video attractive.
● Simple click and drag actions are sufficient to implement the desired effects on your video.
● The user-friendly interface assists even the newbie users to carry out the video editing process effortlessly.
● There are numerous audio edit options like ducking, detaching audio, and recording voiceover to enhance the audio quality in the media file.
● Easily export the edited file into desired storage space for future access. You can also share them directly on social media platforms like YouTube and Vimeo.
These are the incredible functionalities of the Filmora Video Editor application. You can perform professional edits on your video effortlessly using this tool. You can download this app and explore the hidden features of this program practically. You will feel comfortable working on this program because the essential controls are explicitly visible for easy access. In no time you can make desired edits and share them to any storage space or social media flawlessly.
The stepwise guidelines on editing the memorable clicks using the efficient program Filmora Video Editor application.
Step 1: Download Filmora
Go to the Filmora official website and download the program based on the system OS version. Then, install the app by following the instruction wizard. Launch the tool and import the desired video into the working space of the Filmora video editor. Drag and drop the video file into the timeline to add more effects to the media file.

Step 2: Insert the music
Next, tap the Audio option from the menu and select the Sound Effects option in the right panel of the screen. Choose your favorite music from the left side of the screen and make a right-click and select Apply option. You can also drag it into the timeline to make further edits. There are possibilities to import your desired audios into this working space by tapping the Import option.

Step 3: Start creating your video
Now, hit the Preview option to view the edited video and finally tap the Export button to share the edited file on any social media or other storage space. You can access the edited video from

These are the stepwise instructions on editing the videos to obtain desired outcomes. You can also make further edits using the in-built features of the Filmora Video Editor application.

Wondershare Filmora - Best Video Editor for Mac/Windows
5,481,435 people have downloaded it.
Build unique custom animations without breaking a sweat.
Focus on creating epic stories and leave the details to Filmora’s auto features.
Start a creative adventure with drag & drop effects and endless possibilities.
Filmora simplifies advanced features to save you time and effort.
Filmora cuts out repetition so you can move on to your next creative breakthrough.
Tip: Advanced Video Edits Options in Filmora Video Editor program
Here are the few in-built features of Filmora Video Editor that helps you to make the best edits professionally.
Here are the few in-built features of Filmora Video Editor that helps you to make the best edits professionally.
Filter Effects: Implement the desired filter effects on your videos by choosing the perfect options from the displayed items. Select the ‘Filters’ label on the Menu and from the expanded lists, select the desired ones.
Transitions and Add Titles: Next, you can make your video interactive by inserting the transitions for the videos. Animate the video content using the Animation feature and add desired titles to the video to add fun while playing them.
Royalty-Free Music: In the Filmora Video Editor program, you can find huge collections of royalty-free soundtracks to add to your videos to make them engaging to the audience. In the Audio option, you can find the available music tracks by choosing the Sound Effects option.
Audio Ducking: It is an important feature to fade in and out the desired audio tracks in your video. You can work on the specific audio track and enhance its clarity by implementing this feature.
Noise Removal: The Denoise feature helps you to remove the background noise in the audio tracks. You can remove the noise elements and improve the quality of the audio precisely.
Detach Audio: To customize the audio tracks in the videos, use this Deatch Audio option. You can reach out for this option by making a right-click on the video file. Detach the audio signal and embed the desired voice-over signal to make the video file entertaining to the audience.
In-built Templates: It has numerous collections of templates to create a wide range of personalized videos for your needs. Save your valuable time by using the perfect template according to your theme. You do not have to work on the videos from the scratch. The newbie users can perform advanced video creation operations with the help of these available sources.
Color Corrections: Increase the visibility of the videos by manually correcting the colors and adjusting the contrast, saturation, brightness and white balance.
Green Screen: Using the Chroma Key change the background of the videos as per your desires in no time. You can add special effects to your videos with the help of the Green Screen option.
Split the Screen: Add fun to your videos by splitting the screen. You can add multiple screens and narrate your story precisely using quality video edits.
These are the video edits you can perform on the videos to enhance the quality and improve interaction with the audience.
Wondershare Filmora
Get started easily with Filmora’s powerful performance, intuitive interface, and countless effects!
Try It Free Try It Free Try It Free Learn More >

Conclusion
Thus, this article gives you the best insights on how to create a video with music. Follow the above-discussed instructions to append the desired soundtracks to your favorite videos using the incredible application Filmora Video Editor program. Connect with this article and discover the optimal ways to edit the videos precisely. Choose Filmora Video Editor and edit your videos professionally without any special skills. The Filmora video editor has a simple interface and assists you to edit videos beyond imagination. Stay tuned for the impressive features of Filmora Video editors in customizing the video content for your requirements.
Customizing the videos as per your desires is a quite challenging task. You require a sophisticated tool to perform the edits on your video. The Filmora is an awesome program that helps you to create a video with music using the in-built library sources. You would have come across many video editors in the digital market. Here, you will find in-built libraries carrying numerous customizable files to create outstanding effects on the media files. Quickly surf the below content for better edits on your videos using the Filmora video editor application.
Create videos with music using the Filmora Video Editor
In this section, you will learn about the tips and tricks associated with the optimal utilization of the Filmora Video editor. Follow the guidelines carefully and create videos with music precisely.
The Filmora application is a sophisticated tool that has a wide range of editing features to result in the desired customization of memorable clicks. This working space provides an effortless import option to load the media files into the timeline to make further edits. There are options to include filter effects, transitions, add sound effects and edit the background music professionally. You can merge quality audio tracks along with the video using this creative tool. This program helps you to unleash imagination beyond boundaries. It has a simple interface and encourages the users to work on this platform comfortably.
Another interesting fact on Filmora is that you can have a preview of the edited video before exporting it to any desired platform. During the export option, you can modify the file size, resolution, and file formats to overcome the compatibility features. The simple environment of this app inspires even newbie users to handle this tool effortlessly. Few clicks are sufficient to create desired changes on your videos. Step into this app and enjoy the flavors of the video without compromising on any factors.
The key features of Filmora Video Editor.
● The Filmora has in-built features like sound effects, filters, transitions to make your video attractive.
● Simple click and drag actions are sufficient to implement the desired effects on your video.
● The user-friendly interface assists even the newbie users to carry out the video editing process effortlessly.
● There are numerous audio edit options like ducking, detaching audio, and recording voiceover to enhance the audio quality in the media file.
● Easily export the edited file into desired storage space for future access. You can also share them directly on social media platforms like YouTube and Vimeo.
These are the incredible functionalities of the Filmora Video Editor application. You can perform professional edits on your video effortlessly using this tool. You can download this app and explore the hidden features of this program practically. You will feel comfortable working on this program because the essential controls are explicitly visible for easy access. In no time you can make desired edits and share them to any storage space or social media flawlessly.
The stepwise guidelines on editing the memorable clicks using the efficient program Filmora Video Editor application.
Step 1: Download Filmora
Go to the Filmora official website and download the program based on the system OS version. Then, install the app by following the instruction wizard. Launch the tool and import the desired video into the working space of the Filmora video editor. Drag and drop the video file into the timeline to add more effects to the media file.
Step 2: Insert the music
Next, tap the Audio option from the menu and select the Sound Effects option in the right panel of the screen. Choose your favorite music from the left side of the screen and make a right-click and select Apply option. You can also drag it into the timeline to make further edits. There are possibilities to import your desired audios into this working space by tapping the Import option.
Step 3: Start creating your video
Now, hit the Preview option to view the edited video and finally tap the Export button to share the edited file on any social media or other storage space. You can access the edited video from
These are the stepwise instructions on editing the videos to obtain desired outcomes. You can also make further edits using the in-built features of the Filmora Video Editor application.
Wondershare Filmora - Best Video Editor for Mac/Windows
5,481,435 people have downloaded it.
Build unique custom animations without breaking a sweat.
Focus on creating epic stories and leave the details to Filmora’s auto features.
Start a creative adventure with drag & drop effects and endless possibilities.
Filmora simplifies advanced features to save you time and effort.
Filmora cuts out repetition so you can move on to your next creative breakthrough.
Tip: Advanced Video Edits Options in Filmora Video Editor program
Here are the few in-built features of Filmora Video Editor that helps you to make the best edits professionally.
Here are the few in-built features of Filmora Video Editor that helps you to make the best edits professionally.
Filter Effects: Implement the desired filter effects on your videos by choosing the perfect options from the displayed items. Select the ‘Filters’ label on the Menu and from the expanded lists, select the desired ones.
Transitions and Add Titles: Next, you can make your video interactive by inserting the transitions for the videos. Animate the video content using the Animation feature and add desired titles to the video to add fun while playing them.
Royalty-Free Music: In the Filmora Video Editor program, you can find huge collections of royalty-free soundtracks to add to your videos to make them engaging to the audience. In the Audio option, you can find the available music tracks by choosing the Sound Effects option.
Audio Ducking: It is an important feature to fade in and out the desired audio tracks in your video. You can work on the specific audio track and enhance its clarity by implementing this feature.
Noise Removal: The Denoise feature helps you to remove the background noise in the audio tracks. You can remove the noise elements and improve the quality of the audio precisely.
Detach Audio: To customize the audio tracks in the videos, use this Deatch Audio option. You can reach out for this option by making a right-click on the video file. Detach the audio signal and embed the desired voice-over signal to make the video file entertaining to the audience.
In-built Templates: It has numerous collections of templates to create a wide range of personalized videos for your needs. Save your valuable time by using the perfect template according to your theme. You do not have to work on the videos from the scratch. The newbie users can perform advanced video creation operations with the help of these available sources.
Color Corrections: Increase the visibility of the videos by manually correcting the colors and adjusting the contrast, saturation, brightness and white balance.
Green Screen: Using the Chroma Key change the background of the videos as per your desires in no time. You can add special effects to your videos with the help of the Green Screen option.
Split the Screen: Add fun to your videos by splitting the screen. You can add multiple screens and narrate your story precisely using quality video edits.
These are the video edits you can perform on the videos to enhance the quality and improve interaction with the audience.
Wondershare Filmora
Get started easily with Filmora’s powerful performance, intuitive interface, and countless effects!
Try It Free Try It Free Try It Free Learn More >
Conclusion
Thus, this article gives you the best insights on how to create a video with music. Follow the above-discussed instructions to append the desired soundtracks to your favorite videos using the incredible application Filmora Video Editor program. Connect with this article and discover the optimal ways to edit the videos precisely. Choose Filmora Video Editor and edit your videos professionally without any special skills. The Filmora video editor has a simple interface and assists you to edit videos beyond imagination. Stay tuned for the impressive features of Filmora Video editors in customizing the video content for your requirements.
Also read:
- New In 2024, Harmony Helpers The Premier Sync Edit Software for Video Rhythms, 2023 Release
- New The Role of High-Stakes Soundtracks in Crafting Unforgettable Movie Experiences for 2024
- New Step-by-Step An Essential Tutorial on Editing Your First Podcast for 2024
- Updated The Power of Projection Adjusting Your Voice Across Different Settings
- New 10 Best Sites to Download BGM Music for 2024
- New The Ultimate List of High-Quality Instant Speech Transformers
- Separating Audio and Video A Comprehensive Approach for Premiere Pro Editors
- New Premier Mixers Transforming Your Home Streaming Setup for 2024
- Updated 2024 Approved Sculpting Soundscapes Advanced Methods for Isolating Lyrics From Harmonized Tunes
- New Resounding Riches A Curated List of 8 Soundscape Sanctuaries for Pro Bono Audio Extras, Updated for 2024
- New In 2024, The Art of Auditory Alignment Selecting Ideal Frequency Filters
- New Beyond Audacity A Comprehensive List of Cross-Platform Audio Editors Excelling in Performance and Features
- Overcoming the Challenge of Acoustic Reflections in Sound Engineering for 2024
- Updated MP4s Melodic Mysteries Solved Nine Easy-to-Implement Audio Extraction Methods for the New Decade for 2024
- 2024 Approved Harmony Hunters Excellent iOS and Android Apps That Help Identify Tracks Effortlessly
- 2024 Approved Sculpting Your Audio Experience in Videos with Ease and Precision
- Updated The Ultimate List of Easy-to-Find Websites Offering Free Ding Noise Sounds for 2024
- New 2024 Approved Discovering the 10 Premium PC Voice Capture Software
- Updated 2024 Approved Pexels.com Uncovered An Exploration of High-Quality, Copyright-Friendly Images
- Mastering Audio Clarity The Most Effective Noise Reduction Tools Revealed for 2024
- Updated In 2024, Premium Selection The Most Exceptional 11 Voice Alteration Apps Available at No Charge for Mobile Devices
- Updated In 2024, Revolutionizing Public Speaking Introducing Av Voice Alteration Devices and Their Alternatives
- Updated 2024 Approved Cutting the Waves A Review of Best Free & Paid Linux Audio Editors
- In 2024, Top 8 Best DAW for Hip Hop Music Production
- New In 2024, Revolutionary MP3 File Management Toolkit Windows & Mac Edition, Leading the Industry
- Updated In 2024, The Beat Engineers Handbook Designing Sounds for the Silver Screen
- New In 2024, Voice Modification Innovations Product Introduction, Reviews, & Comparisons
- Updated In 2024, The Sound Detectives Handbook Extracting Silence From Video Files in iOS/OS X Systems
- Updated 2024 Approved Advanced Voice Communication Technology for Gamers Interaction
- In 2024, Harmonizing Tech with Creativity – Best 10 Song Editors for Windows/Mac Enthusiasts
- 2024 Approved The Ultimate Guide to Finding and Downloading Pristine Birdsong MP3s
- Premier Voice Command Conversion Apps for Windows Users
- In 2024, Premierly Free Female Speech Alteration Platform
- Updated Experts Choice The Top 10 Digital Stores Specializing in Montage Music Downloads
- Top 7 Online Auto Subtitle Translators for Content Creators
- In 2024, Easiest Guide How to Clone Infinix GT 10 Pro Phone? | Dr.fone
- How to Transfer Everything from Apple iPhone 13 to iPhone 8/X/11 | Dr.fone
- 5 Ways Change Your Home Address in Google/Apple Map on Apple iPhone XR/iPad | Dr.fone
- Things You Dont Know About Lava Blaze 2 Pro Reset Code | Dr.fone
- New Guide How To Check iCloud Activation Lock Status From Your Apple iPhone 15 Pro Max
- How To Repair iOS System Issues of iPhone 8 Plus? | Dr.fone
- Unlocking the Power of Smart Lock A Beginners Guide for Vivo S17t Users
- In 2024, How to Change Your Location on Apple iPhone 15 Pro | Dr.fone
- Fix Cant Take Screenshot Due to Security Policy on Infinix GT 10 Pro | Dr.fone
- Pro Audio in FCP Expert Tips for Enhancing Your Video Soundtrack for 2024
- 2024 Approved Aspect Ratio Changer 10 Essential Tools
- In 2024, Dose Life360 Notify Me When Someone Checks My Location On Realme Narzo 60 Pro 5G? | Dr.fone
- How to Bypass Android Lock Screen Using Emergency Call On Realme 12 Pro+ 5G?
- How To Remove Phone Number From Your Apple ID from Your Apple iPhone 15 Plus?
- Guide To Cropping and Combining Content in Wondershare Filmora Latest for 2024
- Title: Updated Melodic Compilation A Comprehensive Guide to Exclusive Online Sites for Video Tune Libraries
- Author: Kate
- Created at : 2024-05-20 02:42:45
- Updated at : 2024-05-21 02:42:45
- Link: https://audio-editing.techidaily.com/updated-melodic-compilation-a-comprehensive-guide-to-exclusive-online-sites-for-video-tune-libraries/
- License: This work is licensed under CC BY-NC-SA 4.0.
