
:max_bytes(150000):strip_icc():format(webp)/GettyImages-1365158534-d6952b03afff43f7a1c5f0405f31dc92.jpg)
Updated Integrating Subtle Audio Declines Techniques for Gradual Volume Reduction in iMovie for 2024
Integrating Subtle Audio Declines: Techniques for Gradual Volume Reduction in iMovie
How to Fade Music and Audio in iMovie on Mac?

Shanoon Cox
Mar 27, 2024• Proven solutions
Fade-in and fade-out effects can help you smooth the video, music, and audio transitions, thus you can make a better movie. When editing videos in iMovie, people may have many video clips and transitions connected to the clips. The fade in and fade out effect seems more important than ever. This tutorial will show you how to fade music and audio in iMovie.
- Part 1: How to Fade Music and Audio in iMovie on Mac
- Part 2: An Easier Way to Fade Audio and Music on Mac
Apart from fading in/fading out the audio, we also want to introduce the video fade-in and fade-out effects, which will help your video to get more attention. Watch the tutorial below to get detailed information about how to fade in/fade out your videos easily.


Related : How to Fade-in and Fade-out Video Clips
After adding the fade-in and fade-out effects to your video, let’s check how to fade your music and audio in iMovie first, and then we will show you how to fade in/fade out your music and audio file in an easier way.
You may also like:
- iMovie for Windows: 10 Best iMovie Alternatives for You
- How to Add Audio to Your Videos
- How to Add Video Effects in iMovie
Part 1: How to Fade Music and Audio in iMovie on Mac
There are two ways available to fade music and audio with iMovie. One is using the fade handles, and the other is using the audio inspector. Before using iMovie audio fade-out effects, please import your video and audio files to iMovie and start a new project.
Method 1: Use Fade Handles to Add Fade in/Fade out Effect in iMovie
Firstly, let’s take a look at the video below to check how to fade audio in/out the audio in iMovie with fade handles.
Step 1. Enable Audio Waveform
When the project opens, check “Show Waveforms” at the bottom of the Project window.

Note: The Blue waveforms indicate the sound recorded within your video clips. Green and purple waveforms indicate sounds and music you’ve added to your project.
Step 2. Move Pointer to Apply Fade Effects
Move the pointer over a waveform, and drag the small gray fade handle at the left of the clip to adjust the fade audio in effect. Then drag the small fade handle at the right of the clip to adjust the fade-out effect.

Step 3. Playback to Check
Move the playhead to the beginning part of the clips with fade effects to check the fade-in and fade-out effects. If everything works OK, uncheck “Show Waveforms” to hide the waveforms.

Related: How to Remove Background Noise from Video
Method 2: Use the Audio Inspector to Apply Fade in/Fade Out Effect in iMovie
To fade audios in and out in iMovie with the audio inspector, you can follow these steps:
Step 1. Open Your iMovie Project and Select a Clip
Double-click the video clip, choose “Clip Adjustments” to open the Inspector, and then click the “Audio” tab.

If there are two audio tracks, and you want to set the fade in and fade out in iMovie for the background music, you can double-click the background music clip to open the audio inspector. This inspector is a little different. If you don’t know how to add background music to iMovie, you can refer to this post: add background music in iMovie .
Step 2. Set the Fade In and Fade Out Effect
In the window, you can manually set the fade-in and fade-out length by dragging the slider bar to the right or left.
If you do not choose “Manual”, that means you’d like iMovie to automatically set it for you. Usually, when you drag video clips to the Project, iMovie will set the fade-in and fade-out effect randomly by increasing the audio volume at the beginning of the clip and decrease the volume at the end of the clip.
If you manually adjust the effect, you can have a better effect.
Step 3. Save the Audio Fade In and Out Effect

After the settings, you can preview the effect in the viewing window to make sure all goes well, and you are much satisfied. Then click “Done” to save the audio fade-in and fade-out effects in iMovie.
Now, that’s done! I hope the above information does help you to set the fade effects to smooth your video and audio transitions.
Related: How to Get More iMovie Themes
Part 2: An Easier Way to Fade Audio and Music on Mac
Let watch the video below to check how to apply fade-in and fade-out effects in an easier way with Wondershare Filmora for Mac. And download it now to try it by yourself.
Download Mac Version ](https://tools.techidaily.com/wondershare/filmora/download/ )
If you want to quickly apply fade-in or fade-out effects, iMovie’s alternative for Mac - Wondershare Filmora can help you. It enables you to easily edit videos. After you’ve made your creation, it also allows you to directly upload the complete video file to YouTube and Vimeo for sharing. Check out the quick guide below to see how to add audio fade effects in Filmora.
Step 1. Import Your Video
Import the video clip you want to add audio in and out effect. To do this, click “File” > “Import Media” to import your local file to the user’s album. Or you can drag and drop these target files from the computer to this app’s album.
Step 2. Add the Audio Fade In/Out Effect to Your Video
Place the video onto the timeline. Double-click on it and then choose “Audio”. In the tab, you can drag the slider bar to the right or left to manually set the fade in and fade out the length.

Step 3. Save Your Video
Click the “Export” button to select one of the export methods. You can choose your desired format or mobile devices, burn it to DVD and upload it to YouTube and Vimeo.

That’s all about how to fade music and audio with iMovie and its alternative. If you want to learn more about how to edit video clips with Filmora, you can visit its YouTube channel to get more detailed information. Feel free to leave comments below if you need further assistance.
Shanoon Cox
Shanoon Cox is a writer and a lover of all things video.
Follow @Shanoon Cox
Shanoon Cox
Mar 27, 2024• Proven solutions
Fade-in and fade-out effects can help you smooth the video, music, and audio transitions, thus you can make a better movie. When editing videos in iMovie, people may have many video clips and transitions connected to the clips. The fade in and fade out effect seems more important than ever. This tutorial will show you how to fade music and audio in iMovie.
- Part 1: How to Fade Music and Audio in iMovie on Mac
- Part 2: An Easier Way to Fade Audio and Music on Mac
Apart from fading in/fading out the audio, we also want to introduce the video fade-in and fade-out effects, which will help your video to get more attention. Watch the tutorial below to get detailed information about how to fade in/fade out your videos easily.
Related : How to Fade-in and Fade-out Video Clips
After adding the fade-in and fade-out effects to your video, let’s check how to fade your music and audio in iMovie first, and then we will show you how to fade in/fade out your music and audio file in an easier way.
You may also like:
- iMovie for Windows: 10 Best iMovie Alternatives for You
- How to Add Audio to Your Videos
- How to Add Video Effects in iMovie
Part 1: How to Fade Music and Audio in iMovie on Mac
There are two ways available to fade music and audio with iMovie. One is using the fade handles, and the other is using the audio inspector. Before using iMovie audio fade-out effects, please import your video and audio files to iMovie and start a new project.
Method 1: Use Fade Handles to Add Fade in/Fade out Effect in iMovie
Firstly, let’s take a look at the video below to check how to fade audio in/out the audio in iMovie with fade handles.
Step 1. Enable Audio Waveform
When the project opens, check “Show Waveforms” at the bottom of the Project window.
Note: The Blue waveforms indicate the sound recorded within your video clips. Green and purple waveforms indicate sounds and music you’ve added to your project.
Step 2. Move Pointer to Apply Fade Effects
Move the pointer over a waveform, and drag the small gray fade handle at the left of the clip to adjust the fade audio in effect. Then drag the small fade handle at the right of the clip to adjust the fade-out effect.
Step 3. Playback to Check
Move the playhead to the beginning part of the clips with fade effects to check the fade-in and fade-out effects. If everything works OK, uncheck “Show Waveforms” to hide the waveforms.
Related: How to Remove Background Noise from Video
Method 2: Use the Audio Inspector to Apply Fade in/Fade Out Effect in iMovie
To fade audios in and out in iMovie with the audio inspector, you can follow these steps:
Step 1. Open Your iMovie Project and Select a Clip
Double-click the video clip, choose “Clip Adjustments” to open the Inspector, and then click the “Audio” tab.
If there are two audio tracks, and you want to set the fade in and fade out in iMovie for the background music, you can double-click the background music clip to open the audio inspector. This inspector is a little different. If you don’t know how to add background music to iMovie, you can refer to this post: add background music in iMovie .
Step 2. Set the Fade In and Fade Out Effect
In the window, you can manually set the fade-in and fade-out length by dragging the slider bar to the right or left.
If you do not choose “Manual”, that means you’d like iMovie to automatically set it for you. Usually, when you drag video clips to the Project, iMovie will set the fade-in and fade-out effect randomly by increasing the audio volume at the beginning of the clip and decrease the volume at the end of the clip.
If you manually adjust the effect, you can have a better effect.
Step 3. Save the Audio Fade In and Out Effect
After the settings, you can preview the effect in the viewing window to make sure all goes well, and you are much satisfied. Then click “Done” to save the audio fade-in and fade-out effects in iMovie.
Now, that’s done! I hope the above information does help you to set the fade effects to smooth your video and audio transitions.
Related: How to Get More iMovie Themes
Part 2: An Easier Way to Fade Audio and Music on Mac
Let watch the video below to check how to apply fade-in and fade-out effects in an easier way with Wondershare Filmora for Mac. And download it now to try it by yourself.
Download Mac Version ](https://tools.techidaily.com/wondershare/filmora/download/ )
If you want to quickly apply fade-in or fade-out effects, iMovie’s alternative for Mac - Wondershare Filmora can help you. It enables you to easily edit videos. After you’ve made your creation, it also allows you to directly upload the complete video file to YouTube and Vimeo for sharing. Check out the quick guide below to see how to add audio fade effects in Filmora.
Step 1. Import Your Video
Import the video clip you want to add audio in and out effect. To do this, click “File” > “Import Media” to import your local file to the user’s album. Or you can drag and drop these target files from the computer to this app’s album.
Step 2. Add the Audio Fade In/Out Effect to Your Video
Place the video onto the timeline. Double-click on it and then choose “Audio”. In the tab, you can drag the slider bar to the right or left to manually set the fade in and fade out the length.
Step 3. Save Your Video
Click the “Export” button to select one of the export methods. You can choose your desired format or mobile devices, burn it to DVD and upload it to YouTube and Vimeo.
That’s all about how to fade music and audio with iMovie and its alternative. If you want to learn more about how to edit video clips with Filmora, you can visit its YouTube channel to get more detailed information. Feel free to leave comments below if you need further assistance.
Shanoon Cox
Shanoon Cox is a writer and a lover of all things video.
Follow @Shanoon Cox
“Backwards Play: A Review of High-End Audio Reversal Software “
Reverse Audio: Best Audio Reversers in 2024
Shanoon Cox
Mar 27, 2024• Proven solutions
Playing a song or any other type of audio file backwards can be useful in a surprisingly diverse number of ways. Discovering subliminal messages in pop songs, creating unusual sound effects or learning to play a song in reverse are only a few reasons why you may want to reverse an audio. If you would like to find out more about the best audio reversers in 2024, you’ve come to the right place, because in this article we are going to take you through the some of the most attractive online options as well as PC, Mac and mobile solutions.
- Part 1: Best Free Online Audio Reversers
- Part 2: Best Audio Editing Software to Reverse Audio
- Part 3: Best Audio Reverser Apps for iOS and Android
3 Best Online Audio Reversers to Play Music Backwards
Reversing a song and all other types of audio recordings is a straightforward process that doesn’t take a lot of effort or time. Let’s have a look at some of the best online destinations you should visit if you’re looking to quickly reverse audio.
1. 3 PM Reverser

This free platform lets you reverse audio files in a matter of minutes. You just have to click on the Choose File button and select the file you’d like to play backwards. The maximum size of the audio file you can upload to this online audio reverser in limited to 20 MB. As soon as the audio file uploads to the platform, it will be reversed, and you can just click on the Download button to save the newly created reversed audio file. The only downside is that you won’t be able to adjust the audio reverse settings because the process is fully automated.
2. Online MP3 Reverser

Short recordings of cymbals or any other type of frequently used effects can be quickly reversed with Online MP3 Reverser. The platform supports nearly all popular audio file formats, such as wav, ogg, m4a and of course mp3, as suggested in the platform’s name. The maximum supported size of an audio file is 10MB. In order to reverse a song or an audio effect, you just have to click on the Choose File button to select the file and hit the Reverse It button to start reversing the audio file. Once the process is completed, you can save the file to a destination on your hard drive by clicking on the Download button.
3. TwistedWave Online Audio Editor

Even though the TwistedWave Online Audio Editor can be used free of charge, you must create an account in order to save the files you create. And the free plan has limited features in file length and audio editing features. The online audio editor enables you to record new audio files or to edit the existing ones. Audio clips can be imported from your computer, the Soundcloud platform or Google Drive. After you upload a file to the TwistedWave, the editor window will display the file on its timeline as a waveform. Clicking on the Effects menu and selecting the Reverse option will play the file you uploaded backwards. Selecting the Download option in the File menu will give you the access to the Audio Export window where you can adjust the file’s properties before saving it to your computer.
Best Audio Editing Software to Reverse Audio
At the moment there a lot of free audio editing software options available on the market which are powerful enough to enable you to reverse all sorts of audio files. We recommend using the Audacity software to reverse your audio files. This free, open source and cross-platform software had 62.5 million downloads as of September 2018, which speaks volumes about its audio editing potential.
The software is compatible with Mac, Linux, and Windows operating systems, and it offers a quick and easy way to reverse an audio file. After you’ve installed and launched the software, you just have to import the file, by selecting the Audio option, from the Import submenu that can be accessed from the software’s File menu. Alternatively, you can use the Ctrl+Shift+I keyboard shortcut to select the file you’d like to import into the software.
The file will be displayed as a waveform and placed on the software’s timeline. You can then proceed to select the portion of the file you’d like to reverse by holding the left mouse button while dragging the mouse cursor between any two points within the file. Use the Ctrl+A shortcut to select the entire file or head over to the Edit menu, click on the Select option and choose All from the submenu.

Once you’ve made sure that you properly selected the portion of the file you’d like to reverse, you should go to the Effects menu and click on the Reverse feature. The software will reverse the highlighted portion of the file and you can listen to the results by clicking on the Play button. The Export Audio option that is available in the File menu lets you save the reversed audio to a chosen destination on your hard drive.
Best Audio Reverser Apps for iOS and Android
Listening to reversed versions of your favorite songs on your Smartphone can be a lot of fun, so if you would like to explore the possibilities of reversing audio directly from an iPhone or Android device you should check out these apps.
1. Reverse

The Reverse Music Player is an Android-based app that lets you reverse sounds or music with ease. What’s more, you can make a song’s tempo up to 4 times faster or slower or adjust its Pitch. The app supports wav, mp3, ogg and flac audio file formats, but if you are using a large audio file reversing a song may take some time. A three-minute song can temporarily take up to 20MB of storage space on your phone’s memory card, while longer songs may take even more, so it is important to make sure that you have enough free space on your phone before you start using this app.
2. Reverse Audio

iPhone users can reverse audio files they record with this app in just a few simple steps. The app lets you record an audio file and then it automatically plays the recording backwards. While you’re playing the audio, you can alter the Playback Rate or the Pitch. The Reverse Audio app also enables you to import audio files from other apps via the Share option, but audio files cannot be directly imported into the app. The limited amount of audio editing options makes this iOS-based app a moderately reliable choice for reversing audio files.
Conclusion
Playing songs or audio effects backwards can have unexpected results, which makes the process of reversing audio incredibly entertaining. These free and easy to use audio reversers can help you create high-quality sound effects that might make the videos you used them for, go viral. What is your favorite method of reversing audio files? Leave a comment below and let us know.
Shanoon Cox
Shanoon Cox is a writer and a lover of all things video.
Follow @Shanoon Cox
Shanoon Cox
Mar 27, 2024• Proven solutions
Playing a song or any other type of audio file backwards can be useful in a surprisingly diverse number of ways. Discovering subliminal messages in pop songs, creating unusual sound effects or learning to play a song in reverse are only a few reasons why you may want to reverse an audio. If you would like to find out more about the best audio reversers in 2024, you’ve come to the right place, because in this article we are going to take you through the some of the most attractive online options as well as PC, Mac and mobile solutions.
- Part 1: Best Free Online Audio Reversers
- Part 2: Best Audio Editing Software to Reverse Audio
- Part 3: Best Audio Reverser Apps for iOS and Android
3 Best Online Audio Reversers to Play Music Backwards
Reversing a song and all other types of audio recordings is a straightforward process that doesn’t take a lot of effort or time. Let’s have a look at some of the best online destinations you should visit if you’re looking to quickly reverse audio.
1. 3 PM Reverser
This free platform lets you reverse audio files in a matter of minutes. You just have to click on the Choose File button and select the file you’d like to play backwards. The maximum size of the audio file you can upload to this online audio reverser in limited to 20 MB. As soon as the audio file uploads to the platform, it will be reversed, and you can just click on the Download button to save the newly created reversed audio file. The only downside is that you won’t be able to adjust the audio reverse settings because the process is fully automated.
2. Online MP3 Reverser
Short recordings of cymbals or any other type of frequently used effects can be quickly reversed with Online MP3 Reverser. The platform supports nearly all popular audio file formats, such as wav, ogg, m4a and of course mp3, as suggested in the platform’s name. The maximum supported size of an audio file is 10MB. In order to reverse a song or an audio effect, you just have to click on the Choose File button to select the file and hit the Reverse It button to start reversing the audio file. Once the process is completed, you can save the file to a destination on your hard drive by clicking on the Download button.
3. TwistedWave Online Audio Editor
Even though the TwistedWave Online Audio Editor can be used free of charge, you must create an account in order to save the files you create. And the free plan has limited features in file length and audio editing features. The online audio editor enables you to record new audio files or to edit the existing ones. Audio clips can be imported from your computer, the Soundcloud platform or Google Drive. After you upload a file to the TwistedWave, the editor window will display the file on its timeline as a waveform. Clicking on the Effects menu and selecting the Reverse option will play the file you uploaded backwards. Selecting the Download option in the File menu will give you the access to the Audio Export window where you can adjust the file’s properties before saving it to your computer.
Best Audio Editing Software to Reverse Audio
At the moment there a lot of free audio editing software options available on the market which are powerful enough to enable you to reverse all sorts of audio files. We recommend using the Audacity software to reverse your audio files. This free, open source and cross-platform software had 62.5 million downloads as of September 2018, which speaks volumes about its audio editing potential.
The software is compatible with Mac, Linux, and Windows operating systems, and it offers a quick and easy way to reverse an audio file. After you’ve installed and launched the software, you just have to import the file, by selecting the Audio option, from the Import submenu that can be accessed from the software’s File menu. Alternatively, you can use the Ctrl+Shift+I keyboard shortcut to select the file you’d like to import into the software.
The file will be displayed as a waveform and placed on the software’s timeline. You can then proceed to select the portion of the file you’d like to reverse by holding the left mouse button while dragging the mouse cursor between any two points within the file. Use the Ctrl+A shortcut to select the entire file or head over to the Edit menu, click on the Select option and choose All from the submenu.
Once you’ve made sure that you properly selected the portion of the file you’d like to reverse, you should go to the Effects menu and click on the Reverse feature. The software will reverse the highlighted portion of the file and you can listen to the results by clicking on the Play button. The Export Audio option that is available in the File menu lets you save the reversed audio to a chosen destination on your hard drive.
Best Audio Reverser Apps for iOS and Android
Listening to reversed versions of your favorite songs on your Smartphone can be a lot of fun, so if you would like to explore the possibilities of reversing audio directly from an iPhone or Android device you should check out these apps.
1. Reverse
The Reverse Music Player is an Android-based app that lets you reverse sounds or music with ease. What’s more, you can make a song’s tempo up to 4 times faster or slower or adjust its Pitch. The app supports wav, mp3, ogg and flac audio file formats, but if you are using a large audio file reversing a song may take some time. A three-minute song can temporarily take up to 20MB of storage space on your phone’s memory card, while longer songs may take even more, so it is important to make sure that you have enough free space on your phone before you start using this app.
2. Reverse Audio
iPhone users can reverse audio files they record with this app in just a few simple steps. The app lets you record an audio file and then it automatically plays the recording backwards. While you’re playing the audio, you can alter the Playback Rate or the Pitch. The Reverse Audio app also enables you to import audio files from other apps via the Share option, but audio files cannot be directly imported into the app. The limited amount of audio editing options makes this iOS-based app a moderately reliable choice for reversing audio files.
Conclusion
Playing songs or audio effects backwards can have unexpected results, which makes the process of reversing audio incredibly entertaining. These free and easy to use audio reversers can help you create high-quality sound effects that might make the videos you used them for, go viral. What is your favorite method of reversing audio files? Leave a comment below and let us know.
Shanoon Cox
Shanoon Cox is a writer and a lover of all things video.
Follow @Shanoon Cox
The Ultimate Selection of Downloadable Cartoon Soundscapes for Animators (2023 Edition)
8 Best Cartoon Sound Effects You Can Download

Benjamin Arango
Mar 27, 2024• Proven solutions
The sound plays a significant role in the videos. Without the right sound effects, your videos become dull. It doesn’t create an impact to grab the attention of the viewers. Especially when it comes to attracting the attention of kids while they watch cartoons.
Are you working on a cartoon video for kids or some animated action cartoons? Use the cartoon sound effects to add more intensity and emotions to the videos. Every time creating a new sound effect for your cartoon video becomes difficult.
If you are on a strict budget, producing new content becomes almost impossible. In such situations, free cartoon sound effects are the best way to enhance your cartoon videos.
In this article, you will learn eight best cartoon sound effects that you can download and make your videos perfect.
8 Best Cartoon Sound Effects Resources
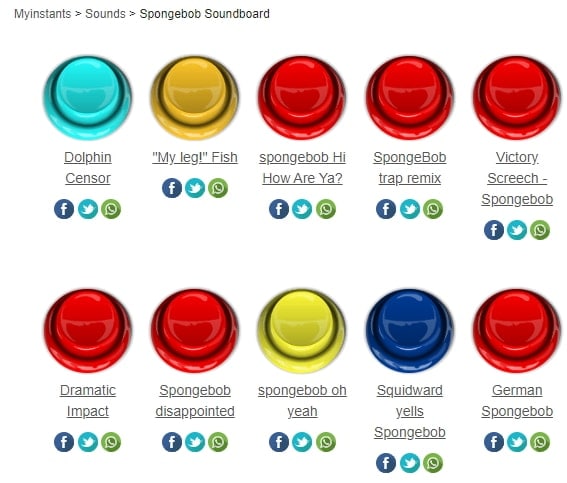
1. Spongebob Sound Effects
MyInstant’s Spongebob soundboard offers a range of cartoon sound effects that can be easily downloaded just by clicking on the Download mp3 sound effect button. You can listen to over 120 classic cartoon sound effects and download it for free. You can also copy the embed link and paste it to your website.
2. Hanna Barbera Sound Effects
From Sounddogs, Hanna Barbera sound effects library, you can find over 2200 cartoon sound effects that are divided into 4 CDs. It has almost all the legendary classic cartoon sound effects from the cartoon shows like Yogi Bear, Huckleberry Hound, the Flintstones, The Jetsons, Quick Draw McGraw, and all the rest of the gang.
You can download the mp3 cartoon sound effects completely free by clicking on the Download ID number mentioned at the right end of each link.
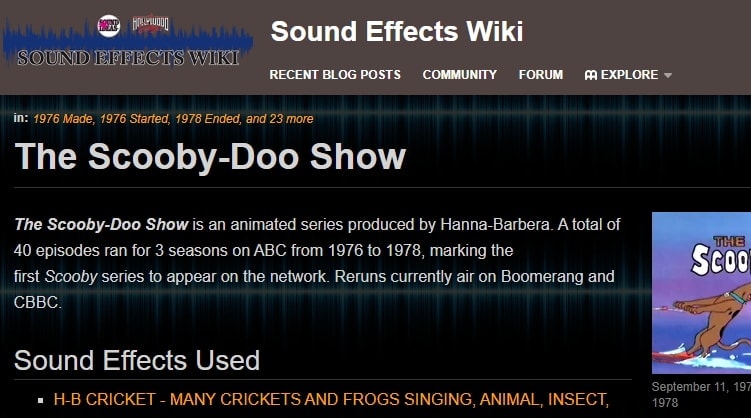
3. Scooby Doo Running Sound
Fandom’s Scooby Doo running sound effects offers all the ideas used in 40 episodes of Scooby Doo throughout the three seasons on ABC. It is over 37000 pages wiki that you can click and browse through the pages to find the right sound effect and download it for free.
4. Tom and Jerry Sound Effects
Pond5 offers 13 Tom and Jerry sound effects that you can listen by scrolling the cursor over the boxes and download the free preview of cartoon sound effects by clicking on Download Preview.
If you want to download the entire cartoon sound effect, you need to register, log in, and pay for it. There are filters like price, collections, duration, etc. to make your selection more precise.
5. Free SFX
In FreeSFX website, you can find a range of comical cartoon sound effects that includes classic effects like descend, boink, impact, pop, musical, running, rip and snap, bounce spring, slide whistle, squelch and splat, horn and loads more.
You need to log in to the website to download free cartoon sound effects.

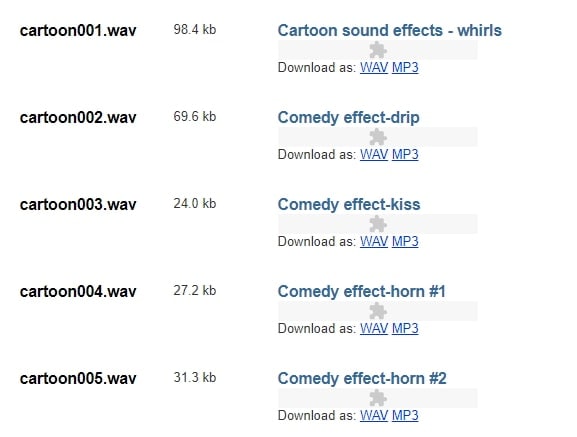
6.GRSites
With over 1980 cartoon sound effects, the GRSites is one of the best free sites for downloading both mp3 and WAV files. You can browse from a range of categories to find the best cartoon sound effects for your videos.
7. Cartoon Running Sound Effect
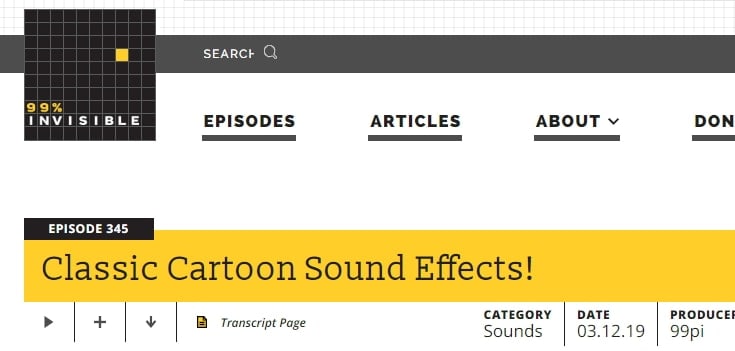
If you are looking for cartoon running sound effect, turn to Episode 345 in 99PercentInvisible. You can download the complete transcript page of around 30 minutes to use it in your video. Use the cartoon running sound effect produced by 99pi to enhance your video.
8. Big Fish Audio
The Big Fish Audio’s cartoon sound FX includes 23 free classic cartoon sound effects. The filters include a range of sound FX types, styles, format, brand, etc.
You can click on the cartoon sound effect and listen to it or add it to your playlist. But, if you wish to download the free cartoon sound effects, you need to register and pay to use the sound effect.

You may also like: How to Extract Audio from Videos on Win/Mac/Phone >>
Conclusion
Make your cartoon videos perfect with the fantastic free cartoon sound effects available for download completely free. With the range of free cartoon sound effects, you don’t need to worry about creating new sounds or expenses. You need to download the free sounds and beautifully enhance it with your creativity. There are several other sites for downloading free cartoon sound effects, but here you can check out some of the trusted ones to use.
Benjamin Arango
Benjamin Arango is a writer and a lover of all things video.
Follow @Benjamin Arango
Benjamin Arango
Mar 27, 2024• Proven solutions
The sound plays a significant role in the videos. Without the right sound effects, your videos become dull. It doesn’t create an impact to grab the attention of the viewers. Especially when it comes to attracting the attention of kids while they watch cartoons.
Are you working on a cartoon video for kids or some animated action cartoons? Use the cartoon sound effects to add more intensity and emotions to the videos. Every time creating a new sound effect for your cartoon video becomes difficult.
If you are on a strict budget, producing new content becomes almost impossible. In such situations, free cartoon sound effects are the best way to enhance your cartoon videos.
In this article, you will learn eight best cartoon sound effects that you can download and make your videos perfect.
8 Best Cartoon Sound Effects Resources
1. Spongebob Sound Effects
MyInstant’s Spongebob soundboard offers a range of cartoon sound effects that can be easily downloaded just by clicking on the Download mp3 sound effect button. You can listen to over 120 classic cartoon sound effects and download it for free. You can also copy the embed link and paste it to your website.
2. Hanna Barbera Sound Effects
From Sounddogs, Hanna Barbera sound effects library, you can find over 2200 cartoon sound effects that are divided into 4 CDs. It has almost all the legendary classic cartoon sound effects from the cartoon shows like Yogi Bear, Huckleberry Hound, the Flintstones, The Jetsons, Quick Draw McGraw, and all the rest of the gang.
You can download the mp3 cartoon sound effects completely free by clicking on the Download ID number mentioned at the right end of each link.
3. Scooby Doo Running Sound
Fandom’s Scooby Doo running sound effects offers all the ideas used in 40 episodes of Scooby Doo throughout the three seasons on ABC. It is over 37000 pages wiki that you can click and browse through the pages to find the right sound effect and download it for free.
4. Tom and Jerry Sound Effects
Pond5 offers 13 Tom and Jerry sound effects that you can listen by scrolling the cursor over the boxes and download the free preview of cartoon sound effects by clicking on Download Preview.
If you want to download the entire cartoon sound effect, you need to register, log in, and pay for it. There are filters like price, collections, duration, etc. to make your selection more precise.
5. Free SFX
In FreeSFX website, you can find a range of comical cartoon sound effects that includes classic effects like descend, boink, impact, pop, musical, running, rip and snap, bounce spring, slide whistle, squelch and splat, horn and loads more.
You need to log in to the website to download free cartoon sound effects.
6.GRSites
With over 1980 cartoon sound effects, the GRSites is one of the best free sites for downloading both mp3 and WAV files. You can browse from a range of categories to find the best cartoon sound effects for your videos.
7. Cartoon Running Sound Effect
If you are looking for cartoon running sound effect, turn to Episode 345 in 99PercentInvisible. You can download the complete transcript page of around 30 minutes to use it in your video. Use the cartoon running sound effect produced by 99pi to enhance your video.
8. Big Fish Audio
The Big Fish Audio’s cartoon sound FX includes 23 free classic cartoon sound effects. The filters include a range of sound FX types, styles, format, brand, etc.
You can click on the cartoon sound effect and listen to it or add it to your playlist. But, if you wish to download the free cartoon sound effects, you need to register and pay to use the sound effect.
You may also like: How to Extract Audio from Videos on Win/Mac/Phone >>
Conclusion
Make your cartoon videos perfect with the fantastic free cartoon sound effects available for download completely free. With the range of free cartoon sound effects, you don’t need to worry about creating new sounds or expenses. You need to download the free sounds and beautifully enhance it with your creativity. There are several other sites for downloading free cartoon sound effects, but here you can check out some of the trusted ones to use.
Benjamin Arango
Benjamin Arango is a writer and a lover of all things video.
Follow @Benjamin Arango
Also read:
- The Ultimate Guide Seamless MP4 Audio Extraction Techniques for 2024
- New 2024 Approved Ultimate List of Linux-Based Audio Editors Review and Ratings Edition
- Updated In 2024, Efficient Sound Management Cutting Down Video Audio in iMovie Across Mac and iPhone
- New 2024 Approved How to Make Every Call a Chuckle A List of 10 Voice Alteration Tricks
- New Finding the Ideal Game Voice Modifier A Comprehensive Guide for 2024
- 2024 Approved Pitch Control Made Easy A Comprehensive Guide to Altering Voices with Audacity
- New Silencing Sounds A Deep Dive Into Audacitys Features for Sound Reduction for 2024
- The Ultimate Guide Top 8 Mac DAWs with In-Depth Analysis for 2024
- No-Cost Voice Shaping Secrets Revealed Comprehensive Guide to Professional Video Voice Edits Using Filmora for 2024
- Updated Harmonizing Without Spending - The Ultimate Selection of No-Fee Audio Mixing Programs for 2024
- Taming The Whirlwind Expert Tips to Eschew Wind Noise in Audio Captures for 2024
- Updated In 2024, Collecting Serene Melodies A Comprehensive Approach
- 2024 Approved Vocal Vanishing Act How to Seamlessly Remove Singers Voice From an Audio Track Using Audacity Tools
- Updated 2024 Approved Essential Techniques for Filtering Out Background Disturbances in Digital Sound Recordings
- Updated In 2024, How to Add Audio to Video in Magix Movie Edit Pro
- Innovating Your Impact Strategies for Changing Your Vocal Characteristics for 2024
- In 2024, Enhancing Visual Storytelling The Role of Classical Piano in Film Scoring
- FRP Hijacker by Hagard Download and Bypass your Vivo S18e FRP Locks
- How to retrieve erased music from Honor 70 Lite 5G
- Poco C65 Bootloop Problem, How to Fix it Without Data Loss | Dr.fone
- Updated In 2024, Free MKV Trimming Software Top 10 Picks
- How to Mirror Honor Magic 5 to Mac? | Dr.fone
- In 2024, How PGSharp Save You from Ban While Spoofing Pokemon Go On Google Pixel 7a? | Dr.fone
- Updated Bring Your Ideas to Life Top Free 3D Animation Apps for Android and iPhone for 2024
- In 2024, How to Transfer Data from Nokia C300 to Other Android Devices? | Dr.fone
- 2024 Approved 10 Free Online Tools to Create Subtitles for Your Videos 2023 Update
- Getting the Pokemon Go GPS Signal Not Found 11 Error in Lava Storm 5G | Dr.fone
- Updated In 2024, Create Stunning Slow-Mo Videos with Windows Live Movie Maker Updated 2023
- Updated In 2024, Macs Best Video Production Tools Unleash Your Creativity
- Preparation to Beat Giovani in Pokemon Go For Vivo V27e | Dr.fone
- Hassle-Free Ways to Remove FRP Lock from Tecno Pop 7 Pro Phones with/without a PC
- Updated From Video to MP3 The Essential YouTube Audio Download Guide for 2024
- 2024 Approved 15 Amazing GIF Splitter Examples You Need to Bookmark
- New Best Free VOB Video Editor Options Ranked
- Title: Updated Integrating Subtle Audio Declines Techniques for Gradual Volume Reduction in iMovie for 2024
- Author: Kate
- Created at : 2024-05-05 07:57:42
- Updated at : 2024-05-06 07:57:42
- Link: https://audio-editing.techidaily.com/updated-integrating-subtle-audio-declines-techniques-for-gradual-volume-reduction-in-imovie-for-2024/
- License: This work is licensed under CC BY-NC-SA 4.0.
