
:max_bytes(150000):strip_icc():format(webp)/best-time-of-day-to-instagram-3485858-1-5bb3cc9046e0fb002612537d.jpg)
Updated In 2024, The Ultimate Guide to Audio Length Reduction in Apples iMovie App
The Ultimate Guide to Audio Length Reduction in Apple’s iMovie App
Cutting Audio in iMovie: A Guide for Mac and iPhone Users

Marion Dubois
Apr 30, 2024• Proven solutions
Sometimes, we find the desired audio or soundtrack for our videos longer or shorter than we want, and that is where audio editing comes. Audio editing refers to manipulating audio to alter the length, speed, and volume or create additional effects such as loops. Are you new to audio trimming? Don’t worry, as our article today would show how to cut audio in iMovie on Mac and iPhone.
Part 1: How to Cut Music in iMovie on Mac?
Cutting music is audio editing carried out when the music or soundtrack seems longer than desired. To cut music or soundtrack in iMovie using Mac involves the following steps:
Step 1: Adjust the Playhead to Cut the Clip
You can cut an audio clip only when the specified audio is in the timeline. To perform the operation, right-click on the clip and pick out a split clip. This operation cuts the clip into two and divides the two pieces wherever the playhead is situated.
Step 2: Select Split Clip
Right-click and select the Split Clip. Once this step is over, you have successfully cut the audio clip.
Part 2: Cut Audio in iMovie Alternative – Wondershare Filmora
Generally, as humans, we feel more satisfied when we have options or choices because we get fed up with doing the same over and over again the same way without changes. Wondershare Filmora is an alternative for iMovie and can easily carry out the function of various forms of audio editing.
If you wish to trim off the beginning or the ending of a mp3 file quite swiftly, this section is for you. Things can get specifically weird if you want to import heavy mp3 files to your space-limited MP3 player to play.
You’re required to choose an intelligent MP3 trimmer to trim an MP3 file to any length. Here, we suggest this robust video editing software — Wondershare Filmora, which enables you to precisely extract an MP3 file or audio segment effortlessly without losing any original audio quality.


You can get both the Windows and Mac versions of this great video editor. It embodies the following features:
- Import videos, audio, or photos from various sources and edit them in one place.
- Three different video cutting methods to meet different editing needs.
- Various editing tools help you edit the video completely, including rotation, picture-in-picture, green screen, cropping, etc.
- Output the edited video to more than 20 different formats or locations as needed.
- Use more than 1,000 video effects in the effect store to customize videos.
Using Filmora is quite effortless. The following tutorial will display how to cut audio in it easily and quickly.
Step 1: Import MP3 Files for Editing
Firstly, drag the specific MP3 file or audio clip into the media library, or you can directly import audio files or video from portable devices such as your digital camera, smartphone, or camcorder, etc.
Step 2: Drag MP3 Files to the Timeline below for Cutting
Filmora provides two ways to cut audio/video files. You can either select to cut from the beginning or the end by trimming. You can also split it into various segments from the mid-sections.
Move the slider ahead to the cutting point within the midsection, and then tap the scissor icon to split it into little sections as desired.
When executed, please select the part that you don’t want to, hit the Delete button to remove.
Step 3: Export to Save
Hit the Export tab to save your edited project. If you want to save in the original MP3 format, select MP3 before you export.
Part 3: How to Trim Music in iMovie on iPhone
This section will offer you a guide on how to cut out parts of audio in an iMovie project on an iPad or iPhone. After adding music to your project, the audio is trimmed to the desired length using iMovie’s inbuilt tool.
Step #1: Open iMovie on your iPhone or iPad.
Step #2: Tap the movie project you want to edit.
It will display a list of your projects, among which you must select the one you want to edit.
If you want to edit a current section of video not even opened in iMovie, you have to make a new iMovie project to add your audio and video. Select the + icon, choose the Movie tab, select the video(s), and then choose the Create movie button.
Step #3: Hit the Edit button below the name of your project.
This opens your project in the editor. And, you’re already in the editor if you just created a new project in the previous step.
Step #4: Add audio to your project.
You can skip this step if your project already contains the audio. Hit the + icon in the upper-left timeline’s corner.
Choose Audio.
Go with a specific category:
Soundtracks are audio tracks provided by iMovie which are free to use in your project.
Select My Music to locate the file and use a song from iTunes or the music app.
Sound effects are shorter sounds—mostly below 10 seconds duration.
Choose an audio file for the preview.
Select the + icon to add the file to your project.
Step #5: Hit the audio bar on the timeline.
It is present below the multi-frame version of your video in the screen’s bottom area.
Now, detach the MP3 segment or audio from the video by tapping the video on the timeline and selecting the Detach button at the screen’s bottom area.
Step #6: Tap and drag the beginning of the audio track.
Drag or move the audio track to the exact point where you wish it to start from—the audio track’s left-end marks of the yellow bar starting your audio.
Step #7: Tap and drag the end of the audio track.
You can drag the yellow bar at the end and move it to the exact point where you want the audio to end.
If you can’t see the yellow bar on the far-right end of the audio track, swipe left below the audio track to scroll to the end.
To move the audio track to another location, select and hold it for about one second, and then move it to the desired video’s location.
Step #8: Select the Play tab for preview.
It’s the sideways triangle just below the video preview.
Step #9: Select the Done button when you’re finished.
It is present at the screen’s top-left corner. You have now confirmed the changes done to your project.
If you want to play it on any other device, tap the Share button at the bottom after choosing the Done tab and select Save Video to export it.
Part 4: Audio Editing Tips for iMovie Users
Here are some guidelines or tips for various audio editing processes, starting from cutting trim music on iMovie, using iMovie to trim audio and video together, and other audio and video editing tips.
- Use Waveforms to See What You Hear
Sound is just as relevant as the images in a video, and should focus just as much during editing. To efficiently and adequately edit audio, you need a good set of speakers and headphones to hear the sound, and you also need to be able to see the sound.
If the waveforms don’t appear, go to the “view” drop-down menu and select “show waveforms”, the waveform would show you the sound intensity level of a sound clip and definitely would give you an idea of what part will need to be turned up or down.
- Audio Adjustments
With the audio button situated at the top right, you have access to some essential audio editing tools for changing the sound level of your chosen clip or changing the relative volume of other films in the project.
The audio editing window also contains primary noise reduction and audio equalization tools and a range of effects – from robot to echo- which would affect how people sound in your video.
- Editing Audio with the Timeline
iMovie permits you to adjust the audio within the clips themselves, each volume as a bar. You can shift up and down to increase or decrease the audio level. The clips also have “fade in” and “fade out” buttons at the beginning and end, which are draggable to adjust the fade length.
Conclusion
Finally, with the answers to the question, how to cut audio in iMovie, you can follow the simple step guide and feel free to edit your audio or video to your taste using iMovie or Wondershare Filmora.
Marion Dubois
Marion Dubois is a writer and a lover of all things video.
Follow @Marion Dubois
Marion Dubois
Apr 30, 2024• Proven solutions
Sometimes, we find the desired audio or soundtrack for our videos longer or shorter than we want, and that is where audio editing comes. Audio editing refers to manipulating audio to alter the length, speed, and volume or create additional effects such as loops. Are you new to audio trimming? Don’t worry, as our article today would show how to cut audio in iMovie on Mac and iPhone.
Part 1: How to Cut Music in iMovie on Mac?
Cutting music is audio editing carried out when the music or soundtrack seems longer than desired. To cut music or soundtrack in iMovie using Mac involves the following steps:
Step 1: Adjust the Playhead to Cut the Clip
You can cut an audio clip only when the specified audio is in the timeline. To perform the operation, right-click on the clip and pick out a split clip. This operation cuts the clip into two and divides the two pieces wherever the playhead is situated.
Step 2: Select Split Clip
Right-click and select the Split Clip. Once this step is over, you have successfully cut the audio clip.
Part 2: Cut Audio in iMovie Alternative – Wondershare Filmora
Generally, as humans, we feel more satisfied when we have options or choices because we get fed up with doing the same over and over again the same way without changes. Wondershare Filmora is an alternative for iMovie and can easily carry out the function of various forms of audio editing.
If you wish to trim off the beginning or the ending of a mp3 file quite swiftly, this section is for you. Things can get specifically weird if you want to import heavy mp3 files to your space-limited MP3 player to play.
You’re required to choose an intelligent MP3 trimmer to trim an MP3 file to any length. Here, we suggest this robust video editing software — Wondershare Filmora, which enables you to precisely extract an MP3 file or audio segment effortlessly without losing any original audio quality.
You can get both the Windows and Mac versions of this great video editor. It embodies the following features:
- Import videos, audio, or photos from various sources and edit them in one place.
- Three different video cutting methods to meet different editing needs.
- Various editing tools help you edit the video completely, including rotation, picture-in-picture, green screen, cropping, etc.
- Output the edited video to more than 20 different formats or locations as needed.
- Use more than 1,000 video effects in the effect store to customize videos.
Using Filmora is quite effortless. The following tutorial will display how to cut audio in it easily and quickly.
Step 1: Import MP3 Files for Editing
Firstly, drag the specific MP3 file or audio clip into the media library, or you can directly import audio files or video from portable devices such as your digital camera, smartphone, or camcorder, etc.
Step 2: Drag MP3 Files to the Timeline below for Cutting
Filmora provides two ways to cut audio/video files. You can either select to cut from the beginning or the end by trimming. You can also split it into various segments from the mid-sections.
Move the slider ahead to the cutting point within the midsection, and then tap the scissor icon to split it into little sections as desired.
When executed, please select the part that you don’t want to, hit the Delete button to remove.
Step 3: Export to Save
Hit the Export tab to save your edited project. If you want to save in the original MP3 format, select MP3 before you export.
Part 3: How to Trim Music in iMovie on iPhone
This section will offer you a guide on how to cut out parts of audio in an iMovie project on an iPad or iPhone. After adding music to your project, the audio is trimmed to the desired length using iMovie’s inbuilt tool.
Step #1: Open iMovie on your iPhone or iPad.
Step #2: Tap the movie project you want to edit.
It will display a list of your projects, among which you must select the one you want to edit.
If you want to edit a current section of video not even opened in iMovie, you have to make a new iMovie project to add your audio and video. Select the + icon, choose the Movie tab, select the video(s), and then choose the Create movie button.
Step #3: Hit the Edit button below the name of your project.
This opens your project in the editor. And, you’re already in the editor if you just created a new project in the previous step.
Step #4: Add audio to your project.
You can skip this step if your project already contains the audio. Hit the + icon in the upper-left timeline’s corner.
Choose Audio.
Go with a specific category:
Soundtracks are audio tracks provided by iMovie which are free to use in your project.
Select My Music to locate the file and use a song from iTunes or the music app.
Sound effects are shorter sounds—mostly below 10 seconds duration.
Choose an audio file for the preview.
Select the + icon to add the file to your project.
Step #5: Hit the audio bar on the timeline.
It is present below the multi-frame version of your video in the screen’s bottom area.
Now, detach the MP3 segment or audio from the video by tapping the video on the timeline and selecting the Detach button at the screen’s bottom area.
Step #6: Tap and drag the beginning of the audio track.
Drag or move the audio track to the exact point where you wish it to start from—the audio track’s left-end marks of the yellow bar starting your audio.
Step #7: Tap and drag the end of the audio track.
You can drag the yellow bar at the end and move it to the exact point where you want the audio to end.
If you can’t see the yellow bar on the far-right end of the audio track, swipe left below the audio track to scroll to the end.
To move the audio track to another location, select and hold it for about one second, and then move it to the desired video’s location.
Step #8: Select the Play tab for preview.
It’s the sideways triangle just below the video preview.
Step #9: Select the Done button when you’re finished.
It is present at the screen’s top-left corner. You have now confirmed the changes done to your project.
If you want to play it on any other device, tap the Share button at the bottom after choosing the Done tab and select Save Video to export it.
Part 4: Audio Editing Tips for iMovie Users
Here are some guidelines or tips for various audio editing processes, starting from cutting trim music on iMovie, using iMovie to trim audio and video together, and other audio and video editing tips.
- Use Waveforms to See What You Hear
Sound is just as relevant as the images in a video, and should focus just as much during editing. To efficiently and adequately edit audio, you need a good set of speakers and headphones to hear the sound, and you also need to be able to see the sound.
If the waveforms don’t appear, go to the “view” drop-down menu and select “show waveforms”, the waveform would show you the sound intensity level of a sound clip and definitely would give you an idea of what part will need to be turned up or down.
- Audio Adjustments
With the audio button situated at the top right, you have access to some essential audio editing tools for changing the sound level of your chosen clip or changing the relative volume of other films in the project.
The audio editing window also contains primary noise reduction and audio equalization tools and a range of effects – from robot to echo- which would affect how people sound in your video.
- Editing Audio with the Timeline
iMovie permits you to adjust the audio within the clips themselves, each volume as a bar. You can shift up and down to increase or decrease the audio level. The clips also have “fade in” and “fade out” buttons at the beginning and end, which are draggable to adjust the fade length.
Conclusion
Finally, with the answers to the question, how to cut audio in iMovie, you can follow the simple step guide and feel free to edit your audio or video to your taste using iMovie or Wondershare Filmora.
Marion Dubois
Marion Dubois is a writer and a lover of all things video.
Follow @Marion Dubois
“Multi-Platform Speech-to-MP3 Technology for Everyday Use”
Convert Text to MP3 on Windows, Mac, Android and iPhone

Shanoon Cox
Mar 27, 2024• Proven solutions
Wondering why you need to convert text to MP3 audio files? Well, the possibilities and reasons are endless. Whether you want to cover up endless lecture notes or prepare a vital speech, or perhaps you just want to avoid reading eye-straining tiny fonts, converting any written text to mp3 online comes in handy in so many ways. Not to mention, narration and the use of natural human voice can do wonders for your eLearning experience. And that is what text to mp3 converters are perfect for.
Without paying a professional, you or virtually anyone out there can produce professional voice-overs with an efficient text to audio converter. In this article, we have rounded up some of the best tools for Mac, Windows, Android, and iOS users, with quick tutorials to convert your text to mp3 files.
So, let’s check them out!
- Part 1: Text to MP3 Online on PC (Windows and Mac)
- Part 2: Text to MP3 on Android
- Part 3: Text to MP3 on iOS
Part 1: Text to MP3 Online on PC (Windows and Mac)
If you are looking for a text to mp3 online converter to use on your PC, FreeTTS is your best bet. This handy online tool helps you convert countless lines of text to mp3 audio files on Windows and Mac. The free software is powered by Google machine learning and text-to-speech capability, which converts text to audio faster than ever. With FreeTTS, just copy and paste your text content, wait for a few seconds, and get high-quality audio files without any subscription or registration.
To inspire you, here is a quick step-by-step tutorial on how you can turn long texts into professional audio files with natural voices using the online FreeTTS converter.
1. Launch FreeTTS on your Windows or Mac
Start by launching the online FreeTTS software on your Windows or Mac browser.

2. Copy and paste your words
On the main interface, copy and paste your text into the text box.

3. Convert text to mp3
After pasting your words in the text box, select your required Language and Voice style from the dropdown. Then hit Convert to start the process. Once the audio file is ready, you can save it to your PC by clicking on Download audio.

Part 2: Text to MP3 on Android
Narrator’s voice is an excellent text-to-speech converter app available on the Google Play Store. The app allows you to convert text to mp3 and mp4 files and share the converted files with your friends on various social platforms. With a wide range of language options and amusing voice styles, your phone will read out what you type in funny or serious tones using the Narrator’s voice app.
The output is an expressive and natural-sounding narration of your written content that you can export as audio or video files to engage the audience. Moreover, using this powerful app is pretty easy to turn text to mp3. Just follow these steps, and your voice-over will be ready.
1. Download and install the Narrator’s Voice app
To get started, download and install the Narrator’s voice app on your phone, then open it to enter the main screen.

2. Read aloud or type your content in the text box
On the Create tab, type the content that you wish to convert to an audio file. Or you can also choose to read aloud and record your words by clicking on the voice to text option.

3. Customize your language and voice style
Next, tap on the icon with the letter A located on the bottom left corner of the main interface to customize your audio. Then select your preferred Language, Voice, and Effect and hit Back to return.

4. Convert text to mp3
After all the edits are completed, click on the Play icon to start the conversion process.

5. Save or share the converted audio
Finally, tap on the Export icon and select Save to download the mp3 file on your phone or choose Share audio.

Part 3: Text to MP3 on iOS
The easiest way to turn large amounts of text to mp3 on an iPhone is the Text to Speech-Recorder app. The essence of this user-friendly app is the multi-lingual speech service that brings your text to life with multiple natural sounding voices. A standout feature of the app is background music support for the mp3 file. All you have to do is type your words or record your voice, explore the worldwide language library, add background music of your choice, and play to convert text to mp3.
All in all, Text to Speech-Recorder is one of the most customizable text to audio apps for iPhone users. In only five quick steps, you can transform your words into high-quality audio using this convenient app.
1. Open the Text to Speech-Recorder app
First, download the Text to Speech-Recorder app from the App store. Then open the app once it is installed.

2. Input text or record voice
Next, choose text to mp3 to manually type your content or select Record to mp3 if you wish to record your voice.

3. Edit your language, voice, and background music settings
To edit language and voice settings, click the Face icon to enter the Anchor tab. Here you can preview and choose a language and voice style of your choice. Then, tap the music icon and choose from the free background music options or hit No music if you don’t want to add any music.

4. Convert text to speech
Once you have selected the language, voice, and music, click on Save to save it to the My Audio list.

5. Download the audio file
To download the converted file to your device, hit Export.

Conclusion
Now that you know some of the best text to mp3 converters, you can cut costs of hiring a professional voice-over artist, better memorize your lectures, and even have your phone read your favorite eBook for you.
All the apps in our list are top-notch and easy-to-use text-to-speech converters with user-friendly interfaces and customizable settings. These handy tools will read aloud anything you type in amusing narration styles to create an unforgettable eLearning experience. Whether you are an Apple fan or an Android user, there is something for everyone.
Shanoon Cox
Shanoon Cox is a writer and a lover of all things video.
Follow @Shanoon Cox
Shanoon Cox
Mar 27, 2024• Proven solutions
Wondering why you need to convert text to MP3 audio files? Well, the possibilities and reasons are endless. Whether you want to cover up endless lecture notes or prepare a vital speech, or perhaps you just want to avoid reading eye-straining tiny fonts, converting any written text to mp3 online comes in handy in so many ways. Not to mention, narration and the use of natural human voice can do wonders for your eLearning experience. And that is what text to mp3 converters are perfect for.
Without paying a professional, you or virtually anyone out there can produce professional voice-overs with an efficient text to audio converter. In this article, we have rounded up some of the best tools for Mac, Windows, Android, and iOS users, with quick tutorials to convert your text to mp3 files.
So, let’s check them out!
- Part 1: Text to MP3 Online on PC (Windows and Mac)
- Part 2: Text to MP3 on Android
- Part 3: Text to MP3 on iOS
Part 1: Text to MP3 Online on PC (Windows and Mac)
If you are looking for a text to mp3 online converter to use on your PC, FreeTTS is your best bet. This handy online tool helps you convert countless lines of text to mp3 audio files on Windows and Mac. The free software is powered by Google machine learning and text-to-speech capability, which converts text to audio faster than ever. With FreeTTS, just copy and paste your text content, wait for a few seconds, and get high-quality audio files without any subscription or registration.
To inspire you, here is a quick step-by-step tutorial on how you can turn long texts into professional audio files with natural voices using the online FreeTTS converter.
1. Launch FreeTTS on your Windows or Mac
Start by launching the online FreeTTS software on your Windows or Mac browser.
2. Copy and paste your words
On the main interface, copy and paste your text into the text box.
3. Convert text to mp3
After pasting your words in the text box, select your required Language and Voice style from the dropdown. Then hit Convert to start the process. Once the audio file is ready, you can save it to your PC by clicking on Download audio.
Part 2: Text to MP3 on Android
Narrator’s voice is an excellent text-to-speech converter app available on the Google Play Store. The app allows you to convert text to mp3 and mp4 files and share the converted files with your friends on various social platforms. With a wide range of language options and amusing voice styles, your phone will read out what you type in funny or serious tones using the Narrator’s voice app.
The output is an expressive and natural-sounding narration of your written content that you can export as audio or video files to engage the audience. Moreover, using this powerful app is pretty easy to turn text to mp3. Just follow these steps, and your voice-over will be ready.
1. Download and install the Narrator’s Voice app
To get started, download and install the Narrator’s voice app on your phone, then open it to enter the main screen.
2. Read aloud or type your content in the text box
On the Create tab, type the content that you wish to convert to an audio file. Or you can also choose to read aloud and record your words by clicking on the voice to text option.
3. Customize your language and voice style
Next, tap on the icon with the letter A located on the bottom left corner of the main interface to customize your audio. Then select your preferred Language, Voice, and Effect and hit Back to return.
4. Convert text to mp3
After all the edits are completed, click on the Play icon to start the conversion process.
5. Save or share the converted audio
Finally, tap on the Export icon and select Save to download the mp3 file on your phone or choose Share audio.
Part 3: Text to MP3 on iOS
The easiest way to turn large amounts of text to mp3 on an iPhone is the Text to Speech-Recorder app. The essence of this user-friendly app is the multi-lingual speech service that brings your text to life with multiple natural sounding voices. A standout feature of the app is background music support for the mp3 file. All you have to do is type your words or record your voice, explore the worldwide language library, add background music of your choice, and play to convert text to mp3.
All in all, Text to Speech-Recorder is one of the most customizable text to audio apps for iPhone users. In only five quick steps, you can transform your words into high-quality audio using this convenient app.
1. Open the Text to Speech-Recorder app
First, download the Text to Speech-Recorder app from the App store. Then open the app once it is installed.
2. Input text or record voice
Next, choose text to mp3 to manually type your content or select Record to mp3 if you wish to record your voice.
3. Edit your language, voice, and background music settings
To edit language and voice settings, click the Face icon to enter the Anchor tab. Here you can preview and choose a language and voice style of your choice. Then, tap the music icon and choose from the free background music options or hit No music if you don’t want to add any music.
4. Convert text to speech
Once you have selected the language, voice, and music, click on Save to save it to the My Audio list.
5. Download the audio file
To download the converted file to your device, hit Export.
Conclusion
Now that you know some of the best text to mp3 converters, you can cut costs of hiring a professional voice-over artist, better memorize your lectures, and even have your phone read your favorite eBook for you.
All the apps in our list are top-notch and easy-to-use text-to-speech converters with user-friendly interfaces and customizable settings. These handy tools will read aloud anything you type in amusing narration styles to create an unforgettable eLearning experience. Whether you are an Apple fan or an Android user, there is something for everyone.
Shanoon Cox
Shanoon Cox is a writer and a lover of all things video.
Follow @Shanoon Cox
Ultimate Guide to the Leading 11 Free Voice Changing Applications on iOS & Android Platforms
Best Voice Changer Apps for iPhone and Android

Benjamin Arango
Mar 27, 2024• Proven solutions
Have you ever wondered what your voice would sound like if you were a cartoon character, a robot, or an older version of yourself? Changing how your voice sounds has never been easier, regardless of the Smartphone model you have, since voice changer apps can be used on both iPhone and Android devices.
Even though there is nothing wrong with modulating your voice to have fun with your friends, using voice changer apps to pull malicious pranks or bully strangers online is far from acceptable. Read on if you would like to find out more about the best voice changer apps for iPhone and Android devices and discover the one you enjoy using the most.
Best Voice Changer Apps for iPhone and Android
Creating a new ringtone, making a voice recording, or having fun with your friends are only a few reasons why so many people choose to try out voice changer apps. The vast majority of these apps feature well-equipped audio effects libraries that enable users to have fun with their friends and hear how they would sound if they were drunk or after inhaling helium. So, let’s take a look at some of the best voice changer apps on the market.


Changing video voice on Windows and Mac with Wondershare Filmora
Do you want to change the voice in video on Windows and Mac and don’t know which software can meet this requirement? Try Filmra video editor , which provides several ways to change voice over, such as changing the voice speed or changing the pitch. Download the trial version below and find out more possibility in video creation with Filmora.
1. Celebrity Voice Changer – Face
Price: Free, but offers in-app purchases
Compatibility: iOS 9.0 or later
User Rating: 4.0
In case you would like to sound like your favorite movie star of TV host, then Celebrity Voice Changer is one of the best choices you can make. Besides the standard set of options, the app also lets you request new voices since its machine learning technology can mimic virtually anyone’s voice. However, Celebrity Voice Changer is currently only available in English and it cannot modulate speech in other languages. In addition, you must make an in-app purchase in order to gain access to all of the app’s features or unlock the unlimited usage of the app.
Pros
- Automatic voice modulation
- Huge selection of voice filters
- The app generates video files that are better adjusted to the audience on social media than audio files
- Excellent impressions of celebrities
Cons
- Unreasonably expensive
- The app’s Deep Learning technology still has a lot of room for improvement
2. Snapchat
Price: Free, but offers in-app purchases
Compatibility: iOS 10.0 or later, Android 4.4 or up
User Rating: 3.8
With more than 203 million daily users, Snapchat is one of the largest messaging platforms on the market. Previously, we’ve shared how to change gender on Snapchat , beside that, the app lets its users capture short moments or the so-called Snaps and share them with friends. In addition to hundreds of video filters , Snapchat also features a broad spectrum of voice changing effects that make Snaps more entertaining. Even so, the audio recording options Snapchat offers are far from ideal, because the app doesn’t allow you to edit the files you create with it. Using Snapchat will drain your battery quickly, which is why you must pay attention to how frequently you use this app.
Pros
- The easy voice modulation process
- Excellent messaging options
- Grants you access to a large community of likeminded people
- Lenses and filters are updated on a daily basis
Cons
- Editing voice changes after you create a Snap is not possible
- Snapchat is not primarily a voice changer app
Check the detailed information about How to Change Voice on Snapchat with 2 Easy Methods >>
3. Voice Changer
Price: Free
Compatibility: Android 4.1 and up
User Rating: 4.3

Changing your voice with this app won’t take more than a few moments of your time. You just have to launch the app and hit the microphone button to record a message or a joke you would like to modulate. Once you’re happy with the audio recording you made, you can proceed to choose from more than twenty voice effects that will make you sound like a dwarf, a robot, or an alien. The app’s file-sharing capabilities enable you to post your audio recordings to any social media platform of your choosing or store your files and use them as many times as you want.
Pros
- Entertaining and easy to use
- The simple three-step voice modulation process
- Good selection of voice filters
- Excellent file sharing options
Cons
- The app displays ads
- No audio editing tools
4. Voicy: Celebrity Voice Changer
**Price:**Free, but offers in-app purchases
Compatibility: iOS 10 or later
User Rating: 4.3

Impersonating your favorite celebrity can be a fun way to prank your friends on social media. Voicy features a broad selection of celebrity voice impersonations you can use to make you sound like a famous actress or TV personality. The app utilizes a machine learning technology that can generate more than forty avatars and allows the users to experiment with different voice effects. The free version of the app offers only limited capabilities, so if you want to gain access to all of the Voicy’s features, you must choose a weekly, monthly or an annual subscription.
Pros
- Equipped with a powerful machine learning technology
- Offers a vast selection of voice avatars
- The quick voice modification process
- A great choice if you want to make a parody
Cons
- More expensive than the competition
- Support only the English language
5. Video Voice Changer – Fun Editor
Price: Free, but offers in-app purchases
Compatibility: iOS 8.0 or later
User Rating: 4.4

Changing the voices in the videos you record with your iPhones or iPads is a straightforward process that takes a minimum amount of effort. You can either use this iOS-based app to capture videos you’re going to dub or import them from the albums in which they are stored. The Video Voice Changer app is a great option if you want to dub videos directly from your phone because it enables you to change the voices in your videos and make them sound like mice, bears or ghosts. There are over thirty voice effects to choose from, so you can easily pick the one that best fits the video you’re editing.
Pros
- Equipped with video recording tools
- Excellent dubbing features
- A rich selection of voice effects
- Allows users to share their creations on Facebook, Instagram, and other social media platforms
Cons
- You must make an in-app purchase to unlock all of the app’s features
- No audio mixing options
6. Video Voice Changer FX
**Price:**Free, but offers in-app purchases
Compatibility: Android 4.1 and up
User Rating: 4.1

This is a simple app, anyone can use to change the voices in a video. Simply upload a video file from an SD card in your phone and choose an audio effect you want to apply. The app’s collection of funny voices includes options like echo, squirrel, space ship or chipmunk. As soon as you select the voice effect you want to add to a video, the app will start generating a new video that will be saved to your phone. Sharing the videos you edit with Video Voice Changer FX to social media directly from the app is not an option.
Pros
- Fun and easy to use
- Great price to performance ratio
- Changing a voice requires just a few taps
- Allows users to switch between effects while the video is playing
Cons
- No audio or video recording capability
- Doesn’t support social media sharing
7. Squeak Voice Changer
**Price:**Free, but offers in-app purchases
Compatibility: Android 4.3 and up
User Rating: 3.9

Every joke you want to share with your online friends is going to be a little funnier if you record it with Squeak Voice Changer. You just have to tap on the Record button and choose one of the available effects. Each voice changing effect this app offers is represented by a character so you should select Jamie the Jolly if you want to make your voice sound like you’re at a party or Bruce the Sentimental Bot if you want your voice to sound artificial. All the recordings you make with Squeak Voice Changer can be easily shared on social media.
Pros
- Equipped with audio recording options
- Cute and memorable characters that represent voice effects
- Inexpensive and fun to use
- Functional app design
Cons
- Poor selection of voice effects
- The AI only recognizes the English language
8. Voice Changer with Effects
**Price:**Free
Compatibility: Android 4.1 and up
User Rating: 4.5
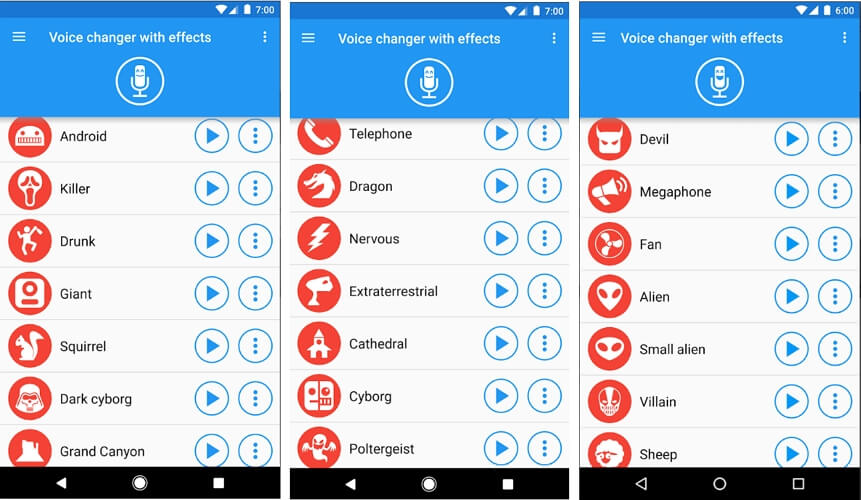
This Android-based app is designed to make fun and easy since voice modulation features enable you to play voice recording backward or change your voice to sound robotic or even alien. Besides recording your voice, the app also lets you modulate pre-recorded sounds and save them to your phone or use them as ringtones or notification sounds. Furthermore, the app lets you add sounds to images and share them to Facebook. The Voice Changer with Effects enables you to share all audio files you process with it to any of the most popular social media platforms.
Pros
- The app has over 50,000,000 installs
- Equipped with a text to voice feature
- Setting a new ringtone with this app is easy
- Supports editing of pre-recorded audio files
Cons
- Contains ads
- No audio or video editing options
9. Voice Changer
**Price:**Free
Compatibility: Android 4.1 and up
User Rating: 4.4

If you are looking for an Android app that lets you modulate your voice quickly and effortlessly, then Voice Changer may be one of the best options you can find on the market. You can record your voice by simply tapping on the microphone and speaking into your phone’s speaker and then apply one of the audio effects this app offers. Optionally, you can import an audio file you already recorded into the app and then apply Martian, Foreigner, Giant or Child effects to your voice recording. The best part is that you can apply each effect to the audio files you’re editing as many times as you want.
Pros
- Loads of funny effects
- Simple audio recording setup
- Intuitive and modernly designed interface
- Enables users to share audio files via Bluetooth or social media platforms
Cons
- No video editing tools
- The quality of output audio files can vary
10. Voice FX
**Price:**Free, but offers in-app purchases
Compatibility: Android 4.0.3 and up
User Rating: 3.8

Modulating voices in all types of audio files is a straightforward and fun process that can be completed in just a few taps. During the audio recording session, you can apply all voice effects to the sound you are recording and stream it live to your web browsers or media players you’re using. Voice FX changes your voice in real time, which enables you to preview your results before deciding if you want to save them. All files you export from this app will be saved in the MP3 format so you can use them as ringtones on your Android device.
Pros
- Allows users to modulate pre-recorded audio files
- Voice effects are applied in real time
- Offers live streaming features
- Exports files in the MP3 format
Cons
- Prone to glitches
- A limited selection of voice effects
11. Voice Changer Plus
**Price:**Free, but offers in-app purchases
Compatibility: iOS 8.0 or later
User Rating: 4.8
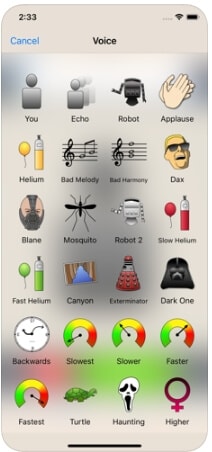
iPhone and iPad owners in need of a voice changer app that grants them complete creative freedom over the modulation of the voices they record, should consider using the Voice Changer Plus. The app features more than fifty voice effects and it provides support for voiceover recordings. Moreover, you can edit all your audio files even after you saved them, enabling you to find new ways to improve your recordings over time. Voice Changer Plus is also equipped with trim controls, so you can remove all parts of your audio files you don’t want to share with your friends on social media.
Pros
- Offers more voice effects than most of its competitors
- Provides voiceover recording options
- Users can trim their audio files
- All audio recordings can be edited after the voice modulation
Cons
- In-app purchase is required in order to unlock all of the app’s features
- Modulating audio in video files is not an option
Below is a quick comparison table among these voice changer apps, hope it will be helpful.
| App | Supported OS | User Rating | Voice Templates |
|---|---|---|---|
| Celebrity Voice Changer - Face | iOS 9.0 or later | 4.0 | Yes |
| Snapchat | iOS 10.0 or later, Android 4.4 or up | 3.8 | No |
| Voice Changer by e3games | Android 4.1 and up | 4.3 | Yes |
| Voicy: Celebrity Voice Changer | iOS 10 or later | 4.3 | Yes |
| Video Voice Changer – Fun Editor | iOS 8.0 or later | 4.4 | Yes |
| Video Voice Changer FX | Android 4.1 and up | 4.1 | Yes |
| Squeak Voice Changer | Android 4.3 and up | 3.9 | Yes |
| Voice Changer with Effects | Android 4.1 and up | 4.5 | Yes |
| Voice Changer | Android 4.1 and up | 4.4 | Yes |
| Voice FX | Android 4.0.3 and up | 3.8 | Yes |
| Voice Changer Plus | iOS 8.0 or later | 4.8 | Yes |
Conclusion
Everybody enjoys a good joke, and the apps we featured in this article enable you to have a lot of fun while experimenting with different voice modulation options. All of the voice effects these apps offer can change a voice automatically, but if you would like to alter the voices in your videos you must choose an app that supports this option. Which of the best voice changer apps for iPhone and Android devices are you going to choose? Leave a comment, and share your opinions with us.
Benjamin Arango
Benjamin Arango is a writer and a lover of all things video.
Follow @Benjamin Arango
Benjamin Arango
Mar 27, 2024• Proven solutions
Have you ever wondered what your voice would sound like if you were a cartoon character, a robot, or an older version of yourself? Changing how your voice sounds has never been easier, regardless of the Smartphone model you have, since voice changer apps can be used on both iPhone and Android devices.
Even though there is nothing wrong with modulating your voice to have fun with your friends, using voice changer apps to pull malicious pranks or bully strangers online is far from acceptable. Read on if you would like to find out more about the best voice changer apps for iPhone and Android devices and discover the one you enjoy using the most.
Best Voice Changer Apps for iPhone and Android
Creating a new ringtone, making a voice recording, or having fun with your friends are only a few reasons why so many people choose to try out voice changer apps. The vast majority of these apps feature well-equipped audio effects libraries that enable users to have fun with their friends and hear how they would sound if they were drunk or after inhaling helium. So, let’s take a look at some of the best voice changer apps on the market.
Changing video voice on Windows and Mac with Wondershare Filmora
Do you want to change the voice in video on Windows and Mac and don’t know which software can meet this requirement? Try Filmra video editor , which provides several ways to change voice over, such as changing the voice speed or changing the pitch. Download the trial version below and find out more possibility in video creation with Filmora.
1. Celebrity Voice Changer – Face
Price: Free, but offers in-app purchases
Compatibility: iOS 9.0 or later
User Rating: 4.0
In case you would like to sound like your favorite movie star of TV host, then Celebrity Voice Changer is one of the best choices you can make. Besides the standard set of options, the app also lets you request new voices since its machine learning technology can mimic virtually anyone’s voice. However, Celebrity Voice Changer is currently only available in English and it cannot modulate speech in other languages. In addition, you must make an in-app purchase in order to gain access to all of the app’s features or unlock the unlimited usage of the app.
Pros
- Automatic voice modulation
- Huge selection of voice filters
- The app generates video files that are better adjusted to the audience on social media than audio files
- Excellent impressions of celebrities
Cons
- Unreasonably expensive
- The app’s Deep Learning technology still has a lot of room for improvement
2. Snapchat
Price: Free, but offers in-app purchases
Compatibility: iOS 10.0 or later, Android 4.4 or up
User Rating: 3.8
With more than 203 million daily users, Snapchat is one of the largest messaging platforms on the market. Previously, we’ve shared how to change gender on Snapchat , beside that, the app lets its users capture short moments or the so-called Snaps and share them with friends. In addition to hundreds of video filters , Snapchat also features a broad spectrum of voice changing effects that make Snaps more entertaining. Even so, the audio recording options Snapchat offers are far from ideal, because the app doesn’t allow you to edit the files you create with it. Using Snapchat will drain your battery quickly, which is why you must pay attention to how frequently you use this app.
Pros
- The easy voice modulation process
- Excellent messaging options
- Grants you access to a large community of likeminded people
- Lenses and filters are updated on a daily basis
Cons
- Editing voice changes after you create a Snap is not possible
- Snapchat is not primarily a voice changer app
Check the detailed information about How to Change Voice on Snapchat with 2 Easy Methods >>
3. Voice Changer
Price: Free
Compatibility: Android 4.1 and up
User Rating: 4.3
Changing your voice with this app won’t take more than a few moments of your time. You just have to launch the app and hit the microphone button to record a message or a joke you would like to modulate. Once you’re happy with the audio recording you made, you can proceed to choose from more than twenty voice effects that will make you sound like a dwarf, a robot, or an alien. The app’s file-sharing capabilities enable you to post your audio recordings to any social media platform of your choosing or store your files and use them as many times as you want.
Pros
- Entertaining and easy to use
- The simple three-step voice modulation process
- Good selection of voice filters
- Excellent file sharing options
Cons
- The app displays ads
- No audio editing tools
4. Voicy: Celebrity Voice Changer
**Price:**Free, but offers in-app purchases
Compatibility: iOS 10 or later
User Rating: 4.3
Impersonating your favorite celebrity can be a fun way to prank your friends on social media. Voicy features a broad selection of celebrity voice impersonations you can use to make you sound like a famous actress or TV personality. The app utilizes a machine learning technology that can generate more than forty avatars and allows the users to experiment with different voice effects. The free version of the app offers only limited capabilities, so if you want to gain access to all of the Voicy’s features, you must choose a weekly, monthly or an annual subscription.
Pros
- Equipped with a powerful machine learning technology
- Offers a vast selection of voice avatars
- The quick voice modification process
- A great choice if you want to make a parody
Cons
- More expensive than the competition
- Support only the English language
5. Video Voice Changer – Fun Editor
Price: Free, but offers in-app purchases
Compatibility: iOS 8.0 or later
User Rating: 4.4
Changing the voices in the videos you record with your iPhones or iPads is a straightforward process that takes a minimum amount of effort. You can either use this iOS-based app to capture videos you’re going to dub or import them from the albums in which they are stored. The Video Voice Changer app is a great option if you want to dub videos directly from your phone because it enables you to change the voices in your videos and make them sound like mice, bears or ghosts. There are over thirty voice effects to choose from, so you can easily pick the one that best fits the video you’re editing.
Pros
- Equipped with video recording tools
- Excellent dubbing features
- A rich selection of voice effects
- Allows users to share their creations on Facebook, Instagram, and other social media platforms
Cons
- You must make an in-app purchase to unlock all of the app’s features
- No audio mixing options
6. Video Voice Changer FX
**Price:**Free, but offers in-app purchases
Compatibility: Android 4.1 and up
User Rating: 4.1
This is a simple app, anyone can use to change the voices in a video. Simply upload a video file from an SD card in your phone and choose an audio effect you want to apply. The app’s collection of funny voices includes options like echo, squirrel, space ship or chipmunk. As soon as you select the voice effect you want to add to a video, the app will start generating a new video that will be saved to your phone. Sharing the videos you edit with Video Voice Changer FX to social media directly from the app is not an option.
Pros
- Fun and easy to use
- Great price to performance ratio
- Changing a voice requires just a few taps
- Allows users to switch between effects while the video is playing
Cons
- No audio or video recording capability
- Doesn’t support social media sharing
7. Squeak Voice Changer
**Price:**Free, but offers in-app purchases
Compatibility: Android 4.3 and up
User Rating: 3.9
Every joke you want to share with your online friends is going to be a little funnier if you record it with Squeak Voice Changer. You just have to tap on the Record button and choose one of the available effects. Each voice changing effect this app offers is represented by a character so you should select Jamie the Jolly if you want to make your voice sound like you’re at a party or Bruce the Sentimental Bot if you want your voice to sound artificial. All the recordings you make with Squeak Voice Changer can be easily shared on social media.
Pros
- Equipped with audio recording options
- Cute and memorable characters that represent voice effects
- Inexpensive and fun to use
- Functional app design
Cons
- Poor selection of voice effects
- The AI only recognizes the English language
8. Voice Changer with Effects
**Price:**Free
Compatibility: Android 4.1 and up
User Rating: 4.5
This Android-based app is designed to make fun and easy since voice modulation features enable you to play voice recording backward or change your voice to sound robotic or even alien. Besides recording your voice, the app also lets you modulate pre-recorded sounds and save them to your phone or use them as ringtones or notification sounds. Furthermore, the app lets you add sounds to images and share them to Facebook. The Voice Changer with Effects enables you to share all audio files you process with it to any of the most popular social media platforms.
Pros
- The app has over 50,000,000 installs
- Equipped with a text to voice feature
- Setting a new ringtone with this app is easy
- Supports editing of pre-recorded audio files
Cons
- Contains ads
- No audio or video editing options
9. Voice Changer
**Price:**Free
Compatibility: Android 4.1 and up
User Rating: 4.4
If you are looking for an Android app that lets you modulate your voice quickly and effortlessly, then Voice Changer may be one of the best options you can find on the market. You can record your voice by simply tapping on the microphone and speaking into your phone’s speaker and then apply one of the audio effects this app offers. Optionally, you can import an audio file you already recorded into the app and then apply Martian, Foreigner, Giant or Child effects to your voice recording. The best part is that you can apply each effect to the audio files you’re editing as many times as you want.
Pros
- Loads of funny effects
- Simple audio recording setup
- Intuitive and modernly designed interface
- Enables users to share audio files via Bluetooth or social media platforms
Cons
- No video editing tools
- The quality of output audio files can vary
10. Voice FX
**Price:**Free, but offers in-app purchases
Compatibility: Android 4.0.3 and up
User Rating: 3.8
Modulating voices in all types of audio files is a straightforward and fun process that can be completed in just a few taps. During the audio recording session, you can apply all voice effects to the sound you are recording and stream it live to your web browsers or media players you’re using. Voice FX changes your voice in real time, which enables you to preview your results before deciding if you want to save them. All files you export from this app will be saved in the MP3 format so you can use them as ringtones on your Android device.
Pros
- Allows users to modulate pre-recorded audio files
- Voice effects are applied in real time
- Offers live streaming features
- Exports files in the MP3 format
Cons
- Prone to glitches
- A limited selection of voice effects
11. Voice Changer Plus
**Price:**Free, but offers in-app purchases
Compatibility: iOS 8.0 or later
User Rating: 4.8
iPhone and iPad owners in need of a voice changer app that grants them complete creative freedom over the modulation of the voices they record, should consider using the Voice Changer Plus. The app features more than fifty voice effects and it provides support for voiceover recordings. Moreover, you can edit all your audio files even after you saved them, enabling you to find new ways to improve your recordings over time. Voice Changer Plus is also equipped with trim controls, so you can remove all parts of your audio files you don’t want to share with your friends on social media.
Pros
- Offers more voice effects than most of its competitors
- Provides voiceover recording options
- Users can trim their audio files
- All audio recordings can be edited after the voice modulation
Cons
- In-app purchase is required in order to unlock all of the app’s features
- Modulating audio in video files is not an option
Below is a quick comparison table among these voice changer apps, hope it will be helpful.
| App | Supported OS | User Rating | Voice Templates |
|---|---|---|---|
| Celebrity Voice Changer - Face | iOS 9.0 or later | 4.0 | Yes |
| Snapchat | iOS 10.0 or later, Android 4.4 or up | 3.8 | No |
| Voice Changer by e3games | Android 4.1 and up | 4.3 | Yes |
| Voicy: Celebrity Voice Changer | iOS 10 or later | 4.3 | Yes |
| Video Voice Changer – Fun Editor | iOS 8.0 or later | 4.4 | Yes |
| Video Voice Changer FX | Android 4.1 and up | 4.1 | Yes |
| Squeak Voice Changer | Android 4.3 and up | 3.9 | Yes |
| Voice Changer with Effects | Android 4.1 and up | 4.5 | Yes |
| Voice Changer | Android 4.1 and up | 4.4 | Yes |
| Voice FX | Android 4.0.3 and up | 3.8 | Yes |
| Voice Changer Plus | iOS 8.0 or later | 4.8 | Yes |
Conclusion
Everybody enjoys a good joke, and the apps we featured in this article enable you to have a lot of fun while experimenting with different voice modulation options. All of the voice effects these apps offer can change a voice automatically, but if you would like to alter the voices in your videos you must choose an app that supports this option. Which of the best voice changer apps for iPhone and Android devices are you going to choose? Leave a comment, and share your opinions with us.
Benjamin Arango
Benjamin Arango is a writer and a lover of all things video.
Follow @Benjamin Arango
Also read:
- Updated 2024 Approved A Curated Selection of Freely Available Sound Pressure Balancers
- Updated In 2024, Seeking Out Elaborate Zombie Soundtracks
- 2024 Approved Step-by-Step Adding and Eliminating Audacity From Chromebooks
- New Enable Silence Mode & Incorporate Custom Tracks via Windows Movie Maker for 2024
- Updated In 2024, Optimizing Auditory Experience Windows Edition with Adobe Premiere Pro Techniques
- Essential Audio Collection The Top Ten Devices for Facile Song Archiving
- In 2024, Unlocking the Power of Google Voice with Effective Call Recording Techniques
- New In 2024, Best-Liked Platforms to Access Compilation of Guitar Chord Diagrams & Visual Themes
- Updated Techniques for Tempo Reduction in Music Without Altering Tone
- Updated In 2024, 5 Top Audio Tools to Master Recording Your Voice with Ease
- Beating Time A Guide to Adding Rhythms and Tempos Using Premiere Pro
- New Master Effortless Audio Enhancement with These 7 Online Audio Processors
- New In 2024, The Ultimate Podcast Recording Playbook A Seamless Process
- Updated In 2024, Transforming Podcast Content Into High-Quality MP3 Audio A Step-by-Step Guide
- Separating Audio and Video A Comprehensive Approach for Premiere Pro Editors
- Discovering Where to Get Realistic Smashing Glass Audio Cues
- 2024 Approved These Titles Encapsulate the Concept of Bird Sound Collections or Archives that Are Available as MP3 Files, Highlighting Both Their Musical and Natural Elements
- New In 2024, The Novices Roadmap to Picking Powerful Hip-Hop Accompaniments
- Updated In 2024, A Comprehensive Compilation of Top 10 Affordable Browser-Based DAWs
- Updated Techniques for Excising Drum Sections in Online Music Editing for 2024
- Updated 2024 Approved How to Clone Voice in 2 Ways-Create AI Voices
- Updated Pinpointing the Acoustic Signature of a Clicky Button
- Updated 2024 Approved Revolutionizing Music Production A Look at the Leading Audio Editing Suites
- Updated Melody Mavens Exploring the Best Tunes – An Online, Up-to-Date Song Identifier for 2024
- Updated 2024 Approved Securing Purity in Recordings The Art of Removing Hum and Hissing Sounds
- Remove Background Noise Online Useful Guideline
- Updated In 2024, Mastering the Art of Detaching Sound From Visuals in Adobe Premiere Pro
- Clarity in Capture State-of-the-Art Techniques for Dampening Sound Distortion for 2024
- Mastering Sounds and Visuals Discover the Best 5 Multimedia Fusion Systems
- Pinnacle Audio Compatibility Toolkit Comprehensive, Gratis Conversion of MPEG-4 Files to MP3 Standard (2023 Version) for 2024
- In 2024, Sonic Clarity Mastering Silence in Recorded Sound with Wondershare Filmora
- How to Unlock Samsung Phone without Any Data Loss
- 8 Solutions to Fix Find My Friends Location Not Available On Vivo T2 5G | Dr.fone
- The way to get back lost videos from Nokia
- CatchEmAll Celebrate National Pokémon Day with Virtual Location On Oppo Reno 10 Pro 5G | Dr.fone
- 5 Solutions For Oppo A59 5G Unlock Without Password
- Updated 2024 Approved Neon Text Generators The 9 Easiest Online Tools to Use This Year
- How to Reset Honor X50i without Losing Data | Dr.fone
- How to Factory Reset Vivo Y100i Power 5G in 5 Easy Ways | Dr.fone
- In 2024, Two Ways to Track My Boyfriends Motorola Moto G34 5G without Him Knowing | Dr.fone
- 2024 Approved Top-Rated MP3 Converters for Mac Reviews and Comparisons
- Dose Life360 Notify Me When Someone Checks My Location On Motorola Moto G73 5G? | Dr.fone
- How to Mirror PC to Apple iPhone 15 Pro Max? | Dr.fone
- In 2024, Edit and Send Fake Location on Telegram For your Realme C67 5G in 3 Ways | Dr.fone
- What is the best Pokemon for pokemon pvp ranking On Vivo Y78t? | Dr.fone
- How to Restore Deleted Oppo Reno 10 Pro+ 5G Contacts An Easy Method Explained.
- 9 Quick Fixes to Unfortunately TouchWiz has stopped Of Oppo Find X6 | Dr.fone
- New Boost Sales with Live Shopping Learn Winning Strategies From Top Brands for 2024
- New In 2024, Video Editing for Kids Made Easy Top 10 Apps to Get Started
- How To Remove Flashlight From iPhone 12 mini Lock Screen | Dr.fone
- Updated How Can You Deny These Top 10 Free Speech to Text Software for 2024
- Things You Should Know When Unlocking Total Wireless Of iPhone 15 Pro Max
- Updated In 2024, The Most Popular Android Apps You Need to Try
- How to Bypass FRP from Tecno Spark Go (2024)?
- 4 Feasible Ways to Fake Location on Facebook For your Vivo Y36 | Dr.fone
- How to Fix It Xiaomi 13 Ultra Wont Turn On | Dr.fone
- How to Change Location On Facebook Dating for your Honor Magic 6 Pro | Dr.fone
- Samsung Galaxy A54 5G won't play MOV videos, how to fix ?
- In 2024, How to Unlock Verizon Apple iPhone 12 Pro
- 2024 Approved Dont Miss Out The Importance of Reading This Mp3 Converter Windows Post
- Updated 2024 Approved Windows Movie Maker Replacement 10 Free Video Editors to Try
- New In 2024, Chromebook Video Editor Roundup Top Picks
- Title: Updated In 2024, The Ultimate Guide to Audio Length Reduction in Apples iMovie App
- Author: Kate
- Created at : 2024-05-05 08:09:50
- Updated at : 2024-05-06 08:09:50
- Link: https://audio-editing.techidaily.com/updated-in-2024-the-ultimate-guide-to-audio-length-reduction-in-apples-imovie-app/
- License: This work is licensed under CC BY-NC-SA 4.0.
