
:max_bytes(150000):strip_icc():format(webp)/sony-ps5-d3975e63d2ff47e6ac4e81768b79801c.jpg)
Updated Essential Audio Software for Musicians A Comprehensive List of Best Free & Paid Options 2023 for 2024
Essential Audio Software for Musicians: A Comprehensive List of Best Free & Paid Options 2023
FREE 10 Best Online Music Makers

Benjamin Arango
Apr 26, 2024• Proven solutions


Expressing ideas through music was never easy, and even today in the age of powerful digital audio stations like Ableton Live or FruityLoops , producing original music requires a certain set of skills. However, online content producers often need music for their videos, but they neither have the time or the budget to hire a professional musician to create a soundtrack for their project in studio conditions. If you are looking for a quick way to make your own music online, then you should keep reading, because in this article we are going to take you through the ten best online music makers you should check out in 2021.
10 Best Online Music Makers in 2021
The music-making platforms that are currently available online are still not as nearly as powerful as professional software products for music producers. Nonetheless, this doesn’t mean that you can’t use them to create the music you like or just have fun with them. Here are the ten best online music makers in 2019.
1. Typeatone
Price: Free
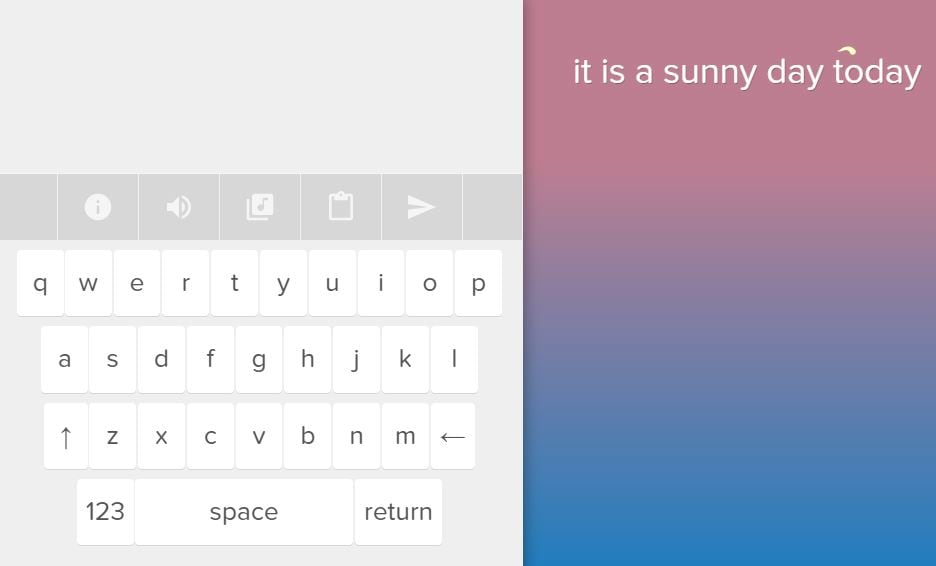
Image from Internet
Have you ever wondered what your words would sound like if they were turned into music? Head over to the Typeatone platform if you want to find out since all you have to do in order to start creating your own music is type in the text. As you type, the platform will automatically start playing your words and once you’re done, you’ll be able to hear your new song. You can also choose between different instruments to make the process of creating music with Typeatone even more entertaining. You can share all of your creations with your friends on social media.
![]()
A cross-platform for making videos anywhere for all creators

Why your video editing isn’t good enough? How about some creative inspo?
- 100 Million+ Users
- 150+ Countries and Regions
- 4 Million+ Social Media Followers
- 5 Million+ Stock Media for Use
* Secure Download

2. Audiotool
Price: Free
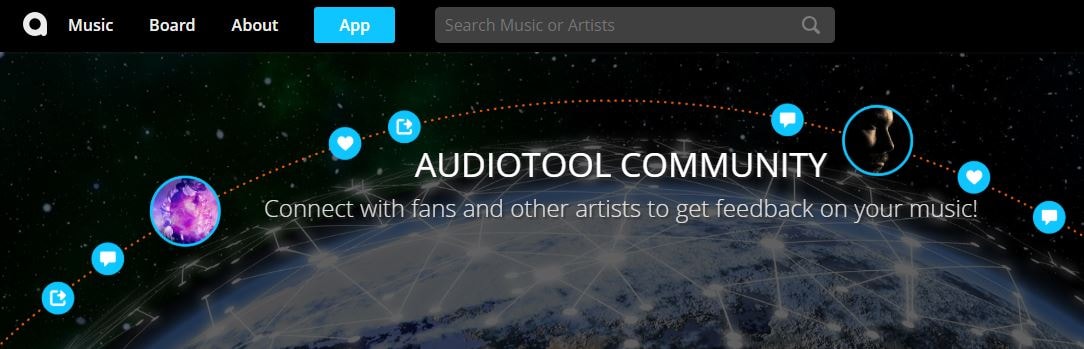
Image from Internet
Electronic music producers who often use synthesizers like Roland TB-303 or Roland TR-909 are going to love the features this online collaborative platform offers. Audiotool hosts a huge music library, you can explore even if you are not a registered user. In order to access the platform’s music studio, you first have to create an account and make sure that you are signed in. Audiotool is also a community of like-minded people where you can meet artists whose work you appreciate or hear what others think about your work. The only downside is that Audiotool’s abundance of features can be overwhelming for the newcomers to the world of electronic music production.
3. AudioSauna
Price: Free
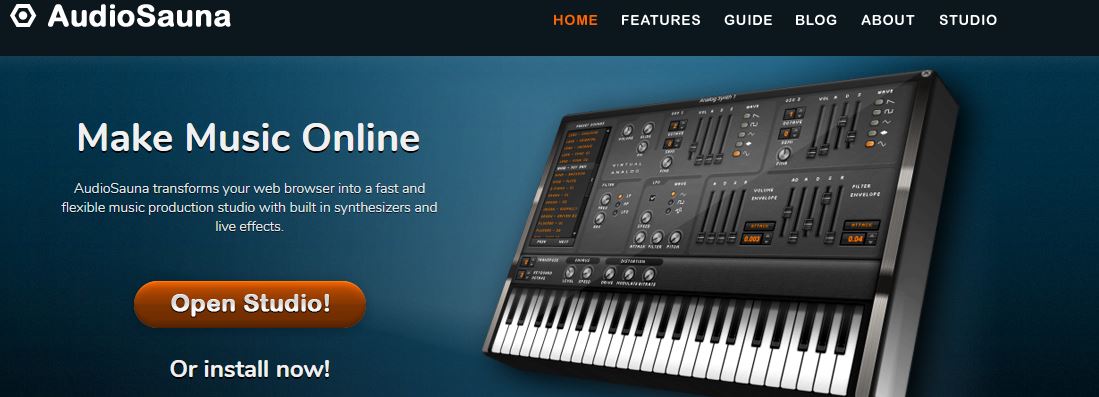
Image from Internet
AudioSauna seems to offer everything its users need to create inspiring music because it is equipped with frequency modulation synth, virtual analog synth and a sampler that provides layering features. Moreover, its intuitive interface makes the process of arranging the song structure or changing several note values simultaneously much easier. Creating an account on AudioSauna will enable to record all your projects and export them as audio files that can be uploaded to SoundCloud or any other audio distribution platform. AudioSauna is a perfect tool for skilled producers who want to create their music online.
4. Soundtrap
Price: Free trial available, subscription plans start at $3.99 per month

Image from Internet
Soundtrap offers a long list of features that enable professional musicians to create their music online. All you have to do is create an account and you will get access to the Sountrap’s studio that let you create new beat patterns, use a synthesizer or even invite friends to make music together. The platform also offers the possibility to connect your own instruments to the Soundtrap’s studio, so that you can record your music as you play it. This online platform also has an Education section where you can share your knowledge with others or learn valuable music lessons.
5. PatternSketch
Price: Free
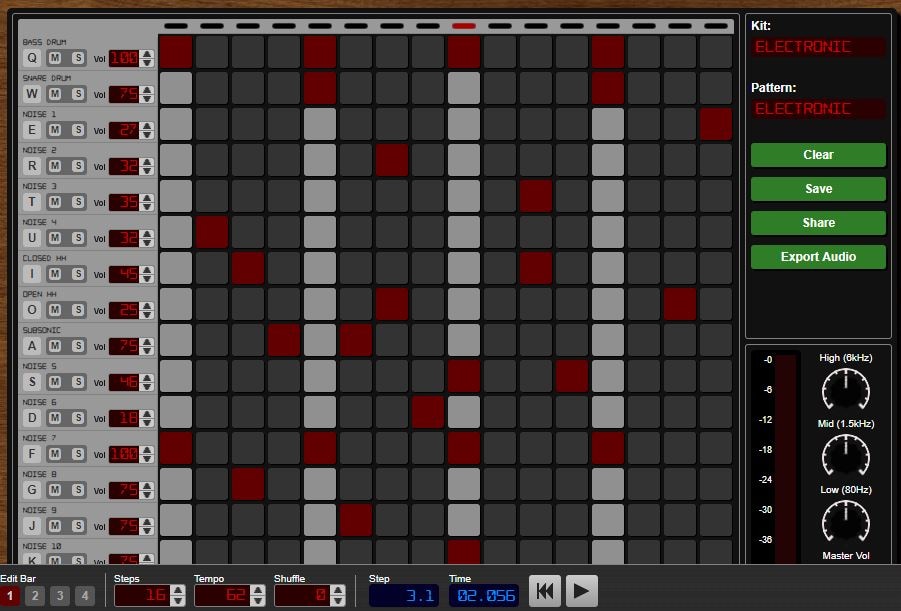
Image from Internet
This basic and yet effective drum machine can help you generate amazing beats for the songs you’re working on. Once you sign up, you will be able to choose from a number of different kits and patterns that are fully customizable or create your own original beats. After you create a pattern you like, you can save it with a single click or send it to your friends via email. Optionally, you can export all of your creations from PatternSketch and save them as wav, mp3 or ogg files, although in some cases mp3 audio files may not loop properly.
6. Soundation
Price: Free version available, pricing plans start at $1.99 per month

Image from Internet
If you choose to create music with the free version of Soundation, you’ll be able to work on up to ten projects, try out over 700 audio effects and loops, and export all your music in low quality. Purchasing the Intro pricing plan will enable you to work on an unlimited number of projects, make live audio recordings, import audio files smaller than 100MB or use an external midi controller. Moreover, opting for any of the annual or monthly subscription plans will allow you to export entire projects and audio files in high resolution from Soundation.
7. Text to Speech
Price: Free

online-music-maker-Text to Speech.jpg
Vocals are often overlooked in contemporary electronic music, but there are so many ways they can be used creatively. The platform lets you turn up to 50000 characters into speech at once, and it also offers several different voices you can choose from. Before you create an audio file you can determine how fast the text is going to be vocalized, so you should try different options and see which one fits your project the best. Text to Speech platform can be used during the process of creating a new song, but the tools it offers are not enough to make an entire song.
8. Looplabs
Price: Free
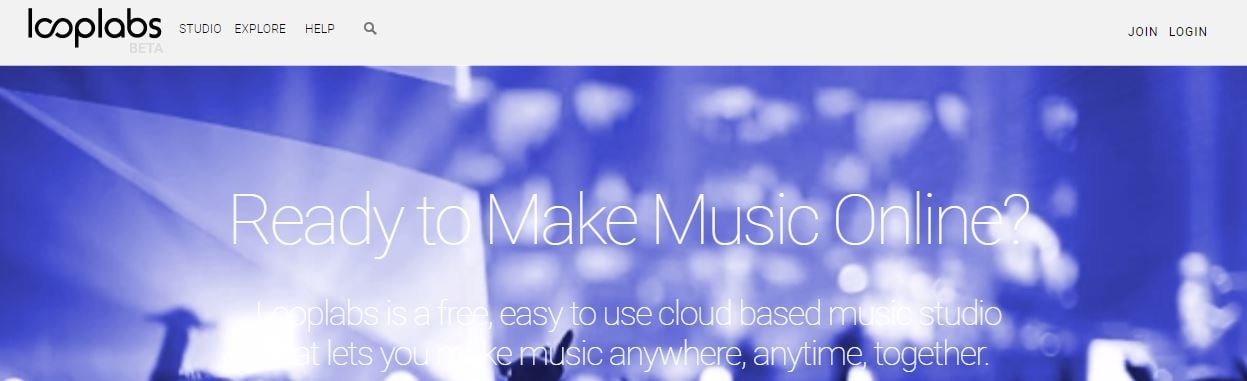
Music enthusiasts who would like to produce different genres of music online should definitely get familiar with Looplabs, as this online music maker lets its users remix songs or make music from scratch. Besides being one of the best places on the Internet to record music, Looplabs is also a community where you can meet people who like your music or discover artists whose work you admire. The Looplab’s studio features samples for a broad range of music genres and musical instruments, and you can use it to make Electro or Funk music equally effectively.
9. Online Sequencer
Price: Free
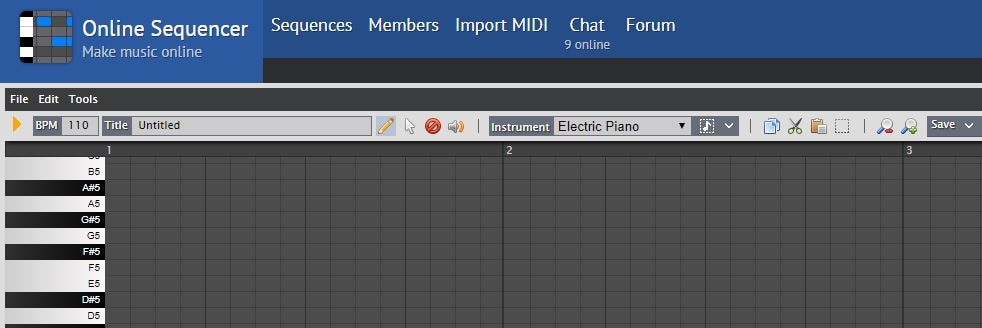
This is a perfect tool for developing an idea for a song, as you can create a sequence in just a few minutes. You can choose from Piano, Drums and Guitar categories of instruments or browse through a huge collection of fully customizable preset sequences that is updated on a daily basis. The platform also lets you import MIDI files and work on projects you’ve already started developing or you can export your sequences as MIDI files from the Online Sequencer and edit them with your DAW. Even though Online Sequencer is a useful tool for making music, the features it offers can’t really be compared with those on Soundation or AudioSauna.
10. Autochords
Price: Free
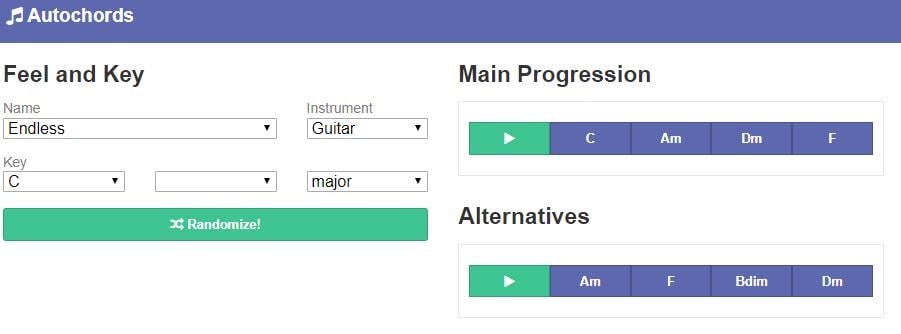
Finding new ideas for songs is often more difficult than it sounds, and if you ever face a creative block you should simply head over to Autochords. This platform suggests chord progressions based on the parameters you set, so you just have to select an instrument and the name of the song to set the feel, and the platform will show you the main progression and its alternatives. Rather than being an online music maker, Autochords is more a tool that helps piano and guitar players understand chord progressions better. iPhone and iPad users can download the Autochords app from the App Store for free.
Read More to Get : Best Free DAW for Windows and Mac for Beginners >>
Conclusion
You don’t have to be a professional musician in order to start making music online, you just have to love music, and an online music maker of your choice will take care of the rest. Do you use online music makers for entertainment or to express your creativity? Leave a comment below and share your opinions with us.
Benjamin Arango
Benjamin Arango is a writer and a lover of all things video.
Follow @Benjamin Arango
Benjamin Arango
Apr 26, 2024• Proven solutions
Expressing ideas through music was never easy, and even today in the age of powerful digital audio stations like Ableton Live or FruityLoops , producing original music requires a certain set of skills. However, online content producers often need music for their videos, but they neither have the time or the budget to hire a professional musician to create a soundtrack for their project in studio conditions. If you are looking for a quick way to make your own music online, then you should keep reading, because in this article we are going to take you through the ten best online music makers you should check out in 2021.
10 Best Online Music Makers in 2021
The music-making platforms that are currently available online are still not as nearly as powerful as professional software products for music producers. Nonetheless, this doesn’t mean that you can’t use them to create the music you like or just have fun with them. Here are the ten best online music makers in 2019.
1. Typeatone
Price: Free
Image from Internet
Have you ever wondered what your words would sound like if they were turned into music? Head over to the Typeatone platform if you want to find out since all you have to do in order to start creating your own music is type in the text. As you type, the platform will automatically start playing your words and once you’re done, you’ll be able to hear your new song. You can also choose between different instruments to make the process of creating music with Typeatone even more entertaining. You can share all of your creations with your friends on social media.
![]()
A cross-platform for making videos anywhere for all creators
Why your video editing isn’t good enough? How about some creative inspo?
- 100 Million+ Users
- 150+ Countries and Regions
- 4 Million+ Social Media Followers
- 5 Million+ Stock Media for Use
* Secure Download
2. Audiotool
Price: Free
Image from Internet
Electronic music producers who often use synthesizers like Roland TB-303 or Roland TR-909 are going to love the features this online collaborative platform offers. Audiotool hosts a huge music library, you can explore even if you are not a registered user. In order to access the platform’s music studio, you first have to create an account and make sure that you are signed in. Audiotool is also a community of like-minded people where you can meet artists whose work you appreciate or hear what others think about your work. The only downside is that Audiotool’s abundance of features can be overwhelming for the newcomers to the world of electronic music production.
3. AudioSauna
Price: Free
Image from Internet
AudioSauna seems to offer everything its users need to create inspiring music because it is equipped with frequency modulation synth, virtual analog synth and a sampler that provides layering features. Moreover, its intuitive interface makes the process of arranging the song structure or changing several note values simultaneously much easier. Creating an account on AudioSauna will enable to record all your projects and export them as audio files that can be uploaded to SoundCloud or any other audio distribution platform. AudioSauna is a perfect tool for skilled producers who want to create their music online.
4. Soundtrap
Price: Free trial available, subscription plans start at $3.99 per month
Image from Internet
Soundtrap offers a long list of features that enable professional musicians to create their music online. All you have to do is create an account and you will get access to the Sountrap’s studio that let you create new beat patterns, use a synthesizer or even invite friends to make music together. The platform also offers the possibility to connect your own instruments to the Soundtrap’s studio, so that you can record your music as you play it. This online platform also has an Education section where you can share your knowledge with others or learn valuable music lessons.
5. PatternSketch
Price: Free
Image from Internet
This basic and yet effective drum machine can help you generate amazing beats for the songs you’re working on. Once you sign up, you will be able to choose from a number of different kits and patterns that are fully customizable or create your own original beats. After you create a pattern you like, you can save it with a single click or send it to your friends via email. Optionally, you can export all of your creations from PatternSketch and save them as wav, mp3 or ogg files, although in some cases mp3 audio files may not loop properly.
6. Soundation
Price: Free version available, pricing plans start at $1.99 per month
Image from Internet
If you choose to create music with the free version of Soundation, you’ll be able to work on up to ten projects, try out over 700 audio effects and loops, and export all your music in low quality. Purchasing the Intro pricing plan will enable you to work on an unlimited number of projects, make live audio recordings, import audio files smaller than 100MB or use an external midi controller. Moreover, opting for any of the annual or monthly subscription plans will allow you to export entire projects and audio files in high resolution from Soundation.
7. Text to Speech
Price: Free

online-music-maker-Text to Speech.jpg
Vocals are often overlooked in contemporary electronic music, but there are so many ways they can be used creatively. The platform lets you turn up to 50000 characters into speech at once, and it also offers several different voices you can choose from. Before you create an audio file you can determine how fast the text is going to be vocalized, so you should try different options and see which one fits your project the best. Text to Speech platform can be used during the process of creating a new song, but the tools it offers are not enough to make an entire song.
8. Looplabs
Price: Free
Music enthusiasts who would like to produce different genres of music online should definitely get familiar with Looplabs, as this online music maker lets its users remix songs or make music from scratch. Besides being one of the best places on the Internet to record music, Looplabs is also a community where you can meet people who like your music or discover artists whose work you admire. The Looplab’s studio features samples for a broad range of music genres and musical instruments, and you can use it to make Electro or Funk music equally effectively.
9. Online Sequencer
Price: Free
This is a perfect tool for developing an idea for a song, as you can create a sequence in just a few minutes. You can choose from Piano, Drums and Guitar categories of instruments or browse through a huge collection of fully customizable preset sequences that is updated on a daily basis. The platform also lets you import MIDI files and work on projects you’ve already started developing or you can export your sequences as MIDI files from the Online Sequencer and edit them with your DAW. Even though Online Sequencer is a useful tool for making music, the features it offers can’t really be compared with those on Soundation or AudioSauna.
10. Autochords
Price: Free
Finding new ideas for songs is often more difficult than it sounds, and if you ever face a creative block you should simply head over to Autochords. This platform suggests chord progressions based on the parameters you set, so you just have to select an instrument and the name of the song to set the feel, and the platform will show you the main progression and its alternatives. Rather than being an online music maker, Autochords is more a tool that helps piano and guitar players understand chord progressions better. iPhone and iPad users can download the Autochords app from the App Store for free.
Read More to Get : Best Free DAW for Windows and Mac for Beginners >>
Conclusion
You don’t have to be a professional musician in order to start making music online, you just have to love music, and an online music maker of your choice will take care of the rest. Do you use online music makers for entertainment or to express your creativity? Leave a comment below and share your opinions with us.
Benjamin Arango
Benjamin Arango is a writer and a lover of all things video.
Follow @Benjamin Arango
The Hasty Guide to Altering Playback Rate in Sound Files
If you have a music file, and you notice that it is a bit slow or fast, making the entire ambiance kind of dull or overly exciting respectively, you can change audio speed to get the track right as per your mood. However, when you make any such adjustments, some unwanted effects can be experienced, such as format limitations while exporting, changes in the pitch of the sound, etc.
That said, here, you will learn how to change audio speed with the least adverse effects using some of the most popular and highly recommended tools.
How to Change Audio Speed in Filmora
Being a lightweight and less resource-intensive post-production tool, Filmora is admired by several professionals across the globe and is many times preferred over other editing programs like Adobe Premiere Pro and Final Cut Pro X. Easy-to-understand UI and large-sized, clearly visible options and buttons are what make Filmora extremely popular among those who are new to the industry and don’t have a computer with a powerful processor, gigantic memory, and enormous GPU.
For Win 7 or later (64-bit)
For macOS 10.12 or later
You can follow the steps given below to learn how to change audio speed with Wondershare Filmora:
Step 1: Import Audio and Add to Filmora Timeline
Launch Filmora on your Windows or Mac computer, make sure that the Media icon is selected from the standard toolbar at the top, click the + icon in the Media (also referred to as Library here) window (on Mac) or anywhere in the Media window itself (on Windows) from the upper-left corner of the interface, and import the audio file that you want to manage the playback speed of. Next, drag the media file from the Library to the timeline.

Step 2: Increase or Decrease Audio Speed
Ensure that the audio track is selected in the timeline. Click the Speedometer icon from the timeline toolbar at the upper section, hover mouse to the Slow option from the menu, and click your preferred value form the submenu to reduce the sound speed. Likewise, hover the mouse to the Fast option, and choose a value from the submenu to increase it.

Note: Usually, the audio pitch wouldn’t change as long as you pick the values anywhere between 0.5x and 5x. However, if you select any option beyond this range, you may experience variations in the pitch according the value you selected.
Step 3: Set Custom Speed or Reverse the Audio
Click the Speedometer icon from above the timeline, and click Custom Speed from the menu. Use the slider to slow down (move to the left) or speed up (move to the right) the audio on the Custom Speed box. Alternatively, you can manually enter your preferred value in the available field for granular control. In addition, you can also check the Reverse Speed box to reverse the audio if need be.

Step 4: Export the Output
Click EXPORT from the top-center area of the interface, go to the Local tab on the Export box that opens next, select your preferred audio format from the Format list in the left, make necessary customizations from the right pane, and click EXPORT from the bottom-right corner of the box to export the audio with the modified speed.

How to Change the Speed of Audio with Video in Filmora
The process to change audio speed that also has a video is identical to what is explained in the previous section. The only additional step required in this case is separating the audio track from that of video.
You can learn how to get this done by following the instructions given below:
Step 1: Import File to Media Window and then Add to Timeline
Use the method explained in Step 1 of the previous section to import a file to Filmora, drag the media to the timeline, and click MATCH TO MEDIA when the Project Setting box appears and prompts for confirmation. Note: Except for the Project Setting box, the rest of the process for adding audio and video files to the timeline is the same.
Step 2: Separate Audio from Video
Select and then right-click the video track with audio in the timeline, and click Detach Audio from the context menu.

Step 3: Adjust the Audio Speed
After the audio is detached, you can select the audio track and follow the method explained in the previous section to adjust its speed as needed. As for the video, you can use the trimming and cropping options to adjust its duration and size and export the entire project as explained in Step 4 of the previous section. Note: To export the project as video, all you need to do is, choose a video format like MP4 or something similar to that when on the Export box.
How to Change Audio Speed without Changing Pitch in Audacity for Free
One of the most downloaded, used, and admired applications, Audacity, is an open-source and free audio editing software available for Windows, Mac, and Linux computers in both x32 and x64 variants. The software has all the professionals’ tools for basic to advanced sound editing to produce industry-standard outputs.
You can follow the steps given below to learn how to change audio speed with Audacity without changing the pitch of the sound:
- Launch Audacity
- Click File
- Go to Import > Audio

- Import the audio you want to speed up or slow down
- Press Ctrl + A on the keyboard to select the whole audio track
- Go to the Effect menu
- Click Change Tempo

- In the Percent Change field, enter a value with or without minus (-) to reduce or increase the tempo of the audio respectively.

- Click OK
- Go to file> Export
- Select your preferred option from the submenu to export the modified audio as needed
Note: Changing the tempo usually doesn’t change the pitch of the audio up to some extent. However, you can expect some variations in the pitch if the new tempo value is too high or too low.
Conclusion
You may want to slow down or speed up audio if the existing one is not up to the mark, and you wish to manage the ambiance with the help of the music track either while playing a video or when merely a soundtrack is to be played during some event. In either case, the best tool for all your needs is Wondershare Filmora, and if you are looking for a program dedicated to audio only, Audacity is something worth trying.
Versatile Video Editor - Wondershare Filmora
An easy yet powerful editor
Numerous effects to choose from
Detailed tutorials provided by the official channel
For Win 7 or later (64-bit)
For macOS 10.12 or later
You can follow the steps given below to learn how to change audio speed with Wondershare Filmora:
Step 1: Import Audio and Add to Filmora Timeline
Launch Filmora on your Windows or Mac computer, make sure that the Media icon is selected from the standard toolbar at the top, click the + icon in the Media (also referred to as Library here) window (on Mac) or anywhere in the Media window itself (on Windows) from the upper-left corner of the interface, and import the audio file that you want to manage the playback speed of. Next, drag the media file from the Library to the timeline.
Step 2: Increase or Decrease Audio Speed
Ensure that the audio track is selected in the timeline. Click the Speedometer icon from the timeline toolbar at the upper section, hover mouse to the Slow option from the menu, and click your preferred value form the submenu to reduce the sound speed. Likewise, hover the mouse to the Fast option, and choose a value from the submenu to increase it.
Note: Usually, the audio pitch wouldn’t change as long as you pick the values anywhere between 0.5x and 5x. However, if you select any option beyond this range, you may experience variations in the pitch according the value you selected.
Step 3: Set Custom Speed or Reverse the Audio
Click the Speedometer icon from above the timeline, and click Custom Speed from the menu. Use the slider to slow down (move to the left) or speed up (move to the right) the audio on the Custom Speed box. Alternatively, you can manually enter your preferred value in the available field for granular control. In addition, you can also check the Reverse Speed box to reverse the audio if need be.
Step 4: Export the Output
Click EXPORT from the top-center area of the interface, go to the Local tab on the Export box that opens next, select your preferred audio format from the Format list in the left, make necessary customizations from the right pane, and click EXPORT from the bottom-right corner of the box to export the audio with the modified speed.
How to Change the Speed of Audio with Video in Filmora
The process to change audio speed that also has a video is identical to what is explained in the previous section. The only additional step required in this case is separating the audio track from that of video.
You can learn how to get this done by following the instructions given below:
Step 1: Import File to Media Window and then Add to Timeline
Use the method explained in Step 1 of the previous section to import a file to Filmora, drag the media to the timeline, and click MATCH TO MEDIA when the Project Setting box appears and prompts for confirmation. Note: Except for the Project Setting box, the rest of the process for adding audio and video files to the timeline is the same.
Step 2: Separate Audio from Video
Select and then right-click the video track with audio in the timeline, and click Detach Audio from the context menu.
Step 3: Adjust the Audio Speed
After the audio is detached, you can select the audio track and follow the method explained in the previous section to adjust its speed as needed. As for the video, you can use the trimming and cropping options to adjust its duration and size and export the entire project as explained in Step 4 of the previous section. Note: To export the project as video, all you need to do is, choose a video format like MP4 or something similar to that when on the Export box.
How to Change Audio Speed without Changing Pitch in Audacity for Free
One of the most downloaded, used, and admired applications, Audacity, is an open-source and free audio editing software available for Windows, Mac, and Linux computers in both x32 and x64 variants. The software has all the professionals’ tools for basic to advanced sound editing to produce industry-standard outputs.
You can follow the steps given below to learn how to change audio speed with Audacity without changing the pitch of the sound:
- Launch Audacity
- Click File
- Go to Import > Audio
- Import the audio you want to speed up or slow down
- Press Ctrl + A on the keyboard to select the whole audio track
- Go to the Effect menu
- Click Change Tempo
- In the Percent Change field, enter a value with or without minus (-) to reduce or increase the tempo of the audio respectively.
- Click OK
- Go to file> Export
- Select your preferred option from the submenu to export the modified audio as needed
Note: Changing the tempo usually doesn’t change the pitch of the audio up to some extent. However, you can expect some variations in the pitch if the new tempo value is too high or too low.
Conclusion
You may want to slow down or speed up audio if the existing one is not up to the mark, and you wish to manage the ambiance with the help of the music track either while playing a video or when merely a soundtrack is to be played during some event. In either case, the best tool for all your needs is Wondershare Filmora, and if you are looking for a program dedicated to audio only, Audacity is something worth trying.
Versatile Video Editor - Wondershare Filmora
An easy yet powerful editor
Numerous effects to choose from
Detailed tutorials provided by the official channel
The Innovator’s Guide to Non-Intrusive Audio Modulation in Modern Videos
How to Adjust Audio Volume in Videos [4 Ways]

Shanoon Cox
Mar 27, 2024• Proven solutions
Some of the greatest film directors of all time have used sound to make the scenes in their movies more dramatic, romantic or to build suspense. The importance of sound for the overall quality of a video is often overlooked by young filmmakers, as they tend to dedicate all of their attention to the visual part of their projects.
The fact of the matter is that even a minor error in the video’s soundtrack can distract the viewer and ruin a video completely. That’s why, in this article, we are going to show you four different methods of adjusting the audio volume in Filmora.
To increse the volume of your video, click here.
Four Ways of Adjusting Audio Volume in Filmora
The audio clips often have different volume levels, so in order to create a balanced soundtrack, you have to adjust the volume of each audio track you intend to use in your projects. Filmora offers several different ways to adjust the volume of audio files quickly and effortlessly. Here’s how you can increase or decrease the volume of the audio clips in Filmora.
Download Filmora and watch the video below to get a full knowledge abtou adjusting volume!
1. Changing the Audio Volume of Entire Track
This is probably the easiest and fastest way to adjust the volume of a video or an audio file in Filmora. After you import the file into a project you just have to add it to a certain position on the timeline. You can do this by simply dragging and dropping the file at the location on the timeline where you want the file to be placed. Click on the Add Track menu that is located in the upper left corner of the timeline and select the Big option from the Adjust Track Height submenu.
Enlarging the video and audio tracks will enable you to see the audio volume line that is displayed over all clips that contain sound you add to the timeline. Click on the line and drag it upwards if you would like to increase the volume or drag it downwards if you want to decrease the volume of an audio or a video file.
2. Applying the Fade In and Fade Out Effects to Change the Audio Volume Partially
Once you add an audio clip to an audio track on Filmora’s timeline, you can adjust its volume from the Audio Editing panel. Double-clicking on an audio file will bring up the Audio Editing panel that contains Fade In and Fade Out sliders. Both sliders are going to be set to zero by default, so you just have to drag each of them to the right in order to create the Fade In or Fade Out effect.
Filmora also lets you create the Fade In and Fade Out effect directly from the timeline, as you just have to hover the mouse over an audio file and drag the Fade In or Fade Out markers to set the duration of the effect for that particular file.
3. Using the Volume Slider to Change the Audio Volume
On the left side of the Audio Editing panel that can be accessed by double clicking on an audio file, you will be able to see the volume slider. Its value is going to be set to 0 dB by default and you just have to drag it upward or downward in order to adjust the audio volume. As you drag the slider the new audio volume value is going to be displayed in a box below the slider. The left/right balance value can be adjusted by dragging the knob that is located above the volume slider in either direction. Alternatively, you can insert a new numerical value in the box below the knob. If the displayed value is 0 dB, then the left and right channels are balanced, while the value of -100 dB means that all the sound goes through the left channel and if the displayed value is 100 dB all the sound will go through the right channel.

4. Adding Keyframes to Adjust the Audio Volume
Once you add an audio file to the timeline you can adjust its volume by adding keyframes to it. Place the playhead to the exact spot in the audio file where you want to add the first keyframe and then double click on the file to bring up the Audio Editing panel. Click on the Add Volume Keyframes icon and use the volume slider to adjust the volume at the position of the first keyframe.

Simply move the playhead and change the value on the volume slider to add new keyframes to the audio file. This method of adjusting audio volume enables you to set different volume values for different parts of an audio file.
Still not solved? Try this audio guide of Filmora to settle all the audio problems.
Conclusion
Having complete control over the volume of all audio files you use in your projects is important for so many different reasons. Filmora offers four easy ways to adjust the audio volume so you can focus on more important tasks. Which method of adjusting the audio volume in Filmora do you like to use the most? Leave a comment and let us know.
Shanoon Cox
Shanoon Cox is a writer and a lover of all things video.
Follow @Shanoon Cox
Shanoon Cox
Mar 27, 2024• Proven solutions
Some of the greatest film directors of all time have used sound to make the scenes in their movies more dramatic, romantic or to build suspense. The importance of sound for the overall quality of a video is often overlooked by young filmmakers, as they tend to dedicate all of their attention to the visual part of their projects.
The fact of the matter is that even a minor error in the video’s soundtrack can distract the viewer and ruin a video completely. That’s why, in this article, we are going to show you four different methods of adjusting the audio volume in Filmora.
To increse the volume of your video, click here.
Four Ways of Adjusting Audio Volume in Filmora
The audio clips often have different volume levels, so in order to create a balanced soundtrack, you have to adjust the volume of each audio track you intend to use in your projects. Filmora offers several different ways to adjust the volume of audio files quickly and effortlessly. Here’s how you can increase or decrease the volume of the audio clips in Filmora.
Download Filmora and watch the video below to get a full knowledge abtou adjusting volume!
1. Changing the Audio Volume of Entire Track
This is probably the easiest and fastest way to adjust the volume of a video or an audio file in Filmora. After you import the file into a project you just have to add it to a certain position on the timeline. You can do this by simply dragging and dropping the file at the location on the timeline where you want the file to be placed. Click on the Add Track menu that is located in the upper left corner of the timeline and select the Big option from the Adjust Track Height submenu.
Enlarging the video and audio tracks will enable you to see the audio volume line that is displayed over all clips that contain sound you add to the timeline. Click on the line and drag it upwards if you would like to increase the volume or drag it downwards if you want to decrease the volume of an audio or a video file.
2. Applying the Fade In and Fade Out Effects to Change the Audio Volume Partially
Once you add an audio clip to an audio track on Filmora’s timeline, you can adjust its volume from the Audio Editing panel. Double-clicking on an audio file will bring up the Audio Editing panel that contains Fade In and Fade Out sliders. Both sliders are going to be set to zero by default, so you just have to drag each of them to the right in order to create the Fade In or Fade Out effect.
Filmora also lets you create the Fade In and Fade Out effect directly from the timeline, as you just have to hover the mouse over an audio file and drag the Fade In or Fade Out markers to set the duration of the effect for that particular file.
3. Using the Volume Slider to Change the Audio Volume
On the left side of the Audio Editing panel that can be accessed by double clicking on an audio file, you will be able to see the volume slider. Its value is going to be set to 0 dB by default and you just have to drag it upward or downward in order to adjust the audio volume. As you drag the slider the new audio volume value is going to be displayed in a box below the slider. The left/right balance value can be adjusted by dragging the knob that is located above the volume slider in either direction. Alternatively, you can insert a new numerical value in the box below the knob. If the displayed value is 0 dB, then the left and right channels are balanced, while the value of -100 dB means that all the sound goes through the left channel and if the displayed value is 100 dB all the sound will go through the right channel.
4. Adding Keyframes to Adjust the Audio Volume
Once you add an audio file to the timeline you can adjust its volume by adding keyframes to it. Place the playhead to the exact spot in the audio file where you want to add the first keyframe and then double click on the file to bring up the Audio Editing panel. Click on the Add Volume Keyframes icon and use the volume slider to adjust the volume at the position of the first keyframe.
Simply move the playhead and change the value on the volume slider to add new keyframes to the audio file. This method of adjusting audio volume enables you to set different volume values for different parts of an audio file.
Still not solved? Try this audio guide of Filmora to settle all the audio problems.
Conclusion
Having complete control over the volume of all audio files you use in your projects is important for so many different reasons. Filmora offers four easy ways to adjust the audio volume so you can focus on more important tasks. Which method of adjusting the audio volume in Filmora do you like to use the most? Leave a comment and let us know.
Shanoon Cox
Shanoon Cox is a writer and a lover of all things video.
Follow @Shanoon Cox
Also read:
- 2024 Approved Cutting-Edge Techniques for Pitch Modification in Audacity Keeping the Sound Crisp
- In 2024, Discard the Audio How to Isolate and Remove Sound in iOS Video Playbacks
- 2024 Approved The Annual Showcase of Innovative Anime Casting Talent
- New Mute Media Magic A How-To Guide for Quieting Soundtracks in MOV Files Across Operating Systems
- Updated Ultimate No-Cost, Low-Cost Mac Music Editor Software for 2024
- In 2024, Perfecting Volume Control Strategies for Seamless Audio Transitions
- Updated 2024 Approved Top Places to Obtain Humorous Audio Triggers
- 2024 Approved Mastering Audio Cut and Mix A Comprehensive Guide to Using Avidemux
- Updated Easy Voice Cutting A Comprehensive Audacity Resource for 2024
- Updated In 2024, Top-Rated No-Cost Female Vocal Enhancer Web Service
- In 2024, Mastering GarageBand Recording Your Step-by-Step Tutorial
- In 2024, Premium Audio Transformation Tool Free MP3 Creation From MPA Files
- Updated Exploring the Top 10 Windows Speech to Text Technology Choices
- New Mastering Podcasting A Look at the Premier Hosting Services
- Chart-Topping Radio Auditory Elements for 2024
- New 2024 Approved Expert Recommendations Leveraging Voxels Voice Manipulation Feature to Boost Your Discord Experience
- Updated 2024 Approved Discovering the Finest Online Sound Design Tools - With Cost Breakdown
- Updated Mastering Your Voice Top 6 Alteration Programs for iPhone and Android Users for 2024
- New How to Remove Audio From MP4 Video
- Updated 2024 Approved Breaking Down Jazz Key Terminology and Principles for Newbies
- New 2024 Approved Zoom Voice Transformation Hacks Top 6 Tips to Spice Up Your Speech and Spark Laughter
- Updated Guide to Removing Melodic Elements Focusing on Basslines for Media Projects
- Updated Intuitive Vocal Modification Mechanisms An Insight Into Operational Aspects, Standards, and Workarounds for 2024
- Updated 2024 Approved Achieving Sonic Clarity Overcoming Hiss and Other Unwanted Noises in Audio Tracks
- Ultimate Guide to Audiovisual Excellence in Music Videos for 2024
- Masterful Audio Blenders Perfecting the Art of Online Content Delivery
- New 2024 Approved Unveiling the Top 10 Free Audio Recording Apps for Professional Podcasters
- In 2024, The Insiders Guide to Removing Background Noise From Videos in Adobe Premiere Pro
- Updated In 2024, Audio Enhancement in Your Windows Environment - Maximizing Sound on Budget
- Updated Exploring the Latest Mood-Aligned Symphonies
- New In 2024, The Novices Roadmap to Picking Powerful Hip-Hop Accompaniments
- New Leading Rhythm Alignment Editing Solutions – 2023S Guide for 2024
- New Should I Use Audio Ducking to Help Sound Better?
- In 2024, Decoding Soundscapes Discovering the Top 7 Audio Alterations for Todays Producers
- Mastering Audio Clarity Techniques for Eliminating Distortion in Videos for 2024
- In 2024, 5 Popular Linux Audio Recorder and Linux Audio Recording Tips
- New Boost Your Call Audio Quality with These Top 6 Mobile Enhancers (Android & iPhone) for 2024
- New In 2024, Best Voice Changer Apps for iPhone and Android
- In 2024, The Premium Collection Top 3 Online Platforms for Lifting MP3 Volume Levels
- Updated 2024 Approved The Speakers Selection Top-Rated Audio Recording Applications of the Year
- Updated 2024 Approved Unleashing Voices From Text The Ultimate Guide to Free Online Generators Ranked #9
- New In 2024, The Ultimate Tutorial for Novices Navigating Wave Editor Features
- Forge Your Path with Music Top 6 Budget-Friendly DAW Tools Recommended for Beginners
- Best Anti Tracker Software For Apple iPhone 8 Plus | Dr.fone
- Updated In 2024, Unlock FCPXs Full Potential Top 10 Free Plug-Ins
- In 2024, Mastering Android Device Manager The Ultimate Guide to Unlocking Your Realme Narzo 60 5G Device
- 4 Feasible Ways to Fake Location on Facebook For your Motorola Edge+ (2023) | Dr.fone
- New Effortless Video Editing Top Picks for You for 2024
- In 2024, How to Reset a Locked Realme Note 50 Phone
- Updated 2024 Approved Unlock the Power of Animated Photos Top Tools
- How to Change Google Play Location On Tecno Phantom V Flip | Dr.fone
- Top 15 Apps To Hack WiFi Password On Samsung Galaxy A14 4G
- How to Restore Deleted Redmi K70 Photos An Easy Method Explained.
- In 2024, PassFab Apple iPhone 8 Plus Backup Unlocker Top 4 Alternatives
- Updated Edit Videos Like a Pro on Mac VN Video Editor and Its Competitors for 2024
- 6 Ways to Change Spotify Location On Your Tecno Camon 20 Pro 5G | Dr.fone
- 9 Best Free Android Monitoring Apps to Monitor Phone Remotely For your Vivo G2 | Dr.fone
- New How to Choose the Best YouTube to MP3 Converter Insider Tips
- In 2024, The Best iSpoofer Alternative to Try On Lava Yuva 3 | Dr.fone
- 9 Quick Fixes to Unfortunately TouchWiz has stopped Of Honor X7b | Dr.fone
- How to Manually Install a Hardware Driver on Windows 11
- In 2024, Android to Apple How To Transfer Photos From Infinix Zero 5G 2023 Turbo to iPad Easily | Dr.fone
- Simple and Effective Ways to Change Your Country on YouTube App Of your Samsung Galaxy F15 5G | Dr.fone
- Fixing Foneazy MockGo Not Working On Vivo V27 Pro | Dr.fone
- Ways To Find Unlocking Codes For Nokia C12 Plus Phones
- Top-Notch Solutions for Disabled Apple ID From Apple iPhone 15 Plus Making It Possible
- New 2024 Approved Conversion Corner Insights From the Leading OGG Converters
- In 2024, 3 Facts You Need to Know about Screen Mirroring Xiaomi Redmi 13C 5G | Dr.fone
- New Create Epic Lip Syncs Top-Rated Apps for Android and iOS for 2024
- New 2024 Approved Cut Video Clips Online A Step-by-Step Guide to Kapwing Editor
- New In 2024, Make Every Moment Epic Free Slow Motion Video Editing Software - Filmora
- New The Ultimate List 10 Best Cartoon Video Makers for PC and Web for 2024
- 4 Easy Ways for Your Poco M6 Pro 4G Hard Reset | Dr.fone
- How to Transfer Data After Switching From Samsung Galaxy A05s to Latest Samsung | Dr.fone
- Title: Updated Essential Audio Software for Musicians A Comprehensive List of Best Free & Paid Options 2023 for 2024
- Author: Kate
- Created at : 2024-05-05 07:52:17
- Updated at : 2024-05-06 07:52:17
- Link: https://audio-editing.techidaily.com/updated-essential-audio-software-for-musicians-a-comprehensive-list-of-best-free-and-paid-options-2023-for-2024/
- License: This work is licensed under CC BY-NC-SA 4.0.
