
:max_bytes(150000):strip_icc():format(webp)/18-Hidden-Snapchat-Features-efa75dca521e4cf6bb321dc960276deb.jpg)
Updated Audio Ducking in Adobe Premiere Pro on Win for 2024
Audio Ducking in Adobe Premiere Pro on Win
The audio ducking technology aids the editors in creating a precise video as per their needs. In this article, you will discuss audio ducking Premiere Pro of Adobe to enhance the video’s audio quality optimally. Audio ducking is a feature that helps the audience to listen to every detail on the video flawlessly.

Here, you will be using Adobe Premiere Pro to establish this audio ducking feature precisely. This functionality is applicable on the Windows platform. To try on the Mac system, you can use the Filmora application to acquire precise results. In this article, you will learn how to use audio ducking concepts on Windows and Mac systems with the help of incredible tools in the digital space.
In this article
02 Use Audio Ducking in Adobe Premiere Pro on Win
03 Alternative ways to use Audio Ducking with Filmora
Part 1: What is audio ducking?
The concept of audio ducking is simple. In a soundtrack, you can find a wide range of music playing in the background. Audio ducking is the process of suppressing one type of audio signal and increasing the other movement simultaneously without causing any issues. Mostly audio ducking is processed for movies or any live sessions that reduce the background music when the characters or person speaks on the screen and increases the speaker’s volume. The scenario happens vice versa when the speaker completes its conversation. Here, the background music increases, and the speaker’s audio is reduced drastically. This type of audio ducking occurs to enhance the audio quality and reach the target audience without any issues.

The automatic changes with the audio volume are triggered by a common control using the audio ducking settings. When you enable this option in your device, this module is programmed to balance the volume settings as per the requirements. The audio ducking process allows the audio files to sound better by improving the quality of the audio signals. The audio parameters are adjusted at the specific track in the audio clippings to enhance the overall quality of the audio file.
You will be able to feel the difference when the audio tracks are played. Use the audio ducking feature optimally to strengthen the crucial audio signals when required. Identify the perfect sound spots at the audio file that requires this ducking feature. Implement this feature at particular spots to enjoy the benefits of this audio ducking functionality. It serves as a boon for sound editors and creates a positive impact on the audio files.
Part 2: Use Audio Ducking in Adobe Premiere Pro on Win
The Adobe Premiere Pro app helps to edit your media files professionally, and you can explore a wide range of settings to enhance the overall performance of the files. In the following content, you will study how to perform audio ducking in Adobe Premiere Pro at Windows space.
Step 1: Import the audio file and assign the audio type to the Essential Sound Panel. Next, auto-match the loudness level at the Essential Sound panel section.

Step 2: Choose the audio clip that requires audio ducking settings and adjusts values for sensitivity, amount of volume reduction, and the duration of fades along with the audio levels. These parameters determine the quality of audio ducking on the selected audio clips. Assign the perfect values as per your needs.

**Step 3: Finally, click Generate Keyframes to save the audio ducking settings on the chosen audio clips.

To modify the audio ducking settings, it is enough if you tap the Generate Keyframes option to create new audio ducking attributes. When you click Generate Keyframe, the older settings are erased and prompt for the new settings to be assigned for the audio ducking feature.
You can use the above instructions to perform the desired audio ducking feature at the selected audio clips.
Part 3: Alternative ways to use Audio Ducking with Filmora
If you are working with the Mac systems, worry not here is an incredible application that assists in performing the audio ducking at audio files in the Mac platform. The Filmora app from Wondershare is a sophisticated tool that carries out professional edits on media files based on your needs. The quality factors of the audio and video signals are retained, and the desired changes are implemented on the files precisely.
Versatile Video Editor - Wondershare Filmora
An easy yet powerful editor
Numerous effects to choose from
Detailed tutorials provided by the official channel
The Filmora application offers powerful features while editing audio files. You can apply audio ducking to enhance the vocals and use 100 audio effects to add flavors to the existing audio files. This app allows you to make any constructive changes to the file without disturbing the original elements set at the time of recording.
The remarkable features of the Filmora
- An exclusive audio file editor and improves the vocals using Audio Ducking strategy
- You can access the 100 audio effects built-in at its working ambiance to enhance your imported media files.
- The simple user interface helps you to discover awesome editing features effortlessly.
- All the changes in the audio signals are embedded without affecting the quality factors.
- The easy export option helps you to move the edited audio files to any storage space flawlessly.
These are the stunning functionalities of the Filmora app concerning audio files. You can perform a wide range of miraculous edits on the media tracks precisely in a professional way.
Here, you will be surfing the discussion about the effective usage of Filmora in implementing audio ducking functionality on the audio files. The Filmora offers an Audio Adjust module to perform the ducking operation efficiently without affecting the audio quality. It helps the audio to sound better and improves the clarity of vocals. The auto-adjust function modifies the volume of the audio files precisely as per the programmed algorithm. You do not have to write any code or perform manual adjustments in embedding this setting to your audio file. Few clicks are enough to enable the ducking functionality at the audio files.

The stepwise procedure to enable the audio ducking feature at Filmora application.
Step 1: Install the app and import the file.
First, download the application from its official webpage based on your system OS. Then, install the app and import the audio files into the working space of Filmora.

Step 2: Set Ducking parameters
Drag it to the timeline and choose the audio track that requires the audio ducking feature. After selecting the audio clip, right-click on it and choose ‘Adjust Audio’ from the pop-up message. The Audio Editor window appears, go to the Ducking menu and turn on ‘Lower the Volume of other clips. You can repeat this step to other audio clippings effortlessly.

Step 3: Save and Export
Next, save the changes by tapping the ‘OK’ button and clicking the Export button to store the edited audio files at any storage space. Filmora will adjust the volume on other audio clips as per the settings and export the file precisely.

The above guidelines help you to establish the audio ducking feature on your audio clips using the Filmora. Perform the appropriate clicks and set the attributes according to your needs to refine the audio ducking feature.
Conclusion
Thus, this article had given valuable insights on **audio ducking Premiere Pro of Adobe. Use Adobe Premiere Pro to perform the desired audio adjustments to enhance the vocal signal on your Windows system. The Filmora application assists in editing the audio clips at the Mac system effortlessly. The above instructions aid you in performing the audio ducking feature successfully. Connect with this article to discover unique editing options on media files to enhance their overall performance. Stay tuned to explore the features of the Filmora application in detail.
02 Use Audio Ducking in Adobe Premiere Pro on Win
03 Alternative ways to use Audio Ducking with Filmora
Part 1: What is audio ducking?
The concept of audio ducking is simple. In a soundtrack, you can find a wide range of music playing in the background. Audio ducking is the process of suppressing one type of audio signal and increasing the other movement simultaneously without causing any issues. Mostly audio ducking is processed for movies or any live sessions that reduce the background music when the characters or person speaks on the screen and increases the speaker’s volume. The scenario happens vice versa when the speaker completes its conversation. Here, the background music increases, and the speaker’s audio is reduced drastically. This type of audio ducking occurs to enhance the audio quality and reach the target audience without any issues.
The automatic changes with the audio volume are triggered by a common control using the audio ducking settings. When you enable this option in your device, this module is programmed to balance the volume settings as per the requirements. The audio ducking process allows the audio files to sound better by improving the quality of the audio signals. The audio parameters are adjusted at the specific track in the audio clippings to enhance the overall quality of the audio file.
You will be able to feel the difference when the audio tracks are played. Use the audio ducking feature optimally to strengthen the crucial audio signals when required. Identify the perfect sound spots at the audio file that requires this ducking feature. Implement this feature at particular spots to enjoy the benefits of this audio ducking functionality. It serves as a boon for sound editors and creates a positive impact on the audio files.
Part 2: Use Audio Ducking in Adobe Premiere Pro on Win
The Adobe Premiere Pro app helps to edit your media files professionally, and you can explore a wide range of settings to enhance the overall performance of the files. In the following content, you will study how to perform audio ducking in Adobe Premiere Pro at Windows space.
Step 1: Import the audio file and assign the audio type to the Essential Sound Panel. Next, auto-match the loudness level at the Essential Sound panel section.
Step 2: Choose the audio clip that requires audio ducking settings and adjusts values for sensitivity, amount of volume reduction, and the duration of fades along with the audio levels. These parameters determine the quality of audio ducking on the selected audio clips. Assign the perfect values as per your needs.
**Step 3: Finally, click Generate Keyframes to save the audio ducking settings on the chosen audio clips.
To modify the audio ducking settings, it is enough if you tap the Generate Keyframes option to create new audio ducking attributes. When you click Generate Keyframe, the older settings are erased and prompt for the new settings to be assigned for the audio ducking feature.
You can use the above instructions to perform the desired audio ducking feature at the selected audio clips.
Part 3: Alternative ways to use Audio Ducking with Filmora
If you are working with the Mac systems, worry not here is an incredible application that assists in performing the audio ducking at audio files in the Mac platform. The Filmora app from Wondershare is a sophisticated tool that carries out professional edits on media files based on your needs. The quality factors of the audio and video signals are retained, and the desired changes are implemented on the files precisely.
Versatile Video Editor - Wondershare Filmora
An easy yet powerful editor
Numerous effects to choose from
Detailed tutorials provided by the official channel
The Filmora application offers powerful features while editing audio files. You can apply audio ducking to enhance the vocals and use 100 audio effects to add flavors to the existing audio files. This app allows you to make any constructive changes to the file without disturbing the original elements set at the time of recording.
The remarkable features of the Filmora
- An exclusive audio file editor and improves the vocals using Audio Ducking strategy
- You can access the 100 audio effects built-in at its working ambiance to enhance your imported media files.
- The simple user interface helps you to discover awesome editing features effortlessly.
- All the changes in the audio signals are embedded without affecting the quality factors.
- The easy export option helps you to move the edited audio files to any storage space flawlessly.
These are the stunning functionalities of the Filmora app concerning audio files. You can perform a wide range of miraculous edits on the media tracks precisely in a professional way.
Here, you will be surfing the discussion about the effective usage of Filmora in implementing audio ducking functionality on the audio files. The Filmora offers an Audio Adjust module to perform the ducking operation efficiently without affecting the audio quality. It helps the audio to sound better and improves the clarity of vocals. The auto-adjust function modifies the volume of the audio files precisely as per the programmed algorithm. You do not have to write any code or perform manual adjustments in embedding this setting to your audio file. Few clicks are enough to enable the ducking functionality at the audio files.
The stepwise procedure to enable the audio ducking feature at Filmora application.
Step 1: Install the app and import the file.
First, download the application from its official webpage based on your system OS. Then, install the app and import the audio files into the working space of Filmora.
Step 2: Set Ducking parameters
Drag it to the timeline and choose the audio track that requires the audio ducking feature. After selecting the audio clip, right-click on it and choose ‘Adjust Audio’ from the pop-up message. The Audio Editor window appears, go to the Ducking menu and turn on ‘Lower the Volume of other clips. You can repeat this step to other audio clippings effortlessly.
Step 3: Save and Export
Next, save the changes by tapping the ‘OK’ button and clicking the Export button to store the edited audio files at any storage space. Filmora will adjust the volume on other audio clips as per the settings and export the file precisely.
The above guidelines help you to establish the audio ducking feature on your audio clips using the Filmora. Perform the appropriate clicks and set the attributes according to your needs to refine the audio ducking feature.
Conclusion
Thus, this article had given valuable insights on **audio ducking Premiere Pro of Adobe. Use Adobe Premiere Pro to perform the desired audio adjustments to enhance the vocal signal on your Windows system. The Filmora application assists in editing the audio clips at the Mac system effortlessly. The above instructions aid you in performing the audio ducking feature successfully. Connect with this article to discover unique editing options on media files to enhance their overall performance. Stay tuned to explore the features of the Filmora application in detail.
“The Future of Filmmaking: Techniques for Automatic Audio and Video Synchronization “
4 Ways to Sync Audio to Video in Filmora and Premiere Pro

Shanoon Cox
Mar 27, 2024• Proven solutions
Watching a video out-of-sync is an extreme turn off. And having a perception that sync audio and video is easy can be misleading. Despite adding sound easily, the actuality lies in its variety of needed operations as well as precision, especially when you have multiple audios and video clips. Moreover, possessing no idea on proper procedure can serve as real headache.
Nonetheless, you are fortunately at the right place as we are going to introduce an advanced technology that can fulfill this motive. Reading this article will prove to be helpful for you as we will enlighten upon syncing audios smoothly on Filmora and Premiere Pro. If you are interested and never want synchronizing issues, have a look upon this post and learn about how to sync audio and video.
- Part 1: How to Automatically Sync Audio to Video with Filmora
- Part 2: How to Sync Audio to Video in Premiere Pro
- Part 3: How to Sync Audio to Video Manually in Premiere Pro
- Part 4: How to Sync Audio to Video with Plug in
Part 1: How to Automatically Sync Audio to Video with Filmora
Auto Audio Sync is one of the best features of Filmora Video Editor . It allows you to adjust the audio tempo to sync with the video. You can slow down or speed up the audio with the button and setting. Auto Audio Sync is the ability to sync video and audio together automatically. Moreover, it is an all-in-one video editor with powerful functionality and a fully stacked feature set. It makes professional video editing easy with an intuitive interface, drag-and-drop editing, and advanced video editing features.
Steps to Use Auto Audio Sync Tool
This tool is best as it gives a perfect result when you try to match your audio files with your video files. For example, you might have a YouTube channel, and you record your audio from a Microphone, your video from a webcam camera, and your screen from your computer. The audio directly from the camera could be a little faint, resulting from the recording being farther from where you are. While the audio from the microphone would give you a high-quality audio.

First, detach your audio file from your screen recording as the tool works with an audio file and a video file. Right-click on the audio file and click on detach audio to separate the audio file from the screen recording.

Return the audio file and the screen recording to the normal position, which gives you three layers on the timeline.

Next, select your audio and your video by making sure both footages are related to each other and then right-click and then tap the audio synchronization. This will sync the audio and the video together, and the echo will seize because the footage will perfectly match the audio.

Part 2: How to Sync Audio to Video in Premiere Pro – Merging Audio and Video
The first way that can help you sync audio and video is merging the two files. You can simply get the media from the folders and this allows you to sync a max of 16 audio files to single video.
- To proceed, press Control and Command> key on Windows and Mac respectively. Now, pick out the two files that you want to merge. You will now get the Merge Clips menu having a list of options. Choose Audio option and click OK.

- Premiere Pro will now examine your video’s audio with the help of External audio and find out the similarities. In a couple of minutes, you will receive a new file with the name given to it in the Merge Clips menu.
Part 3: How to Sync Audio to Video Manually in Premiere Pro
- Step 1: Another is the manual way to sync audio to your videos. In order to work with this uncomplicated way of synchronization, get your video clip and the audio file into the timeline. Make sure to stack up the two files loosely (do not group them).

- Step 2: Now, you may have either used a professional slate/clapper or simply done a single clap with your hands to give a clue to start performing. All you need to do is to zoom the video file in the timeline. Look for the spike in waveforms that shows the slate. Where you notice the spike, slide the audio file and make the markers lined up.

- Step 3: Start playing the clip to see if it works perfectly. Just in case, if a little tweaking is still required, click the audio file and hold down the Shift key while tapping left or right arrow key to adjust the audio file as per requirement.

Part 4: How to Sync Audio to Video with Plug in
PluralEyes is the next ideal option to work with. It is a plug-in and comes for $200 from Red Giant. When you have the projects like documentaries which include numerous camera angles, PluralEyes easily handles such stuff and make audio and video synchronization easy for you.
- For this, run PluralEyes and hit on Add Media to import the clip. Alternatively, you can drag and drop the file directly to Premiere Pro. Now, click on Synchronize and let the program do the job.

- You will notice the synced clips in green while the files that are not synchronized will show up in red as errors. In case there are files with the red error, you need to get to the Sync drop-down menu and click Try Really Hard.
- When the entire files are synced, hit on Export Timeline and you can then drag the exported project into Premiere Pro.
Bonus Tips: How to Record Audio Properly
Nothing is worse than a bad quality audio file. You must have always wanted to keep a high-quality audio file, correct? More than desire, it is a vital thing to have. Hence, to record your audio appropriately, you must have a quality microphone and an audio recorder that should stand out from others. This dual combination is significant in capturing the sound in an excellent quality and they indeed provide better output than an on-camera microphone.
The audio recorders with a little more price employ XLR cables. On the other hand, some affordable ones make use of the ideal headphone jacks i.e. 1/8” jacks.
You just need to have the right equipment with you when you are looking for the quality output for recording audio files.
Shanoon Cox
Shanoon Cox is a writer and a lover of all things video.
Follow @Shanoon Cox
Shanoon Cox
Mar 27, 2024• Proven solutions
Watching a video out-of-sync is an extreme turn off. And having a perception that sync audio and video is easy can be misleading. Despite adding sound easily, the actuality lies in its variety of needed operations as well as precision, especially when you have multiple audios and video clips. Moreover, possessing no idea on proper procedure can serve as real headache.
Nonetheless, you are fortunately at the right place as we are going to introduce an advanced technology that can fulfill this motive. Reading this article will prove to be helpful for you as we will enlighten upon syncing audios smoothly on Filmora and Premiere Pro. If you are interested and never want synchronizing issues, have a look upon this post and learn about how to sync audio and video.
- Part 1: How to Automatically Sync Audio to Video with Filmora
- Part 2: How to Sync Audio to Video in Premiere Pro
- Part 3: How to Sync Audio to Video Manually in Premiere Pro
- Part 4: How to Sync Audio to Video with Plug in
Part 1: How to Automatically Sync Audio to Video with Filmora
Auto Audio Sync is one of the best features of Filmora Video Editor . It allows you to adjust the audio tempo to sync with the video. You can slow down or speed up the audio with the button and setting. Auto Audio Sync is the ability to sync video and audio together automatically. Moreover, it is an all-in-one video editor with powerful functionality and a fully stacked feature set. It makes professional video editing easy with an intuitive interface, drag-and-drop editing, and advanced video editing features.
Steps to Use Auto Audio Sync Tool
This tool is best as it gives a perfect result when you try to match your audio files with your video files. For example, you might have a YouTube channel, and you record your audio from a Microphone, your video from a webcam camera, and your screen from your computer. The audio directly from the camera could be a little faint, resulting from the recording being farther from where you are. While the audio from the microphone would give you a high-quality audio.
First, detach your audio file from your screen recording as the tool works with an audio file and a video file. Right-click on the audio file and click on detach audio to separate the audio file from the screen recording.
Return the audio file and the screen recording to the normal position, which gives you three layers on the timeline.
Next, select your audio and your video by making sure both footages are related to each other and then right-click and then tap the audio synchronization. This will sync the audio and the video together, and the echo will seize because the footage will perfectly match the audio.
Part 2: How to Sync Audio to Video in Premiere Pro – Merging Audio and Video
The first way that can help you sync audio and video is merging the two files. You can simply get the media from the folders and this allows you to sync a max of 16 audio files to single video.
- To proceed, press Control and Command> key on Windows and Mac respectively. Now, pick out the two files that you want to merge. You will now get the Merge Clips menu having a list of options. Choose Audio option and click OK.
- Premiere Pro will now examine your video’s audio with the help of External audio and find out the similarities. In a couple of minutes, you will receive a new file with the name given to it in the Merge Clips menu.
Part 3: How to Sync Audio to Video Manually in Premiere Pro
- Step 1: Another is the manual way to sync audio to your videos. In order to work with this uncomplicated way of synchronization, get your video clip and the audio file into the timeline. Make sure to stack up the two files loosely (do not group them).
- Step 2: Now, you may have either used a professional slate/clapper or simply done a single clap with your hands to give a clue to start performing. All you need to do is to zoom the video file in the timeline. Look for the spike in waveforms that shows the slate. Where you notice the spike, slide the audio file and make the markers lined up.
- Step 3: Start playing the clip to see if it works perfectly. Just in case, if a little tweaking is still required, click the audio file and hold down the Shift key while tapping left or right arrow key to adjust the audio file as per requirement.
Part 4: How to Sync Audio to Video with Plug in
PluralEyes is the next ideal option to work with. It is a plug-in and comes for $200 from Red Giant. When you have the projects like documentaries which include numerous camera angles, PluralEyes easily handles such stuff and make audio and video synchronization easy for you.
- For this, run PluralEyes and hit on Add Media to import the clip. Alternatively, you can drag and drop the file directly to Premiere Pro. Now, click on Synchronize and let the program do the job.
- You will notice the synced clips in green while the files that are not synchronized will show up in red as errors. In case there are files with the red error, you need to get to the Sync drop-down menu and click Try Really Hard.
- When the entire files are synced, hit on Export Timeline and you can then drag the exported project into Premiere Pro.
Bonus Tips: How to Record Audio Properly
Nothing is worse than a bad quality audio file. You must have always wanted to keep a high-quality audio file, correct? More than desire, it is a vital thing to have. Hence, to record your audio appropriately, you must have a quality microphone and an audio recorder that should stand out from others. This dual combination is significant in capturing the sound in an excellent quality and they indeed provide better output than an on-camera microphone.
The audio recorders with a little more price employ XLR cables. On the other hand, some affordable ones make use of the ideal headphone jacks i.e. 1/8” jacks.
You just need to have the right equipment with you when you are looking for the quality output for recording audio files.
Shanoon Cox
Shanoon Cox is a writer and a lover of all things video.
Follow @Shanoon Cox
The Ultimate Voice Transformation Handbook: Ranking the Leading 11 Speech Alteration Software for Mobile Platforms, No Cost
Best Voice Changer Apps for iPhone and Android

Benjamin Arango
Mar 27, 2024• Proven solutions
Have you ever wondered what your voice would sound like if you were a cartoon character, a robot, or an older version of yourself? Changing how your voice sounds has never been easier, regardless of the Smartphone model you have, since voice changer apps can be used on both iPhone and Android devices.
Even though there is nothing wrong with modulating your voice to have fun with your friends, using voice changer apps to pull malicious pranks or bully strangers online is far from acceptable. Read on if you would like to find out more about the best voice changer apps for iPhone and Android devices and discover the one you enjoy using the most.
Best Voice Changer Apps for iPhone and Android
Creating a new ringtone, making a voice recording, or having fun with your friends are only a few reasons why so many people choose to try out voice changer apps. The vast majority of these apps feature well-equipped audio effects libraries that enable users to have fun with their friends and hear how they would sound if they were drunk or after inhaling helium. So, let’s take a look at some of the best voice changer apps on the market.


Changing video voice on Windows and Mac with Wondershare Filmora
Do you want to change the voice in video on Windows and Mac and don’t know which software can meet this requirement? Try Filmra video editor , which provides several ways to change voice over, such as changing the voice speed or changing the pitch. Download the trial version below and find out more possibility in video creation with Filmora.
1. Celebrity Voice Changer – Face
Price: Free, but offers in-app purchases
Compatibility: iOS 9.0 or later
User Rating: 4.0
In case you would like to sound like your favorite movie star of TV host, then Celebrity Voice Changer is one of the best choices you can make. Besides the standard set of options, the app also lets you request new voices since its machine learning technology can mimic virtually anyone’s voice. However, Celebrity Voice Changer is currently only available in English and it cannot modulate speech in other languages. In addition, you must make an in-app purchase in order to gain access to all of the app’s features or unlock the unlimited usage of the app.
Pros
- Automatic voice modulation
- Huge selection of voice filters
- The app generates video files that are better adjusted to the audience on social media than audio files
- Excellent impressions of celebrities
Cons
- Unreasonably expensive
- The app’s Deep Learning technology still has a lot of room for improvement
2. Snapchat
Price: Free, but offers in-app purchases
Compatibility: iOS 10.0 or later, Android 4.4 or up
User Rating: 3.8
With more than 203 million daily users, Snapchat is one of the largest messaging platforms on the market. Previously, we’ve shared how to change gender on Snapchat , beside that, the app lets its users capture short moments or the so-called Snaps and share them with friends. In addition to hundreds of video filters , Snapchat also features a broad spectrum of voice changing effects that make Snaps more entertaining. Even so, the audio recording options Snapchat offers are far from ideal, because the app doesn’t allow you to edit the files you create with it. Using Snapchat will drain your battery quickly, which is why you must pay attention to how frequently you use this app.
Pros
- The easy voice modulation process
- Excellent messaging options
- Grants you access to a large community of likeminded people
- Lenses and filters are updated on a daily basis
Cons
- Editing voice changes after you create a Snap is not possible
- Snapchat is not primarily a voice changer app
Check the detailed information about How to Change Voice on Snapchat with 2 Easy Methods >>
3. Voice Changer
Price: Free
Compatibility: Android 4.1 and up
User Rating: 4.3

Changing your voice with this app won’t take more than a few moments of your time. You just have to launch the app and hit the microphone button to record a message or a joke you would like to modulate. Once you’re happy with the audio recording you made, you can proceed to choose from more than twenty voice effects that will make you sound like a dwarf, a robot, or an alien. The app’s file-sharing capabilities enable you to post your audio recordings to any social media platform of your choosing or store your files and use them as many times as you want.
Pros
- Entertaining and easy to use
- The simple three-step voice modulation process
- Good selection of voice filters
- Excellent file sharing options
Cons
- The app displays ads
- No audio editing tools
4. Voicy: Celebrity Voice Changer
**Price:**Free, but offers in-app purchases
Compatibility: iOS 10 or later
User Rating: 4.3

Impersonating your favorite celebrity can be a fun way to prank your friends on social media. Voicy features a broad selection of celebrity voice impersonations you can use to make you sound like a famous actress or TV personality. The app utilizes a machine learning technology that can generate more than forty avatars and allows the users to experiment with different voice effects. The free version of the app offers only limited capabilities, so if you want to gain access to all of the Voicy’s features, you must choose a weekly, monthly or an annual subscription.
Pros
- Equipped with a powerful machine learning technology
- Offers a vast selection of voice avatars
- The quick voice modification process
- A great choice if you want to make a parody
Cons
- More expensive than the competition
- Support only the English language
5. Video Voice Changer – Fun Editor
Price: Free, but offers in-app purchases
Compatibility: iOS 8.0 or later
User Rating: 4.4

Changing the voices in the videos you record with your iPhones or iPads is a straightforward process that takes a minimum amount of effort. You can either use this iOS-based app to capture videos you’re going to dub or import them from the albums in which they are stored. The Video Voice Changer app is a great option if you want to dub videos directly from your phone because it enables you to change the voices in your videos and make them sound like mice, bears or ghosts. There are over thirty voice effects to choose from, so you can easily pick the one that best fits the video you’re editing.
Pros
- Equipped with video recording tools
- Excellent dubbing features
- A rich selection of voice effects
- Allows users to share their creations on Facebook, Instagram, and other social media platforms
Cons
- You must make an in-app purchase to unlock all of the app’s features
- No audio mixing options
6. Video Voice Changer FX
**Price:**Free, but offers in-app purchases
Compatibility: Android 4.1 and up
User Rating: 4.1

This is a simple app, anyone can use to change the voices in a video. Simply upload a video file from an SD card in your phone and choose an audio effect you want to apply. The app’s collection of funny voices includes options like echo, squirrel, space ship or chipmunk. As soon as you select the voice effect you want to add to a video, the app will start generating a new video that will be saved to your phone. Sharing the videos you edit with Video Voice Changer FX to social media directly from the app is not an option.
Pros
- Fun and easy to use
- Great price to performance ratio
- Changing a voice requires just a few taps
- Allows users to switch between effects while the video is playing
Cons
- No audio or video recording capability
- Doesn’t support social media sharing
7. Squeak Voice Changer
**Price:**Free, but offers in-app purchases
Compatibility: Android 4.3 and up
User Rating: 3.9

Every joke you want to share with your online friends is going to be a little funnier if you record it with Squeak Voice Changer. You just have to tap on the Record button and choose one of the available effects. Each voice changing effect this app offers is represented by a character so you should select Jamie the Jolly if you want to make your voice sound like you’re at a party or Bruce the Sentimental Bot if you want your voice to sound artificial. All the recordings you make with Squeak Voice Changer can be easily shared on social media.
Pros
- Equipped with audio recording options
- Cute and memorable characters that represent voice effects
- Inexpensive and fun to use
- Functional app design
Cons
- Poor selection of voice effects
- The AI only recognizes the English language
8. Voice Changer with Effects
**Price:**Free
Compatibility: Android 4.1 and up
User Rating: 4.5
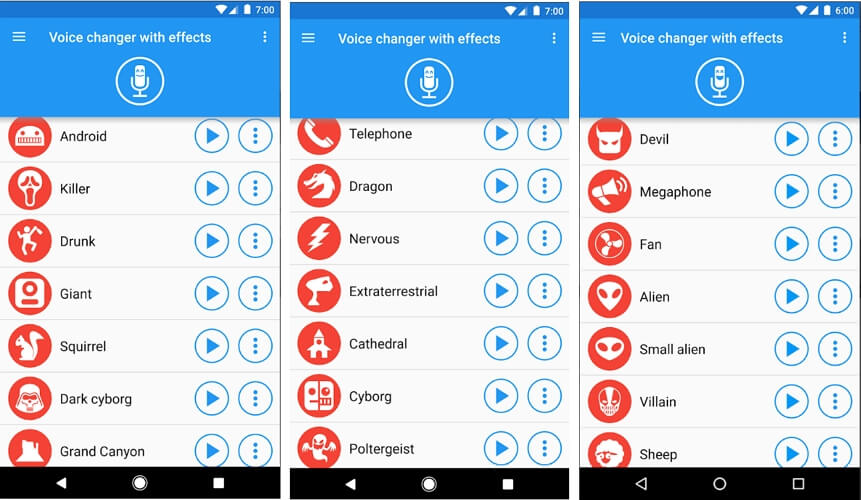
This Android-based app is designed to make fun and easy since voice modulation features enable you to play voice recording backward or change your voice to sound robotic or even alien. Besides recording your voice, the app also lets you modulate pre-recorded sounds and save them to your phone or use them as ringtones or notification sounds. Furthermore, the app lets you add sounds to images and share them to Facebook. The Voice Changer with Effects enables you to share all audio files you process with it to any of the most popular social media platforms.
Pros
- The app has over 50,000,000 installs
- Equipped with a text to voice feature
- Setting a new ringtone with this app is easy
- Supports editing of pre-recorded audio files
Cons
- Contains ads
- No audio or video editing options
9. Voice Changer
**Price:**Free
Compatibility: Android 4.1 and up
User Rating: 4.4

If you are looking for an Android app that lets you modulate your voice quickly and effortlessly, then Voice Changer may be one of the best options you can find on the market. You can record your voice by simply tapping on the microphone and speaking into your phone’s speaker and then apply one of the audio effects this app offers. Optionally, you can import an audio file you already recorded into the app and then apply Martian, Foreigner, Giant or Child effects to your voice recording. The best part is that you can apply each effect to the audio files you’re editing as many times as you want.
Pros
- Loads of funny effects
- Simple audio recording setup
- Intuitive and modernly designed interface
- Enables users to share audio files via Bluetooth or social media platforms
Cons
- No video editing tools
- The quality of output audio files can vary
10. Voice FX
**Price:**Free, but offers in-app purchases
Compatibility: Android 4.0.3 and up
User Rating: 3.8

Modulating voices in all types of audio files is a straightforward and fun process that can be completed in just a few taps. During the audio recording session, you can apply all voice effects to the sound you are recording and stream it live to your web browsers or media players you’re using. Voice FX changes your voice in real time, which enables you to preview your results before deciding if you want to save them. All files you export from this app will be saved in the MP3 format so you can use them as ringtones on your Android device.
Pros
- Allows users to modulate pre-recorded audio files
- Voice effects are applied in real time
- Offers live streaming features
- Exports files in the MP3 format
Cons
- Prone to glitches
- A limited selection of voice effects
11. Voice Changer Plus
**Price:**Free, but offers in-app purchases
Compatibility: iOS 8.0 or later
User Rating: 4.8
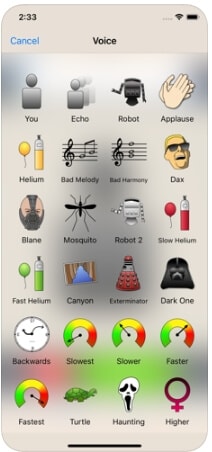
iPhone and iPad owners in need of a voice changer app that grants them complete creative freedom over the modulation of the voices they record, should consider using the Voice Changer Plus. The app features more than fifty voice effects and it provides support for voiceover recordings. Moreover, you can edit all your audio files even after you saved them, enabling you to find new ways to improve your recordings over time. Voice Changer Plus is also equipped with trim controls, so you can remove all parts of your audio files you don’t want to share with your friends on social media.
Pros
- Offers more voice effects than most of its competitors
- Provides voiceover recording options
- Users can trim their audio files
- All audio recordings can be edited after the voice modulation
Cons
- In-app purchase is required in order to unlock all of the app’s features
- Modulating audio in video files is not an option
Below is a quick comparison table among these voice changer apps, hope it will be helpful.
| App | Supported OS | User Rating | Voice Templates |
|---|---|---|---|
| Celebrity Voice Changer - Face | iOS 9.0 or later | 4.0 | Yes |
| Snapchat | iOS 10.0 or later, Android 4.4 or up | 3.8 | No |
| Voice Changer by e3games | Android 4.1 and up | 4.3 | Yes |
| Voicy: Celebrity Voice Changer | iOS 10 or later | 4.3 | Yes |
| Video Voice Changer – Fun Editor | iOS 8.0 or later | 4.4 | Yes |
| Video Voice Changer FX | Android 4.1 and up | 4.1 | Yes |
| Squeak Voice Changer | Android 4.3 and up | 3.9 | Yes |
| Voice Changer with Effects | Android 4.1 and up | 4.5 | Yes |
| Voice Changer | Android 4.1 and up | 4.4 | Yes |
| Voice FX | Android 4.0.3 and up | 3.8 | Yes |
| Voice Changer Plus | iOS 8.0 or later | 4.8 | Yes |
Conclusion
Everybody enjoys a good joke, and the apps we featured in this article enable you to have a lot of fun while experimenting with different voice modulation options. All of the voice effects these apps offer can change a voice automatically, but if you would like to alter the voices in your videos you must choose an app that supports this option. Which of the best voice changer apps for iPhone and Android devices are you going to choose? Leave a comment, and share your opinions with us.
Benjamin Arango
Benjamin Arango is a writer and a lover of all things video.
Follow @Benjamin Arango
Benjamin Arango
Mar 27, 2024• Proven solutions
Have you ever wondered what your voice would sound like if you were a cartoon character, a robot, or an older version of yourself? Changing how your voice sounds has never been easier, regardless of the Smartphone model you have, since voice changer apps can be used on both iPhone and Android devices.
Even though there is nothing wrong with modulating your voice to have fun with your friends, using voice changer apps to pull malicious pranks or bully strangers online is far from acceptable. Read on if you would like to find out more about the best voice changer apps for iPhone and Android devices and discover the one you enjoy using the most.
Best Voice Changer Apps for iPhone and Android
Creating a new ringtone, making a voice recording, or having fun with your friends are only a few reasons why so many people choose to try out voice changer apps. The vast majority of these apps feature well-equipped audio effects libraries that enable users to have fun with their friends and hear how they would sound if they were drunk or after inhaling helium. So, let’s take a look at some of the best voice changer apps on the market.
Changing video voice on Windows and Mac with Wondershare Filmora
Do you want to change the voice in video on Windows and Mac and don’t know which software can meet this requirement? Try Filmra video editor , which provides several ways to change voice over, such as changing the voice speed or changing the pitch. Download the trial version below and find out more possibility in video creation with Filmora.
1. Celebrity Voice Changer – Face
Price: Free, but offers in-app purchases
Compatibility: iOS 9.0 or later
User Rating: 4.0
In case you would like to sound like your favorite movie star of TV host, then Celebrity Voice Changer is one of the best choices you can make. Besides the standard set of options, the app also lets you request new voices since its machine learning technology can mimic virtually anyone’s voice. However, Celebrity Voice Changer is currently only available in English and it cannot modulate speech in other languages. In addition, you must make an in-app purchase in order to gain access to all of the app’s features or unlock the unlimited usage of the app.
Pros
- Automatic voice modulation
- Huge selection of voice filters
- The app generates video files that are better adjusted to the audience on social media than audio files
- Excellent impressions of celebrities
Cons
- Unreasonably expensive
- The app’s Deep Learning technology still has a lot of room for improvement
2. Snapchat
Price: Free, but offers in-app purchases
Compatibility: iOS 10.0 or later, Android 4.4 or up
User Rating: 3.8
With more than 203 million daily users, Snapchat is one of the largest messaging platforms on the market. Previously, we’ve shared how to change gender on Snapchat , beside that, the app lets its users capture short moments or the so-called Snaps and share them with friends. In addition to hundreds of video filters , Snapchat also features a broad spectrum of voice changing effects that make Snaps more entertaining. Even so, the audio recording options Snapchat offers are far from ideal, because the app doesn’t allow you to edit the files you create with it. Using Snapchat will drain your battery quickly, which is why you must pay attention to how frequently you use this app.
Pros
- The easy voice modulation process
- Excellent messaging options
- Grants you access to a large community of likeminded people
- Lenses and filters are updated on a daily basis
Cons
- Editing voice changes after you create a Snap is not possible
- Snapchat is not primarily a voice changer app
Check the detailed information about How to Change Voice on Snapchat with 2 Easy Methods >>
3. Voice Changer
Price: Free
Compatibility: Android 4.1 and up
User Rating: 4.3
Changing your voice with this app won’t take more than a few moments of your time. You just have to launch the app and hit the microphone button to record a message or a joke you would like to modulate. Once you’re happy with the audio recording you made, you can proceed to choose from more than twenty voice effects that will make you sound like a dwarf, a robot, or an alien. The app’s file-sharing capabilities enable you to post your audio recordings to any social media platform of your choosing or store your files and use them as many times as you want.
Pros
- Entertaining and easy to use
- The simple three-step voice modulation process
- Good selection of voice filters
- Excellent file sharing options
Cons
- The app displays ads
- No audio editing tools
4. Voicy: Celebrity Voice Changer
**Price:**Free, but offers in-app purchases
Compatibility: iOS 10 or later
User Rating: 4.3
Impersonating your favorite celebrity can be a fun way to prank your friends on social media. Voicy features a broad selection of celebrity voice impersonations you can use to make you sound like a famous actress or TV personality. The app utilizes a machine learning technology that can generate more than forty avatars and allows the users to experiment with different voice effects. The free version of the app offers only limited capabilities, so if you want to gain access to all of the Voicy’s features, you must choose a weekly, monthly or an annual subscription.
Pros
- Equipped with a powerful machine learning technology
- Offers a vast selection of voice avatars
- The quick voice modification process
- A great choice if you want to make a parody
Cons
- More expensive than the competition
- Support only the English language
5. Video Voice Changer – Fun Editor
Price: Free, but offers in-app purchases
Compatibility: iOS 8.0 or later
User Rating: 4.4
Changing the voices in the videos you record with your iPhones or iPads is a straightforward process that takes a minimum amount of effort. You can either use this iOS-based app to capture videos you’re going to dub or import them from the albums in which they are stored. The Video Voice Changer app is a great option if you want to dub videos directly from your phone because it enables you to change the voices in your videos and make them sound like mice, bears or ghosts. There are over thirty voice effects to choose from, so you can easily pick the one that best fits the video you’re editing.
Pros
- Equipped with video recording tools
- Excellent dubbing features
- A rich selection of voice effects
- Allows users to share their creations on Facebook, Instagram, and other social media platforms
Cons
- You must make an in-app purchase to unlock all of the app’s features
- No audio mixing options
6. Video Voice Changer FX
**Price:**Free, but offers in-app purchases
Compatibility: Android 4.1 and up
User Rating: 4.1
This is a simple app, anyone can use to change the voices in a video. Simply upload a video file from an SD card in your phone and choose an audio effect you want to apply. The app’s collection of funny voices includes options like echo, squirrel, space ship or chipmunk. As soon as you select the voice effect you want to add to a video, the app will start generating a new video that will be saved to your phone. Sharing the videos you edit with Video Voice Changer FX to social media directly from the app is not an option.
Pros
- Fun and easy to use
- Great price to performance ratio
- Changing a voice requires just a few taps
- Allows users to switch between effects while the video is playing
Cons
- No audio or video recording capability
- Doesn’t support social media sharing
7. Squeak Voice Changer
**Price:**Free, but offers in-app purchases
Compatibility: Android 4.3 and up
User Rating: 3.9
Every joke you want to share with your online friends is going to be a little funnier if you record it with Squeak Voice Changer. You just have to tap on the Record button and choose one of the available effects. Each voice changing effect this app offers is represented by a character so you should select Jamie the Jolly if you want to make your voice sound like you’re at a party or Bruce the Sentimental Bot if you want your voice to sound artificial. All the recordings you make with Squeak Voice Changer can be easily shared on social media.
Pros
- Equipped with audio recording options
- Cute and memorable characters that represent voice effects
- Inexpensive and fun to use
- Functional app design
Cons
- Poor selection of voice effects
- The AI only recognizes the English language
8. Voice Changer with Effects
**Price:**Free
Compatibility: Android 4.1 and up
User Rating: 4.5
This Android-based app is designed to make fun and easy since voice modulation features enable you to play voice recording backward or change your voice to sound robotic or even alien. Besides recording your voice, the app also lets you modulate pre-recorded sounds and save them to your phone or use them as ringtones or notification sounds. Furthermore, the app lets you add sounds to images and share them to Facebook. The Voice Changer with Effects enables you to share all audio files you process with it to any of the most popular social media platforms.
Pros
- The app has over 50,000,000 installs
- Equipped with a text to voice feature
- Setting a new ringtone with this app is easy
- Supports editing of pre-recorded audio files
Cons
- Contains ads
- No audio or video editing options
9. Voice Changer
**Price:**Free
Compatibility: Android 4.1 and up
User Rating: 4.4
If you are looking for an Android app that lets you modulate your voice quickly and effortlessly, then Voice Changer may be one of the best options you can find on the market. You can record your voice by simply tapping on the microphone and speaking into your phone’s speaker and then apply one of the audio effects this app offers. Optionally, you can import an audio file you already recorded into the app and then apply Martian, Foreigner, Giant or Child effects to your voice recording. The best part is that you can apply each effect to the audio files you’re editing as many times as you want.
Pros
- Loads of funny effects
- Simple audio recording setup
- Intuitive and modernly designed interface
- Enables users to share audio files via Bluetooth or social media platforms
Cons
- No video editing tools
- The quality of output audio files can vary
10. Voice FX
**Price:**Free, but offers in-app purchases
Compatibility: Android 4.0.3 and up
User Rating: 3.8
Modulating voices in all types of audio files is a straightforward and fun process that can be completed in just a few taps. During the audio recording session, you can apply all voice effects to the sound you are recording and stream it live to your web browsers or media players you’re using. Voice FX changes your voice in real time, which enables you to preview your results before deciding if you want to save them. All files you export from this app will be saved in the MP3 format so you can use them as ringtones on your Android device.
Pros
- Allows users to modulate pre-recorded audio files
- Voice effects are applied in real time
- Offers live streaming features
- Exports files in the MP3 format
Cons
- Prone to glitches
- A limited selection of voice effects
11. Voice Changer Plus
**Price:**Free, but offers in-app purchases
Compatibility: iOS 8.0 or later
User Rating: 4.8
iPhone and iPad owners in need of a voice changer app that grants them complete creative freedom over the modulation of the voices they record, should consider using the Voice Changer Plus. The app features more than fifty voice effects and it provides support for voiceover recordings. Moreover, you can edit all your audio files even after you saved them, enabling you to find new ways to improve your recordings over time. Voice Changer Plus is also equipped with trim controls, so you can remove all parts of your audio files you don’t want to share with your friends on social media.
Pros
- Offers more voice effects than most of its competitors
- Provides voiceover recording options
- Users can trim their audio files
- All audio recordings can be edited after the voice modulation
Cons
- In-app purchase is required in order to unlock all of the app’s features
- Modulating audio in video files is not an option
Below is a quick comparison table among these voice changer apps, hope it will be helpful.
| App | Supported OS | User Rating | Voice Templates |
|---|---|---|---|
| Celebrity Voice Changer - Face | iOS 9.0 or later | 4.0 | Yes |
| Snapchat | iOS 10.0 or later, Android 4.4 or up | 3.8 | No |
| Voice Changer by e3games | Android 4.1 and up | 4.3 | Yes |
| Voicy: Celebrity Voice Changer | iOS 10 or later | 4.3 | Yes |
| Video Voice Changer – Fun Editor | iOS 8.0 or later | 4.4 | Yes |
| Video Voice Changer FX | Android 4.1 and up | 4.1 | Yes |
| Squeak Voice Changer | Android 4.3 and up | 3.9 | Yes |
| Voice Changer with Effects | Android 4.1 and up | 4.5 | Yes |
| Voice Changer | Android 4.1 and up | 4.4 | Yes |
| Voice FX | Android 4.0.3 and up | 3.8 | Yes |
| Voice Changer Plus | iOS 8.0 or later | 4.8 | Yes |
Conclusion
Everybody enjoys a good joke, and the apps we featured in this article enable you to have a lot of fun while experimenting with different voice modulation options. All of the voice effects these apps offer can change a voice automatically, but if you would like to alter the voices in your videos you must choose an app that supports this option. Which of the best voice changer apps for iPhone and Android devices are you going to choose? Leave a comment, and share your opinions with us.
Benjamin Arango
Benjamin Arango is a writer and a lover of all things video.
Follow @Benjamin Arango
Also read:
- Updated In 2024, Sonic Sanctuary A Comprehensive Guide to Reducing Reverberation Effects on Audio Fidelity
- New Find Dog Sound Effects
- New Audio Extraction Guide for Updated MKV Files (MKV-2023 Edition)
- Updated 2024 Approved Tips for Smooth Installation/Uninstallation of Audacity on Your Chromebook
- New Top 10 Revolutionary Singing Software for Soloists on the Move
- Updated 2024 Approved The 9 Premier Artificial Intelligence Vocal Tools Reimagining Tomorrows Daily Routine
- Easy Steps to Mastering Voice Transformation Apps for iPhones for 2024
- Cinematic Mood Setting Through Suspenseful and Dynamic Music Cues
- Updated The Leading Edge in Natural Language Processing Voice Synthesis Technologies
- Updated 2024 Approved Unveiling the Best 5 Audio Mixers Engineered for Mac Enthusiasts
- 2024 Approved How to Add Audio to AVI
- 2024 Approved Elevating Your Audio Game A Comprehensive List of the Best Tools to Modify and Transform Sound
- Mastering Clean Audio Tactics to Eradicate Background Noise for 2024
- Updated 2024 Approved Unleashing Creativity in Mobile Sound Selection How to Design Ringtones
- New Fresh Beginnings Selecting the Best 8 Soundtracks to Start Videos
- New Embark on a Complimentary Audacity Adventure Capturing Every Note
- New Tricks for Reducing Resonance in Sound Files Step-by-Step Approach
- Updated In 2024, Demystifying the Art of Anime Adaptation for Global Audiences
- 2024 Approved Unveiling Techniques for Discriminating Premium Sound Artists
- New 2024 Approved Transform Your Zoom Chats Explore These 6 Fun Voice Altering Software Options
- 2024 Approved Maximize Your Viewing Experience with These 4 Pioneering Audio Boosters Online
- New Virtual Vistas of Calm Top Ten Online Journeys for Mental Clarity and Stress Relief This Year for 2024
- 2024 Approved Step-by-Step Getting Audacity Running on Your Ubuntu System
- Updated Add Background Melody to iMovie Sequence for 2024
- Updated 2024 Approved A Filmmakers Guide to Blending Sound and Visuals with Magix Pro Software
- Awaken Your Creative Flow Pro Bargain Tunes for Video Editing
- In 2024, Why Your Transparent GIF Is Hard to Remove
- Motorola Moto E13 Stuck on Screen – Finding Solutions For Stuck on Boot | Dr.fone
- In 2024, CatchEmAll Celebrate National Pokémon Day with Virtual Location On Vivo Y100t | Dr.fone
- A Step-by-Step Guide on Using ADB and Fastboot to Remove FRP Lock on your Oppo A78
- How to Add Subtitles in VLC Media Play
- In 2024, 3 Things You Must Know about Fake Snapchat Location On Realme Narzo N53 | Dr.fone
- In 2024, Does iTools virtual location not work On Apple iPhone 13 Pro Max/iPad? | Dr.fone
- In 2024, How To Track IMEI Number Of Vivo G2 Through Google Earth?
- In 2024, Unleash the Power of Video Scopes in Your Video Editing Projects. Find the Most Common Video Scopes and How to Use Them on Video Editing Software
- In 2024, Get 15 Absolutely-Free LUTs From This Article as Well as Get an Insight on How Cinematic LUTs Affect Your Film
- 2024 Approved The Most Accessible Video Editors
- How To Revive Your Bricked Xiaomi Redmi Note 12 Pro 4G in Minutes | Dr.fone
- Updated How to Create Loop Videos with Filmora for 2024
- In 2024, Additional Tips About Sinnoh Stone For OnePlus Ace 2 Pro | Dr.fone
- In 2024, Unlock Your Xiaomi Redmi 13C 5Gs Potential The Top 20 Lock Screen Apps You Need to Try
- Top 7 Skype Hacker to Hack Any Skype Account On your Lava Blaze 2 Pro | Dr.fone
- Top 9 Nokia 105 Classic Monitoring Apps for Parental Controls | Dr.fone
- Here Are Some Reliable Ways to Get Pokemon Go Friend Codes For Samsung Galaxy S24+ | Dr.fone
- Full Guide to Hard Reset Your Samsung Galaxy S23 Ultra | Dr.fone
- 2024 Approved Accurate Timing Made Simple 8 Best Timecode Conversion Apps and Websites
- New How To Create Animated Clipart in PowerPoint
- Top 5 Samsung Galaxy A24 Bypass FRP Tools for PC That Actually Work
- Title: Updated Audio Ducking in Adobe Premiere Pro on Win for 2024
- Author: Kate
- Created at : 2024-05-05 07:45:13
- Updated at : 2024-05-06 07:45:13
- Link: https://audio-editing.techidaily.com/updated-audio-ducking-in-adobe-premiere-pro-on-win-for-2024/
- License: This work is licensed under CC BY-NC-SA 4.0.
