
Updated 2024 Approved The Ultimate Guide to Recording Sounds in PowerPoint Operating Windows and macOS Systems

The Ultimate Guide to Recording Sounds in PowerPoint: Operating Windows and macOS Systems
Pandemic times have bought us very close to technology and the computerized world. We used various tools and software, we also learned about much new software in this time. We even came across some amazing features of tools that we have been using since our childhood. One best example of this scenario is PowerPoint.
We have been working on PowerPoint, making slides for a long time, but we recently came across the PowerPoint record audio feature. This is the most helpful feature one could imagine. When you cannot express yourself and your point in words, then the use of this PowerPoint voice recording feature jumps in. Stay with us to learn more about audio recording on PowerPoint.
In this article
01 How to Record Audio on PowerPoint in Windows?
02 How to Record Audio on PowerPoint in Mac?
03 7 PowerPoint Presentation Tips to Make Creative Slideshows
Part 1: How to Record Audio on PowerPoint in Windows?
Powerpoint is a presentation-based program. The Microsoft Office product is available for both Windows and macOS. PowerPoint is mostly used in offices for demonstration purposes. It is widely used by teachers to deliver their lectures. With record voice-over PowerPoint, its users can make better presentations.
A question arises here that how to record audio in PowerPoint presentations? If this same question is riding on your mind, then the wait is over. Let us share the steps that should be followed to record audio on PowerPoint in Windows.
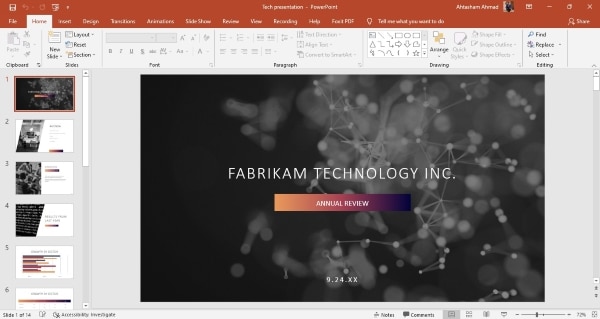
Step 1: Firstly, you should open PowerPoint and add a blank slide to record voice-over PowerPoint. You can also record any old presentation by opening the slide where you plan to record audio.
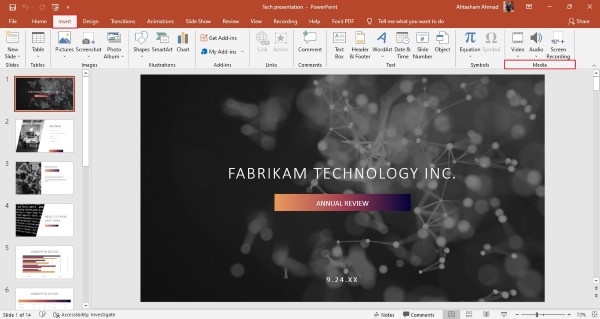
Step 2: then, from the top menu bar, you are requested to head over to the ‘Insert’ section. From the Insert section, select the ‘Media’ option visible at the extreme right side.
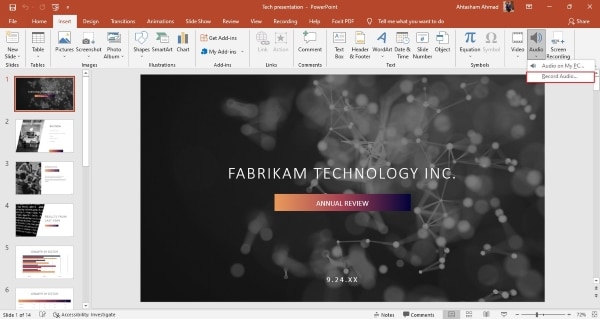
Step 3: The Media offers 3 further options. Among those options, you have to hit the ‘Audio’ option. This will open a drop-down from where you have to click on ‘Record Audio.’
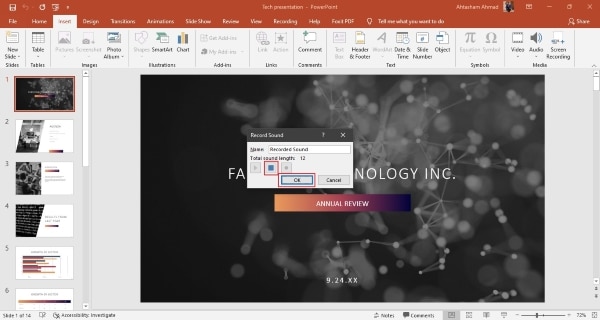
Step 4: Now, a small window for Record Sound will show up. Here, set a name for your recording and hit the Record button to start the recording.

Step 5: Once you have completed the recording, click on the Stop button to end the recording and then hit the ‘Ok’ button to exit the recording window.
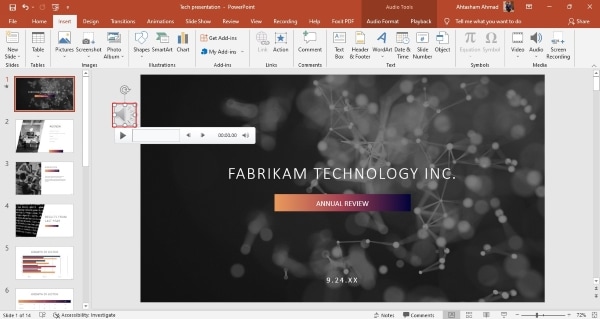
Step 6: At the end, a speaker icon will appear on the screen. When you hover on that icon, it will show the option to play the recording. You can adjust the speaker icon on the slide, and lastly, save your changes to PowerPoint.
Part 2: How to Record Audio on PowerPoint in Mac?
As mentioned earlier, PowerPoint is available for both Windows and macOS, so how can we forget about Mac users? This section of the article will be talking about how to record audio on a PowerPoint Mac. If you are a Mac user and you plan to learn about this, then the following section is for you. By following the steps below, you can record audio on Powerpoint in Mac.
Step 1: Firstly, open PowerPoint and create a new presentation to record voice-over PowerPoint in Mac. You can also import any file from your Mac to PowerPoint for audio recording.
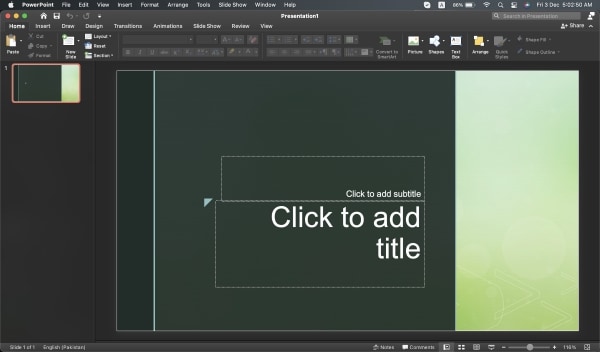
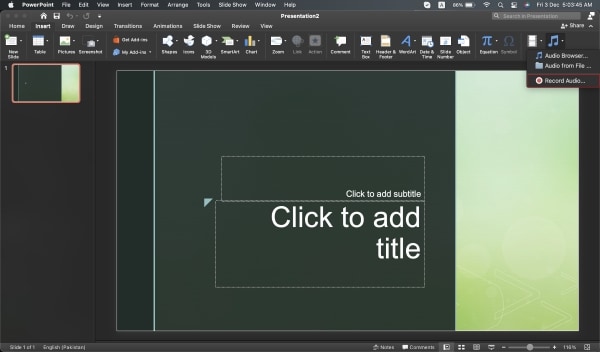
Step 2: After that, you have to open the slide where you want to record the audio. Then from the menu bar at the top, navigate to the ‘Insert’ section. In the Insert section, there will be an ‘Audio’ tab. Tap on it and then select the ‘Record Audio’ option.
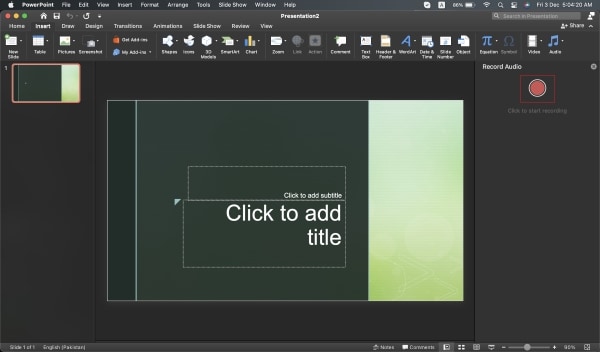
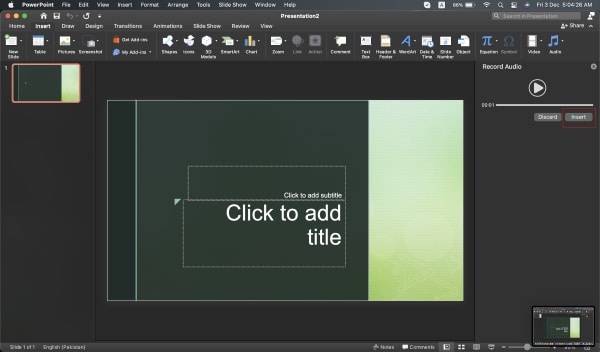
Step 3: At this point, a Record Audio panel will show up on the right side of the screen. From that panel, click on the ‘Record’ button to start the recording.
Step 4: After you have completed the recording, hit the ‘Stop’ button. Now, PowerPoint will ask you to either Insert or Discard the audio. Upon clicking on ‘Insert,’ a speaker icon will pop up on the screen. You can listen to your recording from that speaker icon.
Part 3: 7 PowerPoint Presentation Tips to Make Creative Slideshows
Now that all the Windows and Mac users are satisfied after learning about PowerPoint voice recording, it’s the perfect time to share some very useful tips. In the coming part, we are going to share 7 tips that will aid in making creative slideshows.
1. Minimalism
The most crucial tip when it comes to making creative slides is the amount of information. It is said that ‘Less is More.’ While making your slides, you should always add less information to the slides, and you should speak more.
The slides must contain minimal data. Too many wordy slides look boring, and they can never sustain your audiences’ interest. So, it is best suggested to add less and make your slides neat and spacious.
2. Use Design Elements
Adding stock images and background images is a very common trend for making slides. A tip that will make your slides unique and equally attractive is design elements. Choosing a bold color for the background and then adding elements to it makes them shine. The elements dominate on a strong colored background. Images can never be this dominating or expressive.
Also, changing the common trends will make your presentation different and classic as compared to regularly designed slides.
3. One Story at a Time
A very common mistake that people generally make because they are unaware of it is the content. The best practice for quality presentation slides is to add and discuss one story per slide. You should never confuse your audience by sharing multiple things from the same slide.
If you plan to discuss various things, then make separate slides for each story. This way, the audience gets sufficient time to digest and understand one story before moving on to another.
4. Alignment and Symmetry
While making your slides, one key factor that can either make or break your presentation is consistency and alignment. You should never present a rough slide. Always align the text, images, and headings of your slides. Symmetry and consistency are also very important. Follow the same consistent pattern in all slides.
5. Formatting and Settings
Making your slides creative doesn’t mean making them like a rainbow. Simplicity has its own magic and grace. The more your slide is simple and clean, the more readable it is. You should always keep simple colors for text and headings.
Playing with different fonts and styles for headings might also disturb your presentation visually. Selecting the correct font size, style with appropriate colors is essential.
6. Add and Adjust
Always follow the ‘Add and Adjust’ policy. You should never throw data and elements on the slides and present them. The best practice is to add the content, the images and then adjust everything. You should always arrange the text in bullets with proper headings.
For the case of an image, you should add it, inspect it and if needed, crop it. Adding things with perfection makes your presentation stand out and shine differently.
7. Animation
Static slides are too mainstream for today’s fast world. The last tip to make creative slides that can retain your audiences’ attention is animation. By adding a few animated elements to your presentation makes it look classy and quirky. With animation, you can also maintain the interest of your audience.
Last Words
The article has discussed in detail that how someone could record a voice-over PowerPoint. A complete step-by-step guideline has been shared for both Mac and Windows users on audio recording with PowerPoint. We also talked about 7 tips that will surely improve the quality of your slides.
By using the right and effective tool, you can still make creative slides without bothering to follow any tips. Such a tool is Filmora by Wondershare. This is an all-in-one video editing software. With Filmora, you can make the perfect video slideshow by adding multiple images.
You can collectively import images from your device to Filmora, or else you can also take things from its stock library. Filmora also has a wide range of editing effects, filters, and transitions that can make your content aesthetic and perfect.
Versatile Video Editor - Wondershare Filmora
An easy yet powerful editor
Numerous effects to choose from
Detailed tutorials provided by the official channel
02 How to Record Audio on PowerPoint in Mac?
03 7 PowerPoint Presentation Tips to Make Creative Slideshows
Part 1: How to Record Audio on PowerPoint in Windows?
Powerpoint is a presentation-based program. The Microsoft Office product is available for both Windows and macOS. PowerPoint is mostly used in offices for demonstration purposes. It is widely used by teachers to deliver their lectures. With record voice-over PowerPoint, its users can make better presentations.
A question arises here that how to record audio in PowerPoint presentations? If this same question is riding on your mind, then the wait is over. Let us share the steps that should be followed to record audio on PowerPoint in Windows.
Step 1: Firstly, you should open PowerPoint and add a blank slide to record voice-over PowerPoint. You can also record any old presentation by opening the slide where you plan to record audio.

Step 2: then, from the top menu bar, you are requested to head over to the ‘Insert’ section. From the Insert section, select the ‘Media’ option visible at the extreme right side.

Step 3: The Media offers 3 further options. Among those options, you have to hit the ‘Audio’ option. This will open a drop-down from where you have to click on ‘Record Audio.’

Step 4: Now, a small window for Record Sound will show up. Here, set a name for your recording and hit the Record button to start the recording.

Step 5: Once you have completed the recording, click on the Stop button to end the recording and then hit the ‘Ok’ button to exit the recording window.

Step 6: At the end, a speaker icon will appear on the screen. When you hover on that icon, it will show the option to play the recording. You can adjust the speaker icon on the slide, and lastly, save your changes to PowerPoint.

Part 2: How to Record Audio on PowerPoint in Mac?
As mentioned earlier, PowerPoint is available for both Windows and macOS, so how can we forget about Mac users? This section of the article will be talking about how to record audio on a PowerPoint Mac. If you are a Mac user and you plan to learn about this, then the following section is for you. By following the steps below, you can record audio on Powerpoint in Mac.
Step 1: Firstly, open PowerPoint and create a new presentation to record voice-over PowerPoint in Mac. You can also import any file from your Mac to PowerPoint for audio recording.

Step 2: After that, you have to open the slide where you want to record the audio. Then from the menu bar at the top, navigate to the ‘Insert’ section. In the Insert section, there will be an ‘Audio’ tab. Tap on it and then select the ‘Record Audio’ option.

Step 3: At this point, a Record Audio panel will show up on the right side of the screen. From that panel, click on the ‘Record’ button to start the recording.

Step 4: After you have completed the recording, hit the ‘Stop’ button. Now, PowerPoint will ask you to either Insert or Discard the audio. Upon clicking on ‘Insert,’ a speaker icon will pop up on the screen. You can listen to your recording from that speaker icon.

Part 3: 7 PowerPoint Presentation Tips to Make Creative Slideshows
Now that all the Windows and Mac users are satisfied after learning about PowerPoint voice recording, it’s the perfect time to share some very useful tips. In the coming part, we are going to share 7 tips that will aid in making creative slideshows.
1. Minimalism
The most crucial tip when it comes to making creative slides is the amount of information. It is said that ‘Less is More.’ While making your slides, you should always add less information to the slides, and you should speak more.
The slides must contain minimal data. Too many wordy slides look boring, and they can never sustain your audiences’ interest. So, it is best suggested to add less and make your slides neat and spacious.
2. Use Design Elements
Adding stock images and background images is a very common trend for making slides. A tip that will make your slides unique and equally attractive is design elements. Choosing a bold color for the background and then adding elements to it makes them shine. The elements dominate on a strong colored background. Images can never be this dominating or expressive.
Also, changing the common trends will make your presentation different and classic as compared to regularly designed slides.
3. One Story at a Time
A very common mistake that people generally make because they are unaware of it is the content. The best practice for quality presentation slides is to add and discuss one story per slide. You should never confuse your audience by sharing multiple things from the same slide.
If you plan to discuss various things, then make separate slides for each story. This way, the audience gets sufficient time to digest and understand one story before moving on to another.
4. Alignment and Symmetry
While making your slides, one key factor that can either make or break your presentation is consistency and alignment. You should never present a rough slide. Always align the text, images, and headings of your slides. Symmetry and consistency are also very important. Follow the same consistent pattern in all slides.
5. Formatting and Settings
Making your slides creative doesn’t mean making them like a rainbow. Simplicity has its own magic and grace. The more your slide is simple and clean, the more readable it is. You should always keep simple colors for text and headings.
Playing with different fonts and styles for headings might also disturb your presentation visually. Selecting the correct font size, style with appropriate colors is essential.
6. Add and Adjust
Always follow the ‘Add and Adjust’ policy. You should never throw data and elements on the slides and present them. The best practice is to add the content, the images and then adjust everything. You should always arrange the text in bullets with proper headings.
For the case of an image, you should add it, inspect it and if needed, crop it. Adding things with perfection makes your presentation stand out and shine differently.
7. Animation
Static slides are too mainstream for today’s fast world. The last tip to make creative slides that can retain your audiences’ attention is animation. By adding a few animated elements to your presentation makes it look classy and quirky. With animation, you can also maintain the interest of your audience.
Last Words
The article has discussed in detail that how someone could record a voice-over PowerPoint. A complete step-by-step guideline has been shared for both Mac and Windows users on audio recording with PowerPoint. We also talked about 7 tips that will surely improve the quality of your slides.
By using the right and effective tool, you can still make creative slides without bothering to follow any tips. Such a tool is Filmora by Wondershare. This is an all-in-one video editing software. With Filmora, you can make the perfect video slideshow by adding multiple images.
You can collectively import images from your device to Filmora, or else you can also take things from its stock library. Filmora also has a wide range of editing effects, filters, and transitions that can make your content aesthetic and perfect.
Versatile Video Editor - Wondershare Filmora
An easy yet powerful editor
Numerous effects to choose from
Detailed tutorials provided by the official channel
02 How to Record Audio on PowerPoint in Mac?
03 7 PowerPoint Presentation Tips to Make Creative Slideshows
Part 1: How to Record Audio on PowerPoint in Windows?
Powerpoint is a presentation-based program. The Microsoft Office product is available for both Windows and macOS. PowerPoint is mostly used in offices for demonstration purposes. It is widely used by teachers to deliver their lectures. With record voice-over PowerPoint, its users can make better presentations.
A question arises here that how to record audio in PowerPoint presentations? If this same question is riding on your mind, then the wait is over. Let us share the steps that should be followed to record audio on PowerPoint in Windows.
Step 1: Firstly, you should open PowerPoint and add a blank slide to record voice-over PowerPoint. You can also record any old presentation by opening the slide where you plan to record audio.

Step 2: then, from the top menu bar, you are requested to head over to the ‘Insert’ section. From the Insert section, select the ‘Media’ option visible at the extreme right side.

Step 3: The Media offers 3 further options. Among those options, you have to hit the ‘Audio’ option. This will open a drop-down from where you have to click on ‘Record Audio.’

Step 4: Now, a small window for Record Sound will show up. Here, set a name for your recording and hit the Record button to start the recording.

Step 5: Once you have completed the recording, click on the Stop button to end the recording and then hit the ‘Ok’ button to exit the recording window.

Step 6: At the end, a speaker icon will appear on the screen. When you hover on that icon, it will show the option to play the recording. You can adjust the speaker icon on the slide, and lastly, save your changes to PowerPoint.

Part 2: How to Record Audio on PowerPoint in Mac?
As mentioned earlier, PowerPoint is available for both Windows and macOS, so how can we forget about Mac users? This section of the article will be talking about how to record audio on a PowerPoint Mac. If you are a Mac user and you plan to learn about this, then the following section is for you. By following the steps below, you can record audio on Powerpoint in Mac.
Step 1: Firstly, open PowerPoint and create a new presentation to record voice-over PowerPoint in Mac. You can also import any file from your Mac to PowerPoint for audio recording.

Step 2: After that, you have to open the slide where you want to record the audio. Then from the menu bar at the top, navigate to the ‘Insert’ section. In the Insert section, there will be an ‘Audio’ tab. Tap on it and then select the ‘Record Audio’ option.

Step 3: At this point, a Record Audio panel will show up on the right side of the screen. From that panel, click on the ‘Record’ button to start the recording.

Step 4: After you have completed the recording, hit the ‘Stop’ button. Now, PowerPoint will ask you to either Insert or Discard the audio. Upon clicking on ‘Insert,’ a speaker icon will pop up on the screen. You can listen to your recording from that speaker icon.

Part 3: 7 PowerPoint Presentation Tips to Make Creative Slideshows
Now that all the Windows and Mac users are satisfied after learning about PowerPoint voice recording, it’s the perfect time to share some very useful tips. In the coming part, we are going to share 7 tips that will aid in making creative slideshows.
1. Minimalism
The most crucial tip when it comes to making creative slides is the amount of information. It is said that ‘Less is More.’ While making your slides, you should always add less information to the slides, and you should speak more.
The slides must contain minimal data. Too many wordy slides look boring, and they can never sustain your audiences’ interest. So, it is best suggested to add less and make your slides neat and spacious.
2. Use Design Elements
Adding stock images and background images is a very common trend for making slides. A tip that will make your slides unique and equally attractive is design elements. Choosing a bold color for the background and then adding elements to it makes them shine. The elements dominate on a strong colored background. Images can never be this dominating or expressive.
Also, changing the common trends will make your presentation different and classic as compared to regularly designed slides.
3. One Story at a Time
A very common mistake that people generally make because they are unaware of it is the content. The best practice for quality presentation slides is to add and discuss one story per slide. You should never confuse your audience by sharing multiple things from the same slide.
If you plan to discuss various things, then make separate slides for each story. This way, the audience gets sufficient time to digest and understand one story before moving on to another.
4. Alignment and Symmetry
While making your slides, one key factor that can either make or break your presentation is consistency and alignment. You should never present a rough slide. Always align the text, images, and headings of your slides. Symmetry and consistency are also very important. Follow the same consistent pattern in all slides.
5. Formatting and Settings
Making your slides creative doesn’t mean making them like a rainbow. Simplicity has its own magic and grace. The more your slide is simple and clean, the more readable it is. You should always keep simple colors for text and headings.
Playing with different fonts and styles for headings might also disturb your presentation visually. Selecting the correct font size, style with appropriate colors is essential.
6. Add and Adjust
Always follow the ‘Add and Adjust’ policy. You should never throw data and elements on the slides and present them. The best practice is to add the content, the images and then adjust everything. You should always arrange the text in bullets with proper headings.
For the case of an image, you should add it, inspect it and if needed, crop it. Adding things with perfection makes your presentation stand out and shine differently.
7. Animation
Static slides are too mainstream for today’s fast world. The last tip to make creative slides that can retain your audiences’ attention is animation. By adding a few animated elements to your presentation makes it look classy and quirky. With animation, you can also maintain the interest of your audience.
Last Words
The article has discussed in detail that how someone could record a voice-over PowerPoint. A complete step-by-step guideline has been shared for both Mac and Windows users on audio recording with PowerPoint. We also talked about 7 tips that will surely improve the quality of your slides.
By using the right and effective tool, you can still make creative slides without bothering to follow any tips. Such a tool is Filmora by Wondershare. This is an all-in-one video editing software. With Filmora, you can make the perfect video slideshow by adding multiple images.
You can collectively import images from your device to Filmora, or else you can also take things from its stock library. Filmora also has a wide range of editing effects, filters, and transitions that can make your content aesthetic and perfect.
Versatile Video Editor - Wondershare Filmora
An easy yet powerful editor
Numerous effects to choose from
Detailed tutorials provided by the official channel
02 How to Record Audio on PowerPoint in Mac?
03 7 PowerPoint Presentation Tips to Make Creative Slideshows
Part 1: How to Record Audio on PowerPoint in Windows?
Powerpoint is a presentation-based program. The Microsoft Office product is available for both Windows and macOS. PowerPoint is mostly used in offices for demonstration purposes. It is widely used by teachers to deliver their lectures. With record voice-over PowerPoint, its users can make better presentations.
A question arises here that how to record audio in PowerPoint presentations? If this same question is riding on your mind, then the wait is over. Let us share the steps that should be followed to record audio on PowerPoint in Windows.
Step 1: Firstly, you should open PowerPoint and add a blank slide to record voice-over PowerPoint. You can also record any old presentation by opening the slide where you plan to record audio.

Step 2: then, from the top menu bar, you are requested to head over to the ‘Insert’ section. From the Insert section, select the ‘Media’ option visible at the extreme right side.

Step 3: The Media offers 3 further options. Among those options, you have to hit the ‘Audio’ option. This will open a drop-down from where you have to click on ‘Record Audio.’

Step 4: Now, a small window for Record Sound will show up. Here, set a name for your recording and hit the Record button to start the recording.

Step 5: Once you have completed the recording, click on the Stop button to end the recording and then hit the ‘Ok’ button to exit the recording window.

Step 6: At the end, a speaker icon will appear on the screen. When you hover on that icon, it will show the option to play the recording. You can adjust the speaker icon on the slide, and lastly, save your changes to PowerPoint.

Part 2: How to Record Audio on PowerPoint in Mac?
As mentioned earlier, PowerPoint is available for both Windows and macOS, so how can we forget about Mac users? This section of the article will be talking about how to record audio on a PowerPoint Mac. If you are a Mac user and you plan to learn about this, then the following section is for you. By following the steps below, you can record audio on Powerpoint in Mac.
Step 1: Firstly, open PowerPoint and create a new presentation to record voice-over PowerPoint in Mac. You can also import any file from your Mac to PowerPoint for audio recording.

Step 2: After that, you have to open the slide where you want to record the audio. Then from the menu bar at the top, navigate to the ‘Insert’ section. In the Insert section, there will be an ‘Audio’ tab. Tap on it and then select the ‘Record Audio’ option.

Step 3: At this point, a Record Audio panel will show up on the right side of the screen. From that panel, click on the ‘Record’ button to start the recording.

Step 4: After you have completed the recording, hit the ‘Stop’ button. Now, PowerPoint will ask you to either Insert or Discard the audio. Upon clicking on ‘Insert,’ a speaker icon will pop up on the screen. You can listen to your recording from that speaker icon.

Part 3: 7 PowerPoint Presentation Tips to Make Creative Slideshows
Now that all the Windows and Mac users are satisfied after learning about PowerPoint voice recording, it’s the perfect time to share some very useful tips. In the coming part, we are going to share 7 tips that will aid in making creative slideshows.
1. Minimalism
The most crucial tip when it comes to making creative slides is the amount of information. It is said that ‘Less is More.’ While making your slides, you should always add less information to the slides, and you should speak more.
The slides must contain minimal data. Too many wordy slides look boring, and they can never sustain your audiences’ interest. So, it is best suggested to add less and make your slides neat and spacious.
2. Use Design Elements
Adding stock images and background images is a very common trend for making slides. A tip that will make your slides unique and equally attractive is design elements. Choosing a bold color for the background and then adding elements to it makes them shine. The elements dominate on a strong colored background. Images can never be this dominating or expressive.
Also, changing the common trends will make your presentation different and classic as compared to regularly designed slides.
3. One Story at a Time
A very common mistake that people generally make because they are unaware of it is the content. The best practice for quality presentation slides is to add and discuss one story per slide. You should never confuse your audience by sharing multiple things from the same slide.
If you plan to discuss various things, then make separate slides for each story. This way, the audience gets sufficient time to digest and understand one story before moving on to another.
4. Alignment and Symmetry
While making your slides, one key factor that can either make or break your presentation is consistency and alignment. You should never present a rough slide. Always align the text, images, and headings of your slides. Symmetry and consistency are also very important. Follow the same consistent pattern in all slides.
5. Formatting and Settings
Making your slides creative doesn’t mean making them like a rainbow. Simplicity has its own magic and grace. The more your slide is simple and clean, the more readable it is. You should always keep simple colors for text and headings.
Playing with different fonts and styles for headings might also disturb your presentation visually. Selecting the correct font size, style with appropriate colors is essential.
6. Add and Adjust
Always follow the ‘Add and Adjust’ policy. You should never throw data and elements on the slides and present them. The best practice is to add the content, the images and then adjust everything. You should always arrange the text in bullets with proper headings.
For the case of an image, you should add it, inspect it and if needed, crop it. Adding things with perfection makes your presentation stand out and shine differently.
7. Animation
Static slides are too mainstream for today’s fast world. The last tip to make creative slides that can retain your audiences’ attention is animation. By adding a few animated elements to your presentation makes it look classy and quirky. With animation, you can also maintain the interest of your audience.
Last Words
The article has discussed in detail that how someone could record a voice-over PowerPoint. A complete step-by-step guideline has been shared for both Mac and Windows users on audio recording with PowerPoint. We also talked about 7 tips that will surely improve the quality of your slides.
By using the right and effective tool, you can still make creative slides without bothering to follow any tips. Such a tool is Filmora by Wondershare. This is an all-in-one video editing software. With Filmora, you can make the perfect video slideshow by adding multiple images.
You can collectively import images from your device to Filmora, or else you can also take things from its stock library. Filmora also has a wide range of editing effects, filters, and transitions that can make your content aesthetic and perfect.
Versatile Video Editor - Wondershare Filmora
An easy yet powerful editor
Numerous effects to choose from
Detailed tutorials provided by the official channel
Crafting Silent Elegance: The Art of Audio Ducking in Video Editing with Adobe Premiere Pro on Mac
Tutorial on Audio Ducking in Adobe Premiere Pro on Mac 
Benjamin Arango
Oct 26, 2023• Proven solutions
Too many times, while mixing voiceover with the background music in a video, the dialogues don’t seem to be audible. That’s when we follow the process of audio ducking in Premiere Pro that would automatically lower the volume of the background music whenever there is a dialogue.
The best thing about Premiere Pro audio ducking is that it is an automatic process and we don’t need to put a lot of effort. To make your job easier, I’m going to let you know how to use the Adobe Premiere Pro audio ducking feature in a step by step manner in this guide.
Part 1: How to Use Audio Ducking to Balance Music and Voiceover in Adobe Premiere Pro on Mac?
If you have been using Adobe Premiere Pro on Mac, then you would already be familiar with the wide range of editing features that it has. One of them is the Premiere Pro audio ducking option that comes inbuilt in the application. Using it, you can automatically lower the volume of the background music and amplify your dialogues.
To perform auto-ducking in Premiere Pro, we first need to define each audio track and then use the ducking feature. Here’s how you can also perform audio ducking in Premiere Pro like a pro.
Step 1: Define the Audio Types
Since Adobe Premiere Pro can’t automatically detect the type of sounds, you need to do it manually. To do audio ducking in Premiere Pro, you can first import your video clip and the voiceover to the application, and drag them to the working timeline.
Now, you can first select the voiceover file that you want to amplify, and from the sidebar on the right, click on “Dialogue” as the type of the audio file.
Once you mark the audio type, you will get different options. Here, go to the “Loudness” option and click on the “Auto Match” button.
Afterward, you can do the same for your background audio file. Select the file and choose its audio type as “Music”. You can also set its loudness to “Auto Match” if you want to.
Step 2: Perform Auto Ducking in Premiere Pro
Now when you have set the audio types, you can just find the Ducking option on the sidebar and turn it on. Here, you can first click on the dialogue icon from the top and get the needed options. You can adjust its sensitivity and set a level or improve or reduce its quality.
Apart from the dialogue icon, you can also click on the Music icon and do the same. For instance, you can reduce the quality of the background music and increase the level of the dialogue track.
Step 3: Make the Final Changes
Great! You can now preview the changes you have made and check the audio ducking results in Premiere Pro. If you want to finalize things, then you can perform keyframing and manually adjust the volume.
Furthermore, you can also perform an instant hard ducking in Premiere Pro. For this, just choose the track, go to the side panel, and select Preset > Music > Hard Vocal Ducking. While it would get instant results in Adobe Premiere audio ducking, the results might not be so effective.
Part 2: Wondershare Filmora
As you can see, the Premiere Pro audio ducking feature can get a bit complicated if you are a beginner. Therefore, if you are looking for a simpler and more effective automatic ducking solution, then use Wondershare Filmora. This intuitive and diverse video/audio editing tool has an automatic audio ducking option that would make your job a whole lot easier.
To learn how to perform automatic audio ducking in your videos on Mac via Wondershare Filmora, one can follow these steps:
Step 1: Load the Video or Audio Files on Filmora
Firstly, you can just launch Wondershare Filmora on your Mac and import your videos/audios. You can drag and drop the files or just go to its Import Menu option to browse the files. Afterward, you can drag the files to the timeline at the bottom to work on them.
On the native interface of Filmora, you can also directly record voiceovers. Just click on the voiceover icon (below the preview window) and start recording any dialogue.
Not just that, you can also find a wide range of royalty-free music on Filmora that you can readily use in your projects without any copyright issues.
Step 2: Perform Automatic Audio Ducking on Filmora
Great! Now you can see your video and the audio track on the timeline of Filmora. At first, you need to select the voiceover (or any other track) that you want to amplify.
Once the desired audio track is selected, right-click it, and choose the “Adjust Audio” option.
As the dedicated Audio Editor will open, just go to the “Ducking” option at the bottom and turn on the “Lower the volume of other clips” feature. You can further select the level to lower the volume of other background clips in the video here.
Step 3: Save and Export Your Video
That’s it! After making the changes, just click on the “OK” button and Filmora would automatically adjust the volume of other clips. You can further make the needed changes in the video and click on the “Export” icon. This will let you save the project in the desired format and resolution on your computer.
Who knew it would be so easy to do auto-ducking in Premiere Pro, right? Though, if you are looking for even a simpler alternative to Adobe Premiere audio ducking, then consider using Wondershare Filmora. A user-friendly and resourceful video editor, it offers a wide range of features and other inbuilt tools that would meet every post-production requirement of yours in one place.

Benjamin Arango
Benjamin Arango is a writer and a lover of all things video.
Follow @Benjamin Arango
Benjamin Arango
Oct 26, 2023• Proven solutions
Too many times, while mixing voiceover with the background music in a video, the dialogues don’t seem to be audible. That’s when we follow the process of audio ducking in Premiere Pro that would automatically lower the volume of the background music whenever there is a dialogue.
The best thing about Premiere Pro audio ducking is that it is an automatic process and we don’t need to put a lot of effort. To make your job easier, I’m going to let you know how to use the Adobe Premiere Pro audio ducking feature in a step by step manner in this guide.
Part 1: How to Use Audio Ducking to Balance Music and Voiceover in Adobe Premiere Pro on Mac?
If you have been using Adobe Premiere Pro on Mac, then you would already be familiar with the wide range of editing features that it has. One of them is the Premiere Pro audio ducking option that comes inbuilt in the application. Using it, you can automatically lower the volume of the background music and amplify your dialogues.
To perform auto-ducking in Premiere Pro, we first need to define each audio track and then use the ducking feature. Here’s how you can also perform audio ducking in Premiere Pro like a pro.
Step 1: Define the Audio Types
Since Adobe Premiere Pro can’t automatically detect the type of sounds, you need to do it manually. To do audio ducking in Premiere Pro, you can first import your video clip and the voiceover to the application, and drag them to the working timeline.
Now, you can first select the voiceover file that you want to amplify, and from the sidebar on the right, click on “Dialogue” as the type of the audio file.
Once you mark the audio type, you will get different options. Here, go to the “Loudness” option and click on the “Auto Match” button.
Afterward, you can do the same for your background audio file. Select the file and choose its audio type as “Music”. You can also set its loudness to “Auto Match” if you want to.
Step 2: Perform Auto Ducking in Premiere Pro
Now when you have set the audio types, you can just find the Ducking option on the sidebar and turn it on. Here, you can first click on the dialogue icon from the top and get the needed options. You can adjust its sensitivity and set a level or improve or reduce its quality.
Apart from the dialogue icon, you can also click on the Music icon and do the same. For instance, you can reduce the quality of the background music and increase the level of the dialogue track.
Step 3: Make the Final Changes
Great! You can now preview the changes you have made and check the audio ducking results in Premiere Pro. If you want to finalize things, then you can perform keyframing and manually adjust the volume.
Furthermore, you can also perform an instant hard ducking in Premiere Pro. For this, just choose the track, go to the side panel, and select Preset > Music > Hard Vocal Ducking. While it would get instant results in Adobe Premiere audio ducking, the results might not be so effective.
Part 2: Wondershare Filmora
As you can see, the Premiere Pro audio ducking feature can get a bit complicated if you are a beginner. Therefore, if you are looking for a simpler and more effective automatic ducking solution, then use Wondershare Filmora. This intuitive and diverse video/audio editing tool has an automatic audio ducking option that would make your job a whole lot easier.
To learn how to perform automatic audio ducking in your videos on Mac via Wondershare Filmora, one can follow these steps:
Step 1: Load the Video or Audio Files on Filmora
Firstly, you can just launch Wondershare Filmora on your Mac and import your videos/audios. You can drag and drop the files or just go to its Import Menu option to browse the files. Afterward, you can drag the files to the timeline at the bottom to work on them.
On the native interface of Filmora, you can also directly record voiceovers. Just click on the voiceover icon (below the preview window) and start recording any dialogue.
Not just that, you can also find a wide range of royalty-free music on Filmora that you can readily use in your projects without any copyright issues.
Step 2: Perform Automatic Audio Ducking on Filmora
Great! Now you can see your video and the audio track on the timeline of Filmora. At first, you need to select the voiceover (or any other track) that you want to amplify.
Once the desired audio track is selected, right-click it, and choose the “Adjust Audio” option.
As the dedicated Audio Editor will open, just go to the “Ducking” option at the bottom and turn on the “Lower the volume of other clips” feature. You can further select the level to lower the volume of other background clips in the video here.
Step 3: Save and Export Your Video
That’s it! After making the changes, just click on the “OK” button and Filmora would automatically adjust the volume of other clips. You can further make the needed changes in the video and click on the “Export” icon. This will let you save the project in the desired format and resolution on your computer.
Who knew it would be so easy to do auto-ducking in Premiere Pro, right? Though, if you are looking for even a simpler alternative to Adobe Premiere audio ducking, then consider using Wondershare Filmora. A user-friendly and resourceful video editor, it offers a wide range of features and other inbuilt tools that would meet every post-production requirement of yours in one place.

Benjamin Arango
Benjamin Arango is a writer and a lover of all things video.
Follow @Benjamin Arango
Benjamin Arango
Oct 26, 2023• Proven solutions
Too many times, while mixing voiceover with the background music in a video, the dialogues don’t seem to be audible. That’s when we follow the process of audio ducking in Premiere Pro that would automatically lower the volume of the background music whenever there is a dialogue.
The best thing about Premiere Pro audio ducking is that it is an automatic process and we don’t need to put a lot of effort. To make your job easier, I’m going to let you know how to use the Adobe Premiere Pro audio ducking feature in a step by step manner in this guide.
Part 1: How to Use Audio Ducking to Balance Music and Voiceover in Adobe Premiere Pro on Mac?
If you have been using Adobe Premiere Pro on Mac, then you would already be familiar with the wide range of editing features that it has. One of them is the Premiere Pro audio ducking option that comes inbuilt in the application. Using it, you can automatically lower the volume of the background music and amplify your dialogues.
To perform auto-ducking in Premiere Pro, we first need to define each audio track and then use the ducking feature. Here’s how you can also perform audio ducking in Premiere Pro like a pro.
Step 1: Define the Audio Types
Since Adobe Premiere Pro can’t automatically detect the type of sounds, you need to do it manually. To do audio ducking in Premiere Pro, you can first import your video clip and the voiceover to the application, and drag them to the working timeline.
Now, you can first select the voiceover file that you want to amplify, and from the sidebar on the right, click on “Dialogue” as the type of the audio file.
Once you mark the audio type, you will get different options. Here, go to the “Loudness” option and click on the “Auto Match” button.
Afterward, you can do the same for your background audio file. Select the file and choose its audio type as “Music”. You can also set its loudness to “Auto Match” if you want to.
Step 2: Perform Auto Ducking in Premiere Pro
Now when you have set the audio types, you can just find the Ducking option on the sidebar and turn it on. Here, you can first click on the dialogue icon from the top and get the needed options. You can adjust its sensitivity and set a level or improve or reduce its quality.
Apart from the dialogue icon, you can also click on the Music icon and do the same. For instance, you can reduce the quality of the background music and increase the level of the dialogue track.
Step 3: Make the Final Changes
Great! You can now preview the changes you have made and check the audio ducking results in Premiere Pro. If you want to finalize things, then you can perform keyframing and manually adjust the volume.
Furthermore, you can also perform an instant hard ducking in Premiere Pro. For this, just choose the track, go to the side panel, and select Preset > Music > Hard Vocal Ducking. While it would get instant results in Adobe Premiere audio ducking, the results might not be so effective.
Part 2: Wondershare Filmora
As you can see, the Premiere Pro audio ducking feature can get a bit complicated if you are a beginner. Therefore, if you are looking for a simpler and more effective automatic ducking solution, then use Wondershare Filmora. This intuitive and diverse video/audio editing tool has an automatic audio ducking option that would make your job a whole lot easier.
To learn how to perform automatic audio ducking in your videos on Mac via Wondershare Filmora, one can follow these steps:
Step 1: Load the Video or Audio Files on Filmora
Firstly, you can just launch Wondershare Filmora on your Mac and import your videos/audios. You can drag and drop the files or just go to its Import Menu option to browse the files. Afterward, you can drag the files to the timeline at the bottom to work on them.
On the native interface of Filmora, you can also directly record voiceovers. Just click on the voiceover icon (below the preview window) and start recording any dialogue.
Not just that, you can also find a wide range of royalty-free music on Filmora that you can readily use in your projects without any copyright issues.
Step 2: Perform Automatic Audio Ducking on Filmora
Great! Now you can see your video and the audio track on the timeline of Filmora. At first, you need to select the voiceover (or any other track) that you want to amplify.
Once the desired audio track is selected, right-click it, and choose the “Adjust Audio” option.
As the dedicated Audio Editor will open, just go to the “Ducking” option at the bottom and turn on the “Lower the volume of other clips” feature. You can further select the level to lower the volume of other background clips in the video here.
Step 3: Save and Export Your Video
That’s it! After making the changes, just click on the “OK” button and Filmora would automatically adjust the volume of other clips. You can further make the needed changes in the video and click on the “Export” icon. This will let you save the project in the desired format and resolution on your computer.
Who knew it would be so easy to do auto-ducking in Premiere Pro, right? Though, if you are looking for even a simpler alternative to Adobe Premiere audio ducking, then consider using Wondershare Filmora. A user-friendly and resourceful video editor, it offers a wide range of features and other inbuilt tools that would meet every post-production requirement of yours in one place.

Benjamin Arango
Benjamin Arango is a writer and a lover of all things video.
Follow @Benjamin Arango
Benjamin Arango
Oct 26, 2023• Proven solutions
Too many times, while mixing voiceover with the background music in a video, the dialogues don’t seem to be audible. That’s when we follow the process of audio ducking in Premiere Pro that would automatically lower the volume of the background music whenever there is a dialogue.
The best thing about Premiere Pro audio ducking is that it is an automatic process and we don’t need to put a lot of effort. To make your job easier, I’m going to let you know how to use the Adobe Premiere Pro audio ducking feature in a step by step manner in this guide.
Part 1: How to Use Audio Ducking to Balance Music and Voiceover in Adobe Premiere Pro on Mac?
If you have been using Adobe Premiere Pro on Mac, then you would already be familiar with the wide range of editing features that it has. One of them is the Premiere Pro audio ducking option that comes inbuilt in the application. Using it, you can automatically lower the volume of the background music and amplify your dialogues.
To perform auto-ducking in Premiere Pro, we first need to define each audio track and then use the ducking feature. Here’s how you can also perform audio ducking in Premiere Pro like a pro.
Step 1: Define the Audio Types
Since Adobe Premiere Pro can’t automatically detect the type of sounds, you need to do it manually. To do audio ducking in Premiere Pro, you can first import your video clip and the voiceover to the application, and drag them to the working timeline.
Now, you can first select the voiceover file that you want to amplify, and from the sidebar on the right, click on “Dialogue” as the type of the audio file.
Once you mark the audio type, you will get different options. Here, go to the “Loudness” option and click on the “Auto Match” button.
Afterward, you can do the same for your background audio file. Select the file and choose its audio type as “Music”. You can also set its loudness to “Auto Match” if you want to.
Step 2: Perform Auto Ducking in Premiere Pro
Now when you have set the audio types, you can just find the Ducking option on the sidebar and turn it on. Here, you can first click on the dialogue icon from the top and get the needed options. You can adjust its sensitivity and set a level or improve or reduce its quality.
Apart from the dialogue icon, you can also click on the Music icon and do the same. For instance, you can reduce the quality of the background music and increase the level of the dialogue track.
Step 3: Make the Final Changes
Great! You can now preview the changes you have made and check the audio ducking results in Premiere Pro. If you want to finalize things, then you can perform keyframing and manually adjust the volume.
Furthermore, you can also perform an instant hard ducking in Premiere Pro. For this, just choose the track, go to the side panel, and select Preset > Music > Hard Vocal Ducking. While it would get instant results in Adobe Premiere audio ducking, the results might not be so effective.
Part 2: Wondershare Filmora
As you can see, the Premiere Pro audio ducking feature can get a bit complicated if you are a beginner. Therefore, if you are looking for a simpler and more effective automatic ducking solution, then use Wondershare Filmora. This intuitive and diverse video/audio editing tool has an automatic audio ducking option that would make your job a whole lot easier.
To learn how to perform automatic audio ducking in your videos on Mac via Wondershare Filmora, one can follow these steps:
Step 1: Load the Video or Audio Files on Filmora
Firstly, you can just launch Wondershare Filmora on your Mac and import your videos/audios. You can drag and drop the files or just go to its Import Menu option to browse the files. Afterward, you can drag the files to the timeline at the bottom to work on them.
On the native interface of Filmora, you can also directly record voiceovers. Just click on the voiceover icon (below the preview window) and start recording any dialogue.
Not just that, you can also find a wide range of royalty-free music on Filmora that you can readily use in your projects without any copyright issues.
Step 2: Perform Automatic Audio Ducking on Filmora
Great! Now you can see your video and the audio track on the timeline of Filmora. At first, you need to select the voiceover (or any other track) that you want to amplify.
Once the desired audio track is selected, right-click it, and choose the “Adjust Audio” option.
As the dedicated Audio Editor will open, just go to the “Ducking” option at the bottom and turn on the “Lower the volume of other clips” feature. You can further select the level to lower the volume of other background clips in the video here.
Step 3: Save and Export Your Video
That’s it! After making the changes, just click on the “OK” button and Filmora would automatically adjust the volume of other clips. You can further make the needed changes in the video and click on the “Export” icon. This will let you save the project in the desired format and resolution on your computer.
Who knew it would be so easy to do auto-ducking in Premiere Pro, right? Though, if you are looking for even a simpler alternative to Adobe Premiere audio ducking, then consider using Wondershare Filmora. A user-friendly and resourceful video editor, it offers a wide range of features and other inbuilt tools that would meet every post-production requirement of yours in one place.

Benjamin Arango
Benjamin Arango is a writer and a lover of all things video.
Follow @Benjamin Arango
Pioneering the Sound of Anime: Leading Desktop & Mobile Voice Transformation Tools
If you’re a die-hard anime fan and obsessed with some Japanese characters, you deserve the best anime voice changer. It can be quite hectic for some people to search for the right anime girl voice changer.
Just so you know, voice modifications go a long way rather than just gaming and streaming with anime voices for fun. One can even earn a nice fortune with anime background voices. Beginners could get some dollars per sentence, while many professionals can earn above a hundred dollars.
Sounds interesting? Then keep reading below to check out some of the best voice changers and how to use them! This article will guide you step-by-step, whether you wish to use Voicemod or Premier pro to create an anime voice.
For Win 7 or later (64-bit)
For macOS 10.12 or later
Part 1: Change Voice into Anime With Voicemod
Voicemod is a free and popular anime voice changer that is famous among many ZOOM, Google Hangout and Duo users. It allows content creators and gamers to easily change voices into their favorite anime characters. Streaming is more enjoyable when coupled with the fun voice modification features! Currently, it supports Windows 7/8/10 64-bit computers.
Voicemod is a voice modifier that can be used with any streaming platform from Twitch to Omegle and several others. You can also add “effects” through the soundboard and alter background effects as per your need! There is a surprisingly vast library, and you can even make alterations in the character’s voice, amazing right? Whether you’re a PUBG fan or you belong from the CS: GO or Fortnite teams, Voicemod works with a wide range of games.
You should be a Voicemod PRO user, however, if not, you can still learn these steps and become one easily. Hence, to enjoy the features Voicemode enables you with, get started with the guidelines below!
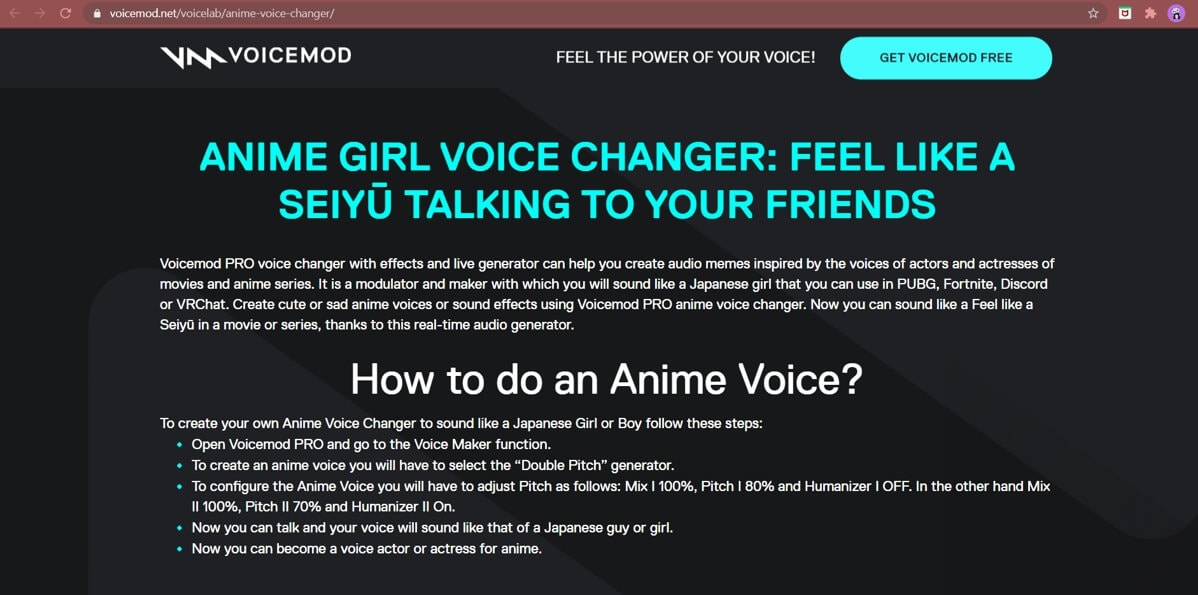
Firstly, you need to access Voicemod PRO and tap onto the “Voice Maker” option from the list.
We will choose accordingly from the various options Voicemod PRO provides, such as robotic voice or any other fictional character. You will tap on the “Double Pitch” generator button for the users looking for an anime voice changer.
To configure the Anime voice, you will have to adjust Pitch: Mix I 100%, Pitch I 80%, and Humanizer I OFF. On the other hand, Mix II 100%, Pitch II 70%, and Humanizer II ON.
That’s it! You’re all set now to enjoy the game with the perfect anime voice. Sound like your favorite anime character and impress other fans and weebs out there!
To configure the Anime voice, you will have to adjust Pitch as follows: Mix I 100%, Pitch I 80%, and Humanizer I OFF. On the other hand, Mix II 100%, Pitch II 70%, and Humanizer II ON.
Part 2: Make an Anime Voice in Adobe Premiere
Adobe Premiere is a software application for video content creators and editors. In the case of TV series or dramas, even professional actors often need a bit of pitch adjustment to voices. Pitch shifting is not only made easy but accessible to all as well in Premiere Pro. Below all the key steps are highlighted, which provide you with the precise process of making anime voice in PR.
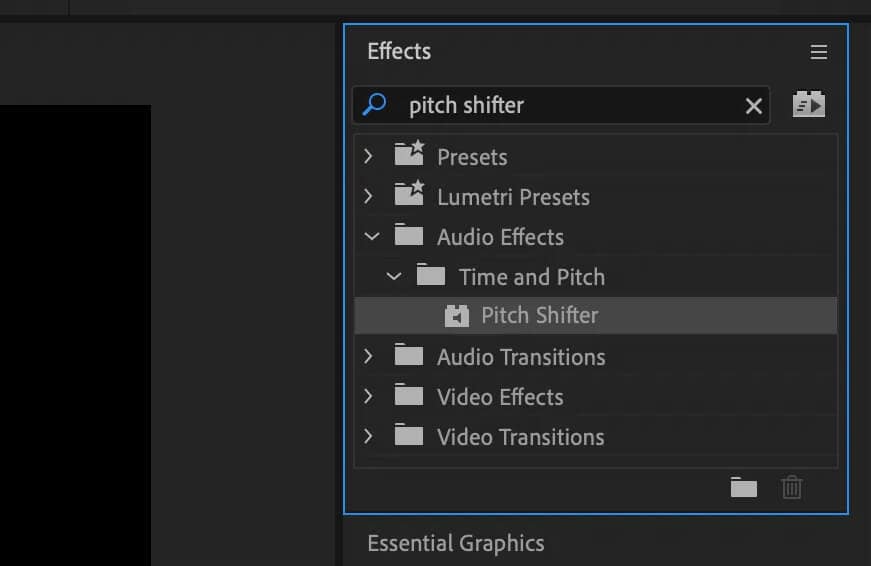
Firstly, the audio recording needs to be uploaded to Adobe Premiere Pro. We can also directly record the audio in the Premiere Pro timeline.
Secondly, we will choose the effect we wish to apply. In this case, the “Pitch Shifter” effect is applied. Tap on the effects list, choose “pitch shifter,” and then drag down to the audio file.
Next, it’s time to adjust the pitch as per the need. We can shift the pitch higher for a sharp female voice or down for heavier vocals. If you now have achieved the desired results, you know how to use this anime girl voice changer.
Besides the Pitch Shifter feature in Premiere Pro, you can also use the equalizer to adjust the voice too. With an equalizer, you can give nasal effects to your audio. This effect is usually a popular trend with anime voice changers. To give nasal effects, you have to load the EQ first. Next, you need to cut or boost the frequencies as per your need. The limit provided is usually 1k to 1.2k Hz.
These are the main effects one gets to choose from when using Adobe Premiere.
Part 3: Cartoon and Animate Your Voice with Adobe Audition in Real-Time
Now Adobe Audition is another Adobe application specifically made for editing audio content. Most users would advise you of this anime girl voice changer because of its ease of use. Also the fact that it is specifically for audio adjustments makes it more favorable.
Adobe Audition is a digital audio workstation and an amazing option for those wishing to make a career in anime voice changing. Whether you wish to lower pitch, change echo levels, or reverb your voice recording, it has a huge library of effects.
To use this real-time voice changer, the first tab you have to open is the top-left “Multitrack” button and create a new multitrack session.
In track 1, tap the “R” button which will turn your microphone for voice recording. Next, tap the “I” button to hear the effects you apply while editing.
Choose your desired effect from the library tab and test it while you adjust other settings.
And that’s it! It is that easy to make settings in Adobe Audition.
Audition provides you a toolkit, in which you can add features and presets for further work. This anime voice changer is professional-level software that allows anime lovers to stream for fun and work with outstanding features.
You can also create amazingly smooth podcasts and design several effects. Now, what’s better than creating and designing your sound effects?
Surely now, many of your confusions regarding anime voice changers would be cleared. Next up on the list is a highly portable mobile app.
Part 4: Create Anime Voice on Mobile with Voice Changer App
1. Voice Changer - anime voice effects changing the game
Available for: Android

With this one, you can easily edit, mix, or disguise voices and get all your content edits done right on your phone. It is a mix of features provided in recording apps and voice editors. It has a wide range of fictional characters, albeit not as much as the other software suggested above.
You can type in a character you wish to modify your voice and apply it to your recording. This one’s mostly used by teenagers and streaming enthusiasts just for fun and is nice entertainment on the go. So if you’re looking for a memory-friendly anime girl voice changer, don’t worry! Even the smallest kid in the house can learn to use it.
Available for: iPad
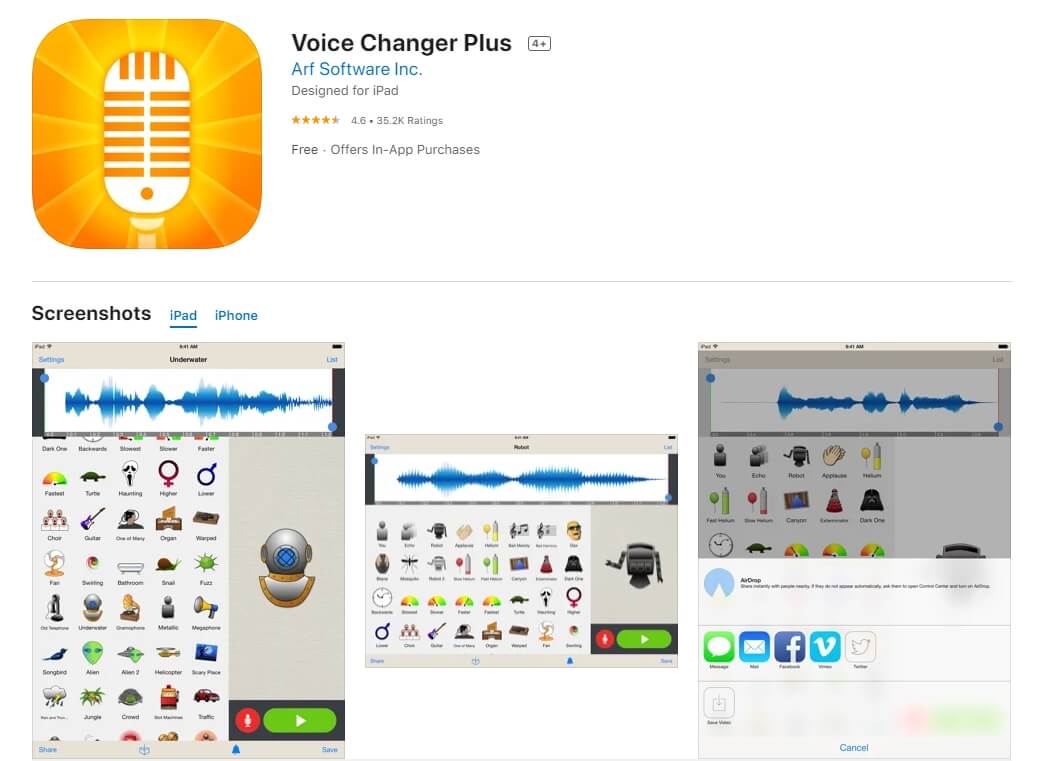
This is another creative mobile voice changer app for iPad users. Widen your horizons with the amazing sound-changing options provided in this software. Voice changer plus is a step ahead in the work of anime edits. While being more of an entertainment app, you can also work with this smoothly. Whether you’re a beginner at using anime voice changers or not, don’t worry. This application is really easy to use and smoothly works on sufficient memory. Listen to your voice backward or reverbed with this creative tool.
Since now you have a nice idea of how the most popular anime voice changers work, you’re ready! Whether you’re looking to make a career in anime background voicing or just streaming for fun, go ahead! All the applications suggested here are super-easy to use and even free.
For Win 7 or later (64-bit)
For macOS 10.12 or later
Part 1: Change Voice into Anime With Voicemod
Voicemod is a free and popular anime voice changer that is famous among many ZOOM, Google Hangout and Duo users. It allows content creators and gamers to easily change voices into their favorite anime characters. Streaming is more enjoyable when coupled with the fun voice modification features! Currently, it supports Windows 7/8/10 64-bit computers.

Voicemod is a voice modifier that can be used with any streaming platform from Twitch to Omegle and several others. You can also add “effects” through the soundboard and alter background effects as per your need! There is a surprisingly vast library, and you can even make alterations in the character’s voice, amazing right? Whether you’re a PUBG fan or you belong from the CS: GO or Fortnite teams, Voicemod works with a wide range of games.
You should be a Voicemod PRO user, however, if not, you can still learn these steps and become one easily. Hence, to enjoy the features Voicemode enables you with, get started with the guidelines below!
Firstly, you need to access Voicemod PRO and tap onto the “Voice Maker” option from the list.
We will choose accordingly from the various options Voicemod PRO provides, such as robotic voice or any other fictional character. You will tap on the “Double Pitch” generator button for the users looking for an anime voice changer.
To configure the Anime voice, you will have to adjust Pitch: Mix I 100%, Pitch I 80%, and Humanizer I OFF. On the other hand, Mix II 100%, Pitch II 70%, and Humanizer II ON.
That’s it! You’re all set now to enjoy the game with the perfect anime voice. Sound like your favorite anime character and impress other fans and weebs out there!
To configure the Anime voice, you will have to adjust Pitch as follows: Mix I 100%, Pitch I 80%, and Humanizer I OFF. On the other hand, Mix II 100%, Pitch II 70%, and Humanizer II ON.
Part 2: Make an Anime Voice in Adobe Premiere
Adobe Premiere is a software application for video content creators and editors. In the case of TV series or dramas, even professional actors often need a bit of pitch adjustment to voices. Pitch shifting is not only made easy but accessible to all as well in Premiere Pro. Below all the key steps are highlighted, which provide you with the precise process of making anime voice in PR.

Firstly, the audio recording needs to be uploaded to Adobe Premiere Pro. We can also directly record the audio in the Premiere Pro timeline.
Secondly, we will choose the effect we wish to apply. In this case, the “Pitch Shifter” effect is applied. Tap on the effects list, choose “pitch shifter,” and then drag down to the audio file.
Next, it’s time to adjust the pitch as per the need. We can shift the pitch higher for a sharp female voice or down for heavier vocals. If you now have achieved the desired results, you know how to use this anime girl voice changer.
Besides the Pitch Shifter feature in Premiere Pro, you can also use the equalizer to adjust the voice too. With an equalizer, you can give nasal effects to your audio. This effect is usually a popular trend with anime voice changers. To give nasal effects, you have to load the EQ first. Next, you need to cut or boost the frequencies as per your need. The limit provided is usually 1k to 1.2k Hz.
These are the main effects one gets to choose from when using Adobe Premiere.
Part 3: Cartoon and Animate Your Voice with Adobe Audition in Real-Time
Now Adobe Audition is another Adobe application specifically made for editing audio content. Most users would advise you of this anime girl voice changer because of its ease of use. Also the fact that it is specifically for audio adjustments makes it more favorable.
Adobe Audition is a digital audio workstation and an amazing option for those wishing to make a career in anime voice changing. Whether you wish to lower pitch, change echo levels, or reverb your voice recording, it has a huge library of effects.
To use this real-time voice changer, the first tab you have to open is the top-left “Multitrack” button and create a new multitrack session.
In track 1, tap the “R” button which will turn your microphone for voice recording. Next, tap the “I” button to hear the effects you apply while editing.
Choose your desired effect from the library tab and test it while you adjust other settings.
And that’s it! It is that easy to make settings in Adobe Audition.
Audition provides you a toolkit, in which you can add features and presets for further work. This anime voice changer is professional-level software that allows anime lovers to stream for fun and work with outstanding features.
You can also create amazingly smooth podcasts and design several effects. Now, what’s better than creating and designing your sound effects?
Surely now, many of your confusions regarding anime voice changers would be cleared. Next up on the list is a highly portable mobile app.
Part 4: Create Anime Voice on Mobile with Voice Changer App
1. Voice Changer - anime voice effects changing the game
Available for: Android

With this one, you can easily edit, mix, or disguise voices and get all your content edits done right on your phone. It is a mix of features provided in recording apps and voice editors. It has a wide range of fictional characters, albeit not as much as the other software suggested above.
You can type in a character you wish to modify your voice and apply it to your recording. This one’s mostly used by teenagers and streaming enthusiasts just for fun and is nice entertainment on the go. So if you’re looking for a memory-friendly anime girl voice changer, don’t worry! Even the smallest kid in the house can learn to use it.
Available for: iPad
This is another creative mobile voice changer app for iPad users. Widen your horizons with the amazing sound-changing options provided in this software. Voice changer plus is a step ahead in the work of anime edits. While being more of an entertainment app, you can also work with this smoothly. Whether you’re a beginner at using anime voice changers or not, don’t worry. This application is really easy to use and smoothly works on sufficient memory. Listen to your voice backward or reverbed with this creative tool.

Since now you have a nice idea of how the most popular anime voice changers work, you’re ready! Whether you’re looking to make a career in anime background voicing or just streaming for fun, go ahead! All the applications suggested here are super-easy to use and even free.
For Win 7 or later (64-bit)
For macOS 10.12 or later
Part 1: Change Voice into Anime With Voicemod
Voicemod is a free and popular anime voice changer that is famous among many ZOOM, Google Hangout and Duo users. It allows content creators and gamers to easily change voices into their favorite anime characters. Streaming is more enjoyable when coupled with the fun voice modification features! Currently, it supports Windows 7/8/10 64-bit computers.

Voicemod is a voice modifier that can be used with any streaming platform from Twitch to Omegle and several others. You can also add “effects” through the soundboard and alter background effects as per your need! There is a surprisingly vast library, and you can even make alterations in the character’s voice, amazing right? Whether you’re a PUBG fan or you belong from the CS: GO or Fortnite teams, Voicemod works with a wide range of games.
You should be a Voicemod PRO user, however, if not, you can still learn these steps and become one easily. Hence, to enjoy the features Voicemode enables you with, get started with the guidelines below!
Firstly, you need to access Voicemod PRO and tap onto the “Voice Maker” option from the list.
We will choose accordingly from the various options Voicemod PRO provides, such as robotic voice or any other fictional character. You will tap on the “Double Pitch” generator button for the users looking for an anime voice changer.
To configure the Anime voice, you will have to adjust Pitch: Mix I 100%, Pitch I 80%, and Humanizer I OFF. On the other hand, Mix II 100%, Pitch II 70%, and Humanizer II ON.
That’s it! You’re all set now to enjoy the game with the perfect anime voice. Sound like your favorite anime character and impress other fans and weebs out there!
To configure the Anime voice, you will have to adjust Pitch as follows: Mix I 100%, Pitch I 80%, and Humanizer I OFF. On the other hand, Mix II 100%, Pitch II 70%, and Humanizer II ON.
Part 2: Make an Anime Voice in Adobe Premiere
Adobe Premiere is a software application for video content creators and editors. In the case of TV series or dramas, even professional actors often need a bit of pitch adjustment to voices. Pitch shifting is not only made easy but accessible to all as well in Premiere Pro. Below all the key steps are highlighted, which provide you with the precise process of making anime voice in PR.

Firstly, the audio recording needs to be uploaded to Adobe Premiere Pro. We can also directly record the audio in the Premiere Pro timeline.
Secondly, we will choose the effect we wish to apply. In this case, the “Pitch Shifter” effect is applied. Tap on the effects list, choose “pitch shifter,” and then drag down to the audio file.
Next, it’s time to adjust the pitch as per the need. We can shift the pitch higher for a sharp female voice or down for heavier vocals. If you now have achieved the desired results, you know how to use this anime girl voice changer.
Besides the Pitch Shifter feature in Premiere Pro, you can also use the equalizer to adjust the voice too. With an equalizer, you can give nasal effects to your audio. This effect is usually a popular trend with anime voice changers. To give nasal effects, you have to load the EQ first. Next, you need to cut or boost the frequencies as per your need. The limit provided is usually 1k to 1.2k Hz.
These are the main effects one gets to choose from when using Adobe Premiere.
Part 3: Cartoon and Animate Your Voice with Adobe Audition in Real-Time
Now Adobe Audition is another Adobe application specifically made for editing audio content. Most users would advise you of this anime girl voice changer because of its ease of use. Also the fact that it is specifically for audio adjustments makes it more favorable.
Adobe Audition is a digital audio workstation and an amazing option for those wishing to make a career in anime voice changing. Whether you wish to lower pitch, change echo levels, or reverb your voice recording, it has a huge library of effects.
To use this real-time voice changer, the first tab you have to open is the top-left “Multitrack” button and create a new multitrack session.
In track 1, tap the “R” button which will turn your microphone for voice recording. Next, tap the “I” button to hear the effects you apply while editing.
Choose your desired effect from the library tab and test it while you adjust other settings.
And that’s it! It is that easy to make settings in Adobe Audition.
Audition provides you a toolkit, in which you can add features and presets for further work. This anime voice changer is professional-level software that allows anime lovers to stream for fun and work with outstanding features.
You can also create amazingly smooth podcasts and design several effects. Now, what’s better than creating and designing your sound effects?
Surely now, many of your confusions regarding anime voice changers would be cleared. Next up on the list is a highly portable mobile app.
Part 4: Create Anime Voice on Mobile with Voice Changer App
1. Voice Changer - anime voice effects changing the game
Available for: Android

With this one, you can easily edit, mix, or disguise voices and get all your content edits done right on your phone. It is a mix of features provided in recording apps and voice editors. It has a wide range of fictional characters, albeit not as much as the other software suggested above.
You can type in a character you wish to modify your voice and apply it to your recording. This one’s mostly used by teenagers and streaming enthusiasts just for fun and is nice entertainment on the go. So if you’re looking for a memory-friendly anime girl voice changer, don’t worry! Even the smallest kid in the house can learn to use it.
Available for: iPad
This is another creative mobile voice changer app for iPad users. Widen your horizons with the amazing sound-changing options provided in this software. Voice changer plus is a step ahead in the work of anime edits. While being more of an entertainment app, you can also work with this smoothly. Whether you’re a beginner at using anime voice changers or not, don’t worry. This application is really easy to use and smoothly works on sufficient memory. Listen to your voice backward or reverbed with this creative tool.

Since now you have a nice idea of how the most popular anime voice changers work, you’re ready! Whether you’re looking to make a career in anime background voicing or just streaming for fun, go ahead! All the applications suggested here are super-easy to use and even free.
For Win 7 or later (64-bit)
For macOS 10.12 or later
Part 1: Change Voice into Anime With Voicemod
Voicemod is a free and popular anime voice changer that is famous among many ZOOM, Google Hangout and Duo users. It allows content creators and gamers to easily change voices into their favorite anime characters. Streaming is more enjoyable when coupled with the fun voice modification features! Currently, it supports Windows 7/8/10 64-bit computers.

Voicemod is a voice modifier that can be used with any streaming platform from Twitch to Omegle and several others. You can also add “effects” through the soundboard and alter background effects as per your need! There is a surprisingly vast library, and you can even make alterations in the character’s voice, amazing right? Whether you’re a PUBG fan or you belong from the CS: GO or Fortnite teams, Voicemod works with a wide range of games.
You should be a Voicemod PRO user, however, if not, you can still learn these steps and become one easily. Hence, to enjoy the features Voicemode enables you with, get started with the guidelines below!
Firstly, you need to access Voicemod PRO and tap onto the “Voice Maker” option from the list.
We will choose accordingly from the various options Voicemod PRO provides, such as robotic voice or any other fictional character. You will tap on the “Double Pitch” generator button for the users looking for an anime voice changer.
To configure the Anime voice, you will have to adjust Pitch: Mix I 100%, Pitch I 80%, and Humanizer I OFF. On the other hand, Mix II 100%, Pitch II 70%, and Humanizer II ON.
That’s it! You’re all set now to enjoy the game with the perfect anime voice. Sound like your favorite anime character and impress other fans and weebs out there!
To configure the Anime voice, you will have to adjust Pitch as follows: Mix I 100%, Pitch I 80%, and Humanizer I OFF. On the other hand, Mix II 100%, Pitch II 70%, and Humanizer II ON.
Part 2: Make an Anime Voice in Adobe Premiere
Adobe Premiere is a software application for video content creators and editors. In the case of TV series or dramas, even professional actors often need a bit of pitch adjustment to voices. Pitch shifting is not only made easy but accessible to all as well in Premiere Pro. Below all the key steps are highlighted, which provide you with the precise process of making anime voice in PR.

Firstly, the audio recording needs to be uploaded to Adobe Premiere Pro. We can also directly record the audio in the Premiere Pro timeline.
Secondly, we will choose the effect we wish to apply. In this case, the “Pitch Shifter” effect is applied. Tap on the effects list, choose “pitch shifter,” and then drag down to the audio file.
Next, it’s time to adjust the pitch as per the need. We can shift the pitch higher for a sharp female voice or down for heavier vocals. If you now have achieved the desired results, you know how to use this anime girl voice changer.
Besides the Pitch Shifter feature in Premiere Pro, you can also use the equalizer to adjust the voice too. With an equalizer, you can give nasal effects to your audio. This effect is usually a popular trend with anime voice changers. To give nasal effects, you have to load the EQ first. Next, you need to cut or boost the frequencies as per your need. The limit provided is usually 1k to 1.2k Hz.
These are the main effects one gets to choose from when using Adobe Premiere.
Part 3: Cartoon and Animate Your Voice with Adobe Audition in Real-Time
Now Adobe Audition is another Adobe application specifically made for editing audio content. Most users would advise you of this anime girl voice changer because of its ease of use. Also the fact that it is specifically for audio adjustments makes it more favorable.
Adobe Audition is a digital audio workstation and an amazing option for those wishing to make a career in anime voice changing. Whether you wish to lower pitch, change echo levels, or reverb your voice recording, it has a huge library of effects.
To use this real-time voice changer, the first tab you have to open is the top-left “Multitrack” button and create a new multitrack session.
In track 1, tap the “R” button which will turn your microphone for voice recording. Next, tap the “I” button to hear the effects you apply while editing.
Choose your desired effect from the library tab and test it while you adjust other settings.
And that’s it! It is that easy to make settings in Adobe Audition.
Audition provides you a toolkit, in which you can add features and presets for further work. This anime voice changer is professional-level software that allows anime lovers to stream for fun and work with outstanding features.
You can also create amazingly smooth podcasts and design several effects. Now, what’s better than creating and designing your sound effects?
Surely now, many of your confusions regarding anime voice changers would be cleared. Next up on the list is a highly portable mobile app.
Part 4: Create Anime Voice on Mobile with Voice Changer App
1. Voice Changer - anime voice effects changing the game
Available for: Android

With this one, you can easily edit, mix, or disguise voices and get all your content edits done right on your phone. It is a mix of features provided in recording apps and voice editors. It has a wide range of fictional characters, albeit not as much as the other software suggested above.
You can type in a character you wish to modify your voice and apply it to your recording. This one’s mostly used by teenagers and streaming enthusiasts just for fun and is nice entertainment on the go. So if you’re looking for a memory-friendly anime girl voice changer, don’t worry! Even the smallest kid in the house can learn to use it.
Available for: iPad
This is another creative mobile voice changer app for iPad users. Widen your horizons with the amazing sound-changing options provided in this software. Voice changer plus is a step ahead in the work of anime edits. While being more of an entertainment app, you can also work with this smoothly. Whether you’re a beginner at using anime voice changers or not, don’t worry. This application is really easy to use and smoothly works on sufficient memory. Listen to your voice backward or reverbed with this creative tool.

Since now you have a nice idea of how the most popular anime voice changers work, you’re ready! Whether you’re looking to make a career in anime background voicing or just streaming for fun, go ahead! All the applications suggested here are super-easy to use and even free.
Also read:
- Updated Comparing Audio Recording Software Steps for Optimal Selection and Usage
- New The Ultimate Technique for Disabling Background Sounds From Digital Media Streams for 2024
- Updated Counteracting Sonic Overlap 3 Proven Techniques for Clear Audio for 2024
- Updated Simplified Singing Separation Tools Ideal for Novices & Experts
- New 2024 Approved 3 Budget-Friendly Ways to Seamlessly Add Soundtracks to Your Videos
- New The Ultimate Audio Edition Understanding AVS Softwares Core Strengths and Evaluating Other Choices
- 2024 Approved The Ultimate Guide to Finding and Downloading Pristine Birdsong MP3s
- Updated Practical Steps for Switching Sounds in Editable Media Formats
- New Detaching Sound Effects From Videos Using Adobe Premiere Pro – Step by Step for 2024
- 2024 Approved Soundless Screen Experience A Walkthrough to Remove Loud Elements From Multiple Video Formats (MP4/MKV/AVI/MOV)
- Updated In 2024, Premier Noise-Canceling Software for Enhancing Music and Speech Clarity
- Updated In 2024, Tutorial Walkthrough Getting the Most Out of Your Experience with Adobe Audition
- New Navigating the Best 10 Audio Editing Applications Focus on Windows & Mac OS X, 2024 Edition
- New Must-Have Strategies for Building a Comprehensive YouTube Auditory Collection for 2024
- New Eliminating Soundtracks in Contemporary MKV Video Files (MKV-2023)
- New Dawn & Dusk in Audio Production Navigating the Best Windows DAWs on Offer, For Free & With Investment for 2024
- New In 2024, Efficient Sound Management Cutting Down Video Audio in iMovie Across Mac and iPhone
- Updated Creating Synchronized Media Incorporating Video Into Audio Streams
- 2024 Approved HarmonySoft Masterclass Exploring the Intricacies of AVS Editing Features, Customer Testimonials & Similar Products
- Updated Earning Beats for Your Ears The Art of Accessing FREE Audio Music Legally
- Updated Mute Movie Tracks Steps to Strip Audio From MOV Files in Windows and Mac OS
- 8 Best DAW for Windows 10/7 Free&Paid
- Updated Innovative Audio Editing Implementing and Designing Keyframes in Adobe Premiere Pro (Mac) for 2024
- Updated In 2024, Transform Your Tunes Free Online Tool to Dial Back MP3 Volume, Ideal for Karaoke Enthusiasts.
- Updated 2024 Approved Mastering Mic Sounds A Comprehensive Approach to Eliminating Ambient Audio Distractions
- New Discover the Premier 8 Audio Waveform Designs for Enhancing Videos for 2024
- New 10 Premier Windows-Based Textual Output Programs for Audio Input
- New In 2024, The Comprehensive Technique for Merging Diverse Auditory Elements
- New In 2024, Free-to-Use Images Made Simple A Deep Dive Into Pexels Features
- New 2024 Approved The Quintessential Free MP3 Amplitude Adjusters Guide
- FREE 8 Best Plugins for Logic Pro X
- Updated Slowing Down Music Rhythmically Without Affecting Pitch Perception for 2024
- New Tips and Tricks to Use Clownfish Voice Changer on Discord/ Fortnite/ Skype for 2024
- Ultimate No-Cost MP3 Conductor Seamless MP3 Integration Tools for 2024
- Updated In 2024, Mastering the Art of Choosing Background Tunes for Visual Media
- Updated In 2024, Frequency Finder The Leading Linux Audio Software Options, Free or Full-Price,
- 2024 Approved Leading Speech-to-Text Solutions for Microsoft OS Ranking
- Unlocking Podcast Quality Learn How to Craft a Professional Audio Experience for 2024
- New Aesthetically Pleasing Scores for YouTube Productions
- 2024 Approved Premier Percussive Pace Collaboration Software for Videos, 2023 Edition
- How To Unlock Apple iPhone 15 Pro Max Official Method to Unlock Your Apple iPhone 15 Pro Max
- New In 2024, Unlock Cross-Platform Video Editing A Chromebook Guide
- In 2024, How To Stream Anything From Gionee F3 Pro to Apple TV | Dr.fone
- Updated 2024 Approved Adobe Premiere Elements Vs. The Rest Top Alternative Video Editors
- 4 Feasible Ways to Fake Location on Facebook For your Sony Xperia 10 V | Dr.fone
- Can Life360 Track Or See Text Messages? What Can You Do with Life360 On Oppo A1x 5G? | Dr.fone
- Updated Top 10 Cartoon Canvas Painting Ideas for Total Beginners
- How To Teleport Your GPS Location On Xiaomi Redmi 13C 5G? | Dr.fone
- How to Easily Hard reset my Xiaomi Redmi Note 12R | Dr.fone
- New The Ultimate Guide to Free WMV Video Editing Software
- 9 Quick Fixes to Unfortunately TouchWiz has stopped Of Oppo Reno 8T 5G | Dr.fone
- In 2024, How to Screen Share on Apple iPhone 11? | Dr.fone
- How and Where to Find a Shiny Stone Pokémon For Google Pixel 8 Pro? | Dr.fone
- 7 Solutions to Fix Error Code 963 on Google Play Of Realme GT 3 | Dr.fone
- Top 4 Android System Repair Software for Motorola Edge 2023 Bricked Devices | Dr.fone
- In 2024, How To Use Special Features - Virtual Location On Vivo Y17s? | Dr.fone
- Top 10 Fixes for Phone Keep Disconnecting from Wi-Fi On Xiaomi 14 | Dr.fone
- Updated In 2024, Cheap Final Cut Pro Alternatives? Nope, Just Smart Student Savings
- How to recover lost data from Nokia 105 Classic?
- How to Fix Pokemon Go Route Not Working On Realme GT Neo 5 SE? | Dr.fone
- App Wont Open on Your Vivo V29e? Here Are All Fixes | Dr.fone
- New Learn Topaz Video Enhance AI Review for 2024
- How to Reset a Itel P55+ Phone That Is Locked | Dr.fone
- New The Ultimate Insiders Guide to the 16X9 Ratio Calculator for 2024
- Bypassing Google Account With vnROM Bypass For Vivo Y55s 5G (2023)
- Full Guide How To Fix Connection Is Not Private on Nubia Red Magic 8S Pro+ | Dr.fone
- In 2024, Complete Review & Guide to Techeligible FRP Bypass and More For Infinix Note 30
- Breaking Language Barriers Elevate Your Content with the Best Free Video Translator Apps
- New In 2024, Smooth Operator Video Stabilization Techniques in Adobe Premiere Pro
- In 2024, Easy Guide to Tecno Camon 20 Premier 5G FRP Bypass With Best Methods
- Can I recover my data if my iPhone 13 Pro Max screen turns black? | Stellar
- In 2024, Beyond Adobe Top 10 Premiere Elements Alternatives for Video Creators
- In 2024, How Can We Bypass Itel S23 FRP?
- Title: Updated 2024 Approved The Ultimate Guide to Recording Sounds in PowerPoint Operating Windows and macOS Systems
- Author: Kate
- Created at : 2024-06-26 11:42:09
- Updated at : 2024-06-27 11:42:09
- Link: https://audio-editing.techidaily.com/updated-2024-approved-the-ultimate-guide-to-recording-sounds-in-powerpoint-operating-windows-and-macos-systems/
- License: This work is licensed under CC BY-NC-SA 4.0.


