
:max_bytes(150000):strip_icc():format(webp)/GettyImages-917461864-7141ebd3ec944ce6a431b8d485cc9cdb.jpg)
Updated 2024 Approved Cutting Through the Clutter Innovative AI Strategies for Signal Purification
Cutting Through the Clutter: Innovative AI Strategies for Signal Purification
How to DeNoise AI
There have often been times when we took some photo or video with our mobile phones or digital cameras, but we found out later that the clip contained hiss, some compression or particles. Everyone, especially in this digital world, is trying to make their content as clean as possible, without impurities, for the audiences to watch, enjoy, and stay with the creators. So, you might find it really uncomfortable when you are in this kind of situation. But what you can do, is doable – you can depend on a video denoise software!
There are a lot of online or offline tools you could use to do that, and we have discussed a lot of them on our web-site, and now, we will review yet another way to achieve your desired result when it comes to noise and grain. So, in today’s article, we will touch upon how to AI DeNoise your image!
The case with this intelligent noise reduction for 2022 is that noise reduction software has been the same for over a decade. This is when DeNoise AI comes to play, because its approach is something new – it uses deep learning. The process is lengthy and focuses on learning millions of images, thus let DeNoise AI to accurately distinguish between real image detail and noise. This is so important because with this new technique, now it is possible to denoise images while actually recovering important detail, something that was impossible a few years ago.
Topaz DeNoise AI has a very simple and intuitive interface with different noise removal options. Anyway, using it in the most effective way would require some knowledge. Oh, and, it would be a headache if you have a slow computer!..
So, as mentioned, traditional noise reduction software most of the time reduces the original detail in the images, but DeNoise AI’s noise reduction eliminates noise, meanwhile, preserves the detail and even enhances it. The new update of Topaz DeNoise AI offers different advanced DeNoise AI Models that can be integrated perfectly into your workflow; you can use it as a standalone piece of software or as a plugin for Adobe Photoshop or Lightroom.
How to AI DeNoise a file
Let’s just suppose you don’t have the software. So, download and install Topaz DeNoise AI. Go to Topaz Labs and select your operating system: Windows or Macintosh OS. Then, install the program.

Once the installation is finished, you will be able to see the Topaz DeNoise AI icon among your applications. Topaz DeNoise AI plugins for Lightroom or Photoshop would also be added there automatically, without any further intervention. But, if that is not the case, it’s ok to add them manually.
The first time you open Topaz DeNoise AI, you can either log in with your Topaz Labs account or try the Denoise AI 30-day free trial.
So, let’s discover how to use DeNoise AI in its different versions!
First, how to remove digital noise with DeNoise AI: DeNoise AI supports most of the commonly used photography files like raw files, dng, tiff, jpegs, etc. So, open the program, drag or open your image and select the best AI model.
In the upper right corner, you will find a toolbar with these options:
Preview Options:
To change the view mode of the photo you’re working with, you can select:
- Original (original photo preview)
- Single (denoised photo preview).
- Split (Original and denoised photo preview with a split slider)
- Side by Side ( Original and denoised photo preview)
- Comparison ( Compare how the different Ai Models work in your photos at the same time).
Zoom
Zoom in on your images to accurately check the process’s progress.

Denoise AI full review and tutorial
On the right side, you’ll find:
- A navigator with the selected zoom box.
- A list with the following DeNoise AI Models:
- Standard: Broadly developed noise reduction that maintains detail.
- Clear: Best for photos with smooth and rounded surfaces such as skin, rocks, water, etc.
- Low light: Best for low-light conditions and heavy noise
- Severe noise: Best for extremely noisy photos
- Raw: The newest AI model in DeNoise. It provides excellent noise reduction, preserving detail, and authentic color starting from a RAW file.
- Main Settings. The Auto mode works great in most situations. However, it can be pretty aggressive and give your photos a washed-out look. With Manual Mode, you can set the adjustments according to your taste.
- The Post-processing sliders help reduce any color noise remaining in your photos and preserve original detail.
- Save Image: To set your output settings before saving your images.

Then, adjust the setting sliders (you can just select Auto mode here); now, apply the adjustments locally, if necessary, using the mask tool; and, save the file with the output settings selected.
Second, let’ts move to DeNoise AI workflow.
If you are trying to find the simplest way to start with DeNoise Ai, it’s better to use the suggested mode, - Light bulb icon! This will automatically select an AI model, and will do so based oon your image. Anyway, in order to remove digital noise there, it’s the best to use the updated comparison view. The reason is obvious – you can take a look right away and compare varied AI models, or the same ones with some different settings to your liking.

So, how to do just that? Well, select the AI model and fine-tune the adjustment using the following settings:
- Remove Noise: This slider is wonderful!. It removes the noise in your photo, but doesn’t kind of wash out the images. Values between 10-50 are the best in most cases.
- Enhance Sharpness: It sharpens and recovers the detail in images that may become a bit blurry after denoising. It would be excessive if you set the values over 30, in case you would like to avoid odd textures.
After that, you can refine your results with these DeNoise AI Post-processing adjustments:
- Recover Original Detail: It helps recover some detail that has been washed out after the noise reduction and adds a bit of grain to keep the image natural. 20-40 points is more than enough.
- Color Noise Reduction: This is a powerful tool that reduces any color noise remaining in your images. Zoom in on a dark area and adjust the slider until the color noise disappears and you are happy with the result!
And, the last topic to discuss is DeNoise AI Masking Tool! The software includes a very simple Mask tool in case you want to denoise the image only in certain areas and not in others. So, the key here is that DeNoise AI will apply your adjustments only to the areas that you paint in red.
You need to ckeck the Overlay tool to see the red color while painting. When you are satisfied with the areas you panted, After painting over these areas, you will see a preview of your mask in black and white. Here, white shows the adjustments while black hides them. Following this, DeNoise AI will just be applied to the areas painted in white.

And, the masking settings are:
- Add/Subtract: to paint in white or black and reveal or hide your adjustments.
- Size: to change the size of your brush.
- Softness: to change the hardness of your brush. Being 0 is the hardest and 100 the softest.
- Opacity: to vary the opacity of the mask to add precise local adjustments.
- Mask options: to clear or invert your mask.
- Overlay: to show in red these areas where you are painting.
Once you finish creating your mask, just click on the “apply mask” button, and there you go!
Wondershare Filmora X
Even though we discussed in so much detail how to DeNoise AI our images, it’s important to keep in mind that even videos need denoising. So, we decided to keep you informed about how to do that, as well. Wondershare Filmora X is something that can help us with that – it can change our damaged scene into something more acceptable. And in order to do so, first, you need to go to the Effects panel and type: “Smart Denoise”, then, right-click on the video and choose Edit Properties.
Free Download For Win 7 or later(64-bit)
Free Download For macOS 10.14 or later

With this, you will see the Smart Denoise, where you are able to change opacity of the clip, threshold and radius.

You can now reduce Opacity until you are satisfied with the result. The box next to Smart Denoise will show you the scene before and after the effect.
Of course, it is much easier than DeNoise AI looks and works, and it’s worth the try – will take so much less minutes!
Bonus tip: Wondershare Filmora audio denoise
We already explained how video image and video denoising work, but, denoising not only means digital noise on the screen, of course. It can be literally a noise! The sound which is not so pleasant to listen to… Audio background denoising is to remove unwanted hum from the audio in order for it to become more hearable. So, doing this in Wondershare Filmora works in a quite easy way. Use the guideline:
Drag and drop your video into the timeline. Right-click on the clip and hit Detach Audio, which will let you separate audio and video from one another and make sure you can work on them one by one.

Double-click on the audio track and have access to the editing panel, where you can see Remove background noise – it is not needed to emphasize what this option does for you!

Keep in mind that there is a second way to achieve the same result as well, but this in case you don’t want to detach the audio: Double-click on the video clip in the timeline, the editing panel opens, so switch to Audio. Checking the box next to Remove background noise will show that there are three levels – weak, mid, and strong, and of course, you can choose to your liking!
If the voice recording doesn’t sound natural anymore, you can do the following: Click on Customize and Customize Equalizer window will open.

On the left, you can see the low tunes, while the highs are on the right. Background noises are often on the left, so you can lower them to get rid of them, but in order to have a more natural sound, raise the middle ones a little – and you are done when you are content with the sound!

So, in this article, you learned about different noises, and about different tools and programs to denoise your images, videos, and audios! Pretty enlightening, ha? Let’s hope this is something you are looking for, and will put to good use very, very soon!
Free Download For macOS 10.14 or later
With this, you will see the Smart Denoise, where you are able to change opacity of the clip, threshold and radius.
You can now reduce Opacity until you are satisfied with the result. The box next to Smart Denoise will show you the scene before and after the effect.
Of course, it is much easier than DeNoise AI looks and works, and it’s worth the try – will take so much less minutes!
Bonus tip: Wondershare Filmora audio denoise
We already explained how video image and video denoising work, but, denoising not only means digital noise on the screen, of course. It can be literally a noise! The sound which is not so pleasant to listen to… Audio background denoising is to remove unwanted hum from the audio in order for it to become more hearable. So, doing this in Wondershare Filmora works in a quite easy way. Use the guideline:
Drag and drop your video into the timeline. Right-click on the clip and hit Detach Audio, which will let you separate audio and video from one another and make sure you can work on them one by one.
Double-click on the audio track and have access to the editing panel, where you can see Remove background noise – it is not needed to emphasize what this option does for you!
Keep in mind that there is a second way to achieve the same result as well, but this in case you don’t want to detach the audio: Double-click on the video clip in the timeline, the editing panel opens, so switch to Audio. Checking the box next to Remove background noise will show that there are three levels – weak, mid, and strong, and of course, you can choose to your liking!
If the voice recording doesn’t sound natural anymore, you can do the following: Click on Customize and Customize Equalizer window will open.
On the left, you can see the low tunes, while the highs are on the right. Background noises are often on the left, so you can lower them to get rid of them, but in order to have a more natural sound, raise the middle ones a little – and you are done when you are content with the sound!
So, in this article, you learned about different noises, and about different tools and programs to denoise your images, videos, and audios! Pretty enlightening, ha? Let’s hope this is something you are looking for, and will put to good use very, very soon!
Recording & Incorporating Narration: A Step-by-Step Approach for Today’s Videos
How to Record & Add Voiceover to Videos

Liza Brown
Mar 27, 2024• Proven solutions
Have you ever wanna add your own voice to video , make a voice over demo for uploading and sharing on social network sites or create a documentary for some important stuff? You can do this as long as you have nice video editing software like Wondershare Filmora Video Editor .
The voiceover function in Filmora video editing software allows you to record your own voice or add voice over file to video easily. You can custom the pitch, speed, and volume of the recorded voiceover, apply fade in and fade out effects as well. In this post, I’ll share how to record and add voiceover to a video with Filmora on your computer.


In Filmora, you can edit your video first and then record the voiceover after. Or, you can record the voiceover first and then edit the video around. In either way, you may need to prepare the script or an outline for smother recording.
Check the tutorial about How to Edit Audio in Filmora
Part 1: Record Voiceover and Add it to Video
In most cases, we recommend you to record the voiceover first so the sound will be more natural. In the following part, I’ll show you how to record Voiceover in Filmora.
1. Connect Microphone to Computer
Plug the microphone into your computer when you’re ready to get started. It’s better to use some professional external microphones to capture high quality sound.
2. Record voiceover
Installing Filmora on your computer, click the Wondershare Filmora icon to launch it. In the starting interface, click New Project to create a new one. Go to the Record tab, and then click “Record a Voiceover ” option to arouse the Record Audio windows.
Installing Filmora on your computer, click the Wondershare Filmora icon to launch it. In the starting interface, click New Project to create a new one. Go to the Record tab, and then click “Record a Voiceover ” option to arouse the Record Audio windows.

Or simply click the microphone icon and you will have 3 seconds of countdown to start speaking. When finished, click the microphone icon again. Then you will see a new Record file appearing on the audio track automatically.
3. Edit Recorded Voiceover to Video
To edit the recorded voiceover, click the it in the audio track and a new window will pop up for you to adjust audio settings, such as change the Speed, Volume, Pitch, etc. of the voiceover.

You can trim, cut out unwanted sound section from the recorded voiceover, or apply the fade in and fade out effect to the voiceover for smother transition.
Creative Audio Editing: How to Change the Recorded Voice
4. Sync Voiceover to Video
Now, it’s time to sync the recorded voiceover to video to make a video. Since Filmora supports up to 100 audio tracks, you can now add some background music to the voiceover as well.
Then import and drag-n-drop the video footage to the video track, drag and drop the sound track to the right position to fit your video. You can keep the audio and video track in the same length if needed.

Note: If you’ve recorded the voiceover on your iPhone or other device already, and want to add it to the video, you can import it in the Project Library and then sync it to video.
To attract viewer’s attention, sometimes, you may need to add some titles or subtitles to emphasis the key points. Here is the detailed steps about how to add titles to video.

5. Export and save the new file
Check your video in the right previewing window. If you’re satisfied, click “Export” to export your new video file. You can either save the video to various formats or directly share it on YouTube and other social media platform. Moreover, you can even burn a DVD disk in minutes to watch it on TV.

You see, with Wondershare Filmora video editor, it’s that easy to add a custom voiceover to video. Now master this feature and open a world of new possibilities for your video making!
Part 2: How to Record and Add Voiceover File during Video editing in Filmora
If you’ve recorded the voiceover on your iPhone or other device already, and want to add it to the video, you can follow the steps below:
1. Import the video to Filmora
After entering the Filmora main editing interface, click “Import” or drag and drop your video and voiceover file to the project library.

Filmora video editing software supports a vast range of formats, so you do not have to convert the files before importing. When all the files are imported, drag and drop them to the Video Timeline.
2. Record Voiceover in Video Editing
If you’re editng video and want to record voiceover in real time, you can also click the Record icon to start the recording.
Place the Playhead to the position where you need a voiceover, and then click the Microphone icon in the toolbar to start.
As before, the recorded voiceover will be added to the audio track automatically.
Note: To start a new record on the Timeline, you don’t need to close the dialog, just move the Time Indicator to another position and record a new voiceover.
3. Edit voiceover and Export
Just like what we said before, you can then edit the recorded voiceover to fit the video perfectly and then export it to your computer or upload to YouTube directly.
Filmora features more audio editing tools for improving the sound. Below is a video tutorial for applying fade in and out transition in Filmora. Download the trial version to test yourself.
Liza Brown
Liza Brown is a writer and a lover of all things video.
Follow @Liza Brown
Liza Brown
Mar 27, 2024• Proven solutions
Have you ever wanna add your own voice to video , make a voice over demo for uploading and sharing on social network sites or create a documentary for some important stuff? You can do this as long as you have nice video editing software like Wondershare Filmora Video Editor .
The voiceover function in Filmora video editing software allows you to record your own voice or add voice over file to video easily. You can custom the pitch, speed, and volume of the recorded voiceover, apply fade in and fade out effects as well. In this post, I’ll share how to record and add voiceover to a video with Filmora on your computer.
In Filmora, you can edit your video first and then record the voiceover after. Or, you can record the voiceover first and then edit the video around. In either way, you may need to prepare the script or an outline for smother recording.
Check the tutorial about How to Edit Audio in Filmora
Part 1: Record Voiceover and Add it to Video
In most cases, we recommend you to record the voiceover first so the sound will be more natural. In the following part, I’ll show you how to record Voiceover in Filmora.
1. Connect Microphone to Computer
Plug the microphone into your computer when you’re ready to get started. It’s better to use some professional external microphones to capture high quality sound.
2. Record voiceover
Installing Filmora on your computer, click the Wondershare Filmora icon to launch it. In the starting interface, click New Project to create a new one. Go to the Record tab, and then click “Record a Voiceover ” option to arouse the Record Audio windows.
Installing Filmora on your computer, click the Wondershare Filmora icon to launch it. In the starting interface, click New Project to create a new one. Go to the Record tab, and then click “Record a Voiceover ” option to arouse the Record Audio windows.
Or simply click the microphone icon and you will have 3 seconds of countdown to start speaking. When finished, click the microphone icon again. Then you will see a new Record file appearing on the audio track automatically.
3. Edit Recorded Voiceover to Video
To edit the recorded voiceover, click the it in the audio track and a new window will pop up for you to adjust audio settings, such as change the Speed, Volume, Pitch, etc. of the voiceover.
You can trim, cut out unwanted sound section from the recorded voiceover, or apply the fade in and fade out effect to the voiceover for smother transition.
Creative Audio Editing: How to Change the Recorded Voice
4. Sync Voiceover to Video
Now, it’s time to sync the recorded voiceover to video to make a video. Since Filmora supports up to 100 audio tracks, you can now add some background music to the voiceover as well.
Then import and drag-n-drop the video footage to the video track, drag and drop the sound track to the right position to fit your video. You can keep the audio and video track in the same length if needed.
Note: If you’ve recorded the voiceover on your iPhone or other device already, and want to add it to the video, you can import it in the Project Library and then sync it to video.
To attract viewer’s attention, sometimes, you may need to add some titles or subtitles to emphasis the key points. Here is the detailed steps about how to add titles to video.
5. Export and save the new file
Check your video in the right previewing window. If you’re satisfied, click “Export” to export your new video file. You can either save the video to various formats or directly share it on YouTube and other social media platform. Moreover, you can even burn a DVD disk in minutes to watch it on TV.
You see, with Wondershare Filmora video editor, it’s that easy to add a custom voiceover to video. Now master this feature and open a world of new possibilities for your video making!
Part 2: How to Record and Add Voiceover File during Video editing in Filmora
If you’ve recorded the voiceover on your iPhone or other device already, and want to add it to the video, you can follow the steps below:
1. Import the video to Filmora
After entering the Filmora main editing interface, click “Import” or drag and drop your video and voiceover file to the project library.
Filmora video editing software supports a vast range of formats, so you do not have to convert the files before importing. When all the files are imported, drag and drop them to the Video Timeline.
2. Record Voiceover in Video Editing
If you’re editng video and want to record voiceover in real time, you can also click the Record icon to start the recording.
Place the Playhead to the position where you need a voiceover, and then click the Microphone icon in the toolbar to start.
As before, the recorded voiceover will be added to the audio track automatically.
Note: To start a new record on the Timeline, you don’t need to close the dialog, just move the Time Indicator to another position and record a new voiceover.
3. Edit voiceover and Export
Just like what we said before, you can then edit the recorded voiceover to fit the video perfectly and then export it to your computer or upload to YouTube directly.
Filmora features more audio editing tools for improving the sound. Below is a video tutorial for applying fade in and out transition in Filmora. Download the trial version to test yourself.
Liza Brown
Liza Brown is a writer and a lover of all things video.
Follow @Liza Brown
Essential Cartoon Noise Packs: A List of the Hottest Sounds to Enhance Your Animation
8 Best Cartoon Sound Effects You Can Download

Benjamin Arango
Mar 27, 2024• Proven solutions
The sound plays a significant role in the videos. Without the right sound effects, your videos become dull. It doesn’t create an impact to grab the attention of the viewers. Especially when it comes to attracting the attention of kids while they watch cartoons.
Are you working on a cartoon video for kids or some animated action cartoons? Use the cartoon sound effects to add more intensity and emotions to the videos. Every time creating a new sound effect for your cartoon video becomes difficult.
If you are on a strict budget, producing new content becomes almost impossible. In such situations, free cartoon sound effects are the best way to enhance your cartoon videos.
In this article, you will learn eight best cartoon sound effects that you can download and make your videos perfect.
8 Best Cartoon Sound Effects Resources
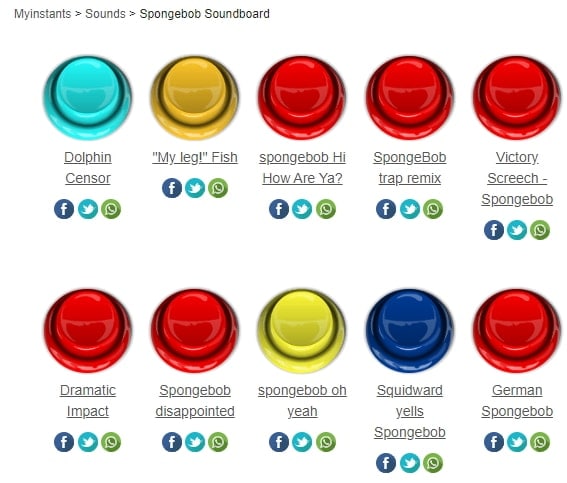
1. Spongebob Sound Effects
MyInstant’s Spongebob soundboard offers a range of cartoon sound effects that can be easily downloaded just by clicking on the Download mp3 sound effect button. You can listen to over 120 classic cartoon sound effects and download it for free. You can also copy the embed link and paste it to your website.
2. Hanna Barbera Sound Effects
From Sounddogs, Hanna Barbera sound effects library, you can find over 2200 cartoon sound effects that are divided into 4 CDs. It has almost all the legendary classic cartoon sound effects from the cartoon shows like Yogi Bear, Huckleberry Hound, the Flintstones, The Jetsons, Quick Draw McGraw, and all the rest of the gang.
You can download the mp3 cartoon sound effects completely free by clicking on the Download ID number mentioned at the right end of each link.
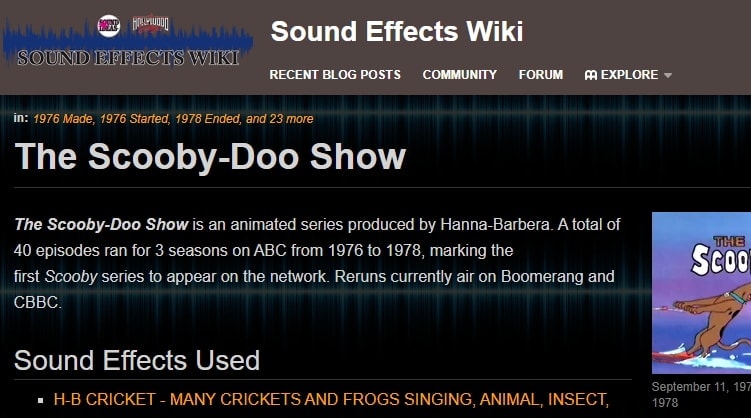
3. Scooby Doo Running Sound
Fandom’s Scooby Doo running sound effects offers all the ideas used in 40 episodes of Scooby Doo throughout the three seasons on ABC. It is over 37000 pages wiki that you can click and browse through the pages to find the right sound effect and download it for free.
4. Tom and Jerry Sound Effects
Pond5 offers 13 Tom and Jerry sound effects that you can listen by scrolling the cursor over the boxes and download the free preview of cartoon sound effects by clicking on Download Preview.
If you want to download the entire cartoon sound effect, you need to register, log in, and pay for it. There are filters like price, collections, duration, etc. to make your selection more precise.
5. Free SFX
In FreeSFX website, you can find a range of comical cartoon sound effects that includes classic effects like descend, boink, impact, pop, musical, running, rip and snap, bounce spring, slide whistle, squelch and splat, horn and loads more.
You need to log in to the website to download free cartoon sound effects.

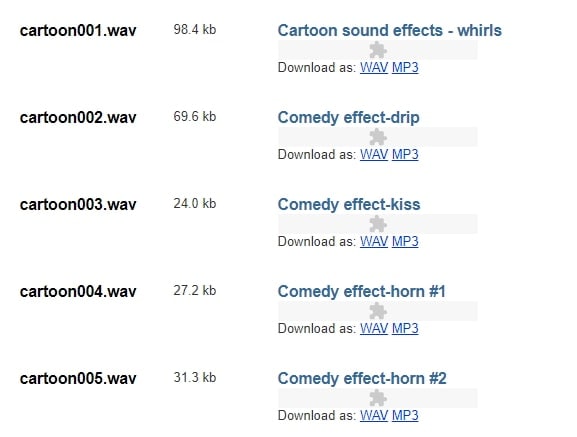
6.GRSites
With over 1980 cartoon sound effects, the GRSites is one of the best free sites for downloading both mp3 and WAV files. You can browse from a range of categories to find the best cartoon sound effects for your videos.
7. Cartoon Running Sound Effect
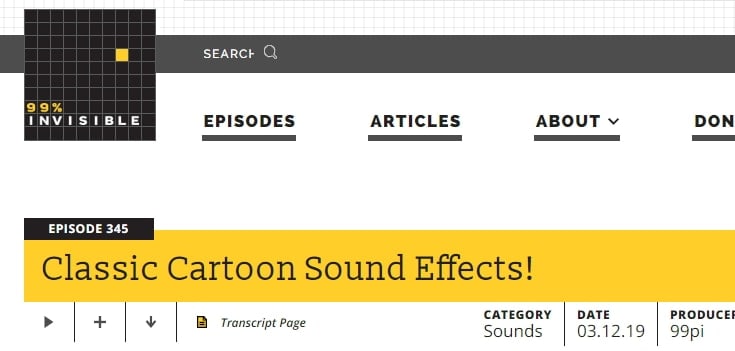
If you are looking for cartoon running sound effect, turn to Episode 345 in 99PercentInvisible. You can download the complete transcript page of around 30 minutes to use it in your video. Use the cartoon running sound effect produced by 99pi to enhance your video.
8. Big Fish Audio
The Big Fish Audio’s cartoon sound FX includes 23 free classic cartoon sound effects. The filters include a range of sound FX types, styles, format, brand, etc.
You can click on the cartoon sound effect and listen to it or add it to your playlist. But, if you wish to download the free cartoon sound effects, you need to register and pay to use the sound effect.

You may also like: How to Extract Audio from Videos on Win/Mac/Phone >>
Conclusion
Make your cartoon videos perfect with the fantastic free cartoon sound effects available for download completely free. With the range of free cartoon sound effects, you don’t need to worry about creating new sounds or expenses. You need to download the free sounds and beautifully enhance it with your creativity. There are several other sites for downloading free cartoon sound effects, but here you can check out some of the trusted ones to use.
Benjamin Arango
Benjamin Arango is a writer and a lover of all things video.
Follow @Benjamin Arango
Benjamin Arango
Mar 27, 2024• Proven solutions
The sound plays a significant role in the videos. Without the right sound effects, your videos become dull. It doesn’t create an impact to grab the attention of the viewers. Especially when it comes to attracting the attention of kids while they watch cartoons.
Are you working on a cartoon video for kids or some animated action cartoons? Use the cartoon sound effects to add more intensity and emotions to the videos. Every time creating a new sound effect for your cartoon video becomes difficult.
If you are on a strict budget, producing new content becomes almost impossible. In such situations, free cartoon sound effects are the best way to enhance your cartoon videos.
In this article, you will learn eight best cartoon sound effects that you can download and make your videos perfect.
8 Best Cartoon Sound Effects Resources
1. Spongebob Sound Effects
MyInstant’s Spongebob soundboard offers a range of cartoon sound effects that can be easily downloaded just by clicking on the Download mp3 sound effect button. You can listen to over 120 classic cartoon sound effects and download it for free. You can also copy the embed link and paste it to your website.
2. Hanna Barbera Sound Effects
From Sounddogs, Hanna Barbera sound effects library, you can find over 2200 cartoon sound effects that are divided into 4 CDs. It has almost all the legendary classic cartoon sound effects from the cartoon shows like Yogi Bear, Huckleberry Hound, the Flintstones, The Jetsons, Quick Draw McGraw, and all the rest of the gang.
You can download the mp3 cartoon sound effects completely free by clicking on the Download ID number mentioned at the right end of each link.
3. Scooby Doo Running Sound
Fandom’s Scooby Doo running sound effects offers all the ideas used in 40 episodes of Scooby Doo throughout the three seasons on ABC. It is over 37000 pages wiki that you can click and browse through the pages to find the right sound effect and download it for free.
4. Tom and Jerry Sound Effects
Pond5 offers 13 Tom and Jerry sound effects that you can listen by scrolling the cursor over the boxes and download the free preview of cartoon sound effects by clicking on Download Preview.
If you want to download the entire cartoon sound effect, you need to register, log in, and pay for it. There are filters like price, collections, duration, etc. to make your selection more precise.
5. Free SFX
In FreeSFX website, you can find a range of comical cartoon sound effects that includes classic effects like descend, boink, impact, pop, musical, running, rip and snap, bounce spring, slide whistle, squelch and splat, horn and loads more.
You need to log in to the website to download free cartoon sound effects.
6.GRSites
With over 1980 cartoon sound effects, the GRSites is one of the best free sites for downloading both mp3 and WAV files. You can browse from a range of categories to find the best cartoon sound effects for your videos.
7. Cartoon Running Sound Effect
If you are looking for cartoon running sound effect, turn to Episode 345 in 99PercentInvisible. You can download the complete transcript page of around 30 minutes to use it in your video. Use the cartoon running sound effect produced by 99pi to enhance your video.
8. Big Fish Audio
The Big Fish Audio’s cartoon sound FX includes 23 free classic cartoon sound effects. The filters include a range of sound FX types, styles, format, brand, etc.
You can click on the cartoon sound effect and listen to it or add it to your playlist. But, if you wish to download the free cartoon sound effects, you need to register and pay to use the sound effect.
You may also like: How to Extract Audio from Videos on Win/Mac/Phone >>
Conclusion
Make your cartoon videos perfect with the fantastic free cartoon sound effects available for download completely free. With the range of free cartoon sound effects, you don’t need to worry about creating new sounds or expenses. You need to download the free sounds and beautifully enhance it with your creativity. There are several other sites for downloading free cartoon sound effects, but here you can check out some of the trusted ones to use.
Benjamin Arango
Benjamin Arango is a writer and a lover of all things video.
Follow @Benjamin Arango
Also read:
- New 2024 Approved Comprehensive Vimeo Video Breakdown Including Aspect Ratio
- New 2024 Approved From Novice to Pro Exploring the Depths of REAPERs Recording Software
- In 2024, Exploring the Horizon of Audio Transcription Technologies
- New Connecting the Dots An In-Depth Look at Linking AirPods with Computers
- Updated 2024 Approved How to Locate and Apply a Kakáring Noise Effect
- New Discovering Where to Get Realistic Smashing Glass Audio Cues for 2024
- Updated Auditory Cuts and Segments Convenient Methods to Divide Your Music Files for 2024
- New In 2024, Discovering the Elite 6 Leading Auto-Transcribing Software Solutions
- How To Remove Vocals From Video Quick And Easy Sound Improvement for 2024
- Updated 2024 Approved Essential Tips for Aspiring Music Video Editors
- A Strategic Approach to Enhancing Your In-Game Vocal Identity for 2024
- Updated 2024 Approved Sounds of the Game Discovering Cricket Ambient Noises
- Updated 2024 Approved Top 10 Windows/Mac/Linux-Friendly Audio Editors That Match Audacitys Capabilities
- New 2024 Approved Orchestrating Audio in Cyberspace A Curated Selection of Text-to-Speech Websites
- New KineMaster Audio Essentials Add Your Music Now for 2024
- New In 2024, Discovering the Best 8 DAW Apps on Android A Production Boost
- New The Ultimate Guide to Popular Sound Capture Software
- New In 2024, Top 8 Digital Audio Workstations (DAWs) on PC Compatible with Windows 10 & 7, Free and Paid Options
- Updated In 2024, Quick Guide to Disabling Zoom Microphones on PC/Mac and iOS Devices
- In 2024, 10 Best Software to Reverse Audio Online, Desktop, and Phone
- New The Complete Manual of GarageBand Audio Sessions for 2024
- New 10 Must-Have Royalty-Free Audio Laughs to Enhance Your Multimedia Productions for 2024
- Updated EasyMP3 Transcriber Free MP3-to-Text Converter for Everyday Use - Available in VideoJot Pro Suite
- Updated Mastering Audio Visualization Creating Waveforms & Enhancing with Animations in Adobe Premiere Pro
- New Best Practices in Music Video Production and Editing
- New Harmonizing Hues and Beats Incorporating Music Into Video Clips with Premiere Pro
- Updated The Essential List Best Free Tools for Mastering Your Accent Online for 2024
- Strategies for Enhancing Clarity Eliminating Unwanted Noise From Internet-Streamed Music and Voices
- Step-by-Step Tutorial Incorporating Autotune Plugins Into Your Audacity Projects for 2024
- New 2024 Approved The Soundless Filmmakers Handbook Techniques for Removing Audio From iPhones
- New Discover Top-Rated Software for Silencing Unwanted Sounds in Your Recordings for 2024
- In 2024, Top 7 Exceptional, No-Pay Voice Customization Software Reviewed
- Updated Find Game Sound Effects for 2024
- Top 15 Audio Collections Matching Melodies with Every Type of Visual Narrative
- New Prime 11 Mobile Audio Processing Software for Creatives for 2024
- 2024 Approved Clearing the Microphone Effective Strategies for Cutting Out Vocals Using Audacitys Spectrum Analyzer
- Silence iPhone Volume Automation Feature for 2024
- Updated In 2024, Free Filmora 13 Editor Download Create Stunning Videos
- Updated The Ultimate List of Neon Text Generators Top 9 Picks
- 4 Easy Ways for Your Oppo Reno 11 5G Hard Reset | Dr.fone
- 3 Ways to Change Location on Facebook Marketplace for Lava Yuva 2 Pro | Dr.fone
- Updated 2024 Approved Download Instagram Audio Top Tools and Techniques
- Proven Ways to Fix There Was A Problem Parsing the Package on Honor 100 Pro | Dr.fone
- How to identify malfunctioning your hardware drivers with Windows Device Manager on Windows 11 & 10
- In 2024, Will Pokémon Go Ban the Account if You Use PGSharp On Vivo X90S | Dr.fone
- Is GSM Flasher ADB Legit? Full Review To Bypass Your Lava Blaze Pro 5GFRP Lock
- In 2024, Catch or Beat Sleeping Snorlax on Pokemon Go For Realme 11 5G | Dr.fone
- Updated In 2024, 10 Awesome Video Editing Apps That Kids Will Love Free & Paid
- 2024 Approved FCPX Tutorial Achieve Flawless Skin without Plugins
- Updated Say Goodbye to Reddit Searching Filmora Deals Ahead for 2024
- How to Check Distance and Radius on Google Maps For your Vivo V30 Pro | Dr.fone
- Did Your Apple iPhone 7 Plus Passcode Change Itself? Unlock It Now | Dr.fone
- A Detailed VPNa Fake GPS Location Free Review On Xiaomi Redmi A2 | Dr.fone
- Updated 2024 Approved Stunning 4K Videos You Need to See
- New 2024 Approved Slow and Steady Wins the Race How to Use VLCs Slow Motion Feature
- Updated 2024 Approved Say Goodbye to Aspect Ratio Confusion The Ultimate Facebook Video Guide
- In 2024, Apple iPhone 14 Plus Asking for Passcode after iOS 17/14 Update, What to Do?
- 2024 Approved Seamless Video Editing The Top Software for a Hassle-Free Experience
- Still Using Pattern Locks with Vivo Y56 5G? Tips, Tricks and Helpful Advice
- Rootjunky APK To Bypass Google FRP Lock For Vivo T2 Pro 5G
- How to Transfer Photos from Oppo Reno 11 5G to Laptop Without USB | Dr.fone
- How to Fake GPS on Android without Mock Location For your Infinix Note 30 VIP Racing Edition | Dr.fone
- Recover lost data from Motorola Edge 40 Pro
- Overview of the Best Vivo V29 Pro Screen Mirroring App | Dr.fone
- In 2024, Unlock Your Realme GT 3 Phone with Ease The 3 Best Lock Screen Removal Tools
- In 2024, Proven Ways in How To Hide Location on Life360 For Apple iPhone XR | Dr.fone
- Calls on Samsung Galaxy S24 Ultra Go Straight to Voicemail? 12 Fixes | Dr.fone
- Discover the Best Free 3D Animation Apps for Android and iOS Devices
- Title: Updated 2024 Approved Cutting Through the Clutter Innovative AI Strategies for Signal Purification
- Author: Kate
- Created at : 2024-05-05 07:49:14
- Updated at : 2024-05-06 07:49:14
- Link: https://audio-editing.techidaily.com/updated-2024-approved-cutting-through-the-clutter-innovative-ai-strategies-for-signal-purification/
- License: This work is licensed under CC BY-NC-SA 4.0.
