
:max_bytes(150000):strip_icc():format(webp)/trends_MontyRakusen_Getty-5a4aa079482c5200362b0987.jpg)
Updated 2024 Approved AudioMastery The Definitive Guide to Choosing the Best Voice Recorders
“AudioMastery: The Definitive Guide to Choosing the Best Voice Recorders”
Top 10 Audio Recording Software to Capture Your Voice Easily

Shanoon Cox
Mar 27, 2024• Proven solutions
Whether professional or for amateur purposes, the audio recording software programs are very important. These programs allow manipulating the audio so that it matches the need for a specific project.
The best audio recording software has a variety of tools embedded to polish the audio recorded, in which this article we are going to review the best of them for you.
What is Audio Recording Software?
As the name suggests, the audio recording software is used to record audio using a unique technology. This allows the users to capture their own or the voice they want and transfer it wherever they want. The software also adds effects to the voice and makes it professional to use wherever the user wants to.
What Does a Sound Recorder Use for?
There are several uses of audio recording software program. Some are listed as under:
- In the music field, this software is of great use. It can be used for multitrack recording. The mixing of the sound is then done using the same or different tools.
- The audio recorded can be edited with ease. This includes enhancing and adding effects to it with perfection.
- With microphone use, the recording software can be integrated to make sure that the voice of the user is also recorded if required.
- Some audio recording software programs also come with screen recording, and therefore, these foster multitasking.
List of Top 10 Audio Recording Software Programs
The audio recording software for PC that would make your life easy is mentioned as under.
1.Wondershare DemoCreator
This is by far the best and the most used software program when it comes to audio recording. It is highly reliable and comes with a GUI. The user interface is easy to understand, and so are the functionalities.
With the best and the most advanced controls recording audio has never been this easy. It also acts as Mac audio recording software, and therefore it is highly recommended for all platforms. The frequent updates make this program even easier to use.
Features
- The interface of the program is very easy to use and stress-free.
- The high definition audio can be recorded with ease.
- The program supports 50+ formats to import audio, video, and other files to the system.
- There are highly advanced options for professional audio recording.
- The program can record endless video and audio as far as there is space on your disk.
Pros
- It is one of the programs that support professional audio editing.
- The program is very easy to use as it has a graphical interface.
Cons
- The program is flash software-based, which can slow down the system.
- It does not offer highly advanced audio editing at all.
Supported Platforms
The program can be used with both Windows and Mac.
Go ahead to download and have a try now!
2.WavePad
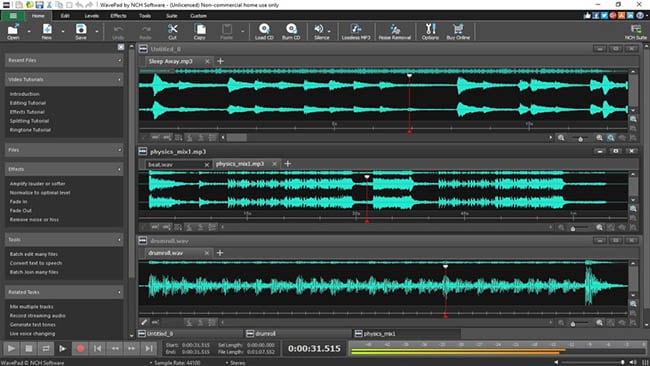
It is one of the best and most used programs to make sure that the audio is recorded with perfection. This program is compatible with most of the audio formats, and therefore it is highly recommended. The overall rating of the program is high as it is used by professionals and, therefore, highly rated as well.
Features
- It has several audio enhancing capabilities, which include amplification and effect addition.
- The audio can be edited, trimmed, and cropped with this program.
- The professional-quality sound recording is used by this program to enhance the capabilities.
Pros
- The best part of this program is its quality of end product that is very high.
- It is a wave editor that gives the users more control over the end product.
Cons
- The mp3 editor of this program does not offer top quality work.
- The program cannot work with multiple files efficiently.
Supported Platforms
It can be installed over Mac, Windows, Android, and iOS.
3.Ocenaudio

As a cross-platform program, this one has a lot to offer. The interface is a bit technical, but overall the use of the program is easy once the hands-on is done. The program is also highly intuitive and allows the users to overcome the day to day audio recording and editing tasks.
Features
- The Ocen Framework is also integrated with this platform to enhance its capabilities.
- The program also records screen if required by the users.
- It is one of the programs that have been rated on other high-end platforms.
Pros
- The program uses auto trim and voice recording controls.
- The sound spectral analysis of the program is highly advanced.
Cons
- The program cannot directly load the file from a CD.
- The program cannot be opened in multiple screens, so the work rate is slow.
Supported Platforms
It is compatible with Mac, Windows, and Linux.
4.Adobe Audition

It can be rightfully regarded as one of the best and the most advanced programs. Backed by years of Adobe experience, it is a program that will get the user a step forward. It is highly recommended to all those users that are looking for a professional level of audio recording.
Features
- It includes multitrack, wave editing, and audio restoration tools to give the best results.
- The essential sound panel has been integrated with the program to get the best oomph effect to the audio.
- The music clips can be integrated within the audio recording to make it sound professional.
Pros
- The platform can be used to create awesome podcasts.
- The audio break can be repaired with perfection.
Cons
- It is expensive, so all the users cannot afford it at all.
- The interface is high tech in nature and requires time to learn.
Supported Platforms
It is supported by Windows and Mac.
5.Audacity

It is free software that is used to record audio professionally. This high-performance program makes sure that the audio which is recorded is also shared with different platforms. The built-in panel is upgraded, and therefore it is highly advance.
Features
- It is ad-free and therefore provides hassle-free work.
- The audio editing and recording have never been as easy as it is with audacity.
- Multitrack editing is also possible with this program.
Pros
- The VST plugin support is provided by the program.
- It is a portable program that can be used for pitch correction.
Cons
- The noise reduction tool of this program needs an upgrade.
- The record to tape feature is currently unavailable.
Supported Platforms
It is supported by Mac, Linux, Windows, and BSD.
6.Wavosaur

It is one of the free programs that can be regarded as better than many paid ones. It is all because the qualities of the program are matchless. The processing of files is done with WAV and Mp3 files filter, which makes the process very much easier.
Features
- The program has multiple document interfaces for multiple file handling.
- The editing features such as cut, copy, paste, and edit can be performed in a single window.
- The waveform representation of the program is accurate and highly advanced.
Pros
- The program offers bit depth convert, pitch shift, and DC offset removal.
- The VST effects can be added to the entire batch of sound files.
Cons
- The audio routing and the multichannel support of the program are not efficient.
- The software sampler extraction is a bit slow when it comes to this program.
Supported Platforms
The program can only be installed on Windows.
7.MixPad
The audio processing and mixing have been made very easy with this platform. The program has an interface that is sleek in design and allows the processing of the audio info with care. The program also supports cloud storage, which means that the entire user’s hard work remains safe and secures all the time.
Features
- The program can mix the unlimited number of tracks all at the same time.
- Depending upon the requirement, the multiple or a single track can be processed at the same time.
- The program supports almost every sound format, so any type of sound can be imported with perfection.
Pros
- The audio effects such as EQ, compression, and reverb can be added with perfection.
- The latency rate is very low, and the program also offers ASIO support for accurate processing.
Cons
- The program only offers the export of the sound that is up to 32 bits.
- The sample rates of up to 96 kHz are only supported, which is less than most of the other mixers.
Supported Platforms
The program can be installed on Mac, Windows, Android, iPad, and Kindle Fire.
8.Sound Forge

If a user wants to completely control the audio editing process, then this software is for them. It is highly advanced and makes sure that the work that is done is highly précised. From Red Book CD creation to sound design and mixing, this program provides the users with complete control and authority over the process.
Features
- The multichannel WAV recording and processing is now possible with the new version of the program.
- The VST plugin support is provided by this program with perfection.
- The VST effects can be chained in a virtual rack.
Pros
- The simple digitization and restoration of the audio have been made simple by this program.
- The one-click solutions allow the users to process the audio tracks easily.
Cons
- The program only offers 32 bits of power, which is very low.
- The multiple VST GUI is not supported by this program.
Supported Platforms
The Sound Forge can be installed on Mac and Windows.
9.Spek

The best part of the software is that it is free and allows the users to overcome the problems which the other audio recorders present. The interface is easy to learn, and therefore the overall usage is easy. The lossless quality is something for which the software is known for. It also supports the FFMPEG library.
Features
- The signal processing is ultra-fast as it uses several threads to process audio.
- The drag and drop support of the program is highly efficient, and the program supports common audio formats.
- The program can be accessed in 19 different languages.
Pros
- The spectral density rulers allow the auto fitting of time.
- The spectral density range of the program is also adjustable.
Cons
- The codec names are, and the audio signal parameters cannot be seen.
- The program is licensed under GPLv3, which is now obsolete.
Supported Platforms
The program is compatible with Windows, Linux, and Mac.
10.Audio Highjack

The program, as the name suggests, makes it possible for the users to completely delve deep into the process of audio editing. The interface, as well as the controls, is very easy to understand and use. For novice users, this program is highly recommended as it makes audio editing a fun-filled activity.
Features
- It provides detailed statistics and min, the max value per channel.
- The processed audio can be listened in real-time to get an idea about the end product.
- The waveform generator and frequency impulse train are embedded within the program.
Pros
- The lame encoder support has been embedded within the recorder to export mp3 files.
- The editor’s look is skin able, which can be changed as per the user choice.
Cons
- The processing options are less as compared to the other recorders.
- The audio files cannot be exported as text, so the program cannot be used with PSpice.
Supported Platforms
The program is only available for Mac.
A Roundup of the Best Audio Recording Software Programs
| No. | Tools | Rating | Supported Formats | Price | Processing Power |
|---|---|---|---|---|---|
| 1 | DemoCreator | 4.5 | .mp3, .m4a, .wav, .wma, .ogg, .flac, .aif, .aiff | $29.99 | 64-bit |
| 2 | WavePad | 4.4 | vox, gsm, WMA, real audio, au, aif, FLAC, and Ogg | $69.95 | 64-bit |
| 3 | Ocenaudio | 4.0 | vox, gsm, WMA, wav, .wma, .ogg, and .flac | Free | 32-bit |
| 4 | Adobe Audition | 4.5 | AIF, AIFF, AIFC | $74.99 | 64-bit |
| 5 | Audacity | 3.9 | mp3, wav, AIFF, au, and ogg | Free | 32-bit |
| 6 | Wavosaur | 3.5 | VST plugins, ASIO driver, multichannel wav files, real-time effect processing. | Free | 32-bit |
| 7 | MixPad | 3.2 | wav, mp3, vox, and gsm | $129 | 32-bit |
| 8 | Sound Forge | 4.0 | SWF, RealMedia 9, WMA, AVI , AIFF, AIF, and SND | Free | 32-bit |
| 9 | Spek | 4.4 | vox, gsm, WMA, Wav, WMA, real audio, au, aif, FLAC, and Ogg | Free | 64-bit |
| 10 | Audio Highjack | 4.2 | .mp3, .m4a, .wav, .wma, aif, FLAC, and Ogg | Free | 64-bit |
Conclusion
With the overall specs and ratings by the users, the Wondershare DemoCreator is the best software that should be used for audio recording.
The program is highly compatible with major operating systems, and therefore it is highly recommended. The overall mechanism is easy, and the program also supports multiple formats.
It is highly technical and is constantly upgraded to make sure that it remains in line with modern technologies. It is a one-stop-shop for all the audio recording needs of the users and therefore highly viable.
With this program, the audio that has been worked on can be shared on most popular social media platforms like YouTube and Facebook.


Shanoon Cox
Shanoon Cox is a writer and a lover of all things video.
Follow @Shanoon Cox
Shanoon Cox
Mar 27, 2024• Proven solutions
Whether professional or for amateur purposes, the audio recording software programs are very important. These programs allow manipulating the audio so that it matches the need for a specific project.
The best audio recording software has a variety of tools embedded to polish the audio recorded, in which this article we are going to review the best of them for you.
What is Audio Recording Software?
As the name suggests, the audio recording software is used to record audio using a unique technology. This allows the users to capture their own or the voice they want and transfer it wherever they want. The software also adds effects to the voice and makes it professional to use wherever the user wants to.
What Does a Sound Recorder Use for?
There are several uses of audio recording software program. Some are listed as under:
- In the music field, this software is of great use. It can be used for multitrack recording. The mixing of the sound is then done using the same or different tools.
- The audio recorded can be edited with ease. This includes enhancing and adding effects to it with perfection.
- With microphone use, the recording software can be integrated to make sure that the voice of the user is also recorded if required.
- Some audio recording software programs also come with screen recording, and therefore, these foster multitasking.
List of Top 10 Audio Recording Software Programs
The audio recording software for PC that would make your life easy is mentioned as under.
1.Wondershare DemoCreator
This is by far the best and the most used software program when it comes to audio recording. It is highly reliable and comes with a GUI. The user interface is easy to understand, and so are the functionalities.
With the best and the most advanced controls recording audio has never been this easy. It also acts as Mac audio recording software, and therefore it is highly recommended for all platforms. The frequent updates make this program even easier to use.
Features
- The interface of the program is very easy to use and stress-free.
- The high definition audio can be recorded with ease.
- The program supports 50+ formats to import audio, video, and other files to the system.
- There are highly advanced options for professional audio recording.
- The program can record endless video and audio as far as there is space on your disk.
Pros
- It is one of the programs that support professional audio editing.
- The program is very easy to use as it has a graphical interface.
Cons
- The program is flash software-based, which can slow down the system.
- It does not offer highly advanced audio editing at all.
Supported Platforms
The program can be used with both Windows and Mac.
Go ahead to download and have a try now!
2.WavePad
It is one of the best and most used programs to make sure that the audio is recorded with perfection. This program is compatible with most of the audio formats, and therefore it is highly recommended. The overall rating of the program is high as it is used by professionals and, therefore, highly rated as well.
Features
- It has several audio enhancing capabilities, which include amplification and effect addition.
- The audio can be edited, trimmed, and cropped with this program.
- The professional-quality sound recording is used by this program to enhance the capabilities.
Pros
- The best part of this program is its quality of end product that is very high.
- It is a wave editor that gives the users more control over the end product.
Cons
- The mp3 editor of this program does not offer top quality work.
- The program cannot work with multiple files efficiently.
Supported Platforms
It can be installed over Mac, Windows, Android, and iOS.
3.Ocenaudio
As a cross-platform program, this one has a lot to offer. The interface is a bit technical, but overall the use of the program is easy once the hands-on is done. The program is also highly intuitive and allows the users to overcome the day to day audio recording and editing tasks.
Features
- The Ocen Framework is also integrated with this platform to enhance its capabilities.
- The program also records screen if required by the users.
- It is one of the programs that have been rated on other high-end platforms.
Pros
- The program uses auto trim and voice recording controls.
- The sound spectral analysis of the program is highly advanced.
Cons
- The program cannot directly load the file from a CD.
- The program cannot be opened in multiple screens, so the work rate is slow.
Supported Platforms
It is compatible with Mac, Windows, and Linux.
4.Adobe Audition
It can be rightfully regarded as one of the best and the most advanced programs. Backed by years of Adobe experience, it is a program that will get the user a step forward. It is highly recommended to all those users that are looking for a professional level of audio recording.
Features
- It includes multitrack, wave editing, and audio restoration tools to give the best results.
- The essential sound panel has been integrated with the program to get the best oomph effect to the audio.
- The music clips can be integrated within the audio recording to make it sound professional.
Pros
- The platform can be used to create awesome podcasts.
- The audio break can be repaired with perfection.
Cons
- It is expensive, so all the users cannot afford it at all.
- The interface is high tech in nature and requires time to learn.
Supported Platforms
It is supported by Windows and Mac.
5.Audacity
It is free software that is used to record audio professionally. This high-performance program makes sure that the audio which is recorded is also shared with different platforms. The built-in panel is upgraded, and therefore it is highly advance.
Features
- It is ad-free and therefore provides hassle-free work.
- The audio editing and recording have never been as easy as it is with audacity.
- Multitrack editing is also possible with this program.
Pros
- The VST plugin support is provided by the program.
- It is a portable program that can be used for pitch correction.
Cons
- The noise reduction tool of this program needs an upgrade.
- The record to tape feature is currently unavailable.
Supported Platforms
It is supported by Mac, Linux, Windows, and BSD.
6.Wavosaur
It is one of the free programs that can be regarded as better than many paid ones. It is all because the qualities of the program are matchless. The processing of files is done with WAV and Mp3 files filter, which makes the process very much easier.
Features
- The program has multiple document interfaces for multiple file handling.
- The editing features such as cut, copy, paste, and edit can be performed in a single window.
- The waveform representation of the program is accurate and highly advanced.
Pros
- The program offers bit depth convert, pitch shift, and DC offset removal.
- The VST effects can be added to the entire batch of sound files.
Cons
- The audio routing and the multichannel support of the program are not efficient.
- The software sampler extraction is a bit slow when it comes to this program.
Supported Platforms
The program can only be installed on Windows.
7.MixPad
The audio processing and mixing have been made very easy with this platform. The program has an interface that is sleek in design and allows the processing of the audio info with care. The program also supports cloud storage, which means that the entire user’s hard work remains safe and secures all the time.
Features
- The program can mix the unlimited number of tracks all at the same time.
- Depending upon the requirement, the multiple or a single track can be processed at the same time.
- The program supports almost every sound format, so any type of sound can be imported with perfection.
Pros
- The audio effects such as EQ, compression, and reverb can be added with perfection.
- The latency rate is very low, and the program also offers ASIO support for accurate processing.
Cons
- The program only offers the export of the sound that is up to 32 bits.
- The sample rates of up to 96 kHz are only supported, which is less than most of the other mixers.
Supported Platforms
The program can be installed on Mac, Windows, Android, iPad, and Kindle Fire.
8.Sound Forge
If a user wants to completely control the audio editing process, then this software is for them. It is highly advanced and makes sure that the work that is done is highly précised. From Red Book CD creation to sound design and mixing, this program provides the users with complete control and authority over the process.
Features
- The multichannel WAV recording and processing is now possible with the new version of the program.
- The VST plugin support is provided by this program with perfection.
- The VST effects can be chained in a virtual rack.
Pros
- The simple digitization and restoration of the audio have been made simple by this program.
- The one-click solutions allow the users to process the audio tracks easily.
Cons
- The program only offers 32 bits of power, which is very low.
- The multiple VST GUI is not supported by this program.
Supported Platforms
The Sound Forge can be installed on Mac and Windows.
9.Spek
The best part of the software is that it is free and allows the users to overcome the problems which the other audio recorders present. The interface is easy to learn, and therefore the overall usage is easy. The lossless quality is something for which the software is known for. It also supports the FFMPEG library.
Features
- The signal processing is ultra-fast as it uses several threads to process audio.
- The drag and drop support of the program is highly efficient, and the program supports common audio formats.
- The program can be accessed in 19 different languages.
Pros
- The spectral density rulers allow the auto fitting of time.
- The spectral density range of the program is also adjustable.
Cons
- The codec names are, and the audio signal parameters cannot be seen.
- The program is licensed under GPLv3, which is now obsolete.
Supported Platforms
The program is compatible with Windows, Linux, and Mac.
10.Audio Highjack
The program, as the name suggests, makes it possible for the users to completely delve deep into the process of audio editing. The interface, as well as the controls, is very easy to understand and use. For novice users, this program is highly recommended as it makes audio editing a fun-filled activity.
Features
- It provides detailed statistics and min, the max value per channel.
- The processed audio can be listened in real-time to get an idea about the end product.
- The waveform generator and frequency impulse train are embedded within the program.
Pros
- The lame encoder support has been embedded within the recorder to export mp3 files.
- The editor’s look is skin able, which can be changed as per the user choice.
Cons
- The processing options are less as compared to the other recorders.
- The audio files cannot be exported as text, so the program cannot be used with PSpice.
Supported Platforms
The program is only available for Mac.
A Roundup of the Best Audio Recording Software Programs
| No. | Tools | Rating | Supported Formats | Price | Processing Power |
|---|---|---|---|---|---|
| 1 | DemoCreator | 4.5 | .mp3, .m4a, .wav, .wma, .ogg, .flac, .aif, .aiff | $29.99 | 64-bit |
| 2 | WavePad | 4.4 | vox, gsm, WMA, real audio, au, aif, FLAC, and Ogg | $69.95 | 64-bit |
| 3 | Ocenaudio | 4.0 | vox, gsm, WMA, wav, .wma, .ogg, and .flac | Free | 32-bit |
| 4 | Adobe Audition | 4.5 | AIF, AIFF, AIFC | $74.99 | 64-bit |
| 5 | Audacity | 3.9 | mp3, wav, AIFF, au, and ogg | Free | 32-bit |
| 6 | Wavosaur | 3.5 | VST plugins, ASIO driver, multichannel wav files, real-time effect processing. | Free | 32-bit |
| 7 | MixPad | 3.2 | wav, mp3, vox, and gsm | $129 | 32-bit |
| 8 | Sound Forge | 4.0 | SWF, RealMedia 9, WMA, AVI , AIFF, AIF, and SND | Free | 32-bit |
| 9 | Spek | 4.4 | vox, gsm, WMA, Wav, WMA, real audio, au, aif, FLAC, and Ogg | Free | 64-bit |
| 10 | Audio Highjack | 4.2 | .mp3, .m4a, .wav, .wma, aif, FLAC, and Ogg | Free | 64-bit |
Conclusion
With the overall specs and ratings by the users, the Wondershare DemoCreator is the best software that should be used for audio recording.
The program is highly compatible with major operating systems, and therefore it is highly recommended. The overall mechanism is easy, and the program also supports multiple formats.
It is highly technical and is constantly upgraded to make sure that it remains in line with modern technologies. It is a one-stop-shop for all the audio recording needs of the users and therefore highly viable.
With this program, the audio that has been worked on can be shared on most popular social media platforms like YouTube and Facebook.
Shanoon Cox
Shanoon Cox is a writer and a lover of all things video.
Follow @Shanoon Cox
Mastering Dynamic Volume Control: A Guide to Audio Ducking with Adobe Premiere Pro on Mac
Tutorial on Audio Ducking in Adobe Premiere Pro on Mac

Benjamin Arango
Oct 26, 2023• Proven solutions
Too many times, while mixing voiceover with the background music in a video, the dialogues don’t seem to be audible. That’s when we follow the process of audio ducking in Premiere Pro that would automatically lower the volume of the background music whenever there is a dialogue.
The best thing about Premiere Pro audio ducking is that it is an automatic process and we don’t need to put a lot of effort. To make your job easier, I’m going to let you know how to use the Adobe Premiere Pro audio ducking feature in a step by step manner in this guide.
Part 1: How to Use Audio Ducking to Balance Music and Voiceover in Adobe Premiere Pro on Mac?
If you have been using Adobe Premiere Pro on Mac, then you would already be familiar with the wide range of editing features that it has. One of them is the Premiere Pro audio ducking option that comes inbuilt in the application. Using it, you can automatically lower the volume of the background music and amplify your dialogues.
To perform auto-ducking in Premiere Pro, we first need to define each audio track and then use the ducking feature. Here’s how you can also perform audio ducking in Premiere Pro like a pro.
Step 1: Define the Audio Types
Since Adobe Premiere Pro can’t automatically detect the type of sounds, you need to do it manually. To do audio ducking in Premiere Pro, you can first import your video clip and the voiceover to the application, and drag them to the working timeline.
Now, you can first select the voiceover file that you want to amplify, and from the sidebar on the right, click on “Dialogue” as the type of the audio file.
Once you mark the audio type, you will get different options. Here, go to the “Loudness” option and click on the “Auto Match” button.
Afterward, you can do the same for your background audio file. Select the file and choose its audio type as “Music”. You can also set its loudness to “Auto Match” if you want to.
Step 2: Perform Auto Ducking in Premiere Pro
Now when you have set the audio types, you can just find the Ducking option on the sidebar and turn it on. Here, you can first click on the dialogue icon from the top and get the needed options. You can adjust its sensitivity and set a level or improve or reduce its quality.
Apart from the dialogue icon, you can also click on the Music icon and do the same. For instance, you can reduce the quality of the background music and increase the level of the dialogue track.
Step 3: Make the Final Changes
Great! You can now preview the changes you have made and check the audio ducking results in Premiere Pro. If you want to finalize things, then you can perform keyframing and manually adjust the volume.
Furthermore, you can also perform an instant hard ducking in Premiere Pro. For this, just choose the track, go to the side panel, and select Preset > Music > Hard Vocal Ducking. While it would get instant results in Adobe Premiere audio ducking, the results might not be so effective.
Part 2: Wondershare Filmora : An Easier Way to Auto Duck Your Audios on Mac
As you can see, the Premiere Pro audio ducking feature can get a bit complicated if you are a beginner. Therefore, if you are looking for a simpler and more effective automatic ducking solution, then use Wondershare Filmora. This intuitive and diverse video/audio editing tool has an automatic audio ducking option that would make your job a whole lot easier.
To learn how to perform automatic audio ducking in your videos on Mac via Wondershare Filmora, one can follow these steps:
Step 1: Load the Video or Audio Files on Filmora
Firstly, you can just launch Wondershare Filmora on your Mac and import your videos/audios. You can drag and drop the files or just go to its Import Menu option to browse the files. Afterward, you can drag the files to the timeline at the bottom to work on them.
On the native interface of Filmora, you can also directly record voiceovers. Just click on the voiceover icon (below the preview window) and start recording any dialogue.
Not just that, you can also find a wide range of royalty-free music on Filmora that you can readily use in your projects without any copyright issues.
Step 2: Perform Automatic Audio Ducking on Filmora
Great! Now you can see your video and the audio track on the timeline of Filmora. At first, you need to select the voiceover (or any other track) that you want to amplify.
Once the desired audio track is selected, right-click it, and choose the “Adjust Audio” option.
As the dedicated Audio Editor will open, just go to the “Ducking” option at the bottom and turn on the “Lower the volume of other clips” feature. You can further select the level to lower the volume of other background clips in the video here.
Step 3: Save and Export Your Video
That’s it! After making the changes, just click on the “OK” button and Filmora would automatically adjust the volume of other clips. You can further make the needed changes in the video and click on the “Export” icon. This will let you save the project in the desired format and resolution on your computer.
Who knew it would be so easy to do auto-ducking in Premiere Pro, right? Though, if you are looking for even a simpler alternative to Adobe Premiere audio ducking, then consider using Wondershare Filmora. A user-friendly and resourceful video editor, it offers a wide range of features and other inbuilt tools that would meet every post-production requirement of yours in one place.
Benjamin Arango
Benjamin Arango is a writer and a lover of all things video.
Follow @Benjamin Arango
Benjamin Arango
Oct 26, 2023• Proven solutions
Too many times, while mixing voiceover with the background music in a video, the dialogues don’t seem to be audible. That’s when we follow the process of audio ducking in Premiere Pro that would automatically lower the volume of the background music whenever there is a dialogue.
The best thing about Premiere Pro audio ducking is that it is an automatic process and we don’t need to put a lot of effort. To make your job easier, I’m going to let you know how to use the Adobe Premiere Pro audio ducking feature in a step by step manner in this guide.
Part 1: How to Use Audio Ducking to Balance Music and Voiceover in Adobe Premiere Pro on Mac?
If you have been using Adobe Premiere Pro on Mac, then you would already be familiar with the wide range of editing features that it has. One of them is the Premiere Pro audio ducking option that comes inbuilt in the application. Using it, you can automatically lower the volume of the background music and amplify your dialogues.
To perform auto-ducking in Premiere Pro, we first need to define each audio track and then use the ducking feature. Here’s how you can also perform audio ducking in Premiere Pro like a pro.
Step 1: Define the Audio Types
Since Adobe Premiere Pro can’t automatically detect the type of sounds, you need to do it manually. To do audio ducking in Premiere Pro, you can first import your video clip and the voiceover to the application, and drag them to the working timeline.
Now, you can first select the voiceover file that you want to amplify, and from the sidebar on the right, click on “Dialogue” as the type of the audio file.
Once you mark the audio type, you will get different options. Here, go to the “Loudness” option and click on the “Auto Match” button.
Afterward, you can do the same for your background audio file. Select the file and choose its audio type as “Music”. You can also set its loudness to “Auto Match” if you want to.
Step 2: Perform Auto Ducking in Premiere Pro
Now when you have set the audio types, you can just find the Ducking option on the sidebar and turn it on. Here, you can first click on the dialogue icon from the top and get the needed options. You can adjust its sensitivity and set a level or improve or reduce its quality.
Apart from the dialogue icon, you can also click on the Music icon and do the same. For instance, you can reduce the quality of the background music and increase the level of the dialogue track.
Step 3: Make the Final Changes
Great! You can now preview the changes you have made and check the audio ducking results in Premiere Pro. If you want to finalize things, then you can perform keyframing and manually adjust the volume.
Furthermore, you can also perform an instant hard ducking in Premiere Pro. For this, just choose the track, go to the side panel, and select Preset > Music > Hard Vocal Ducking. While it would get instant results in Adobe Premiere audio ducking, the results might not be so effective.
Part 2: Wondershare Filmora : An Easier Way to Auto Duck Your Audios on Mac
As you can see, the Premiere Pro audio ducking feature can get a bit complicated if you are a beginner. Therefore, if you are looking for a simpler and more effective automatic ducking solution, then use Wondershare Filmora. This intuitive and diverse video/audio editing tool has an automatic audio ducking option that would make your job a whole lot easier.
To learn how to perform automatic audio ducking in your videos on Mac via Wondershare Filmora, one can follow these steps:
Step 1: Load the Video or Audio Files on Filmora
Firstly, you can just launch Wondershare Filmora on your Mac and import your videos/audios. You can drag and drop the files or just go to its Import Menu option to browse the files. Afterward, you can drag the files to the timeline at the bottom to work on them.
On the native interface of Filmora, you can also directly record voiceovers. Just click on the voiceover icon (below the preview window) and start recording any dialogue.
Not just that, you can also find a wide range of royalty-free music on Filmora that you can readily use in your projects without any copyright issues.
Step 2: Perform Automatic Audio Ducking on Filmora
Great! Now you can see your video and the audio track on the timeline of Filmora. At first, you need to select the voiceover (or any other track) that you want to amplify.
Once the desired audio track is selected, right-click it, and choose the “Adjust Audio” option.
As the dedicated Audio Editor will open, just go to the “Ducking” option at the bottom and turn on the “Lower the volume of other clips” feature. You can further select the level to lower the volume of other background clips in the video here.
Step 3: Save and Export Your Video
That’s it! After making the changes, just click on the “OK” button and Filmora would automatically adjust the volume of other clips. You can further make the needed changes in the video and click on the “Export” icon. This will let you save the project in the desired format and resolution on your computer.
Who knew it would be so easy to do auto-ducking in Premiere Pro, right? Though, if you are looking for even a simpler alternative to Adobe Premiere audio ducking, then consider using Wondershare Filmora. A user-friendly and resourceful video editor, it offers a wide range of features and other inbuilt tools that would meet every post-production requirement of yours in one place.
Benjamin Arango
Benjamin Arango is a writer and a lover of all things video.
Follow @Benjamin Arango
Rapid Rhythm Adjustment: Simplified Audio Pace Tweaking Strategies
If you have a music file, and you notice that it is a bit slow or fast, making the entire ambiance kind of dull or overly exciting respectively, you can change audio speed to get the track right as per your mood. However, when you make any such adjustments, some unwanted effects can be experienced, such as format limitations while exporting, changes in the pitch of the sound, etc.
That said, here, you will learn how to change audio speed with the least adverse effects using some of the most popular and highly recommended tools.
How to Change Audio Speed in Filmora
Being a lightweight and less resource-intensive post-production tool, Filmora is admired by several professionals across the globe and is many times preferred over other editing programs like Adobe Premiere Pro and Final Cut Pro X. Easy-to-understand UI and large-sized, clearly visible options and buttons are what make Filmora extremely popular among those who are new to the industry and don’t have a computer with a powerful processor, gigantic memory, and enormous GPU.
For Win 7 or later (64-bit)
For macOS 10.12 or later
You can follow the steps given below to learn how to change audio speed with Wondershare Filmora:
Step 1: Import Audio and Add to Filmora Timeline
Launch Filmora on your Windows or Mac computer, make sure that the Media icon is selected from the standard toolbar at the top, click the + icon in the Media (also referred to as Library here) window (on Mac) or anywhere in the Media window itself (on Windows) from the upper-left corner of the interface, and import the audio file that you want to manage the playback speed of. Next, drag the media file from the Library to the timeline.

Step 2: Increase or Decrease Audio Speed
Ensure that the audio track is selected in the timeline. Click the Speedometer icon from the timeline toolbar at the upper section, hover mouse to the Slow option from the menu, and click your preferred value form the submenu to reduce the sound speed. Likewise, hover the mouse to the Fast option, and choose a value from the submenu to increase it.

Note: Usually, the audio pitch wouldn’t change as long as you pick the values anywhere between 0.5x and 5x. However, if you select any option beyond this range, you may experience variations in the pitch according the value you selected.
Step 3: Set Custom Speed or Reverse the Audio
Click the Speedometer icon from above the timeline, and click Custom Speed from the menu. Use the slider to slow down (move to the left) or speed up (move to the right) the audio on the Custom Speed box. Alternatively, you can manually enter your preferred value in the available field for granular control. In addition, you can also check the Reverse Speed box to reverse the audio if need be.

Step 4: Export the Output
Click EXPORT from the top-center area of the interface, go to the Local tab on the Export box that opens next, select your preferred audio format from the Format list in the left, make necessary customizations from the right pane, and click EXPORT from the bottom-right corner of the box to export the audio with the modified speed.

How to Change the Speed of Audio with Video in Filmora
The process to change audio speed that also has a video is identical to what is explained in the previous section. The only additional step required in this case is separating the audio track from that of video.
You can learn how to get this done by following the instructions given below:
Step 1: Import File to Media Window and then Add to Timeline
Use the method explained in Step 1 of the previous section to import a file to Filmora, drag the media to the timeline, and click MATCH TO MEDIA when the Project Setting box appears and prompts for confirmation. Note: Except for the Project Setting box, the rest of the process for adding audio and video files to the timeline is the same.
Step 2: Separate Audio from Video
Select and then right-click the video track with audio in the timeline, and click Detach Audio from the context menu.

Step 3: Adjust the Audio Speed
After the audio is detached, you can select the audio track and follow the method explained in the previous section to adjust its speed as needed. As for the video, you can use the trimming and cropping options to adjust its duration and size and export the entire project as explained in Step 4 of the previous section. Note: To export the project as video, all you need to do is, choose a video format like MP4 or something similar to that when on the Export box.
How to Change Audio Speed without Changing Pitch in Audacity for Free
One of the most downloaded, used, and admired applications, Audacity, is an open-source and free audio editing software available for Windows, Mac, and Linux computers in both x32 and x64 variants. The software has all the professionals’ tools for basic to advanced sound editing to produce industry-standard outputs.
You can follow the steps given below to learn how to change audio speed with Audacity without changing the pitch of the sound:
- Launch Audacity
- Click File
- Go to Import > Audio

- Import the audio you want to speed up or slow down
- Press Ctrl + A on the keyboard to select the whole audio track
- Go to the Effect menu
- Click Change Tempo

- In the Percent Change field, enter a value with or without minus (-) to reduce or increase the tempo of the audio respectively.

- Click OK
- Go to file> Export
- Select your preferred option from the submenu to export the modified audio as needed
Note: Changing the tempo usually doesn’t change the pitch of the audio up to some extent. However, you can expect some variations in the pitch if the new tempo value is too high or too low.
Conclusion
You may want to slow down or speed up audio if the existing one is not up to the mark, and you wish to manage the ambiance with the help of the music track either while playing a video or when merely a soundtrack is to be played during some event. In either case, the best tool for all your needs is Wondershare Filmora, and if you are looking for a program dedicated to audio only, Audacity is something worth trying.
Versatile Video Editor - Wondershare Filmora
An easy yet powerful editor
Numerous effects to choose from
Detailed tutorials provided by the official channel
For Win 7 or later (64-bit)
For macOS 10.12 or later
You can follow the steps given below to learn how to change audio speed with Wondershare Filmora:
Step 1: Import Audio and Add to Filmora Timeline
Launch Filmora on your Windows or Mac computer, make sure that the Media icon is selected from the standard toolbar at the top, click the + icon in the Media (also referred to as Library here) window (on Mac) or anywhere in the Media window itself (on Windows) from the upper-left corner of the interface, and import the audio file that you want to manage the playback speed of. Next, drag the media file from the Library to the timeline.
Step 2: Increase or Decrease Audio Speed
Ensure that the audio track is selected in the timeline. Click the Speedometer icon from the timeline toolbar at the upper section, hover mouse to the Slow option from the menu, and click your preferred value form the submenu to reduce the sound speed. Likewise, hover the mouse to the Fast option, and choose a value from the submenu to increase it.
Note: Usually, the audio pitch wouldn’t change as long as you pick the values anywhere between 0.5x and 5x. However, if you select any option beyond this range, you may experience variations in the pitch according the value you selected.
Step 3: Set Custom Speed or Reverse the Audio
Click the Speedometer icon from above the timeline, and click Custom Speed from the menu. Use the slider to slow down (move to the left) or speed up (move to the right) the audio on the Custom Speed box. Alternatively, you can manually enter your preferred value in the available field for granular control. In addition, you can also check the Reverse Speed box to reverse the audio if need be.
Step 4: Export the Output
Click EXPORT from the top-center area of the interface, go to the Local tab on the Export box that opens next, select your preferred audio format from the Format list in the left, make necessary customizations from the right pane, and click EXPORT from the bottom-right corner of the box to export the audio with the modified speed.
How to Change the Speed of Audio with Video in Filmora
The process to change audio speed that also has a video is identical to what is explained in the previous section. The only additional step required in this case is separating the audio track from that of video.
You can learn how to get this done by following the instructions given below:
Step 1: Import File to Media Window and then Add to Timeline
Use the method explained in Step 1 of the previous section to import a file to Filmora, drag the media to the timeline, and click MATCH TO MEDIA when the Project Setting box appears and prompts for confirmation. Note: Except for the Project Setting box, the rest of the process for adding audio and video files to the timeline is the same.
Step 2: Separate Audio from Video
Select and then right-click the video track with audio in the timeline, and click Detach Audio from the context menu.
Step 3: Adjust the Audio Speed
After the audio is detached, you can select the audio track and follow the method explained in the previous section to adjust its speed as needed. As for the video, you can use the trimming and cropping options to adjust its duration and size and export the entire project as explained in Step 4 of the previous section. Note: To export the project as video, all you need to do is, choose a video format like MP4 or something similar to that when on the Export box.
How to Change Audio Speed without Changing Pitch in Audacity for Free
One of the most downloaded, used, and admired applications, Audacity, is an open-source and free audio editing software available for Windows, Mac, and Linux computers in both x32 and x64 variants. The software has all the professionals’ tools for basic to advanced sound editing to produce industry-standard outputs.
You can follow the steps given below to learn how to change audio speed with Audacity without changing the pitch of the sound:
- Launch Audacity
- Click File
- Go to Import > Audio
- Import the audio you want to speed up or slow down
- Press Ctrl + A on the keyboard to select the whole audio track
- Go to the Effect menu
- Click Change Tempo
- In the Percent Change field, enter a value with or without minus (-) to reduce or increase the tempo of the audio respectively.
- Click OK
- Go to file> Export
- Select your preferred option from the submenu to export the modified audio as needed
Note: Changing the tempo usually doesn’t change the pitch of the audio up to some extent. However, you can expect some variations in the pitch if the new tempo value is too high or too low.
Conclusion
You may want to slow down or speed up audio if the existing one is not up to the mark, and you wish to manage the ambiance with the help of the music track either while playing a video or when merely a soundtrack is to be played during some event. In either case, the best tool for all your needs is Wondershare Filmora, and if you are looking for a program dedicated to audio only, Audacity is something worth trying.
Versatile Video Editor - Wondershare Filmora
An easy yet powerful editor
Numerous effects to choose from
Detailed tutorials provided by the official channel
Also read:
- Updated 2024 Approved From Silence to Symphony Adding Soundtracks to KineMaster
- In 2024, A Dive Into Digital Audio Recording Alternatives to Vocaroo Explored
- New The Definitive Collection of FREE Online Tools for Listening to Text Files for 2024
- Synchro-Sound Creation Merging Audio Tracks Into One Cohesive File
- Updated Unveiling the Leading Mixers 5 Highest Rated Audio/Video Combiner Devices for 2024
- Updated 2024 Approved Your First Guide to iPhone Audio Transformation Voice Changer Plus Explained
- Updated Karaoke Enthusiasts Review Best MP3 Converters Compared - Digital vs Physical Realm for 2024
- Updated The Ultimate Playbook for Fine-Tuning Video Soundtracks Including Tips for Modern Platforms
- 2024 Approved The Ultimate Strategy for Fusing Audio with Video Content (Updated )
- New 2024 Approved Mastering Audio Editing Expert Techniques for Voice Isolation in Adobe Audition
- 2024 Approved Guideline for Beginners About Lexis Audio Editor
- How to Download and Install Lame for Audacity for 2024
- New Windows 10/7 Users Guide to Dawnbreakers Discovering Top 8 Audio Workstations for 2024
- New Detailed Tutorial Shifting Audio Tracks Within Multimedia Files
- 2024 Approved Insert Auditory Element to iMovie Storyline
- Enhancing Audio Clarity in iMovie for Mac Essential Techniques
- Are There Better Alternatives to MAGIX Samplitude for Professional Sound Design for 2024
- Dont Miss These The Most Impressive 4K Videos
- Detailed Review of doctorSIM Unlock Service For Apple iPhone 6 | Dr.fone
- In 2024, 5 Most Effective Methods to Unlock iPhone 13 in Lost Mode | Dr.fone
- Can I recover permanently deleted photos from Honor X50 GT
- In 2024, Forgot Your Apple ID Password and Email On Apple iPhone 6 Plus? Heres the Best Fixes
- In 2024, 8 Best Apps for Screen Mirroring Itel P40+ PC | Dr.fone
- Google Play Services Wont Update? 12 Fixes are Here on Vivo V30 Pro | Dr.fone
- 4 Solutions to Fix Unfortunately Your App Has Stopped Error on Realme C67 4G | Dr.fone
- In 2024, How To Track IMEI Number Of Itel A70 Through Google Earth?
- New In 2024, Uncover the Best Ways to Download Instagram Audio
- New In 2024, Capture Your Best Self 10 Top-Rated Webcam Software for Windows 10
- How To Fix Unresponsive Phone Touchscreen Of Oppo Reno 8T | Dr.fone
- 2024 Approved Alternative Video Editing Software to PowerDirector for Smartphone Users
- Fake Android Location without Rooting For Your Poco F5 Pro 5G | Dr.fone
- New 2024 Approved Master the Art of Animation Top Tools and Software for Beginners, Pros, and Everyone in Between
- Fix the Error of Unfortunately the Process.com.android.phone Has Stopped on Infinix Zero 30 5G | Dr.fone
- Title: Updated 2024 Approved AudioMastery The Definitive Guide to Choosing the Best Voice Recorders
- Author: Kate
- Created at : 2024-05-05 07:45:45
- Updated at : 2024-05-06 07:45:45
- Link: https://audio-editing.techidaily.com/updated-2024-approved-audiomastery-the-definitive-guide-to-choosing-the-best-voice-recorders/
- License: This work is licensed under CC BY-NC-SA 4.0.
