
:max_bytes(150000):strip_icc():format(webp)/sofya-NomETWcv2Fo-unsplash-be3fc2855a7e477db0273993fd22e822.jpg)
Updated 10 Best Voice Recording Apps for Android Devices Free Included
10 Best Voice Recording Apps for Android Devices [Free Included]
10 Best Voice Recording Apps for Android Devices [Free Included]

Benjamin Arango
Mar 27, 2024• Proven solutions
Memorizing every bit of information you need to perform your daily or weekly tasks becomes increasingly difficult as your workload rises. Students, journalists, and professionals from a wide array of industries can benefit from making audio notes or even recording entire conversations with their Smartphones.
A simple Android voice recorder can make this task easy since you can just tap on the Record button and create an audio note in seconds. However, with so many voice recorder apps for Android devices out there, finding the one best suited for your needs can be more complicated than it seems. So, in this article, we are going to help you discover some best free voice recorder for an Android device you are currently using.
Want to record voiceover and audio on iPhone? Check 10 Best Voice Recorder Apps for iPhones >>
10 Best Free Voice Recording Apps for Android Devices
Recording audio is no longer a highly technical process since now you can create an audio note or record an interview with an Android phone and a voice recorder app. The question is which voice recording app should you install on your device. So, let’s take a look at some of the most potent Android voice recorders you can find at Google Play Store.
1. Easy Voice Recorder Pro
Price: $3.99
Supported OS: Varies with the device
Best for: Students, musicians, and businessmen

App in Google Play
As the app’s name suggests making recordings for a broad range of purposes is easy. All you need to do is launch the app and start a new audio recording session. Easy Voice Recorder Pro doesn’t limit the duration of your recordings, and it also allows you to compress the recorded audio . That is perfect if you need to record long lectures or conversations. Besides, you can connect an external microphone with the app in case you want to increase the quality of the sound you are recording. The app also lets you store your recordings on Dropbox or Google Drive, while it also offers the possibility to send recordings via email.
Easy Voice Recorder Pro Interface
Pros
- Allows users to manage and organize their recordings effortlessly
- Supports all standard output audio file formats
- Offers the option to record in stereo
- Recordings made with this app can be used as the ringtone
Cons
- Ads can be frustrating
- Limited basic audio editing tools
2. Smart Recorder – High-quality voice recorder
Price: Free, but contains ads and offers in-app purchases
Supported OS: Varies with the device
Best for: Students, musicians, and businessmen
App in Google Play
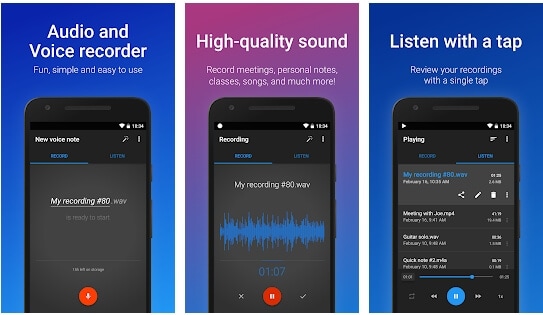
Capturing high-quality audio recordings effortlessly is the ultimate goal of all Android users who want to use voice recorders. As one of the best free voice recorders for Android, Smart Recorder app has a plethora of features that enable users to make high-quality audio recordings even in imperfect conditions. Options like Live Audio Spectrum Analyzer, microphone gain calibration or automatic and manual sensitivity control in Skip Silence mode are just a few reasons why this app has over 10 million installs. However, you should keep in mind that you cannot create audio files that are larger than 2 GB with this app.
Smart Recorder – High-quality voice recorder Interface
Pros
- Provides full control over the audio recording process
- Equipped with the Wave Lock feature that prevents the device from going into the sleep mode
- Features a live audio spectrum analyzer
- Preserves battery life
Cons
- No phone call recording options
- Limited file-sharing capabilities
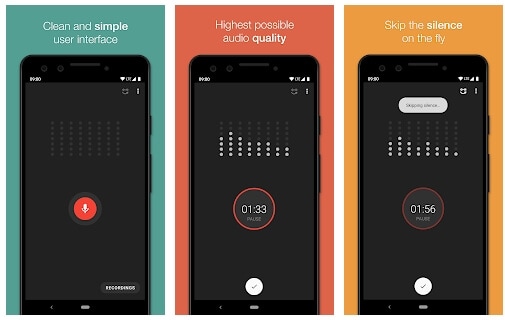
3. RecForge II Audio Recorder
Price: Free, but contains ads
Supported OS: Android 4.0 and up
Best for: Musicians
RecForge-audio-recorder App in Google Play
If you are looking for an Android voice recorder that allows you to customize bit rates, sample rates, choose codecs or record in mono or stereo mode, then you should consider installing RecForge II Audio Recorder on your device. The app allows you to schedule recordings, connect different types of external microphones or adjust the gain manually. In addition, you can also adjust the pitch , tempo and the playback rate of all audio files you record and edit with this app. RecForge II Audio Recorder continues working even while you are using other apps, and it keeps the battery consumption at the very minimum.
Pros
- Supports nearly all common audio file formats
- Offers a versatile set of audio editing tools
- Excellent file-sharing capabilities
- Allows users to increase the audio quality by disabling Automatic Gain Control
Cons
- The maximum duration of a recording is limited for some file formats
- Can be too complicated for inexperienced users
4. Hi-Q MP3 Voice Recorder
Price: Free
Supported OS: Varies with the device
Best for: Students, general use
Hi-Q MP3 Voice Recorder App in Google Play
You don’t need any previous audio recording experience to record long lectures, interviews and all other types of voice recordings with Hi-Q MP3 Voice Recorder. The free version of the app limits the maximum duration of a recording you can make to just 10 minutes. That is why you must upgrade to the Pro version of Hi-Q MP3 Voice Recorder if you want to capture hours of material directly from your phone. The best part is that all versions of the app automatically upload recordings to Google Drive or Dropbox which frees up space on your device.
Pros
- Intuitive and modernly designed interface
- Simple audio recording session setup
- Customizable audio quality
- Excellent file management capabilities
Cons
- Recording with external microphones is not an option
- The free version of the app limits the maximum duration of recordings
5. Voice Recorder
Price: Free, but contains ads
Supported OS: Android 4.1 and up
Best for: Students, musicians, and businessmen
Voice Recorder App in Google Play
If you are looking for an app you can use to record an interview, a business meeting or a lecture, then Voice Recorder may be one of your best options. You can record audio files without any restrictions and visualize the sounds with the Audio Spectrum Analyzer. The app continues recording from the background even while the phone’s screen is off which preserves battery life and enables you to perform other tasks while the recording session is in progress. Voice Recorder offers a broad range of file-sharing capabilities so that you can easily send your audio recordings via SMS, email and the Messenger app or share them on Facebook and WhatsApp.
Pros
- Available for free to all Android users
- Stopping, pausing or resuming a recording session is easy
- Allows users to adjust the sample rate
- Offers the microphone gain calibration tool
Cons
- Audio recordings can only be saved in two different file formats
- Doesn’t provide audio editing options
6. Music Maker JAM
Price: Free, but contains ads and offers in-app purchases
Supported OS: Varies with the device
Best for: Musicians
Music Maker JAM App in Google Play
With the selection of 300 mix packs, Music Maker JAM is one of the best android apps for aspiring musicians who want to compose their music even while they are on the go. You can choose from a variety of samples, audio loops and beats to create your next song or record live performances with the app’s 8-channel mixer. Music Maker JAM also enables you to record vocals, adjust the tempo of the audio files or apply effects to all recordings you edit with this app. Once your recording is ready, you can upload it to SoundCloud directly from the app or post it on Facebook and other social networks.
Pros
- Shake your Android phone to remix a song
- The app lets you choose from more than 300 mix packs
- Supports multi-channel recording
- Offers advanced audio editing options
Cons
- Music Maker JAM is not primarily a voice recorder
- No support for external microphones
7. LectureNotes
Price: Free
Supported OS: Android 3.0 and up
Best for: Students
LectureNotes App in Google Play
In case you take notes often, then this app can be an excellent choice for you as it allows you to use a stylus to create notes. However, the trial version limits the number of notebooks to just two, and neither of the notebooks can have more than eight pages. Moreover, if you would like to utilize the app’s voice recording features, you must install LectureRecordings plugin on your device. To capture videos, you must first install the LectureVideos plugin. Another disappointing thing is that you won’t be able to adjust the settings for your audio recording sessions or edit the recording you create with this app.
Pros
- An efficient tool for creating hand-written notes
- The app can be used while your Android phone is offline
- Allows users to export PDF files
- Compatible with OneNote and Evernote apps
Cons
- Underwhelming voice recording options
- You must install a plugin to record audio files
8. ASR Voice Recorder
Price: Free, but contains ads
Supported OS: Android 5.0 and up
Best for: Journalists, musicians, students

ASR Voice Recorder App in Google Play
A brief look at the list of features this app offers, you will find this is a well-rounded voice recorder because it offers all the tools you are going to need to create high-quality recordings. You can choose from a variety of file formats, add notes to recordings at recording or control the playback speed of all audio files you listen to in AVR Voice Recorder. You can also skip silences, connect a headset microphone to the app via Bluetooth or arrange your voice recordings in any way you want. The app lets you upload your audio files to Dropbox, Google Drive, and other file-hosting platforms.
Pros
- Provides excellent audio recording options for free
- Allows users to save recordings in different file formats
- Equipped with an audio playback controller
- Sharing multiple files is easy
Cons
- Offers only basic audio editing tools
- No audio transcription options
9. Call Recorder
Price: Free, but contains ads
Supported OS: Android 4.0 and up
Best for: Marketing professionals
Call Recorder App in Google Play
If you would like to record all incoming and outgoing calls on your device, the Call Recorder app is one of the best options you have at your disposal. Besides recording all calls from whitelisted numbers automatically, this app also allows you to choose from a variety of different recording modes. Furthermore, Call Recorder lets you blacklist numbers from which you don’t want to receive calls and enables you to organize your recordings efficiently. All files created with this app can be sent via Skype, SMS, Dropbox and other messaging services, which makes Call Recorder app a perfect choice for marketing professionals.
Pros
- No previous experience required to start using the app
- Records an unlimited number of phone calls
- Simple audio file management
- Offers several recording modes
Cons
- No voice recording options
- Doesn’t provide audio editing tools
10. Otter Voice Meeting Notes
Price: Free, but offers in-app purchases
Supported OS: Android 5.0 and up
Best for: Large teams of professionals
Otter Voice Meeting Notes App in Google Play
Besides being a powerful voice recorder, Otter Voice Meeting Notes is a collaborative tool that enables multiple team members to highlight and edit the transcripts this app generates in real-time. In addition to recording business meetings, you can also use Otter Voice Meeting Notes to record interviews, webinars or podcasts . Starting a new recording session takes only a second since you just have to tap on the Record button to capture the voices of all speakers in the room. What’s more, the app lets you add photos or slides to transcripts while the recording session is still in progress.
Pros
- Makes collaboration on a single transcript easier
- The app’s AI identifies different speakers automatically after the initial training
- Allows users to export MP3 audio files
- Compatible with the Call Recorder app
Cons
- In-app purchases are expensive
- Audio editing tools could be better
You may also like: 10 Best Free Discord Voice Changers
Conclusion
Creating an audio note or recording an entire interview with an Android device has never been easier. Each of the voice recorder apps we featured in this article enables you to create high-quality audio files you can share via email or store on the cloud.
Which of these Android voice recorders you are going to choose depends on a broad spectrum of factors, which range from the context in which you want to make the recording toaudio editing tools you want to use to process the audio files you created.
We’ve summarized the essential information in the table below. Hope that will help you to determine. What is your favorite Android voice recorder? Leave a comment and let us know.
| Voice recorder app | Price | Supported OS | User Rating | Best for |
|---|---|---|---|---|
| Easy Voice Recorder Pro | $3.99 | Varies with the device | 4.8 | Students, musicians, and businessmen |
| Smart Recorder – High-quality voice recorder | Free, but contains ads and offers in-app purchases | Varies with the device | 4.7 | Students, musicians, and businessmen |
| RecForge II Audio Recorder | Free, but contains ads | Android 4.0 and up | 4.0 | Musicians |
| Hi-Q MP3 Voice Recorder | Free | Varies with the device | 4.5 | Students |
| Voice Recorder | Free, but contains ads | Android 4.1 and up | 4.8 | Students, musicians, and businessmen |
| Music Maker JAM | Free, but contains ads and offers in-app purchases | Varies with the device | 4.6 | Musicians |
| LectureNotes | Free | Android 3.0 and up | 4.3 | Students |
| ASR Voice Recorder | Free, but contains ads | Android 5.0 and up | 4.4 | Journalists, musicians, students |
| Call Recorder | Free, but contains ads | Android 4.0 and up | 4.3 | Marketing professionals |
| Otter Voice Meeting Notes | Free, but offers in-app purchases | Android 5.0 and up | 4.5 | Large teams of professionals |
Benjamin Arango
Benjamin Arango is a writer and a lover of all things video.
Follow @Benjamin Arango
Benjamin Arango
Mar 27, 2024• Proven solutions
Memorizing every bit of information you need to perform your daily or weekly tasks becomes increasingly difficult as your workload rises. Students, journalists, and professionals from a wide array of industries can benefit from making audio notes or even recording entire conversations with their Smartphones.
A simple Android voice recorder can make this task easy since you can just tap on the Record button and create an audio note in seconds. However, with so many voice recorder apps for Android devices out there, finding the one best suited for your needs can be more complicated than it seems. So, in this article, we are going to help you discover some best free voice recorder for an Android device you are currently using.
Want to record voiceover and audio on iPhone? Check 10 Best Voice Recorder Apps for iPhones >>
10 Best Free Voice Recording Apps for Android Devices
Recording audio is no longer a highly technical process since now you can create an audio note or record an interview with an Android phone and a voice recorder app. The question is which voice recording app should you install on your device. So, let’s take a look at some of the most potent Android voice recorders you can find at Google Play Store.
1. Easy Voice Recorder Pro
Price: $3.99
Supported OS: Varies with the device
Best for: Students, musicians, and businessmen
App in Google Play
As the app’s name suggests making recordings for a broad range of purposes is easy. All you need to do is launch the app and start a new audio recording session. Easy Voice Recorder Pro doesn’t limit the duration of your recordings, and it also allows you to compress the recorded audio . That is perfect if you need to record long lectures or conversations. Besides, you can connect an external microphone with the app in case you want to increase the quality of the sound you are recording. The app also lets you store your recordings on Dropbox or Google Drive, while it also offers the possibility to send recordings via email.
Easy Voice Recorder Pro Interface
Pros
- Allows users to manage and organize their recordings effortlessly
- Supports all standard output audio file formats
- Offers the option to record in stereo
- Recordings made with this app can be used as the ringtone
Cons
- Ads can be frustrating
- Limited basic audio editing tools
2. Smart Recorder – High-quality voice recorder
Price: Free, but contains ads and offers in-app purchases
Supported OS: Varies with the device
Best for: Students, musicians, and businessmen
App in Google Play
Capturing high-quality audio recordings effortlessly is the ultimate goal of all Android users who want to use voice recorders. As one of the best free voice recorders for Android, Smart Recorder app has a plethora of features that enable users to make high-quality audio recordings even in imperfect conditions. Options like Live Audio Spectrum Analyzer, microphone gain calibration or automatic and manual sensitivity control in Skip Silence mode are just a few reasons why this app has over 10 million installs. However, you should keep in mind that you cannot create audio files that are larger than 2 GB with this app.
Smart Recorder – High-quality voice recorder Interface
Pros
- Provides full control over the audio recording process
- Equipped with the Wave Lock feature that prevents the device from going into the sleep mode
- Features a live audio spectrum analyzer
- Preserves battery life
Cons
- No phone call recording options
- Limited file-sharing capabilities
3. RecForge II Audio Recorder
Price: Free, but contains ads
Supported OS: Android 4.0 and up
Best for: Musicians
RecForge-audio-recorder App in Google Play
If you are looking for an Android voice recorder that allows you to customize bit rates, sample rates, choose codecs or record in mono or stereo mode, then you should consider installing RecForge II Audio Recorder on your device. The app allows you to schedule recordings, connect different types of external microphones or adjust the gain manually. In addition, you can also adjust the pitch , tempo and the playback rate of all audio files you record and edit with this app. RecForge II Audio Recorder continues working even while you are using other apps, and it keeps the battery consumption at the very minimum.
Pros
- Supports nearly all common audio file formats
- Offers a versatile set of audio editing tools
- Excellent file-sharing capabilities
- Allows users to increase the audio quality by disabling Automatic Gain Control
Cons
- The maximum duration of a recording is limited for some file formats
- Can be too complicated for inexperienced users
4. Hi-Q MP3 Voice Recorder
Price: Free
Supported OS: Varies with the device
Best for: Students, general use
Hi-Q MP3 Voice Recorder App in Google Play
You don’t need any previous audio recording experience to record long lectures, interviews and all other types of voice recordings with Hi-Q MP3 Voice Recorder. The free version of the app limits the maximum duration of a recording you can make to just 10 minutes. That is why you must upgrade to the Pro version of Hi-Q MP3 Voice Recorder if you want to capture hours of material directly from your phone. The best part is that all versions of the app automatically upload recordings to Google Drive or Dropbox which frees up space on your device.
Pros
- Intuitive and modernly designed interface
- Simple audio recording session setup
- Customizable audio quality
- Excellent file management capabilities
Cons
- Recording with external microphones is not an option
- The free version of the app limits the maximum duration of recordings
5. Voice Recorder
Price: Free, but contains ads
Supported OS: Android 4.1 and up
Best for: Students, musicians, and businessmen
Voice Recorder App in Google Play
If you are looking for an app you can use to record an interview, a business meeting or a lecture, then Voice Recorder may be one of your best options. You can record audio files without any restrictions and visualize the sounds with the Audio Spectrum Analyzer. The app continues recording from the background even while the phone’s screen is off which preserves battery life and enables you to perform other tasks while the recording session is in progress. Voice Recorder offers a broad range of file-sharing capabilities so that you can easily send your audio recordings via SMS, email and the Messenger app or share them on Facebook and WhatsApp.
Pros
- Available for free to all Android users
- Stopping, pausing or resuming a recording session is easy
- Allows users to adjust the sample rate
- Offers the microphone gain calibration tool
Cons
- Audio recordings can only be saved in two different file formats
- Doesn’t provide audio editing options
6. Music Maker JAM
Price: Free, but contains ads and offers in-app purchases
Supported OS: Varies with the device
Best for: Musicians
Music Maker JAM App in Google Play
With the selection of 300 mix packs, Music Maker JAM is one of the best android apps for aspiring musicians who want to compose their music even while they are on the go. You can choose from a variety of samples, audio loops and beats to create your next song or record live performances with the app’s 8-channel mixer. Music Maker JAM also enables you to record vocals, adjust the tempo of the audio files or apply effects to all recordings you edit with this app. Once your recording is ready, you can upload it to SoundCloud directly from the app or post it on Facebook and other social networks.
Pros
- Shake your Android phone to remix a song
- The app lets you choose from more than 300 mix packs
- Supports multi-channel recording
- Offers advanced audio editing options
Cons
- Music Maker JAM is not primarily a voice recorder
- No support for external microphones
7. LectureNotes
Price: Free
Supported OS: Android 3.0 and up
Best for: Students
LectureNotes App in Google Play
In case you take notes often, then this app can be an excellent choice for you as it allows you to use a stylus to create notes. However, the trial version limits the number of notebooks to just two, and neither of the notebooks can have more than eight pages. Moreover, if you would like to utilize the app’s voice recording features, you must install LectureRecordings plugin on your device. To capture videos, you must first install the LectureVideos plugin. Another disappointing thing is that you won’t be able to adjust the settings for your audio recording sessions or edit the recording you create with this app.
Pros
- An efficient tool for creating hand-written notes
- The app can be used while your Android phone is offline
- Allows users to export PDF files
- Compatible with OneNote and Evernote apps
Cons
- Underwhelming voice recording options
- You must install a plugin to record audio files
8. ASR Voice Recorder
Price: Free, but contains ads
Supported OS: Android 5.0 and up
Best for: Journalists, musicians, students
ASR Voice Recorder App in Google Play
A brief look at the list of features this app offers, you will find this is a well-rounded voice recorder because it offers all the tools you are going to need to create high-quality recordings. You can choose from a variety of file formats, add notes to recordings at recording or control the playback speed of all audio files you listen to in AVR Voice Recorder. You can also skip silences, connect a headset microphone to the app via Bluetooth or arrange your voice recordings in any way you want. The app lets you upload your audio files to Dropbox, Google Drive, and other file-hosting platforms.
Pros
- Provides excellent audio recording options for free
- Allows users to save recordings in different file formats
- Equipped with an audio playback controller
- Sharing multiple files is easy
Cons
- Offers only basic audio editing tools
- No audio transcription options
9. Call Recorder
Price: Free, but contains ads
Supported OS: Android 4.0 and up
Best for: Marketing professionals
Call Recorder App in Google Play
If you would like to record all incoming and outgoing calls on your device, the Call Recorder app is one of the best options you have at your disposal. Besides recording all calls from whitelisted numbers automatically, this app also allows you to choose from a variety of different recording modes. Furthermore, Call Recorder lets you blacklist numbers from which you don’t want to receive calls and enables you to organize your recordings efficiently. All files created with this app can be sent via Skype, SMS, Dropbox and other messaging services, which makes Call Recorder app a perfect choice for marketing professionals.
Pros
- No previous experience required to start using the app
- Records an unlimited number of phone calls
- Simple audio file management
- Offers several recording modes
Cons
- No voice recording options
- Doesn’t provide audio editing tools
10. Otter Voice Meeting Notes
Price: Free, but offers in-app purchases
Supported OS: Android 5.0 and up
Best for: Large teams of professionals
Otter Voice Meeting Notes App in Google Play
Besides being a powerful voice recorder, Otter Voice Meeting Notes is a collaborative tool that enables multiple team members to highlight and edit the transcripts this app generates in real-time. In addition to recording business meetings, you can also use Otter Voice Meeting Notes to record interviews, webinars or podcasts . Starting a new recording session takes only a second since you just have to tap on the Record button to capture the voices of all speakers in the room. What’s more, the app lets you add photos or slides to transcripts while the recording session is still in progress.
Pros
- Makes collaboration on a single transcript easier
- The app’s AI identifies different speakers automatically after the initial training
- Allows users to export MP3 audio files
- Compatible with the Call Recorder app
Cons
- In-app purchases are expensive
- Audio editing tools could be better
You may also like: 10 Best Free Discord Voice Changers
Conclusion
Creating an audio note or recording an entire interview with an Android device has never been easier. Each of the voice recorder apps we featured in this article enables you to create high-quality audio files you can share via email or store on the cloud.
Which of these Android voice recorders you are going to choose depends on a broad spectrum of factors, which range from the context in which you want to make the recording toaudio editing tools you want to use to process the audio files you created.
We’ve summarized the essential information in the table below. Hope that will help you to determine. What is your favorite Android voice recorder? Leave a comment and let us know.
| Voice recorder app | Price | Supported OS | User Rating | Best for |
|---|---|---|---|---|
| Easy Voice Recorder Pro | $3.99 | Varies with the device | 4.8 | Students, musicians, and businessmen |
| Smart Recorder – High-quality voice recorder | Free, but contains ads and offers in-app purchases | Varies with the device | 4.7 | Students, musicians, and businessmen |
| RecForge II Audio Recorder | Free, but contains ads | Android 4.0 and up | 4.0 | Musicians |
| Hi-Q MP3 Voice Recorder | Free | Varies with the device | 4.5 | Students |
| Voice Recorder | Free, but contains ads | Android 4.1 and up | 4.8 | Students, musicians, and businessmen |
| Music Maker JAM | Free, but contains ads and offers in-app purchases | Varies with the device | 4.6 | Musicians |
| LectureNotes | Free | Android 3.0 and up | 4.3 | Students |
| ASR Voice Recorder | Free, but contains ads | Android 5.0 and up | 4.4 | Journalists, musicians, students |
| Call Recorder | Free, but contains ads | Android 4.0 and up | 4.3 | Marketing professionals |
| Otter Voice Meeting Notes | Free, but offers in-app purchases | Android 5.0 and up | 4.5 | Large teams of professionals |
Benjamin Arango
Benjamin Arango is a writer and a lover of all things video.
Follow @Benjamin Arango
The Complete Manual of GarageBand Audio Sessions
Apple GarageBand is an in-built tool in Mac that lets you make incredible music with or without an instrument. The software acts as a music creation tool that enables you to record, mix, and master the music world. GarageBand recording has become popular due to a diverse range of editing functions. Essentially, do you want to know how to record on GarageBand? Be our guest! We have covered your basis.
In this article
01 What is GarageBand Recording Software?
02 How to Download and Install GarageBand Recording Software?
03 Tutorial for How to Record on GarageBand
Part 1: What is GarageBand Recording Software?
GarageBand for podcasting and GarageBand voice recording is the two phenomenal usages of Apple GarageBand . The Mac users have access to a sound library constituting synths, loops, and instrument presets. The user can add a song, start a track, and develop a musical career effortlessly.
The app is free for iOS, macOS, and iPadOS; sharing and creating music is effortless. Additionally, the Apple iCloud integration plays a pivotal role in adding tracks across devices. The workability is as easy as it can get. Willing to know how to record on GarageBand? Keep following us!
As far as the interface is concerned, it has been designed to make music easier and compatible with beginners. The “Quick Help” function can be enabled to get useful hints every time you have to hover over the cursor. The music artist can also get creative with Transform Pad Smart Control. It helps produce morph and tweak sounds as you deem necessary.

Along with this, there is a great collection of lessons for piano and guitar. It makes the user get right into the feels. One can also get instant feedback on your playing to hone the skills flawlessly.
So, are you with us? Let us begin! Now that we have established the performance of Apple GarageBand, let us look at its features.
Groove Track Feature
The Groove Track feature is considered a spell checker for rhythm. It adjusts and synchronizes the timing of the chosen track to the groove under action.
Smart Controls
The smart controls are designed to shape any sound in the library with a customized set of buttons, sliders, and knobs—the look of the smart control changes with each instrument.
Logic Remote
The logic remote helps navigate the song to browse the Sound Library and access smart controls. One can also use the tool by using multi-touch gestures.
Drummer Feature
The “Drummer” plays a pivotal role in adding the virtual session drummer and producing beats. There are around 33 players from genres, including Hip Hop, Rock, and EDM. The different groove and fill combinations make the process effortless.
Amps and Stompboxes
The Bass Amp designer helps dial-up modern and classic tones. One can also build their guitar rig via 25 legendary amps and cabinets. Moreover, there are 35 creative and fun stompbox effects.
Are you willing to know how to record voice on GarageBand? Should we? Let us first understand the procedure to download and install Apple GarageBand.
Part 2: How to Download and Install GarageBand Recording Software?
Do you need to make a GarageBand podcast? Before getting done with the process, ensure that your Mac computer completes the minimum system requirements. The Mac computer requires MacOS 11.0 or later. Apple GarageBand covers the size of 783.1 MB; therefore, you should have this storage.

Image alt: install apple garageband
MacOS 11 requires at least 20GB of free hard drive storage to handle the installation process. A 4GB RAM and 1.1 GHz processor are also system requirements to download Apple GarageBand . The software comes in-built with the macOS computer. However, if you don’t find it, install it through the following procedure:
Step 1: Launching App Store
To begin, launch App Store from your macOS computer. After that, go to the search bar and type “GarageBand.”
Step 2: Installing GarageBand
Click on Apple GarageBand from there. The “Get” option appears. Click on it and get done with the process.
Part 3: Tutorial for How to Record on GarageBand
Want to know how to record on GarageBand? Do you have a concern about how to record voice on GarageBand? Worry no more! We are here at your disposal!
Apple GarageBand may offer ease of use for musicians and artists. However, understanding how it works is mandatory. The section of the article reflects upon the complete procedure to record on Apple GarageBand to conclude the process. Henceforth, let us not wait any longer! Time to dive in!
Step 1: Initiating the Project
Tempo and time signature can also be tailored as per need. Launch Apple GarageBand from your Mac computer and then plug in your external microphone. As soon as the interface pops up, click on “Voice.” Expand the “Details” menu located in the bottom left corner of the project selection box. Tap “Input Device” and choose the microphone from your list. Moving on, click on “Choose” in the bottom right corner.

Step 2: Adding the New Track
Moving on, you are expected to add a new track. To do this, click on the button with (+), located in the top left corner of the tracks panel. GarageBand offers four tracks. Pick one as you deem necessary. Tap the “Audio” option and then plug in the external microphone or guitar. Hit the “Input” dropdown and choose the list. Click on “Create” afterward.

Step 3: Recording the Sound
Now, it is time to record the sound. Pick the track that you will be recording by clicking on the track panel. Use the square bottom to stop it. Hit red circle to begin recording.

Step 4: Recording the Multiple Tracks
Moreover, you can record multiple tracks as well. To begin, choose the track where the first track was recorded through the track header. Navigate the play head to the start of the original take. Tap the red circle to initiate the recording process. Now, click on the number in the recorded segment in the top left corner. Pick the take you have to keep and then “Delete Unused Takes to get rid of other takes.

Step 5: Exporting the File
After you are done, it is time to export the finished project. Navigate to the top bar and click on “Share.” Choose “ Export Song to Disk “ from the context menu that appears, choose “Export Song to Disk.” A dialogue box appears.

Step 6: Saving Process
Rename the file, enter the file location, format, and sound quality—hit “Export” when you are done. The project can be saved in MP3 , WAV, and AIFF.

Wrapping Up
There is a diverse range of voice recorders and music-creating software in the business, creating chaos. Apple GarageBand recording is one such Mac recording studio doing wonders in the market. With advanced features and multiple functions, one can count on the tool to create magic in the music fraternity. The users are expected to test the features first before making the call.
02 How to Download and Install GarageBand Recording Software?
03 Tutorial for How to Record on GarageBand
Part 1: What is GarageBand Recording Software?
GarageBand for podcasting and GarageBand voice recording is the two phenomenal usages of Apple GarageBand . The Mac users have access to a sound library constituting synths, loops, and instrument presets. The user can add a song, start a track, and develop a musical career effortlessly.
The app is free for iOS, macOS, and iPadOS; sharing and creating music is effortless. Additionally, the Apple iCloud integration plays a pivotal role in adding tracks across devices. The workability is as easy as it can get. Willing to know how to record on GarageBand? Keep following us!
As far as the interface is concerned, it has been designed to make music easier and compatible with beginners. The “Quick Help” function can be enabled to get useful hints every time you have to hover over the cursor. The music artist can also get creative with Transform Pad Smart Control. It helps produce morph and tweak sounds as you deem necessary.
Along with this, there is a great collection of lessons for piano and guitar. It makes the user get right into the feels. One can also get instant feedback on your playing to hone the skills flawlessly.
So, are you with us? Let us begin! Now that we have established the performance of Apple GarageBand, let us look at its features.
Groove Track Feature
The Groove Track feature is considered a spell checker for rhythm. It adjusts and synchronizes the timing of the chosen track to the groove under action.
Smart Controls
The smart controls are designed to shape any sound in the library with a customized set of buttons, sliders, and knobs—the look of the smart control changes with each instrument.
Logic Remote
The logic remote helps navigate the song to browse the Sound Library and access smart controls. One can also use the tool by using multi-touch gestures.
Drummer Feature
The “Drummer” plays a pivotal role in adding the virtual session drummer and producing beats. There are around 33 players from genres, including Hip Hop, Rock, and EDM. The different groove and fill combinations make the process effortless.
Amps and Stompboxes
The Bass Amp designer helps dial-up modern and classic tones. One can also build their guitar rig via 25 legendary amps and cabinets. Moreover, there are 35 creative and fun stompbox effects.
Are you willing to know how to record voice on GarageBand? Should we? Let us first understand the procedure to download and install Apple GarageBand.
Part 2: How to Download and Install GarageBand Recording Software?
Do you need to make a GarageBand podcast? Before getting done with the process, ensure that your Mac computer completes the minimum system requirements. The Mac computer requires MacOS 11.0 or later. Apple GarageBand covers the size of 783.1 MB; therefore, you should have this storage.
Image alt: install apple garageband
MacOS 11 requires at least 20GB of free hard drive storage to handle the installation process. A 4GB RAM and 1.1 GHz processor are also system requirements to download Apple GarageBand . The software comes in-built with the macOS computer. However, if you don’t find it, install it through the following procedure:
Step 1: Launching App Store
To begin, launch App Store from your macOS computer. After that, go to the search bar and type “GarageBand.”
Step 2: Installing GarageBand
Click on Apple GarageBand from there. The “Get” option appears. Click on it and get done with the process.
Part 3: Tutorial for How to Record on GarageBand
Want to know how to record on GarageBand? Do you have a concern about how to record voice on GarageBand? Worry no more! We are here at your disposal!
Apple GarageBand may offer ease of use for musicians and artists. However, understanding how it works is mandatory. The section of the article reflects upon the complete procedure to record on Apple GarageBand to conclude the process. Henceforth, let us not wait any longer! Time to dive in!
Step 1: Initiating the Project
Tempo and time signature can also be tailored as per need. Launch Apple GarageBand from your Mac computer and then plug in your external microphone. As soon as the interface pops up, click on “Voice.” Expand the “Details” menu located in the bottom left corner of the project selection box. Tap “Input Device” and choose the microphone from your list. Moving on, click on “Choose” in the bottom right corner.
Step 2: Adding the New Track
Moving on, you are expected to add a new track. To do this, click on the button with (+), located in the top left corner of the tracks panel. GarageBand offers four tracks. Pick one as you deem necessary. Tap the “Audio” option and then plug in the external microphone or guitar. Hit the “Input” dropdown and choose the list. Click on “Create” afterward.
Step 3: Recording the Sound
Now, it is time to record the sound. Pick the track that you will be recording by clicking on the track panel. Use the square bottom to stop it. Hit red circle to begin recording.
Step 4: Recording the Multiple Tracks
Moreover, you can record multiple tracks as well. To begin, choose the track where the first track was recorded through the track header. Navigate the play head to the start of the original take. Tap the red circle to initiate the recording process. Now, click on the number in the recorded segment in the top left corner. Pick the take you have to keep and then “Delete Unused Takes to get rid of other takes.
Step 5: Exporting the File
After you are done, it is time to export the finished project. Navigate to the top bar and click on “Share.” Choose “ Export Song to Disk “ from the context menu that appears, choose “Export Song to Disk.” A dialogue box appears.
Step 6: Saving Process
Rename the file, enter the file location, format, and sound quality—hit “Export” when you are done. The project can be saved in MP3 , WAV, and AIFF.
Wrapping Up
There is a diverse range of voice recorders and music-creating software in the business, creating chaos. Apple GarageBand recording is one such Mac recording studio doing wonders in the market. With advanced features and multiple functions, one can count on the tool to create magic in the music fraternity. The users are expected to test the features first before making the call.
Banned From Omegle? How to Get Unbanned?
Banned From Omegle? How to Get Unbanned?

Liza Brown
Mar 27, 2024• Proven solutions
On a platform like Omegle, it is common to be banned because of their strict rules and policies. Their aim to make their platform clean from all kinds of threats and scams, that’s the reason behind so many bans. There could be so many reasons which can cause you to be banned from Omegle but you will never know you got banned. To avoid being banned from Omegle, it is important to keep your activities according to their policies. Being banned on Omegle is a usual thing, if you haven’t got banned yet, take some time you will get banned eventually, without knowing the reason behind that ban. The best way to avoid being banned is to know the reason for which Omegle bans its users. In this article, we are going to take you through the reasons that can cause your account to be banned from Omegle and what are ways of getting the ban removed from your account.

You might be interested in:
Common Reasons behind the Ban
There are several different reasons behind being banned from Omegle, but we will inform you about the most common ones that cause most of the bans in this article.
If you are the one who drops from the calls or chats after being connected with any stranger, then are chances that you will get banned very soon. Omegle is designed in such a way to notice the drops that occur, if these drops are too many the system will automatically ban your account. That’s why it is important to a stable connection while you are trying to connect someone and avoid dropping the calls and chats when you are connected with someone. The system of Omegle will perceive you as a scammer or troll.
One of the strange this that can happen to you on Omegle is being banned because of someone’s false accusations about you. If any other user reports you they will ban you straight away, without investigating the matter to find the truth behind the accusation. If someone doesn’t like you, your voice, your background, your slow internet connection, they can simply get you banned simply by reporting you. This system of reporting was designed to secure the safety of the users and help them avoid any kind of harassment and bully, but many users are using it in a negative and destructive way. To avoid such kind of ban, try to be as modest and as humble as you can with everyone you talk and get connected with.
There are so many conditions of Omegle to follow, and sometimes it feels like an impossible thing to follow all those terms and conditions. They can ban you from Omegle if you are playing copyright music while a video call, if there is a movie or TV show being played in the background, you will be banned from Omegle. Another thing is to avoid being abusive with other users and behaviors.
How to get Unbanned from Omegle?
If you still got banned from Omegle after avoiding all the reasons that can cause a ban, then there is no need to worry. Multiple ways can help you get unbanned from Omegle.

The best and the most effective way to get unbanned from Omegle as many times as you want is to use a VPN. VPN helps you access Omegle from a totally different location, making you a different individual to use Omegle. It masks your IP address and provides you with a virtual and temporary IP address to get access to Omegle. But there is a small disadvantage of using VPN, which is slow speed. If you plan to have video chats, this slow connection may hinder this process and get you to ban again for several drops. But you can simply refresh the VPN and access Omegle from a different location and get unbanned again.
If you don’t want to use any trick to Omegle and wait for a few days, you should. Because some bans only last for few days. Another thing that can happen after few days is the change of your IP by your ISP because it often gets refreshed after every few days, providing you with a new IP address and a way to access Omegle again without any external IP support.
It is no different than a VPN. It allows you to access the websites from an intermediary IP address making it your temporary IP address. This method can get you unbanned from Omegle as many times as you want. The main difference between a Proxy and VPN is data encryption. The proxy doesn’t encrypt your data. Everything else is similar in both of the methods.
Since the ban is not applied to the user, the IP address can simply be bypassed by changing the network you are using to access Omegle. Every network provides you with a different and Unique IP address. This could be anything, a mobile network, friend’s wifi, or public wifi. Changing the network can enable you to access Omegle immediately. Once your device is connected to a new network, your device is assigned to a new IP address making the Omegle access right away.
Conclusion
The System that Omegle uses to ban its users is very strict and automatically bans users without getting into the matter and investigating it. So using Omegle and not getting banned doesn’t seem to be a possible thing. But one can avoid being ban as long as possible by avoiding all the reasons described in this article. But if you are ban, it can easily be accessed by using any of the above methods.


Liza Brown
Liza Brown is a writer and a lover of all things video.
Follow @Liza Brown
Liza Brown
Mar 27, 2024• Proven solutions
On a platform like Omegle, it is common to be banned because of their strict rules and policies. Their aim to make their platform clean from all kinds of threats and scams, that’s the reason behind so many bans. There could be so many reasons which can cause you to be banned from Omegle but you will never know you got banned. To avoid being banned from Omegle, it is important to keep your activities according to their policies. Being banned on Omegle is a usual thing, if you haven’t got banned yet, take some time you will get banned eventually, without knowing the reason behind that ban. The best way to avoid being banned is to know the reason for which Omegle bans its users. In this article, we are going to take you through the reasons that can cause your account to be banned from Omegle and what are ways of getting the ban removed from your account.
You might be interested in:
Common Reasons behind the Ban
There are several different reasons behind being banned from Omegle, but we will inform you about the most common ones that cause most of the bans in this article.
If you are the one who drops from the calls or chats after being connected with any stranger, then are chances that you will get banned very soon. Omegle is designed in such a way to notice the drops that occur, if these drops are too many the system will automatically ban your account. That’s why it is important to a stable connection while you are trying to connect someone and avoid dropping the calls and chats when you are connected with someone. The system of Omegle will perceive you as a scammer or troll.
One of the strange this that can happen to you on Omegle is being banned because of someone’s false accusations about you. If any other user reports you they will ban you straight away, without investigating the matter to find the truth behind the accusation. If someone doesn’t like you, your voice, your background, your slow internet connection, they can simply get you banned simply by reporting you. This system of reporting was designed to secure the safety of the users and help them avoid any kind of harassment and bully, but many users are using it in a negative and destructive way. To avoid such kind of ban, try to be as modest and as humble as you can with everyone you talk and get connected with.
There are so many conditions of Omegle to follow, and sometimes it feels like an impossible thing to follow all those terms and conditions. They can ban you from Omegle if you are playing copyright music while a video call, if there is a movie or TV show being played in the background, you will be banned from Omegle. Another thing is to avoid being abusive with other users and behaviors.
How to get Unbanned from Omegle?
If you still got banned from Omegle after avoiding all the reasons that can cause a ban, then there is no need to worry. Multiple ways can help you get unbanned from Omegle.
The best and the most effective way to get unbanned from Omegle as many times as you want is to use a VPN. VPN helps you access Omegle from a totally different location, making you a different individual to use Omegle. It masks your IP address and provides you with a virtual and temporary IP address to get access to Omegle. But there is a small disadvantage of using VPN, which is slow speed. If you plan to have video chats, this slow connection may hinder this process and get you to ban again for several drops. But you can simply refresh the VPN and access Omegle from a different location and get unbanned again.
If you don’t want to use any trick to Omegle and wait for a few days, you should. Because some bans only last for few days. Another thing that can happen after few days is the change of your IP by your ISP because it often gets refreshed after every few days, providing you with a new IP address and a way to access Omegle again without any external IP support.
It is no different than a VPN. It allows you to access the websites from an intermediary IP address making it your temporary IP address. This method can get you unbanned from Omegle as many times as you want. The main difference between a Proxy and VPN is data encryption. The proxy doesn’t encrypt your data. Everything else is similar in both of the methods.
Since the ban is not applied to the user, the IP address can simply be bypassed by changing the network you are using to access Omegle. Every network provides you with a different and Unique IP address. This could be anything, a mobile network, friend’s wifi, or public wifi. Changing the network can enable you to access Omegle immediately. Once your device is connected to a new network, your device is assigned to a new IP address making the Omegle access right away.
Conclusion
The System that Omegle uses to ban its users is very strict and automatically bans users without getting into the matter and investigating it. So using Omegle and not getting banned doesn’t seem to be a possible thing. But one can avoid being ban as long as possible by avoiding all the reasons described in this article. But if you are ban, it can easily be accessed by using any of the above methods.
Liza Brown
Liza Brown is a writer and a lover of all things video.
Follow @Liza Brown
Also read:
- New How to Change Audio Speed Easily?
- 2024 Approved Cutting-Edge AI Methods for Purifying Audio Recordings From Background Noise
- 2024 Approved Enhancing Project Focus Extracting Audio From Video in iMovie on Mac
- In 2024, The Ultimate List of Male-to-Female Voice Alteration Applications
- Updated A Beginners Handbook to Professional Music Video Editing for 2024
- Updated In 2024, Essential Audiophile Gear Top 9 Tools to Boost Your Podcast and Broadcast Clarity
- New In 2024, Rapid MP3 File Segmentation The Ultimate Guide to Quick Audio Division
- New 2024 Approved Unlocking High-Quality Audio Production with These Top 11 Gratuitous Editors on PC/Mac Systems, Updated
- 2024 Approved Techniques for Separating Beats in Song Arrangements
- Updated From Novice to Pro Key Edits and Tips to Maximize MP3 Potential
- New In 2024, 8 Favorite High-Quality Audio Recorders for Online Sharing
- Updated 2024 Approved Expert Guide to the Most Effective Instant Sound Modifiers A Comprehensive Review
- Updated Unveiling Popular Melancholic Tunes for 2024
- A Practical Approach to Balancing Loudness and Clarity with VLC Normalization for 2024
- Updated In 2024, Elated Acoustic Soundscape for Birthday Video Commemorating
- New Acoustic Enhancement Strategies Cutting Down Background Noise in Audio Recordings, Both Offline & Online
- New 2024 Approved Exhaustive Register of Podcast Discovery Systems
- Updated Acoustic Detox The Best Programs for Minimizing Environmental Audio Interference for 2024
- Updated In 2024, Audio Enhancement Techniques in After Effects A Comprehensive 2023 Guide
- Updated The Art of Synchronizing Video to Music Techniques for 2024
- New The Perfect Harmony of Journalism and Music A Listening Collection for 2024
- Exploring the Best 9 Voice Technology Innovations That Promise a Perfect Day
- Updated 2024 Approved Elevating Your Music Video Game Advanced Editing Techniques
- In 2024, A Filmmakers Choice The Top Five Free Audio Jokes for Creative Videos
- New In 2024, Discover the Top 5 Budget-Friendly Audio Intensity Normalizers
- Updated The Ultimate List of Affordable, Internet-Based Auditory Refinement Platforms – Ranked
- Updated Pinpointing the Acoustic Signature of a Clicky Button
- Updated In 2024, Optimize Your Streaming Quality with These Top 4 Video Boosters
- Updated 2024 Approved Cutting-Edge Audio Equipment to Enhance Virtual Broadcasts
- New In 2024, Find Brush Sound Effect
- New 10 FREE Online MP3 to Text Converters-Wondershare Filmora for 2024
- How to Screen Mirroring Nokia C12 Pro? | Dr.fone
- How To Restore Missing Pictures Files from Honor X50i.
- Undelete lost music from Samsung Galaxy A05s
- Full Guide How To Fix Connection Is Not Private on Samsung Galaxy S23 Ultra | Dr.fone
- How to Fix Corrupt video files of Play 8T using Video Repair Utility?
- New 2024 Approved The Pros and Cons of Final Cut Pro vs Final Cut Express
- How to Factory Reset iPhone 14 and iPad Without Apple ID | Stellar
- In 2024, Getting the Pokemon Go GPS Signal Not Found 11 Error in Poco F5 5G | Dr.fone
- Guide to Mirror Your Lava Storm 5G to Other Android devices | Dr.fone
- In 2024, 9 Best Free Android Monitoring Apps to Monitor Phone Remotely For your Nokia XR21 | Dr.fone
- In 2024, Master Video Storytelling with Adobe Premiere Pro on Mac
- In 2024, How Can Vivo X100Mirror Share to PC? | Dr.fone
- In 2024, How to Fake Snapchat Location without Jailbreak On HTC U23 Pro | Dr.fone
- Bricked Your Samsung Galaxy S23 FE? Heres A Full Solution | Dr.fone
- How To Restore Missing Photos Files from Honor Magic Vs 2.
- Title: Updated 10 Best Voice Recording Apps for Android Devices Free Included
- Author: Kate
- Created at : 2024-05-20 02:42:16
- Updated at : 2024-05-21 02:42:16
- Link: https://audio-editing.techidaily.com/updated-10-best-voice-recording-apps-for-android-devices-free-included/
- License: This work is licensed under CC BY-NC-SA 4.0.
