
:max_bytes(150000):strip_icc():format(webp)/samsung-soundbar-dolby-atmos-569f1fdd925e46ab8b3e1f51d95e1e6c.jpg)
The Fishy Way to Enthrall Listeners A Comprehensive Guide to Applying Clownfish Voice Changes in Virtual Platforms for 2024
The Fishy Way to Enthrall Listeners: A Comprehensive Guide to Applying Clownfish Voice Changes in Virtual Platforms
Want to do something interesting? Think about using a voice changer. A voice changer is used to change your voice to make your daily interaction more interesting. A voice changer changes the pitch or tone of your voice. People also use it to add voice effects that could be either of a certain type or any random effect that the user likes.
You can use voice changers on your live stream. You can also use it on platforms like Discord and Skype. A voice changer can be used to make the gaming experience better as well. You can also use voice changer on online games like Fortnite. If you want to know about Clownfish Voice Changer, then let’s get started.
In this article
01 What Is Clownfish Voice Changer?
02 Tips to Use Clownfish Voice Changer on Discord and Fortnite?
03 Guidelines to Better Use Clownfish Voice Changer on Skype
04 Solution to Fix Clownfish Voice Changer Not Working
For Win 7 or later (64-bit)
For macOS 10.12 or later
Part 1. What Is Clownfish Voice Changer?
Clownfish is considered a famous voice changer. Clownfish Voice Changer is used to change voices for various purposes. It is installed on the system as it uses the microphone of the system that it is installed on. Clownfish Voice Changer has an attractive and intuitive interface that gives the user the best experience. It has plug-in support for Virtual Sound Technology (VST).

Clownfish voice provides multiple choices for voice after-effects that are available in the built-in library. These voices include male/female voices, robotic sounds, radio voices along with alien voices. Clownfish Voice Changer PC is compatible with Windows 7/8/8.1/10 and 11. It also has a built-in music player that supports various media formats.
Part 2. Tips to Use Clownfish Voice Changer on Discord and Fortnite?
As we have discussed earlier, what clownfish voice changer is and how amazing it is, now let’s move further. The following section of this article will share the tips that will help someone use Clownfish Discord and also Clownfish on Fortnite.
Before we start, you should know how to configure the Clownfish voice changer on your device. For this, you can follow the steps given below. Let’s begin!
Step 1: Setup Clownfish
After you have successfully downloaded and installed Clownfish Voice Changer, it’s time to setup. For this, firstly, locate the voice changer in your systems tray. Then, right-click on the icon, and from the menu list, select the ‘Setup’ option to set clownfish across different applications.

Step 2: Install Microphone
You cannot use the voice changer until you have attached a microphone to your device. For this, you need to install the microphone by hitting the ‘Install’ button next to the microphone.

Step 3: Set Microphone as Default Device
For the microphone to work in Clownfish, it should be selected as the default device. For doing this, select the ‘Recording’ option from the ‘Sounds’ tabs. A list of all the compatible devices will appear on the screen, you have to right-click on your device and hit the ‘Set as the Default Device’ option.

Step 4: Default Device is Set
After that, right-click on the Clownfish icon in the system tray and hit the ‘Hear Microphone’ option. The Clownfish Voice Changer is set to the default option. In case you ever plan to change it, right-click on the Clownfish icon from the system tray and tap on ‘Set Voice Changer.’

Step 5: Select Voice Changer Effects
Once Clownfish has been installed and successfully configured, you now have complete access to all voice changer options. There are dozens of effects that you can select from.

How to use Clownfish on Discord
If you want to use Clownfish on Discord, then you have to select Clownfish voice changer as the input device. For this, open Discord and head to ‘App Settings’ under the ‘User Settings’ option. There, look for the ‘Voice and Video’ option. A category of ‘Input Device’ will appear on the screen; from the drop-down list, switch to ‘Clownfish Voice Changer.’

How to use Clownfish on Fortnite
For using Clownfish on Fortnite, start by selecting the ‘Menu’ icon. There, head to the ‘Settings’ and select the ‘Audio’ option. Now, you have to set the input device; for that, go to the ‘Voice Chat’ option and select Clownfish Voice Changer as your input device under the ‘Voice Chat Input Device’ category.

Part 3. Guidelines to Better Use Clownfish Voice Changer on Skype
You can use voice changers on various platforms according to their compatibility; for instance, Clownfish is compatible with Skype. The question is, do you know how to use Clownfish voice changer on Skype? If ‘no,’ then let us share some helping guidelines to use Clownfish on Skype in a better way.
Step 1: If you want to change voice on Skype with Clownfish, then, first of all, download and install Skype on your PC or laptop and launch it.

Step 2: After Skype has been successfully launched, head over to ‘Settings’ by clicking on the three dots present next to your username.

Step 3: From the Settings screen, you have to look for the ‘Audio & Video’ tab and then select it. Lastly, you have to select the microphone ‘Clownfish Voice Changer’ under the ‘Microphone’ option, and you are all done.

Part 4. Solution to Fix Clownfish Voice Changer Not Working
While using Clownfish Voice Changer, you might also come across some troubles. They might be because either the voice changer is not updated, or maybe the apps you are using are not up to date. Let us share some fixes with you for smooth Clownfish functioning.
Fix 1: Update Clownfish Voice Changer
The most significant reason why you face trouble is that your Clownfish version is outdated. For this, you should update the voice changer to its latest version by following the steps given below:
Step 1: You have to start by opening the ‘Control Panel’ from the ‘Run’ window. For that, press ‘Windows and R’ together and then type ‘Control’ and press ‘Enter.’ Now, look for the ‘Programs’ section, and under that section, click on the ‘Uninstall a Program.’

Step 2: A list of all the installed programs will appear on the screen. From that list, look for ‘Clownfish Voice Changer’ and then left-click on it. Lastly, select the option of ‘Uninstall.’

Step 3: Once this is done successfully, head over to the official website of Clownfish Voice Changer and install the latest version. Restart your computer and open the application to check if the problem has been resolved or not.

Fix 2: Check the Application’s Version
Another reason that might be causing the problem is an incompatible version of the application with Clownfish. Both the voice changer and the application must have compatible versions. You can take assistance from the steps below to check the version of Skype.
Step 1: Start by opening Skype, and then from the left menu pane, click on your Skype profile. Then, from the quick access menu list, look for the ‘Settings’ option.

Step 2: After the ‘Settings’ window opens, click on the ‘Help & Feedback’ option once located from the left pane. As the Help & Feedback screen opens, you will see the Skype logo on the screen, and under the logo, you will see the version of Skype.

Fix 3: Microphone Installation in Clownfish
The Voice changer is of no use if the microphone cannot be used as a microphone is an essential component for using a voice changer. An outdated microphone or wrongly installed microphone can cause an error in using Clownfish voice change.
Step 1: Run Clownfish on the computer and open it from the taskbar icon by right-clicking it. Keep your mouse over ‘Setup’ till the sub-menu opens.
Step 2: From the sub-menu, click on ‘System Integration.’ Then, select the microphone which is working fine, and click on ‘Install,’ which will install the microphone automatically.

Step 3: After the installation of the microphone, reboot the computer. Check whether the microphone error is resolved or not.

Bottom Line
Clownfish voice changer is a famous and known software with many amazing features and functionalities. The article above has shared great details about the voice changer and its use on Skype, Discord, and Fortnite.
Additionally, let’s talk about video editing software. As the videos need editing after they are filmed so, why not use Wondershare Filmora for editing your videos? The software offers some crazy and cool features like cut, trim, split, crop, etc.
You can also color match, do animation keyframing and advanced color tuning with the Filmora video editor . The software also owns a media library with hundreds of distinct titles, elements, transitions, effects, and whatnot.
For Win 7 or later (64-bit)
For macOS 10.12 or later
02 Tips to Use Clownfish Voice Changer on Discord and Fortnite?
03 Guidelines to Better Use Clownfish Voice Changer on Skype
04 Solution to Fix Clownfish Voice Changer Not Working
For Win 7 or later (64-bit)
For macOS 10.12 or later
Part 1. What Is Clownfish Voice Changer?
Clownfish is considered a famous voice changer. Clownfish Voice Changer is used to change voices for various purposes. It is installed on the system as it uses the microphone of the system that it is installed on. Clownfish Voice Changer has an attractive and intuitive interface that gives the user the best experience. It has plug-in support for Virtual Sound Technology (VST).
Clownfish voice provides multiple choices for voice after-effects that are available in the built-in library. These voices include male/female voices, robotic sounds, radio voices along with alien voices. Clownfish Voice Changer PC is compatible with Windows 7/8/8.1/10 and 11. It also has a built-in music player that supports various media formats.
Part 2. Tips to Use Clownfish Voice Changer on Discord and Fortnite?
As we have discussed earlier, what clownfish voice changer is and how amazing it is, now let’s move further. The following section of this article will share the tips that will help someone use Clownfish Discord and also Clownfish on Fortnite.
Before we start, you should know how to configure the Clownfish voice changer on your device. For this, you can follow the steps given below. Let’s begin!
Step 1: Setup Clownfish
After you have successfully downloaded and installed Clownfish Voice Changer, it’s time to setup. For this, firstly, locate the voice changer in your systems tray. Then, right-click on the icon, and from the menu list, select the ‘Setup’ option to set clownfish across different applications.
Step 2: Install Microphone
You cannot use the voice changer until you have attached a microphone to your device. For this, you need to install the microphone by hitting the ‘Install’ button next to the microphone.
Step 3: Set Microphone as Default Device
For the microphone to work in Clownfish, it should be selected as the default device. For doing this, select the ‘Recording’ option from the ‘Sounds’ tabs. A list of all the compatible devices will appear on the screen, you have to right-click on your device and hit the ‘Set as the Default Device’ option.
Step 4: Default Device is Set
After that, right-click on the Clownfish icon in the system tray and hit the ‘Hear Microphone’ option. The Clownfish Voice Changer is set to the default option. In case you ever plan to change it, right-click on the Clownfish icon from the system tray and tap on ‘Set Voice Changer.’
Step 5: Select Voice Changer Effects
Once Clownfish has been installed and successfully configured, you now have complete access to all voice changer options. There are dozens of effects that you can select from.
How to use Clownfish on Discord
If you want to use Clownfish on Discord, then you have to select Clownfish voice changer as the input device. For this, open Discord and head to ‘App Settings’ under the ‘User Settings’ option. There, look for the ‘Voice and Video’ option. A category of ‘Input Device’ will appear on the screen; from the drop-down list, switch to ‘Clownfish Voice Changer.’
How to use Clownfish on Fortnite
For using Clownfish on Fortnite, start by selecting the ‘Menu’ icon. There, head to the ‘Settings’ and select the ‘Audio’ option. Now, you have to set the input device; for that, go to the ‘Voice Chat’ option and select Clownfish Voice Changer as your input device under the ‘Voice Chat Input Device’ category.
Part 3. Guidelines to Better Use Clownfish Voice Changer on Skype
You can use voice changers on various platforms according to their compatibility; for instance, Clownfish is compatible with Skype. The question is, do you know how to use Clownfish voice changer on Skype? If ‘no,’ then let us share some helping guidelines to use Clownfish on Skype in a better way.
Step 1: If you want to change voice on Skype with Clownfish, then, first of all, download and install Skype on your PC or laptop and launch it.
Step 2: After Skype has been successfully launched, head over to ‘Settings’ by clicking on the three dots present next to your username.
Step 3: From the Settings screen, you have to look for the ‘Audio & Video’ tab and then select it. Lastly, you have to select the microphone ‘Clownfish Voice Changer’ under the ‘Microphone’ option, and you are all done.
Part 4. Solution to Fix Clownfish Voice Changer Not Working
While using Clownfish Voice Changer, you might also come across some troubles. They might be because either the voice changer is not updated, or maybe the apps you are using are not up to date. Let us share some fixes with you for smooth Clownfish functioning.
Fix 1: Update Clownfish Voice Changer
The most significant reason why you face trouble is that your Clownfish version is outdated. For this, you should update the voice changer to its latest version by following the steps given below:
Step 1: You have to start by opening the ‘Control Panel’ from the ‘Run’ window. For that, press ‘Windows and R’ together and then type ‘Control’ and press ‘Enter.’ Now, look for the ‘Programs’ section, and under that section, click on the ‘Uninstall a Program.’
Step 2: A list of all the installed programs will appear on the screen. From that list, look for ‘Clownfish Voice Changer’ and then left-click on it. Lastly, select the option of ‘Uninstall.’
Step 3: Once this is done successfully, head over to the official website of Clownfish Voice Changer and install the latest version. Restart your computer and open the application to check if the problem has been resolved or not.
Fix 2: Check the Application’s Version
Another reason that might be causing the problem is an incompatible version of the application with Clownfish. Both the voice changer and the application must have compatible versions. You can take assistance from the steps below to check the version of Skype.
Step 1: Start by opening Skype, and then from the left menu pane, click on your Skype profile. Then, from the quick access menu list, look for the ‘Settings’ option.
Step 2: After the ‘Settings’ window opens, click on the ‘Help & Feedback’ option once located from the left pane. As the Help & Feedback screen opens, you will see the Skype logo on the screen, and under the logo, you will see the version of Skype.
Fix 3: Microphone Installation in Clownfish
The Voice changer is of no use if the microphone cannot be used as a microphone is an essential component for using a voice changer. An outdated microphone or wrongly installed microphone can cause an error in using Clownfish voice change.
Step 1: Run Clownfish on the computer and open it from the taskbar icon by right-clicking it. Keep your mouse over ‘Setup’ till the sub-menu opens.
Step 2: From the sub-menu, click on ‘System Integration.’ Then, select the microphone which is working fine, and click on ‘Install,’ which will install the microphone automatically.
Step 3: After the installation of the microphone, reboot the computer. Check whether the microphone error is resolved or not.
Bottom Line
Clownfish voice changer is a famous and known software with many amazing features and functionalities. The article above has shared great details about the voice changer and its use on Skype, Discord, and Fortnite.
Additionally, let’s talk about video editing software. As the videos need editing after they are filmed so, why not use Wondershare Filmora for editing your videos? The software offers some crazy and cool features like cut, trim, split, crop, etc.
You can also color match, do animation keyframing and advanced color tuning with the Filmora video editor . The software also owns a media library with hundreds of distinct titles, elements, transitions, effects, and whatnot.
For Win 7 or later (64-bit)
For macOS 10.12 or later
Discovering Serenity: 10 Choice iOS & Android Auditory Escapes in Nature
Best Nature Sounds Apps for iOS and Android

Benjamin Arango
Apr 26, 2024• Proven solutions
In today’s challenging times, when stress and anxiety has become inevitable for a majority of population, there is a constant search for solutions that will enable people to live a peaceful and pleasant life. Here, the technology comes to their rescue with nature sound effects app.
These applications provide multiple sounds related to the Nature. The users just need to download any of these programs, and select the desired tone according to their choice. Such mobile software also offer numerous relaxing audios that assist in achieving a deeper level of concentration during the meditation.
10 Best Nature Sounds Apps
1. YouTube
YouTube is also one of the important apps for nature sounds where one can get almost any kind of relaxing sounds related to the Nature.
Binaural beats videos, where two different frequencies of sounds are combined to create a new frequency tone are getting highly popular among people. These are believed to help in lowering stress, anxiety and depression and increase concentration, attention, and efficiency of an individual.
It can also be helpful in attaining mental peace and serenity. The app even contains peaceful meditation sounds that ease the ability to focus and remain relaxed during the whole process. It is highly a user-friendly app and is absolutely free to download on the Android Smartphones.
2. Atmosphere: Relaxing Sounds
Compatible with Android 5.0 or up , and iOS 10.0 or later

Atmosphere is one of the best apps for nature sounds. It is custom-made to help people relieve stress and relax their mind.
The key feature of this application is that it allows users to import their personalized audios and mix them with various default acoustics available within the app itself.
The soothing sounds available here are divided into 8 different environments such as Beach, City, Park, Countryside, Home, Underwater, Forest and Oriental. Users can also mix and match the sounds between environments to produce a tailored theme.
3. Rainy Mood
Compatible with both iOS and Android OS 5.0 and up

Rainy Mood provides the most genuine rain, thunderstorm, and lightening sounds available online.
It not only relieves tension and anxiety but also helps users suffering from insomnia.
This app even contains natural white noise facility that helps in getting rid of any unwanted sounds around us.
The various rain sounds are available here in different environments such as heavy rain, tropical rain, umbrella, rain on tent, rain on porch etc. The best thing about this app is that it can work in offline mode, i.e. without any Internet connection. This eventually results in less power consumption.
4. Animal Sounds
Compatible with Android 4.1 and up
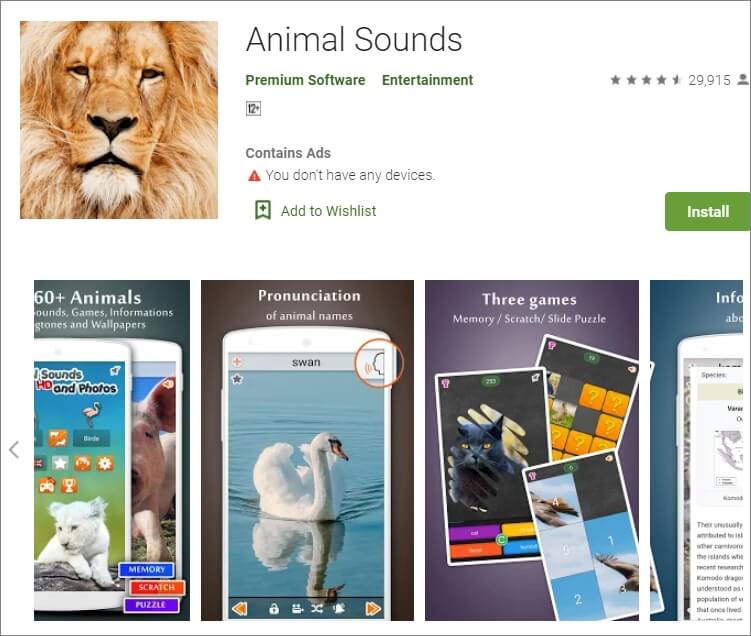
Animal Sounds is a one-stop destination for all animal lovers. The program provides the most detailed information about animals, and also contains hundreds of animal sounds and photographs from all over the globe.
The quality of audios and pictures is remarkably high and clear. The sounds here are categorized under pet animals, mammals, farm animals, bird sounds, wild animals, reptiles and amphibians.
The application also provides the facility of customized ringtones and wallpapers to its users.
5. Sleep Sounds
Compatible with Android 4.4 or later
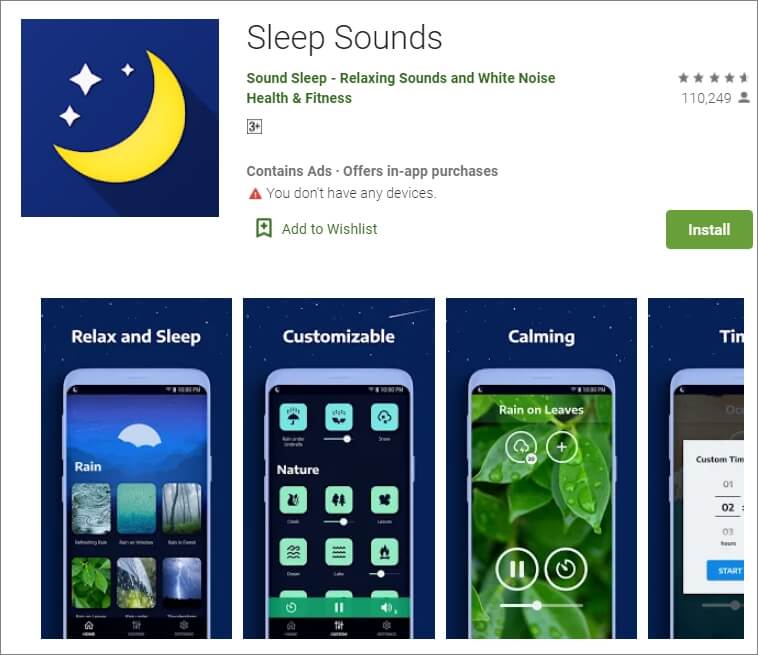
Sleep Sounds is one of the top trending apps nowadays owing to the increasing problems of insomnia and irregular sleep patterns among people. It is very helpful for an uninterrupted quality sleep.
The calm and soft music gradually tranquilizes the mind and the user eases into a good sleep. Its interface is user-friendly with beautiful images in the background.
The sounds here are categorized under rain, nature, relax, transport, noise, and white noise classes. This app also works without an Internet connection.
6.Calm
Compatible with Android and iOS 10.0 and watchOS 6.0 or later
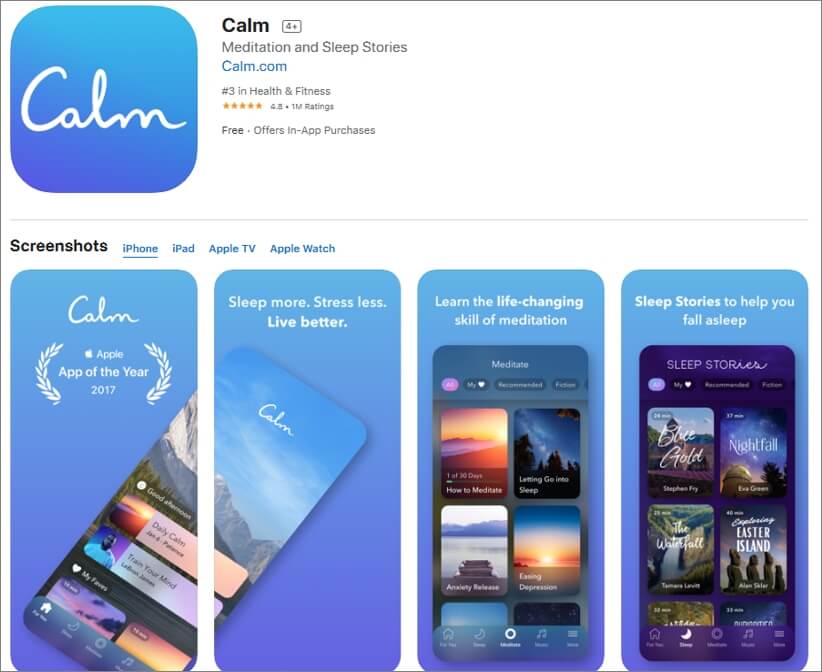
Calm is best suitable for the people who practice meditation on a daily basis. It is available for free and can be used by the beginners as well as experienced users.
The main features include guided meditation programs, breathing sessions, adult bed-time stories, masterclasses by the international coaches, etc.
Here, one can choose a personalized guide for meditation from several topics such as relationships, self-esteem, breaking habits, forgiveness, mindfulness, etc. Users can even track their daily progress on the basis of time spent by them on the app.
7. Ambience – Nature sounds: sleep and meditation
Compatible with Android 4.2 and up .
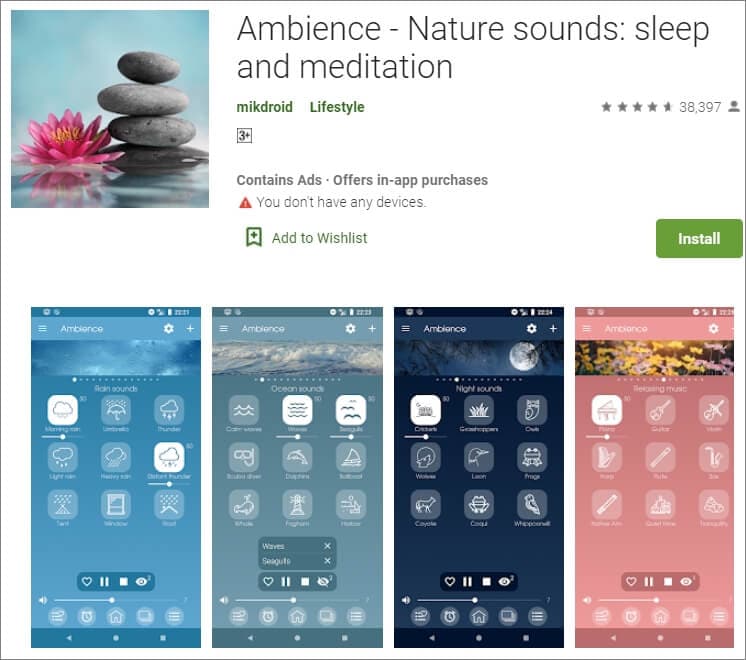
Ambience is another one of the most popular apps for nature sounds providing peace and serenity to its users through relaxing and soothing tones.
It has a very simple and clean user interface which makes it a highly demanding program. The main features include the facility of mixing maximum 10 sounds at the same time. Along with various preset mixtures of audios that are available here, users can also save their customized combinations for future use.
8. Naturespace: Sleep Relax Focus
Compatible with Android 4.0 or up and iOS 9.0 or later
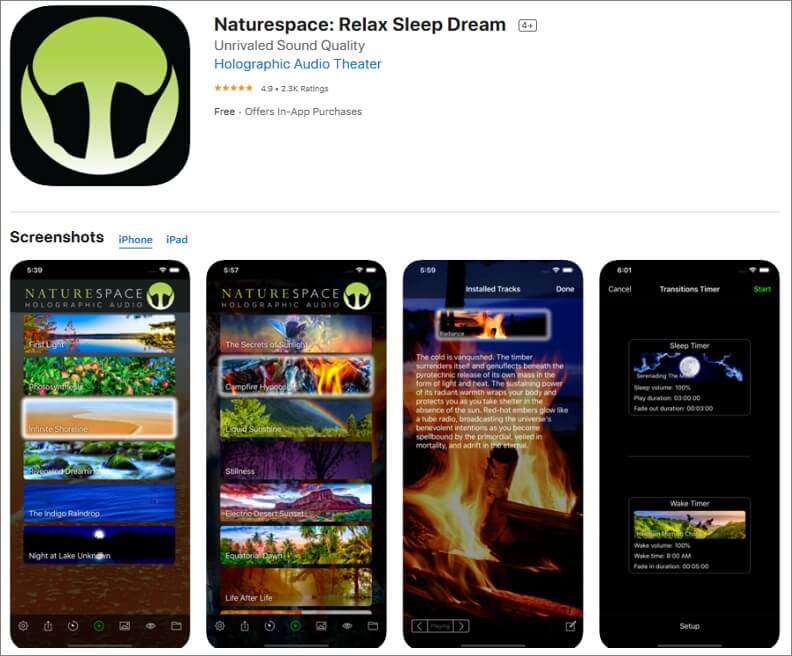
Naturespace is a unique app containing real time 3D recordings of natural places such as forests, deserts, mountains, etc. The equipment used in the program for recording the sounds are of extremely high quality, and as a result, the listening experience is out of this world.
The clarity of the sound surpasses almost every other application available in this genre of nature sound apps. It also provides the facility of sleep and wake timer to its users. The simple user interface along with earbud optimisation facility makes the software highly efficient and popular among people.
9. SimplyNoise – Free White Noise
Compatible with iOS 8.0 or later and Android
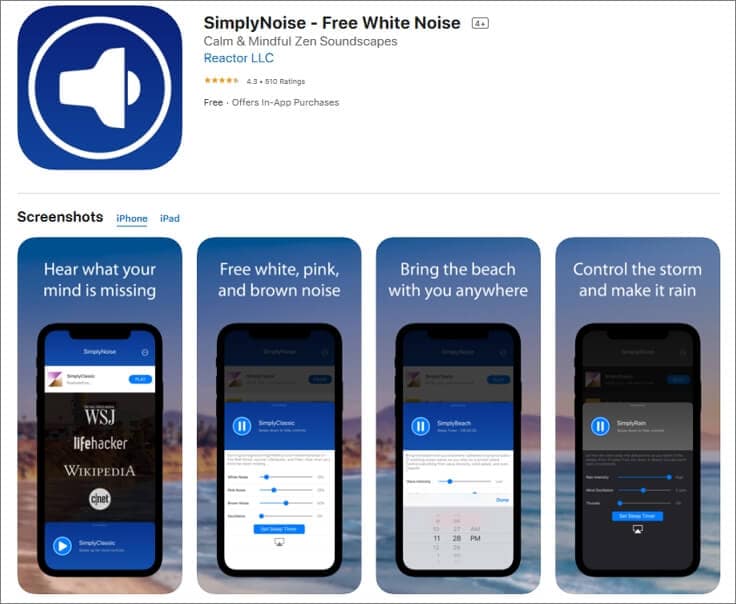
Simply Noise is one of the most basic apps for nature sounds as it provides only one acoustic without any background noises. As there are no such complexities involved, it can also be used by people who are not tech-savvy.
The categorization of sounds is done here as white noise, pink noise, and brown noise. Users can select any of these according to their requirement.
This app is best suitable for people who are unable to concentrate on a particular thing, or suffer from sleeping disorder. Sleep-timer option is also available here.
10. aSleep
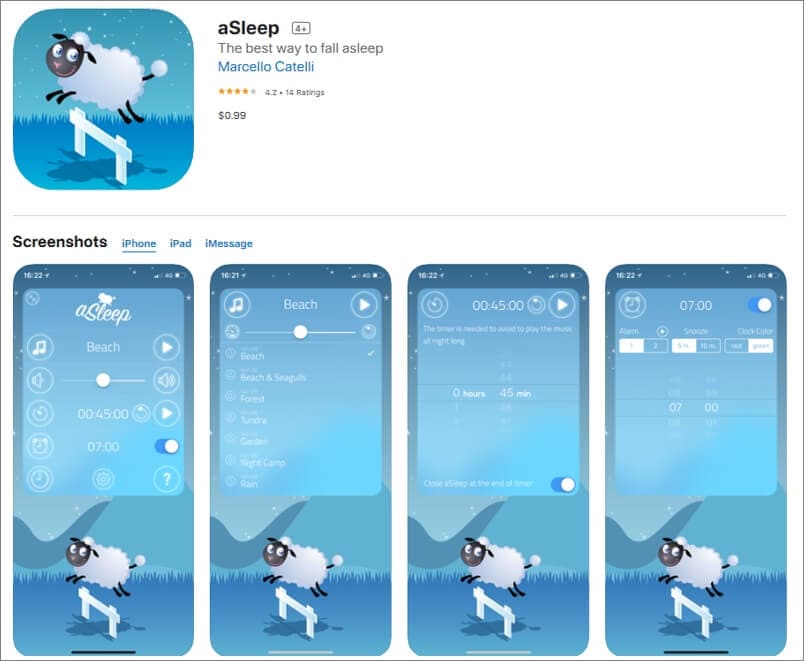
Available for iOS devices like iPhone and iPad, aSleep offers around 64 realistic stereo nature sounds to help you relax your mind and fall asleep almost instantaneously. With the built-in Timer feature, the music can be programmed to stop automatically after a certain amount of time to save your device’s battery.
Furthermore, the also works as an alarm clock that wakes you up with nature sounds at your predefined hour. The application is also good for kids as it can be used to play lullabies to help them get a tight sleep at night. And the program does all this without collecting any data from your iDevice.
What Is the Best Rain Sound App?
Among various rain sound applications available online, Rainy Mood is the most popular one that enjoys high star rating. When it comes to rain sounds, there is no match to it. It mainly includes 4 rain scenes namely Classic, Ocean, Countryside and Cafe. These genres can be customized according to different tastes and preferences.
What Are the Different Sounds of Nature?
The nature is made up of 5 basic elements which include Air, Water, Fire, Earth and Space. These components constitute various natural acoustics. Some examples are music of the rain, thunderstorm or a waterfall, wind blows, sounds of leaves and water streams, chirping of birds or grasshoppers, stridulation of insects like crickets, etc. All these sounds are beautifully incorporated in nature sound effects app.
In case that you want to add some nature sound to your video clip, you can try Wondershare Filmora, which features an audio library containing different nature sound effects as well. Download the free trial version of Filmora and have a try.


Besides adding sound to video, you can also add some elemental 2D visual effects to videos to make it cooler.
Benjamin Arango
Benjamin Arango is a writer and a lover of all things video.
Follow @Benjamin Arango
Benjamin Arango
Apr 26, 2024• Proven solutions
In today’s challenging times, when stress and anxiety has become inevitable for a majority of population, there is a constant search for solutions that will enable people to live a peaceful and pleasant life. Here, the technology comes to their rescue with nature sound effects app.
These applications provide multiple sounds related to the Nature. The users just need to download any of these programs, and select the desired tone according to their choice. Such mobile software also offer numerous relaxing audios that assist in achieving a deeper level of concentration during the meditation.
10 Best Nature Sounds Apps
1. YouTube
YouTube is also one of the important apps for nature sounds where one can get almost any kind of relaxing sounds related to the Nature.
Binaural beats videos, where two different frequencies of sounds are combined to create a new frequency tone are getting highly popular among people. These are believed to help in lowering stress, anxiety and depression and increase concentration, attention, and efficiency of an individual.
It can also be helpful in attaining mental peace and serenity. The app even contains peaceful meditation sounds that ease the ability to focus and remain relaxed during the whole process. It is highly a user-friendly app and is absolutely free to download on the Android Smartphones.
2. Atmosphere: Relaxing Sounds
Compatible with Android 5.0 or up , and iOS 10.0 or later
Atmosphere is one of the best apps for nature sounds. It is custom-made to help people relieve stress and relax their mind.
The key feature of this application is that it allows users to import their personalized audios and mix them with various default acoustics available within the app itself.
The soothing sounds available here are divided into 8 different environments such as Beach, City, Park, Countryside, Home, Underwater, Forest and Oriental. Users can also mix and match the sounds between environments to produce a tailored theme.
3. Rainy Mood
Compatible with both iOS and Android OS 5.0 and up
Rainy Mood provides the most genuine rain, thunderstorm, and lightening sounds available online.
It not only relieves tension and anxiety but also helps users suffering from insomnia.
This app even contains natural white noise facility that helps in getting rid of any unwanted sounds around us.
The various rain sounds are available here in different environments such as heavy rain, tropical rain, umbrella, rain on tent, rain on porch etc. The best thing about this app is that it can work in offline mode, i.e. without any Internet connection. This eventually results in less power consumption.
4. Animal Sounds
Compatible with Android 4.1 and up
Animal Sounds is a one-stop destination for all animal lovers. The program provides the most detailed information about animals, and also contains hundreds of animal sounds and photographs from all over the globe.
The quality of audios and pictures is remarkably high and clear. The sounds here are categorized under pet animals, mammals, farm animals, bird sounds, wild animals, reptiles and amphibians.
The application also provides the facility of customized ringtones and wallpapers to its users.
5. Sleep Sounds
Compatible with Android 4.4 or later
Sleep Sounds is one of the top trending apps nowadays owing to the increasing problems of insomnia and irregular sleep patterns among people. It is very helpful for an uninterrupted quality sleep.
The calm and soft music gradually tranquilizes the mind and the user eases into a good sleep. Its interface is user-friendly with beautiful images in the background.
The sounds here are categorized under rain, nature, relax, transport, noise, and white noise classes. This app also works without an Internet connection.
6.Calm
Compatible with Android and iOS 10.0 and watchOS 6.0 or later
Calm is best suitable for the people who practice meditation on a daily basis. It is available for free and can be used by the beginners as well as experienced users.
The main features include guided meditation programs, breathing sessions, adult bed-time stories, masterclasses by the international coaches, etc.
Here, one can choose a personalized guide for meditation from several topics such as relationships, self-esteem, breaking habits, forgiveness, mindfulness, etc. Users can even track their daily progress on the basis of time spent by them on the app.
7. Ambience – Nature sounds: sleep and meditation
Compatible with Android 4.2 and up .
Ambience is another one of the most popular apps for nature sounds providing peace and serenity to its users through relaxing and soothing tones.
It has a very simple and clean user interface which makes it a highly demanding program. The main features include the facility of mixing maximum 10 sounds at the same time. Along with various preset mixtures of audios that are available here, users can also save their customized combinations for future use.
8. Naturespace: Sleep Relax Focus
Compatible with Android 4.0 or up and iOS 9.0 or later
Naturespace is a unique app containing real time 3D recordings of natural places such as forests, deserts, mountains, etc. The equipment used in the program for recording the sounds are of extremely high quality, and as a result, the listening experience is out of this world.
The clarity of the sound surpasses almost every other application available in this genre of nature sound apps. It also provides the facility of sleep and wake timer to its users. The simple user interface along with earbud optimisation facility makes the software highly efficient and popular among people.
9. SimplyNoise – Free White Noise
Compatible with iOS 8.0 or later and Android
Simply Noise is one of the most basic apps for nature sounds as it provides only one acoustic without any background noises. As there are no such complexities involved, it can also be used by people who are not tech-savvy.
The categorization of sounds is done here as white noise, pink noise, and brown noise. Users can select any of these according to their requirement.
This app is best suitable for people who are unable to concentrate on a particular thing, or suffer from sleeping disorder. Sleep-timer option is also available here.
10. aSleep
Available for iOS devices like iPhone and iPad, aSleep offers around 64 realistic stereo nature sounds to help you relax your mind and fall asleep almost instantaneously. With the built-in Timer feature, the music can be programmed to stop automatically after a certain amount of time to save your device’s battery.
Furthermore, the also works as an alarm clock that wakes you up with nature sounds at your predefined hour. The application is also good for kids as it can be used to play lullabies to help them get a tight sleep at night. And the program does all this without collecting any data from your iDevice.
What Is the Best Rain Sound App?
Among various rain sound applications available online, Rainy Mood is the most popular one that enjoys high star rating. When it comes to rain sounds, there is no match to it. It mainly includes 4 rain scenes namely Classic, Ocean, Countryside and Cafe. These genres can be customized according to different tastes and preferences.
What Are the Different Sounds of Nature?
The nature is made up of 5 basic elements which include Air, Water, Fire, Earth and Space. These components constitute various natural acoustics. Some examples are music of the rain, thunderstorm or a waterfall, wind blows, sounds of leaves and water streams, chirping of birds or grasshoppers, stridulation of insects like crickets, etc. All these sounds are beautifully incorporated in nature sound effects app.
In case that you want to add some nature sound to your video clip, you can try Wondershare Filmora, which features an audio library containing different nature sound effects as well. Download the free trial version of Filmora and have a try.
Besides adding sound to video, you can also add some elemental 2D visual effects to videos to make it cooler.
Benjamin Arango
Benjamin Arango is a writer and a lover of all things video.
Follow @Benjamin Arango
Streamlining Sound Integration: A Fast Fix Manual for Premiere Pro
How to Quickly Fix Audio Importing Issues in Adobe Premiere Pro
Benjamin Arango
Mar 27, 2024• Proven solutions
All video files that are captured with GoPro and other types of digital cameras contain sound, but in certain situations, you may get the ‘The file has no audio or video streams’ after you try to import mp4, mov and MTS files into Adobe Premiere Pro.
This can be quite frustrating, even though, in most cases, you won’t use the sound that was recorded by the camera in the final cut of your video. This problem can be solved quickly, so in this article, we are going to show you a few different methods of fixing audio importing issues in Adobe Premiere Pro.
Read More to Get : Best Audio Mixer Software to Trim Your Sound Easily >>
Four Ways to Solve Audio Importing Issues in Adobe Premiere Pro
There are numerous factors that can cause Adobe Premiere Pro to stop functioning properly , and if the app won’t let you import video files into a project because it has no audio or video streams, there are few things you can do to fix this without having to reinstall the operating system on your computer or the version of Adobe Premiere Pro you’re currently using.
1. Clearing the Media File Cache
If you tried to import a video file into a project and the app notified you that it cannot import the file because there is no audio stream, you should head over to the Edit menu and select the Preferences Tab. Once the Preferences window pops up on the screen, click on the Media tab and then proceed to delete all files that are stored in the Media Cache Database and Media Cache Files folders. Restart the application after you’ve cleaned both of these folders and try to import the video clips into the project once more. If the issue persists, there are a few more things you can do.

2. Renaming the Media Cache Folder
The default location of Media Cache Database and Media Cache Files folders is /Users/Library/Application Support/Adobe/Common on Mac computers and \Users\\AppData\Roaming\Adobe\Common on PC computers. So all you have to do is make sure that all Adobe applications, including the Adobe Premiere Pro, are closed and then go to the location at which these folders are stored and change their names to Media Cache Files_OLD and Media Cache_OLD. Start Adobe Premiere Pro and check if you can import your video files into the editor.
3. Moving Media Files to a Different Folder
If renaming the folders didn’t do the trick you can try moving them from their default location. You can move them wherever you want on your computer, but it is best if you pick a location that is easy to remember, just so you can access them quickly in case you need to delete files that are stored in them.
4. Installing the QuickTime Player
Sometimes the simplest solution is also the most effective one. Check if QuickTime is installed on your computer because installing this player can solve the audio importing issues in Adobe Premiere Pro. Furthermore, if you just reinstalled the OS on your computer, you should download and install QuickTime , before launching Adobe Premiere Pro. Once you create a new project go to the Edit menu, find the Preferences submenu and select the Media option. Clean both the Media Cache Database and Media Cache Files folders, restart Adobe Premiere Pro and then import the video files into your project.

An Alternative Way to Import Video Without This Issue
If you fail to import your video across Adobe Premiere Pro and want to get some work done across the file, you can look for Wondershare Filmora. Filmora provides a pervasive set of tools to work with. With multiple editing tools to work with, you can easily manage your audio across the platform. Filmora provides a self-explanatory and clean user interface to work with.
While being very simple and effective to use, Filmora provides a very powerful structure which makes it one of the best in the market. It can indeed prove to be an excellent alternative to Adobe Premiere Pro. Considering the user experience of Filmora, users can feel safe while working across it.
Steps to Import Videos in Wondershare Filmora
As Filmora provides a very good user experience, they can import their audios by following the step-by-step guide provided below.
Step 1: Create a New Video Project
You need to access the official website of Filmora and download the software. Once installed, launch the software. To create a new project, tap on the “New Project” button to proceed.

Step 2: Import from File Tab
Once a new window opens, three different methods can be used to import audio on Filmora. Tap on “File” to select the option of “Import Media Files” from “Import Media” in the drop-down menu.

Step 3: Import from Import Button
The second method calls up users to import audio through a button. The user needs to tap on the “Import Media Files Here” button to add audio in Filmora directly.

Step 4: Import by Drag and Drop
Users can import audios on Filmora in another way. They can drag and drop the audio files directly on the platform and perform functions using different tools.

Conclusion
If the methods of fixing the audio importing issues in Adobe Premiere Pro we presented in this article don’t help you solve this problem, you should consider reinstalling the OS on your computer. Was this article helpful? Leave a comment and let us know.
Benjamin Arango
Benjamin Arango is a writer and a lover of all things video.
Follow @Benjamin Arango
Benjamin Arango
Mar 27, 2024• Proven solutions
All video files that are captured with GoPro and other types of digital cameras contain sound, but in certain situations, you may get the ‘The file has no audio or video streams’ after you try to import mp4, mov and MTS files into Adobe Premiere Pro.
This can be quite frustrating, even though, in most cases, you won’t use the sound that was recorded by the camera in the final cut of your video. This problem can be solved quickly, so in this article, we are going to show you a few different methods of fixing audio importing issues in Adobe Premiere Pro.
Read More to Get : Best Audio Mixer Software to Trim Your Sound Easily >>
Four Ways to Solve Audio Importing Issues in Adobe Premiere Pro
There are numerous factors that can cause Adobe Premiere Pro to stop functioning properly , and if the app won’t let you import video files into a project because it has no audio or video streams, there are few things you can do to fix this without having to reinstall the operating system on your computer or the version of Adobe Premiere Pro you’re currently using.
1. Clearing the Media File Cache
If you tried to import a video file into a project and the app notified you that it cannot import the file because there is no audio stream, you should head over to the Edit menu and select the Preferences Tab. Once the Preferences window pops up on the screen, click on the Media tab and then proceed to delete all files that are stored in the Media Cache Database and Media Cache Files folders. Restart the application after you’ve cleaned both of these folders and try to import the video clips into the project once more. If the issue persists, there are a few more things you can do.
2. Renaming the Media Cache Folder
The default location of Media Cache Database and Media Cache Files folders is /Users/Library/Application Support/Adobe/Common on Mac computers and \Users\\AppData\Roaming\Adobe\Common on PC computers. So all you have to do is make sure that all Adobe applications, including the Adobe Premiere Pro, are closed and then go to the location at which these folders are stored and change their names to Media Cache Files_OLD and Media Cache_OLD. Start Adobe Premiere Pro and check if you can import your video files into the editor.
3. Moving Media Files to a Different Folder
If renaming the folders didn’t do the trick you can try moving them from their default location. You can move them wherever you want on your computer, but it is best if you pick a location that is easy to remember, just so you can access them quickly in case you need to delete files that are stored in them.
4. Installing the QuickTime Player
Sometimes the simplest solution is also the most effective one. Check if QuickTime is installed on your computer because installing this player can solve the audio importing issues in Adobe Premiere Pro. Furthermore, if you just reinstalled the OS on your computer, you should download and install QuickTime , before launching Adobe Premiere Pro. Once you create a new project go to the Edit menu, find the Preferences submenu and select the Media option. Clean both the Media Cache Database and Media Cache Files folders, restart Adobe Premiere Pro and then import the video files into your project.
An Alternative Way to Import Video Without This Issue
If you fail to import your video across Adobe Premiere Pro and want to get some work done across the file, you can look for Wondershare Filmora. Filmora provides a pervasive set of tools to work with. With multiple editing tools to work with, you can easily manage your audio across the platform. Filmora provides a self-explanatory and clean user interface to work with.
While being very simple and effective to use, Filmora provides a very powerful structure which makes it one of the best in the market. It can indeed prove to be an excellent alternative to Adobe Premiere Pro. Considering the user experience of Filmora, users can feel safe while working across it.
Steps to Import Videos in Wondershare Filmora
As Filmora provides a very good user experience, they can import their audios by following the step-by-step guide provided below.
Step 1: Create a New Video Project
You need to access the official website of Filmora and download the software. Once installed, launch the software. To create a new project, tap on the “New Project” button to proceed.
Step 2: Import from File Tab
Once a new window opens, three different methods can be used to import audio on Filmora. Tap on “File” to select the option of “Import Media Files” from “Import Media” in the drop-down menu.
Step 3: Import from Import Button
The second method calls up users to import audio through a button. The user needs to tap on the “Import Media Files Here” button to add audio in Filmora directly.
Step 4: Import by Drag and Drop
Users can import audios on Filmora in another way. They can drag and drop the audio files directly on the platform and perform functions using different tools.
Conclusion
If the methods of fixing the audio importing issues in Adobe Premiere Pro we presented in this article don’t help you solve this problem, you should consider reinstalling the OS on your computer. Was this article helpful? Leave a comment and let us know.
Benjamin Arango
Benjamin Arango is a writer and a lover of all things video.
Follow @Benjamin Arango
Also read:
- New 2024 Approved Silent Soundscape Revolution A Deep Dive Into Eliminating Sound Interference with the Right Tools (Online & Offline)
- New 2024 Approved Essential Techniques for Filtering Out Background Disturbances in Digital Sound Recordings
- New Innovative Text-to-Speech Solutions Dominating the Market
- New Fundamentals of Transcribing Audio for No Charge - Discover the Best Three Methods
- Updated 2024 Approved Methodologies for Detaching Audio Elements From New MKV File Types
- Finding the Perfect Match Free Video Soundtrack Lists
- New In 2024, Boosting Call Joy with 5 Hilarious Voice Transformation Hacks
- New In 2024, Beyond FaceTime on Android Top 10 Virtual Communication Applications
- Unlock a World of Gratis Song Collections for Editors for 2024
- New Harmonious Sound Editing Guide Advantages, Disadvantages, and Substitutes for 2024
- In 2024, Top Choices for Lyrics Extraction Software, 2023 Edition
- Updated 2024 Approved Crafting an Immersive Gaming Environment A Guide to Incorporating Music Into KineMaster
- Updated Intuitive Vocal Modification Mechanisms An Insight Into Operational Aspects, Standards, and Workarounds for 2024
- New In 2024, Unlocking the Secrets to Finding Your Ideal Mac MP3 Information Editor
- Audio Artistry The Step-by-Step Process of Mixing Sounds for Movie Scenes for 2024
- New Windows 10 Sound Engineering The Ultimate Guide to Capturing Clear Audio
- 2024 Approved How to Mute TikTok Audio 3 Easy Ways to Follow
- Top 5 Cost-Free, Open-Source Windows Audio Editing Software for 2024
- Updated 2024 Approved Windows 10 Sound Engineering The Ultimate Guide to Capturing Clear Audio
- New How to Source Bell Clanging Sounds for Projects for 2024
- Updated 2024 Approved Mastering Autotune A Step-by-Step Guide for Audacity Users
- Unearthing the Chirp-Piece A Study on Cricket Noises for 2024
- New How to Detach Audio in Premiere Pro? Step by Step Guide
- Recover your pictures after Infinix Hot 40i has been deleted.
- Two Ways to Track My Boyfriends Realme 11 5G without Him Knowing | Dr.fone
- Full Solutions to Fix Error Code 920 In Google Play on Vivo Y78 5G | Dr.fone
- How to Fix Error 495 While Download/Updating Android Apps On Google Pixel 7a | Dr.fone
- In 2024, Latest way to get Shiny Meltan Box in Pokémon Go Mystery Box On Realme 11 Pro+ | Dr.fone
- Updated 2024 Approved Unleash Your Creativity Top 10 Intro Maker Websites with Free and Paid Options
- In 2024, Solutions to Spy on Motorola Defy 2 with and without jailbreak | Dr.fone
- Best Pokemons for PVP Matches in Pokemon Go For Vivo T2 Pro 5G | Dr.fone
- New How to Calculate & Change Video Aspect Ratio Online
- Free Video Editing Software The Best Options Without Watermarks for 2024
- New How to Loop Videos on Android Phones for 2024
- In 2024, Full Guide to Catch 100 IV Pokémon Using a Map On Apple iPhone XR | Dr.fone
- Title: The Fishy Way to Enthrall Listeners A Comprehensive Guide to Applying Clownfish Voice Changes in Virtual Platforms for 2024
- Author: Kate
- Created at : 2024-05-05 07:36:18
- Updated at : 2024-05-06 07:36:18
- Link: https://audio-editing.techidaily.com/the-fishy-way-to-enthrall-listeners-a-comprehensive-guide-to-applying-clownfish-voice-changes-in-virtual-platforms-for-2024/
- License: This work is licensed under CC BY-NC-SA 4.0.
