
:max_bytes(150000):strip_icc():format(webp)/sofya-NomETWcv2Fo-unsplash-be3fc2855a7e477db0273993fd22e822.jpg)
Podcast Editing 101 How to Edit a Podcasta Beginners Guide for 2024
Podcast Editing 101: How to Edit a Podcast | a Beginner’s Guide
Podcast Editing 101: How to Edit a Podcast

Benjamin Arango
Mar 27, 2024• Proven solutions
We are glad that you took the first steps to create your podcast episodes. We’d also like to know how far you have reached. Well, most probably, you are at the podcast editing stage as per your search query. So, you are in the right place if this is your concern. We have structured this entire post on how to edit podcasts, especially for the newbies. You can continue reading the article if you have already created a podcast episode and level up the steps with better podcast editing. Remember that editing can either make or break the game! So, don’t take any chances in editing a podcast right from the beginners’ level.

Without further ado, let’s get started with the following editing basics a podcaster should keep in mind.
- Part 1: Editing Basics that Beginners’ Should Keep in Mind
- Part 2: Which DAW should you use?
- Part 3: Advanced Editing Tips to Spice Up Your Podcasts
- Part 4: Edit Podcast with Video Editor
Editing Basics that Beginners’ Should Keep in Mind
Well, it is all dependent upon the approach you follow regarding the podcast audio editing. There are various podcast editing services, and styles worth consider. The list below is the critical podcast editing basics a beginner should follow before publishing the podcast. Overall, it would be awesome if you learn new skills instead of outsourcing the whole stuff. That’s fantastic as well!
Firstly, import the audio.
The editing process starts with importing the audio track. The audio material in the sequence must be at the primary place. Always place the audio track in the first position even if you are importing multiple audio tracks. You can leave the track underneath for editing purposes. After adding this first audio file, you can add sound effects, music, and other secondary audio files for further editing.
Listen again
Don’t proceed before re-listening your added audio! This manner will let you think for different sections, and you can further decide what to keep and what to preserve. Remove any computer noise, background hiss, and unwanted audio areas. Here, you can help with different noise reduction tools available or go for the reliable podcast editing software, specifically the audio ducking feature for noise removal.
Make it consistent throughout
The next step is to make the volume consistent at every stage of the podcast. After removing all the unwanted noises, take the necessary action to normalize the audio levels and specifically select -2.0 for peak amplitude. Amplify the tranquil areas.
Sound Designing and Mixing
Then, you are required to do sound designing and mixing for the podcast. Take it lightly and only especially when you are a beginner. Add the sound effects as per the message of the podcast. Always keep in mind to use significant sound effects that effectively evoke the emotion and ultimately save the audience engaged. The mixing part comes when you compress, equalize, and process the audio to adjust accordingly in the different sections.
Preview and Post
Once your podcast is edited and ready, preview it ensure everything is in place, especially if it is your first time. It would be best to post a clear, concise, and to the point audio/video. Finally, post your podcast, either for free or using one of the software available online on your desired blog/online media.
Which DAW should you use?
You can’t miss using Digital Audio Workstation (DAW) for podcast editing at any cost. It is an audio editing program with all the facilities right from recording the podcast to editing it. To start with, you must consider using among the following three DAWs.
Audacity

Audacity is the most common program providing free podcast editing services. The foremost reason for its popularity is the free and open-source availability. Secondly, the primary user interface makes it the best option for beginners. You can right away start recording with Audacity.
Alitu

Alitu is another recommended tool to make your podcast episodes easily. However, you have to pay to get the podcast editing services of Alitu. It can incredibly do the podcast editing for raw audios and provide you with different options of adding music, transitions, and segments, etc. It also contains the facility to publish your podcast.
Reaper

Reaper is another best podcast editing DAW with the availability of 60 days free trial. Despite a bit high learning curve in Reaper, you will ultimately feel like an artist working upon it. Moreover, it comes with lots of new updates and features for better outcomes. It is compatible with AU, VST, and JS plugins as well.
Advanced Editing Tips to Spice Up Your Podcasts
Don’t miss out on this portion if you want to upgrade your podcasting skills like professionals! Learn some advanced formulas of podcast audio editing as follows.
Trim the Ends
It’s better if you trim the ends before editing the podcast. And, make sure there are no blanks at the beginning or end of the podcast. You can also add fade-in or fade-out effects to avoid unprofessional vibes.
Work on your planning and presentation skills
Focus on having a time-saving podcast editing by working upon your planning and presentation skills. Don’t be that guy who tries to edit every verbal crutch. Instead, focus on being confident while presenting the podcast so that you will need to have significantly fewer editing issues or may not need editing at all. Think upon changing the approach of podcast recording as well.
Provide margin and look for transitions
Offer a little margin and say that thing smoothly again if you have misread or misspell the statement while recording the podcast. Thus, you must not squeeze the information that doesn’t provide a better room for podcast editing. The provided margin will make it a breeze to cut out the messy audio portion.
Then, you have to look for transitions precisely when you are recording in multiple tracks, co-hosting, or taking a long space while recording your podcast. These transitions could be like pointless babbles, awkward silences, cross talks, etc., that need careful watch at both the beginning and the end. Most of the editing will improve by considering and editing these kinds of transitions.
Eliminate awkward silences
Sometimes a podcast is full of awkward silences that look crap at all. Well, you don’t have to remove every silence taken at the end of a talk or something like that. Eliminate only long, awkward silences or reduce their duration. Different plugins are available within the DAWs to remove these background noises and long duration silences.
Adjust the volume of the podcast
It may be a bit tricky to edit the podcast when one person or interviewee is a lot quieter. First of all, check if their microphone signals and settings are strong enough to provide you with audio. Then, you can increase the gain of their speaker before podcast editing. Normalize the voice or add some compression to increase the loudness ultimately.
Save podcast to the right format
Finally, you must be careful while exporting your podcast to the correct format to ensure the best quality. Go to the export settings and find MP3 extension and 192kbps bitrate.
Edit Podcast with Video Editor
Are you recording a video podcast? If yes, you must make very little room for editing while considering the best recording equipment and settings. Secondly, you can look for a high-tech video editor that can do the task of both video editing and podcast editing. The Wondershare Filmora X is one such famous name in the world of video editing. But, the point is to check its features for podcast editing. Are they worth it or not? That is what we’d like to tell you by highlighting the podcast editing services of Filmora.


Video Podcast Editing Services of Wondershare Filmora X
- The very thing needed while podcast editing is the shortcut key commands to save time. The Wondershare Filmora X consists of several such hotkey commands for quick editing.
- You can use Audio Ducking to eliminate background noises and unwanted awkward silences recorded while making the podcast.
- Inject beautiful animations in your video podcast using the keyframing tool of Wondershare Filmora X.
- Use 1000+ Video Effects, including filters, transitions, motion elements, titles, etc., exclusively provided on Filmora.
- Use the Split Screen and showcase multiple screens to make an eye-catchy video podcast appearance.
Conclusion
Now, we are going to end our discussion on podcast editing basics as well as advanced concepts. Try following every tip and suggestion, especially when you are a beginner. Make up your mind to create eye-catchy content that well engages the audience while also providing useful information. Using the best video editor with stunning effects, as mentioned above, won’t make your content look boring at all.
Benjamin Arango
Benjamin Arango is a writer and a lover of all things video.
Follow @Benjamin Arango
Benjamin Arango
Mar 27, 2024• Proven solutions
We are glad that you took the first steps to create your podcast episodes. We’d also like to know how far you have reached. Well, most probably, you are at the podcast editing stage as per your search query. So, you are in the right place if this is your concern. We have structured this entire post on how to edit podcasts, especially for the newbies. You can continue reading the article if you have already created a podcast episode and level up the steps with better podcast editing. Remember that editing can either make or break the game! So, don’t take any chances in editing a podcast right from the beginners’ level.
Without further ado, let’s get started with the following editing basics a podcaster should keep in mind.
- Part 1: Editing Basics that Beginners’ Should Keep in Mind
- Part 2: Which DAW should you use?
- Part 3: Advanced Editing Tips to Spice Up Your Podcasts
- Part 4: Edit Podcast with Video Editor
Editing Basics that Beginners’ Should Keep in Mind
Well, it is all dependent upon the approach you follow regarding the podcast audio editing. There are various podcast editing services, and styles worth consider. The list below is the critical podcast editing basics a beginner should follow before publishing the podcast. Overall, it would be awesome if you learn new skills instead of outsourcing the whole stuff. That’s fantastic as well!
Firstly, import the audio.
The editing process starts with importing the audio track. The audio material in the sequence must be at the primary place. Always place the audio track in the first position even if you are importing multiple audio tracks. You can leave the track underneath for editing purposes. After adding this first audio file, you can add sound effects, music, and other secondary audio files for further editing.
Listen again
Don’t proceed before re-listening your added audio! This manner will let you think for different sections, and you can further decide what to keep and what to preserve. Remove any computer noise, background hiss, and unwanted audio areas. Here, you can help with different noise reduction tools available or go for the reliable podcast editing software, specifically the audio ducking feature for noise removal.
Make it consistent throughout
The next step is to make the volume consistent at every stage of the podcast. After removing all the unwanted noises, take the necessary action to normalize the audio levels and specifically select -2.0 for peak amplitude. Amplify the tranquil areas.
Sound Designing and Mixing
Then, you are required to do sound designing and mixing for the podcast. Take it lightly and only especially when you are a beginner. Add the sound effects as per the message of the podcast. Always keep in mind to use significant sound effects that effectively evoke the emotion and ultimately save the audience engaged. The mixing part comes when you compress, equalize, and process the audio to adjust accordingly in the different sections.
Preview and Post
Once your podcast is edited and ready, preview it ensure everything is in place, especially if it is your first time. It would be best to post a clear, concise, and to the point audio/video. Finally, post your podcast, either for free or using one of the software available online on your desired blog/online media.
Which DAW should you use?
You can’t miss using Digital Audio Workstation (DAW) for podcast editing at any cost. It is an audio editing program with all the facilities right from recording the podcast to editing it. To start with, you must consider using among the following three DAWs.
Audacity
Audacity is the most common program providing free podcast editing services. The foremost reason for its popularity is the free and open-source availability. Secondly, the primary user interface makes it the best option for beginners. You can right away start recording with Audacity.
Alitu
Alitu is another recommended tool to make your podcast episodes easily. However, you have to pay to get the podcast editing services of Alitu. It can incredibly do the podcast editing for raw audios and provide you with different options of adding music, transitions, and segments, etc. It also contains the facility to publish your podcast.
Reaper
Reaper is another best podcast editing DAW with the availability of 60 days free trial. Despite a bit high learning curve in Reaper, you will ultimately feel like an artist working upon it. Moreover, it comes with lots of new updates and features for better outcomes. It is compatible with AU, VST, and JS plugins as well.
Advanced Editing Tips to Spice Up Your Podcasts
Don’t miss out on this portion if you want to upgrade your podcasting skills like professionals! Learn some advanced formulas of podcast audio editing as follows.
Trim the Ends
It’s better if you trim the ends before editing the podcast. And, make sure there are no blanks at the beginning or end of the podcast. You can also add fade-in or fade-out effects to avoid unprofessional vibes.
Work on your planning and presentation skills
Focus on having a time-saving podcast editing by working upon your planning and presentation skills. Don’t be that guy who tries to edit every verbal crutch. Instead, focus on being confident while presenting the podcast so that you will need to have significantly fewer editing issues or may not need editing at all. Think upon changing the approach of podcast recording as well.
Provide margin and look for transitions
Offer a little margin and say that thing smoothly again if you have misread or misspell the statement while recording the podcast. Thus, you must not squeeze the information that doesn’t provide a better room for podcast editing. The provided margin will make it a breeze to cut out the messy audio portion.
Then, you have to look for transitions precisely when you are recording in multiple tracks, co-hosting, or taking a long space while recording your podcast. These transitions could be like pointless babbles, awkward silences, cross talks, etc., that need careful watch at both the beginning and the end. Most of the editing will improve by considering and editing these kinds of transitions.
Eliminate awkward silences
Sometimes a podcast is full of awkward silences that look crap at all. Well, you don’t have to remove every silence taken at the end of a talk or something like that. Eliminate only long, awkward silences or reduce their duration. Different plugins are available within the DAWs to remove these background noises and long duration silences.
Adjust the volume of the podcast
It may be a bit tricky to edit the podcast when one person or interviewee is a lot quieter. First of all, check if their microphone signals and settings are strong enough to provide you with audio. Then, you can increase the gain of their speaker before podcast editing. Normalize the voice or add some compression to increase the loudness ultimately.
Save podcast to the right format
Finally, you must be careful while exporting your podcast to the correct format to ensure the best quality. Go to the export settings and find MP3 extension and 192kbps bitrate.
Edit Podcast with Video Editor
Are you recording a video podcast? If yes, you must make very little room for editing while considering the best recording equipment and settings. Secondly, you can look for a high-tech video editor that can do the task of both video editing and podcast editing. The Wondershare Filmora X is one such famous name in the world of video editing. But, the point is to check its features for podcast editing. Are they worth it or not? That is what we’d like to tell you by highlighting the podcast editing services of Filmora.
Video Podcast Editing Services of Wondershare Filmora X
- The very thing needed while podcast editing is the shortcut key commands to save time. The Wondershare Filmora X consists of several such hotkey commands for quick editing.
- You can use Audio Ducking to eliminate background noises and unwanted awkward silences recorded while making the podcast.
- Inject beautiful animations in your video podcast using the keyframing tool of Wondershare Filmora X.
- Use 1000+ Video Effects, including filters, transitions, motion elements, titles, etc., exclusively provided on Filmora.
- Use the Split Screen and showcase multiple screens to make an eye-catchy video podcast appearance.
Conclusion
Now, we are going to end our discussion on podcast editing basics as well as advanced concepts. Try following every tip and suggestion, especially when you are a beginner. Make up your mind to create eye-catchy content that well engages the audience while also providing useful information. Using the best video editor with stunning effects, as mentioned above, won’t make your content look boring at all.
Benjamin Arango
Benjamin Arango is a writer and a lover of all things video.
Follow @Benjamin Arango
Adding Audio to Photo You Should Know
Almost everyone shoots videos and photos now. But sometimes, it’s hard to record videos while boring to capture images. What if a hybrid mingles still images with an audio file? You can add audio to photo easily.
Images with a soundtrack are simpler to create and more interactive than video; they naturally improve the project without time commitment or complexity. The question that appears is; how to add audio to a photo/image and create great multimedia photography?
In this post, we will describe and clear all your queries on how to add audio to photo. Whether you wish to combine audio and image on the computer or add audio to iPhone pictures, you can all find the answer.
In this article
01 [Can I add audio to the photo?](#Part 1)
02 [How to add audio to a photo?](#Part 2)
03 [Secret about adding audio to the photo?](#Part 3)
Part 1 Can I add audio to the photo?

Yes, it’s possible to add audio to photo, and we have various methods to do this. One of the simplest methods is arranging images into slideshows and adding audio.
Yes, there are different ways by which you can add audio to photo online or offline, including both the easiest and most brutal ways. Let’s list out some general courses as follows!
● The first and common way is by making a slideshow or photo collage like a video and adding background music as audio.
● You can use an image collage app or add audio to a photo app for Android or iPhone devices.
● Lastly, you can add audio to the photo online editor or online video editing program and include voiceover or background music.
All in all, it’s possible to add audio to photo provided you’ve to look straightforward and quick ways of doing so.
Part 2 How to add audio to a photo?
ACDSee supports images with embedded audio and photos with associated audio files. Images with embedded audio are JPEG or TIFF images saved inside the photo folder. You can embed audio inside the folder of photos by adding audio to the photo online.
Images with associated audio are photos are merged with individual WAV audio files. The photo folders and their associated audio files contain the same file name and are placed within the same folder.
You can associate any WAV file with a photo by assigning them the same name and locating them in the same folder or adding audio to the photo.
Note: If you rename or move either an audio file or an image file associated with it, you must rename both the folders or they will not associate for longer. It does not apply to photos with embedded audio.
Steps to add audio to photo via ACDSee
Do one of the following:
● Select an image in Manage mode.
● Open an image in View mode.
Step1 Click Tools | Image Audio | Edit
Step2 In the Edit Audio dialog box, click the Browse button
Step3 Select a WAV file and click Save
Step4 If you would like to truncate or clip the audio file, select the Use markers checkbox and drag the Start marker and End marker sliders. Do one of the following
● Click the Truncate button to remove the beginning and end of the audio file (the sections outside of the start and end markers).
● Click the Clip button to remove the audio file section inside the start and end markers.
Step5 To hear a preview of the file, click the Play button
Step6 Click OK
Part 3 Secret about adding audio to the photo?
If you’re looking to add audio to a photo in a straightforward manner, here’s a tip for you than going complex. It’s because the software or programs available are highly problematic when it comes to better understanding. Thus, using the ideal program is the best way out (and a secret)!
We have to admit that customization is quite trendy among the young generation. Customizing a unique album is a cool thing, too.
A professional editing tool would be an ideal helper to do this (hence, the reason you’re here). While a great variety of music management software and video editors support adding audio to images, Wondershare Filmora stands out for its efficiency, simplicity, and robust capability.
To get started, consider a free trial copy of Wondershare Filmora
Step1 Import Media
Hit the “Import” tab to load your songs from ripped CDs or downloaded from the internet.
Then drag and drop your image in a format like JPEG, JPG, JPE, GIF, BMP, DIB, PNG, JFIF, TIFF, TIF to the media library panel. Now you’ll consider using all the imported files displayed as thumbnails in the Media library.
Step2 Drag and Drop to add photos to audio
Drag songs and photos from the Media Library to the Timeline accordingly.
Filmora assists you in adding various photos to the audio. You can highlight the image and hover your mouse to the last section.
Click the “set duration” icon on the toolbar and set it to fit your music file’s length.
Tips: You can zoom-out or zoom-in on the Timeline in the top right corner by dragging the timeline slider to find the ideal position easily.
Check the effect in the preview window after this. If possible, you can ramp up your creation, e.g., add captions, apply special effects, transitions, and even create a picture-in-picture effect.

Step3 Save Music with Photos
When you’re satisfied with the outcomes, hit the Export tab.
Then, select MP4 under the format tab in the output window, or if you want to play the media on your phone, you can choose the device in the Export window and choose target devices among iPad, iPhone, or Apple TV, etc. Filmora will create a proper setting for phone device saving.

Bonus tips
Rip audio from video: If you wish to extract audio from a movie trailer, film, comedy, TV show, etc., highlight the video file in the Timeline tab, right-click it and choose the “Audio Detach” tab, then you can eliminate the original video stream and save in a new MP3 format, and now you can freely add your images to the ripped music.
Or, you can delete the original audio file and add a new one.
Conclusion
So, that’s all you had to know about adding audio to photo. We’ve discussed all the questions you’re wandering on how to add audio to photo online and mentioned the different ways by which you can do the same.
As the uploading speed is slow, we highly suggest using Filmora to add audio to photos. Besides, Filmora provides 50 plus sounds that you can use. Try it now!
02 [How to add audio to a photo?](#Part 2)
03 [Secret about adding audio to the photo?](#Part 3)
Part 1 Can I add audio to the photo?
Yes, it’s possible to add audio to photo, and we have various methods to do this. One of the simplest methods is arranging images into slideshows and adding audio.
Yes, there are different ways by which you can add audio to photo online or offline, including both the easiest and most brutal ways. Let’s list out some general courses as follows!
● The first and common way is by making a slideshow or photo collage like a video and adding background music as audio.
● You can use an image collage app or add audio to a photo app for Android or iPhone devices.
● Lastly, you can add audio to the photo online editor or online video editing program and include voiceover or background music.
All in all, it’s possible to add audio to photo provided you’ve to look straightforward and quick ways of doing so.
Part 2 How to add audio to a photo?
ACDSee supports images with embedded audio and photos with associated audio files. Images with embedded audio are JPEG or TIFF images saved inside the photo folder. You can embed audio inside the folder of photos by adding audio to the photo online.
Images with associated audio are photos are merged with individual WAV audio files. The photo folders and their associated audio files contain the same file name and are placed within the same folder.
You can associate any WAV file with a photo by assigning them the same name and locating them in the same folder or adding audio to the photo.
Note: If you rename or move either an audio file or an image file associated with it, you must rename both the folders or they will not associate for longer. It does not apply to photos with embedded audio.
Steps to add audio to photo via ACDSee
Do one of the following:
● Select an image in Manage mode.
● Open an image in View mode.
Step1 Click Tools | Image Audio | Edit
Step2 In the Edit Audio dialog box, click the Browse button
Step3 Select a WAV file and click Save
Step4 If you would like to truncate or clip the audio file, select the Use markers checkbox and drag the Start marker and End marker sliders. Do one of the following
● Click the Truncate button to remove the beginning and end of the audio file (the sections outside of the start and end markers).
● Click the Clip button to remove the audio file section inside the start and end markers.
Step5 To hear a preview of the file, click the Play button
Step6 Click OK
Part 3 Secret about adding audio to the photo?
If you’re looking to add audio to a photo in a straightforward manner, here’s a tip for you than going complex. It’s because the software or programs available are highly problematic when it comes to better understanding. Thus, using the ideal program is the best way out (and a secret)!
We have to admit that customization is quite trendy among the young generation. Customizing a unique album is a cool thing, too.
A professional editing tool would be an ideal helper to do this (hence, the reason you’re here). While a great variety of music management software and video editors support adding audio to images, Wondershare Filmora stands out for its efficiency, simplicity, and robust capability.
To get started, consider a free trial copy of Wondershare Filmora
Step1 Import Media
Hit the “Import” tab to load your songs from ripped CDs or downloaded from the internet.
Then drag and drop your image in a format like JPEG, JPG, JPE, GIF, BMP, DIB, PNG, JFIF, TIFF, TIF to the media library panel. Now you’ll consider using all the imported files displayed as thumbnails in the Media library.
Step2 Drag and Drop to add photos to audio
Drag songs and photos from the Media Library to the Timeline accordingly.
Filmora assists you in adding various photos to the audio. You can highlight the image and hover your mouse to the last section.
Click the “set duration” icon on the toolbar and set it to fit your music file’s length.
Tips: You can zoom-out or zoom-in on the Timeline in the top right corner by dragging the timeline slider to find the ideal position easily.
Check the effect in the preview window after this. If possible, you can ramp up your creation, e.g., add captions, apply special effects, transitions, and even create a picture-in-picture effect.
Step3 Save Music with Photos
When you’re satisfied with the outcomes, hit the Export tab.
Then, select MP4 under the format tab in the output window, or if you want to play the media on your phone, you can choose the device in the Export window and choose target devices among iPad, iPhone, or Apple TV, etc. Filmora will create a proper setting for phone device saving.
Bonus tips
Rip audio from video: If you wish to extract audio from a movie trailer, film, comedy, TV show, etc., highlight the video file in the Timeline tab, right-click it and choose the “Audio Detach” tab, then you can eliminate the original video stream and save in a new MP3 format, and now you can freely add your images to the ripped music.
Or, you can delete the original audio file and add a new one.
Conclusion
So, that’s all you had to know about adding audio to photo. We’ve discussed all the questions you’re wandering on how to add audio to photo online and mentioned the different ways by which you can do the same.
As the uploading speed is slow, we highly suggest using Filmora to add audio to photos. Besides, Filmora provides 50 plus sounds that you can use. Try it now!
“Hear & Save: Discovering the Best Audio Devices for Effortless Voice Recording”
Top 10 Audio Recording Software to Capture Your Voice Easily

Shanoon Cox
Mar 27, 2024• Proven solutions
Whether professional or for amateur purposes, the audio recording software programs are very important. These programs allow manipulating the audio so that it matches the need for a specific project.
The best audio recording software has a variety of tools embedded to polish the audio recorded, in which this article we are going to review the best of them for you.
What is Audio Recording Software?
As the name suggests, the audio recording software is used to record audio using a unique technology. This allows the users to capture their own or the voice they want and transfer it wherever they want. The software also adds effects to the voice and makes it professional to use wherever the user wants to.
What Does a Sound Recorder Use for?
There are several uses of audio recording software program. Some are listed as under:
- In the music field, this software is of great use. It can be used for multitrack recording. The mixing of the sound is then done using the same or different tools.
- The audio recorded can be edited with ease. This includes enhancing and adding effects to it with perfection.
- With microphone use, the recording software can be integrated to make sure that the voice of the user is also recorded if required.
- Some audio recording software programs also come with screen recording, and therefore, these foster multitasking.
List of Top 10 Audio Recording Software Programs
The audio recording software for PC that would make your life easy is mentioned as under.
1.Wondershare DemoCreator
This is by far the best and the most used software program when it comes to audio recording. It is highly reliable and comes with a GUI. The user interface is easy to understand, and so are the functionalities.
With the best and the most advanced controls recording audio has never been this easy. It also acts as Mac audio recording software, and therefore it is highly recommended for all platforms. The frequent updates make this program even easier to use.
Features
- The interface of the program is very easy to use and stress-free.
- The high definition audio can be recorded with ease.
- The program supports 50+ formats to import audio, video, and other files to the system.
- There are highly advanced options for professional audio recording.
- The program can record endless video and audio as far as there is space on your disk.
Pros
- It is one of the programs that support professional audio editing.
- The program is very easy to use as it has a graphical interface.
Cons
- The program is flash software-based, which can slow down the system.
- It does not offer highly advanced audio editing at all.
Supported Platforms
The program can be used with both Windows and Mac.
Go ahead to download and have a try now!
2.WavePad
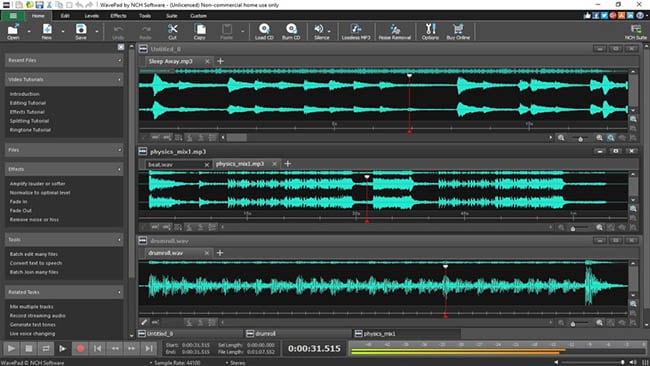
It is one of the best and most used programs to make sure that the audio is recorded with perfection. This program is compatible with most of the audio formats, and therefore it is highly recommended. The overall rating of the program is high as it is used by professionals and, therefore, highly rated as well.
Features
- It has several audio enhancing capabilities, which include amplification and effect addition.
- The audio can be edited, trimmed, and cropped with this program.
- The professional-quality sound recording is used by this program to enhance the capabilities.
Pros
- The best part of this program is its quality of end product that is very high.
- It is a wave editor that gives the users more control over the end product.
Cons
- The mp3 editor of this program does not offer top quality work.
- The program cannot work with multiple files efficiently.
Supported Platforms
It can be installed over Mac, Windows, Android, and iOS.
3.Ocenaudio

As a cross-platform program, this one has a lot to offer. The interface is a bit technical, but overall the use of the program is easy once the hands-on is done. The program is also highly intuitive and allows the users to overcome the day to day audio recording and editing tasks.
Features
- The Ocen Framework is also integrated with this platform to enhance its capabilities.
- The program also records screen if required by the users.
- It is one of the programs that have been rated on other high-end platforms.
Pros
- The program uses auto trim and voice recording controls.
- The sound spectral analysis of the program is highly advanced.
Cons
- The program cannot directly load the file from a CD.
- The program cannot be opened in multiple screens, so the work rate is slow.
Supported Platforms
It is compatible with Mac, Windows, and Linux.
4.Adobe Audition

It can be rightfully regarded as one of the best and the most advanced programs. Backed by years of Adobe experience, it is a program that will get the user a step forward. It is highly recommended to all those users that are looking for a professional level of audio recording.
Features
- It includes multitrack, wave editing, and audio restoration tools to give the best results.
- The essential sound panel has been integrated with the program to get the best oomph effect to the audio.
- The music clips can be integrated within the audio recording to make it sound professional.
Pros
- The platform can be used to create awesome podcasts.
- The audio break can be repaired with perfection.
Cons
- It is expensive, so all the users cannot afford it at all.
- The interface is high tech in nature and requires time to learn.
Supported Platforms
It is supported by Windows and Mac.
5.Audacity

It is free software that is used to record audio professionally. This high-performance program makes sure that the audio which is recorded is also shared with different platforms. The built-in panel is upgraded, and therefore it is highly advance.
Features
- It is ad-free and therefore provides hassle-free work.
- The audio editing and recording have never been as easy as it is with audacity.
- Multitrack editing is also possible with this program.
Pros
- The VST plugin support is provided by the program.
- It is a portable program that can be used for pitch correction.
Cons
- The noise reduction tool of this program needs an upgrade.
- The record to tape feature is currently unavailable.
Supported Platforms
It is supported by Mac, Linux, Windows, and BSD.
6.Wavosaur

It is one of the free programs that can be regarded as better than many paid ones. It is all because the qualities of the program are matchless. The processing of files is done with WAV and Mp3 files filter, which makes the process very much easier.
Features
- The program has multiple document interfaces for multiple file handling.
- The editing features such as cut, copy, paste, and edit can be performed in a single window.
- The waveform representation of the program is accurate and highly advanced.
Pros
- The program offers bit depth convert, pitch shift, and DC offset removal.
- The VST effects can be added to the entire batch of sound files.
Cons
- The audio routing and the multichannel support of the program are not efficient.
- The software sampler extraction is a bit slow when it comes to this program.
Supported Platforms
The program can only be installed on Windows.
7.MixPad
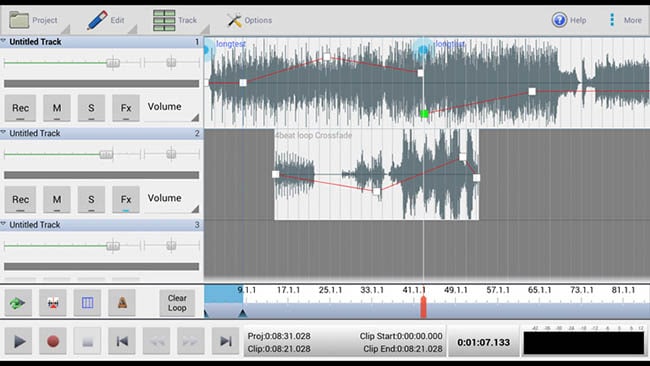
The audio processing and mixing have been made very easy with this platform. The program has an interface that is sleek in design and allows the processing of the audio info with care. The program also supports cloud storage, which means that the entire user’s hard work remains safe and secures all the time.
Features
- The program can mix the unlimited number of tracks all at the same time.
- Depending upon the requirement, the multiple or a single track can be processed at the same time.
- The program supports almost every sound format, so any type of sound can be imported with perfection.
Pros
- The audio effects such as EQ, compression, and reverb can be added with perfection.
- The latency rate is very low, and the program also offers ASIO support for accurate processing.
Cons
- The program only offers the export of the sound that is up to 32 bits.
- The sample rates of up to 96 kHz are only supported, which is less than most of the other mixers.
Supported Platforms
The program can be installed on Mac, Windows, Android, iPad, and Kindle Fire.
8.Sound Forge

If a user wants to completely control the audio editing process, then this software is for them. It is highly advanced and makes sure that the work that is done is highly précised. From Red Book CD creation to sound design and mixing, this program provides the users with complete control and authority over the process.
Features
- The multichannel WAV recording and processing is now possible with the new version of the program.
- The VST plugin support is provided by this program with perfection.
- The VST effects can be chained in a virtual rack.
Pros
- The simple digitization and restoration of the audio have been made simple by this program.
- The one-click solutions allow the users to process the audio tracks easily.
Cons
- The program only offers 32 bits of power, which is very low.
- The multiple VST GUI is not supported by this program.
Supported Platforms
The Sound Forge can be installed on Mac and Windows.
9.Spek

The best part of the software is that it is free and allows the users to overcome the problems which the other audio recorders present. The interface is easy to learn, and therefore the overall usage is easy. The lossless quality is something for which the software is known for. It also supports the FFMPEG library.
Features
- The signal processing is ultra-fast as it uses several threads to process audio.
- The drag and drop support of the program is highly efficient, and the program supports common audio formats.
- The program can be accessed in 19 different languages.
Pros
- The spectral density rulers allow the auto fitting of time.
- The spectral density range of the program is also adjustable.
Cons
- The codec names are, and the audio signal parameters cannot be seen.
- The program is licensed under GPLv3, which is now obsolete.
Supported Platforms
The program is compatible with Windows, Linux, and Mac.
10.Audio Highjack

The program, as the name suggests, makes it possible for the users to completely delve deep into the process of audio editing. The interface, as well as the controls, is very easy to understand and use. For novice users, this program is highly recommended as it makes audio editing a fun-filled activity.
Features
- It provides detailed statistics and min, the max value per channel.
- The processed audio can be listened in real-time to get an idea about the end product.
- The waveform generator and frequency impulse train are embedded within the program.
Pros
- The lame encoder support has been embedded within the recorder to export mp3 files.
- The editor’s look is skin able, which can be changed as per the user choice.
Cons
- The processing options are less as compared to the other recorders.
- The audio files cannot be exported as text, so the program cannot be used with PSpice.
Supported Platforms
The program is only available for Mac.
A Roundup of the Best Audio Recording Software Programs
| No. | Tools | Rating | Supported Formats | Price | Processing Power |
|---|---|---|---|---|---|
| 1 | DemoCreator | 4.5 | .mp3, .m4a, .wav, .wma, .ogg, .flac, .aif, .aiff | $29.99 | 64-bit |
| 2 | WavePad | 4.4 | vox, gsm, WMA, real audio, au, aif, FLAC, and Ogg | $69.95 | 64-bit |
| 3 | Ocenaudio | 4.0 | vox, gsm, WMA, wav, .wma, .ogg, and .flac | Free | 32-bit |
| 4 | Adobe Audition | 4.5 | AIF, AIFF, AIFC | $74.99 | 64-bit |
| 5 | Audacity | 3.9 | mp3, wav, AIFF, au, and ogg | Free | 32-bit |
| 6 | Wavosaur | 3.5 | VST plugins, ASIO driver, multichannel wav files, real-time effect processing. | Free | 32-bit |
| 7 | MixPad | 3.2 | wav, mp3, vox, and gsm | $129 | 32-bit |
| 8 | Sound Forge | 4.0 | SWF, RealMedia 9, WMA, AVI , AIFF, AIF, and SND | Free | 32-bit |
| 9 | Spek | 4.4 | vox, gsm, WMA, Wav, WMA, real audio, au, aif, FLAC, and Ogg | Free | 64-bit |
| 10 | Audio Highjack | 4.2 | .mp3, .m4a, .wav, .wma, aif, FLAC, and Ogg | Free | 64-bit |
Conclusion
With the overall specs and ratings by the users, the Wondershare DemoCreator is the best software that should be used for audio recording.
The program is highly compatible with major operating systems, and therefore it is highly recommended. The overall mechanism is easy, and the program also supports multiple formats.
It is highly technical and is constantly upgraded to make sure that it remains in line with modern technologies. It is a one-stop-shop for all the audio recording needs of the users and therefore highly viable.
With this program, the audio that has been worked on can be shared on most popular social media platforms like YouTube and Facebook.
Shanoon Cox
Shanoon Cox is a writer and a lover of all things video.
Follow @Shanoon Cox
Shanoon Cox
Mar 27, 2024• Proven solutions
Whether professional or for amateur purposes, the audio recording software programs are very important. These programs allow manipulating the audio so that it matches the need for a specific project.
The best audio recording software has a variety of tools embedded to polish the audio recorded, in which this article we are going to review the best of them for you.
What is Audio Recording Software?
As the name suggests, the audio recording software is used to record audio using a unique technology. This allows the users to capture their own or the voice they want and transfer it wherever they want. The software also adds effects to the voice and makes it professional to use wherever the user wants to.
What Does a Sound Recorder Use for?
There are several uses of audio recording software program. Some are listed as under:
- In the music field, this software is of great use. It can be used for multitrack recording. The mixing of the sound is then done using the same or different tools.
- The audio recorded can be edited with ease. This includes enhancing and adding effects to it with perfection.
- With microphone use, the recording software can be integrated to make sure that the voice of the user is also recorded if required.
- Some audio recording software programs also come with screen recording, and therefore, these foster multitasking.
List of Top 10 Audio Recording Software Programs
The audio recording software for PC that would make your life easy is mentioned as under.
1.Wondershare DemoCreator
This is by far the best and the most used software program when it comes to audio recording. It is highly reliable and comes with a GUI. The user interface is easy to understand, and so are the functionalities.
With the best and the most advanced controls recording audio has never been this easy. It also acts as Mac audio recording software, and therefore it is highly recommended for all platforms. The frequent updates make this program even easier to use.
Features
- The interface of the program is very easy to use and stress-free.
- The high definition audio can be recorded with ease.
- The program supports 50+ formats to import audio, video, and other files to the system.
- There are highly advanced options for professional audio recording.
- The program can record endless video and audio as far as there is space on your disk.
Pros
- It is one of the programs that support professional audio editing.
- The program is very easy to use as it has a graphical interface.
Cons
- The program is flash software-based, which can slow down the system.
- It does not offer highly advanced audio editing at all.
Supported Platforms
The program can be used with both Windows and Mac.
Go ahead to download and have a try now!
2.WavePad
It is one of the best and most used programs to make sure that the audio is recorded with perfection. This program is compatible with most of the audio formats, and therefore it is highly recommended. The overall rating of the program is high as it is used by professionals and, therefore, highly rated as well.
Features
- It has several audio enhancing capabilities, which include amplification and effect addition.
- The audio can be edited, trimmed, and cropped with this program.
- The professional-quality sound recording is used by this program to enhance the capabilities.
Pros
- The best part of this program is its quality of end product that is very high.
- It is a wave editor that gives the users more control over the end product.
Cons
- The mp3 editor of this program does not offer top quality work.
- The program cannot work with multiple files efficiently.
Supported Platforms
It can be installed over Mac, Windows, Android, and iOS.
3.Ocenaudio
As a cross-platform program, this one has a lot to offer. The interface is a bit technical, but overall the use of the program is easy once the hands-on is done. The program is also highly intuitive and allows the users to overcome the day to day audio recording and editing tasks.
Features
- The Ocen Framework is also integrated with this platform to enhance its capabilities.
- The program also records screen if required by the users.
- It is one of the programs that have been rated on other high-end platforms.
Pros
- The program uses auto trim and voice recording controls.
- The sound spectral analysis of the program is highly advanced.
Cons
- The program cannot directly load the file from a CD.
- The program cannot be opened in multiple screens, so the work rate is slow.
Supported Platforms
It is compatible with Mac, Windows, and Linux.
4.Adobe Audition
It can be rightfully regarded as one of the best and the most advanced programs. Backed by years of Adobe experience, it is a program that will get the user a step forward. It is highly recommended to all those users that are looking for a professional level of audio recording.
Features
- It includes multitrack, wave editing, and audio restoration tools to give the best results.
- The essential sound panel has been integrated with the program to get the best oomph effect to the audio.
- The music clips can be integrated within the audio recording to make it sound professional.
Pros
- The platform can be used to create awesome podcasts.
- The audio break can be repaired with perfection.
Cons
- It is expensive, so all the users cannot afford it at all.
- The interface is high tech in nature and requires time to learn.
Supported Platforms
It is supported by Windows and Mac.
5.Audacity
It is free software that is used to record audio professionally. This high-performance program makes sure that the audio which is recorded is also shared with different platforms. The built-in panel is upgraded, and therefore it is highly advance.
Features
- It is ad-free and therefore provides hassle-free work.
- The audio editing and recording have never been as easy as it is with audacity.
- Multitrack editing is also possible with this program.
Pros
- The VST plugin support is provided by the program.
- It is a portable program that can be used for pitch correction.
Cons
- The noise reduction tool of this program needs an upgrade.
- The record to tape feature is currently unavailable.
Supported Platforms
It is supported by Mac, Linux, Windows, and BSD.
6.Wavosaur
It is one of the free programs that can be regarded as better than many paid ones. It is all because the qualities of the program are matchless. The processing of files is done with WAV and Mp3 files filter, which makes the process very much easier.
Features
- The program has multiple document interfaces for multiple file handling.
- The editing features such as cut, copy, paste, and edit can be performed in a single window.
- The waveform representation of the program is accurate and highly advanced.
Pros
- The program offers bit depth convert, pitch shift, and DC offset removal.
- The VST effects can be added to the entire batch of sound files.
Cons
- The audio routing and the multichannel support of the program are not efficient.
- The software sampler extraction is a bit slow when it comes to this program.
Supported Platforms
The program can only be installed on Windows.
7.MixPad
The audio processing and mixing have been made very easy with this platform. The program has an interface that is sleek in design and allows the processing of the audio info with care. The program also supports cloud storage, which means that the entire user’s hard work remains safe and secures all the time.
Features
- The program can mix the unlimited number of tracks all at the same time.
- Depending upon the requirement, the multiple or a single track can be processed at the same time.
- The program supports almost every sound format, so any type of sound can be imported with perfection.
Pros
- The audio effects such as EQ, compression, and reverb can be added with perfection.
- The latency rate is very low, and the program also offers ASIO support for accurate processing.
Cons
- The program only offers the export of the sound that is up to 32 bits.
- The sample rates of up to 96 kHz are only supported, which is less than most of the other mixers.
Supported Platforms
The program can be installed on Mac, Windows, Android, iPad, and Kindle Fire.
8.Sound Forge
If a user wants to completely control the audio editing process, then this software is for them. It is highly advanced and makes sure that the work that is done is highly précised. From Red Book CD creation to sound design and mixing, this program provides the users with complete control and authority over the process.
Features
- The multichannel WAV recording and processing is now possible with the new version of the program.
- The VST plugin support is provided by this program with perfection.
- The VST effects can be chained in a virtual rack.
Pros
- The simple digitization and restoration of the audio have been made simple by this program.
- The one-click solutions allow the users to process the audio tracks easily.
Cons
- The program only offers 32 bits of power, which is very low.
- The multiple VST GUI is not supported by this program.
Supported Platforms
The Sound Forge can be installed on Mac and Windows.
9.Spek
The best part of the software is that it is free and allows the users to overcome the problems which the other audio recorders present. The interface is easy to learn, and therefore the overall usage is easy. The lossless quality is something for which the software is known for. It also supports the FFMPEG library.
Features
- The signal processing is ultra-fast as it uses several threads to process audio.
- The drag and drop support of the program is highly efficient, and the program supports common audio formats.
- The program can be accessed in 19 different languages.
Pros
- The spectral density rulers allow the auto fitting of time.
- The spectral density range of the program is also adjustable.
Cons
- The codec names are, and the audio signal parameters cannot be seen.
- The program is licensed under GPLv3, which is now obsolete.
Supported Platforms
The program is compatible with Windows, Linux, and Mac.
10.Audio Highjack
The program, as the name suggests, makes it possible for the users to completely delve deep into the process of audio editing. The interface, as well as the controls, is very easy to understand and use. For novice users, this program is highly recommended as it makes audio editing a fun-filled activity.
Features
- It provides detailed statistics and min, the max value per channel.
- The processed audio can be listened in real-time to get an idea about the end product.
- The waveform generator and frequency impulse train are embedded within the program.
Pros
- The lame encoder support has been embedded within the recorder to export mp3 files.
- The editor’s look is skin able, which can be changed as per the user choice.
Cons
- The processing options are less as compared to the other recorders.
- The audio files cannot be exported as text, so the program cannot be used with PSpice.
Supported Platforms
The program is only available for Mac.
A Roundup of the Best Audio Recording Software Programs
| No. | Tools | Rating | Supported Formats | Price | Processing Power |
|---|---|---|---|---|---|
| 1 | DemoCreator | 4.5 | .mp3, .m4a, .wav, .wma, .ogg, .flac, .aif, .aiff | $29.99 | 64-bit |
| 2 | WavePad | 4.4 | vox, gsm, WMA, real audio, au, aif, FLAC, and Ogg | $69.95 | 64-bit |
| 3 | Ocenaudio | 4.0 | vox, gsm, WMA, wav, .wma, .ogg, and .flac | Free | 32-bit |
| 4 | Adobe Audition | 4.5 | AIF, AIFF, AIFC | $74.99 | 64-bit |
| 5 | Audacity | 3.9 | mp3, wav, AIFF, au, and ogg | Free | 32-bit |
| 6 | Wavosaur | 3.5 | VST plugins, ASIO driver, multichannel wav files, real-time effect processing. | Free | 32-bit |
| 7 | MixPad | 3.2 | wav, mp3, vox, and gsm | $129 | 32-bit |
| 8 | Sound Forge | 4.0 | SWF, RealMedia 9, WMA, AVI , AIFF, AIF, and SND | Free | 32-bit |
| 9 | Spek | 4.4 | vox, gsm, WMA, Wav, WMA, real audio, au, aif, FLAC, and Ogg | Free | 64-bit |
| 10 | Audio Highjack | 4.2 | .mp3, .m4a, .wav, .wma, aif, FLAC, and Ogg | Free | 64-bit |
Conclusion
With the overall specs and ratings by the users, the Wondershare DemoCreator is the best software that should be used for audio recording.
The program is highly compatible with major operating systems, and therefore it is highly recommended. The overall mechanism is easy, and the program also supports multiple formats.
It is highly technical and is constantly upgraded to make sure that it remains in line with modern technologies. It is a one-stop-shop for all the audio recording needs of the users and therefore highly viable.
With this program, the audio that has been worked on can be shared on most popular social media platforms like YouTube and Facebook.
Shanoon Cox
Shanoon Cox is a writer and a lover of all things video.
Follow @Shanoon Cox
Also read:
- Updated Step-by-Step Guide to Audio Keyframing with Adobe Premiere Pro on Apple Devices, 2023 Edition for 2024
- Top-Ranked Windows Edition for Silentizing Videography
- Updated In 2024, Audio Syncs in KineMaster Detailed Instructions and Tips
- New In 2024, Tuned in Truth Exploring How to Identify Songs on Apple Devices without Specialized Software
- 2024 Approved 10 Best Reaper Plugins You Need to Know
- Updated Anthology of Gargantuan Groans and Howls
- In 2024, The Ultimate List of Affordable and Premium Online Recording Studios 2023 Edition
- Mastering AMR Files Comprehensive AMR File Conversion Handbook
- New Unveiling the Leading Mixers 5 Highest Rated Audio/Video Combiner Devices for 2024
- New 2024 Approved Achieving Perfect Ambience Fading and Brightening Sound with Keyframes in Filmora (Mac)
- In 2024, From Silence to Sound Your Essential Guide to Audio Recording in Windows 10
- New In 2024, Enhancing Presentations with Sound In-Depth Techniques for Recording Audio in PowerPoint on PC/Mac Platforms
- New 10 Advanced Audio Separation Programs for Video Content for 2024
- Pure Sound Protocols Methods to Minimize Distractions in Digital Videos for 2024
- 2024 Approved Virtual Birdsongs Library Download
- Updated Experts Choice The Top 10 Digital Stores Specializing in Montage Music Downloads
- New Seamlessly Combining Music and Movement in Windows Gif Files for 2024
- New 2024 Approved Best-Kept Secrets A List of Iconic Radio Effects
- Updated In 2024, Top Tear-Jerking Melodies The Best Sad Songs of the Year
- New Sound Silence Strategies How to Get Cleaner Videos without Lossy Audio Removal
- Updated 2024 Approved Mastering iPhone Disabling Dynamic Volume Adjustment
- New Expert Strategies for Clearer Dialogue and Ambiance in iMovie Projects
- Updated In 2024, No Loudness Left Behind A Comprehensive Guide to Audio Cutting in iMovie
- Updated Audio Offloading for Windows 10 Videos A Budget-Friendly Method for 2024
- New 2024 Approved Hush, Zoom! Muting Your Devices Voice Output Made Simple with Our Tips & Tricks
- Updated 2024 Approved Elite Cross-Gender Vocal Impersonators Guide - Updated
- New Four Simple Steps to Silence TikTok Sounds Effectively
- New In 2024, Enhancing On-Screen Impact with Echoic Audio Adjustments A Deep Dive Into Ducking Techniques
- Updated Cacophony of Cheer Tracking Impactful Sound Waves for 2024
- Updated VoiceChanger Your Guide to Tailoring Communication on Skype Platforms for 2024
- New 2024 Approved From Noisy to Neat Removing Unwanted Audio Distortion From Your Videos
- Updated 2024 Approved Joyful Ambiance Tunes for a 24Th Anniversary Celebration
- Updated The Ultimate Guide to AMR Format Processing and Conversion
- New Essential URLs for Obtaining Free, Legal Birdsong Archives in MP3 for 2024
- New The Ultimate Guide to Auditory Clarity Prime Apps for Removing Unwanted Sounds for 2024
- New In 2024, Elevating Your Videos Atmosphere with Exemplary Instrumental Soundscape
- New IMovies Acoustic Arena Insider Tips to Achieve Flawless Audio Mixes
- In 2024, Cherished Websites Presenting Fee-Free Acoustic Guitar Lyrics & Illustrations
- 2024 Approved Exploring the Essentials of Audio Editing in TwistedWave Software
- New Seek Out Terrifying Auditory Images for 2024
- Updated Mastering Frequency Adjustment in Audacity Without Compromising Sound Fidelity for 2024
- In 2024, Tailoring Your Viewing Experience Eliminating Background Noise From Videos
- Unlock Your Infinix Smart 8s Potential The Top 20 Lock Screen Apps You Need to Try
- How to use iSpoofer on Nubia Red Magic 9 Pro? | Dr.fone
- How to Rescue Lost Music from Y36i
- In 2024, How to Detect and Remove Spyware on OnePlus 12? | Dr.fone
- How To Restore a Bricked Itel P55+ Back to Operation | Dr.fone
- What Does Jailbreaking Apple iPhone 7 Plus i Do? Get Answers here
- New Steady Shots The Best Free Online Video Stabilizers Reviewed
- In 2024, 2 Ways to Monitor Samsung Galaxy M14 5G Activity | Dr.fone
- Full Guide to Unlock Apple iPhone SE with iTunes
- Ultimate Guide from Samsung Galaxy Z Fold 5 FRP Bypass
- Updated In 2024, Blur Out Distractions Free Online Photo Background Editors
- In 2024, How To Leave a Life360 Group On Vivo S17e Without Anyone Knowing? | Dr.fone
- How To Revive Your Bricked Oppo Reno 11 Pro 5G in Minutes | Dr.fone
- Updated Best VSDC Video Editor Alternatives for macOS Users
- Reliable User Guide to Fix Samsung Galaxy A25 5G Running Slow and Freezing | Dr.fone
- New In 2024, Looking for the Latest Information on MP3 Converters? Well, Look No Further! Read This Article to Learn More
- Why is iPogo not working On Nokia C110? Fixed | Dr.fone
- In 2024, Unova Stone Pokémon Go Evolution List and How Catch Them For Honor Magic V2 | Dr.fone
- How to Change Google Play Location On Samsung Galaxy A25 5G | Dr.fone
- In 2024, Tips and Tricks for Apple ID Locked Issue On iPhone XS
- How to Transfer Data from Itel A70 to Any iOS Devices | Dr.fone
- Title: Podcast Editing 101 How to Edit a Podcasta Beginners Guide for 2024
- Author: Kate
- Created at : 2024-05-20 02:42:39
- Updated at : 2024-05-21 02:42:39
- Link: https://audio-editing.techidaily.com/podcast-editing-101-how-to-edit-a-podcasta-beginners-guide-for-2024/
- License: This work is licensed under CC BY-NC-SA 4.0.
