
:max_bytes(150000):strip_icc():format(webp)/GettyImages-917461864-7141ebd3ec944ce6a431b8d485cc9cdb.jpg)
New Voice Transformation Wizardry on a Budget Comprehensive Filmora Edition for Audio Customization for 2024
“Voice Transformation Wizardry on a Budget: Comprehensive Filmora Edition for Audio Customization”
Best Free Voice Changer & How to Video Voice Editing With Filmora in 2024

Shanoon Cox
Mar 27, 2024• Proven solutions
Whenever you make videos, have you ever wished you could do voice video editing? What about just changing the voice in a video using a voice changer? It’s not just you. Below are some questions that users have frequently asked.
- Are there any free software programs that can change your voice even if the video is already recorded?
- I have recorded my video; how can I change the pitch of my voice to make it high or low?
A voice in a video can be changed for a number of reasons, such as changing the quality of the voice or adjusting the sound for anonymity. Whatever the reason for changing your voice, the methods remain the same. There are plenty of software programs available in the market using which you can easily change the voice of your video regardless of your purpose.
In this article, we will discuss how you can do voice video editing using Filmora X version 10.5. We are using Filmora because it is one of the easiest video editing software available in the market right now, and it is also loaded with audio editing tools. Who needs a free voice changer if you can do it in an all-in-one tool. The latest version of Filmora (Version 10.5) has some amazing tools to easily modify and change your voice to make it sound different in your videos.
You might be interested in:
For Win 7 or later (64-bit)
For macOS 10.12 or later
How To Change Your Voice Using Filmora Version 10.5
In this article, we will discuss three different methods to change your voice in Filmora.
  1. **[Using Tune-up or Tune Down Option](#a)**
  2. **[Using Equilizer Option](#b)**
  3. **[Using Filmora Audio Effects](#c)**
Let’s discuss every method one by one in detail and see how you can easily change your voice in Filmora. First of all, make sure that Filmora version 10.5 is installed in your system. If it isn’t already installed, you can visit the official website of Wondershare Filmora and download it from there. If you have an older version of Filmora Installed on your system, then you can update it. The best thing about Filmora is that you can download it for free and use all its features without paying anything. The only drawback here is that the final output of your video will have a watermark on it, which you can easily remove by purchasing Filmora.
1. Using Tune-up or Tune Down Option
Step1: Open Filmora and Import your desired video to filmora by going into a file, then clicking on import, and selecting import media files from there.

Step 2: Now drag and drop the video file to your timeline and double click on it to open the clip settings. You will see different options here; make sure to select the audio to open the audio settings.

Step3: From there, you can easily adjust the pitch of your voice. You can either increase or decrease the pitch of your voice, and it will make your voice sound a lot different as compared to your original voice.

Step4: Once you have done adjusting the pitch of your voice, click ok to apply changes to your audio.
Step5: Now play the audio, and you will notice a considerable change in your voice. Even if you show the video to your friends and family, they won’t even recognize your voice.
2. Using Equilizer Option
Step1: First of all, repeat all steps that we did in option one and open the audio settings of your video clip.

Step2: Not go to the equalizer option and click on the arrow in front of the equalizer option.

Step3: A dropdown menu will appear on your screen where you will see a lot of presets.

Step4: You can select any preset of your choice from this menu. Like if you want to make your voice sound very crisp, then you can choose Sparkle preset.
Step5: Once you have selected your desired preset, click the ok button to apply it to your video.
Step6: Now listen to your video’s audio, and you will notice a considerable difference in the voice of your video.

Also, don’t forget to tick that auto normalization box at the bottom of the audio settings for the above-mentioned methods. It will automatically normalize your video’s audio and make it sound more professional.
3. Using Filmora Audio Effects
The third method you can use to change your voice in a video is through the audio effects of Filmora.
Step1: Click on the Effects tab from the top menu, and you will see an audio effects option in the left sidebar.

Step2: You can see there are a lot of audio effects available to use in your videos.
Step3: If you want to apply any effect on your audio, drag the effect and drop it above your video in the timeline. A yellow symbol will appear on the video file, indicating that the effect has been applied to your audio.

Step4: Now play the video, and you will see that the audio effect has been applied to your voice, and it sounds a lot different.
Conclusion
So, these are the three different methods using which you can easily change your voice in Filmora. As discussed earlier, Filmora is free to download, and you can try all of its features without paying anything. Also, it has a very intuitive interface that is easy to adopt for anyone, even if you are a newbie and don’t have any prior video editing experience. So, make sure to give it a try. You can easily download it from the official website of Filmora.


Shanoon Cox
Shanoon Cox is a writer and a lover of all things video.
Follow @Shanoon Cox
Shanoon Cox
Mar 27, 2024• Proven solutions
Whenever you make videos, have you ever wished you could do voice video editing? What about just changing the voice in a video using a voice changer? It’s not just you. Below are some questions that users have frequently asked.
- Are there any free software programs that can change your voice even if the video is already recorded?
- I have recorded my video; how can I change the pitch of my voice to make it high or low?
A voice in a video can be changed for a number of reasons, such as changing the quality of the voice or adjusting the sound for anonymity. Whatever the reason for changing your voice, the methods remain the same. There are plenty of software programs available in the market using which you can easily change the voice of your video regardless of your purpose.
In this article, we will discuss how you can do voice video editing using Filmora X version 10.5. We are using Filmora because it is one of the easiest video editing software available in the market right now, and it is also loaded with audio editing tools. Who needs a free voice changer if you can do it in an all-in-one tool. The latest version of Filmora (Version 10.5) has some amazing tools to easily modify and change your voice to make it sound different in your videos.
You might be interested in:
For Win 7 or later (64-bit)
For macOS 10.12 or later
How To Change Your Voice Using Filmora Version 10.5
In this article, we will discuss three different methods to change your voice in Filmora.
  1. **[Using Tune-up or Tune Down Option](#a)**
  2. **[Using Equilizer Option](#b)**
  3. **[Using Filmora Audio Effects](#c)**
Let’s discuss every method one by one in detail and see how you can easily change your voice in Filmora. First of all, make sure that Filmora version 10.5 is installed in your system. If it isn’t already installed, you can visit the official website of Wondershare Filmora and download it from there. If you have an older version of Filmora Installed on your system, then you can update it. The best thing about Filmora is that you can download it for free and use all its features without paying anything. The only drawback here is that the final output of your video will have a watermark on it, which you can easily remove by purchasing Filmora.
1. Using Tune-up or Tune Down Option
Step1: Open Filmora and Import your desired video to filmora by going into a file, then clicking on import, and selecting import media files from there.
Step 2: Now drag and drop the video file to your timeline and double click on it to open the clip settings. You will see different options here; make sure to select the audio to open the audio settings.
Step3: From there, you can easily adjust the pitch of your voice. You can either increase or decrease the pitch of your voice, and it will make your voice sound a lot different as compared to your original voice.
Step4: Once you have done adjusting the pitch of your voice, click ok to apply changes to your audio.
Step5: Now play the audio, and you will notice a considerable change in your voice. Even if you show the video to your friends and family, they won’t even recognize your voice.
2. Using Equilizer Option
Step1: First of all, repeat all steps that we did in option one and open the audio settings of your video clip.
Step2: Not go to the equalizer option and click on the arrow in front of the equalizer option.
Step3: A dropdown menu will appear on your screen where you will see a lot of presets.
Step4: You can select any preset of your choice from this menu. Like if you want to make your voice sound very crisp, then you can choose Sparkle preset.
Step5: Once you have selected your desired preset, click the ok button to apply it to your video.
Step6: Now listen to your video’s audio, and you will notice a considerable difference in the voice of your video.
Also, don’t forget to tick that auto normalization box at the bottom of the audio settings for the above-mentioned methods. It will automatically normalize your video’s audio and make it sound more professional.
3. Using Filmora Audio Effects
The third method you can use to change your voice in a video is through the audio effects of Filmora.
Step1: Click on the Effects tab from the top menu, and you will see an audio effects option in the left sidebar.
Step2: You can see there are a lot of audio effects available to use in your videos.
Step3: If you want to apply any effect on your audio, drag the effect and drop it above your video in the timeline. A yellow symbol will appear on the video file, indicating that the effect has been applied to your audio.
Step4: Now play the video, and you will see that the audio effect has been applied to your voice, and it sounds a lot different.
Conclusion
So, these are the three different methods using which you can easily change your voice in Filmora. As discussed earlier, Filmora is free to download, and you can try all of its features without paying anything. Also, it has a very intuitive interface that is easy to adopt for anyone, even if you are a newbie and don’t have any prior video editing experience. So, make sure to give it a try. You can easily download it from the official website of Filmora.
Shanoon Cox
Shanoon Cox is a writer and a lover of all things video.
Follow @Shanoon Cox
“Enhancing Presentations with Sound: In-Depth Techniques for Recording Audio in PowerPoint on PC/Mac Platforms”
Pandemic times have bought us very close to technology and the computerized world. We used various tools and software, we also learned about much new software in this time. We even came across some amazing features of tools that we have been using since our childhood. One best example of this scenario is PowerPoint.
We have been working on PowerPoint, making slides for a long time, but we recently came across the PowerPoint record audio feature. This is the most helpful feature one could imagine. When you cannot express yourself and your point in words, then the use of this PowerPoint voice recording feature jumps in. Stay with us to learn more about audio recording on PowerPoint.
In this article
01 How to Record Audio on PowerPoint in Windows?
02 How to Record Audio on PowerPoint in Mac?
03 7 PowerPoint Presentation Tips to Make Creative Slideshows
Part 1: How to Record Audio on PowerPoint in Windows?
Powerpoint is a presentation-based program. The Microsoft Office product is available for both Windows and macOS. PowerPoint is mostly used in offices for demonstration purposes. It is widely used by teachers to deliver their lectures. With record voice-over PowerPoint, its users can make better presentations.
A question arises here that how to record audio in PowerPoint presentations? If this same question is riding on your mind, then the wait is over. Let us share the steps that should be followed to record audio on PowerPoint in Windows.
Step 1: Firstly, you should open PowerPoint and add a blank slide to record voice-over PowerPoint. You can also record any old presentation by opening the slide where you plan to record audio.

Step 2: then, from the top menu bar, you are requested to head over to the ‘Insert’ section. From the Insert section, select the ‘Media’ option visible at the extreme right side.

Step 3: The Media offers 3 further options. Among those options, you have to hit the ‘Audio’ option. This will open a drop-down from where you have to click on ‘Record Audio.’

Step 4: Now, a small window for Record Sound will show up. Here, set a name for your recording and hit the Record button to start the recording.

Step 5: Once you have completed the recording, click on the Stop button to end the recording and then hit the ‘Ok’ button to exit the recording window.

Step 6: At the end, a speaker icon will appear on the screen. When you hover on that icon, it will show the option to play the recording. You can adjust the speaker icon on the slide, and lastly, save your changes to PowerPoint.

Part 2: How to Record Audio on PowerPoint in Mac?
As mentioned earlier, PowerPoint is available for both Windows and macOS, so how can we forget about Mac users? This section of the article will be talking about how to record audio on a PowerPoint Mac. If you are a Mac user and you plan to learn about this, then the following section is for you. By following the steps below, you can record audio on Powerpoint in Mac.
Step 1: Firstly, open PowerPoint and create a new presentation to record voice-over PowerPoint in Mac. You can also import any file from your Mac to PowerPoint for audio recording.

Step 2: After that, you have to open the slide where you want to record the audio. Then from the menu bar at the top, navigate to the ‘Insert’ section. In the Insert section, there will be an ‘Audio’ tab. Tap on it and then select the ‘Record Audio’ option.

Step 3: At this point, a Record Audio panel will show up on the right side of the screen. From that panel, click on the ‘Record’ button to start the recording.

Step 4: After you have completed the recording, hit the ‘Stop’ button. Now, PowerPoint will ask you to either Insert or Discard the audio. Upon clicking on ‘Insert,’ a speaker icon will pop up on the screen. You can listen to your recording from that speaker icon.

Part 3: 7 PowerPoint Presentation Tips to Make Creative Slideshows
Now that all the Windows and Mac users are satisfied after learning about PowerPoint voice recording, it’s the perfect time to share some very useful tips. In the coming part, we are going to share 7 tips that will aid in making creative slideshows.
1. Minimalism
The most crucial tip when it comes to making creative slides is the amount of information. It is said that ‘Less is More.’ While making your slides, you should always add less information to the slides, and you should speak more.
The slides must contain minimal data. Too many wordy slides look boring, and they can never sustain your audiences’ interest. So, it is best suggested to add less and make your slides neat and spacious.
2. Use Design Elements
Adding stock images and background images is a very common trend for making slides. A tip that will make your slides unique and equally attractive is design elements. Choosing a bold color for the background and then adding elements to it makes them shine. The elements dominate on a strong colored background. Images can never be this dominating or expressive.
Also, changing the common trends will make your presentation different and classic as compared to regularly designed slides.
3. One Story at a Time
A very common mistake that people generally make because they are unaware of it is the content. The best practice for quality presentation slides is to add and discuss one story per slide. You should never confuse your audience by sharing multiple things from the same slide.
If you plan to discuss various things, then make separate slides for each story. This way, the audience gets sufficient time to digest and understand one story before moving on to another.
4. Alignment and Symmetry
While making your slides, one key factor that can either make or break your presentation is consistency and alignment. You should never present a rough slide. Always align the text, images, and headings of your slides. Symmetry and consistency are also very important. Follow the same consistent pattern in all slides.
5. Formatting and Settings
Making your slides creative doesn’t mean making them like a rainbow. Simplicity has its own magic and grace. The more your slide is simple and clean, the more readable it is. You should always keep simple colors for text and headings.
Playing with different fonts and styles for headings might also disturb your presentation visually. Selecting the correct font size, style with appropriate colors is essential.
6. Add and Adjust
Always follow the ‘Add and Adjust’ policy. You should never throw data and elements on the slides and present them. The best practice is to add the content, the images and then adjust everything. You should always arrange the text in bullets with proper headings.
For the case of an image, you should add it, inspect it and if needed, crop it. Adding things with perfection makes your presentation stand out and shine differently.
7. Animation
Static slides are too mainstream for today’s fast world. The last tip to make creative slides that can retain your audiences’ attention is animation. By adding a few animated elements to your presentation makes it look classy and quirky. With animation, you can also maintain the interest of your audience.
Last Words
The article has discussed in detail that how someone could record a voice-over PowerPoint. A complete step-by-step guideline has been shared for both Mac and Windows users on audio recording with PowerPoint. We also talked about 7 tips that will surely improve the quality of your slides.
By using the right and effective tool, you can still make creative slides without bothering to follow any tips. Such a tool is Filmora by Wondershare. This is an all-in-one video editing software. With Filmora, you can make the perfect video slideshow by adding multiple images.
You can collectively import images from your device to Filmora, or else you can also take things from its stock library. Filmora also has a wide range of editing effects, filters, and transitions that can make your content aesthetic and perfect.
Versatile Video Editor - Wondershare Filmora
An easy yet powerful editor
Numerous effects to choose from
Detailed tutorials provided by the official channel
02 How to Record Audio on PowerPoint in Mac?
03 7 PowerPoint Presentation Tips to Make Creative Slideshows
Part 1: How to Record Audio on PowerPoint in Windows?
Powerpoint is a presentation-based program. The Microsoft Office product is available for both Windows and macOS. PowerPoint is mostly used in offices for demonstration purposes. It is widely used by teachers to deliver their lectures. With record voice-over PowerPoint, its users can make better presentations.
A question arises here that how to record audio in PowerPoint presentations? If this same question is riding on your mind, then the wait is over. Let us share the steps that should be followed to record audio on PowerPoint in Windows.
Step 1: Firstly, you should open PowerPoint and add a blank slide to record voice-over PowerPoint. You can also record any old presentation by opening the slide where you plan to record audio.
Step 2: then, from the top menu bar, you are requested to head over to the ‘Insert’ section. From the Insert section, select the ‘Media’ option visible at the extreme right side.
Step 3: The Media offers 3 further options. Among those options, you have to hit the ‘Audio’ option. This will open a drop-down from where you have to click on ‘Record Audio.’
Step 4: Now, a small window for Record Sound will show up. Here, set a name for your recording and hit the Record button to start the recording.
Step 5: Once you have completed the recording, click on the Stop button to end the recording and then hit the ‘Ok’ button to exit the recording window.
Step 6: At the end, a speaker icon will appear on the screen. When you hover on that icon, it will show the option to play the recording. You can adjust the speaker icon on the slide, and lastly, save your changes to PowerPoint.
Part 2: How to Record Audio on PowerPoint in Mac?
As mentioned earlier, PowerPoint is available for both Windows and macOS, so how can we forget about Mac users? This section of the article will be talking about how to record audio on a PowerPoint Mac. If you are a Mac user and you plan to learn about this, then the following section is for you. By following the steps below, you can record audio on Powerpoint in Mac.
Step 1: Firstly, open PowerPoint and create a new presentation to record voice-over PowerPoint in Mac. You can also import any file from your Mac to PowerPoint for audio recording.
Step 2: After that, you have to open the slide where you want to record the audio. Then from the menu bar at the top, navigate to the ‘Insert’ section. In the Insert section, there will be an ‘Audio’ tab. Tap on it and then select the ‘Record Audio’ option.
Step 3: At this point, a Record Audio panel will show up on the right side of the screen. From that panel, click on the ‘Record’ button to start the recording.
Step 4: After you have completed the recording, hit the ‘Stop’ button. Now, PowerPoint will ask you to either Insert or Discard the audio. Upon clicking on ‘Insert,’ a speaker icon will pop up on the screen. You can listen to your recording from that speaker icon.
Part 3: 7 PowerPoint Presentation Tips to Make Creative Slideshows
Now that all the Windows and Mac users are satisfied after learning about PowerPoint voice recording, it’s the perfect time to share some very useful tips. In the coming part, we are going to share 7 tips that will aid in making creative slideshows.
1. Minimalism
The most crucial tip when it comes to making creative slides is the amount of information. It is said that ‘Less is More.’ While making your slides, you should always add less information to the slides, and you should speak more.
The slides must contain minimal data. Too many wordy slides look boring, and they can never sustain your audiences’ interest. So, it is best suggested to add less and make your slides neat and spacious.
2. Use Design Elements
Adding stock images and background images is a very common trend for making slides. A tip that will make your slides unique and equally attractive is design elements. Choosing a bold color for the background and then adding elements to it makes them shine. The elements dominate on a strong colored background. Images can never be this dominating or expressive.
Also, changing the common trends will make your presentation different and classic as compared to regularly designed slides.
3. One Story at a Time
A very common mistake that people generally make because they are unaware of it is the content. The best practice for quality presentation slides is to add and discuss one story per slide. You should never confuse your audience by sharing multiple things from the same slide.
If you plan to discuss various things, then make separate slides for each story. This way, the audience gets sufficient time to digest and understand one story before moving on to another.
4. Alignment and Symmetry
While making your slides, one key factor that can either make or break your presentation is consistency and alignment. You should never present a rough slide. Always align the text, images, and headings of your slides. Symmetry and consistency are also very important. Follow the same consistent pattern in all slides.
5. Formatting and Settings
Making your slides creative doesn’t mean making them like a rainbow. Simplicity has its own magic and grace. The more your slide is simple and clean, the more readable it is. You should always keep simple colors for text and headings.
Playing with different fonts and styles for headings might also disturb your presentation visually. Selecting the correct font size, style with appropriate colors is essential.
6. Add and Adjust
Always follow the ‘Add and Adjust’ policy. You should never throw data and elements on the slides and present them. The best practice is to add the content, the images and then adjust everything. You should always arrange the text in bullets with proper headings.
For the case of an image, you should add it, inspect it and if needed, crop it. Adding things with perfection makes your presentation stand out and shine differently.
7. Animation
Static slides are too mainstream for today’s fast world. The last tip to make creative slides that can retain your audiences’ attention is animation. By adding a few animated elements to your presentation makes it look classy and quirky. With animation, you can also maintain the interest of your audience.
Last Words
The article has discussed in detail that how someone could record a voice-over PowerPoint. A complete step-by-step guideline has been shared for both Mac and Windows users on audio recording with PowerPoint. We also talked about 7 tips that will surely improve the quality of your slides.
By using the right and effective tool, you can still make creative slides without bothering to follow any tips. Such a tool is Filmora by Wondershare. This is an all-in-one video editing software. With Filmora, you can make the perfect video slideshow by adding multiple images.
You can collectively import images from your device to Filmora, or else you can also take things from its stock library. Filmora also has a wide range of editing effects, filters, and transitions that can make your content aesthetic and perfect.
Versatile Video Editor - Wondershare Filmora
An easy yet powerful editor
Numerous effects to choose from
Detailed tutorials provided by the official channel
“Best 13 No-Cost Digital Audio Recording Apps Available on Windows & macOS [2023 Edition]”
13 Free Music Production Software for Windows/Mac/Online

Benjamin Arango
Mar 27, 2024• Proven solutions
13 Free Music Production Software for Windows/Mac/Online
Technology advances have spread through all fields of human activity, including music recording and development. The invention of music development tools has made it simpler for people engaged in the creation of music in one form or another.
Numerous applications for music development are on the market, and some are meant for musicians, and others are for educators and teachers. There is also a need to direct prospective customers to the right free music production software.
A comprehensive analysis of some of the best music development tools has been conducted to help you make the correct decision while you’re ready to purchase the app. This comprehensive Music Production Software Guide will provide solutions to many of your unanswered questions relating to the purchase of music production software.
- Part 1: Free Music Production Software for Windows
- Part 2: Free Music Production Software for Mac
- Part 3: Free Music Production Software Online
Part 1: Free Music Production Software for Windows
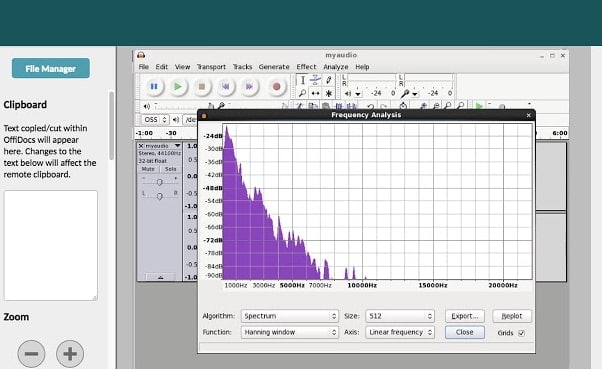
1. Audacity
The system for music development is not complete without an audio editor. Audacity is the best free music creation software available on the market. Audacity is open-source and extensive and provides a wide range of tools and effects for performing all audio editing and recording activities. It is created by a community of volunteers and provides regular notifications almost every month. It’s lightweight, safe, and intuitive enough to be used by novice music makers.
Pros
- It is open-source
- It can load VST plugins
Cons
- Only 32-bit plugins are allowed
- Limited features
2. Ardour
Ardour is a highly integrated program of music production that allows users to record and edit on Mac, Linux, and Windows operating systems. Ardour Music Production Software was created by integrating the efforts of the world’s skilled team, such as recording technicians, programmers, and musicians. Such experienced technicians make their concerted and thorough efforts to build the program. Ardour is one of the few applications in music production that respects honesty. The accessibility of this program allows app developers to concentrate on functionality that matters to consumers rather than to construct compelling apps for advertising purposes. This is a system that should be celebrated for its user-focused functionality.
Pros
- It has excellent user-friendliness
- It is available on Mac, Linux, and Windows
Cons
- It lacks a few integral features
- It is difficult to operate for people new to audio editing

3. Tracktion T7
The people at Tracktion seem to have reached a reasonably canny business model by launching older DAW versions for free and without anything removed.
The convention appears to make it possible to access the edition without charge of two iterations before the new one. You will not be provided with all new functionality, but you will receive an update every time the company updates its flagship DAW, which it does nearly every year.
The growing section is adjustable to match the workflow, and the bottom panel adjusts so that any parameters anywhere on the screen can be seen.
Pros
- It features an unlimited number of audio and MIDI tracks
- It is able to host multiple plugin formats
Cons
- It doesn’t provide all the features at once
- It does not support many plugins
4. LMMS
LMMS is a fully free music production software for windows for music development. It is an open-source and also a project platform for the community. LMMS is a cross-platform device app. It makes it easier to manufacture beats, particularly when many music production professionals have to manufacture quality music with their computers.
Thanks to the powerful sample, beat and melody design, mixing and synthetic sound processes, and many other features, the LMMS music production software provides high-quality audio output. The product also features playback tools, plugins, and samples to produce powerful, high-quality sound.
Pros
- It is compatible with Linux, Windows, and Mac
- Hydrogen project files and MIDI can be imported easily for editing
Cons
- It eats a lot of memory and requires a high-end device to support it
- Some users complained that understanding its working is difficult

5. Cakewalk
This is an exciting app for music production to purchase. It is a fantastic tech to invest in music production. Cakewalk Sonar Artist Software is one of Cakewalk Sonar Artist ‘s great productions. Cakewalk is known for an excellent GUI, an excellent mixing console, an excellent commercial radio system, and limitless MIDI tracks.
A good device to use as part of your instruments for the development of music is the Cakewalk Sonar Artist Music Production program. It stands out as a program packed with excellent features amongst its counterparts. And the app is unmatched in the area of apps.
Pros
- You can share music compilation directly to social media
- You can easily add effects to your tracks
Cons
- It is priced, very high
- One window interface makes it hectic

6. Music Maker by Magix
This app is a special program for sound engineers, skilled musicians, and accomplished music producers, developed by US Magix Entertainment. It offers an excellent forum for creative music development in music production professionals.
In reality, the software for music production is excellent software for the Music Maker by Magix. In the field of music post-production and music mastering, mixing and arrangement, recording, and more, the software achieved remarkable breakthroughs. Thanks to the successful combination of a technical device and highly flexible workflow, the Music Maker by Magix has achieved this groundbreaking success.
With creative algorithm and superb plugin effects, the Music Maker by Magix program enables music manufacturers to develop their ideas in line with the highest quality in this industry.
Pros
- It is great for EDM producers
Cons
- It is not suitable for newbies
- The GUI feels a bit cluttered
Part 2: Free Music Production Software for Mac
7. Garageband
This is a music development studio app that is designed to function on Mac. It is a great free music production software for Mac. This software has a full sound collection, which includes virtual instruments, voice, and guitar preset.
GarageBand is a well-known app for music development and is an excellent tool for music beginners. Many people have chosen GarageBand because it does not match the ease and ease of use for recording purposes in particular.
The user-friendly interface makes you easy to create music with a more unobstructed view of what you’re recording. Apps from GarageBand captured the attention of others because of their ease-to-use and user-friendliness.
Pros
- The software offers some nicely packaged preset for vocal and guitar recording
- Productive workflow
Cons
- It has limited plugins
- It is only supported for Mac platforms

8. Ableton Live
The Ableton Live 10 Suite is a dynamic and comprehensive program for the creation and performance of musical recordings.
An essential feature of this software is that it allows you to work on your time-based workflow without affecting the live session. This means that the software gives you a rare chance to get involved with the workflow without stopping live performance.
The Multitrack Recording Technology of Ableton Live10 Suite allows music producers to adjust the speed and pacing of any audio during the recording. To make these adjustments, you don’t have to pause the recording. This is one of the striking characteristics which makes this product a good option for all.
Pros
- Adjusting the speed and pace of audio is a delight
- Sophisticated MIDI/audio routing capabilities
Cons
- It has a traditional design
- Not enough updates to fix the buggy features

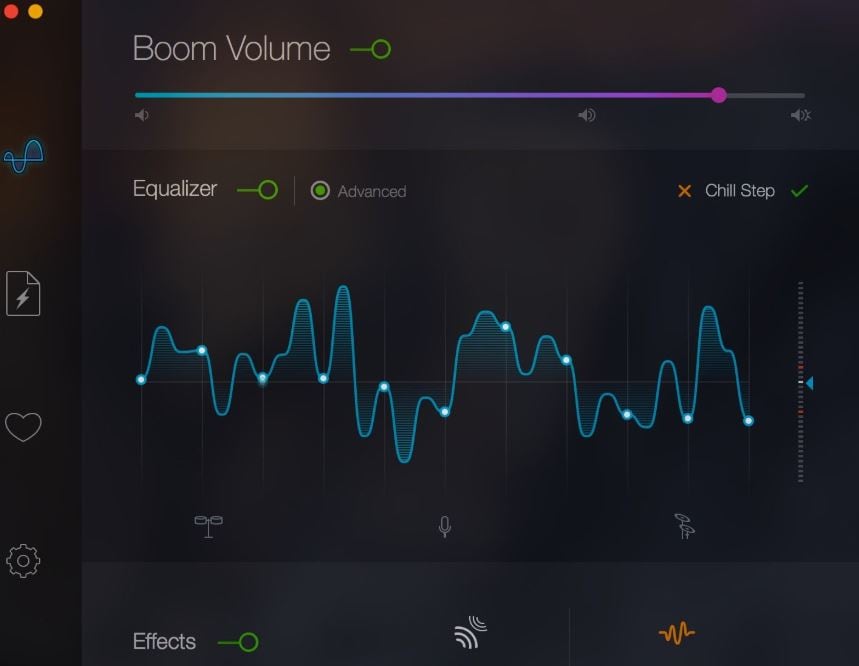
9. Boom 3D
Boom 3D for Mac & Windows is an award-winning pro sound improvement software designed to play your media content on any and all of your devices, phones, or streaming services with amazing 3D effects. No costly headphones or sound boosters will be needed to make your music feel like it! Designed in a new immersive 3D surround sound technology, Boom 3D redefines how people listen to music, watch films, or play games with some headphones on their devices. 3D sound provides the option to check the LFE (subwoofer), and the audio intensity of each Virtual 3D Surround audio system speaker.
Pros
- It comes with loads of content
- Audio quality can be enhanced
Cons
- The design is not suitable for everybody
- It does not have a Linux version
10. Mixxx
For beginners, Mixxx is just another great device. This is also one of the best free music production software downloads for your music. This software supports all Mac, Windows, and Linux platforms.
The application provides you with a DJ-mixing environment and supports all standard formats such as Mp3 and many other formats.
Pros
- It is a great app for beginners
- Supported by Mac, Windows, and Linux
Cons
- It doesn’t support many plugins
- GUI isn’t that great

Part 3: Free Music Production Software Online
11. Soundation
Soundation is a platform that provides free music production software online only capabilities. The free version and three paid versions are offered. You can use this to build your tracks unless you have the resources to do so if you need a web-based music maker and editor.
If you pay, even after you have made your music, you can always cancel. Remember first to save them to your hard drive. If you need paid characteristics, pay for the monthly plan again through PayPal, and you have to use it for a month.
Pros
- Great SSL-modelled mixer
- You can use its devices as a plugin
Cons
- It works only online

12. Audiotool
Audiotool is a popular app for music production hosted online and can be used without installation from inside your browser. It uses a cloud-based network to store all your music and files wherever you are. It is also confirmed that you will share music and tracks directly with YouTube, SoundCloud, and Facebook on its own publishing site. They have premium releases from Loopmasters and some fantastic online VSTs, for example, Heisenberg, Machiniste, Bassline, and Beatbox 8 & 9.
Pros
- No installation needed
- You can directly share it to your social media
Cons
- It works only online
- No upgrades

13. Soundtrap
Soundtrap is not only an online music studio but a training site for students and instructors. The STEAM Curriculum is an online learning resource that helps students to follow music and podcasts, incorporated into the Web app. As we mentioned earlier, in addition to the online Web App, you can also use it on different devices, share it with other users, and work in innovative projects for your music.
The interface is simple, easy to use, and easy to understand. It is simply an instrument for innovation; you don’t have to learn how to apply VST or any other technical elements to music creation. You can also record your MIDI instruments directly from your machine or device’s mic.
Pros
- It provides a great platform for teachers to teach their students
- It is very easy to use
Cons
- It only has a limited number of plugins
- It cannot be used professionally

Conclusion
If you make music on a computer, the most important resource in your artistic arsenal is your DAW; in your home recording system, you ‘re probably going to have the MIDI keyboard, audio interface, studio monitor speakers, and maybe a microphone or two. But your program is at the core of it all. Not everyone can afford expensive DAWs, but one must not worry as free music production software are present to aid us.
It is important to have a DAW with which you are pleased and, perhaps more importantly, a DAW, which allows you to turn your ideas into music as quickly and painlessly as possible. So make sure you choose the best one for you according to your needs. Hopefully, this guide will aid you!

Benjamin Arango
Benjamin Arango is a writer and a lover of all things video.
Follow @Benjamin Arango
Benjamin Arango
Mar 27, 2024• Proven solutions
13 Free Music Production Software for Windows/Mac/Online
Technology advances have spread through all fields of human activity, including music recording and development. The invention of music development tools has made it simpler for people engaged in the creation of music in one form or another.
Numerous applications for music development are on the market, and some are meant for musicians, and others are for educators and teachers. There is also a need to direct prospective customers to the right free music production software.
A comprehensive analysis of some of the best music development tools has been conducted to help you make the correct decision while you’re ready to purchase the app. This comprehensive Music Production Software Guide will provide solutions to many of your unanswered questions relating to the purchase of music production software.
- Part 1: Free Music Production Software for Windows
- Part 2: Free Music Production Software for Mac
- Part 3: Free Music Production Software Online
Part 1: Free Music Production Software for Windows
1. Audacity
The system for music development is not complete without an audio editor. Audacity is the best free music creation software available on the market. Audacity is open-source and extensive and provides a wide range of tools and effects for performing all audio editing and recording activities. It is created by a community of volunteers and provides regular notifications almost every month. It’s lightweight, safe, and intuitive enough to be used by novice music makers.
Pros
- It is open-source
- It can load VST plugins
Cons
- Only 32-bit plugins are allowed
- Limited features
2. Ardour
Ardour is a highly integrated program of music production that allows users to record and edit on Mac, Linux, and Windows operating systems. Ardour Music Production Software was created by integrating the efforts of the world’s skilled team, such as recording technicians, programmers, and musicians. Such experienced technicians make their concerted and thorough efforts to build the program. Ardour is one of the few applications in music production that respects honesty. The accessibility of this program allows app developers to concentrate on functionality that matters to consumers rather than to construct compelling apps for advertising purposes. This is a system that should be celebrated for its user-focused functionality.
Pros
- It has excellent user-friendliness
- It is available on Mac, Linux, and Windows
Cons
- It lacks a few integral features
- It is difficult to operate for people new to audio editing
3. Tracktion T7
The people at Tracktion seem to have reached a reasonably canny business model by launching older DAW versions for free and without anything removed.
The convention appears to make it possible to access the edition without charge of two iterations before the new one. You will not be provided with all new functionality, but you will receive an update every time the company updates its flagship DAW, which it does nearly every year.
The growing section is adjustable to match the workflow, and the bottom panel adjusts so that any parameters anywhere on the screen can be seen.
Pros
- It features an unlimited number of audio and MIDI tracks
- It is able to host multiple plugin formats
Cons
- It doesn’t provide all the features at once
- It does not support many plugins
4. LMMS
LMMS is a fully free music production software for windows for music development. It is an open-source and also a project platform for the community. LMMS is a cross-platform device app. It makes it easier to manufacture beats, particularly when many music production professionals have to manufacture quality music with their computers.
Thanks to the powerful sample, beat and melody design, mixing and synthetic sound processes, and many other features, the LMMS music production software provides high-quality audio output. The product also features playback tools, plugins, and samples to produce powerful, high-quality sound.
Pros
- It is compatible with Linux, Windows, and Mac
- Hydrogen project files and MIDI can be imported easily for editing
Cons
- It eats a lot of memory and requires a high-end device to support it
- Some users complained that understanding its working is difficult
5. Cakewalk
This is an exciting app for music production to purchase. It is a fantastic tech to invest in music production. Cakewalk Sonar Artist Software is one of Cakewalk Sonar Artist ‘s great productions. Cakewalk is known for an excellent GUI, an excellent mixing console, an excellent commercial radio system, and limitless MIDI tracks.
A good device to use as part of your instruments for the development of music is the Cakewalk Sonar Artist Music Production program. It stands out as a program packed with excellent features amongst its counterparts. And the app is unmatched in the area of apps.
Pros
- You can share music compilation directly to social media
- You can easily add effects to your tracks
Cons
- It is priced, very high
- One window interface makes it hectic
6. Music Maker by Magix
This app is a special program for sound engineers, skilled musicians, and accomplished music producers, developed by US Magix Entertainment. It offers an excellent forum for creative music development in music production professionals.
In reality, the software for music production is excellent software for the Music Maker by Magix. In the field of music post-production and music mastering, mixing and arrangement, recording, and more, the software achieved remarkable breakthroughs. Thanks to the successful combination of a technical device and highly flexible workflow, the Music Maker by Magix has achieved this groundbreaking success.
With creative algorithm and superb plugin effects, the Music Maker by Magix program enables music manufacturers to develop their ideas in line with the highest quality in this industry.
Pros
- It is great for EDM producers
Cons
- It is not suitable for newbies
- The GUI feels a bit cluttered
Part 2: Free Music Production Software for Mac
7. Garageband
This is a music development studio app that is designed to function on Mac. It is a great free music production software for Mac. This software has a full sound collection, which includes virtual instruments, voice, and guitar preset.
GarageBand is a well-known app for music development and is an excellent tool for music beginners. Many people have chosen GarageBand because it does not match the ease and ease of use for recording purposes in particular.
The user-friendly interface makes you easy to create music with a more unobstructed view of what you’re recording. Apps from GarageBand captured the attention of others because of their ease-to-use and user-friendliness.
Pros
- The software offers some nicely packaged preset for vocal and guitar recording
- Productive workflow
Cons
- It has limited plugins
- It is only supported for Mac platforms
8. Ableton Live
The Ableton Live 10 Suite is a dynamic and comprehensive program for the creation and performance of musical recordings.
An essential feature of this software is that it allows you to work on your time-based workflow without affecting the live session. This means that the software gives you a rare chance to get involved with the workflow without stopping live performance.
The Multitrack Recording Technology of Ableton Live10 Suite allows music producers to adjust the speed and pacing of any audio during the recording. To make these adjustments, you don’t have to pause the recording. This is one of the striking characteristics which makes this product a good option for all.
Pros
- Adjusting the speed and pace of audio is a delight
- Sophisticated MIDI/audio routing capabilities
Cons
- It has a traditional design
- Not enough updates to fix the buggy features
9. Boom 3D
Boom 3D for Mac & Windows is an award-winning pro sound improvement software designed to play your media content on any and all of your devices, phones, or streaming services with amazing 3D effects. No costly headphones or sound boosters will be needed to make your music feel like it! Designed in a new immersive 3D surround sound technology, Boom 3D redefines how people listen to music, watch films, or play games with some headphones on their devices. 3D sound provides the option to check the LFE (subwoofer), and the audio intensity of each Virtual 3D Surround audio system speaker.
Pros
- It comes with loads of content
- Audio quality can be enhanced
Cons
- The design is not suitable for everybody
- It does not have a Linux version
10. Mixxx
For beginners, Mixxx is just another great device. This is also one of the best free music production software downloads for your music. This software supports all Mac, Windows, and Linux platforms.
The application provides you with a DJ-mixing environment and supports all standard formats such as Mp3 and many other formats.
Pros
- It is a great app for beginners
- Supported by Mac, Windows, and Linux
Cons
- It doesn’t support many plugins
- GUI isn’t that great
Part 3: Free Music Production Software Online
11. Soundation
Soundation is a platform that provides free music production software online only capabilities. The free version and three paid versions are offered. You can use this to build your tracks unless you have the resources to do so if you need a web-based music maker and editor.
If you pay, even after you have made your music, you can always cancel. Remember first to save them to your hard drive. If you need paid characteristics, pay for the monthly plan again through PayPal, and you have to use it for a month.
Pros
- Great SSL-modelled mixer
- You can use its devices as a plugin
Cons
- It works only online
12. Audiotool
Audiotool is a popular app for music production hosted online and can be used without installation from inside your browser. It uses a cloud-based network to store all your music and files wherever you are. It is also confirmed that you will share music and tracks directly with YouTube, SoundCloud, and Facebook on its own publishing site. They have premium releases from Loopmasters and some fantastic online VSTs, for example, Heisenberg, Machiniste, Bassline, and Beatbox 8 & 9.
Pros
- No installation needed
- You can directly share it to your social media
Cons
- It works only online
- No upgrades
13. Soundtrap
Soundtrap is not only an online music studio but a training site for students and instructors. The STEAM Curriculum is an online learning resource that helps students to follow music and podcasts, incorporated into the Web app. As we mentioned earlier, in addition to the online Web App, you can also use it on different devices, share it with other users, and work in innovative projects for your music.
The interface is simple, easy to use, and easy to understand. It is simply an instrument for innovation; you don’t have to learn how to apply VST or any other technical elements to music creation. You can also record your MIDI instruments directly from your machine or device’s mic.
Pros
- It provides a great platform for teachers to teach their students
- It is very easy to use
Cons
- It only has a limited number of plugins
- It cannot be used professionally
Conclusion
If you make music on a computer, the most important resource in your artistic arsenal is your DAW; in your home recording system, you ‘re probably going to have the MIDI keyboard, audio interface, studio monitor speakers, and maybe a microphone or two. But your program is at the core of it all. Not everyone can afford expensive DAWs, but one must not worry as free music production software are present to aid us.
It is important to have a DAW with which you are pleased and, perhaps more importantly, a DAW, which allows you to turn your ideas into music as quickly and painlessly as possible. So make sure you choose the best one for you according to your needs. Hopefully, this guide will aid you!
Benjamin Arango
Benjamin Arango is a writer and a lover of all things video.
Follow @Benjamin Arango
Also read:
- New Acoustic Mastery Techniques for Extracting Singers with Precision
- Updated 2024 Approved Prime 11 Mobile Audio Processing Software for Creatives
- Updated 2024 Approved Audio & Visual Fusion Cutting-Edge Ways to Sync Seamlessly Without Manual Efforts
- 2024 Approved Ode Omission Module Assemble Bespoke Musical Frameworks
- New Discovering the Best Animated Sounds A Curated List for Download for 2024
- Festive Soundtrack Mix for a Special Commemorative Film for 2024
- Updated A Beginners Primer on Professional Wave Editing Techniques and Tools
- New Top 7 Digital Tools for Seamless Audio Cutting and Editing
- Updated In 2024, Sonic Purification Best Practices for Quieting the Chatter Behind Video Streams
- Updated Essential Free Laughter Music Collections for Easy-to-Use Film and Media Projects
- New 2024 Approved Step-by-Step Method for Incorporating Music Into GIFs on a Mac Device
- How to Balance Your Stream Sound with OBS Audio Ducking, In 2024
- Updated In 2024, Peaceful Presentations Advanced Noise Reduction Methods in Adobe Premiere Pro Videos
- New The Insiders Guide to Preserving Your Spotify Collection in Local Formats for 2024
- Updated 2024 Approved Mastering Audio Extraction A Guide for Video Files on Windows, MacOS, and Mobile Devices
- The Silent Song Methods to Extract and Remove Vocal Tracks From Audio Sequences in Audacity for 2024
- Updated Finding Software that Simulates Varied Stomach Gas Emissions for 2024
- 2024 Approved Essential Pop Tunes Assortment for Enhancing Video Narratives with Dynamic Soundscapes
- 2024 Approved Vibrant Soundscapes 10 Melodies That Elevate Your Video Montages
- Updated In 2024, Advanced Audio Synchronization A Step-by-Step Guide to Keyframe Adjustments in Final Cut Pro X
- Updated Audio Enhancement in Your Windows Environment - Maximizing Sound on Budget
- 2024 Approved Digital Listening Made Simple Acquiring and Storing Online Broadcasts on Your PC
- In 2024, Advanced Methods for Silencing Background Music in Videos
- New 2024 Approved Skype Vocalizer Master the Art of Sound Alteration in Digital Calls
- Echoes of Error A Guide to Reestablishing Auditory Integrity Using Diverse Methods
- Updated 2024 Approved Premier Lyric Decoding Applications The Ultimate Guide
- New 2024 Approved Best Choices 8 Leading Audio Production Tools Transforming Todays Hip-Hop Genre
- New 2024 Approved The Easy-Path to Crafting Your Audio Book A Detailed Tutorial
- Updated 2024 Approved The Ultimate List of 8 Chromebook-Compatible Digital Audio Workstations for Composers and Producers
- New 2024 Approved Audio Wizardry with Windows 10 A Complete Tutorial for Professionals
- New In 2024, Unlock Free Vocal Manipulation Expertise with In-Depth Guide to Voice Editing via Filmora
- How To Enable USB Debugging on a Locked Honor X9b Phone
- In 2024, A Complete Guide To OEM Unlocking on Vivo V27
- In 2024, Easy Steps on How To Create a New Apple ID Account On Apple iPhone 14 Pro Max | Dr.fone
- 2024 Approved What Slideshow Templates Can Teach You About Aesthetic
- How to Change Google Play Location On Nokia 105 Classic | Dr.fone
- Best 10 Mock Location Apps Worth Trying On Xiaomi 14 Ultra | Dr.fone
- In 2024, How to Transfer Contacts from Oppo Reno 11 5G to Other Android Devices Using Bluetooth? | Dr.fone
- How To Restore Missing Contacts Files from Xiaomi Redmi A2+.
- In 2024, Lock Your Oppo Reno 11 Pro 5G Phone in Style The Top 5 Gesture Lock Screen Apps
- In 2024, Does Life360 Notify When You Log Out On Apple iPhone 7 Plus? | Dr.fone
- Updated Transform Your Videos How to Add Slow Motion Effects on Kapwing
- How to Screen Mirroring Samsung Galaxy A25 5G to PC? | Dr.fone
- In 2024, Mac Video Editors Similar to VSDC Top Picks
- Updated Make a Statement Top 10 Online Gaming Intro Creators for 2024
- How to Upgrade iPhone 12 Pro Max to the Latest iOS/iPadOS Version? | Dr.fone
- Title: New Voice Transformation Wizardry on a Budget Comprehensive Filmora Edition for Audio Customization for 2024
- Author: Kate
- Created at : 2024-05-05 08:14:49
- Updated at : 2024-05-06 08:14:49
- Link: https://audio-editing.techidaily.com/new-voice-transformation-wizardry-on-a-budget-comprehensive-filmora-edition-for-audio-customization-for-2024/
- License: This work is licensed under CC BY-NC-SA 4.0.
