
:max_bytes(150000):strip_icc():format(webp)/GettyImages-591408071-5bc7767d4cedfd0026a2ce3f.jpg)
New Top 10 FREE Speech-to-Text Apps for Android & iOS, for 2024
“Top 10 FREE Speech-to-Text Apps for Android & iOS, Updated 2023”
10+ Free Online Audio to Text Converters

Shanoon Cox
Mar 27, 2024• Proven solutions
An audio-to-text converter is a tool that can convert audio files to texts or even record any audio and produce the text of it simultaneously. Audio files are one of the most used methods of storing information. From online classes and long lectures to big business meetings and product information, audio is being shared a lot across the world.
But accessing information from a long audio file can be difficult and time-consuming, which is why there is a need to convert audio to text. Information in the form of text can easily be fully or partly accessed and edited whenever needed. And texts can also easily be shared with whomever you want.
So let’s have a look at some of the best audio-to-text converters that might be of use to you.


10+ Free Online Audio to Text Converters
There is number of audio text converters available in the online market that can help you while studying, researching, or even in your business. Some of these recorders can convert any audio file to texts while some others can record and convert to text at the same time. Here we will talk about the top 11 free applications that can be used to convert audio to text.
| 1 - Filmora | 2 - Audext | 3 - Sonix.ai |
|---|---|---|
| 4 - Virtualspeech.com | 5 - Speechnotes | 6 - SpeechTexter |
| 7 - Textfromtospeech.com | 8 - Dictation.io | 9 - Voice Note |
| 10 - Voice Notebook | 11 - NaturalReaders |
1. Wondershare Filmora
Filmora’s Speech To Text (STT) function allows you to transcript audio/voice to subtitles/text in one click. it can save your plenty of time on transcribing subtitles and boost your editing efficiency by applying speech-to-text.
What you need to do is download the software and subsribe for its plan.
Features
- Built-in function to transcribe subtitles and captions for your video
- High accuracy in generating text, allows you to edit text by yourself
- Supports up to 26 languages of transcription to engage more users all around the world
- Offers various tools for editing your videos and audio
2. Audext
Audext is a free online application that can help you to save a lot of time while transcribing any audio to text. The transcription to text is done with the use of an advanced AI and hence produces faster and more accurate results.
Audext is used by people from different sectors like education, marketing, media, consulting, healthcare, etc. for their work purposes.

Features
- An inbuilt editor for editing the text while transcribing
- Identifies the speaker easily
- Supports a variety of audio and video formats like MP3, WAV, MP4, etc.
- Offers an option of easy upload and export of files
Pricing
- Free
- Transcription costs for one hour are $12
- Or with the subscription $5
3. Sonix.ai
Sonix is a fast and accurate application that can be used to convert audio to text for any purpose. This application offers a 30-minute free transcription after which an affordable amount may be charged.
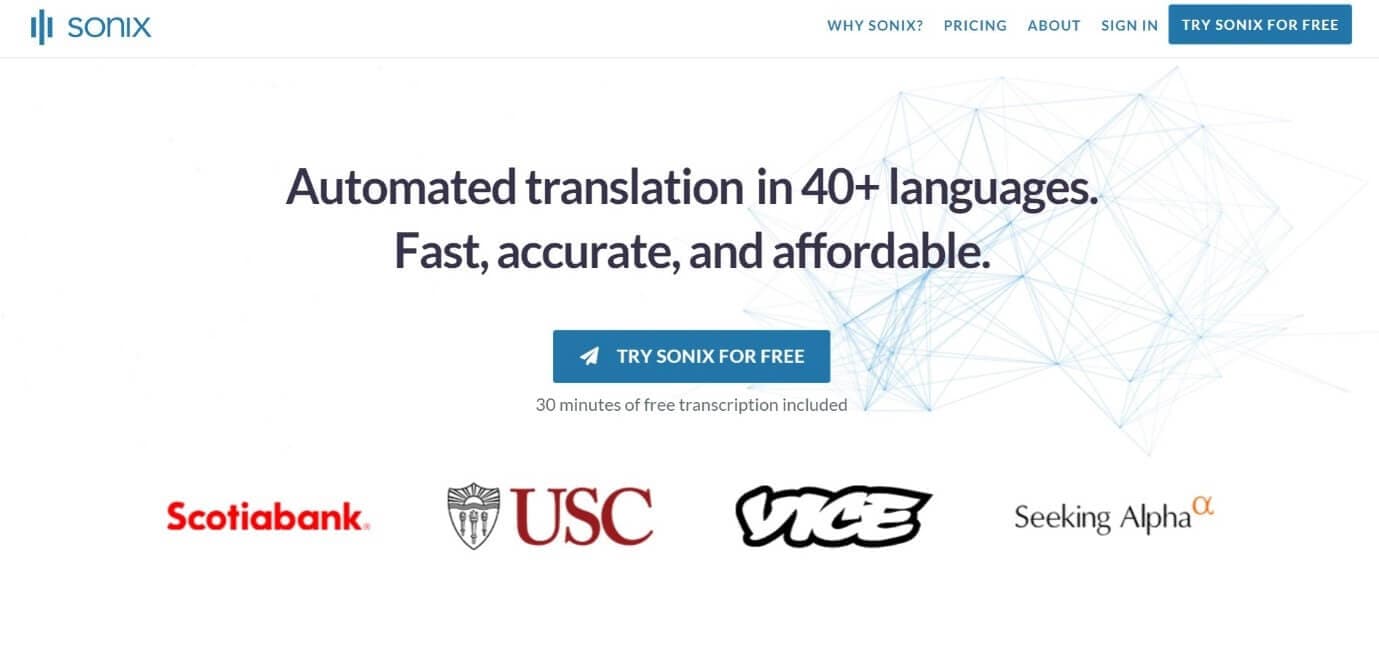
Features
- Automatic transcription of files and accessibility of these files from any device
- Advanced translation of these devices into 30 different languages
- Addition of subtitles into any video for easy understanding
- A Sonix media player that allows to share and publish files easily
Pricing
- Free
- Standard subscription - $10 per hour
- Premium subscription - $5 per hour, and an addition of $22 per month
4. Virtualspeech.com
Virtualspeech is an online tool that can transcribe audio to text free. It is a very simple application that allows fats conversion of audio files to texts. After conversion, the file will be emailed to the user from where it can be downloaded and saved.
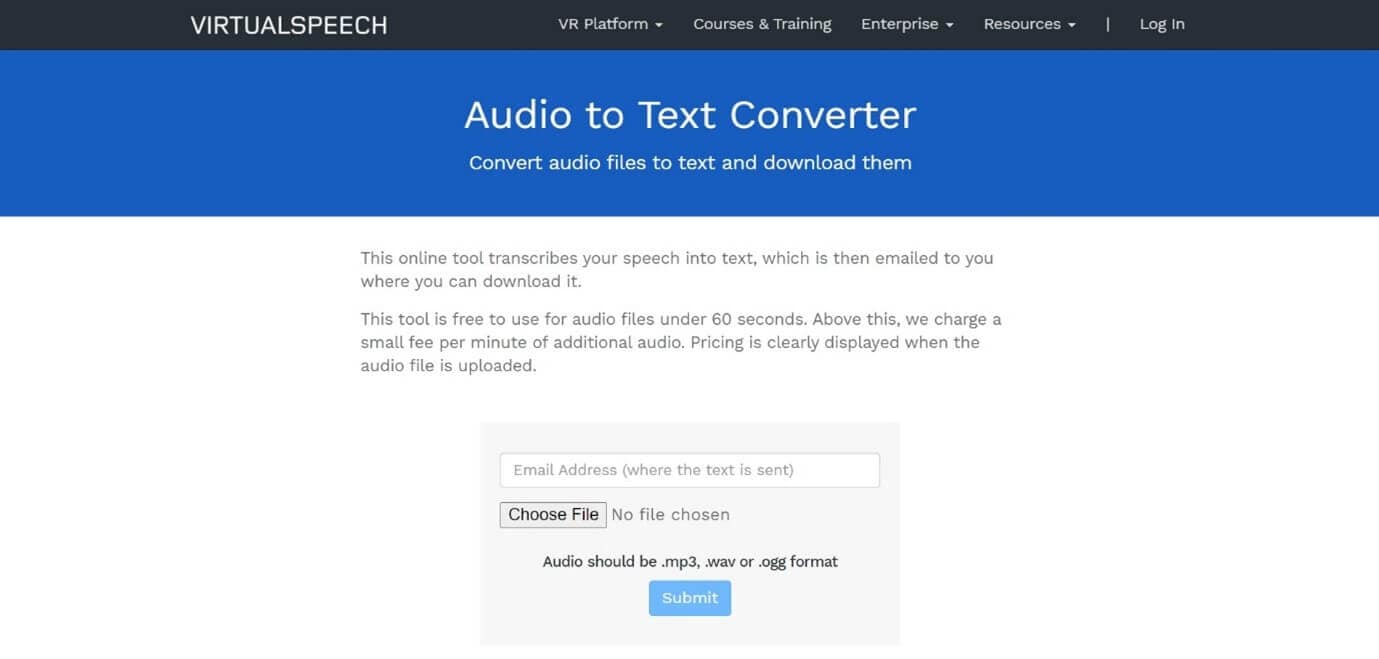
Features
- Free conversion of any audio files under 1 minute.
- Conversion of audio files of formats Mp3, Wav, or Ogg.
- Provides security as the no files are stored on the server and the site is secured with a b SSL
- Speech to text converter within the site
Pricing
- $0.50 per minute after the free minute

Filmora Audio to Text Converter
Filmora - Audio to Text Converter
• Enables you to convert video speech to text in one click
• Extremely accurate in video speech recognition
• Cross-platform supported - (Windows, Mac, iOS, Android)
Transcribe Audio to Text Free Transcribe Audio to Text Free Transcribe Audio to Text Free Learn More >
5. Speechnotes
Speechnotes is a powerful online notepad that can easily convert audio to text. This tool has implemented an efficient and clean design that makes conversion and editing very easy.
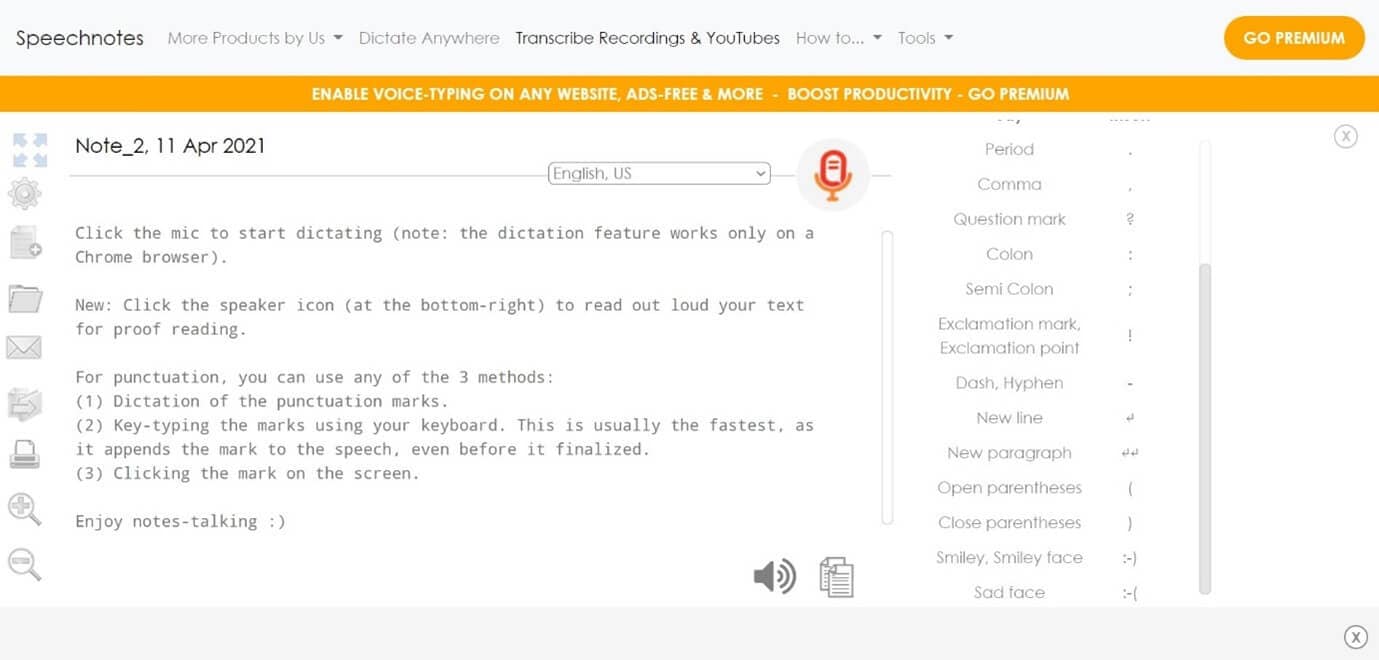
Features
- Best results with an advanced speech recognition technology
- Built-in tools that allow easy editing and correction of the converted text
- Fast working on any web browser and no installation apps required
- Autosave feature that ensures that your data is not lost
- Export to Google Drive option for easy accessibility from any device
Pricing
- Free
- Premium version with the addition of some extra features
6. SpeechTexter
SpeechTexter is a multilingual application that can help you transcribe any type of book, document, blog posts, etc. by using your audio. This tool has a custom dictionary that allows adding short commands for adding frequently used data like phone numbers, punctuation marks, addresses, etc.
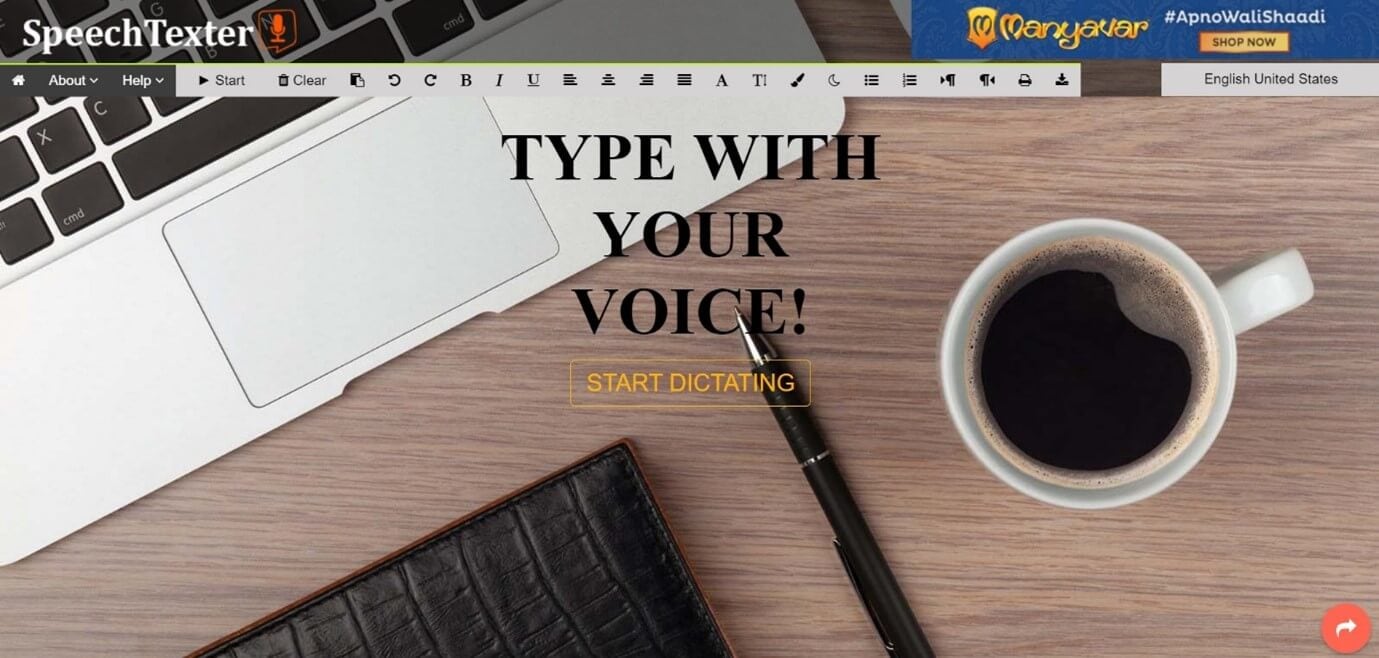
Features
- Offers accuracy rate of 90 to 95% percent
- Can be used to increase your fluency in English
- Offers powerful real-time speech recognition
- Easy creation of emails, text notes, blog posts, etc.
- A custom dictionary that can be customized according to the individual use
- Supports more than 60 languages
- Available on both chrome browser and android
Pricing
- Free
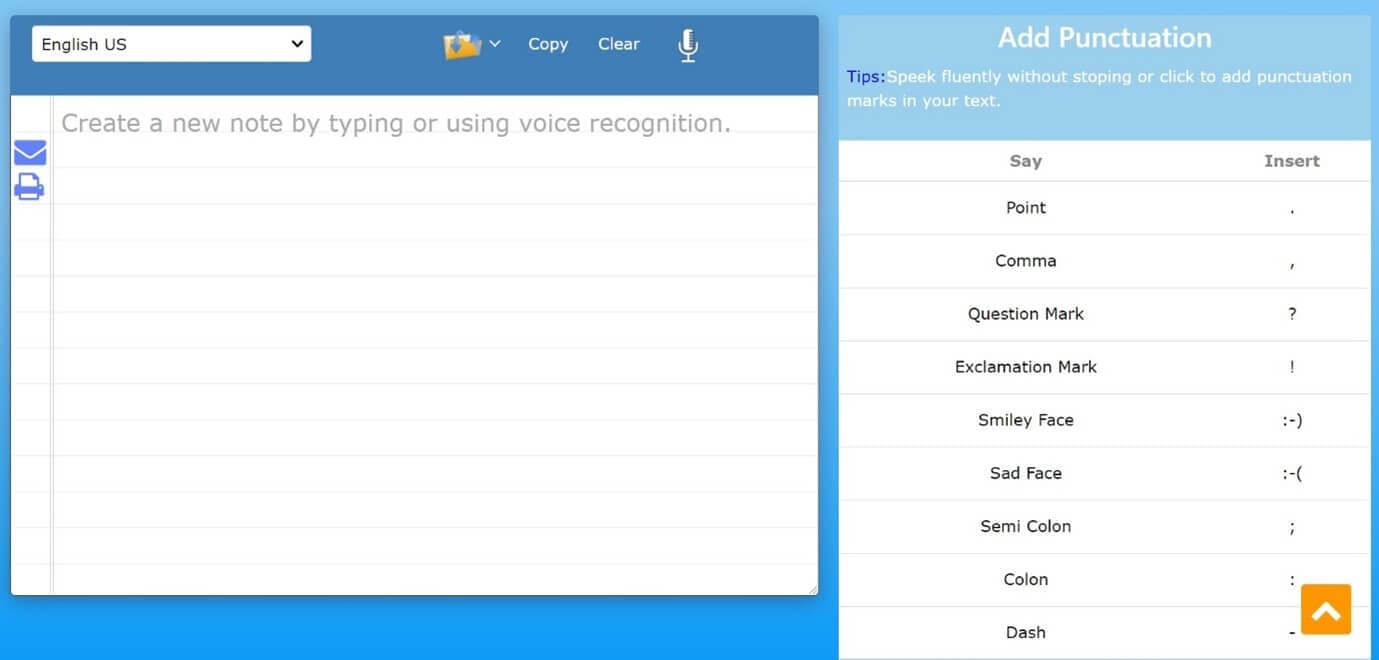
7. Textfromtospeech.com
Textfromtospeech is a free online tool that allows you to easily convert audio to text without the need for registration downloading or installation. It has a very simple interface that can record and convert your speech into text with a single click.
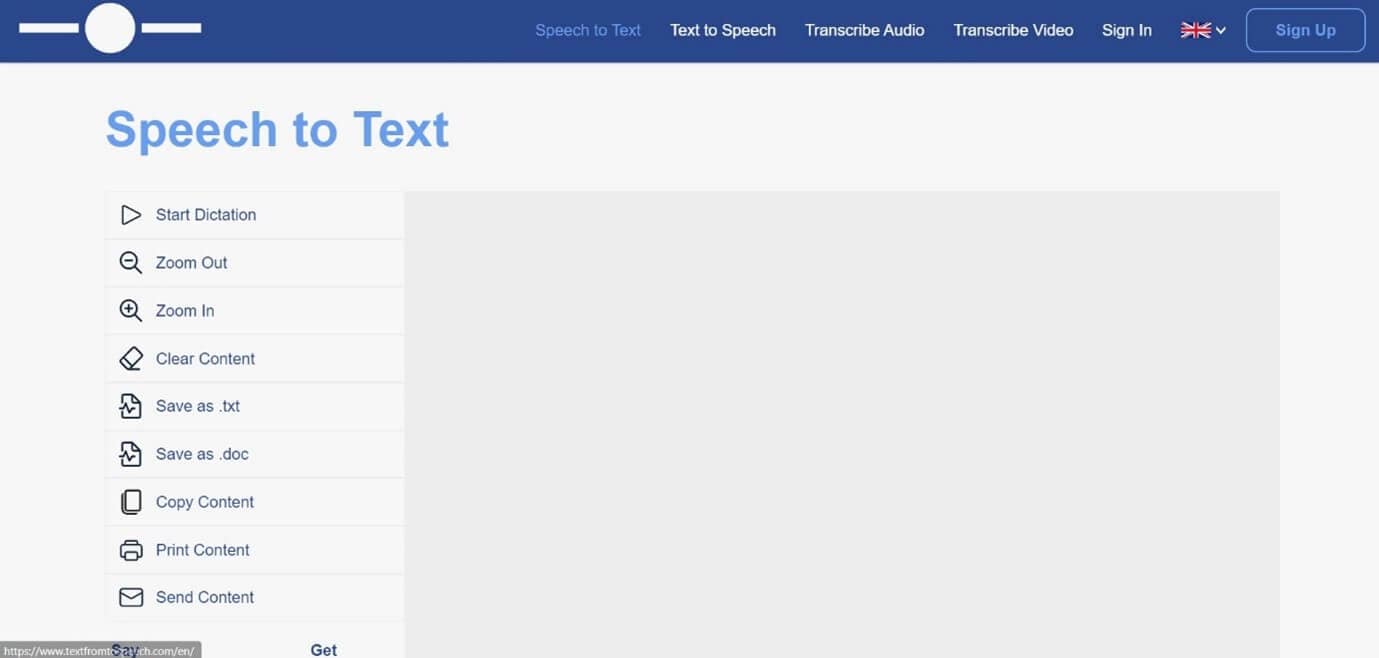
Features
- Free and online text recognition and transcription
- Supports many languages
- Pause and record option while converting large files
- Can use voice commands for insertion of symbols like “comma”, “full stop”, etc.
- Smart capitalization
- Easy saving, copying, and sharing of the dictated text
- Available on mobile devices, tablet, and computer
Pricing
- Free
![]()
A cross-platform for making videos anywhere for all creators

Why your video editing isn’t good enough? How about some creative inspo?
- 100 Million+ Users
- 150+ Countries and Regions
- 4 Million+ Social Media Followers
- 5 Million+ Stock Media for Use
* Secure Download

8. Dictation.io
Dictation is a free and simple tool that offers fast conversion of audio to text. Its interface is like that of a very simple notepad and allows the conversion of audio to text for a number of languages including English, Español, Français, Italiano, Português, and more.

Features
- Advanced speech recognition
- Easy editing within the notes
- Easy sharing to mail, tweets, etc.
- No storing of any data and hence offers the necessary security
Pricing
- Free
9. Voice Note
Voice Note is an online speech recognition tool that can automatically record and type anything including speech, interview, etc. This tool can convert any audio file into text format which can easily be opened in Microsoft Word.
Features
- No saving of data in any servers
- Customizable options for audio and text
- A number of languages to choose from while converting audio to text
- Easy copying and exporting options
- Direct Print option from the site
Price
- Free
10. Voice Notebook
Voice Notebook is a speech recognition app that can also convert audio files to text. This application is compatible with a wide range of devices like Mac, Windows, Linux OS, Android, and iOS.
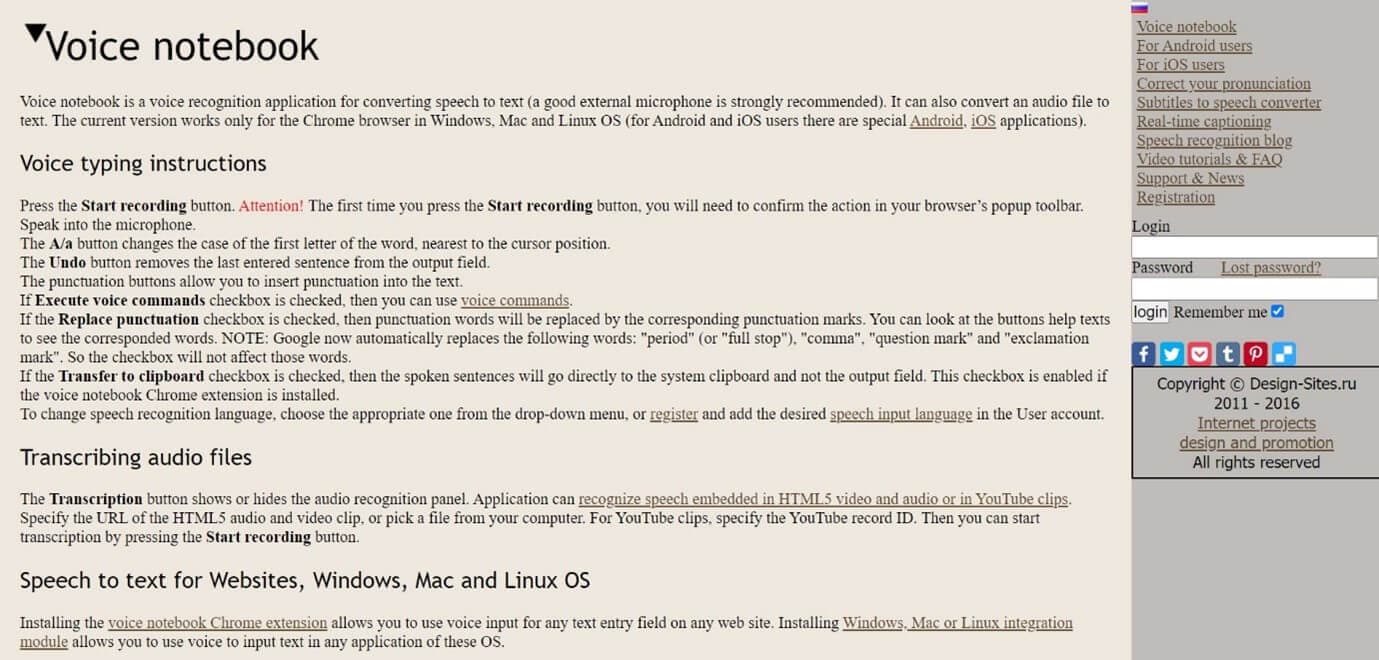
Features
- Voice commands are available when you transcribe audio to text
- Has the ability to recognize any speech embedded in YouTube clips or HTML5 audio or video
- Simple interface and easy editing of text
- An option to download into TXT format is available
Price
- Free
11. NaturalReaders
Natural Readers is a professional program that can convert any text into spoken words. This program offers a lot of features like adjusting the speed of audio, conversion into mp3, selection of voice, etc.
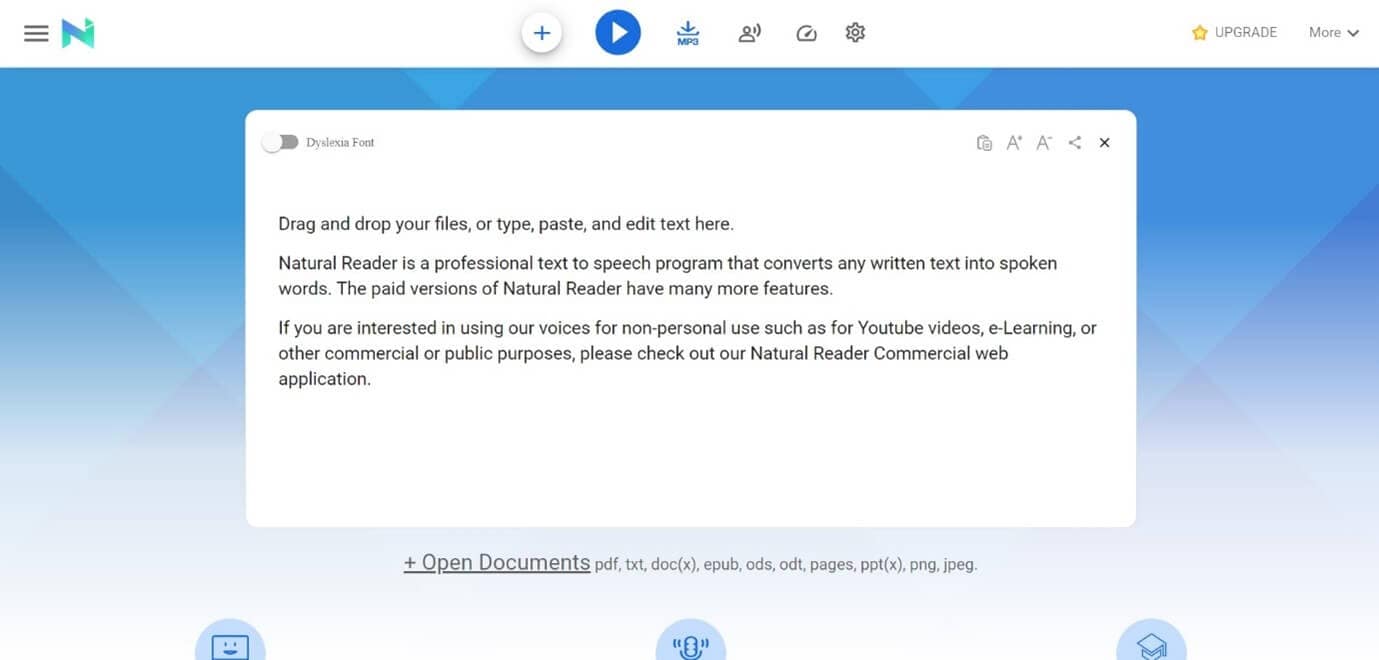
Features
- A font option available for dyslexic people
- Supports formats like pdf, txt, docs, epub, ods, ppt, png, jpeg
- App versions of this online tool are available both for android and apple devices
Pricing
- Free
- Premium plan - $9.99 per month, $59.88 per year
- Plus plan - $19.00 per month, $110.00 per year
Filmora Audio to Text Converter
Filmora - Audio to Text Converter
• Enables you to convert video speech to text in one click
• Extremely accurate in video speech recognition
• Cross-platform supported - (Windows, Mac, iOS, Android)
Transcribe Audio to Text Free Transcribe Audio to Text Free Transcribe Audio to Text Free Learn More >
Conclusion
We have listed above the top 11 tools that can be used to convert audio to text on any device using a browser. Converting audio to text allows you to easily access the required information, edit it, or even share it fully or partially with anyone you wish,
The applications we have listed are free and some of them might charge for the extra features they provide. So no matter what your profession is if you are looking for an app to convert audio to text or record and produce the text of the recordings, choose any one of the listed above applications.
We hope our suggestions help you reduce effort and save time. Please leave your valuable feedback in the comment box below, thank you.
Transform Long Videos into Short Ones Instantly
Turn long videos into viral clips. Effortlessly transform lengthy videos into engaging, shareable clips.

Shanoon Cox
Shanoon Cox is a writer and a lover of all things video.
Follow @Shanoon Cox
Shanoon Cox
Mar 27, 2024• Proven solutions
An audio-to-text converter is a tool that can convert audio files to texts or even record any audio and produce the text of it simultaneously. Audio files are one of the most used methods of storing information. From online classes and long lectures to big business meetings and product information, audio is being shared a lot across the world.
But accessing information from a long audio file can be difficult and time-consuming, which is why there is a need to convert audio to text. Information in the form of text can easily be fully or partly accessed and edited whenever needed. And texts can also easily be shared with whomever you want.
So let’s have a look at some of the best audio-to-text converters that might be of use to you.
10+ Free Online Audio to Text Converters
There is number of audio text converters available in the online market that can help you while studying, researching, or even in your business. Some of these recorders can convert any audio file to texts while some others can record and convert to text at the same time. Here we will talk about the top 11 free applications that can be used to convert audio to text.
| 1 - Filmora | 2 - Audext | 3 - Sonix.ai |
|---|---|---|
| 4 - Virtualspeech.com | 5 - Speechnotes | 6 - SpeechTexter |
| 7 - Textfromtospeech.com | 8 - Dictation.io | 9 - Voice Note |
| 10 - Voice Notebook | 11 - NaturalReaders |
1. Wondershare Filmora
Filmora’s Speech To Text (STT) function allows you to transcript audio/voice to subtitles/text in one click. it can save your plenty of time on transcribing subtitles and boost your editing efficiency by applying speech-to-text.
What you need to do is download the software and subsribe for its plan.
Features
- Built-in function to transcribe subtitles and captions for your video
- High accuracy in generating text, allows you to edit text by yourself
- Supports up to 26 languages of transcription to engage more users all around the world
- Offers various tools for editing your videos and audio
2. Audext
Audext is a free online application that can help you to save a lot of time while transcribing any audio to text. The transcription to text is done with the use of an advanced AI and hence produces faster and more accurate results.
Audext is used by people from different sectors like education, marketing, media, consulting, healthcare, etc. for their work purposes.
Features
- An inbuilt editor for editing the text while transcribing
- Identifies the speaker easily
- Supports a variety of audio and video formats like MP3, WAV, MP4, etc.
- Offers an option of easy upload and export of files
Pricing
- Free
- Transcription costs for one hour are $12
- Or with the subscription $5
3. Sonix.ai
Sonix is a fast and accurate application that can be used to convert audio to text for any purpose. This application offers a 30-minute free transcription after which an affordable amount may be charged.
Features
- Automatic transcription of files and accessibility of these files from any device
- Advanced translation of these devices into 30 different languages
- Addition of subtitles into any video for easy understanding
- A Sonix media player that allows to share and publish files easily
Pricing
- Free
- Standard subscription - $10 per hour
- Premium subscription - $5 per hour, and an addition of $22 per month
4. Virtualspeech.com
Virtualspeech is an online tool that can transcribe audio to text free. It is a very simple application that allows fats conversion of audio files to texts. After conversion, the file will be emailed to the user from where it can be downloaded and saved.
Features
- Free conversion of any audio files under 1 minute.
- Conversion of audio files of formats Mp3, Wav, or Ogg.
- Provides security as the no files are stored on the server and the site is secured with a b SSL
- Speech to text converter within the site
Pricing
- $0.50 per minute after the free minute
Filmora Audio to Text Converter
Filmora - Audio to Text Converter
• Enables you to convert video speech to text in one click
• Extremely accurate in video speech recognition
• Cross-platform supported - (Windows, Mac, iOS, Android)
Transcribe Audio to Text Free Transcribe Audio to Text Free Transcribe Audio to Text Free Learn More >
5. Speechnotes
Speechnotes is a powerful online notepad that can easily convert audio to text. This tool has implemented an efficient and clean design that makes conversion and editing very easy.
Features
- Best results with an advanced speech recognition technology
- Built-in tools that allow easy editing and correction of the converted text
- Fast working on any web browser and no installation apps required
- Autosave feature that ensures that your data is not lost
- Export to Google Drive option for easy accessibility from any device
Pricing
- Free
- Premium version with the addition of some extra features
6. SpeechTexter
SpeechTexter is a multilingual application that can help you transcribe any type of book, document, blog posts, etc. by using your audio. This tool has a custom dictionary that allows adding short commands for adding frequently used data like phone numbers, punctuation marks, addresses, etc.
Features
- Offers accuracy rate of 90 to 95% percent
- Can be used to increase your fluency in English
- Offers powerful real-time speech recognition
- Easy creation of emails, text notes, blog posts, etc.
- A custom dictionary that can be customized according to the individual use
- Supports more than 60 languages
- Available on both chrome browser and android
Pricing
- Free
7. Textfromtospeech.com
Textfromtospeech is a free online tool that allows you to easily convert audio to text without the need for registration downloading or installation. It has a very simple interface that can record and convert your speech into text with a single click.
Features
- Free and online text recognition and transcription
- Supports many languages
- Pause and record option while converting large files
- Can use voice commands for insertion of symbols like “comma”, “full stop”, etc.
- Smart capitalization
- Easy saving, copying, and sharing of the dictated text
- Available on mobile devices, tablet, and computer
Pricing
- Free
![]()
A cross-platform for making videos anywhere for all creators
Why your video editing isn’t good enough? How about some creative inspo?
- 100 Million+ Users
- 150+ Countries and Regions
- 4 Million+ Social Media Followers
- 5 Million+ Stock Media for Use
* Secure Download
8. Dictation.io
Dictation is a free and simple tool that offers fast conversion of audio to text. Its interface is like that of a very simple notepad and allows the conversion of audio to text for a number of languages including English, Español, Français, Italiano, Português, and more.
Features
- Advanced speech recognition
- Easy editing within the notes
- Easy sharing to mail, tweets, etc.
- No storing of any data and hence offers the necessary security
Pricing
- Free
9. Voice Note
Voice Note is an online speech recognition tool that can automatically record and type anything including speech, interview, etc. This tool can convert any audio file into text format which can easily be opened in Microsoft Word.
Features
- No saving of data in any servers
- Customizable options for audio and text
- A number of languages to choose from while converting audio to text
- Easy copying and exporting options
- Direct Print option from the site
Price
- Free
10. Voice Notebook
Voice Notebook is a speech recognition app that can also convert audio files to text. This application is compatible with a wide range of devices like Mac, Windows, Linux OS, Android, and iOS.
Features
- Voice commands are available when you transcribe audio to text
- Has the ability to recognize any speech embedded in YouTube clips or HTML5 audio or video
- Simple interface and easy editing of text
- An option to download into TXT format is available
Price
- Free
11. NaturalReaders
Natural Readers is a professional program that can convert any text into spoken words. This program offers a lot of features like adjusting the speed of audio, conversion into mp3, selection of voice, etc.
Features
- A font option available for dyslexic people
- Supports formats like pdf, txt, docs, epub, ods, ppt, png, jpeg
- App versions of this online tool are available both for android and apple devices
Pricing
- Free
- Premium plan - $9.99 per month, $59.88 per year
- Plus plan - $19.00 per month, $110.00 per year
Filmora Audio to Text Converter
Filmora - Audio to Text Converter
• Enables you to convert video speech to text in one click
• Extremely accurate in video speech recognition
• Cross-platform supported - (Windows, Mac, iOS, Android)
Transcribe Audio to Text Free Transcribe Audio to Text Free Transcribe Audio to Text Free Learn More >
Conclusion
We have listed above the top 11 tools that can be used to convert audio to text on any device using a browser. Converting audio to text allows you to easily access the required information, edit it, or even share it fully or partially with anyone you wish,
The applications we have listed are free and some of them might charge for the extra features they provide. So no matter what your profession is if you are looking for an app to convert audio to text or record and produce the text of the recordings, choose any one of the listed above applications.
We hope our suggestions help you reduce effort and save time. Please leave your valuable feedback in the comment box below, thank you.
Transform Long Videos into Short Ones Instantly
Turn long videos into viral clips. Effortlessly transform lengthy videos into engaging, shareable clips.
Shanoon Cox
Shanoon Cox is a writer and a lover of all things video.
Follow @Shanoon Cox
Harmonious Sound Editing Guide: Advantages, Disadvantages, and Substitutes
Audio editors are generally referred to as Digital Audio Workstation, DAW. They provide you with digital tools to edit, record, and also produce audio files. Most audio editors are used to create podcasts and mix different audio files.
Internet is full of different audio editors, but the case in the study is about Beautiful Audio Editor. To know more about this editor and to learn about its steps, read the article below.
In this article
01 What Is Beautiful Audio Editor?
02 Beautiful Audio Editor: Key Features, Pros & Cons
03 How to Use Beautiful Audio Editor?
04 Best Alternatives for Beautiful Audio Editor
Part 1. What Is Beautiful Audio Editor?
For an online editor, Beautiful Audio Editor is the best choice, and this is because the editor is feature-rich. This editor works well on both Chrome and Firefox browsers. Beautiful Audio Editor is great for the fact that it offers excellent options of frequency effects. Importantly, the audio editor allows you to save the files on Google Drive.

Do you know the best part of Beautiful Audio Editor? The editor supports multi-track editing and allows you to adjust and manage every track level. With this editor, try and move from complete silence to 6 decibels higher than the actual level. Do you know what wonders this can do? For smooth fade-ins and fade-outs, this is very helpful.
Part 2. Beautiful Audio Editor: Key Features, Pros & Cons
With Beautiful Audio Editor, you can edit amazing audio files, make stunning mixes and crazy podcasts. This online, easy-to-use editor has a lot of features to offer. Do you know what they are? Let’s increase your knowledge and share some key features of Beautiful Audio Editor:
· Editing Features
This is a multi-track audio editor that supports adjusting every level of each track. With Beautiful Audio Editor, try to alter volume and pan. Along with this, options like Move, Split, Duplicate and Delete sections of the audio file are also offered.
· Recording
Do you think Beautiful Audio Editor is just an editor? You are wrong if you think so. This is because the editor is not only great for editing but try and record with this fantastic tool. You can record through your microphone and get high-quality recordings.
· Effects
Beautiful Audio Editor provides a wide range of effects that can modify and transform your audio file. For instance, you get effects like Gain, Dynamic Compression, Reverb, Low/High pass filters. Along with all this, you can also speed up or slow down the audio.
· Customized Effects
Which audio editor offers customized effects? Beautiful Audio Editor does! With Volume Envelopes, you can create custom Fade Ins and Fade Outs. Moreover, the editor also provides features like dragging the effects, zooming, etc.
2.1. Pros & Cons of Beautiful Audio Editor
Do you have any idea about the benefits that you get from Beautiful Audio Editor? If you don’t, let’s enlighten you with this editor’s pros and cons.
Benefits
- You can export files both in 16-bit WAV and also in 128-bit MP3 format from Beautiful AudioEditor.
- This audio editor is free to use. You don’t even have to register for editing audio, just open Chrome or Firefox and start the work.
- Your edited audio files are saved both online and offline. You can either save files on Google Drive or else save local files.
- Beautiful Audio Editorenables you to create audio envelopes. Moreover, you can apply dozens of audio effects while editing.
Drawback
- A significant drawback of this editor is that it crashes if the project is over 300MB or 45mins. This is not reliable for high stake projects.
Part 3. How to Use Beautiful Audio Editor?
Have you ever used this editor before? As we mentioned in the introduction, we would introduce the steps to use Beautiful Audio Editor, so here we are. Are you ready to learn about its step-by-step guidelines? Let’s get started!
Step 1: To start the editing, open the online editor. A timeline screen will appear in front of you; head to the ‘File’ tab and click on it from the top menu bar. From the sub-menu, select the ‘Import local sound file’ option to import the file from your device.

Step 2: For splitting the audio, drag the play head to the point from where you want to split. Next to the toolbar, click on the ‘Split’ icon. This will split the audio into 2 parts, and you can split as much as you want to. By using the ‘Remove’ icon from the toolbar, you can also remove the extra audio part.

Step 3: For adding Fade to your audio, move to the line under the timeline. Now, select a start and an endpoint on the line and drag it downwards for Fade Out. In comparison, push it upwards for Fade In.

Step 4: For adjusting the Volume or the Gain, move to the bottom left corner. You will see a ‘Gain’ option, hit on it to open its tab on the right side of the screen, and then adjust the ‘Gain’ by moving the slider.

Step 5: You can also rename your file by double-clicking on it. Lastly, to save the file, tap on the ‘File’ tab and select the ‘Save project to a local file for later load’ option. After this, download the file to your preferred location.

Part 4. Best Alternatives for Beautiful Audio Editor
We have something for you if Beautiful Audio Editor has failed to impress you. The following section of this article will share the best alternatives with its readers. Let’s begin!
1. TwistedWave
Do you know how amazing this alternative is? TwistedWave is an online, easy-to-use audio editor. The interface of this editor is very clean and simple to understand. Moreover, you get a long list of effects from TwistedWave, for instance, Reverse, Graphic EQ, Fade in and Fade out, Amplify, Normalize, and others.
The best part about this audio editor is that you can easily send files to SoundCloud and also Google Drive. Likewise, you can upload files from both Google Drive and SoundCloud.

2. Bear Audio Editor
Moving on to discuss Bear Audio Editor, which can trim, cut, and also convert music files. Interestingly, you can avail all these amazing features online and free, without even downloading any software. This editor offers you options like Fade In and Out, Mute, Pitch and Volume Adjustment, etc.
You can also combine different music files, ringtones, etc., to make your perfect mix. Bear Audio Editor supports MP3, OGG, and WAV input formats. Whereas OGG, WMA, WAV, MP3, and M4R are output-supported formats.

3. Sodaphonic
Do you want to edit a file from Dropbox? Try Sodaphonic audio editor. You can not only open files from Dropbox but also import them from Google Drive. This online editor offers diverse options that include Louder, Quieter, Silence, Normalize, Bleep it, Reverse, and much more than this.
Other than this, you get different editing options, including Delete, Trim, Cut, Copy, etc. This editor also allows access to a microphone for recording.

Last Words
Beautiful Audio Editor, like its name, is beautiful and equally amazing to use. The online editor offers a lot of features, and interestingly, it’s free. The article discussed great details about Beautiful Audio Editor along with its guideline. What if we share another audio editor? Try Wondershare Filmora Audio Editor, the easy-to-use, drag-and-drop software.
You can modify your audio files to the next level with Filmora . Its advanced audio editing features are unmatched, like Audio Equalizer, Audio Denoise, Detach Audio from Video, and so much more. You can also add Voiceovers, replace original audio from video, add background music, etc.
Wondershare Filmora
Get started easily with Filmora’s powerful performance, intuitive interface, and countless effects!
Try It Free Try It Free Try It Free Learn More >
02 Beautiful Audio Editor: Key Features, Pros & Cons
03 How to Use Beautiful Audio Editor?
04 Best Alternatives for Beautiful Audio Editor
Part 1. What Is Beautiful Audio Editor?
For an online editor, Beautiful Audio Editor is the best choice, and this is because the editor is feature-rich. This editor works well on both Chrome and Firefox browsers. Beautiful Audio Editor is great for the fact that it offers excellent options of frequency effects. Importantly, the audio editor allows you to save the files on Google Drive.
Do you know the best part of Beautiful Audio Editor? The editor supports multi-track editing and allows you to adjust and manage every track level. With this editor, try and move from complete silence to 6 decibels higher than the actual level. Do you know what wonders this can do? For smooth fade-ins and fade-outs, this is very helpful.
Part 2. Beautiful Audio Editor: Key Features, Pros & Cons
With Beautiful Audio Editor, you can edit amazing audio files, make stunning mixes and crazy podcasts. This online, easy-to-use editor has a lot of features to offer. Do you know what they are? Let’s increase your knowledge and share some key features of Beautiful Audio Editor:
· Editing Features
This is a multi-track audio editor that supports adjusting every level of each track. With Beautiful Audio Editor, try to alter volume and pan. Along with this, options like Move, Split, Duplicate and Delete sections of the audio file are also offered.
· Recording
Do you think Beautiful Audio Editor is just an editor? You are wrong if you think so. This is because the editor is not only great for editing but try and record with this fantastic tool. You can record through your microphone and get high-quality recordings.
· Effects
Beautiful Audio Editor provides a wide range of effects that can modify and transform your audio file. For instance, you get effects like Gain, Dynamic Compression, Reverb, Low/High pass filters. Along with all this, you can also speed up or slow down the audio.
· Customized Effects
Which audio editor offers customized effects? Beautiful Audio Editor does! With Volume Envelopes, you can create custom Fade Ins and Fade Outs. Moreover, the editor also provides features like dragging the effects, zooming, etc.
2.1. Pros & Cons of Beautiful Audio Editor
Do you have any idea about the benefits that you get from Beautiful Audio Editor? If you don’t, let’s enlighten you with this editor’s pros and cons.
Benefits
- You can export files both in 16-bit WAV and also in 128-bit MP3 format from Beautiful AudioEditor.
- This audio editor is free to use. You don’t even have to register for editing audio, just open Chrome or Firefox and start the work.
- Your edited audio files are saved both online and offline. You can either save files on Google Drive or else save local files.
- Beautiful Audio Editorenables you to create audio envelopes. Moreover, you can apply dozens of audio effects while editing.
Drawback
- A significant drawback of this editor is that it crashes if the project is over 300MB or 45mins. This is not reliable for high stake projects.
Part 3. How to Use Beautiful Audio Editor?
Have you ever used this editor before? As we mentioned in the introduction, we would introduce the steps to use Beautiful Audio Editor, so here we are. Are you ready to learn about its step-by-step guidelines? Let’s get started!
Step 1: To start the editing, open the online editor. A timeline screen will appear in front of you; head to the ‘File’ tab and click on it from the top menu bar. From the sub-menu, select the ‘Import local sound file’ option to import the file from your device.
Step 2: For splitting the audio, drag the play head to the point from where you want to split. Next to the toolbar, click on the ‘Split’ icon. This will split the audio into 2 parts, and you can split as much as you want to. By using the ‘Remove’ icon from the toolbar, you can also remove the extra audio part.
Step 3: For adding Fade to your audio, move to the line under the timeline. Now, select a start and an endpoint on the line and drag it downwards for Fade Out. In comparison, push it upwards for Fade In.
Step 4: For adjusting the Volume or the Gain, move to the bottom left corner. You will see a ‘Gain’ option, hit on it to open its tab on the right side of the screen, and then adjust the ‘Gain’ by moving the slider.
Step 5: You can also rename your file by double-clicking on it. Lastly, to save the file, tap on the ‘File’ tab and select the ‘Save project to a local file for later load’ option. After this, download the file to your preferred location.
Part 4. Best Alternatives for Beautiful Audio Editor
We have something for you if Beautiful Audio Editor has failed to impress you. The following section of this article will share the best alternatives with its readers. Let’s begin!
1. TwistedWave
Do you know how amazing this alternative is? TwistedWave is an online, easy-to-use audio editor. The interface of this editor is very clean and simple to understand. Moreover, you get a long list of effects from TwistedWave, for instance, Reverse, Graphic EQ, Fade in and Fade out, Amplify, Normalize, and others.
The best part about this audio editor is that you can easily send files to SoundCloud and also Google Drive. Likewise, you can upload files from both Google Drive and SoundCloud.
2. Bear Audio Editor
Moving on to discuss Bear Audio Editor, which can trim, cut, and also convert music files. Interestingly, you can avail all these amazing features online and free, without even downloading any software. This editor offers you options like Fade In and Out, Mute, Pitch and Volume Adjustment, etc.
You can also combine different music files, ringtones, etc., to make your perfect mix. Bear Audio Editor supports MP3, OGG, and WAV input formats. Whereas OGG, WMA, WAV, MP3, and M4R are output-supported formats.
3. Sodaphonic
Do you want to edit a file from Dropbox? Try Sodaphonic audio editor. You can not only open files from Dropbox but also import them from Google Drive. This online editor offers diverse options that include Louder, Quieter, Silence, Normalize, Bleep it, Reverse, and much more than this.
Other than this, you get different editing options, including Delete, Trim, Cut, Copy, etc. This editor also allows access to a microphone for recording.
Last Words
Beautiful Audio Editor, like its name, is beautiful and equally amazing to use. The online editor offers a lot of features, and interestingly, it’s free. The article discussed great details about Beautiful Audio Editor along with its guideline. What if we share another audio editor? Try Wondershare Filmora Audio Editor, the easy-to-use, drag-and-drop software.
You can modify your audio files to the next level with Filmora . Its advanced audio editing features are unmatched, like Audio Equalizer, Audio Denoise, Detach Audio from Video, and so much more. You can also add Voiceovers, replace original audio from video, add background music, etc.
Wondershare Filmora
Get started easily with Filmora’s powerful performance, intuitive interface, and countless effects!
Try It Free Try It Free Try It Free Learn More >
Soundscape Synthesis: Techniques for Customizing Timestamps and Soundscapes in Final Cut Pro X [2023 Guide]
How to Add and Modify Audio Keyframes in Final Cut Pro X

Benjamin Arango
Aug 18, 2022• Proven solutions
Are you familiar with audio keyframing? So, what is this audio keyframing? Does this term appear new for you? It won’t anymore as we are here to explain. In the world of animation, knowing about keyframes is more critical. Have you ever noticed certain scenes while watching a movie that would reflect different audio volume in other video clips? It is all because of this process of keyframing that allows you to change the parameter values in a video clip. A keyframe on the clip specifies the start and end of the changes that occur in the frames, images, or drawings.
Filmmaking, hand-drawn animation, and short movies are critical applications where keyframing finds the place, especially in changing positions, scaling subjects, and customizing opacity. Although the concept might seem in-depth and confusing, implementing such keyframes isn’t a hassle as you think if you have a handy video editor. Today, let’s look at one such software, Final Cut Pro X, which is the popular tool for Mac at present in keyframing. With no delay, scroll down to add and edit audio keyframes in FCPX at ease.
Part 1: How to Add Audio Keyframes in Final Cut Pro X?
So, how to precisely add the Final Cut Pro keyframes? This session will reveal the answer as we have given a step-by-step guide.
Step 1: Launch and open the Final Cut Pro X software on your Mac device. Select the video clip in the timeline or select a video from the location.
Now, choose “Clip > Show Audio Animation”, or you can also press Ctrl + A.
Step 2: You will now see various automation options to change the audio of the clips.
To add keyframes, you have to hold or press option-K to create a keyframe on the horizontal effect control that will result in a white diamond depicting the created keyframes.
Step 3: Apart from the Audio Animator tool, you can create a Final Cut Pro audio keyframe with the range selection tool. To do so, on the video timeline, you need to sue the keyframe shortcut Final Cut Pro, which is to hold down R.
Hold the R key down, and on the timeline, click the spot where you need to begin the keyframing, drag the mouse pointer to the area where the keyframing should end. It will mark a range with a diamond.
That is the way you can add a fcpx audio keyframe, and is it easy?
Part 2: How to Modify Audio Keyframes in Final Cut Pro X?
Now that you have successfully created or added audio keyframes fcpx, do you wish to adjust or modify them, like changing the volume or any other enhancements? Yes, Final Cut Pro X offers adjustments. Learn how to do it from here.
Step 1: Usually, users follow the same way in the keyframe to change the volume per your requirement on the “Volume and Pan” segment.
You can slide the volume pointer as needed, or from the inverted triangle next to the option, you can choose the “Reset Parameter” option to reset the changes.
Step 2: You can configure the Pan option of the keyframe and FCPX that offers multiples ones like stereo left/right, basic surround, create space, and so on.
Step 3: To adjust the audio animation editor’s keyframes, you can drag the diamond to the left/right to change the keyframe position.
If you want to alter the effect’s parameter value, you can drag the keyframe up or down.
There is one more option by which you can edit the final cut pro audio keyframe. If you click the “Final Cut Pro” option on the top and choose the editing option, it will show you various options to adjust the keyframes like reference waveforms, transitions, etc.
With access to the in-built options offered by Final Cut Pro X, you can easily adjust the created or added fcpx audio keyframe at ease.
Part 3: FAQs about Audio Keyframing in Final Cut Pro X?
1. Will changing the “Show reference waveform” checkbox on the editing window’s audio aspect affect the fcpx audio keyframe?
No. A tick over the “Shoe reference waveforms” checkbox will only make changes over the timeline waveform representation. However, no change will occur on the keyframe unless the duration or still images get altered.
2. Can I add keyframes across a selected area automatically?
Yes, with the Range Selection tool’s assistance, you can add keyframes over a selected range automatically. To do so, execute the “Clip > Audio Animation > select an effect > disclosure button.” From the tools pop-up menu with the mouse icon, choose the option, “Range Selection.”
3. Despite Audio animation, is there any other option to adjust the fcpx keyframe?
Yes. To access many different effects in the Final Cut Pro X software, you can change the parameter values of sole keyframes using Audio Inspector.
4. Is viewing a single effect at a time in the Audio Animation editor is possible in FCPX?
Yes. If you have applied multiple effects to a clip and need to preserve a screen space, you can collapse the Audio Animation editor to view one impact at a time. Tapping the “Solo Animation” option from the Click Menu can execute this task.
5. Can I delete the created Final Cut Pro audio keyframe?
Sure. To delete an audio keyframe, select the keyframe, and press the “Shift + Delete” option. Now, navigate to the Audio Inspector, and hit the “Keyframe” button.
Conclusion
I am sure you are excited to know that working with the Final Cut Pro keyframe is easier than you have imagined. Yes, it is, and I hope with the ultimate guide on how to add keyframe Final Cut Pro X along with specific FAQs regarding fcpx audio keyframe, we have put a full-stop to your queries. So, with no delay, get started to make your video by audio keyframes on Final Cut Pro X!
Benjamin Arango
Benjamin Arango is a writer and a lover of all things video.
Follow @Benjamin Arango
Benjamin Arango
Aug 18, 2022• Proven solutions
Are you familiar with audio keyframing? So, what is this audio keyframing? Does this term appear new for you? It won’t anymore as we are here to explain. In the world of animation, knowing about keyframes is more critical. Have you ever noticed certain scenes while watching a movie that would reflect different audio volume in other video clips? It is all because of this process of keyframing that allows you to change the parameter values in a video clip. A keyframe on the clip specifies the start and end of the changes that occur in the frames, images, or drawings.
Filmmaking, hand-drawn animation, and short movies are critical applications where keyframing finds the place, especially in changing positions, scaling subjects, and customizing opacity. Although the concept might seem in-depth and confusing, implementing such keyframes isn’t a hassle as you think if you have a handy video editor. Today, let’s look at one such software, Final Cut Pro X, which is the popular tool for Mac at present in keyframing. With no delay, scroll down to add and edit audio keyframes in FCPX at ease.
Part 1: How to Add Audio Keyframes in Final Cut Pro X?
So, how to precisely add the Final Cut Pro keyframes? This session will reveal the answer as we have given a step-by-step guide.
Step 1: Launch and open the Final Cut Pro X software on your Mac device. Select the video clip in the timeline or select a video from the location.
Now, choose “Clip > Show Audio Animation”, or you can also press Ctrl + A.
Step 2: You will now see various automation options to change the audio of the clips.
To add keyframes, you have to hold or press option-K to create a keyframe on the horizontal effect control that will result in a white diamond depicting the created keyframes.
Step 3: Apart from the Audio Animator tool, you can create a Final Cut Pro audio keyframe with the range selection tool. To do so, on the video timeline, you need to sue the keyframe shortcut Final Cut Pro, which is to hold down R.
Hold the R key down, and on the timeline, click the spot where you need to begin the keyframing, drag the mouse pointer to the area where the keyframing should end. It will mark a range with a diamond.
That is the way you can add a fcpx audio keyframe, and is it easy?
Part 2: How to Modify Audio Keyframes in Final Cut Pro X?
Now that you have successfully created or added audio keyframes fcpx, do you wish to adjust or modify them, like changing the volume or any other enhancements? Yes, Final Cut Pro X offers adjustments. Learn how to do it from here.
Step 1: Usually, users follow the same way in the keyframe to change the volume per your requirement on the “Volume and Pan” segment.
You can slide the volume pointer as needed, or from the inverted triangle next to the option, you can choose the “Reset Parameter” option to reset the changes.
Step 2: You can configure the Pan option of the keyframe and FCPX that offers multiples ones like stereo left/right, basic surround, create space, and so on.
Step 3: To adjust the audio animation editor’s keyframes, you can drag the diamond to the left/right to change the keyframe position.
If you want to alter the effect’s parameter value, you can drag the keyframe up or down.
There is one more option by which you can edit the final cut pro audio keyframe. If you click the “Final Cut Pro” option on the top and choose the editing option, it will show you various options to adjust the keyframes like reference waveforms, transitions, etc.
With access to the in-built options offered by Final Cut Pro X, you can easily adjust the created or added fcpx audio keyframe at ease.
Part 3: FAQs about Audio Keyframing in Final Cut Pro X?
1. Will changing the “Show reference waveform” checkbox on the editing window’s audio aspect affect the fcpx audio keyframe?
No. A tick over the “Shoe reference waveforms” checkbox will only make changes over the timeline waveform representation. However, no change will occur on the keyframe unless the duration or still images get altered.
2. Can I add keyframes across a selected area automatically?
Yes, with the Range Selection tool’s assistance, you can add keyframes over a selected range automatically. To do so, execute the “Clip > Audio Animation > select an effect > disclosure button.” From the tools pop-up menu with the mouse icon, choose the option, “Range Selection.”
3. Despite Audio animation, is there any other option to adjust the fcpx keyframe?
Yes. To access many different effects in the Final Cut Pro X software, you can change the parameter values of sole keyframes using Audio Inspector.
4. Is viewing a single effect at a time in the Audio Animation editor is possible in FCPX?
Yes. If you have applied multiple effects to a clip and need to preserve a screen space, you can collapse the Audio Animation editor to view one impact at a time. Tapping the “Solo Animation” option from the Click Menu can execute this task.
5. Can I delete the created Final Cut Pro audio keyframe?
Sure. To delete an audio keyframe, select the keyframe, and press the “Shift + Delete” option. Now, navigate to the Audio Inspector, and hit the “Keyframe” button.
Conclusion
I am sure you are excited to know that working with the Final Cut Pro keyframe is easier than you have imagined. Yes, it is, and I hope with the ultimate guide on how to add keyframe Final Cut Pro X along with specific FAQs regarding fcpx audio keyframe, we have put a full-stop to your queries. So, with no delay, get started to make your video by audio keyframes on Final Cut Pro X!
Benjamin Arango
Benjamin Arango is a writer and a lover of all things video.
Follow @Benjamin Arango
Also read:
- Updated Where to Find Premium DJ Audios Online
- Updated 2024 Approved Mastering the Art of AI-Based Signal Denoising
- Updated The Ultimate Selection of Downloadable Cartoon Soundscapes for Animators
- New Best 10 Voice Changer Apps Male to Female Powerful for 2024
- New In 2024, Top 5 Essential Linux-Based Audio Capture Tools & Practical Recording Techniques
- Updated Free Flight Bird Sounds in MP3
- Echoes in Editing Innovative Methods for Seamlessly Combining Sound and Video for 2024
- New 2024 Approved Essential AI-Driven Audio to Text Tools of the Year
- Updated 10 Budget-Friendly Tools for Effortless Audio to Text Transformation for 2024
- Multi-Platform Speech-to-MP3 Technology for Everyday Use
- Updated Crafting Emotional Impact Utilizing Suspenseful Music for Film Scoring
- New Online Learning Module A Complete Overview
- New In 2024, MP3 Cat Sound Effect
- New In 2024, Exploring Top 5 Gratis Volume Calibration Options for MP3s
- Updated Art of Voice Imitation Leveraging AI for Realistic Synthesis
- Step-by-Step An Essential Tutorial on Editing Your First Podcast for 2024
- HarmonyHack Expert Vocal Pitch-Shifting and Editing Program of the Year for 2024
- Updated The Ultimate List of Affordable Android Speech Capture and Audio Recording Tools for 2024
- New In 2024, Synergizing Individual Tracks Into a Singular, Polished Auditory Assembly
- Digital Music Vault - YouTube Edition for 2024
- Updated Achieving Pristine Audio Quality Tips to Eradicate Distorted Sounds in Visual Media
- Updated 2024 Approved Best Audio Editors to Remove Background Noise From Audio
- Updated Optimize Acoustic Balance Using Side-Chain Processing Methods
- Updated A Strategic Approach to Enhancing Your In-Game Vocal Identity
- New 2024 Approved 15 Free Music Pieces Recommended for Crafting Memorable Video Narratives
- Updated In 2024, Locating High-Quality Brush Stroke Reverb Tones
- New In 2024, Androids Premier Voice Recorders A Ranked Selection of 10 Apps
- New 2024 Approved The Complete Lexis Audio Editor Experience Critiques, Advanced Features, and Tutorials
- New In 2024, Top 10 Calming Websites To Relax Your Mind
- Taming The Wildscape Techniques for Subtracting Unwanted Audio Disturbances for 2024
- Updated In 2024, Accelerating Listening Experience Speed Up Your Audio Swiftly
- Top 15 Augmented Reality Games Like Pokémon GO To Play On Vivo Y100t | Dr.fone
- How To Get Out of Recovery on Apple iPhone 11 Pro Max? | Dr.fone
- Full Guide to Unlock Your Itel P55
- In 2024, Full Guide to Fix iToolab AnyGO Not Working On Vivo X Fold 2 | Dr.fone
- Full Guide to Unlock Your Vivo Y36
- In 2024, How to Mirror PC Screen to Infinix Note 30 VIP Racing Edition Phones? | Dr.fone
- 2024 Approved How to Add Emojis To Discord on Desktop Computer and Mobile
- iPogo will be the new iSpoofer On Poco X6 Pro? | Dr.fone
- How to recover old call logs from your Y36i?
- New 2024 Approved The Ultimate Guide to Converting Text Into Engaging Audio Files
- 10 Easy-to-Use FRP Bypass Tools for Unlocking Google Accounts On Poco X5
- Updated Unleash Your Creativity Best Free Open-Source Video Editors for 2024
- In 2024, How to Transfer Contacts from Tecno Spark 10 4G to Outlook | Dr.fone
- Easy steps to recover deleted music from Samsung Galaxy A05
- Unlocking iPhone 8 Plus Passcode without a Computer | Dr.fone
- Updated Learn How to Create Inspiring Motivational Videos Using AI. Explore Tools Like Midjourney, Runway Gen2, Chat-GPT, and Filmora AI for Seamless Content Creation. Start Your Journey
- How To Change Infinix GT 10 Pro Lock Screen Password?
- Updated The Best of Both Worlds Top 10 Free and Paid Android Video Editors for 2024
- How to Fix & Retrieve Pictures/Videos From a Water Damaged iPhone 11 Pro Max That Wont Turn on | Stellar
- In 2024, Effective Ways To Fix Checkra1n Error 31 On Apple iPhone 6 Plus
- Updated 2024 Approved From Photos to Videos 10 Best Online Creators Free & Paid
- Convert Instagram Videos to MP3 Easy Download Methods for 2024
- Best 10 Mock Location Apps Worth Trying On Samsung Galaxy S24+ | Dr.fone
- Title: New Top 10 FREE Speech-to-Text Apps for Android & iOS, for 2024
- Author: Kate
- Created at : 2024-05-05 08:11:17
- Updated at : 2024-05-06 08:11:17
- Link: https://audio-editing.techidaily.com/new-top-10-free-speech-to-text-apps-for-android-and-ios-for-2024/
- License: This work is licensed under CC BY-NC-SA 4.0.
