
:max_bytes(150000):strip_icc():format(webp)/GettyImages-136612668-5c640cc5c9e77c00010a4ff4.jpg)
New The Art of Sound Integration A Detailed Tutorial on Video Audio Addition for 2024
The Art of Sound Integration: A Detailed Tutorial on Video Audio Addition
How to Add Audio to Your Video (with Steps)

Shanoon Cox
Mar 27, 2024• Proven solutions
Videos are everywhere around us, to promote a brand, create an Ad, or for larger programs like movies. Only a voice-over or a clip fails to grab attention of the audience, so you got to add music to the video and make it spectacularly fascinating. By adding background music to a video, you kill its monotony and make it more appealing to touch people’s heart and evoke the response your video is intended to.
If you want to explore the numerous options to edit and add audio to videos with free audio editor , then you have come to the right spot.
Through this article, we are going to introduce you to various desktop, and phone based applications as well as free online methods to help you add audio to your videos and make them strikingly beautiful.
- Part1: How to add music to videos on Desktop
- Part2: How to add audio to video online
- Part3: How to add music to videos on Mobile Phone
- Part4: How to download royalty free music from website
- Part5: Audio editing - 5 tips for mixing audio
You may also like
15 Free Music Sites to Use (Royalty Free) >>
Part 1: How to add music to videos on Desktop
1. How to add audio to videos with for Windows 10, 8, 7
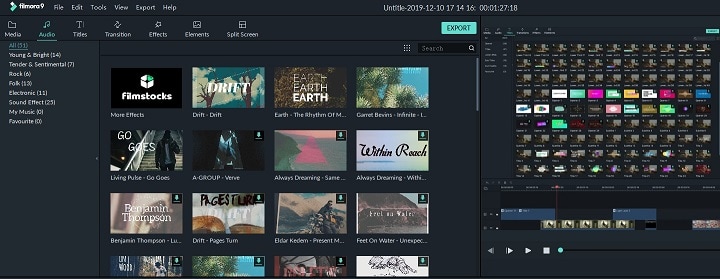
Filmora
When you need a video editing software application that comes with a brilliant built-in audio library, you can undoubtedly pick Filmora to save you.
This is a perfect application for Windows PC, which enables you to add music to video (.MP3, .WMA, or .OGG audio files to .AVI, .MP4, .MKV videos) files while allowing you to remove any existing background music from the videos as well. Its intuitive design with drag and drop features makes editing videos cake walk.
Isn’t it great when the software supports such wide varieties of audio and video formats and helps you create the most enthralling videos for you?
Explore the way it transforms your mundane videos to an exquisite piece of art, within no time. Here is the step-by-step guide for Filmora –


Step 1: Where to import audio
Install Wondershare Filmora from the official website on your computer and launch it. Once the software gets launched tap ‘MEDIA’ and then click the ‘IMPORT’ tab just below the menu bar. Now, from the drop down list click on ‘Import Media Files’ to choose the video file, and then repeat the process to pick a desired background music file.
Note: You can also use the in-built music tracks to add music to your video by selecting the ‘MUSIC’ tab.

Step 2: How to add music to timeline
Now, hover the mouse over the audio and video files you have just imported to Filmora and then tap the ‘+’ sign on it (displays ‘Add to Project’). You can also drag the media files down to the timeline.

Step 3: Edit music file
You can edit the music by double tapping the audio from the timeline. It will show you the audio panel at the top of the screen. You can the audio to fade in or fade out, manage the volume, pitch, speed, and set the desired equalizer as well.

Step 4: Export
Now that you have made the desired changes to your video, tap on the ‘EXPORT’ tab on the toolbar to export the video. The exported file can be saved in .MP4, and .WMV formats and rename, define the resolution as well.

2. How to add audio to videos on Mac
VLC
Most people have no idea that VLC is not only a media player but a video editor as well, which allows you to add music to video. This open source cross-platform multimedia player supports almost all multimedia files and various streaming protocols.
VLC step-by-step guide to add audio to video –
Step 1: Add audio file
First of all install VLC media player on your computer and launch it. Now, tap the click file tab from the menu bar at the top. After that, pick the ‘Advanced Open File’ option from the drop down menu.

Step 2: Import audio and video
You need to click the ‘Browse…’ button for importing video, and select the ‘Play another media synchronously’. Now, click the ‘Choose…’ button for importing an audio file for editing. After that, you need to click the ‘Open’ button. You also have the option for adding sub-titles to your video. Now that you have imported and merged both the audio and video files, you can also enhance the audio settings.

Step 3: Quick Tip
Tap the ‘Window’ from the top bar and click on ‘Audio Effects…’ for applying the various audio effects to your edited video.

QuickTime
QuickTime Player is the default media player for Mac computer that supports older medial formats including QTVR, MIDI files on Snow Leopard and OS X Lion, and interactive QuickTime movies.
Entering QuickTime 7 Pro registration codes, you can unlock the QuickTime Pro functions that will enable you to add music to video files. If you don’t have it on your computer, then install it and find under the ‘Utilities’ folder within the ‘Applications’ folder. Here is the step-by-step guide for QuickTime to add audio to video –
Step 1: Import the files
First of all, launch QuickTime Player and tap ‘File’ and then click ‘Open File’. Pick your desired audio file to be imported. On the subsequent window of QuickTime Player, select ‘Edit’ and then tap ‘Select All’ to import the complete audio file. Hit ‘Edit’ and tap on the ‘Copy’ option.

Step 2: Import video and add audio to QuickTime movie
Now, you need to open the desired video that you are going to add audio to. For that, you need to first open the video in QuickTime and the click ‘Edit’ and ‘Add Clip to End’.

Note: You can add a part of the audio to the video by tapping ‘Edit’ and then ‘Add to Selection and Scale’. ‘Add to Selection and Scale’ fastens or lowers down the pace of the audio track to fit with the video’s length (that you have selected to add audio to).
3. How to add audio to videos with on Linux
Mkvmerge
This software for the Linux system is broadly known for editing the Matroska Multimedia Container. The GUI of this tool is much appealing but is rather simple and basic.
The software helps you to merge the audio or video multimedia streams into one single Matroska file. Matroska acts exactly like AVI, ASF, or MP4 the common container files. The Matroska files have .MKV extension for videos which includes audio and subtitles as well, files with a .MK3D extension represent stereoscopic video, .MKS for only subtitles, and .MKA for audio-only files.
Step-by-step guide for merging audio into video: (MKV ONLY)
Step 1: Add audio to video files
Download the software and launch it on your Linux computer. From the mkvtoolnix-gui package, open the mkvmerge GUI. Click the ‘add’ button for importing the audio and video files to the software interface.
Step 2: Choose the audio track
After importing the audio and video files, select the new audio tracks by marking the check boxes against them, under the ‘Tracks, chapters and tags’ section. You can also set the language in the ‘General track options’ and delay under ‘Format specific options’ tab.
Step 3: Merge the files
Mention the output format under ‘Output filename’ section and then tap ‘Start muxing’. This process will save the video file. Using this program you can also remover tracks from a video and fix the default audio track as well.

Part 2: How to add music to videos online
Mp3Care
MP3Care is an online video editing application that people mostly use to add audio to video files. This application wipes out the existing audio track from the video file and mixes the new audio file that you upload to create an interesting video.
The supported audio input format is MP3, whereas the supported video files include MKV, FLV, AVI, MOV, MP4, and WMV. You can record a video on your mobile phone or tablet and merge a desired audio background with this using MP3Care. All you need to do is select this recorded video and a preferred audio track in this website and get going.
Steps for adding audio track to video –
Step 1: Launch the web browser and open this application, then choose the audio and video file as per the online instruction.

Step 2: After you are done with the video selection, tap ‘ADD MUSIC TO VIDEO’ and then download your edited video file.

AddAudioToVideo
AddAudioToVideo is an online application for adding music/audio to a video. MP3 audio and AVI, WMV, MOV, and MP4 video formats are only supported with this program. It replaces the MP3 audio from any video and the uploaded files get removed after a while from the web.
Step-by-step guide –
Step 1: Choose a video file
You need to first select the video file from your local drive after browsing to this site.
Step 2: Choose audio files
Select the MP3 audio file after the video file. Tap ‘Upload’ to get the files uploaded to the program and wait for some time to get them merged together.
Tip: The video file size limit is up to 500 MB.

Check out more ways of adding music to video online >>
Part 3: How to add music to videos on Mobile Phone
1. How to add audio to video on Android
Filmora
The best method to add music to video files on Android devices is none other than Filmora. A video editing app that has no time limit to edit a video and leaves no watermark on videos either is always the talk of the show.
Using the music and effects, you can indeed make hilarious funny-videos to entertain yourself and your friends. You can create videos simply by selecting pictures and videos from your phone, Instagram, or Facebook and select a theme, template, mix some music, transitions, subtitles, filters etc. and then get the video saved on your phone or shared over popular social media platforms like Facebook, Instagram, WhatsApp, Vimeo, Email, Tumblr, or YouTube.
The best part about this app is it supports multiple international languages, fits the popular ratios of Instagram and YouTube during exporting of video, allows real-time preview of clips, exports HD videos, and provides overlay elements for the best video editing experience.
Let’s go through the step-by-step guide –
Step 1: Select video and audio
Install Filmora on your Android device and launch it. Click the ‘CREATE NEW VIDEO’ over there and select the desired video. After that, tap on the ‘Add’ button found on the right side of the screen and click ‘NEXT’ on the top right part of the mobile screen.

Step 2: Add audio to video
You will be navigated to the editing interface. Click on ‘MUSIC’ from the right toolbar and then choose the desired audio after pressing plus icon. Play and confirm the audio by clicking ‘OKAY’ on the top right corner.

Step 3: Export
You can swap the music by clicking the thumbnail icon at the bottom of the screen. Save the edited video by tapping ‘Save’

KineMaster
It is a fully-featured app in Android Play store that supports numerous images, video, and text layers along with multi-track audio, precise trimming and cutting, volume envelope control, 3D transition, color LUT features and the likes.
It allows a great amount of control for an app that does editing over a mobile. Artists and educators will make use of the handwriting layers for drawing directly over the video. It supports most of the video, audio, and image formats.
Tutorial Guide for KineMaster –
Step 1: Launch KineMaster
Install and launch the app on your Android phone. Click the ‘+’ icon found in the middle of the app screen and then tap ‘Empty Project’ for a new project or ‘Project Assistant’ otherwise.

Step 2: Select media
Under the media tab, choose the desired video file and then tap ‘Background Audio’ tab. From the left panel you can choose almost 8 categories for audio.
Tips: Without tapping the plus ‘+’ icon on the music, the audio will be added to the desired video.

Step 3: Edit and export
Now, select the preferred audio track and click the share icon from the left panel. Confirm your actions by tapping ‘Export’.
Note: Voice change, looping music, or setting up the fade in/out effect is a cake walk with this app. You can also set resolution, frame rate, and bitrate using this video editing app.

2. How to add audio to video on iPhone/iPad
iMovie
If you want to add music to video in your iPhone, then the in-built iMovie option helps you import music from Theme, iTunes and your own music. Your videos will be turned into exhilarating master pieces.
You can effortlessly browse through the music files and create awesome 4K-resolution movie and Hollywood-style trailers to amaze your friends. iMovie is built to work in sync with your iOS and Mac devices.
It doesn’t matter where you are working, we mean from your iPhone to your iPad or Mac system, the project can be synced automatically as you move ahead. Once you are done editing, the movie will show up on iMovie Theatre across your iOS and Mac devices.
The step-by-step guide to add music to video using iMovie –
Step 1: On your iPhone launch the iMovie app and click ‘Project’ from the top of the screen, and tap ‘Create Project’ represented by a ‘+’ icon.

Step 2: Now, click ‘Create’ and then ‘Movie’ to open the project interface on screen. Browse the ‘Media’ option from the top left corner of the timeline and explore the video gallery on screen and pick the desired video for editing then hit ‘Add’ and then ‘Use’.

Step 3: The source video gets added to the timeline. You need to reach to the starting point of the video, so that you can add audio from there. Add audio by following similar process to that of adding video from the gallery, but tap ‘Audio’ after clicking the ‘Add Media’ button. Ensure that music has been placed at background, by tapping the ‘Background’ button from the bottom of the screen. By clicking the ‘Theme Music’ option you can find the synced media on your device.

Step 4: Click ‘Play’ for previewing the audio visual, and click ‘Done’ if satisfied with your new creation.
Tip: iMovie will loop the background audio automatically, in case the video runs longer than the audio. It is recommended to adjust their lengths while merging them.
Part 4: How to download royalty free music from website
Few of the video editing software comes up with in-built library for music but not all of them. When there is no music with the software, you might import music from an external source to add audio to your video.
The biggest problem while using the audio tracks is copyright issues, they are not always copyright free. But, there is nothing to worry about. There are sites that offer free of cost stock music/audio tracks across genres that you can use and make a breath-taking audio visual. Let’s go through the most popular royalty free music sites.
Free Stock Music
Free Stock Music contains a library full of audio tracks across genres that you can avail for free. MP3, AIFF, and WAV audio formats are available within this site and asks you for free sign-up. You don’t have to provide any attribution to download the music.

Machinima Sound
Though this site doesn’t offer free music for you, few tracks might be there to suit your needs. You can find them under ‘LEGACY TRACKS’ at the bottom of the page. This site has a huge collection of tracks divided into genres, moods, and stingers. The audio is available in MP3 format and for attributions you might need specific license.

Free Soundtrack Music
Free Soundtrack Music enables you to access numerous royalty-free music tracks that you can make use of in your audio-visuals. Brilliant audio tracks are available with this audio library that you can download and add to your videos. When they say add credit, it usually means the music is paid and you need to buy the credits.

Part 5: Audio editing - 5 tips for mixing audio
Keyframe audio Levels
After fixing the primary audio, you shift your task to the new audio that you are adding to the video. Preview your track and make adjustments, then add the music to timeline and start balancing everything that seems out of place by managing the keyframes. Either work with the clip keyframes, or with the entire track, do whatever seems more pleasing with the composition.
Use filters and effects
You can apply filters/effects as you require, and keep in mind that an audio should only be added for enhanced effects, when you have a clear source for that effect. They shouldn’t make the composition weird. Use appropriate filters that separate a voice-over and a telephonic voice from usual dialogue in a video/audio.
Volume is important
Editing video or audio clip is just like attending a live concert. If not paid attention, the surrounding music will overpower the vocalist, or the guitar might be too low to be audible due to the dominant bass effect. The volume should be properly tuned to match with the rest of the audio visuals while adding audio to video. You can pick portions of the audio and balance audio level accordingly to allow a drop in volume during vocals and rise when there are no vocals.
Change tempo
The change in tempo enhances the composition. You can get creative and experiment. Let’s say there is a portion in your video that is slow and has music at a regular pace. Then why not stretch the tempo and slow it down to blend properly with your video? Altering the tempo brings more creative aspects to create better audio visuals.
Use fade in and fade out
While adding audio to video, if the new one music is instrumental whereas the existing one in the video is a quiet background track, the sudden change in volume might sound weird. Effective use of fades can lower the aural unexpectedness of the instruments.
Final Verdict
Coming towards the end of the discussion and after going through an elaborated list of video editing applications, we came to a final verdict that Filmora sound to be the best out of them. It allows you to flawlessly edit audio and video files on your desktop, with multiple in-built royalty free music tracks to choose from that can enhance your video’s beauty.
Shanoon Cox
Shanoon Cox is a writer and a lover of all things video.
Follow @Shanoon Cox
Shanoon Cox
Mar 27, 2024• Proven solutions
Videos are everywhere around us, to promote a brand, create an Ad, or for larger programs like movies. Only a voice-over or a clip fails to grab attention of the audience, so you got to add music to the video and make it spectacularly fascinating. By adding background music to a video, you kill its monotony and make it more appealing to touch people’s heart and evoke the response your video is intended to.
If you want to explore the numerous options to edit and add audio to videos with free audio editor , then you have come to the right spot.
Through this article, we are going to introduce you to various desktop, and phone based applications as well as free online methods to help you add audio to your videos and make them strikingly beautiful.
- Part1: How to add music to videos on Desktop
- Part2: How to add audio to video online
- Part3: How to add music to videos on Mobile Phone
- Part4: How to download royalty free music from website
- Part5: Audio editing - 5 tips for mixing audio
You may also like
15 Free Music Sites to Use (Royalty Free) >>
Part 1: How to add music to videos on Desktop
1. How to add audio to videos with for Windows 10, 8, 7
Filmora
When you need a video editing software application that comes with a brilliant built-in audio library, you can undoubtedly pick Filmora to save you.
This is a perfect application for Windows PC, which enables you to add music to video (.MP3, .WMA, or .OGG audio files to .AVI, .MP4, .MKV videos) files while allowing you to remove any existing background music from the videos as well. Its intuitive design with drag and drop features makes editing videos cake walk.
Isn’t it great when the software supports such wide varieties of audio and video formats and helps you create the most enthralling videos for you?
Explore the way it transforms your mundane videos to an exquisite piece of art, within no time. Here is the step-by-step guide for Filmora –
Step 1: Where to import audio
Install Wondershare Filmora from the official website on your computer and launch it. Once the software gets launched tap ‘MEDIA’ and then click the ‘IMPORT’ tab just below the menu bar. Now, from the drop down list click on ‘Import Media Files’ to choose the video file, and then repeat the process to pick a desired background music file.
Note: You can also use the in-built music tracks to add music to your video by selecting the ‘MUSIC’ tab.
Step 2: How to add music to timeline
Now, hover the mouse over the audio and video files you have just imported to Filmora and then tap the ‘+’ sign on it (displays ‘Add to Project’). You can also drag the media files down to the timeline.
Step 3: Edit music file
You can edit the music by double tapping the audio from the timeline. It will show you the audio panel at the top of the screen. You can the audio to fade in or fade out, manage the volume, pitch, speed, and set the desired equalizer as well.
Step 4: Export
Now that you have made the desired changes to your video, tap on the ‘EXPORT’ tab on the toolbar to export the video. The exported file can be saved in .MP4, and .WMV formats and rename, define the resolution as well.
2. How to add audio to videos on Mac
VLC
Most people have no idea that VLC is not only a media player but a video editor as well, which allows you to add music to video. This open source cross-platform multimedia player supports almost all multimedia files and various streaming protocols.
VLC step-by-step guide to add audio to video –
Step 1: Add audio file
First of all install VLC media player on your computer and launch it. Now, tap the click file tab from the menu bar at the top. After that, pick the ‘Advanced Open File’ option from the drop down menu.
Step 2: Import audio and video
You need to click the ‘Browse…’ button for importing video, and select the ‘Play another media synchronously’. Now, click the ‘Choose…’ button for importing an audio file for editing. After that, you need to click the ‘Open’ button. You also have the option for adding sub-titles to your video. Now that you have imported and merged both the audio and video files, you can also enhance the audio settings.
Step 3: Quick Tip
Tap the ‘Window’ from the top bar and click on ‘Audio Effects…’ for applying the various audio effects to your edited video.
QuickTime
QuickTime Player is the default media player for Mac computer that supports older medial formats including QTVR, MIDI files on Snow Leopard and OS X Lion, and interactive QuickTime movies.
Entering QuickTime 7 Pro registration codes, you can unlock the QuickTime Pro functions that will enable you to add music to video files. If you don’t have it on your computer, then install it and find under the ‘Utilities’ folder within the ‘Applications’ folder. Here is the step-by-step guide for QuickTime to add audio to video –
Step 1: Import the files
First of all, launch QuickTime Player and tap ‘File’ and then click ‘Open File’. Pick your desired audio file to be imported. On the subsequent window of QuickTime Player, select ‘Edit’ and then tap ‘Select All’ to import the complete audio file. Hit ‘Edit’ and tap on the ‘Copy’ option.
Step 2: Import video and add audio to QuickTime movie
Now, you need to open the desired video that you are going to add audio to. For that, you need to first open the video in QuickTime and the click ‘Edit’ and ‘Add Clip to End’.
Note: You can add a part of the audio to the video by tapping ‘Edit’ and then ‘Add to Selection and Scale’. ‘Add to Selection and Scale’ fastens or lowers down the pace of the audio track to fit with the video’s length (that you have selected to add audio to).
3. How to add audio to videos with on Linux
Mkvmerge
This software for the Linux system is broadly known for editing the Matroska Multimedia Container. The GUI of this tool is much appealing but is rather simple and basic.
The software helps you to merge the audio or video multimedia streams into one single Matroska file. Matroska acts exactly like AVI, ASF, or MP4 the common container files. The Matroska files have .MKV extension for videos which includes audio and subtitles as well, files with a .MK3D extension represent stereoscopic video, .MKS for only subtitles, and .MKA for audio-only files.
Step-by-step guide for merging audio into video: (MKV ONLY)
Step 1: Add audio to video files
Download the software and launch it on your Linux computer. From the mkvtoolnix-gui package, open the mkvmerge GUI. Click the ‘add’ button for importing the audio and video files to the software interface.
Step 2: Choose the audio track
After importing the audio and video files, select the new audio tracks by marking the check boxes against them, under the ‘Tracks, chapters and tags’ section. You can also set the language in the ‘General track options’ and delay under ‘Format specific options’ tab.
Step 3: Merge the files
Mention the output format under ‘Output filename’ section and then tap ‘Start muxing’. This process will save the video file. Using this program you can also remover tracks from a video and fix the default audio track as well.
Part 2: How to add music to videos online
Mp3Care
MP3Care is an online video editing application that people mostly use to add audio to video files. This application wipes out the existing audio track from the video file and mixes the new audio file that you upload to create an interesting video.
The supported audio input format is MP3, whereas the supported video files include MKV, FLV, AVI, MOV, MP4, and WMV. You can record a video on your mobile phone or tablet and merge a desired audio background with this using MP3Care. All you need to do is select this recorded video and a preferred audio track in this website and get going.
Steps for adding audio track to video –
Step 1: Launch the web browser and open this application, then choose the audio and video file as per the online instruction.
Step 2: After you are done with the video selection, tap ‘ADD MUSIC TO VIDEO’ and then download your edited video file.
AddAudioToVideo
AddAudioToVideo is an online application for adding music/audio to a video. MP3 audio and AVI, WMV, MOV, and MP4 video formats are only supported with this program. It replaces the MP3 audio from any video and the uploaded files get removed after a while from the web.
Step-by-step guide –
Step 1: Choose a video file
You need to first select the video file from your local drive after browsing to this site.
Step 2: Choose audio files
Select the MP3 audio file after the video file. Tap ‘Upload’ to get the files uploaded to the program and wait for some time to get them merged together.
Tip: The video file size limit is up to 500 MB.
Check out more ways of adding music to video online >>
Part 3: How to add music to videos on Mobile Phone
1. How to add audio to video on Android
Filmora
The best method to add music to video files on Android devices is none other than Filmora. A video editing app that has no time limit to edit a video and leaves no watermark on videos either is always the talk of the show.
Using the music and effects, you can indeed make hilarious funny-videos to entertain yourself and your friends. You can create videos simply by selecting pictures and videos from your phone, Instagram, or Facebook and select a theme, template, mix some music, transitions, subtitles, filters etc. and then get the video saved on your phone or shared over popular social media platforms like Facebook, Instagram, WhatsApp, Vimeo, Email, Tumblr, or YouTube.
The best part about this app is it supports multiple international languages, fits the popular ratios of Instagram and YouTube during exporting of video, allows real-time preview of clips, exports HD videos, and provides overlay elements for the best video editing experience.
Let’s go through the step-by-step guide –
Step 1: Select video and audio
Install Filmora on your Android device and launch it. Click the ‘CREATE NEW VIDEO’ over there and select the desired video. After that, tap on the ‘Add’ button found on the right side of the screen and click ‘NEXT’ on the top right part of the mobile screen.
Step 2: Add audio to video
You will be navigated to the editing interface. Click on ‘MUSIC’ from the right toolbar and then choose the desired audio after pressing plus icon. Play and confirm the audio by clicking ‘OKAY’ on the top right corner.
Step 3: Export
You can swap the music by clicking the thumbnail icon at the bottom of the screen. Save the edited video by tapping ‘Save’
KineMaster
It is a fully-featured app in Android Play store that supports numerous images, video, and text layers along with multi-track audio, precise trimming and cutting, volume envelope control, 3D transition, color LUT features and the likes.
It allows a great amount of control for an app that does editing over a mobile. Artists and educators will make use of the handwriting layers for drawing directly over the video. It supports most of the video, audio, and image formats.
Tutorial Guide for KineMaster –
Step 1: Launch KineMaster
Install and launch the app on your Android phone. Click the ‘+’ icon found in the middle of the app screen and then tap ‘Empty Project’ for a new project or ‘Project Assistant’ otherwise.
Step 2: Select media
Under the media tab, choose the desired video file and then tap ‘Background Audio’ tab. From the left panel you can choose almost 8 categories for audio.
Tips: Without tapping the plus ‘+’ icon on the music, the audio will be added to the desired video.
Step 3: Edit and export
Now, select the preferred audio track and click the share icon from the left panel. Confirm your actions by tapping ‘Export’.
Note: Voice change, looping music, or setting up the fade in/out effect is a cake walk with this app. You can also set resolution, frame rate, and bitrate using this video editing app.
2. How to add audio to video on iPhone/iPad
iMovie
If you want to add music to video in your iPhone, then the in-built iMovie option helps you import music from Theme, iTunes and your own music. Your videos will be turned into exhilarating master pieces.
You can effortlessly browse through the music files and create awesome 4K-resolution movie and Hollywood-style trailers to amaze your friends. iMovie is built to work in sync with your iOS and Mac devices.
It doesn’t matter where you are working, we mean from your iPhone to your iPad or Mac system, the project can be synced automatically as you move ahead. Once you are done editing, the movie will show up on iMovie Theatre across your iOS and Mac devices.
The step-by-step guide to add music to video using iMovie –
Step 1: On your iPhone launch the iMovie app and click ‘Project’ from the top of the screen, and tap ‘Create Project’ represented by a ‘+’ icon.
Step 2: Now, click ‘Create’ and then ‘Movie’ to open the project interface on screen. Browse the ‘Media’ option from the top left corner of the timeline and explore the video gallery on screen and pick the desired video for editing then hit ‘Add’ and then ‘Use’.
Step 3: The source video gets added to the timeline. You need to reach to the starting point of the video, so that you can add audio from there. Add audio by following similar process to that of adding video from the gallery, but tap ‘Audio’ after clicking the ‘Add Media’ button. Ensure that music has been placed at background, by tapping the ‘Background’ button from the bottom of the screen. By clicking the ‘Theme Music’ option you can find the synced media on your device.
Step 4: Click ‘Play’ for previewing the audio visual, and click ‘Done’ if satisfied with your new creation.
Tip: iMovie will loop the background audio automatically, in case the video runs longer than the audio. It is recommended to adjust their lengths while merging them.
Part 4: How to download royalty free music from website
Few of the video editing software comes up with in-built library for music but not all of them. When there is no music with the software, you might import music from an external source to add audio to your video.
The biggest problem while using the audio tracks is copyright issues, they are not always copyright free. But, there is nothing to worry about. There are sites that offer free of cost stock music/audio tracks across genres that you can use and make a breath-taking audio visual. Let’s go through the most popular royalty free music sites.
Free Stock Music
Free Stock Music contains a library full of audio tracks across genres that you can avail for free. MP3, AIFF, and WAV audio formats are available within this site and asks you for free sign-up. You don’t have to provide any attribution to download the music.
Machinima Sound
Though this site doesn’t offer free music for you, few tracks might be there to suit your needs. You can find them under ‘LEGACY TRACKS’ at the bottom of the page. This site has a huge collection of tracks divided into genres, moods, and stingers. The audio is available in MP3 format and for attributions you might need specific license.
Free Soundtrack Music
Free Soundtrack Music enables you to access numerous royalty-free music tracks that you can make use of in your audio-visuals. Brilliant audio tracks are available with this audio library that you can download and add to your videos. When they say add credit, it usually means the music is paid and you need to buy the credits.
Part 5: Audio editing - 5 tips for mixing audio
Keyframe audio Levels
After fixing the primary audio, you shift your task to the new audio that you are adding to the video. Preview your track and make adjustments, then add the music to timeline and start balancing everything that seems out of place by managing the keyframes. Either work with the clip keyframes, or with the entire track, do whatever seems more pleasing with the composition.
Use filters and effects
You can apply filters/effects as you require, and keep in mind that an audio should only be added for enhanced effects, when you have a clear source for that effect. They shouldn’t make the composition weird. Use appropriate filters that separate a voice-over and a telephonic voice from usual dialogue in a video/audio.
Volume is important
Editing video or audio clip is just like attending a live concert. If not paid attention, the surrounding music will overpower the vocalist, or the guitar might be too low to be audible due to the dominant bass effect. The volume should be properly tuned to match with the rest of the audio visuals while adding audio to video. You can pick portions of the audio and balance audio level accordingly to allow a drop in volume during vocals and rise when there are no vocals.
Change tempo
The change in tempo enhances the composition. You can get creative and experiment. Let’s say there is a portion in your video that is slow and has music at a regular pace. Then why not stretch the tempo and slow it down to blend properly with your video? Altering the tempo brings more creative aspects to create better audio visuals.
Use fade in and fade out
While adding audio to video, if the new one music is instrumental whereas the existing one in the video is a quiet background track, the sudden change in volume might sound weird. Effective use of fades can lower the aural unexpectedness of the instruments.
Final Verdict
Coming towards the end of the discussion and after going through an elaborated list of video editing applications, we came to a final verdict that Filmora sound to be the best out of them. It allows you to flawlessly edit audio and video files on your desktop, with multiple in-built royalty free music tracks to choose from that can enhance your video’s beauty.
Shanoon Cox
Shanoon Cox is a writer and a lover of all things video.
Follow @Shanoon Cox
Directory of Free, Non-Copyrighted Background Song Sources (Updated 2023)
10 Best Sources to Download Free Outro Music [No Copyright]

Liza Brown
Mar 27, 2024• Proven solutions
The more powerful the ending of a chapter or music is, the more long-lasting and powerful the impact it will leave behind in the heart and minds of the audience. Hence, one cannot deny the importance of strong outro music in the content to enhance the quality and value of it.
So here we are to guide you all about outro music and 10 best sources to download a perfect outro song.
10 Best Sources to Download Outro Music [No Copyright]
1. Filmora:
It is one of the freely available platforms that allows one to not only avail a diverse variety of features and customization options into your videos and creation but also facilitates one by being a highly compatible software that can be operated in Windows as well as Mac.
Hence this entails that Filmora is a complete package for quality and quality with your utmost desire while giving a high-end quality output with a vast personalized configuration option.
In any of your videos, Filmora offers you to drastically shift the level of your production by adding a mesmerizing outro music that well suits the content and level up the end result.
This not only offers you royalty free outro music from their own audio library but also supports importing any of your already download music files from your system and can perform multiple customization operations to enhance your video’s end result.
2. Audionautix:
If you are looking for outro music download MP3 music instantly then you have got to try Audionautix which is a website that entails one to avail as many music tracks as you want in be able to download it instantly. As soon as you deliver a link to any music, you are free to listen and download music from “music by audionatic.com”.
Without the hassle of registration or payment, you can select, search, listen and download a pool of good outro music.
3. FreePD:
This is free of cost and free from copyright hassle site where you are free to download any of the cool outro music you want. All you have to do is to download a music track and consolidate it with your composition giving you a sea of the genre of music you can choose from ranging from horror, romantic, suspense, sentimental and lot more.
Not only limited to their given library, you can download any music of your likeliness downloaded using this site on any of the social media platform.
4. Jamendo:

This domain is a connecting platform of music fonder and musicians worldwide. This aims to affiliate free music community, spreading the love with mesmerizing music and creating value surrounded by it.
The site is not only a free domain for music lovers but offers you a pool of music library that allows one to listen and download with merely a matter of a single click. With a registration process away, you can save on your systems and share free outro music on any social media platform.
5. SoundSnap:

The feature that makes this free online software outshine over the others is that it not only provides a wide variety of music but also offers a huge pallet of sound effects, distinct genre of sounds and audio clips and several samples to let you explore and play with experimenting music and enhance your creativity.
However, this requires you to make an account prior to downloading music tracks.
6. Musopen:

This website provides a free hand to record any music and download royalty free outro music. This website has recently released several Beethoven sonatas of piano, all on a public domain.
This gives you a free and publically available powerful domain to search and download any outro music no copyright.
7. Free Play Music:
This is considered as one of the renowned small-scaled company of music-licensing. You can undoubtedly call this domain a music composer, bestowing you with the online library of tons of music belonging to several genres. Moreover, this contains zillions of musical and classical pieces of work which allows one to be used as per their likeliness.
Fortunately, there exists a list of playlist with royalty free outro music and the top-ranked music tracks, all accessible from this online website. It lets one first assure regarding your choice of music by first letting one listen to the selected music then lets you download as many music tracks as you want.
8. West One Music:

West one music is basically a British production of a music company globally that facilitates you with a pool of music and songs, including intro, outro and background music around the entire world.
This company was established in the year 2003 in Soho, London with having these groups contained eight distinct labels. Fired earth music, the scoring house, noise refinery, and west one music are some of the labels that exist.
Not only limited to these facilitations but this domain offers a vast variety and distinct genre of music sounds ranging from rock band to classical, western to brass, electronic to woodwind and so many to consider.
9. AudioBlocks:
AudioBlocks is considered as one of the copyright-free websites that allows you to use any of their publically available playlist of distinct types of music that can be used as intro, outro or background depending upon the usability of the user while facilitating more than 100,000 music tracks, more than enough for one to choose the best one out of the available pool.
This website is free to use at any instant without bounding one with hidden terms and conditions and allowing them to download and utilize music from their song library at any time. One of the most highlighting features bestowed to the users by this website is that it facilitates one with royalty free outro music for the sake of commercials or any of your personal music-related projects.
Their perfectly maintained and updated listing of the songs allows one to search and choose the freshly available and trendy music from their playlist without the hassle to search it from scratch.
10. Bensound
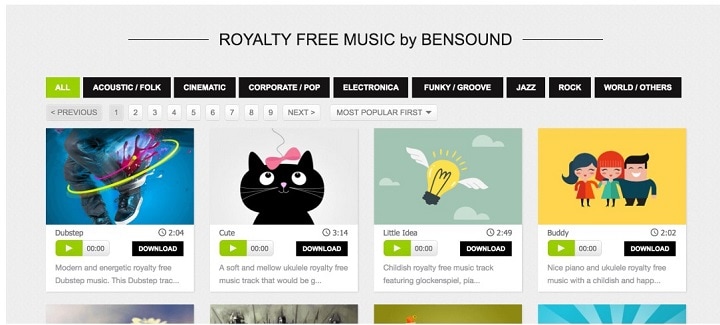
This is yet another browser-based website that is entirely free of cost to download and use music for outro song and a stock of royalty free music for the sake of either any of your multimedia projects or YouTube outro music for your productions in YouTube domain.
This facilitate one with vast palate music types ranging from classical to rock, electronica to acoustic folks and cinematic and so on, just right for any of the type of your video to elevate it to the next level.
Best Practice to Choose the Right Outro Music for Your Video
Since the quality of your production is highly relied on the beat conclusion of your music, it’s of high significance to choose a perfect outro song. But it requires you to know some of the best practices that you can follow while picking a track perfect for you. So, stay tuned!
- Evaluate the type and purpose of the video and then assessing what role the outro music will be playing in the video to best know what fits the purpose.
- You need to have an understanding of the genre of music that rightly escalates the soul of the listener and evokes the desired value.
- Make use of outro music as Bookends to indicate the ending of a video with impactful text or animation.
- You can make use of reference music to guide you to your desired music rhythm, progression, key speed or instrumentation.
- You must know your budget to spend on the outro music to create or own music as per the requirements and resources.
- If your content is on a professional level, then it’s better to consider hiring a good composer as the composition is like a backbone of the song, making it either a hit or a miss!
- Choose self-explanatory music that speaks to the viewers and best connects with them to serve the content’s purpose in an effective manner.
- You ought to consider the tone and the role of frequency.
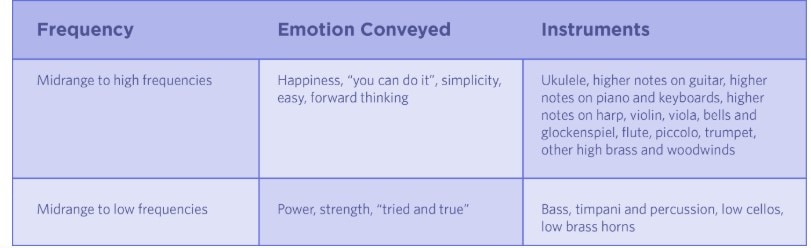
- A little break in the music catches the attention of an audience to fulfill the aim behind the content.
- Using famous music or the one that best mimics the famous ones would be best to capture the audience’s attention and interest.
What is Outro Music?
By outro music definition, it means that music is affiliated at the end of the song. However, this term is an umbrella term which also means the concluding or ending track of an album. This basically refers to the linear structure of a song starting from intro, verse, chorus, bridge, verse and then finally the outro which is used only once at the end.
However, the chorus and verse can be repeated more than once but the occurrence of intro, outro, and bridge is used only once. The primary reason for inserting an outro into a song is to have a mesmerizing and impactful ending to it, giving listeners a soothing experience since ending matters the most to leave a powerful impact behind.
A piece of outro music in the video is music or song that used at the end of the video. Outra music is important because it’s one of the key elements that attract people to what you expect.
What Are the Most Popular Style Outro Music?
As once said by a French poet, Music is the literature of heart, written with utmost love, sympathy, passion and pure emotions. It is the outro or the strong ending of the movie, play, song or literally anything that outsell the content and leave a powerful impact to be remembered forever and so does the outro of a song, making it a hit or miss for the entire content for whatever purpose that music is used for.
Hence, the significance of outro music cannot be more emphasized enough. Thus the choice of the song is utterly important and styles/genre must be chosen wisely to boost up your content or your music alone.
So let’s explore some of the best and top-ranked style of outro music and the type of content where it fits the most to give you an instant recipe of perfection!
Type 1: cinematic
Usability: victorious, sweeping, grand and big events.
Type 2: corporate
Usability: unobtrusive, inviting and engaging event.
Type 3: ambient
Usability: calm, soothing and centered events
Type 4: acoustic:
Usability: connected, empathetic, melancholy and human
Type 5: comedic
Usability: bright, bubbly, exciting and fun events
Type 6: electronic
Usability: curious, cerebral and electronic
Type 7: hip hop
Usability: confident, edgy and fast
Type 8: rock
Usability: substantial, raw and gritty
Type 9: Funk
Usability: unapologetic, bright and discordant
With this wide variety along with the usability of such outro music, you can now surely get an idea which of the above fits your content the best to uplift the perfectionism in your creation!
Composing Outro Music
Typically, the recapitulation is often used to conclude while using the sonata form is performed. To end a piece of clip or song, the thematic material is often repeated in the process to provide the closure in the tonic key from the exposition. Unexpected digression being fooled by a return in order to produce more empathic confirmation regarding the structural relationship employed to the body of the production.
Moreover, the styles of the outro also make a huge impact and difference in successfully delivering the purpose of the video.
- Fadeout Effect: the echoing effect leave a heartfelt story in heart and mind
- Full stop Effect: shows abruption, finality, emptiness and completeness effect in the song.
Having more than 300 effects available in Filmora with tons of audio editing features available for free, running on both platforms, Windows, and Mac, you can make perfect outro music for your production to attract the target audience and uplift the quality and value of your content!
How to Record Music for an Outro Using Filmora Scrn?
Filmora Scrn is a powerful tool to not only record the audio but all the video playing on the screen, thus facilitating you to record your favorite outro playing in the system.
Step1: after launching the app, tap on “get started” where you’ll see 4 tabs, “scree, audio, camera and advanced” to customize the recording setting.
Step 2: choose the “Audio” tab, where you need to select “computer audio” to record the outro song running in your system and “don’t capture” in the Microphone option.
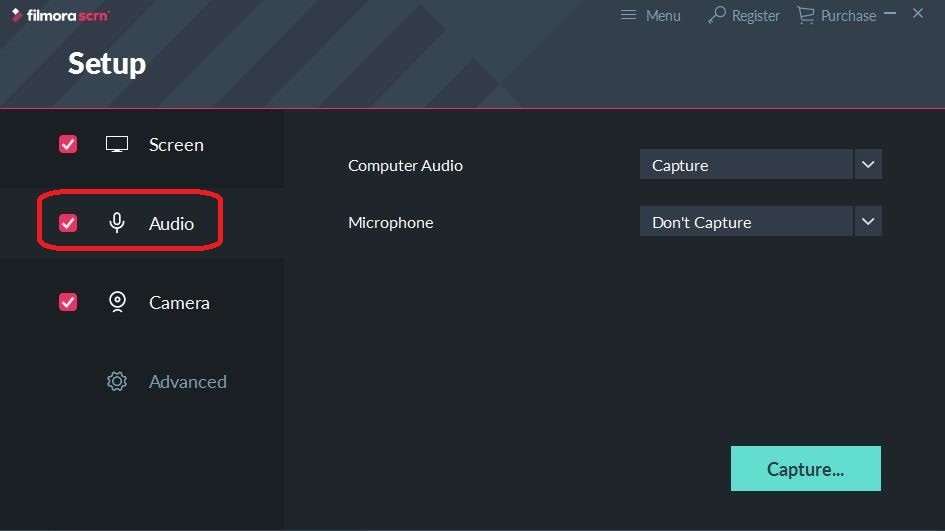
Step 3: press “record” for recording initiation.
Step 4: hit the “pause” tab to pause and F10 key to stop the recording.
Step 5: Edit the recording as per your likeliness.
Step 6: export your recording in any of the audio formats to save it.


Conclusion
As much as a powerful start of the music is important to attract the audience, the perfect end leaves an utmost impact on them, making your content valuable and distinct. Many software or website can help you make outro songs but the versatility and feasibility in use of Filmora and Filmora Scrn leave one speechless with the profound promising results it produces.
Liza Brown
Liza Brown is a writer and a lover of all things video.
Follow @Liza Brown
Liza Brown
Mar 27, 2024• Proven solutions
The more powerful the ending of a chapter or music is, the more long-lasting and powerful the impact it will leave behind in the heart and minds of the audience. Hence, one cannot deny the importance of strong outro music in the content to enhance the quality and value of it.
So here we are to guide you all about outro music and 10 best sources to download a perfect outro song.
10 Best Sources to Download Outro Music [No Copyright]
1. Filmora:
It is one of the freely available platforms that allows one to not only avail a diverse variety of features and customization options into your videos and creation but also facilitates one by being a highly compatible software that can be operated in Windows as well as Mac.
Hence this entails that Filmora is a complete package for quality and quality with your utmost desire while giving a high-end quality output with a vast personalized configuration option.
In any of your videos, Filmora offers you to drastically shift the level of your production by adding a mesmerizing outro music that well suits the content and level up the end result.
This not only offers you royalty free outro music from their own audio library but also supports importing any of your already download music files from your system and can perform multiple customization operations to enhance your video’s end result.
2. Audionautix:
If you are looking for outro music download MP3 music instantly then you have got to try Audionautix which is a website that entails one to avail as many music tracks as you want in be able to download it instantly. As soon as you deliver a link to any music, you are free to listen and download music from “music by audionatic.com”.
Without the hassle of registration or payment, you can select, search, listen and download a pool of good outro music.
3. FreePD:
This is free of cost and free from copyright hassle site where you are free to download any of the cool outro music you want. All you have to do is to download a music track and consolidate it with your composition giving you a sea of the genre of music you can choose from ranging from horror, romantic, suspense, sentimental and lot more.
Not only limited to their given library, you can download any music of your likeliness downloaded using this site on any of the social media platform.
4. Jamendo:
This domain is a connecting platform of music fonder and musicians worldwide. This aims to affiliate free music community, spreading the love with mesmerizing music and creating value surrounded by it.
The site is not only a free domain for music lovers but offers you a pool of music library that allows one to listen and download with merely a matter of a single click. With a registration process away, you can save on your systems and share free outro music on any social media platform.
5. SoundSnap:
The feature that makes this free online software outshine over the others is that it not only provides a wide variety of music but also offers a huge pallet of sound effects, distinct genre of sounds and audio clips and several samples to let you explore and play with experimenting music and enhance your creativity.
However, this requires you to make an account prior to downloading music tracks.
6. Musopen:
This website provides a free hand to record any music and download royalty free outro music. This website has recently released several Beethoven sonatas of piano, all on a public domain.
This gives you a free and publically available powerful domain to search and download any outro music no copyright.
7. Free Play Music:
This is considered as one of the renowned small-scaled company of music-licensing. You can undoubtedly call this domain a music composer, bestowing you with the online library of tons of music belonging to several genres. Moreover, this contains zillions of musical and classical pieces of work which allows one to be used as per their likeliness.
Fortunately, there exists a list of playlist with royalty free outro music and the top-ranked music tracks, all accessible from this online website. It lets one first assure regarding your choice of music by first letting one listen to the selected music then lets you download as many music tracks as you want.
8. West One Music:
West one music is basically a British production of a music company globally that facilitates you with a pool of music and songs, including intro, outro and background music around the entire world.
This company was established in the year 2003 in Soho, London with having these groups contained eight distinct labels. Fired earth music, the scoring house, noise refinery, and west one music are some of the labels that exist.
Not only limited to these facilitations but this domain offers a vast variety and distinct genre of music sounds ranging from rock band to classical, western to brass, electronic to woodwind and so many to consider.
9. AudioBlocks:
AudioBlocks is considered as one of the copyright-free websites that allows you to use any of their publically available playlist of distinct types of music that can be used as intro, outro or background depending upon the usability of the user while facilitating more than 100,000 music tracks, more than enough for one to choose the best one out of the available pool.
This website is free to use at any instant without bounding one with hidden terms and conditions and allowing them to download and utilize music from their song library at any time. One of the most highlighting features bestowed to the users by this website is that it facilitates one with royalty free outro music for the sake of commercials or any of your personal music-related projects.
Their perfectly maintained and updated listing of the songs allows one to search and choose the freshly available and trendy music from their playlist without the hassle to search it from scratch.
10. Bensound
This is yet another browser-based website that is entirely free of cost to download and use music for outro song and a stock of royalty free music for the sake of either any of your multimedia projects or YouTube outro music for your productions in YouTube domain.
This facilitate one with vast palate music types ranging from classical to rock, electronica to acoustic folks and cinematic and so on, just right for any of the type of your video to elevate it to the next level.
Best Practice to Choose the Right Outro Music for Your Video
Since the quality of your production is highly relied on the beat conclusion of your music, it’s of high significance to choose a perfect outro song. But it requires you to know some of the best practices that you can follow while picking a track perfect for you. So, stay tuned!
- Evaluate the type and purpose of the video and then assessing what role the outro music will be playing in the video to best know what fits the purpose.
- You need to have an understanding of the genre of music that rightly escalates the soul of the listener and evokes the desired value.
- Make use of outro music as Bookends to indicate the ending of a video with impactful text or animation.
- You can make use of reference music to guide you to your desired music rhythm, progression, key speed or instrumentation.
- You must know your budget to spend on the outro music to create or own music as per the requirements and resources.
- If your content is on a professional level, then it’s better to consider hiring a good composer as the composition is like a backbone of the song, making it either a hit or a miss!
- Choose self-explanatory music that speaks to the viewers and best connects with them to serve the content’s purpose in an effective manner.
- You ought to consider the tone and the role of frequency.
- A little break in the music catches the attention of an audience to fulfill the aim behind the content.
- Using famous music or the one that best mimics the famous ones would be best to capture the audience’s attention and interest.
What is Outro Music?
By outro music definition, it means that music is affiliated at the end of the song. However, this term is an umbrella term which also means the concluding or ending track of an album. This basically refers to the linear structure of a song starting from intro, verse, chorus, bridge, verse and then finally the outro which is used only once at the end.
However, the chorus and verse can be repeated more than once but the occurrence of intro, outro, and bridge is used only once. The primary reason for inserting an outro into a song is to have a mesmerizing and impactful ending to it, giving listeners a soothing experience since ending matters the most to leave a powerful impact behind.
A piece of outro music in the video is music or song that used at the end of the video. Outra music is important because it’s one of the key elements that attract people to what you expect.
What Are the Most Popular Style Outro Music?
As once said by a French poet, Music is the literature of heart, written with utmost love, sympathy, passion and pure emotions. It is the outro or the strong ending of the movie, play, song or literally anything that outsell the content and leave a powerful impact to be remembered forever and so does the outro of a song, making it a hit or miss for the entire content for whatever purpose that music is used for.
Hence, the significance of outro music cannot be more emphasized enough. Thus the choice of the song is utterly important and styles/genre must be chosen wisely to boost up your content or your music alone.
So let’s explore some of the best and top-ranked style of outro music and the type of content where it fits the most to give you an instant recipe of perfection!
Type 1: cinematic
Usability: victorious, sweeping, grand and big events.
Type 2: corporate
Usability: unobtrusive, inviting and engaging event.
Type 3: ambient
Usability: calm, soothing and centered events
Type 4: acoustic:
Usability: connected, empathetic, melancholy and human
Type 5: comedic
Usability: bright, bubbly, exciting and fun events
Type 6: electronic
Usability: curious, cerebral and electronic
Type 7: hip hop
Usability: confident, edgy and fast
Type 8: rock
Usability: substantial, raw and gritty
Type 9: Funk
Usability: unapologetic, bright and discordant
With this wide variety along with the usability of such outro music, you can now surely get an idea which of the above fits your content the best to uplift the perfectionism in your creation!
Composing Outro Music
Typically, the recapitulation is often used to conclude while using the sonata form is performed. To end a piece of clip or song, the thematic material is often repeated in the process to provide the closure in the tonic key from the exposition. Unexpected digression being fooled by a return in order to produce more empathic confirmation regarding the structural relationship employed to the body of the production.
Moreover, the styles of the outro also make a huge impact and difference in successfully delivering the purpose of the video.
- Fadeout Effect: the echoing effect leave a heartfelt story in heart and mind
- Full stop Effect: shows abruption, finality, emptiness and completeness effect in the song.
Having more than 300 effects available in Filmora with tons of audio editing features available for free, running on both platforms, Windows, and Mac, you can make perfect outro music for your production to attract the target audience and uplift the quality and value of your content!
How to Record Music for an Outro Using Filmora Scrn?
Filmora Scrn is a powerful tool to not only record the audio but all the video playing on the screen, thus facilitating you to record your favorite outro playing in the system.
Step1: after launching the app, tap on “get started” where you’ll see 4 tabs, “scree, audio, camera and advanced” to customize the recording setting.
Step 2: choose the “Audio” tab, where you need to select “computer audio” to record the outro song running in your system and “don’t capture” in the Microphone option.
Step 3: press “record” for recording initiation.
Step 4: hit the “pause” tab to pause and F10 key to stop the recording.
Step 5: Edit the recording as per your likeliness.
Step 6: export your recording in any of the audio formats to save it.
Conclusion
As much as a powerful start of the music is important to attract the audience, the perfect end leaves an utmost impact on them, making your content valuable and distinct. Many software or website can help you make outro songs but the versatility and feasibility in use of Filmora and Filmora Scrn leave one speechless with the profound promising results it produces.
Liza Brown
Liza Brown is a writer and a lover of all things video.
Follow @Liza Brown
“Cutting the Clutter: Strategies for Eliminating Background Noise in Final Cut Pro”
Adobe Premiere Pro is a video editing tool. In the editing world, Premiere Pro has a separate fan base; people use this video editing tool because of its unmatchable features. People love the quality of editing that Premiere Pro delivers. Among its many features, few are color correction, safe margins, rulers, and audio assign.
Moreover, the video editor has an Auto Reframe feature. Along with this, Premiere Pro offers Comparison View and many other things. If you want to learn more about Premiere Pro and how to remove noise from video in Premiere Pro, then stay with us.
In this article
01 Remove Background Noise Premiere Pro
02 How to Mute A Clip in Premiere Pro
03 Tips and Tricks to Help You Better Editing Audio in Premiere Pro
Part 1. Remove Background Noise Premiere Pro
While recording a video, you cannot control every noise. Sometimes, you get disturbed by your doorbell. Sometimes, it’s your neighbor’s horn that might bother you or anything else. What do you do when this happens to you? Do you stop the recording and wait until it’s quiet?
If this is what you do, then let us share a smart solution with you. Background noise can be removed from your video using the remove background noise Premiere Pro feature. Allow us to share its steps to guide you more about it.
Step 1: Import the File
To remove background noise from your videos, you first need to import the media file to Premiere Pro. Then drag and drop the file onto the timeline. After that, you need to select and open the ‘Effects’ menu.

Step 2: Add Denoise Effect
On the right side of the Effects menu, type and search for ‘Denoise.’ Then, you should select the Denoise option and drag it onto the timeline over the media file. The Denoise feature removes nearly 50% of the noise automatically.

Step 3: Denoise Effects Control
The rest of the background noise can be customized. For that, head to the ‘Effects Control’ section. You will see Denoise-related options. There, click on ‘Edit’ for Custom Setup. You can adjust both the ‘Frequency’ and ‘Amount’ values.

Step 4: Voice Enhance Effect
Removing background noise damages the quality of voice. This quality can be improved by using ‘Vocal Enhance.’ You can search it from the search bar in the Effects tab and drag it over to the media file in the timeline. You can also customize this from the ‘Effects Control’ tab.

Part 2. How to Mute A Clip in Premiere Pro
Sometimes, you might need to mute a clip. You can use such clips as your status. You can also add your desired background music and then share the clips. In any case, you need to mute the clip, but what if you don’t know how to mute the clip in Premiere Pro?
Don’t worry because we are here to help you. The following section of this article will share different methods to mute clips in Adobe Premiere Pro.
Method 1: The first method is to mute an entire clip on the timeline. This could be done by checking the Mute Track ‘M’ button. You will find the mute button beside the track name.

Method 2: The next method is to mute a specific clip. For that, go to the ‘Audio’ section from the menu bar. Then, look at the ‘Essential Sound’ panel on the right side of the screen. From you will see various tags. Open your desired tag and check the box against the ‘Mute’ option.

Method 3: Another method that could be used to mute a clip is by right-clicking on the clip that you want to mute. A menu appears on the screen. From that menu, you need to uncheck the ‘Enable’ button. This mutes the clip.

Method 4: The next method demands you to first select the video clip. Then, from the menu bar, head over to the ‘Editing’ tab. There go to the ‘Audio Clip Mixer’ section. You will see volume sliders; drag down the Volume slider to negative to mute the clip.

Part 3. Tips and Tricks to Help You Better Editing Audio in Premiere Pro
As we have mentioned earlier, noise removal damages the overall quality of the audio. All your effort goes to waste if your voice is not clear or anything else. Now that you know how you can handle background noise removal, it’s time to talk about something new and different.
The following section of this article is going to share tips and tricks that could be adopted. These will help you to get better and improved quality while editing audio.
1. Restore Bass
The first tip that we are going to introduce is restoring the bass of the media file. You can do this by using the Parametric Equalizer and dragging it onto the timeline. With an equalizer, you can play with different audio frequencies. Whatsoever suits the best, you can set it.
2. Atmosphere Setting
Its essential to first of all create an atmosphere. For this, you can mix sounds, add reverb and even adjust the loudness. An ambiance audio tag can be used for background noise. You need to set the scene for your music or the dialogue.
3. Compress the Audio
To make the audio better and more consistent, it is essential to compress it. Like the name is presenting, compression lowers the volume of loud parts, increases the volume of fairly quiet parts, it compresses the waveform of audio. After compression, your audio sounds instantly better, especially the voices.
4. Dialogue Adjustments
You can unify different recordings for a common loudness if you tag audio clips as Dialogue. If you plan to add a voiceover to your video, then you must improve the clarity, reduce or remove any background noise and also, adjust the reverb. Subtitles could be added to make the conversation understandable in your video.
5. Remove Noise
The noise of the computer fan or the weird hissing noise of the microphone and other similar things are referred to as Background noise. This can become a distracting element. While editing the audio, it matters that you remove the background noise because it does not get automatically removed. So, to have good audio, always remove background noise.
Bottom Line
If background noise is bothering you, then this problem is resolved. The article above has shared how to remove noise from video in premiere pro. The easy step-by-step guide for removing background noise with Premiere Pro has been shared.
To remove background noise, Premiere Pro is not the only editor. Wondershare Filmora is another stunning and known video editor. You can use the tool to remove background noise from your videos. With this editor, you can also mute your clips.
Not just this, but the editor has many more classic features. Filmora allows keyframing, motion tracking, and doing cool edits with a split-screen. Color match is another offered feature among the many other features of Filmora. It also has an asset library. You can get fantastic effects, transitions, elements, and whatnot from its library.
For Win 7 or later (64-bit)
For macOS 10.12 or later
02 How to Mute A Clip in Premiere Pro
03 Tips and Tricks to Help You Better Editing Audio in Premiere Pro
Part 1. Remove Background Noise Premiere Pro
While recording a video, you cannot control every noise. Sometimes, you get disturbed by your doorbell. Sometimes, it’s your neighbor’s horn that might bother you or anything else. What do you do when this happens to you? Do you stop the recording and wait until it’s quiet?
If this is what you do, then let us share a smart solution with you. Background noise can be removed from your video using the remove background noise Premiere Pro feature. Allow us to share its steps to guide you more about it.
Step 1: Import the File
To remove background noise from your videos, you first need to import the media file to Premiere Pro. Then drag and drop the file onto the timeline. After that, you need to select and open the ‘Effects’ menu.
Step 2: Add Denoise Effect
On the right side of the Effects menu, type and search for ‘Denoise.’ Then, you should select the Denoise option and drag it onto the timeline over the media file. The Denoise feature removes nearly 50% of the noise automatically.
Step 3: Denoise Effects Control
The rest of the background noise can be customized. For that, head to the ‘Effects Control’ section. You will see Denoise-related options. There, click on ‘Edit’ for Custom Setup. You can adjust both the ‘Frequency’ and ‘Amount’ values.
Step 4: Voice Enhance Effect
Removing background noise damages the quality of voice. This quality can be improved by using ‘Vocal Enhance.’ You can search it from the search bar in the Effects tab and drag it over to the media file in the timeline. You can also customize this from the ‘Effects Control’ tab.
Part 2. How to Mute A Clip in Premiere Pro
Sometimes, you might need to mute a clip. You can use such clips as your status. You can also add your desired background music and then share the clips. In any case, you need to mute the clip, but what if you don’t know how to mute the clip in Premiere Pro?
Don’t worry because we are here to help you. The following section of this article will share different methods to mute clips in Adobe Premiere Pro.
Method 1: The first method is to mute an entire clip on the timeline. This could be done by checking the Mute Track ‘M’ button. You will find the mute button beside the track name.
Method 2: The next method is to mute a specific clip. For that, go to the ‘Audio’ section from the menu bar. Then, look at the ‘Essential Sound’ panel on the right side of the screen. From you will see various tags. Open your desired tag and check the box against the ‘Mute’ option.
Method 3: Another method that could be used to mute a clip is by right-clicking on the clip that you want to mute. A menu appears on the screen. From that menu, you need to uncheck the ‘Enable’ button. This mutes the clip.
Method 4: The next method demands you to first select the video clip. Then, from the menu bar, head over to the ‘Editing’ tab. There go to the ‘Audio Clip Mixer’ section. You will see volume sliders; drag down the Volume slider to negative to mute the clip.
Part 3. Tips and Tricks to Help You Better Editing Audio in Premiere Pro
As we have mentioned earlier, noise removal damages the overall quality of the audio. All your effort goes to waste if your voice is not clear or anything else. Now that you know how you can handle background noise removal, it’s time to talk about something new and different.
The following section of this article is going to share tips and tricks that could be adopted. These will help you to get better and improved quality while editing audio.
1. Restore Bass
The first tip that we are going to introduce is restoring the bass of the media file. You can do this by using the Parametric Equalizer and dragging it onto the timeline. With an equalizer, you can play with different audio frequencies. Whatsoever suits the best, you can set it.
2. Atmosphere Setting
Its essential to first of all create an atmosphere. For this, you can mix sounds, add reverb and even adjust the loudness. An ambiance audio tag can be used for background noise. You need to set the scene for your music or the dialogue.
3. Compress the Audio
To make the audio better and more consistent, it is essential to compress it. Like the name is presenting, compression lowers the volume of loud parts, increases the volume of fairly quiet parts, it compresses the waveform of audio. After compression, your audio sounds instantly better, especially the voices.
4. Dialogue Adjustments
You can unify different recordings for a common loudness if you tag audio clips as Dialogue. If you plan to add a voiceover to your video, then you must improve the clarity, reduce or remove any background noise and also, adjust the reverb. Subtitles could be added to make the conversation understandable in your video.
5. Remove Noise
The noise of the computer fan or the weird hissing noise of the microphone and other similar things are referred to as Background noise. This can become a distracting element. While editing the audio, it matters that you remove the background noise because it does not get automatically removed. So, to have good audio, always remove background noise.
Bottom Line
If background noise is bothering you, then this problem is resolved. The article above has shared how to remove noise from video in premiere pro. The easy step-by-step guide for removing background noise with Premiere Pro has been shared.
To remove background noise, Premiere Pro is not the only editor. Wondershare Filmora is another stunning and known video editor. You can use the tool to remove background noise from your videos. With this editor, you can also mute your clips.
Not just this, but the editor has many more classic features. Filmora allows keyframing, motion tracking, and doing cool edits with a split-screen. Color match is another offered feature among the many other features of Filmora. It also has an asset library. You can get fantastic effects, transitions, elements, and whatnot from its library.
For Win 7 or later (64-bit)
For macOS 10.12 or later
Also read:
- Updated Edit MP3 Basic and Useful Tips
- New 2024 Approved Transform Your Virtual Presence A Look at The Top 5 Voice Change Tools for Google Meet
- New Step-by-Step Method for Incorporating Music Into GIFs on a Mac Device for 2024
- New Cutting-Edge MP3 Editing Solutions for Mac A Comprehensive Review of Leading Cutter Tools
- New In 2024, Mastering Spotify Downloads An Expert Guide for Extracting Songs
- The Path to Pristine Sounds A Guide to Clearing Up Internet-Based Auditory Interruptions
- New 2024 Approved Digital Audio Tutorial Removing Drum Beats From Your Songs with Ease
- New 2024 Approved Uncover the Acoustic Bell Tone Excerpt
- 2024 Approved Voice Cloning Simplified Two Approaches to Achieve Consistent AI Voices
- Updated In 2024, Top Methods for Pulling Spotify Music Tracks Without Subscription
- Updated In 2024, Top 10 Free Browser-Based DAWs for Creatives
- Updated 2024 Approved Skype Voice Changer 5 Useful Tools to Change Voice for Skype
- 2024 Approved Exploring Resources for Clap-Induced Acoustic Enhancements
- Updated 2024 Approved Best Audio Mixers For Enhancing Your Streaming
- Updated Free Methods to Embed Songs Within Video Content Creation Processes for 2024
- Voice Mastery on Mac An Intuitive Tutorial for First-Time Users
- Updated The Singers Secrets to Crafting a New Voice Identity for 2024
- In 2024, How to Change Pitch in Audacity? Without Losing Quality
- 2024 Approved Most Popular Background Scores for Films & Videos Updated List 2023
- Auditory Landmarks Pinpointing Button-Induced Sounds in Software for 2024
- Updated Harmonizing Silence A Comprehensive Guide to Muting Superfluous Sounds and Background Distractions in VisionPro Studio
- In 2024, Acoustic Isolation Device Separate Music From Visuals Flawlessly
- Updated The Leading Edge in Natural Language Processing Voice Synthesis Technologies
- Updated In 2024, Sonic Sanctuary A Comprehensive Guide to Reducing Reverberation Effects on Audio Fidelity
- New In 2024, Masterclass Identifying the Best Vocal Effacement Tools and Programs
- New Creative Freedom at No Cost Top Free Audio Engineering Tools of the Year
- Updated Digital Sound Seekers Five Progressive Tactics for MP4 Audio Extraction
- Updated In 2024, The Updated Guide to Video-Audio Integration for Filmmakers
- Elite Sound Mixers for Superior Stream Quality for 2024
- New Achieving Acoustic Perfection The Top Noise-Canceling Apps of the Future for 2024
- Updated Step-by-Step Guide to Harnessing the Power of Morphvox in Virtual Worlds for 2024
- New Expert Sound Engineers to Elevate Live and On-Demand Streams for 2024
- New 2024 Approved Exploring the Best Available Free Audio Editing Solutions for Windows and Mac Enthusiasts
- Setting Up Audacity on Your Chromebook A Step-by-Step Guide for 2024
- New In 2024, The Essential List of Top 10 Audio Editors for Windows & Mac Platforms
- How To Get Out of Recovery on iPhone 14 Pro? | Dr.fone
- Is GSM Flasher ADB Legit? Full Review To Bypass Your Infinix Note 30 Phone FRP Lock
- In 2024, Easiest Guide How to Clone Realme 11 5G Phone? | Dr.fone
- In 2024, Top 5 Car Locator Apps for Xiaomi Redmi Note 12 Pro 5G | Dr.fone
- 6 Things We Can Do To Save A Water Damaged iPhone 7 Plus | Stellar
- Top 6 Apps/Services to Trace Any Oppo K11 5G Location By Mobile Number | Dr.fone
- New Convert Video to MP3 Like a Pro Tips for Maintaining Audio Quality for 2024
- A Wedding Is One of the Exciting Parts that Will Happen in Your Life. Its Not that Easy to Plan a Wedding, Theres a Lot to Be Consider Like Wedding Dress, Food, Venue, Videographer Etc
- In 2024, Best Pokemons for PVP Matches in Pokemon Go For Oppo Find X7 Ultra | Dr.fone
- Make Subtitles Online for Free Top 10 Resources for 2024
- Title: New The Art of Sound Integration A Detailed Tutorial on Video Audio Addition for 2024
- Author: Kate
- Created at : 2024-05-05 08:07:03
- Updated at : 2024-05-06 08:07:03
- Link: https://audio-editing.techidaily.com/new-the-art-of-sound-integration-a-detailed-tutorial-on-video-audio-addition-for-2024/
- License: This work is licensed under CC BY-NC-SA 4.0.
