
:max_bytes(150000):strip_icc():format(webp)/TheOscarsStatue-33f6c30d7ffd4694a4dd1d1113de57f5.jpg)
New REAPER Decoded In-Depth Analysis of Its Professional Recording Suite and Educational Materials for 2024
“REAPER Decoded: In-Depth Analysis of Its Professional Recording Suite and Educational Materials”
DAW stands for Digital Audio Workstation. It is where you can record, edit, mix or even master your music. You always need good DAW software to help you with the job to produce music or live recording musicians.
A good DAW software must have a multi-track audio recording , virtual instruments, MIDI sequencer, excellent mixing capabilities, and plug-in processor hosting. The software is found for all major operating systems such as Linux , Windows, and Mac. If you want to learn more about DAW, then stay with us. The article will discuss in detail REAPER Recording Software.
In this article
01 What Is REAPER Recording Software?
02 How to Download and Install REAPER Software?
03 Tutorial for Using REAPER Recording Software
Part 1. What Is REAPER Recording Software?
Recording software like REAPER records computer audio is used to produce music, edit it, transform, and customize your music. With REAPER Recording Software , you can record multi-layer audio and MIDI in various formats. REAPER has the easiest interface that allows you to drag and drop to import, split, move and do many other tasks.

This is just one feature of REAPER that sounds very interesting. In this section, we will talk about more of its features.
1. Record and Edit
You can easily record the audio and (MIDI) Musical Instrumental Digital Interface with REAPER recording software. It lets you edit and customize everything. You can record and edit things limitlessly. When it comes to recording, it’s not at all difficult for REAPER software to record various instruments or vocals.
2. Mixing
Initially, the mixer might seem inflexible, but in reality, REAPER has a lot to offer you. It has great automated capabilities for instrument and effect parameters. It doesn’t matter if you are working because you can still bounce or freeze tracks while working.
The mixer is very flexible. With REAPERs mixer, you just have to drag and drop your recordings so that you can create tracks, and also, you can customize the arrangements by moving the portions.
3. Interface
While looking at the interface, you might question yourself about how to use its interface. Some people love to learn about new things, such as the REAPER Recording Software. Whereas, some people seem least interested because the half-empty interface is not intuitive to them.
Whereas, the best thing about its interface is that you can customize it. REAPER allows you to add different wallpapers and layouts to your software interface.
4. Strong Stability
REAPER Recording Software has very strong stability. This is one of its strongest features as compared to other competitors. The RAM is rarely affected by the load time and the used resources. Moreover, the software offers a wide range of languages. You can select your desired language to run the software.
Part 2. How to Download and Install REAPER Software?
REAPER is a Digital Audio Workstation. The perfect platform where you can manipulate and transform your audio. With REAPER Record Computer audio, you can work efficiently in a resource-friendly studio with saving your time. Stay tuned if you plan to learn more about its pricing and requirements.

Pricing of REAPER Software
A reaper is a brilliant software. It has a 60-day trial period. REAPER costs $60 in total to register. It has complete MIDI sequencing. You can also get a discounted license if REAPER is the best private option for you or has commercial usage. You can set the equal license key on every computer for someone with multiple computers.
System Requirements
The recording software has uncountable features. REAPER software facilitates its users at every level by giving the best audio manipulating platform. The best thing about REAPER Recording Software is its compatibility with different operating systems. Let us add more to your knowledge on this.
Windows
REAPER software is available for Windows 7, 8, 10, XP, and Vista. The version of REAPER for Windows is 6.42. This is for Windows 64-bit whereas, a download package is also available for Windows 32-bit.
macOS
For macOS 64-bit, REAPER has a 6.42 version. This version is compatible with macOS 10.5 – 10.14. Whereas, for macOS 10.15+, the available version of REAPER is 6.42 with a 15MB file size.
Linux
REAPER Recording Software is also compatible with Linux x86_64. The REAPER version is 6.42 with an 11 MB file size. This version can also work on AMD64 64-bit.
Downloading and Installing REAPER
Now that REAPER Record Computer Audio has impressed you a lot. You must be thinking about how to download it. If this is on your mind, then we got you. Allow us to share its steps that will guide you to download the software easily.
Step 1: To install REAPER software, first of all, visit its official website. Then locate and head over to its download section.
Step 2: Click on ‘Download REAPER from the download section.’ For Windows users, they can download the Windows installation package. At the same time, Linux and macOS users can select their installation packages.
Step 3: Lastly, after you have downloaded your systems compatible installation package, you simply have to run it and then install it according to your respective operating system.
Part 3. Tutorial for Using REAPER Recording Software
After its attractive features and detailed downloading procedure, it is finally the time to talk about its works. This section of the article will explain to you more about REAPER Recording Software as we are now going to present a tutorial on how to use the software.
Understand the Layout
Understanding and knowing the layout of your software before you start working on it is essential. The crucial components of REAPER software include the Timeline, Arrangement Window, Track Panel, Toolbar, and lastly, Transport.

The Arrangement window holds all the added items. The items are played from left to right order, similar to their timeline arrangement. You can also zoom in and out. Then comes the transport toolbar, which holds the functions to stop, rewind, play, fast forward, adjust the timeline speed, etc. The toolbar holds all the toggle buttons. You can also customize your toolbar.
New Track Creation
For creating a new track on REAPER, go to the Track menu and hit Insert New Track. A track is like another layer to your audio. Multiple layers and tracks make your work complex yet interesting as you can play all the different tracks at the same time. By double-clicking in the Track Control Panel, you can set a name for the added track.

Audio Hardware Settings for Audio Recording
It is best suggested always to check your audio hardware settings before you start to record, edit or mix with REAPER Recording Software. Your primary focus should be on the recording device’s devices should be set as Input Device, whereas the listening device should be set as the Output Device.
For this, you have to select Preferences from the Options menu. A window will appear in front of you, the REAPER Preference window. You have to select the correct Input and Output devices from the dropdown menu from this window.

Arm your Track
Arming your track is very important. For this, head over to the Track Control Panel, and next to your track name, hit the red circle. If you have various tracks, you should solo this track and mute the other tracks.
As soon as the track is armed, a Gain Meter will activate on the side. From this, you can check if you have properly set the microphone or not. This could be tested by tapping on the microphone.

Record
After all, the hardware settings are done, and your track is armed, it’s time to start the recording. For that, just tap on the Record button in the Transport toolbar. A yellow line in the timeline will indicate the end of the recording.

To end the recording, tap on the Stop button from the Transport Toolbar. Lastly, REAPER Recording Software will ask you to save the file. In case you don’t want it, you can also delete it.
Create and Manipulate Clips
Things like manipulation get a lot easier if you split the clips in REAPER. From the items menu, you have to select the option of Split Item on Cursor. This divides your clip into two clips on each side of the cursor. You can also remove the clips by going to the Items Menu. From there, you just have to hit the Remove Item option, or else, simply press the Delete key on your keyboard.

Removing clips will create a gap in the arrangement window that can be filled by dragging forward the remaining clip.
Volume Adjustments – Normalize
By double-clicking on the item or by selecting ‘Item Properties’ from a right-click, you can normalize the item. A new window will appear as Media Item Properties, from where you have to locate the Volume Settings and then select the option of Normalize.
If your item is already loud, then nothing will happen, but if it is not, then the slider will change from 0.00 dB showing an increase in the volume. Lastly, hit the ‘Apply’ or ‘OK’ button to imply the changes.
Fade in/out
With the Media Properties, you can also adjust a Fade in and a Fade out. For this, you simply have to set an end time for the Fade in, whereas a start time is entered for Fade out. Hit the ‘Ok’ or ‘Apply’ button to apply the changes.
From the Arrangement window, fades can be adjusted. For adjusting the fades, hover with your mouse over the red line. You will see a newly shaped cursor. Just drag on the timeline to play and adjust the Fade with this new cursor.

Automate Changes
With REAPER, you can also automate changes in track parameters. We will guide about automation from Track Envelopes. From Track Control Panel, hit the Trim option. A new Envelopes window will open at this point from where you have to check the Volume box.
A new Volume Track will open up. Here, you have to set new Envelope points. That could be done by holding the shift key, right-clicking on the point, and then selecting Create New Point. A green circle will indicate the new point.
By dragging the Envelope point, you can also adjust the volume. Dragging it towards the top will increase the volume, whereas dragging it towards the bottom will eventually decrease.

Finalize the Audio – Render
After all the above steps have been completed to set the order and adjust your desired volume, the last step comes to render your project file. For that, move to the File menu and select the ‘Render’ option. A window will be opened as ‘Render to File.’ Now, from the dropdown menu, select your desired Output Format.
Lastly, hit the Render 1 File button, and then REAPER will export your project. You can immediately listen to it by selecting the ‘Launch File’ option.

Concluding Thoughts
This article is everything you need to learn about REAPER Recording Software. The article that started from an introduction on DAW took you on a roller coaster ride. Everything about REAPER software has been shared.
We hope that this article helps you in all possible ways. The attractive features impress you, and its pricing and system specifications increase your knowledge. Along with that, the shared tutorial will guide you thoroughly on how to use it.
02 How to Download and Install REAPER Software?
03 Tutorial for Using REAPER Recording Software
Part 1. What Is REAPER Recording Software?
Recording software like REAPER records computer audio is used to produce music, edit it, transform, and customize your music. With REAPER Recording Software , you can record multi-layer audio and MIDI in various formats. REAPER has the easiest interface that allows you to drag and drop to import, split, move and do many other tasks.
This is just one feature of REAPER that sounds very interesting. In this section, we will talk about more of its features.
1. Record and Edit
You can easily record the audio and (MIDI) Musical Instrumental Digital Interface with REAPER recording software. It lets you edit and customize everything. You can record and edit things limitlessly. When it comes to recording, it’s not at all difficult for REAPER software to record various instruments or vocals.
2. Mixing
Initially, the mixer might seem inflexible, but in reality, REAPER has a lot to offer you. It has great automated capabilities for instrument and effect parameters. It doesn’t matter if you are working because you can still bounce or freeze tracks while working.
The mixer is very flexible. With REAPERs mixer, you just have to drag and drop your recordings so that you can create tracks, and also, you can customize the arrangements by moving the portions.
3. Interface
While looking at the interface, you might question yourself about how to use its interface. Some people love to learn about new things, such as the REAPER Recording Software. Whereas, some people seem least interested because the half-empty interface is not intuitive to them.
Whereas, the best thing about its interface is that you can customize it. REAPER allows you to add different wallpapers and layouts to your software interface.
4. Strong Stability
REAPER Recording Software has very strong stability. This is one of its strongest features as compared to other competitors. The RAM is rarely affected by the load time and the used resources. Moreover, the software offers a wide range of languages. You can select your desired language to run the software.
Part 2. How to Download and Install REAPER Software?
REAPER is a Digital Audio Workstation. The perfect platform where you can manipulate and transform your audio. With REAPER Record Computer audio, you can work efficiently in a resource-friendly studio with saving your time. Stay tuned if you plan to learn more about its pricing and requirements.
Pricing of REAPER Software
A reaper is a brilliant software. It has a 60-day trial period. REAPER costs $60 in total to register. It has complete MIDI sequencing. You can also get a discounted license if REAPER is the best private option for you or has commercial usage. You can set the equal license key on every computer for someone with multiple computers.
System Requirements
The recording software has uncountable features. REAPER software facilitates its users at every level by giving the best audio manipulating platform. The best thing about REAPER Recording Software is its compatibility with different operating systems. Let us add more to your knowledge on this.
Windows
REAPER software is available for Windows 7, 8, 10, XP, and Vista. The version of REAPER for Windows is 6.42. This is for Windows 64-bit whereas, a download package is also available for Windows 32-bit.
macOS
For macOS 64-bit, REAPER has a 6.42 version. This version is compatible with macOS 10.5 – 10.14. Whereas, for macOS 10.15+, the available version of REAPER is 6.42 with a 15MB file size.
Linux
REAPER Recording Software is also compatible with Linux x86_64. The REAPER version is 6.42 with an 11 MB file size. This version can also work on AMD64 64-bit.
Downloading and Installing REAPER
Now that REAPER Record Computer Audio has impressed you a lot. You must be thinking about how to download it. If this is on your mind, then we got you. Allow us to share its steps that will guide you to download the software easily.
Step 1: To install REAPER software, first of all, visit its official website. Then locate and head over to its download section.
Step 2: Click on ‘Download REAPER from the download section.’ For Windows users, they can download the Windows installation package. At the same time, Linux and macOS users can select their installation packages.
Step 3: Lastly, after you have downloaded your systems compatible installation package, you simply have to run it and then install it according to your respective operating system.
Part 3. Tutorial for Using REAPER Recording Software
After its attractive features and detailed downloading procedure, it is finally the time to talk about its works. This section of the article will explain to you more about REAPER Recording Software as we are now going to present a tutorial on how to use the software.
Understand the Layout
Understanding and knowing the layout of your software before you start working on it is essential. The crucial components of REAPER software include the Timeline, Arrangement Window, Track Panel, Toolbar, and lastly, Transport.
The Arrangement window holds all the added items. The items are played from left to right order, similar to their timeline arrangement. You can also zoom in and out. Then comes the transport toolbar, which holds the functions to stop, rewind, play, fast forward, adjust the timeline speed, etc. The toolbar holds all the toggle buttons. You can also customize your toolbar.
New Track Creation
For creating a new track on REAPER, go to the Track menu and hit Insert New Track. A track is like another layer to your audio. Multiple layers and tracks make your work complex yet interesting as you can play all the different tracks at the same time. By double-clicking in the Track Control Panel, you can set a name for the added track.
Audio Hardware Settings for Audio Recording
It is best suggested always to check your audio hardware settings before you start to record, edit or mix with REAPER Recording Software. Your primary focus should be on the recording device’s devices should be set as Input Device, whereas the listening device should be set as the Output Device.
For this, you have to select Preferences from the Options menu. A window will appear in front of you, the REAPER Preference window. You have to select the correct Input and Output devices from the dropdown menu from this window.
Arm your Track
Arming your track is very important. For this, head over to the Track Control Panel, and next to your track name, hit the red circle. If you have various tracks, you should solo this track and mute the other tracks.
As soon as the track is armed, a Gain Meter will activate on the side. From this, you can check if you have properly set the microphone or not. This could be tested by tapping on the microphone.
Record
After all, the hardware settings are done, and your track is armed, it’s time to start the recording. For that, just tap on the Record button in the Transport toolbar. A yellow line in the timeline will indicate the end of the recording.
To end the recording, tap on the Stop button from the Transport Toolbar. Lastly, REAPER Recording Software will ask you to save the file. In case you don’t want it, you can also delete it.
Create and Manipulate Clips
Things like manipulation get a lot easier if you split the clips in REAPER. From the items menu, you have to select the option of Split Item on Cursor. This divides your clip into two clips on each side of the cursor. You can also remove the clips by going to the Items Menu. From there, you just have to hit the Remove Item option, or else, simply press the Delete key on your keyboard.
Removing clips will create a gap in the arrangement window that can be filled by dragging forward the remaining clip.
Volume Adjustments – Normalize
By double-clicking on the item or by selecting ‘Item Properties’ from a right-click, you can normalize the item. A new window will appear as Media Item Properties, from where you have to locate the Volume Settings and then select the option of Normalize.
If your item is already loud, then nothing will happen, but if it is not, then the slider will change from 0.00 dB showing an increase in the volume. Lastly, hit the ‘Apply’ or ‘OK’ button to imply the changes.
Fade in/out
With the Media Properties, you can also adjust a Fade in and a Fade out. For this, you simply have to set an end time for the Fade in, whereas a start time is entered for Fade out. Hit the ‘Ok’ or ‘Apply’ button to apply the changes.
From the Arrangement window, fades can be adjusted. For adjusting the fades, hover with your mouse over the red line. You will see a newly shaped cursor. Just drag on the timeline to play and adjust the Fade with this new cursor.
Automate Changes
With REAPER, you can also automate changes in track parameters. We will guide about automation from Track Envelopes. From Track Control Panel, hit the Trim option. A new Envelopes window will open at this point from where you have to check the Volume box.
A new Volume Track will open up. Here, you have to set new Envelope points. That could be done by holding the shift key, right-clicking on the point, and then selecting Create New Point. A green circle will indicate the new point.
By dragging the Envelope point, you can also adjust the volume. Dragging it towards the top will increase the volume, whereas dragging it towards the bottom will eventually decrease.
Finalize the Audio – Render
After all the above steps have been completed to set the order and adjust your desired volume, the last step comes to render your project file. For that, move to the File menu and select the ‘Render’ option. A window will be opened as ‘Render to File.’ Now, from the dropdown menu, select your desired Output Format.
Lastly, hit the Render 1 File button, and then REAPER will export your project. You can immediately listen to it by selecting the ‘Launch File’ option.
Concluding Thoughts
This article is everything you need to learn about REAPER Recording Software. The article that started from an introduction on DAW took you on a roller coaster ride. Everything about REAPER software has been shared.
We hope that this article helps you in all possible ways. The attractive features impress you, and its pricing and system specifications increase your knowledge. Along with that, the shared tutorial will guide you thoroughly on how to use it.
Key Components of a Quality Audio Editor on macOS
What to Look for in Audio Editor Software for Mac OS X

Shanoon Cox
Mar 27, 2024• Proven solutions
The Mac offers the perfect computer platform for innumerable editing software when it comes to editing audio files. You can find plenty of audio editor for Mac choices that range from the free to very expensive, and each has its unique advantages.
However, before you start searching for the right music editing software for your Mac, you’ll need to know what you want, what to look for and what current audio editing software is the best for your needs.
- Part1. Common Demands on Audio Editing Software
- Part2. What to Look for in Audio Editing Software
- Part3. Three Audio Editor Software Mac Selections
Part 1. Common Demands on Audio Editing Software
Those who regularly use this audio edit software can be divided into two categories: commercial and consumer.
For most commercial-based needs, you’ll want the best in professional audio editor Mac software that meets the needs of your studio system. The software needed will generally be expensive and geared to handling large, professional projects that require many different tracks.
However, it is fair to say that plenty of sound engineers use cheap or even free audio editing software to accomplish certain tasks quickly.
For the consumer, most audio editing needs are based on loading and doing basic editing on tracks. Whether you run your band, private studio, or one-person podcast, most of the demands that consumers put on their editing software is pretty straightforward;
- Record Tracks
- Basic Editing: Cutting, Deleting, and Inserting
- Adding Sound Effects
Given that most consumer projects demand the limited amount of time available, it is not surprising that most people want an audio editor Mac system to be simple, straightforward, and easy to use. This means that most of the work is simply recording or adding new tracks, making basic edits, and putting in certain sound effects, which often augments or changes the vocal track.
Part2. What to Look for in Audio Editing Software
For consumers looking to obtain the right audio editor for their Mac, several considerations need to be taken into account, starting with their particular demands.
- Simple or Full Featured: In essence, do you need a full-featured editing software similar to what professionals use, or do you just need something that can record, edit, and then share clean audio? For example, if you are running a podcast, then the software itself can be quite simple in its features. formats.
- Compatibility: You’ll want the software to be compatible with the format you are recording or obtaining the tracks. For the most part, audio editing software is quite adaptable, but certain types of tracks may not be compatible. So, check it out before you make your choice.
- Sharing Capacity: The editing software must output in a format that can be shared easily. So, you will want to look for systems compatible with what you are using.
Part3. Three Audio Editor Software Mac Selections
What follows are three audio editing software solutions for the Mac which are relatively inexpensive but meet the needs of most consumer and small business operations.
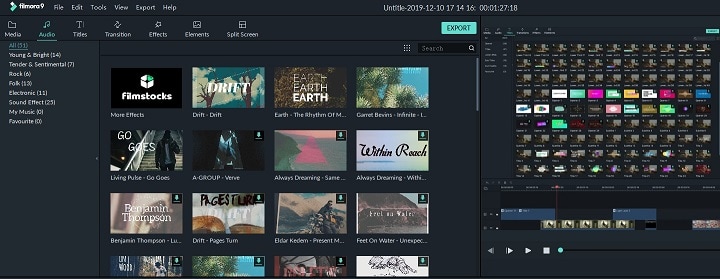
Wondershare Filmora Audio Editor for Mac:
Filmora supports a vast range of audio formats, covering AC3, AIF, AIFF, APE, AU, FLAC, M4A, MKA, MP2, MP3, OGG, WAV, WMA, etc.
With a built-in recorder, you can directly record voice over from your microphone. Basic editing features such as splitting, merging, changing speed, editing pitch, changing voice, etc are available. The multi-audio track allows you to add up to 3 audio tracks at a time so that you can easily add sound effects, voice-over, or background music to your audio file.
Though a full-featured audio editor, Filmora is more like a multimedia toolbox that allows you to edit videos, audios, and photos. The modern and intuitive interface will involve the least learning curve you could ever imagine and thus, it is renowned as the best video and audio editor Mac software for beginner users. Download a free copy to try it out below:


Audio Editor: Audacity (Free)
This editor handles uncompressed audio and supports many files, including AIFF, .WAV, MP2/3.FLAC and .OGG. You can record from different inputs, employ the JACK Audio feature, monitor the volume, and add several different effects.
The good news is that this editing software is simple, straightforward, and will work for many consumers who create their own broadcasts. However, it is rather limited when recording audio from your computer itself, and you’ll need to add SoundFlower to accomplish that.

Audio Editor:WavePad ($50)
This is one of the more celebrated audio editing software systems for Mac computers. It contains many tools and sound effects and supports a considerable number of file types. The main attribute may be how user-friendly the wavepad sound editor is and the number of different features.
The only substantial negative is that the floating toolbars used will get in the way when you are working on larger projects. However, a big positive is that this editing system can clean up old, hissy audio quite well, substantially improving your recordings.

Audio Editor: Sound Forge Pro Mac 2 ($99)
Sound Forge is an almost legendary audio editing system used by professionals and now priced for consumers. Sound for those who want the ultimate file compatibility, features, and overall quality, Sound Forge sets the standards. The 2.0 version is perfect for sound design projects as many different audio files can be used.
The only real negative is the price itself which will push it beyond the needs of many consumers looking for a simple, straightforward audio editor Mac system. However, if you plan on growing your current projects into something more professional and expansive, then the relatively low price of the Sound Forge Pro Mac 2 should be considered.

Finding the best audio editor Mac software should start with their own particular needs and then find the product that allows them to accomplish their goals.
Shanoon Cox
Shanoon Cox is a writer and a lover of all things video.
Follow @Shanoon Cox
Shanoon Cox
Mar 27, 2024• Proven solutions
The Mac offers the perfect computer platform for innumerable editing software when it comes to editing audio files. You can find plenty of audio editor for Mac choices that range from the free to very expensive, and each has its unique advantages.
However, before you start searching for the right music editing software for your Mac, you’ll need to know what you want, what to look for and what current audio editing software is the best for your needs.
- Part1. Common Demands on Audio Editing Software
- Part2. What to Look for in Audio Editing Software
- Part3. Three Audio Editor Software Mac Selections
Part 1. Common Demands on Audio Editing Software
Those who regularly use this audio edit software can be divided into two categories: commercial and consumer.
For most commercial-based needs, you’ll want the best in professional audio editor Mac software that meets the needs of your studio system. The software needed will generally be expensive and geared to handling large, professional projects that require many different tracks.
However, it is fair to say that plenty of sound engineers use cheap or even free audio editing software to accomplish certain tasks quickly.
For the consumer, most audio editing needs are based on loading and doing basic editing on tracks. Whether you run your band, private studio, or one-person podcast, most of the demands that consumers put on their editing software is pretty straightforward;
- Record Tracks
- Basic Editing: Cutting, Deleting, and Inserting
- Adding Sound Effects
Given that most consumer projects demand the limited amount of time available, it is not surprising that most people want an audio editor Mac system to be simple, straightforward, and easy to use. This means that most of the work is simply recording or adding new tracks, making basic edits, and putting in certain sound effects, which often augments or changes the vocal track.
Part2. What to Look for in Audio Editing Software
For consumers looking to obtain the right audio editor for their Mac, several considerations need to be taken into account, starting with their particular demands.
- Simple or Full Featured: In essence, do you need a full-featured editing software similar to what professionals use, or do you just need something that can record, edit, and then share clean audio? For example, if you are running a podcast, then the software itself can be quite simple in its features. formats.
- Compatibility: You’ll want the software to be compatible with the format you are recording or obtaining the tracks. For the most part, audio editing software is quite adaptable, but certain types of tracks may not be compatible. So, check it out before you make your choice.
- Sharing Capacity: The editing software must output in a format that can be shared easily. So, you will want to look for systems compatible with what you are using.
Part3. Three Audio Editor Software Mac Selections
What follows are three audio editing software solutions for the Mac which are relatively inexpensive but meet the needs of most consumer and small business operations.
Wondershare Filmora Audio Editor for Mac:
Filmora supports a vast range of audio formats, covering AC3, AIF, AIFF, APE, AU, FLAC, M4A, MKA, MP2, MP3, OGG, WAV, WMA, etc.
With a built-in recorder, you can directly record voice over from your microphone. Basic editing features such as splitting, merging, changing speed, editing pitch, changing voice, etc are available. The multi-audio track allows you to add up to 3 audio tracks at a time so that you can easily add sound effects, voice-over, or background music to your audio file.
Though a full-featured audio editor, Filmora is more like a multimedia toolbox that allows you to edit videos, audios, and photos. The modern and intuitive interface will involve the least learning curve you could ever imagine and thus, it is renowned as the best video and audio editor Mac software for beginner users. Download a free copy to try it out below:
Audio Editor: Audacity (Free)
This editor handles uncompressed audio and supports many files, including AIFF, .WAV, MP2/3.FLAC and .OGG. You can record from different inputs, employ the JACK Audio feature, monitor the volume, and add several different effects.
The good news is that this editing software is simple, straightforward, and will work for many consumers who create their own broadcasts. However, it is rather limited when recording audio from your computer itself, and you’ll need to add SoundFlower to accomplish that.
Audio Editor:WavePad ($50)
This is one of the more celebrated audio editing software systems for Mac computers. It contains many tools and sound effects and supports a considerable number of file types. The main attribute may be how user-friendly the wavepad sound editor is and the number of different features.
The only substantial negative is that the floating toolbars used will get in the way when you are working on larger projects. However, a big positive is that this editing system can clean up old, hissy audio quite well, substantially improving your recordings.
Audio Editor: Sound Forge Pro Mac 2 ($99)
Sound Forge is an almost legendary audio editing system used by professionals and now priced for consumers. Sound for those who want the ultimate file compatibility, features, and overall quality, Sound Forge sets the standards. The 2.0 version is perfect for sound design projects as many different audio files can be used.
The only real negative is the price itself which will push it beyond the needs of many consumers looking for a simple, straightforward audio editor Mac system. However, if you plan on growing your current projects into something more professional and expansive, then the relatively low price of the Sound Forge Pro Mac 2 should be considered.
Finding the best audio editor Mac software should start with their own particular needs and then find the product that allows them to accomplish their goals.
Shanoon Cox
Shanoon Cox is a writer and a lover of all things video.
Follow @Shanoon Cox
Essential Websites for Obtaining Free and Unlicensed Outro Tracks
10 Best Sources to Download Free Outro Music [No Copyright]

Liza Brown
Mar 27, 2024• Proven solutions
The more powerful the ending of a chapter or music is, the more long-lasting and powerful the impact it will leave behind in the heart and minds of the audience. Hence, one cannot deny the importance of strong outro music in the content to enhance the quality and value of it.
So here we are to guide you all about outro music and 10 best sources to download a perfect outro song.
10 Best Sources to Download Outro Music [No Copyright]
1. Filmora:
It is one of the freely available platforms that allows one to not only avail a diverse variety of features and customization options into your videos and creation but also facilitates one by being a highly compatible software that can be operated in Windows as well as Mac.
Hence this entails that Filmora is a complete package for quality and quality with your utmost desire while giving a high-end quality output with a vast personalized configuration option.
In any of your videos, Filmora offers you to drastically shift the level of your production by adding a mesmerizing outro music that well suits the content and level up the end result.
This not only offers you royalty free outro music from their own audio library but also supports importing any of your already download music files from your system and can perform multiple customization operations to enhance your video’s end result.
2. Audionautix:
If you are looking for outro music download MP3 music instantly then you have got to try Audionautix which is a website that entails one to avail as many music tracks as you want in be able to download it instantly. As soon as you deliver a link to any music, you are free to listen and download music from “music by audionatic.com”.
Without the hassle of registration or payment, you can select, search, listen and download a pool of good outro music.
3. FreePD:
This is free of cost and free from copyright hassle site where you are free to download any of the cool outro music you want. All you have to do is to download a music track and consolidate it with your composition giving you a sea of the genre of music you can choose from ranging from horror, romantic, suspense, sentimental and lot more.
Not only limited to their given library, you can download any music of your likeliness downloaded using this site on any of the social media platform.
4. Jamendo:

This domain is a connecting platform of music fonder and musicians worldwide. This aims to affiliate free music community, spreading the love with mesmerizing music and creating value surrounded by it.
The site is not only a free domain for music lovers but offers you a pool of music library that allows one to listen and download with merely a matter of a single click. With a registration process away, you can save on your systems and share free outro music on any social media platform.
5. SoundSnap:

The feature that makes this free online software outshine over the others is that it not only provides a wide variety of music but also offers a huge pallet of sound effects, distinct genre of sounds and audio clips and several samples to let you explore and play with experimenting music and enhance your creativity.
However, this requires you to make an account prior to downloading music tracks.
6. Musopen:

This website provides a free hand to record any music and download royalty free outro music. This website has recently released several Beethoven sonatas of piano, all on a public domain.
This gives you a free and publically available powerful domain to search and download any outro music no copyright.
7. Free Play Music:
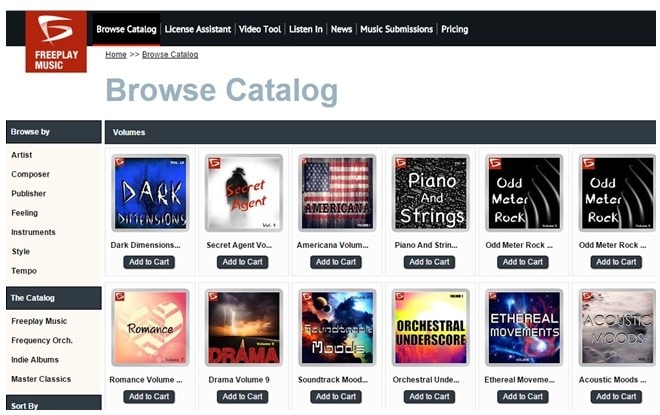
This is considered as one of the renowned small-scaled company of music-licensing. You can undoubtedly call this domain a music composer, bestowing you with the online library of tons of music belonging to several genres. Moreover, this contains zillions of musical and classical pieces of work which allows one to be used as per their likeliness.
Fortunately, there exists a list of playlist with royalty free outro music and the top-ranked music tracks, all accessible from this online website. It lets one first assure regarding your choice of music by first letting one listen to the selected music then lets you download as many music tracks as you want.
8. West One Music:

West one music is basically a British production of a music company globally that facilitates you with a pool of music and songs, including intro, outro and background music around the entire world.
This company was established in the year 2003 in Soho, London with having these groups contained eight distinct labels. Fired earth music, the scoring house, noise refinery, and west one music are some of the labels that exist.
Not only limited to these facilitations but this domain offers a vast variety and distinct genre of music sounds ranging from rock band to classical, western to brass, electronic to woodwind and so many to consider.
9. AudioBlocks:
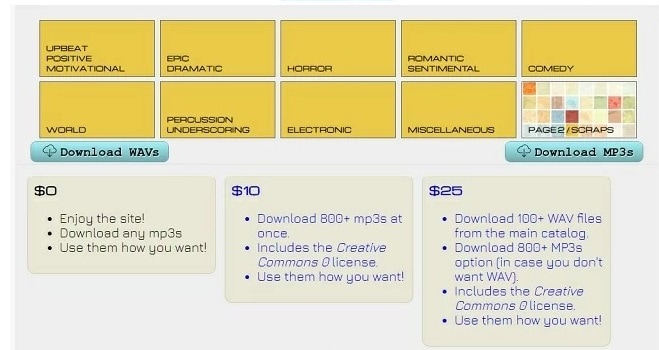
AudioBlocks is considered as one of the copyright-free websites that allows you to use any of their publically available playlist of distinct types of music that can be used as intro, outro or background depending upon the usability of the user while facilitating more than 100,000 music tracks, more than enough for one to choose the best one out of the available pool.
This website is free to use at any instant without bounding one with hidden terms and conditions and allowing them to download and utilize music from their song library at any time. One of the most highlighting features bestowed to the users by this website is that it facilitates one with royalty free outro music for the sake of commercials or any of your personal music-related projects.
Their perfectly maintained and updated listing of the songs allows one to search and choose the freshly available and trendy music from their playlist without the hassle to search it from scratch.
10. Bensound
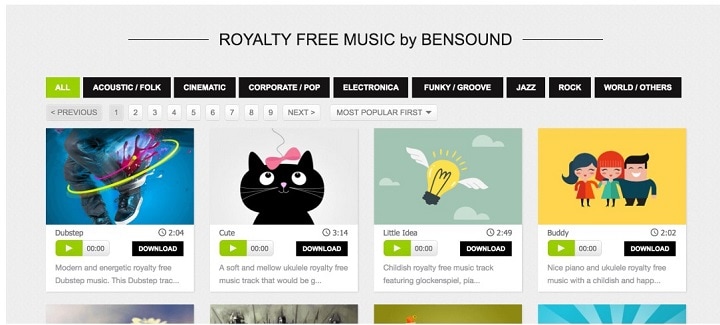
This is yet another browser-based website that is entirely free of cost to download and use music for outro song and a stock of royalty free music for the sake of either any of your multimedia projects or YouTube outro music for your productions in YouTube domain.
This facilitate one with vast palate music types ranging from classical to rock, electronica to acoustic folks and cinematic and so on, just right for any of the type of your video to elevate it to the next level.
Best Practice to Choose the Right Outro Music for Your Video
Since the quality of your production is highly relied on the beat conclusion of your music, it’s of high significance to choose a perfect outro song. But it requires you to know some of the best practices that you can follow while picking a track perfect for you. So, stay tuned!
- Evaluate the type and purpose of the video and then assessing what role the outro music will be playing in the video to best know what fits the purpose.
- You need to have an understanding of the genre of music that rightly escalates the soul of the listener and evokes the desired value.
- Make use of outro music as Bookends to indicate the ending of a video with impactful text or animation.
- You can make use of reference music to guide you to your desired music rhythm, progression, key speed or instrumentation.
- You must know your budget to spend on the outro music to create or own music as per the requirements and resources.
- If your content is on a professional level, then it’s better to consider hiring a good composer as the composition is like a backbone of the song, making it either a hit or a miss!
- Choose self-explanatory music that speaks to the viewers and best connects with them to serve the content’s purpose in an effective manner.
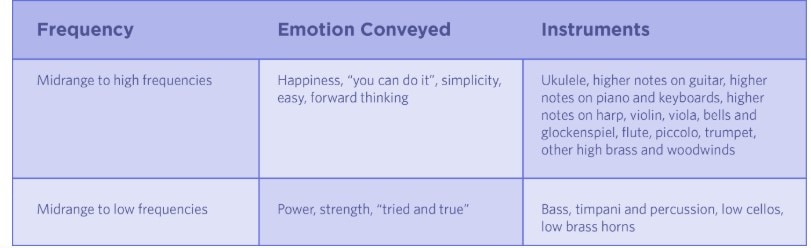
- You ought to consider the tone and the role of frequency.
- A little break in the music catches the attention of an audience to fulfill the aim behind the content.
- Using famous music or the one that best mimics the famous ones would be best to capture the audience’s attention and interest.
What is Outro Music?
By outro music definition, it means that music is affiliated at the end of the song. However, this term is an umbrella term which also means the concluding or ending track of an album. This basically refers to the linear structure of a song starting from intro, verse, chorus, bridge, verse and then finally the outro which is used only once at the end.
However, the chorus and verse can be repeated more than once but the occurrence of intro, outro, and bridge is used only once. The primary reason for inserting an outro into a song is to have a mesmerizing and impactful ending to it, giving listeners a soothing experience since ending matters the most to leave a powerful impact behind.
A piece of outro music in the video is music or song that used at the end of the video. Outra music is important because it’s one of the key elements that attract people to what you expect.
What Are the Most Popular Style Outro Music?
As once said by a French poet, Music is the literature of heart, written with utmost love, sympathy, passion and pure emotions. It is the outro or the strong ending of the movie, play, song or literally anything that outsell the content and leave a powerful impact to be remembered forever and so does the outro of a song, making it a hit or miss for the entire content for whatever purpose that music is used for.
Hence, the significance of outro music cannot be more emphasized enough. Thus the choice of the song is utterly important and styles/genre must be chosen wisely to boost up your content or your music alone.
So let’s explore some of the best and top-ranked style of outro music and the type of content where it fits the most to give you an instant recipe of perfection!
Type 1: cinematic
Usability: victorious, sweeping, grand and big events.
Type 2: corporate
Usability: unobtrusive, inviting and engaging event.
Type 3: ambient
Usability: calm, soothing and centered events
Type 4: acoustic:
Usability: connected, empathetic, melancholy and human
Type 5: comedic
Usability: bright, bubbly, exciting and fun events
Type 6: electronic
Usability: curious, cerebral and electronic
Type 7: hip hop
Usability: confident, edgy and fast
Type 8: rock
Usability: substantial, raw and gritty
Type 9: Funk
Usability: unapologetic, bright and discordant
With this wide variety along with the usability of such outro music, you can now surely get an idea which of the above fits your content the best to uplift the perfectionism in your creation!
Composing Outro Music
Typically, the recapitulation is often used to conclude while using the sonata form is performed. To end a piece of clip or song, the thematic material is often repeated in the process to provide the closure in the tonic key from the exposition. Unexpected digression being fooled by a return in order to produce more empathic confirmation regarding the structural relationship employed to the body of the production.
Moreover, the styles of the outro also make a huge impact and difference in successfully delivering the purpose of the video.
- Fadeout Effect: the echoing effect leave a heartfelt story in heart and mind
- Full stop Effect: shows abruption, finality, emptiness and completeness effect in the song.
Having more than 300 effects available in Filmora with tons of audio editing features available for free, running on both platforms, Windows, and Mac, you can make perfect outro music for your production to attract the target audience and uplift the quality and value of your content!
How to Record Music for an Outro Using Filmora Scrn?
Filmora Scrn is a powerful tool to not only record the audio but all the video playing on the screen, thus facilitating you to record your favorite outro playing in the system.
Step1: after launching the app, tap on “get started” where you’ll see 4 tabs, “scree, audio, camera and advanced” to customize the recording setting.
Step 2: choose the “Audio” tab, where you need to select “computer audio” to record the outro song running in your system and “don’t capture” in the Microphone option.
Step 3: press “record” for recording initiation.
Step 4: hit the “pause” tab to pause and F10 key to stop the recording.
Step 5: Edit the recording as per your likeliness.
Step 6: export your recording in any of the audio formats to save it.

Conclusion
As much as a powerful start of the music is important to attract the audience, the perfect end leaves an utmost impact on them, making your content valuable and distinct. Many software or website can help you make outro songs but the versatility and feasibility in use of Filmora and Filmora Scrn leave one speechless with the profound promising results it produces.
Liza Brown
Liza Brown is a writer and a lover of all things video.
Follow @Liza Brown
Liza Brown
Mar 27, 2024• Proven solutions
The more powerful the ending of a chapter or music is, the more long-lasting and powerful the impact it will leave behind in the heart and minds of the audience. Hence, one cannot deny the importance of strong outro music in the content to enhance the quality and value of it.
So here we are to guide you all about outro music and 10 best sources to download a perfect outro song.
10 Best Sources to Download Outro Music [No Copyright]
1. Filmora:
It is one of the freely available platforms that allows one to not only avail a diverse variety of features and customization options into your videos and creation but also facilitates one by being a highly compatible software that can be operated in Windows as well as Mac.
Hence this entails that Filmora is a complete package for quality and quality with your utmost desire while giving a high-end quality output with a vast personalized configuration option.
In any of your videos, Filmora offers you to drastically shift the level of your production by adding a mesmerizing outro music that well suits the content and level up the end result.
This not only offers you royalty free outro music from their own audio library but also supports importing any of your already download music files from your system and can perform multiple customization operations to enhance your video’s end result.
2. Audionautix:
If you are looking for outro music download MP3 music instantly then you have got to try Audionautix which is a website that entails one to avail as many music tracks as you want in be able to download it instantly. As soon as you deliver a link to any music, you are free to listen and download music from “music by audionatic.com”.
Without the hassle of registration or payment, you can select, search, listen and download a pool of good outro music.
3. FreePD:
This is free of cost and free from copyright hassle site where you are free to download any of the cool outro music you want. All you have to do is to download a music track and consolidate it with your composition giving you a sea of the genre of music you can choose from ranging from horror, romantic, suspense, sentimental and lot more.
Not only limited to their given library, you can download any music of your likeliness downloaded using this site on any of the social media platform.
4. Jamendo:
This domain is a connecting platform of music fonder and musicians worldwide. This aims to affiliate free music community, spreading the love with mesmerizing music and creating value surrounded by it.
The site is not only a free domain for music lovers but offers you a pool of music library that allows one to listen and download with merely a matter of a single click. With a registration process away, you can save on your systems and share free outro music on any social media platform.
5. SoundSnap:
The feature that makes this free online software outshine over the others is that it not only provides a wide variety of music but also offers a huge pallet of sound effects, distinct genre of sounds and audio clips and several samples to let you explore and play with experimenting music and enhance your creativity.
However, this requires you to make an account prior to downloading music tracks.
6. Musopen:
This website provides a free hand to record any music and download royalty free outro music. This website has recently released several Beethoven sonatas of piano, all on a public domain.
This gives you a free and publically available powerful domain to search and download any outro music no copyright.
7. Free Play Music:
This is considered as one of the renowned small-scaled company of music-licensing. You can undoubtedly call this domain a music composer, bestowing you with the online library of tons of music belonging to several genres. Moreover, this contains zillions of musical and classical pieces of work which allows one to be used as per their likeliness.
Fortunately, there exists a list of playlist with royalty free outro music and the top-ranked music tracks, all accessible from this online website. It lets one first assure regarding your choice of music by first letting one listen to the selected music then lets you download as many music tracks as you want.
8. West One Music:
West one music is basically a British production of a music company globally that facilitates you with a pool of music and songs, including intro, outro and background music around the entire world.
This company was established in the year 2003 in Soho, London with having these groups contained eight distinct labels. Fired earth music, the scoring house, noise refinery, and west one music are some of the labels that exist.
Not only limited to these facilitations but this domain offers a vast variety and distinct genre of music sounds ranging from rock band to classical, western to brass, electronic to woodwind and so many to consider.
9. AudioBlocks:
AudioBlocks is considered as one of the copyright-free websites that allows you to use any of their publically available playlist of distinct types of music that can be used as intro, outro or background depending upon the usability of the user while facilitating more than 100,000 music tracks, more than enough for one to choose the best one out of the available pool.
This website is free to use at any instant without bounding one with hidden terms and conditions and allowing them to download and utilize music from their song library at any time. One of the most highlighting features bestowed to the users by this website is that it facilitates one with royalty free outro music for the sake of commercials or any of your personal music-related projects.
Their perfectly maintained and updated listing of the songs allows one to search and choose the freshly available and trendy music from their playlist without the hassle to search it from scratch.
10. Bensound
This is yet another browser-based website that is entirely free of cost to download and use music for outro song and a stock of royalty free music for the sake of either any of your multimedia projects or YouTube outro music for your productions in YouTube domain.
This facilitate one with vast palate music types ranging from classical to rock, electronica to acoustic folks and cinematic and so on, just right for any of the type of your video to elevate it to the next level.
Best Practice to Choose the Right Outro Music for Your Video
Since the quality of your production is highly relied on the beat conclusion of your music, it’s of high significance to choose a perfect outro song. But it requires you to know some of the best practices that you can follow while picking a track perfect for you. So, stay tuned!
- Evaluate the type and purpose of the video and then assessing what role the outro music will be playing in the video to best know what fits the purpose.
- You need to have an understanding of the genre of music that rightly escalates the soul of the listener and evokes the desired value.
- Make use of outro music as Bookends to indicate the ending of a video with impactful text or animation.
- You can make use of reference music to guide you to your desired music rhythm, progression, key speed or instrumentation.
- You must know your budget to spend on the outro music to create or own music as per the requirements and resources.
- If your content is on a professional level, then it’s better to consider hiring a good composer as the composition is like a backbone of the song, making it either a hit or a miss!
- Choose self-explanatory music that speaks to the viewers and best connects with them to serve the content’s purpose in an effective manner.
- You ought to consider the tone and the role of frequency.
- A little break in the music catches the attention of an audience to fulfill the aim behind the content.
- Using famous music or the one that best mimics the famous ones would be best to capture the audience’s attention and interest.
What is Outro Music?
By outro music definition, it means that music is affiliated at the end of the song. However, this term is an umbrella term which also means the concluding or ending track of an album. This basically refers to the linear structure of a song starting from intro, verse, chorus, bridge, verse and then finally the outro which is used only once at the end.
However, the chorus and verse can be repeated more than once but the occurrence of intro, outro, and bridge is used only once. The primary reason for inserting an outro into a song is to have a mesmerizing and impactful ending to it, giving listeners a soothing experience since ending matters the most to leave a powerful impact behind.
A piece of outro music in the video is music or song that used at the end of the video. Outra music is important because it’s one of the key elements that attract people to what you expect.
What Are the Most Popular Style Outro Music?
As once said by a French poet, Music is the literature of heart, written with utmost love, sympathy, passion and pure emotions. It is the outro or the strong ending of the movie, play, song or literally anything that outsell the content and leave a powerful impact to be remembered forever and so does the outro of a song, making it a hit or miss for the entire content for whatever purpose that music is used for.
Hence, the significance of outro music cannot be more emphasized enough. Thus the choice of the song is utterly important and styles/genre must be chosen wisely to boost up your content or your music alone.
So let’s explore some of the best and top-ranked style of outro music and the type of content where it fits the most to give you an instant recipe of perfection!
Type 1: cinematic
Usability: victorious, sweeping, grand and big events.
Type 2: corporate
Usability: unobtrusive, inviting and engaging event.
Type 3: ambient
Usability: calm, soothing and centered events
Type 4: acoustic:
Usability: connected, empathetic, melancholy and human
Type 5: comedic
Usability: bright, bubbly, exciting and fun events
Type 6: electronic
Usability: curious, cerebral and electronic
Type 7: hip hop
Usability: confident, edgy and fast
Type 8: rock
Usability: substantial, raw and gritty
Type 9: Funk
Usability: unapologetic, bright and discordant
With this wide variety along with the usability of such outro music, you can now surely get an idea which of the above fits your content the best to uplift the perfectionism in your creation!
Composing Outro Music
Typically, the recapitulation is often used to conclude while using the sonata form is performed. To end a piece of clip or song, the thematic material is often repeated in the process to provide the closure in the tonic key from the exposition. Unexpected digression being fooled by a return in order to produce more empathic confirmation regarding the structural relationship employed to the body of the production.
Moreover, the styles of the outro also make a huge impact and difference in successfully delivering the purpose of the video.
- Fadeout Effect: the echoing effect leave a heartfelt story in heart and mind
- Full stop Effect: shows abruption, finality, emptiness and completeness effect in the song.
Having more than 300 effects available in Filmora with tons of audio editing features available for free, running on both platforms, Windows, and Mac, you can make perfect outro music for your production to attract the target audience and uplift the quality and value of your content!
How to Record Music for an Outro Using Filmora Scrn?
Filmora Scrn is a powerful tool to not only record the audio but all the video playing on the screen, thus facilitating you to record your favorite outro playing in the system.
Step1: after launching the app, tap on “get started” where you’ll see 4 tabs, “scree, audio, camera and advanced” to customize the recording setting.
Step 2: choose the “Audio” tab, where you need to select “computer audio” to record the outro song running in your system and “don’t capture” in the Microphone option.
Step 3: press “record” for recording initiation.
Step 4: hit the “pause” tab to pause and F10 key to stop the recording.
Step 5: Edit the recording as per your likeliness.
Step 6: export your recording in any of the audio formats to save it.
Conclusion
As much as a powerful start of the music is important to attract the audience, the perfect end leaves an utmost impact on them, making your content valuable and distinct. Many software or website can help you make outro songs but the versatility and feasibility in use of Filmora and Filmora Scrn leave one speechless with the profound promising results it produces.
Liza Brown
Liza Brown is a writer and a lover of all things video.
Follow @Liza Brown
Also read:
- Multi-Platform Speech-to-MP3 Technology for Everyday Use
- 2024 Approved The Ultimate Guide to Fine-Tuning Audio Volume for Optimal Listening Experience
- 2024 Approved Mastering Echo Effects Implementing Reverb in Digital Sound Environments (Windows Edition)
- Updated 2024 Approved Top 5 Essential Linux-Based Audio Capture Tools & Practical Recording Techniques
- New 2024 Approved Swift Soundscape Shifts A Practical Approach to Changing Audio Speeds
- New In 2024, The Beastly Symphony Capturing Giants in Audio Form
- Updated Innovative Online Audio Cutter Utilities – The Leading Tools
- Framing Moments with Notes Composers and Clip Assembly in Filmography
- 2024 Approved Elite Group 3 Audio Level Augmentation Tools for Digital Tunes
- New 2024 Approved Leading Voice Modification Tools at Zero Cost An In-Depth Filmora Video Voice Editing Handbook
- Updated EchoShift Elite Revolutionary Sound Design and Pitch Adjustment App
- New DJ Audio Editor Software Review for 2024
- Updated 2024 Approved Navigating the Melody to Words Top Three Online Tools for MP3 Conversion Current Trends
- Navigating Through Music Tech Top 7 DAWs for Fostering Exceptional Guitar Recordings (Updated ) for 2024
- New 2024 Approved Historic Harmonies Ideal Classical Tracks for Wedding Visuals
- Updated 2024 Approved Navigating the Nuances of Audio Graphics Plotting Waveform Data & Infusing Videos with Life-Like Animations Using Premiere Pro
- Essential Techniques for Filtering Out Background Disturbances in Digital Sound Recordings for 2024
- Updated A Symphony of Screens Crafting Audio-Visual Masterpieces with Filmora
- Updated Unveiling the Best 5 Audio Mixers Engineered for Mac Enthusiasts for 2024
- In-Depth Tips Utilizing Voxacells Voice Change Functionality for a More Dynamic Discord Interaction
- Auditory Excellence Guide Discovering the Finest Audio Editing Software with a Comprehensive Look at Benefits & Challenges
- Seeking Out The Tone of a Fuming Dogs Cry
- Updated In 2024, Preferred Destinations for Zero-Price Guitar Backdrop Images and Song Selections
- Setting Up Audacity on Ubuntu Linux A 2023 Comprehensive Instruction Manual for Audio Enthusiasts
- 2024 Approved Enthusiastic Appreciation Audio Creator
- New 2024 Approved Voice Memos Made Simple Your Comprehensive Guide to High-Quality Audio Recordings on Windows 10
- In 2024, Winning Windows DAW Choices Ranking the Best Free and Premium Software
- New Troubleshooting Speed Mastering Sound Integration in Adobe Premiere Pro for 2024
- New Analyzing Auditory Excellence The Revised Assessment of the Cambridge CXU Equipment, 2023 Edition for 2024
- 2024 Approved Ultimate Guide to Instantaneous Vocal Transformation Tools
- Updated Seamless Audio Transfer Essential Tips for Downloading Music From Spotify for 2024
- In 2024, A Practical Approach to Balancing Loudness and Clarity with VLC Normalization
- Updated In 2024, Mastering the Art of Sourcing Quiet, Melodic Tunes
- New Audio Goldmine The Most Valuable Websites for Illustrious Sound Snippets for 2024
- Updated A Deep Dive Into Top Audio Production Tools Is MAGIX Samplitude Still King, In 2024
- Updated Cutting Edge Sound Management The Top 5 Android Audio Editors Every Professional Should Own for 2024
- How PGSharp Save You from Ban While Spoofing Pokemon Go On Samsung Galaxy F54 5G? | Dr.fone
- How to Change your Apple iPhone 13 mini Location on Twitter | Dr.fone
- Fake the Location to Get Around the MLB Blackouts on Oppo A58 4G | Dr.fone
- 5 Solutions For Honor X50 Unlock Without Password
- In 2024, Hacks to do pokemon go trainer battles For Nokia C110 | Dr.fone
- Easily Unlock Your Vivo X Flip Device SIM
- Process of Screen Sharing Samsung Galaxy S23 Ultra to PC- Detailed Steps | Dr.fone
- Looking for Simple Steps to Customize the Speed of Your Video in DaVinci Resolve? Find Out How You Can Do that and Discover an Easier Alternative to DaVinci Resolve
- Strategies for Apps That Wont Download From Play Store On Realme 11 5G | Dr.fone
- Updated 18 Best Tools and Services to Create Animated Videos for Business 2023
- In 2024, The Best Android Unlock Software For Samsung Galaxy Z Flip 5 Device Top 5 Picks to Remove Android Locks
- How To Use Special Features - Virtual Location On Tecno Camon 20? | Dr.fone
- In 2024, Unlock Your Poco X6 Pro Phone with Ease The 3 Best Lock Screen Removal Tools
- How To Restore Missing Messages Files from Find X6
- New In 2024, The Ultimate Guide to Making Movie-Style Intros with Ease
- New 2024 Approved Stop Motion Made Easy Cloud Software, Guidelines, and Alternatives
- New In 2024, How To Fix Slow Playback Issues in DaVinci Resolve Finding the Best Solutions
- Best Video Repair tool to Fix and Repair Corrupt MP4,MOV,AVI video files of Infinix Note 30 VIP
- 5 Easy Ways to Copy Contacts from OnePlus Nord CE 3 5G to iPhone 14 and 15 | Dr.fone
- In 2024, Tips and Tricks for Setting Up your Nokia C12 Phone Pattern Lock
- Authentication Error Occurred on Samsung Galaxy M54 5G? Here Are 10 Proven Fixes | Dr.fone
- Updated In 2024, From Beginner to Pro Best Video Editors for Windows 11 (Free, Paid, and Trial)
- Apply These Techniques to Improve How to Detect Fake GPS Location On Realme 12+ 5G | Dr.fone
- In 2024, How to Show Wi-Fi Password on Infinix Note 30 VIP Racing Edition
- How to Fix Unfortunately, Contacts Has Stopped Error on Vivo T2 5G | Dr.fone
- Updated 2024 Approved Track Your Every Step Top Motion Tracking Apps
- Best Anti Tracker Software For Nokia 105 Classic | Dr.fone
- Title: New REAPER Decoded In-Depth Analysis of Its Professional Recording Suite and Educational Materials for 2024
- Author: Kate
- Created at : 2024-05-05 08:03:15
- Updated at : 2024-05-06 08:03:15
- Link: https://audio-editing.techidaily.com/new-reaper-decoded-in-depth-analysis-of-its-professional-recording-suite-and-educational-materials-for-2024/
- License: This work is licensed under CC BY-NC-SA 4.0.
