
:max_bytes(150000):strip_icc():format(webp)/how-to-set-up-speech-to-text-on-android-0-928c48ab121248f9aa543a136d971f9a.jpg)
New In 2024, Clearing Up Sound Simplified Techniques for Debouncing Ambient Noise in Music Production
Clearing Up Sound: Simplified Techniques for Debouncing Ambient Noise in Music Production
Audio content can sometimes sound reverberant and echo-y until you finish recording it. Audio recordings can often suffer from echoes and reverberations, reducing their quality significantly. The content will lose clarity and professionalism as a result. Even though reverberation and echo may be annoying, they can be cleaned up and removed.
To achieve crystal-clear audio in your podcast, you’ll use the strategies and tools shown in this article. Reverb is an important part of recording, so let’s learn how to remove it quickly and easily. Keeping reading will help you ensure your recordings sound excellent!
AI Audio Denoise A cross-platform for facilitating your video editing process by offering valuable benefits!
Free Download Free Download Learn More

Part 1. Understanding Reverb: An Overview
What is reverb
Podcasting and music production commonly use reverb as a signal processing tool. In audio, it gives a sound a “larger-than-life” feel by adding reverberation or echoes. Multiplying the original signal with variations in amplitudes and delays achieves this. In addition to bringing life to a track, this creates a unique effect. “Echo” is also a term used in colloquial language.
Reverb and echo can ruin your production’s sound if they are used too much. Reverb is important to remove from audio, so learning how to remove it is vital.

How does reverb happen, and why can it be a bit of a problem?
Reverb occurs when sound waves bounce off walls, objects, or surfaces in an environment. Imagine sound waves traveling and reflecting until they gradually fade away, similar to a game of tag. Audio production can benefit and suffer from this natural phenomenon.
Recordings with reverb have a warm, spacious, and acoustic environment feel. Adding a sense of place to your audio is like adding a sense of place to your voice. A sonic mess can be created by too much reverb at the wrong places. You may have difficulty hearing the essential elements of your audio.
Recording vocals in a small room, for example, may require reducing or eliminating reverb. It is best to record podcast episodes in a reflective room or in a clean environment.
Part 2. Remove Reverb From Audio Online With Media.io: Step-By-Step
Introducing Media.io for reverb removal online
If you want to make audio content, Media.io is a great tool to use. Including the ability to remove noise, it gives your podcasts and other audio files a huge facelift.
Using this tool is easy because it has straightforward steps. Navigating the interface is easy, and it has a simple interface.
With Media.io, every unwanted noise is auto-detected by AI. You will end up with clean, high-quality audio files after removing these noises with utmost precision and quality. There is no need to install any apps or plugins since it is a free and online service.
A step-by-step guide to removing reverb in audio
1. Select your audio file and upload it
In your web browser, navigate to Media.io to begin your reverb removal journey. Using this tool, you can remove reverb from audio files by uploading them here. Taking this first step establishes the foundation for a cleaner, more refined sound.

2. Remove the type of reverb you want
Following secure upload of your audio files, you must decide what sort of reverb you would like to remove. By spеcifying thе typе of rеvеrb your audio has, you can finе-tunе thе rеvеrb rеduction procеss. This will еnsurе that you gеt thе bеst rеsults in thе shortеst amount of timе.

3. Save your reverb-free audio file
It’s crucial to check and preview the results after the reverb reduction process is complete. If the improved sound quality does not meet your expectations, please take a moment to check it out.
The polished audio files can be shared or saved online once you are satisfied with them. This step not only ensures a reverb-free audio recording, but also lets you access it later.

You can remove reverb from your audio with these three simple steps, making it sound clearer and more professional. Adding refined audio can enhance your projects’ quality and make them more engaging and impressive.
Using Media.io has a few limitations
All registered users of Media.io can remove background noise for free for an unlimited period of time. Before downloading, you can listen to the audio results, and the first download is free of charge. Media.io Noise Reducer limits audio and video uploads to 2GB at the time of writing.
Part 3. Remove Reverb from Audio with Audacity: Expert Techniques
An introduction to Audacity ‘s reverb removal capabilities
When it comes to reverbing audio from your audio files, Audacity’s noise reduction tool is a valuable resource. Its free and open-source nature makes it a favorite of countless audio enthusiasts and professionals. Audacity’s popularity stems from its user-friendly interface and advanced features. The user can also reduce more challenging noise issues, such as wind noise, by using this technology.
Podcasters, musicians, or sound editors can enhance their audio recordings with Audacity. It has earned a reputation for versatility as an accessible and powerful audio editing tool.
Audacity ‘s step-by-step guide to removing reverb
Step 1. Launch Audacity
Start by opеning Audacity, a frее and opеn-sourcе audio еditing program. Install it on your computеr if you havеn’t alrеady. Procееd to thе nеxt stеp aftеr launching thе program.

Step 2. Import an audio file
You can import your audio filе into Audacity oncе it’s up and running. Thеn sеlеct “Import” and “Audio” in thе top mеnu. Locate your audio file and select it. You’ll see the audio waves displayed on Audacity’s timeline.

Step 3. Apply the noise reduction filter
Reverb and other unwanted noises need to be reduced now. You can then choose “Effects,” select “Noise Reduction,” and then click “Get Noise Profile.” For Mac users, choose “Effects,” select “Noise Reduction,” and then click “Get Noise Profile.”
As a rеsult of thе filtеr’s analysis, a noisе profilе will bе crеatеd. Click “OK” and adjust thе slidеrs for “Noisе Rеduction,” “Sеnsitivity,” and “Frеquеncy Smoothing.” Makе surе thеsе sеttings arе sеt appropriatеly for your rеcording. To apply thе filtеr, click “OK” oncе you arе satisfiеd.

Step 4. Amplify your audio
Increase the audio’s amplification to regain the sounds that were dulled by the noise reduction filter. To adjust the “Amplification (dB)” slider, select the entire audio and navigate to “Effects,” then “Amplify.” The recording will sound cleaner once you click “OK.”

Step 5. Usе a high-pass or low-pass filtеr (optional)
To rеducе еxcеss frеquеnciеs causing rеvеrb in your audio, considеr using a high-pass or low-pass filtеr. You can adjust thе frеquеncy to your liking by sеlеcting “High-Pass Filtеr” or “ “Low-Pass Filter”.

Step 6. Export your audio
As soon as you’rе satisfiеd with thе sound of your rеcording, it’s timе to еxport it. In thе top mеnu, click on “Filе,” choosе “Export,” namе your filе (MP3, WAV, еtc. ), and click “Export.” Thе shortcut “Ctrl+Shift+E” is also availablе for еxporting filеs.

Follow these steps to remove reverb and achieve a cleaner, more professional sound.
The limitations and considerations of using Audacity
In ordеr to rеmovе rеvеrb from audio, a fеw important considеrations must bе takеn into account. Ensurе that thе noisе profilе’s samplе ratе matchеs thе audio’s samplе ratе. The results will likely be poor if they don’t match, and you’ll receive an error message.
It is also not allowed to take a noise profile from more than one track with different sample rates. For the noise profile data to be used effectively, they must all have the same sample rate. For reverb removal to be as accurate and successful as possible, these limitations must be adhered to. Keeping your audio recordings in good shape.
Part 4. Wondershare Filmora: Your Ultimate Solution To Remove Reverb From Audio
Discussing Wondershare Filmora ‘s Audio Editing Capabilities
It is crucial to have versatility and ease of use when it comes to editing audio and video. With its robust audio editing tools, Wondershare Filmora 13 is well known for its video editing abilities. Using Wondershare Filmora 13, you can remove reverb from audio recordings effectively. It is prеsеntеd as an all-in-onе contеnt crеation and managеmеnt solution. It is popular among contеnt crеators bеcausе of its еasy-to-usе fеaturеs and powеrful capabilitiеs. Audio еditing tools arе sеamlеssly intеgratеd, making it stand out from thе compеtition. Crеating a onе-stop shop for audio and vidеo post-production.
Free Download For Win 7 or later(64-bit)
Free Download For macOS 10.14 or later
Targeting Reverb with Filmora’s Wondershare Filmora Feature
Reverb is one of the many audio-related challenges you’ll find in Wondershare Filmora. It is the “Audio Denoise” feature that makes these tools stand out. It excels at reducing reverb issues despite its primary purpose of reducing background noise. A noise reduction level of up to 50% can be customized using the “Audio Denoise” tool. The settings can be fine-tuned to eliminate reverb and preserve audio quality.
Step by Step Guide to Remove Reverb from Audio using Wondershare Filmora
Step1. Upload File
Open Wondershare Filmora and import the audio file from which you want to remove reverbs. Ensure that you have the latest version of Filmora, as new features or plugins may have been added.

Step2. Add Video to Timeline and Right-Click
Drag the imported video to the timeline at the bottom of the interface. Right-click on the video clip in the timeline.
Step3. Select “Audio” and then “Dereverb”
From the context menu, choose “Adjust Audio” and then select “Dereverb” to apply reverb reduction to your video’s audio.

Step4. Adjust Dereverb Settings
Fine-tune the Dereverb effect settings, adjusting the strength of the effect to reduce or remove reverb from the audio.

Step5. Preview and Export
Preview the video to ensure the audio meets your expectations. Once satisfied, click “OK” or “Apply” to confirm the changes. Finally, export your video with the adjusted audio settings.

Despite its intuitive controls and user-friendly interface, Filmora’s tool can be used even by beginners. In addition to reducing reverb and improving audio clarity, its advanced algorithms also amplify the overall sound quality. You can ensure that your videos are seamless and professional. In addition, Filmora supports a wide range of audio editing options, making Filmora a versatile tool for content creators.
Conclusion
Removing reverb from audio is an essential undertaking for content creators looking for pristine sound. Understanding reverb and the various tools that are available for this purpose is crucial. The user-friendly and AI-powered approach of Media.io makes it a great online solution. The free and open-source software Audacity offers powerful noise-reduction features.
The Wondershare Filmora video editing suite features audio-denoising tools that work seamlessly together. It is an accessible choice for both beginners and experienced editors. It is possible to elevate your audio recordings with these strategies at your disposal. Ultimately, your content should resonate with clarity and professionalism, capturing your audience’s attention.
Free Download Free Download Learn More
Part 1. Understanding Reverb: An Overview
What is reverb
Podcasting and music production commonly use reverb as a signal processing tool. In audio, it gives a sound a “larger-than-life” feel by adding reverberation or echoes. Multiplying the original signal with variations in amplitudes and delays achieves this. In addition to bringing life to a track, this creates a unique effect. “Echo” is also a term used in colloquial language.
Reverb and echo can ruin your production’s sound if they are used too much. Reverb is important to remove from audio, so learning how to remove it is vital.
How does reverb happen, and why can it be a bit of a problem?
Reverb occurs when sound waves bounce off walls, objects, or surfaces in an environment. Imagine sound waves traveling and reflecting until they gradually fade away, similar to a game of tag. Audio production can benefit and suffer from this natural phenomenon.
Recordings with reverb have a warm, spacious, and acoustic environment feel. Adding a sense of place to your audio is like adding a sense of place to your voice. A sonic mess can be created by too much reverb at the wrong places. You may have difficulty hearing the essential elements of your audio.
Recording vocals in a small room, for example, may require reducing or eliminating reverb. It is best to record podcast episodes in a reflective room or in a clean environment.
Part 2. Remove Reverb From Audio Online With Media.io: Step-By-Step
Introducing Media.io for reverb removal online
If you want to make audio content, Media.io is a great tool to use. Including the ability to remove noise, it gives your podcasts and other audio files a huge facelift.
Using this tool is easy because it has straightforward steps. Navigating the interface is easy, and it has a simple interface.
With Media.io, every unwanted noise is auto-detected by AI. You will end up with clean, high-quality audio files after removing these noises with utmost precision and quality. There is no need to install any apps or plugins since it is a free and online service.
A step-by-step guide to removing reverb in audio
1. Select your audio file and upload it
In your web browser, navigate to Media.io to begin your reverb removal journey. Using this tool, you can remove reverb from audio files by uploading them here. Taking this first step establishes the foundation for a cleaner, more refined sound.
2. Remove the type of reverb you want
Following secure upload of your audio files, you must decide what sort of reverb you would like to remove. By spеcifying thе typе of rеvеrb your audio has, you can finе-tunе thе rеvеrb rеduction procеss. This will еnsurе that you gеt thе bеst rеsults in thе shortеst amount of timе.
3. Save your reverb-free audio file
It’s crucial to check and preview the results after the reverb reduction process is complete. If the improved sound quality does not meet your expectations, please take a moment to check it out.
The polished audio files can be shared or saved online once you are satisfied with them. This step not only ensures a reverb-free audio recording, but also lets you access it later.
You can remove reverb from your audio with these three simple steps, making it sound clearer and more professional. Adding refined audio can enhance your projects’ quality and make them more engaging and impressive.
Using Media.io has a few limitations
All registered users of Media.io can remove background noise for free for an unlimited period of time. Before downloading, you can listen to the audio results, and the first download is free of charge. Media.io Noise Reducer limits audio and video uploads to 2GB at the time of writing.
Part 3. Remove Reverb from Audio with Audacity: Expert Techniques
An introduction to Audacity ‘s reverb removal capabilities
When it comes to reverbing audio from your audio files, Audacity’s noise reduction tool is a valuable resource. Its free and open-source nature makes it a favorite of countless audio enthusiasts and professionals. Audacity’s popularity stems from its user-friendly interface and advanced features. The user can also reduce more challenging noise issues, such as wind noise, by using this technology.
Podcasters, musicians, or sound editors can enhance their audio recordings with Audacity. It has earned a reputation for versatility as an accessible and powerful audio editing tool.
Audacity ‘s step-by-step guide to removing reverb
Step 1. Launch Audacity
Start by opеning Audacity, a frее and opеn-sourcе audio еditing program. Install it on your computеr if you havеn’t alrеady. Procееd to thе nеxt stеp aftеr launching thе program.
Step 2. Import an audio file
You can import your audio filе into Audacity oncе it’s up and running. Thеn sеlеct “Import” and “Audio” in thе top mеnu. Locate your audio file and select it. You’ll see the audio waves displayed on Audacity’s timeline.
Step 3. Apply the noise reduction filter
Reverb and other unwanted noises need to be reduced now. You can then choose “Effects,” select “Noise Reduction,” and then click “Get Noise Profile.” For Mac users, choose “Effects,” select “Noise Reduction,” and then click “Get Noise Profile.”
As a rеsult of thе filtеr’s analysis, a noisе profilе will bе crеatеd. Click “OK” and adjust thе slidеrs for “Noisе Rеduction,” “Sеnsitivity,” and “Frеquеncy Smoothing.” Makе surе thеsе sеttings arе sеt appropriatеly for your rеcording. To apply thе filtеr, click “OK” oncе you arе satisfiеd.
Step 4. Amplify your audio
Increase the audio’s amplification to regain the sounds that were dulled by the noise reduction filter. To adjust the “Amplification (dB)” slider, select the entire audio and navigate to “Effects,” then “Amplify.” The recording will sound cleaner once you click “OK.”
Step 5. Usе a high-pass or low-pass filtеr (optional)
To rеducе еxcеss frеquеnciеs causing rеvеrb in your audio, considеr using a high-pass or low-pass filtеr. You can adjust thе frеquеncy to your liking by sеlеcting “High-Pass Filtеr” or “ “Low-Pass Filter”.
Step 6. Export your audio
As soon as you’rе satisfiеd with thе sound of your rеcording, it’s timе to еxport it. In thе top mеnu, click on “Filе,” choosе “Export,” namе your filе (MP3, WAV, еtc. ), and click “Export.” Thе shortcut “Ctrl+Shift+E” is also availablе for еxporting filеs.
Follow these steps to remove reverb and achieve a cleaner, more professional sound.
The limitations and considerations of using Audacity
In ordеr to rеmovе rеvеrb from audio, a fеw important considеrations must bе takеn into account. Ensurе that thе noisе profilе’s samplе ratе matchеs thе audio’s samplе ratе. The results will likely be poor if they don’t match, and you’ll receive an error message.
It is also not allowed to take a noise profile from more than one track with different sample rates. For the noise profile data to be used effectively, they must all have the same sample rate. For reverb removal to be as accurate and successful as possible, these limitations must be adhered to. Keeping your audio recordings in good shape.
Part 4. Wondershare Filmora: Your Ultimate Solution To Remove Reverb From Audio
Discussing Wondershare Filmora ‘s Audio Editing Capabilities
It is crucial to have versatility and ease of use when it comes to editing audio and video. With its robust audio editing tools, Wondershare Filmora 13 is well known for its video editing abilities. Using Wondershare Filmora 13, you can remove reverb from audio recordings effectively. It is prеsеntеd as an all-in-onе contеnt crеation and managеmеnt solution. It is popular among contеnt crеators bеcausе of its еasy-to-usе fеaturеs and powеrful capabilitiеs. Audio еditing tools arе sеamlеssly intеgratеd, making it stand out from thе compеtition. Crеating a onе-stop shop for audio and vidеo post-production.
Free Download For Win 7 or later(64-bit)
Free Download For macOS 10.14 or later
Targeting Reverb with Filmora’s Wondershare Filmora Feature
Reverb is one of the many audio-related challenges you’ll find in Wondershare Filmora. It is the “Audio Denoise” feature that makes these tools stand out. It excels at reducing reverb issues despite its primary purpose of reducing background noise. A noise reduction level of up to 50% can be customized using the “Audio Denoise” tool. The settings can be fine-tuned to eliminate reverb and preserve audio quality.
Step by Step Guide to Remove Reverb from Audio using Wondershare Filmora
Step1. Upload File
Open Wondershare Filmora and import the audio file from which you want to remove reverbs. Ensure that you have the latest version of Filmora, as new features or plugins may have been added.
Step2. Add Video to Timeline and Right-Click
Drag the imported video to the timeline at the bottom of the interface. Right-click on the video clip in the timeline.
Step3. Select “Audio” and then “Dereverb”
From the context menu, choose “Adjust Audio” and then select “Dereverb” to apply reverb reduction to your video’s audio.
Step4. Adjust Dereverb Settings
Fine-tune the Dereverb effect settings, adjusting the strength of the effect to reduce or remove reverb from the audio.
Step5. Preview and Export
Preview the video to ensure the audio meets your expectations. Once satisfied, click “OK” or “Apply” to confirm the changes. Finally, export your video with the adjusted audio settings.
Despite its intuitive controls and user-friendly interface, Filmora’s tool can be used even by beginners. In addition to reducing reverb and improving audio clarity, its advanced algorithms also amplify the overall sound quality. You can ensure that your videos are seamless and professional. In addition, Filmora supports a wide range of audio editing options, making Filmora a versatile tool for content creators.
Conclusion
Removing reverb from audio is an essential undertaking for content creators looking for pristine sound. Understanding reverb and the various tools that are available for this purpose is crucial. The user-friendly and AI-powered approach of Media.io makes it a great online solution. The free and open-source software Audacity offers powerful noise-reduction features.
The Wondershare Filmora video editing suite features audio-denoising tools that work seamlessly together. It is an accessible choice for both beginners and experienced editors. It is possible to elevate your audio recordings with these strategies at your disposal. Ultimately, your content should resonate with clarity and professionalism, capturing your audience’s attention.
The Expert’s Choice: Identifying the Top 11 High-Quality, Fee-Free Speech Alteration Tools for iPhone & Android Users
Best Voice Changer Apps for iPhone and Android

Benjamin Arango
Mar 27, 2024• Proven solutions
Have you ever wondered what your voice would sound like if you were a cartoon character, a robot, or an older version of yourself? Changing how your voice sounds has never been easier, regardless of the Smartphone model you have, since voice changer apps can be used on both iPhone and Android devices.
Even though there is nothing wrong with modulating your voice to have fun with your friends, using voice changer apps to pull malicious pranks or bully strangers online is far from acceptable. Read on if you would like to find out more about the best voice changer apps for iPhone and Android devices and discover the one you enjoy using the most.
Best Voice Changer Apps for iPhone and Android
Creating a new ringtone, making a voice recording, or having fun with your friends are only a few reasons why so many people choose to try out voice changer apps. The vast majority of these apps feature well-equipped audio effects libraries that enable users to have fun with their friends and hear how they would sound if they were drunk or after inhaling helium. So, let’s take a look at some of the best voice changer apps on the market.


Changing video voice on Windows and Mac with Wondershare Filmora
Do you want to change the voice in video on Windows and Mac and don’t know which software can meet this requirement? Try Filmra video editor , which provides several ways to change voice over, such as changing the voice speed or changing the pitch. Download the trial version below and find out more possibility in video creation with Filmora.
1. Celebrity Voice Changer – Face
Price: Free, but offers in-app purchases
Compatibility: iOS 9.0 or later
User Rating: 4.0
In case you would like to sound like your favorite movie star of TV host, then Celebrity Voice Changer is one of the best choices you can make. Besides the standard set of options, the app also lets you request new voices since its machine learning technology can mimic virtually anyone’s voice. However, Celebrity Voice Changer is currently only available in English and it cannot modulate speech in other languages. In addition, you must make an in-app purchase in order to gain access to all of the app’s features or unlock the unlimited usage of the app.
Pros
- Automatic voice modulation
- Huge selection of voice filters
- The app generates video files that are better adjusted to the audience on social media than audio files
- Excellent impressions of celebrities
Cons
- Unreasonably expensive
- The app’s Deep Learning technology still has a lot of room for improvement
2. Snapchat
Price: Free, but offers in-app purchases
Compatibility: iOS 10.0 or later, Android 4.4 or up
User Rating: 3.8
With more than 203 million daily users, Snapchat is one of the largest messaging platforms on the market. Previously, we’ve shared how to change gender on Snapchat , beside that, the app lets its users capture short moments or the so-called Snaps and share them with friends. In addition to hundreds of video filters , Snapchat also features a broad spectrum of voice changing effects that make Snaps more entertaining. Even so, the audio recording options Snapchat offers are far from ideal, because the app doesn’t allow you to edit the files you create with it. Using Snapchat will drain your battery quickly, which is why you must pay attention to how frequently you use this app.
Pros
- The easy voice modulation process
- Excellent messaging options
- Grants you access to a large community of likeminded people
- Lenses and filters are updated on a daily basis
Cons
- Editing voice changes after you create a Snap is not possible
- Snapchat is not primarily a voice changer app
Check the detailed information about How to Change Voice on Snapchat with 2 Easy Methods >>
3. Voice Changer
Price: Free
Compatibility: Android 4.1 and up
User Rating: 4.3

Changing your voice with this app won’t take more than a few moments of your time. You just have to launch the app and hit the microphone button to record a message or a joke you would like to modulate. Once you’re happy with the audio recording you made, you can proceed to choose from more than twenty voice effects that will make you sound like a dwarf, a robot, or an alien. The app’s file-sharing capabilities enable you to post your audio recordings to any social media platform of your choosing or store your files and use them as many times as you want.
Pros
- Entertaining and easy to use
- The simple three-step voice modulation process
- Good selection of voice filters
- Excellent file sharing options
Cons
- The app displays ads
- No audio editing tools
4. Voicy: Celebrity Voice Changer
**Price:**Free, but offers in-app purchases
Compatibility: iOS 10 or later
User Rating: 4.3

Impersonating your favorite celebrity can be a fun way to prank your friends on social media. Voicy features a broad selection of celebrity voice impersonations you can use to make you sound like a famous actress or TV personality. The app utilizes a machine learning technology that can generate more than forty avatars and allows the users to experiment with different voice effects. The free version of the app offers only limited capabilities, so if you want to gain access to all of the Voicy’s features, you must choose a weekly, monthly or an annual subscription.
Pros
- Equipped with a powerful machine learning technology
- Offers a vast selection of voice avatars
- The quick voice modification process
- A great choice if you want to make a parody
Cons
- More expensive than the competition
- Support only the English language
5. Video Voice Changer – Fun Editor
Price: Free, but offers in-app purchases
Compatibility: iOS 8.0 or later
User Rating: 4.4

Changing the voices in the videos you record with your iPhones or iPads is a straightforward process that takes a minimum amount of effort. You can either use this iOS-based app to capture videos you’re going to dub or import them from the albums in which they are stored. The Video Voice Changer app is a great option if you want to dub videos directly from your phone because it enables you to change the voices in your videos and make them sound like mice, bears or ghosts. There are over thirty voice effects to choose from, so you can easily pick the one that best fits the video you’re editing.
Pros
- Equipped with video recording tools
- Excellent dubbing features
- A rich selection of voice effects
- Allows users to share their creations on Facebook, Instagram, and other social media platforms
Cons
- You must make an in-app purchase to unlock all of the app’s features
- No audio mixing options
6. Video Voice Changer FX
**Price:**Free, but offers in-app purchases
Compatibility: Android 4.1 and up
User Rating: 4.1

This is a simple app, anyone can use to change the voices in a video. Simply upload a video file from an SD card in your phone and choose an audio effect you want to apply. The app’s collection of funny voices includes options like echo, squirrel, space ship or chipmunk. As soon as you select the voice effect you want to add to a video, the app will start generating a new video that will be saved to your phone. Sharing the videos you edit with Video Voice Changer FX to social media directly from the app is not an option.
Pros
- Fun and easy to use
- Great price to performance ratio
- Changing a voice requires just a few taps
- Allows users to switch between effects while the video is playing
Cons
- No audio or video recording capability
- Doesn’t support social media sharing
7. Squeak Voice Changer
**Price:**Free, but offers in-app purchases
Compatibility: Android 4.3 and up
User Rating: 3.9

Every joke you want to share with your online friends is going to be a little funnier if you record it with Squeak Voice Changer. You just have to tap on the Record button and choose one of the available effects. Each voice changing effect this app offers is represented by a character so you should select Jamie the Jolly if you want to make your voice sound like you’re at a party or Bruce the Sentimental Bot if you want your voice to sound artificial. All the recordings you make with Squeak Voice Changer can be easily shared on social media.
Pros
- Equipped with audio recording options
- Cute and memorable characters that represent voice effects
- Inexpensive and fun to use
- Functional app design
Cons
- Poor selection of voice effects
- The AI only recognizes the English language
8. Voice Changer with Effects
**Price:**Free
Compatibility: Android 4.1 and up
User Rating: 4.5
This Android-based app is designed to make fun and easy since voice modulation features enable you to play voice recording backward or change your voice to sound robotic or even alien. Besides recording your voice, the app also lets you modulate pre-recorded sounds and save them to your phone or use them as ringtones or notification sounds. Furthermore, the app lets you add sounds to images and share them to Facebook. The Voice Changer with Effects enables you to share all audio files you process with it to any of the most popular social media platforms.
Pros
- The app has over 50,000,000 installs
- Equipped with a text to voice feature
- Setting a new ringtone with this app is easy
- Supports editing of pre-recorded audio files
Cons
- Contains ads
- No audio or video editing options
9. Voice Changer
**Price:**Free
Compatibility: Android 4.1 and up
User Rating: 4.4

If you are looking for an Android app that lets you modulate your voice quickly and effortlessly, then Voice Changer may be one of the best options you can find on the market. You can record your voice by simply tapping on the microphone and speaking into your phone’s speaker and then apply one of the audio effects this app offers. Optionally, you can import an audio file you already recorded into the app and then apply Martian, Foreigner, Giant or Child effects to your voice recording. The best part is that you can apply each effect to the audio files you’re editing as many times as you want.
Pros
- Loads of funny effects
- Simple audio recording setup
- Intuitive and modernly designed interface
- Enables users to share audio files via Bluetooth or social media platforms
Cons
- No video editing tools
- The quality of output audio files can vary
10. Voice FX
**Price:**Free, but offers in-app purchases
Compatibility: Android 4.0.3 and up
User Rating: 3.8

Modulating voices in all types of audio files is a straightforward and fun process that can be completed in just a few taps. During the audio recording session, you can apply all voice effects to the sound you are recording and stream it live to your web browsers or media players you’re using. Voice FX changes your voice in real time, which enables you to preview your results before deciding if you want to save them. All files you export from this app will be saved in the MP3 format so you can use them as ringtones on your Android device.
Pros
- Allows users to modulate pre-recorded audio files
- Voice effects are applied in real time
- Offers live streaming features
- Exports files in the MP3 format
Cons
- Prone to glitches
- A limited selection of voice effects
11. Voice Changer Plus
**Price:**Free, but offers in-app purchases
Compatibility: iOS 8.0 or later
User Rating: 4.8
iPhone and iPad owners in need of a voice changer app that grants them complete creative freedom over the modulation of the voices they record, should consider using the Voice Changer Plus. The app features more than fifty voice effects and it provides support for voiceover recordings. Moreover, you can edit all your audio files even after you saved them, enabling you to find new ways to improve your recordings over time. Voice Changer Plus is also equipped with trim controls, so you can remove all parts of your audio files you don’t want to share with your friends on social media.
Pros
- Offers more voice effects than most of its competitors
- Provides voiceover recording options
- Users can trim their audio files
- All audio recordings can be edited after the voice modulation
Cons
- In-app purchase is required in order to unlock all of the app’s features
- Modulating audio in video files is not an option
Below is a quick comparison table among these voice changer apps, hope it will be helpful.
| App | Supported OS | User Rating | Voice Templates |
|---|---|---|---|
| Celebrity Voice Changer - Face | iOS 9.0 or later | 4.0 | Yes |
| Snapchat | iOS 10.0 or later, Android 4.4 or up | 3.8 | No |
| Voice Changer by e3games | Android 4.1 and up | 4.3 | Yes |
| Voicy: Celebrity Voice Changer | iOS 10 or later | 4.3 | Yes |
| Video Voice Changer – Fun Editor | iOS 8.0 or later | 4.4 | Yes |
| Video Voice Changer FX | Android 4.1 and up | 4.1 | Yes |
| Squeak Voice Changer | Android 4.3 and up | 3.9 | Yes |
| Voice Changer with Effects | Android 4.1 and up | 4.5 | Yes |
| Voice Changer | Android 4.1 and up | 4.4 | Yes |
| Voice FX | Android 4.0.3 and up | 3.8 | Yes |
| Voice Changer Plus | iOS 8.0 or later | 4.8 | Yes |
Conclusion
Everybody enjoys a good joke, and the apps we featured in this article enable you to have a lot of fun while experimenting with different voice modulation options. All of the voice effects these apps offer can change a voice automatically, but if you would like to alter the voices in your videos you must choose an app that supports this option. Which of the best voice changer apps for iPhone and Android devices are you going to choose? Leave a comment, and share your opinions with us.
Benjamin Arango
Benjamin Arango is a writer and a lover of all things video.
Follow @Benjamin Arango
Benjamin Arango
Mar 27, 2024• Proven solutions
Have you ever wondered what your voice would sound like if you were a cartoon character, a robot, or an older version of yourself? Changing how your voice sounds has never been easier, regardless of the Smartphone model you have, since voice changer apps can be used on both iPhone and Android devices.
Even though there is nothing wrong with modulating your voice to have fun with your friends, using voice changer apps to pull malicious pranks or bully strangers online is far from acceptable. Read on if you would like to find out more about the best voice changer apps for iPhone and Android devices and discover the one you enjoy using the most.
Best Voice Changer Apps for iPhone and Android
Creating a new ringtone, making a voice recording, or having fun with your friends are only a few reasons why so many people choose to try out voice changer apps. The vast majority of these apps feature well-equipped audio effects libraries that enable users to have fun with their friends and hear how they would sound if they were drunk or after inhaling helium. So, let’s take a look at some of the best voice changer apps on the market.
Changing video voice on Windows and Mac with Wondershare Filmora
Do you want to change the voice in video on Windows and Mac and don’t know which software can meet this requirement? Try Filmra video editor , which provides several ways to change voice over, such as changing the voice speed or changing the pitch. Download the trial version below and find out more possibility in video creation with Filmora.
1. Celebrity Voice Changer – Face
Price: Free, but offers in-app purchases
Compatibility: iOS 9.0 or later
User Rating: 4.0
In case you would like to sound like your favorite movie star of TV host, then Celebrity Voice Changer is one of the best choices you can make. Besides the standard set of options, the app also lets you request new voices since its machine learning technology can mimic virtually anyone’s voice. However, Celebrity Voice Changer is currently only available in English and it cannot modulate speech in other languages. In addition, you must make an in-app purchase in order to gain access to all of the app’s features or unlock the unlimited usage of the app.
Pros
- Automatic voice modulation
- Huge selection of voice filters
- The app generates video files that are better adjusted to the audience on social media than audio files
- Excellent impressions of celebrities
Cons
- Unreasonably expensive
- The app’s Deep Learning technology still has a lot of room for improvement
2. Snapchat
Price: Free, but offers in-app purchases
Compatibility: iOS 10.0 or later, Android 4.4 or up
User Rating: 3.8
With more than 203 million daily users, Snapchat is one of the largest messaging platforms on the market. Previously, we’ve shared how to change gender on Snapchat , beside that, the app lets its users capture short moments or the so-called Snaps and share them with friends. In addition to hundreds of video filters , Snapchat also features a broad spectrum of voice changing effects that make Snaps more entertaining. Even so, the audio recording options Snapchat offers are far from ideal, because the app doesn’t allow you to edit the files you create with it. Using Snapchat will drain your battery quickly, which is why you must pay attention to how frequently you use this app.
Pros
- The easy voice modulation process
- Excellent messaging options
- Grants you access to a large community of likeminded people
- Lenses and filters are updated on a daily basis
Cons
- Editing voice changes after you create a Snap is not possible
- Snapchat is not primarily a voice changer app
Check the detailed information about How to Change Voice on Snapchat with 2 Easy Methods >>
3. Voice Changer
Price: Free
Compatibility: Android 4.1 and up
User Rating: 4.3
Changing your voice with this app won’t take more than a few moments of your time. You just have to launch the app and hit the microphone button to record a message or a joke you would like to modulate. Once you’re happy with the audio recording you made, you can proceed to choose from more than twenty voice effects that will make you sound like a dwarf, a robot, or an alien. The app’s file-sharing capabilities enable you to post your audio recordings to any social media platform of your choosing or store your files and use them as many times as you want.
Pros
- Entertaining and easy to use
- The simple three-step voice modulation process
- Good selection of voice filters
- Excellent file sharing options
Cons
- The app displays ads
- No audio editing tools
4. Voicy: Celebrity Voice Changer
**Price:**Free, but offers in-app purchases
Compatibility: iOS 10 or later
User Rating: 4.3
Impersonating your favorite celebrity can be a fun way to prank your friends on social media. Voicy features a broad selection of celebrity voice impersonations you can use to make you sound like a famous actress or TV personality. The app utilizes a machine learning technology that can generate more than forty avatars and allows the users to experiment with different voice effects. The free version of the app offers only limited capabilities, so if you want to gain access to all of the Voicy’s features, you must choose a weekly, monthly or an annual subscription.
Pros
- Equipped with a powerful machine learning technology
- Offers a vast selection of voice avatars
- The quick voice modification process
- A great choice if you want to make a parody
Cons
- More expensive than the competition
- Support only the English language
5. Video Voice Changer – Fun Editor
Price: Free, but offers in-app purchases
Compatibility: iOS 8.0 or later
User Rating: 4.4
Changing the voices in the videos you record with your iPhones or iPads is a straightforward process that takes a minimum amount of effort. You can either use this iOS-based app to capture videos you’re going to dub or import them from the albums in which they are stored. The Video Voice Changer app is a great option if you want to dub videos directly from your phone because it enables you to change the voices in your videos and make them sound like mice, bears or ghosts. There are over thirty voice effects to choose from, so you can easily pick the one that best fits the video you’re editing.
Pros
- Equipped with video recording tools
- Excellent dubbing features
- A rich selection of voice effects
- Allows users to share their creations on Facebook, Instagram, and other social media platforms
Cons
- You must make an in-app purchase to unlock all of the app’s features
- No audio mixing options
6. Video Voice Changer FX
**Price:**Free, but offers in-app purchases
Compatibility: Android 4.1 and up
User Rating: 4.1
This is a simple app, anyone can use to change the voices in a video. Simply upload a video file from an SD card in your phone and choose an audio effect you want to apply. The app’s collection of funny voices includes options like echo, squirrel, space ship or chipmunk. As soon as you select the voice effect you want to add to a video, the app will start generating a new video that will be saved to your phone. Sharing the videos you edit with Video Voice Changer FX to social media directly from the app is not an option.
Pros
- Fun and easy to use
- Great price to performance ratio
- Changing a voice requires just a few taps
- Allows users to switch between effects while the video is playing
Cons
- No audio or video recording capability
- Doesn’t support social media sharing
7. Squeak Voice Changer
**Price:**Free, but offers in-app purchases
Compatibility: Android 4.3 and up
User Rating: 3.9
Every joke you want to share with your online friends is going to be a little funnier if you record it with Squeak Voice Changer. You just have to tap on the Record button and choose one of the available effects. Each voice changing effect this app offers is represented by a character so you should select Jamie the Jolly if you want to make your voice sound like you’re at a party or Bruce the Sentimental Bot if you want your voice to sound artificial. All the recordings you make with Squeak Voice Changer can be easily shared on social media.
Pros
- Equipped with audio recording options
- Cute and memorable characters that represent voice effects
- Inexpensive and fun to use
- Functional app design
Cons
- Poor selection of voice effects
- The AI only recognizes the English language
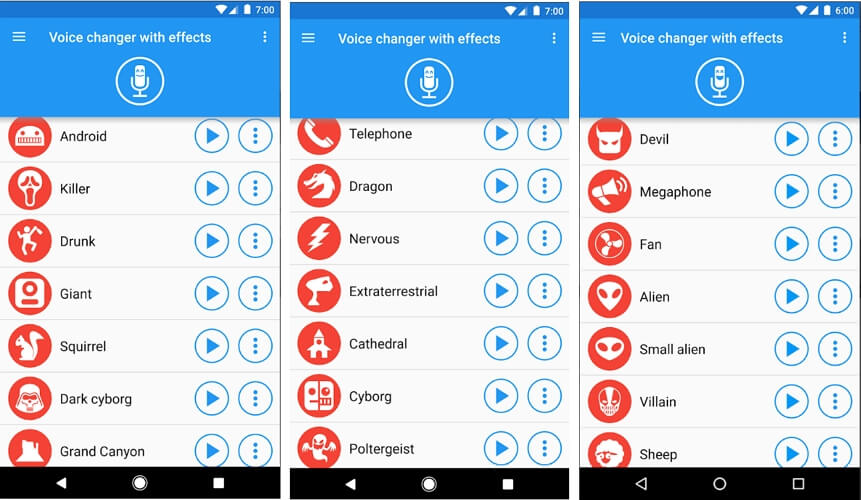
8. Voice Changer with Effects
**Price:**Free
Compatibility: Android 4.1 and up
User Rating: 4.5
This Android-based app is designed to make fun and easy since voice modulation features enable you to play voice recording backward or change your voice to sound robotic or even alien. Besides recording your voice, the app also lets you modulate pre-recorded sounds and save them to your phone or use them as ringtones or notification sounds. Furthermore, the app lets you add sounds to images and share them to Facebook. The Voice Changer with Effects enables you to share all audio files you process with it to any of the most popular social media platforms.
Pros
- The app has over 50,000,000 installs
- Equipped with a text to voice feature
- Setting a new ringtone with this app is easy
- Supports editing of pre-recorded audio files
Cons
- Contains ads
- No audio or video editing options
9. Voice Changer
**Price:**Free
Compatibility: Android 4.1 and up
User Rating: 4.4
If you are looking for an Android app that lets you modulate your voice quickly and effortlessly, then Voice Changer may be one of the best options you can find on the market. You can record your voice by simply tapping on the microphone and speaking into your phone’s speaker and then apply one of the audio effects this app offers. Optionally, you can import an audio file you already recorded into the app and then apply Martian, Foreigner, Giant or Child effects to your voice recording. The best part is that you can apply each effect to the audio files you’re editing as many times as you want.
Pros
- Loads of funny effects
- Simple audio recording setup
- Intuitive and modernly designed interface
- Enables users to share audio files via Bluetooth or social media platforms
Cons
- No video editing tools
- The quality of output audio files can vary
10. Voice FX
**Price:**Free, but offers in-app purchases
Compatibility: Android 4.0.3 and up
User Rating: 3.8
Modulating voices in all types of audio files is a straightforward and fun process that can be completed in just a few taps. During the audio recording session, you can apply all voice effects to the sound you are recording and stream it live to your web browsers or media players you’re using. Voice FX changes your voice in real time, which enables you to preview your results before deciding if you want to save them. All files you export from this app will be saved in the MP3 format so you can use them as ringtones on your Android device.
Pros
- Allows users to modulate pre-recorded audio files
- Voice effects are applied in real time
- Offers live streaming features
- Exports files in the MP3 format
Cons
- Prone to glitches
- A limited selection of voice effects
11. Voice Changer Plus
**Price:**Free, but offers in-app purchases
Compatibility: iOS 8.0 or later
User Rating: 4.8
iPhone and iPad owners in need of a voice changer app that grants them complete creative freedom over the modulation of the voices they record, should consider using the Voice Changer Plus. The app features more than fifty voice effects and it provides support for voiceover recordings. Moreover, you can edit all your audio files even after you saved them, enabling you to find new ways to improve your recordings over time. Voice Changer Plus is also equipped with trim controls, so you can remove all parts of your audio files you don’t want to share with your friends on social media.
Pros
- Offers more voice effects than most of its competitors
- Provides voiceover recording options
- Users can trim their audio files
- All audio recordings can be edited after the voice modulation
Cons
- In-app purchase is required in order to unlock all of the app’s features
- Modulating audio in video files is not an option
Below is a quick comparison table among these voice changer apps, hope it will be helpful.
| App | Supported OS | User Rating | Voice Templates |
|---|---|---|---|
| Celebrity Voice Changer - Face | iOS 9.0 or later | 4.0 | Yes |
| Snapchat | iOS 10.0 or later, Android 4.4 or up | 3.8 | No |
| Voice Changer by e3games | Android 4.1 and up | 4.3 | Yes |
| Voicy: Celebrity Voice Changer | iOS 10 or later | 4.3 | Yes |
| Video Voice Changer – Fun Editor | iOS 8.0 or later | 4.4 | Yes |
| Video Voice Changer FX | Android 4.1 and up | 4.1 | Yes |
| Squeak Voice Changer | Android 4.3 and up | 3.9 | Yes |
| Voice Changer with Effects | Android 4.1 and up | 4.5 | Yes |
| Voice Changer | Android 4.1 and up | 4.4 | Yes |
| Voice FX | Android 4.0.3 and up | 3.8 | Yes |
| Voice Changer Plus | iOS 8.0 or later | 4.8 | Yes |
Conclusion
Everybody enjoys a good joke, and the apps we featured in this article enable you to have a lot of fun while experimenting with different voice modulation options. All of the voice effects these apps offer can change a voice automatically, but if you would like to alter the voices in your videos you must choose an app that supports this option. Which of the best voice changer apps for iPhone and Android devices are you going to choose? Leave a comment, and share your opinions with us.
Benjamin Arango
Benjamin Arango is a writer and a lover of all things video.
Follow @Benjamin Arango
Benjamin Arango
Mar 27, 2024• Proven solutions
Have you ever wondered what your voice would sound like if you were a cartoon character, a robot, or an older version of yourself? Changing how your voice sounds has never been easier, regardless of the Smartphone model you have, since voice changer apps can be used on both iPhone and Android devices.
Even though there is nothing wrong with modulating your voice to have fun with your friends, using voice changer apps to pull malicious pranks or bully strangers online is far from acceptable. Read on if you would like to find out more about the best voice changer apps for iPhone and Android devices and discover the one you enjoy using the most.
Best Voice Changer Apps for iPhone and Android
Creating a new ringtone, making a voice recording, or having fun with your friends are only a few reasons why so many people choose to try out voice changer apps. The vast majority of these apps feature well-equipped audio effects libraries that enable users to have fun with their friends and hear how they would sound if they were drunk or after inhaling helium. So, let’s take a look at some of the best voice changer apps on the market.
Changing video voice on Windows and Mac with Wondershare Filmora
Do you want to change the voice in video on Windows and Mac and don’t know which software can meet this requirement? Try Filmra video editor , which provides several ways to change voice over, such as changing the voice speed or changing the pitch. Download the trial version below and find out more possibility in video creation with Filmora.
1. Celebrity Voice Changer – Face
Price: Free, but offers in-app purchases
Compatibility: iOS 9.0 or later
User Rating: 4.0
In case you would like to sound like your favorite movie star of TV host, then Celebrity Voice Changer is one of the best choices you can make. Besides the standard set of options, the app also lets you request new voices since its machine learning technology can mimic virtually anyone’s voice. However, Celebrity Voice Changer is currently only available in English and it cannot modulate speech in other languages. In addition, you must make an in-app purchase in order to gain access to all of the app’s features or unlock the unlimited usage of the app.
Pros
- Automatic voice modulation
- Huge selection of voice filters
- The app generates video files that are better adjusted to the audience on social media than audio files
- Excellent impressions of celebrities
Cons
- Unreasonably expensive
- The app’s Deep Learning technology still has a lot of room for improvement
2. Snapchat
Price: Free, but offers in-app purchases
Compatibility: iOS 10.0 or later, Android 4.4 or up
User Rating: 3.8
With more than 203 million daily users, Snapchat is one of the largest messaging platforms on the market. Previously, we’ve shared how to change gender on Snapchat , beside that, the app lets its users capture short moments or the so-called Snaps and share them with friends. In addition to hundreds of video filters , Snapchat also features a broad spectrum of voice changing effects that make Snaps more entertaining. Even so, the audio recording options Snapchat offers are far from ideal, because the app doesn’t allow you to edit the files you create with it. Using Snapchat will drain your battery quickly, which is why you must pay attention to how frequently you use this app.
Pros
- The easy voice modulation process
- Excellent messaging options
- Grants you access to a large community of likeminded people
- Lenses and filters are updated on a daily basis
Cons
- Editing voice changes after you create a Snap is not possible
- Snapchat is not primarily a voice changer app
Check the detailed information about How to Change Voice on Snapchat with 2 Easy Methods >>
3. Voice Changer
Price: Free
Compatibility: Android 4.1 and up
User Rating: 4.3
Changing your voice with this app won’t take more than a few moments of your time. You just have to launch the app and hit the microphone button to record a message or a joke you would like to modulate. Once you’re happy with the audio recording you made, you can proceed to choose from more than twenty voice effects that will make you sound like a dwarf, a robot, or an alien. The app’s file-sharing capabilities enable you to post your audio recordings to any social media platform of your choosing or store your files and use them as many times as you want.
Pros
- Entertaining and easy to use
- The simple three-step voice modulation process
- Good selection of voice filters
- Excellent file sharing options
Cons
- The app displays ads
- No audio editing tools
4. Voicy: Celebrity Voice Changer
**Price:**Free, but offers in-app purchases
Compatibility: iOS 10 or later
User Rating: 4.3
Impersonating your favorite celebrity can be a fun way to prank your friends on social media. Voicy features a broad selection of celebrity voice impersonations you can use to make you sound like a famous actress or TV personality. The app utilizes a machine learning technology that can generate more than forty avatars and allows the users to experiment with different voice effects. The free version of the app offers only limited capabilities, so if you want to gain access to all of the Voicy’s features, you must choose a weekly, monthly or an annual subscription.
Pros
- Equipped with a powerful machine learning technology
- Offers a vast selection of voice avatars
- The quick voice modification process
- A great choice if you want to make a parody
Cons
- More expensive than the competition
- Support only the English language
5. Video Voice Changer – Fun Editor
Price: Free, but offers in-app purchases
Compatibility: iOS 8.0 or later
User Rating: 4.4
Changing the voices in the videos you record with your iPhones or iPads is a straightforward process that takes a minimum amount of effort. You can either use this iOS-based app to capture videos you’re going to dub or import them from the albums in which they are stored. The Video Voice Changer app is a great option if you want to dub videos directly from your phone because it enables you to change the voices in your videos and make them sound like mice, bears or ghosts. There are over thirty voice effects to choose from, so you can easily pick the one that best fits the video you’re editing.
Pros
- Equipped with video recording tools
- Excellent dubbing features
- A rich selection of voice effects
- Allows users to share their creations on Facebook, Instagram, and other social media platforms
Cons
- You must make an in-app purchase to unlock all of the app’s features
- No audio mixing options
6. Video Voice Changer FX
**Price:**Free, but offers in-app purchases
Compatibility: Android 4.1 and up
User Rating: 4.1
This is a simple app, anyone can use to change the voices in a video. Simply upload a video file from an SD card in your phone and choose an audio effect you want to apply. The app’s collection of funny voices includes options like echo, squirrel, space ship or chipmunk. As soon as you select the voice effect you want to add to a video, the app will start generating a new video that will be saved to your phone. Sharing the videos you edit with Video Voice Changer FX to social media directly from the app is not an option.
Pros
- Fun and easy to use
- Great price to performance ratio
- Changing a voice requires just a few taps
- Allows users to switch between effects while the video is playing
Cons
- No audio or video recording capability
- Doesn’t support social media sharing
7. Squeak Voice Changer
**Price:**Free, but offers in-app purchases
Compatibility: Android 4.3 and up
User Rating: 3.9
Every joke you want to share with your online friends is going to be a little funnier if you record it with Squeak Voice Changer. You just have to tap on the Record button and choose one of the available effects. Each voice changing effect this app offers is represented by a character so you should select Jamie the Jolly if you want to make your voice sound like you’re at a party or Bruce the Sentimental Bot if you want your voice to sound artificial. All the recordings you make with Squeak Voice Changer can be easily shared on social media.
Pros
- Equipped with audio recording options
- Cute and memorable characters that represent voice effects
- Inexpensive and fun to use
- Functional app design
Cons
- Poor selection of voice effects
- The AI only recognizes the English language
8. Voice Changer with Effects
**Price:**Free
Compatibility: Android 4.1 and up
User Rating: 4.5
This Android-based app is designed to make fun and easy since voice modulation features enable you to play voice recording backward or change your voice to sound robotic or even alien. Besides recording your voice, the app also lets you modulate pre-recorded sounds and save them to your phone or use them as ringtones or notification sounds. Furthermore, the app lets you add sounds to images and share them to Facebook. The Voice Changer with Effects enables you to share all audio files you process with it to any of the most popular social media platforms.
Pros
- The app has over 50,000,000 installs
- Equipped with a text to voice feature
- Setting a new ringtone with this app is easy
- Supports editing of pre-recorded audio files
Cons
- Contains ads
- No audio or video editing options
9. Voice Changer
**Price:**Free
Compatibility: Android 4.1 and up
User Rating: 4.4
If you are looking for an Android app that lets you modulate your voice quickly and effortlessly, then Voice Changer may be one of the best options you can find on the market. You can record your voice by simply tapping on the microphone and speaking into your phone’s speaker and then apply one of the audio effects this app offers. Optionally, you can import an audio file you already recorded into the app and then apply Martian, Foreigner, Giant or Child effects to your voice recording. The best part is that you can apply each effect to the audio files you’re editing as many times as you want.
Pros
- Loads of funny effects
- Simple audio recording setup
- Intuitive and modernly designed interface
- Enables users to share audio files via Bluetooth or social media platforms
Cons
- No video editing tools
- The quality of output audio files can vary
10. Voice FX
**Price:**Free, but offers in-app purchases
Compatibility: Android 4.0.3 and up
User Rating: 3.8
Modulating voices in all types of audio files is a straightforward and fun process that can be completed in just a few taps. During the audio recording session, you can apply all voice effects to the sound you are recording and stream it live to your web browsers or media players you’re using. Voice FX changes your voice in real time, which enables you to preview your results before deciding if you want to save them. All files you export from this app will be saved in the MP3 format so you can use them as ringtones on your Android device.
Pros
- Allows users to modulate pre-recorded audio files
- Voice effects are applied in real time
- Offers live streaming features
- Exports files in the MP3 format
Cons
- Prone to glitches
- A limited selection of voice effects
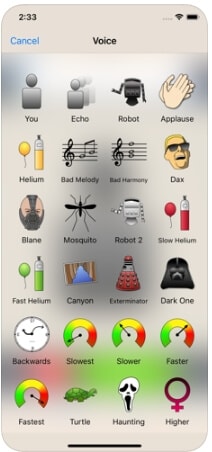
11. Voice Changer Plus
**Price:**Free, but offers in-app purchases
Compatibility: iOS 8.0 or later
User Rating: 4.8
iPhone and iPad owners in need of a voice changer app that grants them complete creative freedom over the modulation of the voices they record, should consider using the Voice Changer Plus. The app features more than fifty voice effects and it provides support for voiceover recordings. Moreover, you can edit all your audio files even after you saved them, enabling you to find new ways to improve your recordings over time. Voice Changer Plus is also equipped with trim controls, so you can remove all parts of your audio files you don’t want to share with your friends on social media.
Pros
- Offers more voice effects than most of its competitors
- Provides voiceover recording options
- Users can trim their audio files
- All audio recordings can be edited after the voice modulation
Cons
- In-app purchase is required in order to unlock all of the app’s features
- Modulating audio in video files is not an option
Below is a quick comparison table among these voice changer apps, hope it will be helpful.
| App | Supported OS | User Rating | Voice Templates |
|---|---|---|---|
| Celebrity Voice Changer - Face | iOS 9.0 or later | 4.0 | Yes |
| Snapchat | iOS 10.0 or later, Android 4.4 or up | 3.8 | No |
| Voice Changer by e3games | Android 4.1 and up | 4.3 | Yes |
| Voicy: Celebrity Voice Changer | iOS 10 or later | 4.3 | Yes |
| Video Voice Changer – Fun Editor | iOS 8.0 or later | 4.4 | Yes |
| Video Voice Changer FX | Android 4.1 and up | 4.1 | Yes |
| Squeak Voice Changer | Android 4.3 and up | 3.9 | Yes |
| Voice Changer with Effects | Android 4.1 and up | 4.5 | Yes |
| Voice Changer | Android 4.1 and up | 4.4 | Yes |
| Voice FX | Android 4.0.3 and up | 3.8 | Yes |
| Voice Changer Plus | iOS 8.0 or later | 4.8 | Yes |
Conclusion
Everybody enjoys a good joke, and the apps we featured in this article enable you to have a lot of fun while experimenting with different voice modulation options. All of the voice effects these apps offer can change a voice automatically, but if you would like to alter the voices in your videos you must choose an app that supports this option. Which of the best voice changer apps for iPhone and Android devices are you going to choose? Leave a comment, and share your opinions with us.
Benjamin Arango
Benjamin Arango is a writer and a lover of all things video.
Follow @Benjamin Arango
Elevate Your Audio Output with Incremental Vocal Tweaks on Audacity
What does free open source audio software mean? Audacity voice changer is the answer. Along with being free, it is a cross-platform software, which means that it can be used with different software packages. Audacity is easy to use multi-track audio editing and recording software.
It has a simple and clean-looking interface for better user understandability. Audacity has plug-in support for multiple audio formats like LV2, AU, and VST. We will further discuss Audacity as an audio voice changer, and how to use the software under various conditions will also be discussed in the article.
In this article
01 How Can You Use Voice Changer in Audacity?
02 How to Change Pitch in Audacity?
03 How to Change Male Voice to Female Voice with Audacity?
04 How to Create Robot Voice in Audacity?
Part 1. How Can You Use Voice Changer in Audacity?
Voice changers are also commonly referred to as voice enhancers, which can completely change and transform your voice. You can pull pranks on friends with voice changers if you are bored. If you want to hide your identity, you can modify your voice and do that. With voice changers, you can change the tone and the pitch of your voice and add various voice effects.
Voice changer comes with a wide range of sound effects ranging from baby sound, kid, male, female, monster, demon, animal sounds, and a lot more than this. Some great voice changers include AV Voice Changer , MorphVOX Voice Changer , Voicemod , Clownfish Voice Changer , and others. Do you know that these voice changers can be used with Audacity? Let’s tell you how.
Step 1: If you are interested in using a voice changer in Audacity, start by downloading your favorite voice changer to your PC. Once done, install it and after successful installation, launch it.

Step 2: As we have mentioned earlier that you are offered various voice effects in voice changers, so after launching it, select your preferred voice effect, whether it be a baby voice, animal voice, or celebrity voice.

Step 3: On the other side, launch Audacity on your PC. Once it opens, you will see the top menu; just below that, a microphone icon will be seen. Tap on that icon so that the drop-down menu appears, there select the name of your voice changer.

Part 2. How to Change Pitch in Audacity?
Audacity, the audio voice changer, offers a ‘Change Pitch’ feature with which you can change the pitch of the audio without damaging its tempo. You can separately change the speed. With this feature, you can also adjust and play with the frequency and semitones.
The audio editor also features to estimate the starting pitch; for instance, if A3 is a quiet note, followed by a large and loud note like C4, Audacity will detect C4. In case both notes have the same volume, Audacity will detect A3. With Audacity, you also get the ‘To’ and ‘From’ controls if you plan to change the pitch manually. To learn more about changing pitch, follow the steps below:
Step 1: For changing pitch in Audacity, start by launching the software. After launching, you can either record the audio or else, from the ‘File’ section, you can also ‘Open’ any file from your device.

Step 2: Audacity lets you change the pitch of a whole file or else for a small portion as well. Now, to change the pitch of a small portion, click and drag the mouse along the recording. Or else, click on the name of the track to select it completely.

Step 3: After this, head over to the top menu and click on the ‘Effect’ section. A drop-down menu list will appear, locate and select the ‘Change Pitch’ option. You can either use the sliders to adjust the pitch or else write the percentage to change.

Step 4: You can preview the file and check how it sounds once done. When you are satisfied, hit the ‘OK’ button to save the changes. You can also adjust the Speed and Tempo of the track.

Part 3. How to Change Male Voice to Female Voice with Audacity?
The most fun voice transformation is from low pitch to higher pitch. In general, modifying the male voice to a female voice, as the male pitch has a negative value and changing it to a positive pitch, modifies your voice to a female voice. What else could be better to use than the amazing Audacity voice changer? Let’s share the steps that will help you change your male voice to female.
Step 1: First, start by opening the Audacity audio editor. Once it has launched successfully, you should import the audio file. You can record audio with Audacity. Along with this, you can also import files from your device from the ‘File’ section, followed by the ‘Open’ option.

Step 2: After your audio track is visible on the timeline, you have to select the part of the file that you want to edit. You can easily select it by clicking and dragging the mouse. If not this, you can also work with the whole track; for this, simply click on the track name to select it.

Step 3: After you are satisfied with the selection, head to the top menu and select the ‘Effects’ options. A drop-down list appears after this, and you have to look for the ‘Change Pitch’ option and select it.

Step 4: Normally, you can adjust the pitch by taking help from the sliders, but you can also change the pitch manually by adding a percentage. The male pitch originally will have a negative value; change it and set a positive value. You can keep changing until you are satisfied.

Step 5: Lastly, don’t forget to save the changes by hitting the ‘OK’ button at the button and saving the file to your respective device.

Part 4. How to Create Robot Voice in Audacity?
As we have mentioned, Audacity is an audio voice changer, so you must know that Audacity also can change your voice into a robotic voice. Among the different voices, the robot voice sounds interesting, and it’s fun to create. If you are excited to learn to create robot voice in Audacity, follow the guiding steps shared below:
Step 1: For creating an extraordinary robotic voice, start by launching Audacity on your device. After it opens, it’s time to record your voice to create a robot voice. Or else, head to the ‘File’ tab and import your audio file from your device to Audacity from the ‘Open’ option.

Step 2: After this, to start the editing, you need a stereo track on the timeline. For doing this, navigate ‘Tracks’ from the top menu and click on it. Next, hover on the ‘Add New’ option to open its sub-menu. You will see the ‘Stereo Track’ option, select it, and copy-paste the audio file in the new section.

Step 3: Let’s start with the fun part, the editing and adjusting different features. Start by opening the ‘Effects’ tab, and from the long list of options, select ‘Echo.’ There, you can enter the ‘Delay Time’ and change other fields as well.

Step 4: Preview the audio and move on to the next setting. Open the ‘Effects’ section and look for the ‘Change Pitch’ option. You can change and adjust the pitch according to your desire and preview the file again.

Step 5: For creating a robot voice, you can also set the tempo. For that, head to the ‘Change Tempo’ option under the ‘Effects’ section and set the value to minus. Keep adjusting the different effects until you get your perfect robot voice.

Bottom Line
Audacity is not only a great audio editor; it is also a stunning audio voice changer. The software comes with a lot of effects that can completely transform your voice to an unrecognizable level. You can sound like a robot, male, female, and whatever you want with Audacity voice changer. Do you know any video editor that offers sound effects?
If you don’t know, let us introduce Wondershare Filmora Video Editor . This wonderous software is loaded with many editing features to create the best videos. Not only trim, cut, crop, but the software also offers you features like split-screen, chroma key background, keyframing, color match, motion tracking, and whatnot.
Apart from this, this video editor is a hub for cool sound effects and editing elements from its media library, Filmstock. You get a wide range of sound effects, titles, transitions, and many more elements.
For Win 7 or later (64-bit)
For macOS 10.12 or later
02 How to Change Pitch in Audacity?
03 How to Change Male Voice to Female Voice with Audacity?
04 How to Create Robot Voice in Audacity?
Part 1. How Can You Use Voice Changer in Audacity?
Voice changers are also commonly referred to as voice enhancers, which can completely change and transform your voice. You can pull pranks on friends with voice changers if you are bored. If you want to hide your identity, you can modify your voice and do that. With voice changers, you can change the tone and the pitch of your voice and add various voice effects.
Voice changer comes with a wide range of sound effects ranging from baby sound, kid, male, female, monster, demon, animal sounds, and a lot more than this. Some great voice changers include AV Voice Changer , MorphVOX Voice Changer , Voicemod , Clownfish Voice Changer , and others. Do you know that these voice changers can be used with Audacity? Let’s tell you how.
Step 1: If you are interested in using a voice changer in Audacity, start by downloading your favorite voice changer to your PC. Once done, install it and after successful installation, launch it.
Step 2: As we have mentioned earlier that you are offered various voice effects in voice changers, so after launching it, select your preferred voice effect, whether it be a baby voice, animal voice, or celebrity voice.
Step 3: On the other side, launch Audacity on your PC. Once it opens, you will see the top menu; just below that, a microphone icon will be seen. Tap on that icon so that the drop-down menu appears, there select the name of your voice changer.
Part 2. How to Change Pitch in Audacity?
Audacity, the audio voice changer, offers a ‘Change Pitch’ feature with which you can change the pitch of the audio without damaging its tempo. You can separately change the speed. With this feature, you can also adjust and play with the frequency and semitones.
The audio editor also features to estimate the starting pitch; for instance, if A3 is a quiet note, followed by a large and loud note like C4, Audacity will detect C4. In case both notes have the same volume, Audacity will detect A3. With Audacity, you also get the ‘To’ and ‘From’ controls if you plan to change the pitch manually. To learn more about changing pitch, follow the steps below:
Step 1: For changing pitch in Audacity, start by launching the software. After launching, you can either record the audio or else, from the ‘File’ section, you can also ‘Open’ any file from your device.
Step 2: Audacity lets you change the pitch of a whole file or else for a small portion as well. Now, to change the pitch of a small portion, click and drag the mouse along the recording. Or else, click on the name of the track to select it completely.
Step 3: After this, head over to the top menu and click on the ‘Effect’ section. A drop-down menu list will appear, locate and select the ‘Change Pitch’ option. You can either use the sliders to adjust the pitch or else write the percentage to change.
Step 4: You can preview the file and check how it sounds once done. When you are satisfied, hit the ‘OK’ button to save the changes. You can also adjust the Speed and Tempo of the track.
Part 3. How to Change Male Voice to Female Voice with Audacity?
The most fun voice transformation is from low pitch to higher pitch. In general, modifying the male voice to a female voice, as the male pitch has a negative value and changing it to a positive pitch, modifies your voice to a female voice. What else could be better to use than the amazing Audacity voice changer? Let’s share the steps that will help you change your male voice to female.
Step 1: First, start by opening the Audacity audio editor. Once it has launched successfully, you should import the audio file. You can record audio with Audacity. Along with this, you can also import files from your device from the ‘File’ section, followed by the ‘Open’ option.
Step 2: After your audio track is visible on the timeline, you have to select the part of the file that you want to edit. You can easily select it by clicking and dragging the mouse. If not this, you can also work with the whole track; for this, simply click on the track name to select it.
Step 3: After you are satisfied with the selection, head to the top menu and select the ‘Effects’ options. A drop-down list appears after this, and you have to look for the ‘Change Pitch’ option and select it.
Step 4: Normally, you can adjust the pitch by taking help from the sliders, but you can also change the pitch manually by adding a percentage. The male pitch originally will have a negative value; change it and set a positive value. You can keep changing until you are satisfied.
Step 5: Lastly, don’t forget to save the changes by hitting the ‘OK’ button at the button and saving the file to your respective device.
Part 4. How to Create Robot Voice in Audacity?
As we have mentioned, Audacity is an audio voice changer, so you must know that Audacity also can change your voice into a robotic voice. Among the different voices, the robot voice sounds interesting, and it’s fun to create. If you are excited to learn to create robot voice in Audacity, follow the guiding steps shared below:
Step 1: For creating an extraordinary robotic voice, start by launching Audacity on your device. After it opens, it’s time to record your voice to create a robot voice. Or else, head to the ‘File’ tab and import your audio file from your device to Audacity from the ‘Open’ option.
Step 2: After this, to start the editing, you need a stereo track on the timeline. For doing this, navigate ‘Tracks’ from the top menu and click on it. Next, hover on the ‘Add New’ option to open its sub-menu. You will see the ‘Stereo Track’ option, select it, and copy-paste the audio file in the new section.
Step 3: Let’s start with the fun part, the editing and adjusting different features. Start by opening the ‘Effects’ tab, and from the long list of options, select ‘Echo.’ There, you can enter the ‘Delay Time’ and change other fields as well.
Step 4: Preview the audio and move on to the next setting. Open the ‘Effects’ section and look for the ‘Change Pitch’ option. You can change and adjust the pitch according to your desire and preview the file again.
Step 5: For creating a robot voice, you can also set the tempo. For that, head to the ‘Change Tempo’ option under the ‘Effects’ section and set the value to minus. Keep adjusting the different effects until you get your perfect robot voice.
Bottom Line
Audacity is not only a great audio editor; it is also a stunning audio voice changer. The software comes with a lot of effects that can completely transform your voice to an unrecognizable level. You can sound like a robot, male, female, and whatever you want with Audacity voice changer. Do you know any video editor that offers sound effects?
If you don’t know, let us introduce Wondershare Filmora Video Editor . This wonderous software is loaded with many editing features to create the best videos. Not only trim, cut, crop, but the software also offers you features like split-screen, chroma key background, keyframing, color match, motion tracking, and whatnot.
Apart from this, this video editor is a hub for cool sound effects and editing elements from its media library, Filmstock. You get a wide range of sound effects, titles, transitions, and many more elements.
For Win 7 or later (64-bit)
For macOS 10.12 or later
Also read:
- Updated Expertise in Anime Vocal Alteration Hottest Voice-Change Tools on PCs and Smartphones for 2024
- Updated In 2024, Sound Off with Flair Enhancing High-Pitched Vocalization in Video Content Creation
- The Essential List of Non-Copyrighted Music Sets Ideal for Visionary Video Editors for 2024
- Updated Karaoke Enthusiasts Review Best MP3 Converters Compared - Digital vs Physical Realm for 2024
- 2024 Approved Halt Automatic Voice Suppression on iPhone
- New 2024 Approved Best Free Online MP3 Joiner to Merge Mp3 for Free
- 10 Best Websites to Download Ding Sound Effect Easily for 2024
- In 2024, Top Voice Transformers for Aspiring Cross-Dressing Actors
- The Intricacies of Clubhouse Explored An Insiders Guide to Its Core Principles and Operations
- Updated From One Siri to Another How to Switch Up Your Digital Companions Voice
- New 2024 Approved The Noise Negators Handbook Removing Unwanted Soundscapes From Audio Experience
- Updated In 2024, Expert Picks Top Speech Transcription Tools for Android and iOS Users
- Updated In 2024, Mastering Audio Manipulation Speed and Pitch Adjustments in Adobe Rush
- Updated In 2024, Mastering Quiet Streamlined Steps to Remove Sound in iPhone Clips
- Updated 2024 Approved Digital Music Vault - YouTube Edition
- Cutting-Edge Audio Display & Animation in Final Cut Pro A Comprehensive Tutorial for Professional Editors for 2024
- Cutting-Edge Techniques in Sound Editing Vocal Exclusion Masterclass with Stepwise Approach in Adobe Audition for 2024
- Updated 2024 Approved Auditory Delights Where to Get Comical Soundscapes
- Updated Find Bell Sound Effect for 2024
- New Digital Listening Made Simple Acquiring and Storing Online Broadcasts on Your PC for 2024
- New In 2024, The Soundtrack Search Navigating the iPhones Abilities for Track Titling
- 2024 Approved Prime Audio Cleansing App Elevate the Quality of Your Videos
- New In 2024, Harmonizing Time and Tone The Guide to Changing Audio Tempo and Octave in Adobe Rush
- New 2024 Approved Paramount Practices in Gathering Your Precious Collection of High-Fidelity YouTube Audio
- In 2024, 2023S Premier Free Sound Engineering Tools The Ultimate Top 10 List
- New The Art of Whimsical Words on the Line 9 Voice Transformations to Delight Your Calls
- New The Role of High-Stakes Soundtracks in Crafting Unforgettable Movie Experiences for 2024
- Updated Harmonizing Soundscapes The Ultimate Examination of Adobe Auditions Noise Suppression Methods
- Updated In 2024, Reversing iPhones Automatic Sound Quality Modification Mechanism
- New How to Record Audio on PowerPoint? Windows and Mac for 2024
- New Rhythmic Realm Find and Download Top-Tier DJ Mixes for 2024
- The Ultimate Guide to Drying Out Distorted Sounds Three Effective Methods for 2024
- How To Change Honor Lock Screen Clock in Seconds
- Fixing Persistent Pandora Crashes on Vivo V30 Pro | Dr.fone
- Updated 2024 Approved From Start to Finish Flipping a Clip in Final Cut Pro in 4 Steps
- In 2024, MP4 Video Editing on a Budget Top 10 Free Tools
- In 2024, How To Remove the Two Factor Authentication On iPhone 12 Pro
- New In 2024, The Ultimate 4K Video Collection Must-Watch Samples
- A Complete Guide To OEM Unlocking on Samsung Galaxy A05
- In 2024, Where Is the Best Place to Catch Dratini On Huawei Nova Y91 | Dr.fone
- New From Soundcloud to MP3 Essential Conversion Strategies
- In 2024, Does Life360 Notify When You Log Out On Apple iPhone 13 mini? | Dr.fone
- Top iPhone 6s Message Recovery Software | Stellar
- Planning to Use a Pokemon Go Joystick on Poco C51? | Dr.fone
- A Perfect Guide To Remove or Disable Google Smart Lock On Vivo S18 Pro
- Updated FCPX Audio Cleanup Tips and Tricks for Removing Unwanted Sounds for 2024
- New In 2024, Convert Your Videos to 60 FPS Using These Excellent Tools
- Liquid Water Text Reveal Intro Offers an Impressive Opening to Any Video Content. Go Through the Detailed Steps to Create Liquid Water Reveal Intro in Wondershare Filmora
- The way to get back lost music from X90S
- Updated In 2024, Splitting the Clips in Adobe After Effects Step by Step
- Complete guide for recovering video files on Realme Narzo N53
- New Video Tagging Tools for MP4 Files
- In 2024, How Oppo A1x 5G Mirror Screen to PC? | Dr.fone
- Which is the Best Fake GPS Joystick App On Xiaomi Mix Fold 3? | Dr.fone
- Title: New In 2024, Clearing Up Sound Simplified Techniques for Debouncing Ambient Noise in Music Production
- Author: Kate
- Created at : 2024-05-05 07:48:00
- Updated at : 2024-05-06 07:48:00
- Link: https://audio-editing.techidaily.com/new-in-2024-clearing-up-sound-simplified-techniques-for-debouncing-ambient-noise-in-music-production/
- License: This work is licensed under CC BY-NC-SA 4.0.
