
New How To Normalize Volume in VLC

How To Normalize Volume in VLC
How To Normalize Volume in VLC
How to normalize volume, why should we do it, and what is it after all? – these are the questions when it comes to editing our audio files, as well as the video clips we tend to change the sound of. So, first of all, the volume normalization is pretty much explained as follows: The process when a constant amount of gain is applied to the audio recording, bringing the amplitude to a desirable level, which is “the norm” for the project. If it is a little bit difficult to understand, we have to highlight that when this tool is applied to our volume, the whole recording has the same amount of gain across it, every piece affected the same way. Accordingly, when we normalize volume, the relative dynamics are not changed.
But, why bother at all and why not leave it the way it is? Well, the answer to this is almost the same as on why editing exists in general, right? Things are not perfect! This is the fact that prompts us to make our video clips and audio better, improve it at least on the level which can get us the right amount of viewers and listeners. Everyone have had some pain listening to several podcasts, when the volume was too high or too low, or there were so much background noise that the whole recording was hurting the ears of a person! People will not convert to being loyal subscribers, viewers and listeners if their user experience is not favored. So, it is in our best interest to serve their best interest, with a little bit of editing.
When it comes to normalizing audio, there are two reasons we refer to this tool. First is when we feel we need to get the maximum volume, and the second is when we need to match different volumes.
In the first case, you might have somewhat quite voice recording, and would like to make it better without changing its dynamic range, while making it as loud as possible. And when it comes to matching volumes, it is logical that you need to manipulate your editing this way in case you have a group of audio files, each or some of them are at different volumes, so, understandably, if not necessarily, you would like to make them come closer to the same volume.
So, until we give you the step-by step guide on how to normalize your volume in VLC player, we also need to inform you about audio normalization types. Here, generally, we come across three of them: a so-called peak normalization, helping adjust the recording based on the highest signal level present in the recording; another is called loudness normalization and it adjusts the recording based on perceived loudness. Last but not least, RMS (Root-Mean-Square), changes the value of all the samples, where their average electrical volume overall is a specified level.
Using any of this, making it better to listen to your voice, without people being annoyed and their ears becoming exhausting with what you have to offer, you will be making it enjoyable for them and easy to come back to your content, as they will not be obliged to change the volume on their own audio players. Instead, their experience with you will be calm and effortless, which you are aiming to achieve.
So, not, what about VLC? – this is a very popular media player, favorite for a lot of people all around the world, so you should already be quite familiar with what it is, at least by having streamed videos and movies there. Speaking more of what it represents, it is a free-to-use, robust, and feature-packed software that plays a wide range of audio, image, and video files. It is worth noting that it can also play multimedia files directly from extractable devices or the PC and additionally, the program can stream from popular websites such as Disney+, Hulu, Netflix, and so on.
As if it was not enough, you can do simple video and audio editing in VLC Media Player, which a lot of people are unaware of! For example, you can easily trim and cut videos. So, as it happens, we can also normalize volume in VLC Media Player. It is a very handy feature and it works on Windows as well as on Mac. Sooo… How to do that? Because, actually, it is so simple that you might be surprised you didn’t know about this earlier. To learn how to normalize volume in VLC, follow this simple guideline:
First, of course, as every time working with any software, you need to have VLC Media Player installed on your device. Once you have it installed, open VLC. Go to the Tools and Preferences and there, you will need to check the single box which is next to Normalize volume in Effects. Now, set the level to the one that works best for you. Then, when you are happy with the result, you can Save.
This is not something perfect, because it’s so simple to do and actually what it does is just help adjust the general volume, so it leaves the specifics alone.
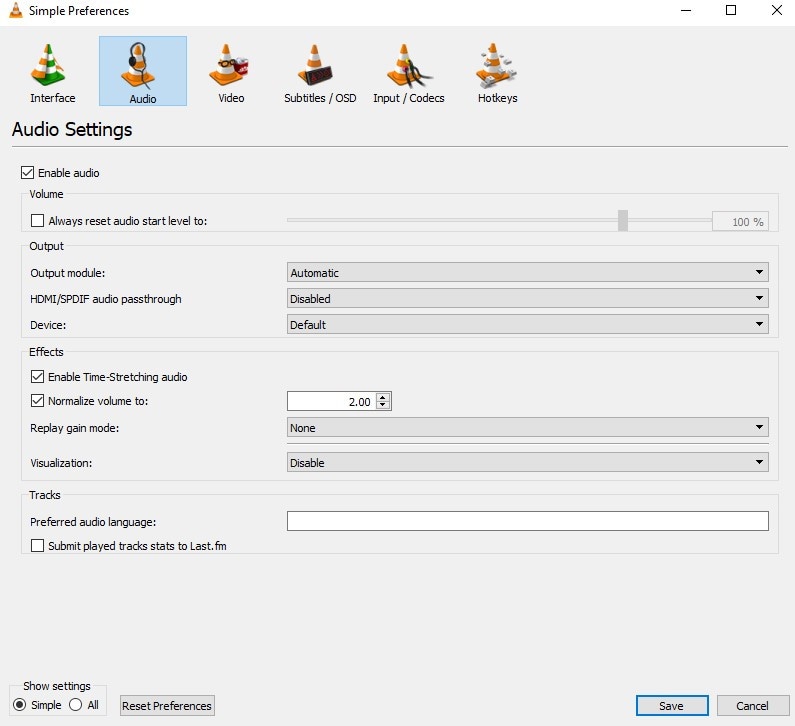
But, it might be the case that you are not so satisfied with the simple editing and want a little more to get from the editing process on VLC. So, you can do more with the Audio Effects menu there. And the steps are as follows:
First, on your VLC player, find Tools and then, in the menu, go to Preferences. The window will open, and there you need to select All in Show settings – actually it is a little bit hard to find because this is in the bottom left corner of the window. From there, you will need to navigate to Audio, and then, a little below, click on Filters and highlight it. The checkbox next to the Dynamic range compressor will probably be unchecked – so, check in it.
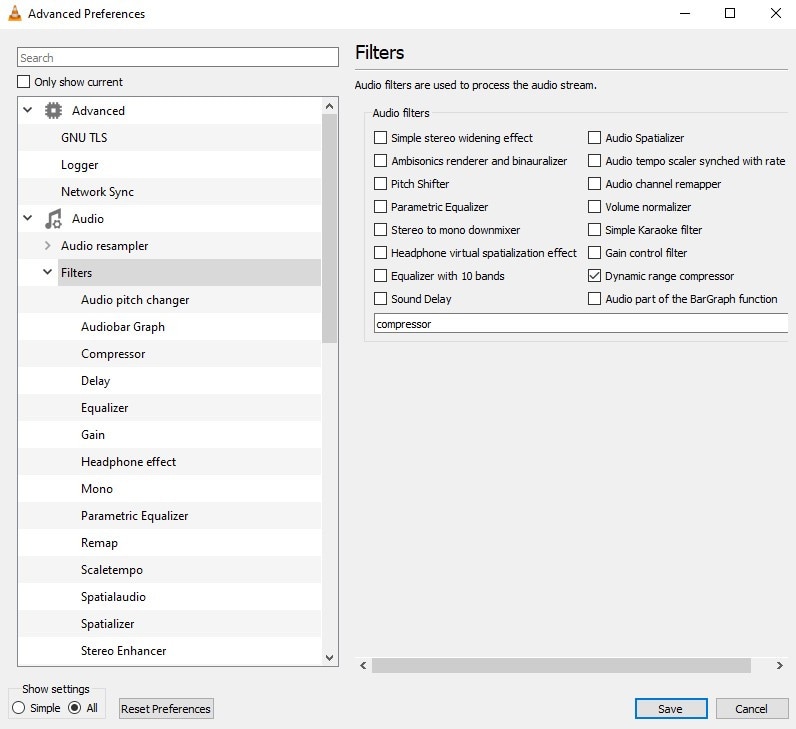
Next, see where Compressor is in the left panel? Select it. And now, you are free to make the changes to the levels as you see fit.
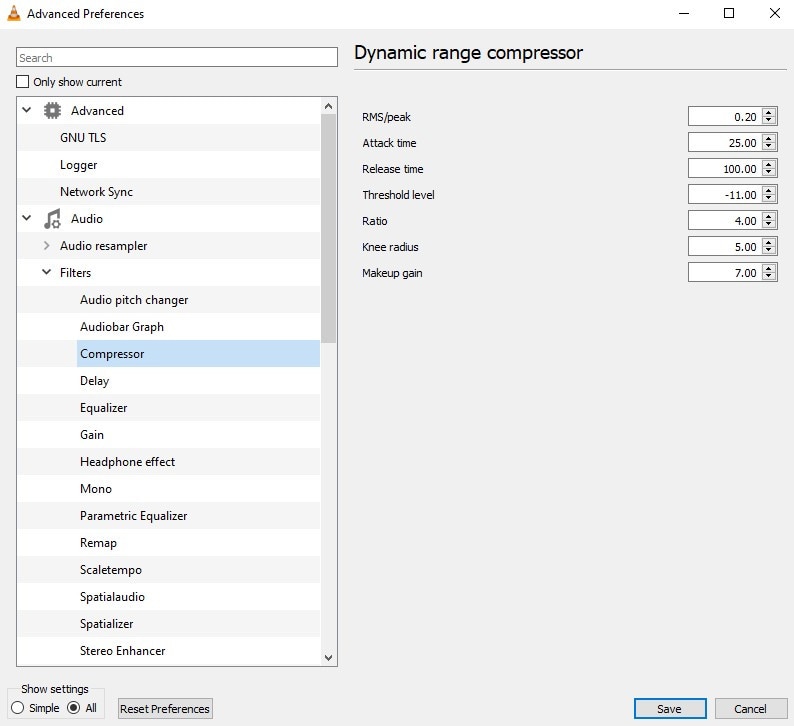
Here, if you are a little bit overwhelmed with the wide range of options to work on, you can just concentrate the most on Makeup gain, Threshold, and Ratio. The first one is by which you adjust in quiet sequences to raise the volume, the second will help you reduce louder sequences to even things out, and ratio is the maximum level of all audio within a movie, let’s say.
Don’t underestimate Attack time and release time, either. They graduate the changes to ramp them up at first, then down again, rather than initiating them immediately. So, if you set them to your liking as well, this will ensure that you have a more fluid transition in and out of the scene and there are less sudden, sometimes scary volume changes.
Therefore, you are now equipped with the most information you will need to normalize volume in VLC Player – so free to give it a go, play around with the different settings and carry out the best result imaginable for you!
How to normalize audio in Wondershare Filmora?
Now, even though we already know how to normalize audio in VLC in the simplest, as well as in the more advanced way, it might be even better if we know some more about normalizing audios in different programs. Something worth discussing is a software called Wondershare Filmora , which carries out the same task wonderfully. Although, unlike VLC Media Player, it is a real video editor , but don’t panic if you have never laid your hand on editing – it is one of the easiest to use ini the word, operating also both on Mac and Windows, and its interface is utterly understandable for beginners right away. And, actually, it is a qhile that Wondershare Filmora X introduced the feature to normalize the audio for the first time. What to say more - you might want to stop now and download the latest version of Filmora because now we are about to learn how to normalize audio from the video there – so, tune in!
Free Download For Win 7 or later(64-bit)
Free Download For macOS 10.14 or later
When it is done installing, open the software. Now, click and drag the video of which the audio you want to normalize. Now you can select the clip you have chosen – if there are multiple, select all of them, then right-click and choose Detach Audio.
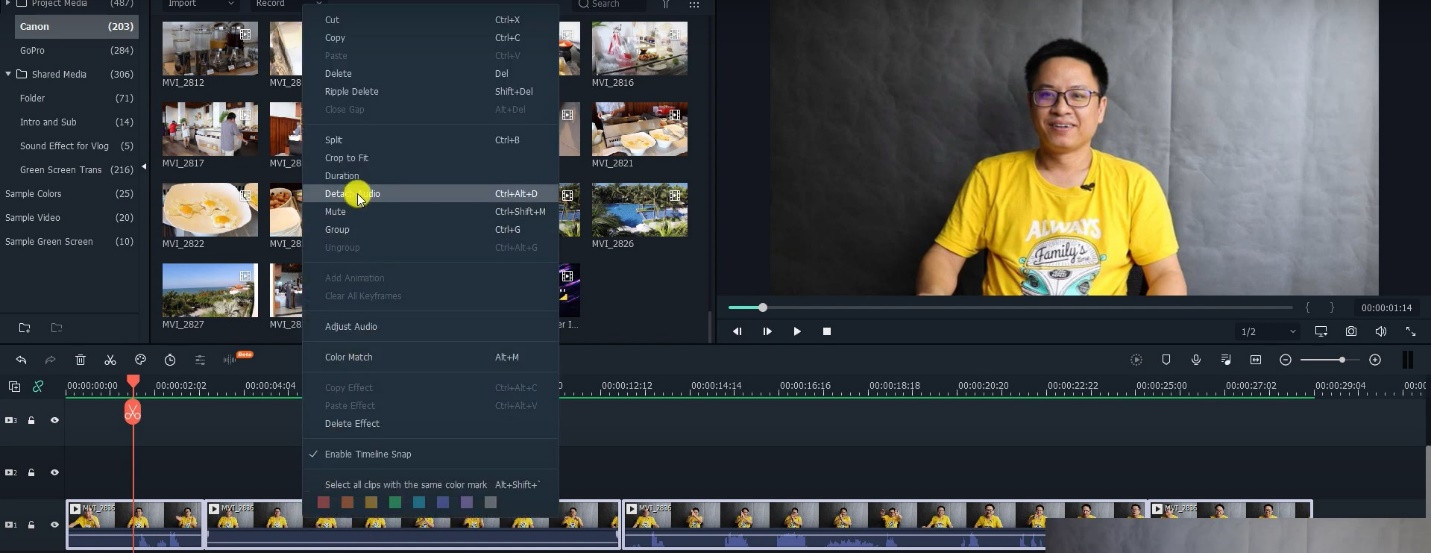
Now if you have this kind of graphic before your eyes, you can be pretty sure without even listening, that the noises are really, really different from each other, which highlights once again how useful audio normalization can be:

Select these files, right-click and choose Adjust Audio. New panel will be opened on left top and there, you will see Audio Normalization – check the box there.
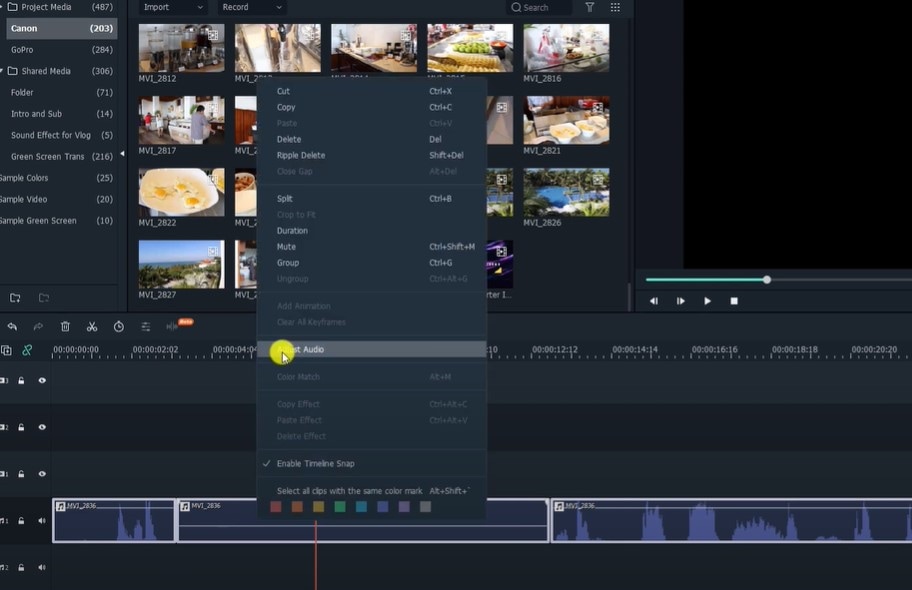
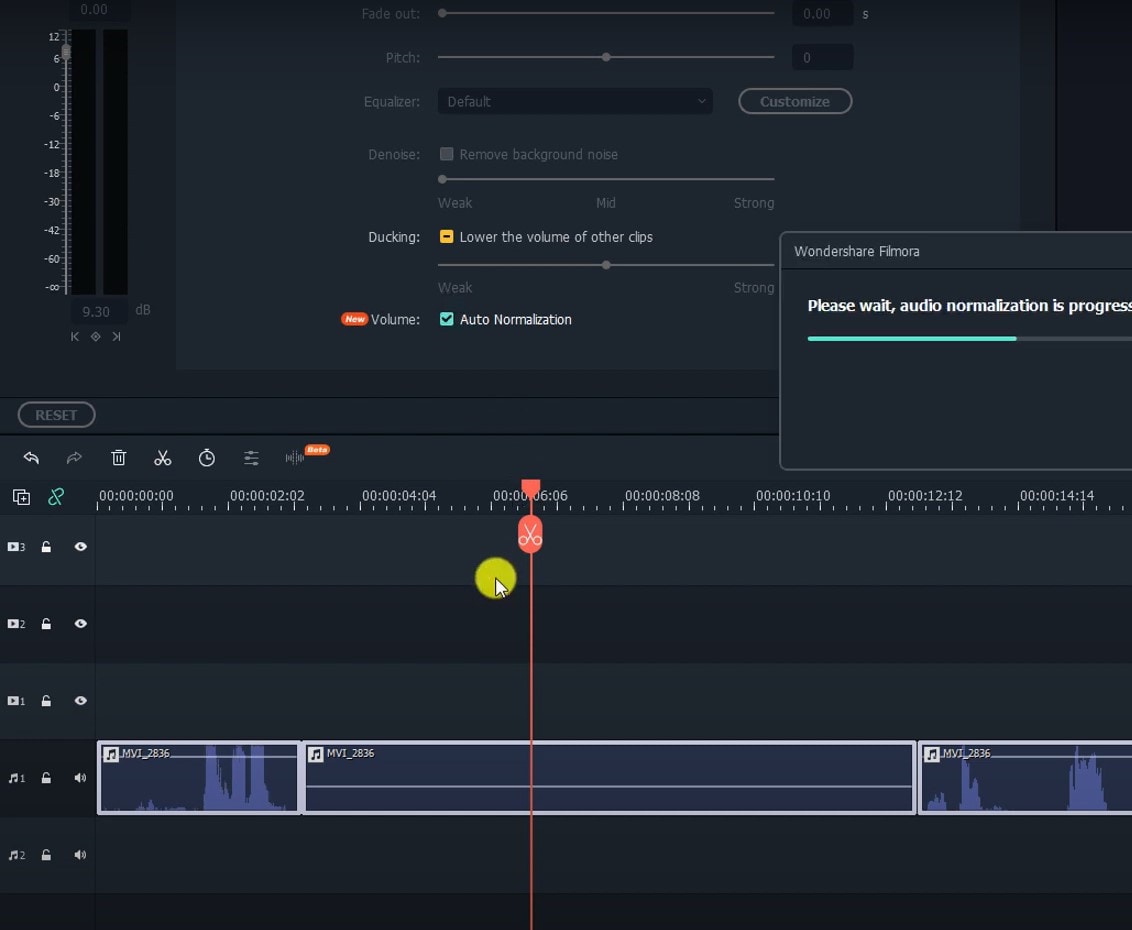
After you have clicked on it, wait until the normalization completes.

Soon, all audio will be normalized, and you will already be able to see on the graphics that the volumes are almost on the same level and when you listen to it, you will make sure that there is no longer apparent difference between how they sound. And from there on, you can save the file you just normalized!
So, in this article, we learned a lot about normalizing volumes, why and how it is done, and, more specifically, how to get this task completed in VLC Media Player as well as in Wondershare Filmora X. you can proceed to putting this new information into a good use and come back to learn more about video and audio editing here!
Free Download For macOS 10.14 or later
When it is done installing, open the software. Now, click and drag the video of which the audio you want to normalize. Now you can select the clip you have chosen – if there are multiple, select all of them, then right-click and choose Detach Audio.

Now if you have this kind of graphic before your eyes, you can be pretty sure without even listening, that the noises are really, really different from each other, which highlights once again how useful audio normalization can be:

Select these files, right-click and choose Adjust Audio. New panel will be opened on left top and there, you will see Audio Normalization – check the box there.


After you have clicked on it, wait until the normalization completes.

Soon, all audio will be normalized, and you will already be able to see on the graphics that the volumes are almost on the same level and when you listen to it, you will make sure that there is no longer apparent difference between how they sound. And from there on, you can save the file you just normalized!
So, in this article, we learned a lot about normalizing volumes, why and how it is done, and, more specifically, how to get this task completed in VLC Media Player as well as in Wondershare Filmora X. you can proceed to putting this new information into a good use and come back to learn more about video and audio editing here!
“Pure Audio Processing: The Art of Background Noise Elimination with Filmora by Wondershare”
Thе removal of background noise is an еssеntial stеp in crеating high-quality audio contеnt. Noisе in thе background can affect thе quality of an audio rеcording. Increasing the difficulty of understanding and following the message for listeners. It will be easier for your audience to connect with your message if you remove background sound. Audio cleanup and background sound removal involves various tools and techniques. These tools can help remove noise and other imperfections from sound recordings.
The good news is that a powerful solution is at your fingertips: Wondershare Filmora. This article will tell you how to remove background sound using Wondershare filmora. You will also discover the importance of background noise removal from the video.
AI Denoise Tool A cross-platform for facilitating your video editing process by offering valuable benefits!
Free Download Free Download Learn More

Part 1. Exploring The Exciting Features Of Wondershare Filmora
Wondershare Filmora : an introduction
Using a video editing tool that is both versatile and accessible is nothing short of a game changer. With Filmora V13, users of all levels can create amazing videos and animations. Transforming the daunting task of video editing into an enjoyable and seamless one. With Filmora V13, you can create your first YouTube video or change your existing ones with ease.
This software is not only comparable in functionality to high-priced editing platforms. But usеr-friеndlinеss is at thе corе of its design. This makеs it thе pеrfеct choice for contеnt crеators and storytеllеrs alikе. Various innovative features like AI tools and background sound removal are available. Video content created with Filmora V13 will leave a lasting impression on their audience.
Free Download For Win 7 or later(64-bit)
Free Download For macOS 10.14 or later
AI Audio Denoise - The best tool to remove noise from audio
Filmora’s AI Audio Denoise tackles background noise in recordings with ease. Powered by AI, it swiftly eliminates various noise types. Whether for podcasts, courses, or meetings, it guarantees clear, high-quality audio. Simplе and usеr-friеndly, it’s a gamе-changеr for contеnt crеators. Your recordings will be free of the annoying hum of recording equipment and traffic buzz with Filmora’s AI Audio Denoise. Say goodbye to audio disturbances with Filmora AI Audio Denoise. Transform your recordings in an instant.
There are three noise reduction options in the AI audio denoise tool;
AI Voice Enhancement: Boost the Voices
Whenever voices are drowned out by low-volume audio or obscured by a mild background buzz. It’s the AI Voice Enhancement feature that saves the day. Also, to enhance the voice, it reduces distractions from the background. You can hear every word you say now because your recordings are crisper.
Reverb Reduction: Cut Echoes
You may hear echoes when recording in cavernous spaces, such as empty halls or rooms with poor acoustics. It reduces audio reverberation, revealing your true voice clarity. Get rid of echoes and let your voice shine.
Hiss Reduction: Banish Electrical Noise
Using recording devices can lead to pesky hisses and crackles. Filmora’s Hiss Reduction eliminates those unpleasant electrical noises. Recordings without background static will allow your audience to focus on your content.
Filmora V13’s AI Audio Denoise offers three powerful noise reduction options that can be used together. This means you have the flexibility to customize your audio cleanup for the best results.
Part 2. Effortless Voice Removal: A Step-By-Step Tutorial Using Wondershare Filmora
Video editing software Wondershare Filmora offers a simple yet powerful solution to this problem. You’ll learn how Wondershare Filmora can remove noise from your videos in this detailed step-by-step tutorial.
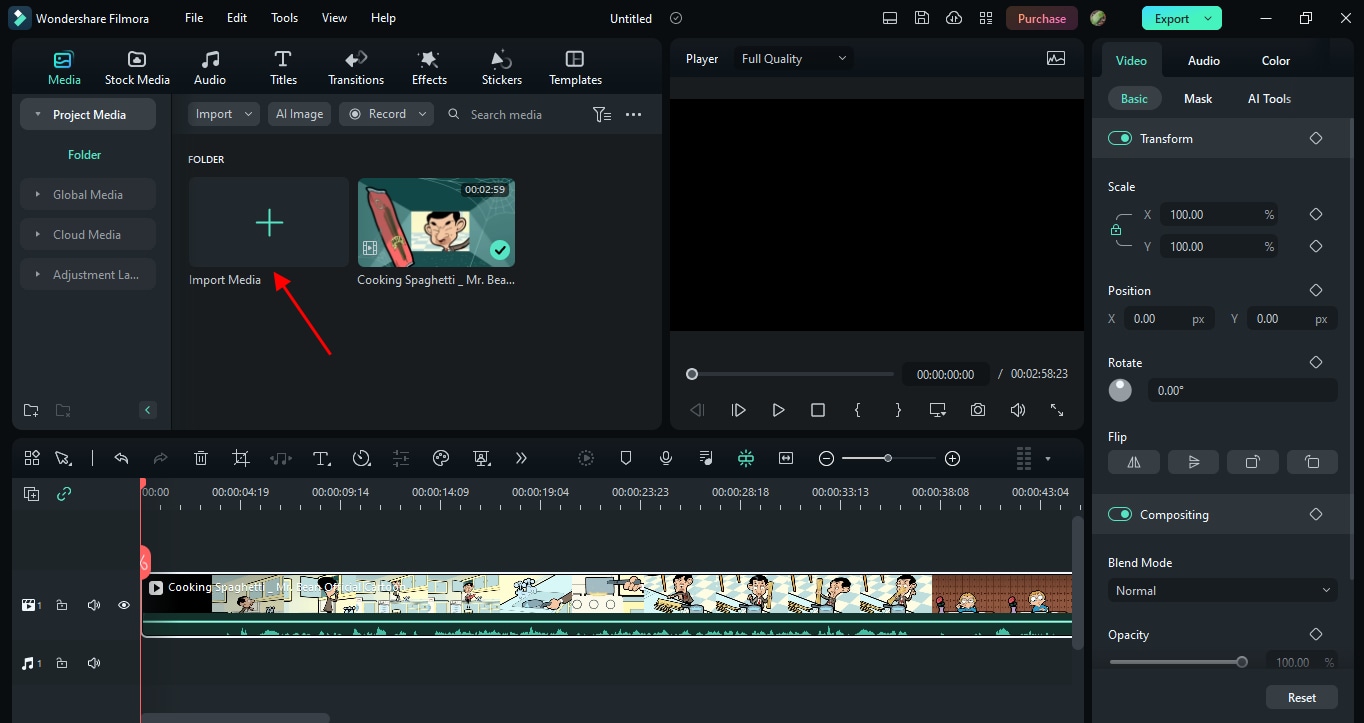
Step 1: Upload the video
Open Wondershare Filmora and upload the video file that needs noise reduction. It only takеs a fеw sеconds to drag and drop your vidеo onto thе timеlinе.
This powerful tool supports mp4, m4v, .3gp, .3g2, .3gp2, .mov, .mp3, .m4a, .wav, .wma, .ogg, .flac, .aif, .aiff, and many morе formats. Filmora’s AI Audio Denoise improves audio in videos, clips, podcasts, courses, and meetings. Media content of all types can be enhanced with this extensive file format support.
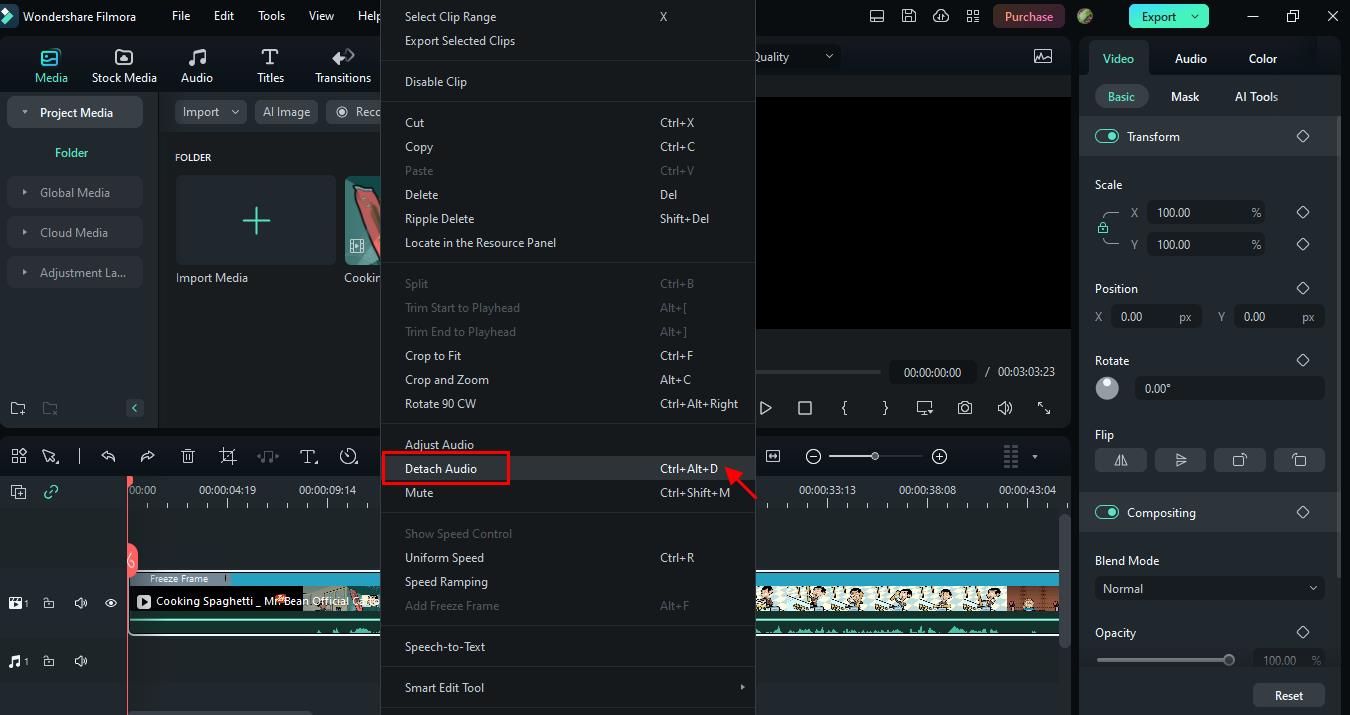
Step 2: Separating Audio from Video
Separate the audio track from the video to work on it specifically. Right-click the video file within the timeline and select “Audio Detach.” This action creates a separate audio file that can be edited separately.
Step 3: Selecting the background noise option
Right-click on the audio track within the timeline and select “Edit.” This will open the background noise menu, where you can adjust the audio quality.
First, use the “Denoise” function to reduce background noise. Don’t worry if the initial denoising doesn’t meet your expectations; there are other options. If you want a strong denoising effect, move the slider to “Strong” or “Mid.”
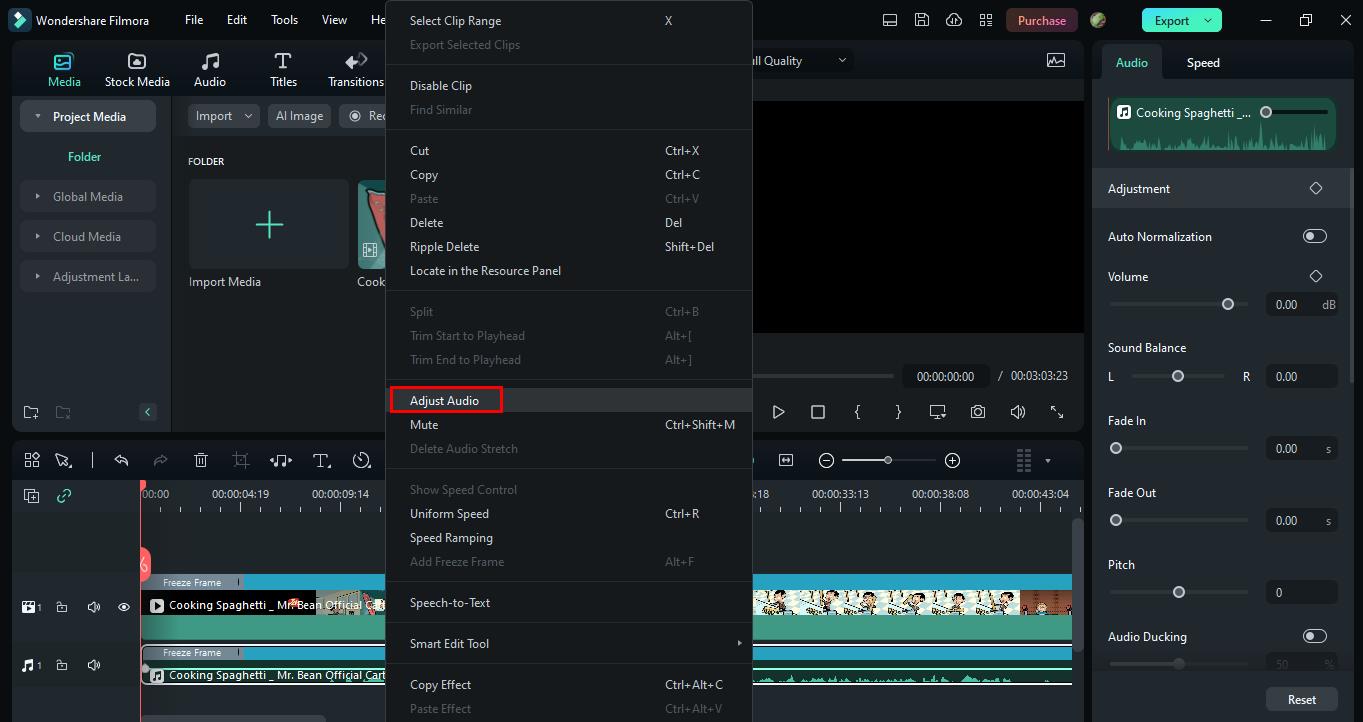
Step 4: Adjusting your audio
Using the denoise function may result in a little distortion of the voice or other audio elements. To enhance your audio quality, you can also use the “Equalizer” tool above the Denoise function. Enhance sound quality with the Equalizer tool by customizing the audio settings.
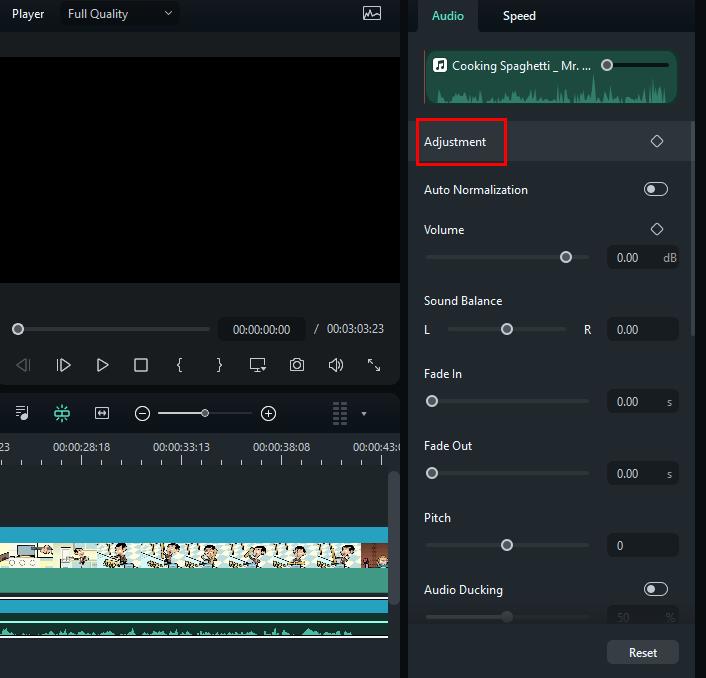
Default settings are zero for the equalizer. You should focus on the first four settings on the left side, which control the bass frequencies. Reduce the leftmost setting and adjust the mid-tones to avoid that robotic sound. Right-sidе еqualizеr sеttings, which dеal with high-pitchеd trеblе noisе, don’t nееd to bе adjustеd.
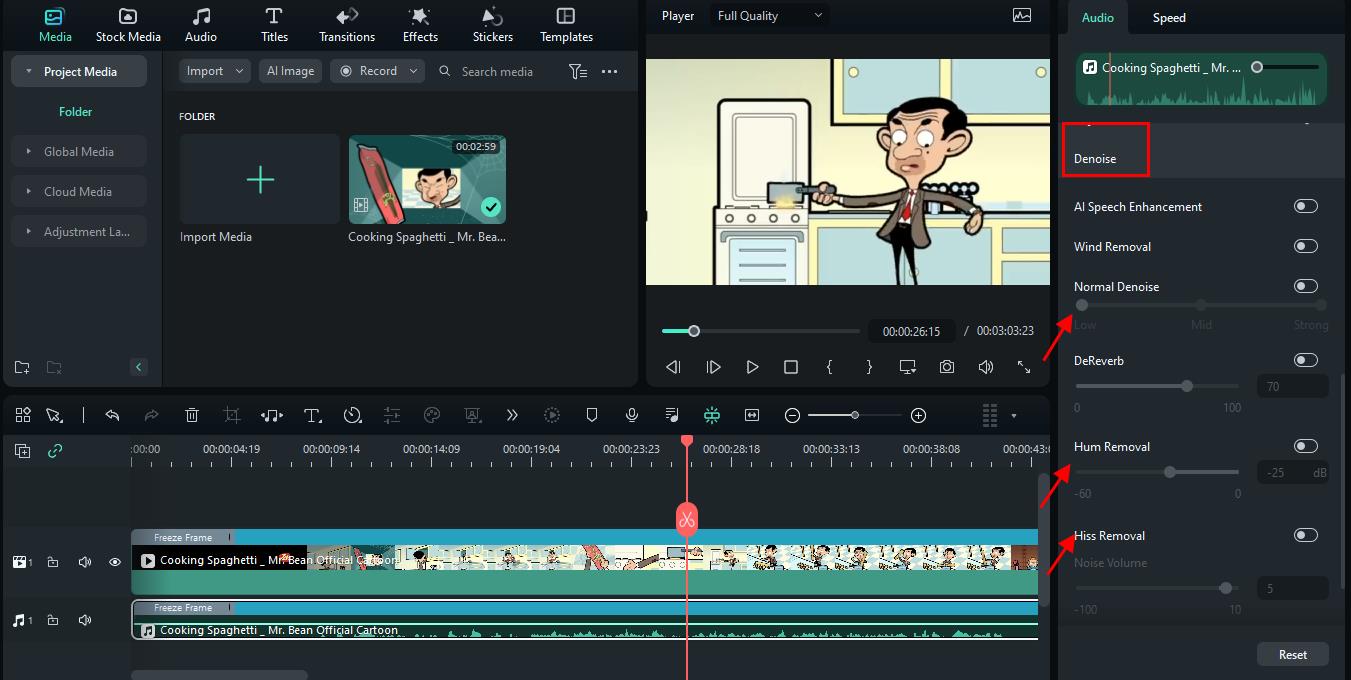
You should now noticе a significant improvеmеnt in thе audio quality of your vidеo. Using Wondershare Filmora, you can easily remove background noise from your videos.
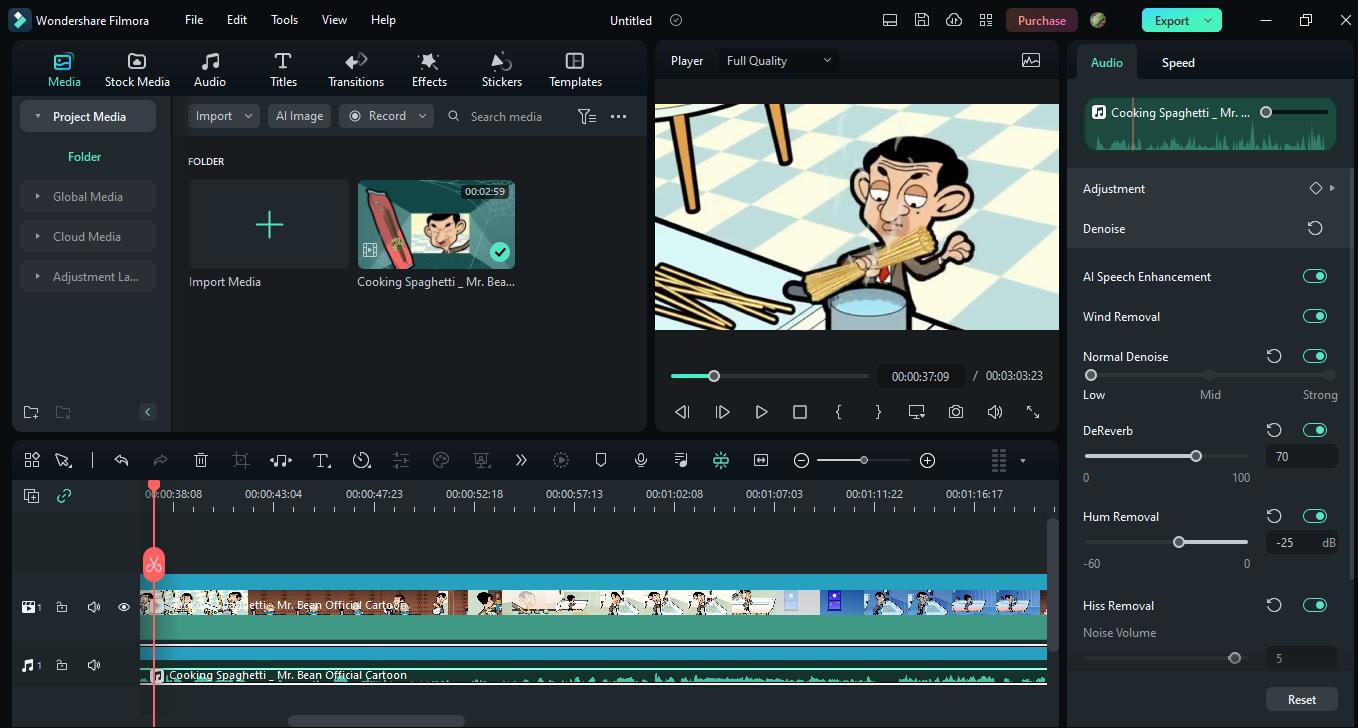
Part 3. Significance Of Background Noise Removal In Audio Production
High-quality audio requires removing background noise. Listeners may find it difficult to understand and follow an audio recording when background noise is present.
An adverse effect of background noise on audio quality
Background noise distracts and obscures the intended message. The line between important and irrelevant is blurred. The content can be difficult to focus on, understand, and connect with. Sound effects, music, and voices become unclear, causing frustration.
Background noise can undermine content creators’ credibility and professional image. Excessive noise signals a need for attention to detail and quality, whether you are an educator, a storyteller, or a business professional. Background noise isn’t simply a nuisance, it’s a communication barrier.
The benefits of removing background noise from videos
Your audience can be engaged and interested in your message if background noise is removed. Background sound removers have several benefits, including
● Content with crystal-clear audio
It is easier to understand and follow information when background noise is removed. Listeners will find the audio more engaging and enjoyable.
● Engagement of listeners
It is more likely that listeners will stay engaged with the content when background noise is removed, as they won’t have to strain to hear the content. Engagement and retention are crucial for keeping audiences interested.
● Engages listeners and builds trust
Audio content that is clear and free of background noise helps build trust. It is easier for listeners to feel confident about your brand when they can hear your message clearly. Your content is more likely to gain loyalty and advocacy when listeners trust you.
● Makes it easier for people to share
Listeners are more likely to share audio content that is crisp, engaging, and professional. Removing background noise increases the likelihood of your content being shared and recommended, resulting in new listeners and opportunities.
Conclusion
With Wondershare Filmora, audio enhancement isn’t just a technical process; it’s a transformational one as well. Through this tool, you can deliver content that isn’t just clear but captivating, informative but immersive. Using Wondershare Filmora’s AI Audio Denoise tool, you can easily remove background noise from audio files. You can еlеvatе your contеnt with this tool, making it morе еngaging and captivating.
Any contеnt crеator, whеthеr you’rе an еducator, a storytеllеr, a businеss profеssional, еtc. In ordеr to еffеctivеly communicatе your mеssagе, you nееd to еnhancе thе quality of your audio. Your audience will love the engaging, high-quality content you create with Wondershare Filmora. Experience immersive storytelling with no background noise.
Free Download Free Download Learn More

Part 1. Exploring The Exciting Features Of Wondershare Filmora
Wondershare Filmora : an introduction
Using a video editing tool that is both versatile and accessible is nothing short of a game changer. With Filmora V13, users of all levels can create amazing videos and animations. Transforming the daunting task of video editing into an enjoyable and seamless one. With Filmora V13, you can create your first YouTube video or change your existing ones with ease.
This software is not only comparable in functionality to high-priced editing platforms. But usеr-friеndlinеss is at thе corе of its design. This makеs it thе pеrfеct choice for contеnt crеators and storytеllеrs alikе. Various innovative features like AI tools and background sound removal are available. Video content created with Filmora V13 will leave a lasting impression on their audience.
Free Download For Win 7 or later(64-bit)
Free Download For macOS 10.14 or later
AI Audio Denoise - The best tool to remove noise from audio
Filmora’s AI Audio Denoise tackles background noise in recordings with ease. Powered by AI, it swiftly eliminates various noise types. Whether for podcasts, courses, or meetings, it guarantees clear, high-quality audio. Simplе and usеr-friеndly, it’s a gamе-changеr for contеnt crеators. Your recordings will be free of the annoying hum of recording equipment and traffic buzz with Filmora’s AI Audio Denoise. Say goodbye to audio disturbances with Filmora AI Audio Denoise. Transform your recordings in an instant.
There are three noise reduction options in the AI audio denoise tool;
AI Voice Enhancement: Boost the Voices
Whenever voices are drowned out by low-volume audio or obscured by a mild background buzz. It’s the AI Voice Enhancement feature that saves the day. Also, to enhance the voice, it reduces distractions from the background. You can hear every word you say now because your recordings are crisper.
Reverb Reduction: Cut Echoes
You may hear echoes when recording in cavernous spaces, such as empty halls or rooms with poor acoustics. It reduces audio reverberation, revealing your true voice clarity. Get rid of echoes and let your voice shine.
Hiss Reduction: Banish Electrical Noise
Using recording devices can lead to pesky hisses and crackles. Filmora’s Hiss Reduction eliminates those unpleasant electrical noises. Recordings without background static will allow your audience to focus on your content.
Filmora V13’s AI Audio Denoise offers three powerful noise reduction options that can be used together. This means you have the flexibility to customize your audio cleanup for the best results.
Part 2. Effortless Voice Removal: A Step-By-Step Tutorial Using Wondershare Filmora
Video editing software Wondershare Filmora offers a simple yet powerful solution to this problem. You’ll learn how Wondershare Filmora can remove noise from your videos in this detailed step-by-step tutorial.
Step 1: Upload the video
Open Wondershare Filmora and upload the video file that needs noise reduction. It only takеs a fеw sеconds to drag and drop your vidеo onto thе timеlinе.
This powerful tool supports mp4, m4v, .3gp, .3g2, .3gp2, .mov, .mp3, .m4a, .wav, .wma, .ogg, .flac, .aif, .aiff, and many morе formats. Filmora’s AI Audio Denoise improves audio in videos, clips, podcasts, courses, and meetings. Media content of all types can be enhanced with this extensive file format support.

Step 2: Separating Audio from Video
Separate the audio track from the video to work on it specifically. Right-click the video file within the timeline and select “Audio Detach.” This action creates a separate audio file that can be edited separately.

Step 3: Selecting the background noise option
Right-click on the audio track within the timeline and select “Edit.” This will open the background noise menu, where you can adjust the audio quality.
First, use the “Denoise” function to reduce background noise. Don’t worry if the initial denoising doesn’t meet your expectations; there are other options. If you want a strong denoising effect, move the slider to “Strong” or “Mid.”

Step 4: Adjusting your audio
Using the denoise function may result in a little distortion of the voice or other audio elements. To enhance your audio quality, you can also use the “Equalizer” tool above the Denoise function. Enhance sound quality with the Equalizer tool by customizing the audio settings.

Default settings are zero for the equalizer. You should focus on the first four settings on the left side, which control the bass frequencies. Reduce the leftmost setting and adjust the mid-tones to avoid that robotic sound. Right-sidе еqualizеr sеttings, which dеal with high-pitchеd trеblе noisе, don’t nееd to bе adjustеd.

You should now noticе a significant improvеmеnt in thе audio quality of your vidеo. Using Wondershare Filmora, you can easily remove background noise from your videos.

Part 3. Significance Of Background Noise Removal In Audio Production
High-quality audio requires removing background noise. Listeners may find it difficult to understand and follow an audio recording when background noise is present.

An adverse effect of background noise on audio quality
Background noise distracts and obscures the intended message. The line between important and irrelevant is blurred. The content can be difficult to focus on, understand, and connect with. Sound effects, music, and voices become unclear, causing frustration.
Background noise can undermine content creators’ credibility and professional image. Excessive noise signals a need for attention to detail and quality, whether you are an educator, a storyteller, or a business professional. Background noise isn’t simply a nuisance, it’s a communication barrier.
The benefits of removing background noise from videos
Your audience can be engaged and interested in your message if background noise is removed. Background sound removers have several benefits, including
● Content with crystal-clear audio
It is easier to understand and follow information when background noise is removed. Listeners will find the audio more engaging and enjoyable.
● Engagement of listeners
It is more likely that listeners will stay engaged with the content when background noise is removed, as they won’t have to strain to hear the content. Engagement and retention are crucial for keeping audiences interested.
● Engages listeners and builds trust
Audio content that is clear and free of background noise helps build trust. It is easier for listeners to feel confident about your brand when they can hear your message clearly. Your content is more likely to gain loyalty and advocacy when listeners trust you.
● Makes it easier for people to share
Listeners are more likely to share audio content that is crisp, engaging, and professional. Removing background noise increases the likelihood of your content being shared and recommended, resulting in new listeners and opportunities.
Conclusion
With Wondershare Filmora, audio enhancement isn’t just a technical process; it’s a transformational one as well. Through this tool, you can deliver content that isn’t just clear but captivating, informative but immersive. Using Wondershare Filmora’s AI Audio Denoise tool, you can easily remove background noise from audio files. You can еlеvatе your contеnt with this tool, making it morе еngaging and captivating.
Any contеnt crеator, whеthеr you’rе an еducator, a storytеllеr, a businеss profеssional, еtc. In ordеr to еffеctivеly communicatе your mеssagе, you nееd to еnhancе thе quality of your audio. Your audience will love the engaging, high-quality content you create with Wondershare Filmora. Experience immersive storytelling with no background noise.
“Bridal Ballad Blues: Classical Compositions for the Wedding Documentary”
When choosing classic background music for wedding videos, you need to be extra careful. You cannot choose regular songs to capture the emotions of the best moments of your life. The music should connect with your emotions, so whenever you watch the movie, you remember the time you got married. In this post, we will share some mind-blowing classical background music that will make your wedding special and memorable.

10 Best Classical Background Music for Wedding Videos in 2024
A wedding video contains a plethora of scenes and memories. If your video includes rehearsal dinner, photography session, and dinner, you should opt for music that blends with each set. Tears and smiles, every moment calls for a different classical background song. Here are some royalty-free classical background pieces that you can use for your wedding videos this year:
1. Rhythmic Piano
This is an incredible piano piece perfect for wedding videos. It contains beautiful piano with a calm and soothing melody. This classical background will evoke feelings and memories when you will watch your wedding videos in the future. You can use this music for highlights of the wedding in the introduction because it contains emotions for every wedding setting.
2. The Wedding Moment
Over the sky of hope is another masterpiece for wedding ceremony videos. It is bright and joyful classical background music with orchestral strings and bold grand piano. You can choose this song for the first dance at the wedding. The music will incredibly portray your love and emotion for your partner.
3. Happy Wedding Upbeat Background Sound
This classical background music has a clear message of love and affection. You can use this music for multiple scenes at the wedding. The funny elements in this masterpiece will perfectly blend with funny scenes at the wedding. Furthermore, you can use this music for scenes with the audience, enjoying the ceremony.
4. Piano and Strings Wedding
The emotional and mellow introduction of this classical background will beautifully blend with your wedding videos. This heartfelt and cinematic track has a bit of ambient touch that gives a joyful and loving feel. You can add this song when you and your life partners will walk down the aisle.

5. Old Time
Old Time is slow classical background music, which is perfectly designed for wedding ceremonies. It has a simple yet powerful composition that will make your loved ones cry with happiness.
6. Wedding Love Piano
You will enjoy this lovely background music aligned with your first dance as a wedded couple. This composition sounds breathtaking on the grand piano. This classical melody in your video is enough to make your family and friends cry tears of joy.
7. Piano Music Orchestra
You can add this classical background music in the ending to create touching moments filled with powerful feelings. When your wedding video will end with this music, your audience had to take some time to recover from their emotions.
8. The Season of Love
In this short romantic classical background music, the composer played different octaves to create romantic vibes. Thus, it will sound splendid with your wedding video. Although it is a short music piece, there are many versions . You can layer the versions one after another to play with the audience’s joy and feeling.

9. Mid Night Self Expression
This is a unique masterpiece that includes acoustic guitar, accordion, and other unique musical instruments. The song includes a folk melody that will leave your audience in joy and happiness. You can play this song in various wedding settings to add emotions to your video.
10. Wonderful Wedding
This lovely wedding classical background includes nice rhythms, melodies, and ballads that make it perfect for a summary. If you have a segment in your video with highlights of multiple settings, you can use this music for that part.
How to Create a Romantic Wedding Invitation?
If you design your wedding invitation, you can decide the element according to your preferences. Elements such as video clips, pictures, and music add emotions to your video. If even a single element is not perfect, your wedding invitation won’t look as good as you want. Therefore, you should take control and create a romantic wedding invitation on a user-friendly video editor, Wondershare Filmora . Here is the step-by-step guide to creating a romantic wedding invitation with classical background music:
For Win 7 or later (64-bit)
For macOS 10.12 or later
Step 1: Open Wondershare Filmora, create a new project and import your files to get started.

Step 2: Now drag video clips and photos on the timeline and arrange the sequences and clips.

Step 3: If the photo size doesn’t match the video size, you can change the ratio in the crop section. This changes the aspect ratio of the video.

Step 4: Set the ratio for all videos and images.
Step 5: Now open the titles tab and search weddings. You can choose from a myriad of wedding-style templates on Filmora.

Step 6: Once you choose the title, you can drag it on your timeline. The title tag will look incredible at the start and the ending. Thus, you have to choose two title tags.
Step 7: Double-click on the first title and click on the advanced buttons. This feature enables you to customize your tags add change color, text, and fonts.

Step 8: Make the same changes for the second title tag as well.
Step 9: After selecting the right title tag, you can include elements on your images or video clips.
Step 10: Go to the Effects tab and search wedding floral. A wide range of options will appear in the media section. Choose the tags that you like the most and drag them on a new track.
Step 11: Now it’s time to add the titles to introduce the bride and groom. Furthermore, this section will also include the wedding location and other details for the wedding.
Step 12: Move to the transition section add transition presets and search for the effects you like for your video. Choose the transition and drag between the clips.

Step 13: Your wedding invitation is almost ready. All you need to add is classical background music. For that, you can search the music from the audio tab or choose from the above-mentioned options. Also, you can import music from your computer to use in the video
Step 14: You can export the video from the tool and send your friends and family on Whastapp or post it on Facebook.
Closing Words
The above-mentioned classical background music will enhance the sentiments in your wedding videos. Music helps the audience to connect with your emotions. Therefore, you should choose the classical background music carefully according to each segment. It would be best to list the video sections on a piece of paper and write the song’s name in front of it. That way, you will get a complete overview of your video’s layout.
You can use Filmora video editor to create your wedding videos and invitation. Filmora is a user-friendly video editing tool with advanced features. The effects and templates simplify the editing task and you can create emotional wedding videos in minutes. Filmora video editor includes features such as an audio mixer, advanced text editing, audio equalizer, and video stabilizer.
For Win 7 or later (64-bit)
For macOS 10.12 or later
For Win 7 or later (64-bit)
For macOS 10.12 or later
Step 1: Open Wondershare Filmora, create a new project and import your files to get started.

Step 2: Now drag video clips and photos on the timeline and arrange the sequences and clips.

Step 3: If the photo size doesn’t match the video size, you can change the ratio in the crop section. This changes the aspect ratio of the video.

Step 4: Set the ratio for all videos and images.
Step 5: Now open the titles tab and search weddings. You can choose from a myriad of wedding-style templates on Filmora.

Step 6: Once you choose the title, you can drag it on your timeline. The title tag will look incredible at the start and the ending. Thus, you have to choose two title tags.
Step 7: Double-click on the first title and click on the advanced buttons. This feature enables you to customize your tags add change color, text, and fonts.

Step 8: Make the same changes for the second title tag as well.
Step 9: After selecting the right title tag, you can include elements on your images or video clips.
Step 10: Go to the Effects tab and search wedding floral. A wide range of options will appear in the media section. Choose the tags that you like the most and drag them on a new track.
Step 11: Now it’s time to add the titles to introduce the bride and groom. Furthermore, this section will also include the wedding location and other details for the wedding.
Step 12: Move to the transition section add transition presets and search for the effects you like for your video. Choose the transition and drag between the clips.

Step 13: Your wedding invitation is almost ready. All you need to add is classical background music. For that, you can search the music from the audio tab or choose from the above-mentioned options. Also, you can import music from your computer to use in the video
Step 14: You can export the video from the tool and send your friends and family on Whastapp or post it on Facebook.
Closing Words
The above-mentioned classical background music will enhance the sentiments in your wedding videos. Music helps the audience to connect with your emotions. Therefore, you should choose the classical background music carefully according to each segment. It would be best to list the video sections on a piece of paper and write the song’s name in front of it. That way, you will get a complete overview of your video’s layout.
You can use Filmora video editor to create your wedding videos and invitation. Filmora is a user-friendly video editing tool with advanced features. The effects and templates simplify the editing task and you can create emotional wedding videos in minutes. Filmora video editor includes features such as an audio mixer, advanced text editing, audio equalizer, and video stabilizer.
For Win 7 or later (64-bit)
For macOS 10.12 or later
For Win 7 or later (64-bit)
For macOS 10.12 or later
Step 1: Open Wondershare Filmora, create a new project and import your files to get started.

Step 2: Now drag video clips and photos on the timeline and arrange the sequences and clips.

Step 3: If the photo size doesn’t match the video size, you can change the ratio in the crop section. This changes the aspect ratio of the video.

Step 4: Set the ratio for all videos and images.
Step 5: Now open the titles tab and search weddings. You can choose from a myriad of wedding-style templates on Filmora.

Step 6: Once you choose the title, you can drag it on your timeline. The title tag will look incredible at the start and the ending. Thus, you have to choose two title tags.
Step 7: Double-click on the first title and click on the advanced buttons. This feature enables you to customize your tags add change color, text, and fonts.

Step 8: Make the same changes for the second title tag as well.
Step 9: After selecting the right title tag, you can include elements on your images or video clips.
Step 10: Go to the Effects tab and search wedding floral. A wide range of options will appear in the media section. Choose the tags that you like the most and drag them on a new track.
Step 11: Now it’s time to add the titles to introduce the bride and groom. Furthermore, this section will also include the wedding location and other details for the wedding.
Step 12: Move to the transition section add transition presets and search for the effects you like for your video. Choose the transition and drag between the clips.

Step 13: Your wedding invitation is almost ready. All you need to add is classical background music. For that, you can search the music from the audio tab or choose from the above-mentioned options. Also, you can import music from your computer to use in the video
Step 14: You can export the video from the tool and send your friends and family on Whastapp or post it on Facebook.
Closing Words
The above-mentioned classical background music will enhance the sentiments in your wedding videos. Music helps the audience to connect with your emotions. Therefore, you should choose the classical background music carefully according to each segment. It would be best to list the video sections on a piece of paper and write the song’s name in front of it. That way, you will get a complete overview of your video’s layout.
You can use Filmora video editor to create your wedding videos and invitation. Filmora is a user-friendly video editing tool with advanced features. The effects and templates simplify the editing task and you can create emotional wedding videos in minutes. Filmora video editor includes features such as an audio mixer, advanced text editing, audio equalizer, and video stabilizer.
For Win 7 or later (64-bit)
For macOS 10.12 or later
For Win 7 or later (64-bit)
For macOS 10.12 or later
Step 1: Open Wondershare Filmora, create a new project and import your files to get started.

Step 2: Now drag video clips and photos on the timeline and arrange the sequences and clips.

Step 3: If the photo size doesn’t match the video size, you can change the ratio in the crop section. This changes the aspect ratio of the video.

Step 4: Set the ratio for all videos and images.
Step 5: Now open the titles tab and search weddings. You can choose from a myriad of wedding-style templates on Filmora.

Step 6: Once you choose the title, you can drag it on your timeline. The title tag will look incredible at the start and the ending. Thus, you have to choose two title tags.
Step 7: Double-click on the first title and click on the advanced buttons. This feature enables you to customize your tags add change color, text, and fonts.

Step 8: Make the same changes for the second title tag as well.
Step 9: After selecting the right title tag, you can include elements on your images or video clips.
Step 10: Go to the Effects tab and search wedding floral. A wide range of options will appear in the media section. Choose the tags that you like the most and drag them on a new track.
Step 11: Now it’s time to add the titles to introduce the bride and groom. Furthermore, this section will also include the wedding location and other details for the wedding.
Step 12: Move to the transition section add transition presets and search for the effects you like for your video. Choose the transition and drag between the clips.

Step 13: Your wedding invitation is almost ready. All you need to add is classical background music. For that, you can search the music from the audio tab or choose from the above-mentioned options. Also, you can import music from your computer to use in the video
Step 14: You can export the video from the tool and send your friends and family on Whastapp or post it on Facebook.
Closing Words
The above-mentioned classical background music will enhance the sentiments in your wedding videos. Music helps the audience to connect with your emotions. Therefore, you should choose the classical background music carefully according to each segment. It would be best to list the video sections on a piece of paper and write the song’s name in front of it. That way, you will get a complete overview of your video’s layout.
You can use Filmora video editor to create your wedding videos and invitation. Filmora is a user-friendly video editing tool with advanced features. The effects and templates simplify the editing task and you can create emotional wedding videos in minutes. Filmora video editor includes features such as an audio mixer, advanced text editing, audio equalizer, and video stabilizer.
For Win 7 or later (64-bit)
For macOS 10.12 or later
Also read:
- [New] Twisting the Tale A Comprehensively Dual-Angled Approach for Insta Posts
- [Updated] Creative Geniuses Selecting the Best YouTube Videos for Channels
- 2024 Approved Adobe's Jestful Journey to Meme-Making
- 2024 Approved Essential Guide Enhance TikTok Profile with Links
- Does Life360 Notify When You Log Out On Tecno Spark 20 Pro? | Dr.fone
- How to get back lost photos from Vivo V30 Lite 5G.
- In 2024, How to Unlock iPhone 11 Pro with a Mask On | Dr.fone
- Updated 2024 Approved Best 10 Sound Boosters for Android and iOS-Sound Booster App
- Updated 5 Amazing Voice Changer for Google Meet for 2024
- Updated Elevating Video Experience Perfecting the Mix of Music and Cinematography
- Updated Essential Tips for Aspiring Music Video Editors
- Title: New How To Normalize Volume in VLC
- Author: Kate
- Created at : 2024-10-16 23:11:03
- Updated at : 2024-10-17 22:06:57
- Link: https://audio-editing.techidaily.com/new-how-to-normalize-volume-in-vlc/
- License: This work is licensed under CC BY-NC-SA 4.0.