
:max_bytes(150000):strip_icc():format(webp)/windows11contextmenu-f4d6ebb14db4444d851b4338aa553e21.png)
New Convert Text to MP3 on Windows, Mac, Android and iPhone for 2024
“Text to MP3 Encoding Across All Major Mobile and Desktop OS”
Convert Text to MP3 on Windows, Mac, Android and iPhone

Shanoon Cox
Mar 27, 2024• Proven solutions
Wondering why you need to convert text to MP3 audio files? Well, the possibilities and reasons are endless. Whether you want to cover up endless lecture notes or prepare a vital speech, or perhaps you just want to avoid reading eye-straining tiny fonts, converting any written text to mp3 online comes in handy in so many ways. Not to mention, narration and the use of natural human voice can do wonders for your eLearning experience. And that is what text to mp3 converters are perfect for.
Without paying a professional, you or virtually anyone out there can produce professional voice-overs with an efficient text to audio converter. In this article, we have rounded up some of the best tools for Mac, Windows, Android, and iOS users, with quick tutorials to convert your text to mp3 files.
So, let’s check them out!
- Part 1: Text to MP3 Online on PC (Windows and Mac)
- Part 2: Text to MP3 on Android
- Part 3: Text to MP3 on iOS
Part 1: Text to MP3 Online on PC (Windows and Mac)
If you are looking for a text to mp3 online converter to use on your PC, FreeTTS is your best bet. This handy online tool helps you convert countless lines of text to mp3 audio files on Windows and Mac. The free software is powered by Google machine learning and text-to-speech capability, which converts text to audio faster than ever. With FreeTTS, just copy and paste your text content, wait for a few seconds, and get high-quality audio files without any subscription or registration.
To inspire you, here is a quick step-by-step tutorial on how you can turn long texts into professional audio files with natural voices using the online FreeTTS converter.
1. Launch FreeTTS on your Windows or Mac
Start by launching the online FreeTTS software on your Windows or Mac browser.

2. Copy and paste your words
On the main interface, copy and paste your text into the text box.

3. Convert text to mp3
After pasting your words in the text box, select your required Language and Voice style from the dropdown. Then hit Convert to start the process. Once the audio file is ready, you can save it to your PC by clicking on Download audio.

Part 2: Text to MP3 on Android
Narrator’s voice is an excellent text-to-speech converter app available on the Google Play Store. The app allows you to convert text to mp3 and mp4 files and share the converted files with your friends on various social platforms. With a wide range of language options and amusing voice styles, your phone will read out what you type in funny or serious tones using the Narrator’s voice app.
The output is an expressive and natural-sounding narration of your written content that you can export as audio or video files to engage the audience. Moreover, using this powerful app is pretty easy to turn text to mp3. Just follow these steps, and your voice-over will be ready.
1. Download and install the Narrator’s Voice app
To get started, download and install the Narrator’s voice app on your phone, then open it to enter the main screen.

2. Read aloud or type your content in the text box
On the Create tab, type the content that you wish to convert to an audio file. Or you can also choose to read aloud and record your words by clicking on the voice to text option.

3. Customize your language and voice style
Next, tap on the icon with the letter A located on the bottom left corner of the main interface to customize your audio. Then select your preferred Language, Voice, and Effect and hit Back to return.

4. Convert text to mp3
After all the edits are completed, click on the Play icon to start the conversion process.

5. Save or share the converted audio
Finally, tap on the Export icon and select Save to download the mp3 file on your phone or choose Share audio.

Part 3: Text to MP3 on iOS
The easiest way to turn large amounts of text to mp3 on an iPhone is the Text to Speech-Recorder app. The essence of this user-friendly app is the multi-lingual speech service that brings your text to life with multiple natural sounding voices. A standout feature of the app is background music support for the mp3 file. All you have to do is type your words or record your voice, explore the worldwide language library, add background music of your choice, and play to convert text to mp3.
All in all, Text to Speech-Recorder is one of the most customizable text to audio apps for iPhone users. In only five quick steps, you can transform your words into high-quality audio using this convenient app.
1. Open the Text to Speech-Recorder app
First, download the Text to Speech-Recorder app from the App store. Then open the app once it is installed.

2. Input text or record voice
Next, choose text to mp3 to manually type your content or select Record to mp3 if you wish to record your voice.

3. Edit your language, voice, and background music settings
To edit language and voice settings, click the Face icon to enter the Anchor tab. Here you can preview and choose a language and voice style of your choice. Then, tap the music icon and choose from the free background music options or hit No music if you don’t want to add any music.

4. Convert text to speech
Once you have selected the language, voice, and music, click on Save to save it to the My Audio list.

5. Download the audio file
To download the converted file to your device, hit Export.

Conclusion
Now that you know some of the best text to mp3 converters, you can cut costs of hiring a professional voice-over artist, better memorize your lectures, and even have your phone read your favorite eBook for you.
All the apps in our list are top-notch and easy-to-use text-to-speech converters with user-friendly interfaces and customizable settings. These handy tools will read aloud anything you type in amusing narration styles to create an unforgettable eLearning experience. Whether you are an Apple fan or an Android user, there is something for everyone.
Shanoon Cox
Shanoon Cox is a writer and a lover of all things video.
Follow @Shanoon Cox
Shanoon Cox
Mar 27, 2024• Proven solutions
Wondering why you need to convert text to MP3 audio files? Well, the possibilities and reasons are endless. Whether you want to cover up endless lecture notes or prepare a vital speech, or perhaps you just want to avoid reading eye-straining tiny fonts, converting any written text to mp3 online comes in handy in so many ways. Not to mention, narration and the use of natural human voice can do wonders for your eLearning experience. And that is what text to mp3 converters are perfect for.
Without paying a professional, you or virtually anyone out there can produce professional voice-overs with an efficient text to audio converter. In this article, we have rounded up some of the best tools for Mac, Windows, Android, and iOS users, with quick tutorials to convert your text to mp3 files.
So, let’s check them out!
- Part 1: Text to MP3 Online on PC (Windows and Mac)
- Part 2: Text to MP3 on Android
- Part 3: Text to MP3 on iOS
Part 1: Text to MP3 Online on PC (Windows and Mac)
If you are looking for a text to mp3 online converter to use on your PC, FreeTTS is your best bet. This handy online tool helps you convert countless lines of text to mp3 audio files on Windows and Mac. The free software is powered by Google machine learning and text-to-speech capability, which converts text to audio faster than ever. With FreeTTS, just copy and paste your text content, wait for a few seconds, and get high-quality audio files without any subscription or registration.
To inspire you, here is a quick step-by-step tutorial on how you can turn long texts into professional audio files with natural voices using the online FreeTTS converter.
1. Launch FreeTTS on your Windows or Mac
Start by launching the online FreeTTS software on your Windows or Mac browser.
2. Copy and paste your words
On the main interface, copy and paste your text into the text box.
3. Convert text to mp3
After pasting your words in the text box, select your required Language and Voice style from the dropdown. Then hit Convert to start the process. Once the audio file is ready, you can save it to your PC by clicking on Download audio.
Part 2: Text to MP3 on Android
Narrator’s voice is an excellent text-to-speech converter app available on the Google Play Store. The app allows you to convert text to mp3 and mp4 files and share the converted files with your friends on various social platforms. With a wide range of language options and amusing voice styles, your phone will read out what you type in funny or serious tones using the Narrator’s voice app.
The output is an expressive and natural-sounding narration of your written content that you can export as audio or video files to engage the audience. Moreover, using this powerful app is pretty easy to turn text to mp3. Just follow these steps, and your voice-over will be ready.
1. Download and install the Narrator’s Voice app
To get started, download and install the Narrator’s voice app on your phone, then open it to enter the main screen.
2. Read aloud or type your content in the text box
On the Create tab, type the content that you wish to convert to an audio file. Or you can also choose to read aloud and record your words by clicking on the voice to text option.
3. Customize your language and voice style
Next, tap on the icon with the letter A located on the bottom left corner of the main interface to customize your audio. Then select your preferred Language, Voice, and Effect and hit Back to return.
4. Convert text to mp3
After all the edits are completed, click on the Play icon to start the conversion process.
5. Save or share the converted audio
Finally, tap on the Export icon and select Save to download the mp3 file on your phone or choose Share audio.
Part 3: Text to MP3 on iOS
The easiest way to turn large amounts of text to mp3 on an iPhone is the Text to Speech-Recorder app. The essence of this user-friendly app is the multi-lingual speech service that brings your text to life with multiple natural sounding voices. A standout feature of the app is background music support for the mp3 file. All you have to do is type your words or record your voice, explore the worldwide language library, add background music of your choice, and play to convert text to mp3.
All in all, Text to Speech-Recorder is one of the most customizable text to audio apps for iPhone users. In only five quick steps, you can transform your words into high-quality audio using this convenient app.
1. Open the Text to Speech-Recorder app
First, download the Text to Speech-Recorder app from the App store. Then open the app once it is installed.
2. Input text or record voice
Next, choose text to mp3 to manually type your content or select Record to mp3 if you wish to record your voice.
3. Edit your language, voice, and background music settings
To edit language and voice settings, click the Face icon to enter the Anchor tab. Here you can preview and choose a language and voice style of your choice. Then, tap the music icon and choose from the free background music options or hit No music if you don’t want to add any music.
4. Convert text to speech
Once you have selected the language, voice, and music, click on Save to save it to the My Audio list.
5. Download the audio file
To download the converted file to your device, hit Export.
Conclusion
Now that you know some of the best text to mp3 converters, you can cut costs of hiring a professional voice-over artist, better memorize your lectures, and even have your phone read your favorite eBook for you.
All the apps in our list are top-notch and easy-to-use text-to-speech converters with user-friendly interfaces and customizable settings. These handy tools will read aloud anything you type in amusing narration styles to create an unforgettable eLearning experience. Whether you are an Apple fan or an Android user, there is something for everyone.
Shanoon Cox
Shanoon Cox is a writer and a lover of all things video.
Follow @Shanoon Cox
Add Audio to Video in Premiere Pro
Versatile Video Editor - Wondershare Filmora
An easy yet powerful editor
Numerous effects to choose from
Detailed tutorials provided by the official channel
Look at any of the spot commercials, wedding videos, or even some family candid videos. Adding audio makes them appealing and likable. To catch a potential customer or create an emotional connection with the viewer combination of audio and video is a must. This makes the footage attractive and exceptional.
Read on to know more about the step-by-step approach how to add audio to video in Adobe Premiere Pro.
In this article
01 [How to add audio to video in Premiere Pro](#Part 1)
02 [How to adjust audio in Premiere Pro](#Part 2)
03 [Adding Audio to Video files](#Part 3)
Part 1 How to add audio to video in Premiere Pro
Some essential pointers for all would-be videographers are:
● Before you add audio to video in Premiere Pro, be ready to see your file size increase to a large extent. If you add a background score of 15MB, your total video file size will increase by the same amount of 15MB. The best way to take care of such a problem is to use additional compression techniques to get a suitable file size.
● Most videographers use lots of software tools to add audio to video professionally. One such trending software tool is the Adobe Premiere Pro. Its simple to add audio to video in Premiere Pro, edit your audio and video, and fine-tune the audio volume of each video project.
Let’s learn how.

Step1 Find out the Audio option
Navigate to the Audio workspace, select Audio at the top on the tools bar
Step2 Choose the Workspace
Click Window select Workspace click on Audio
Step3 Check toolbar
Within Audio, click on Choose Window Media Browser to show the Media Browser toolbar.
Step4 Select audio files
Go to your audio file; for Windows OS, right-click or control-click the selected audio file for macOS.
Step5 Import and add
Please select the desired audio file, then click import to add it to your Project.
An important tip is to keep the Ingest box selected if you want to copy your audio file concurrently to your project folder.
Adding audio to your series

Step1 Go to the Project panel
Select Window, click on Project to open the Project panel.
Step2 Select audio file
Click on the audio file you imported to select it.
Step3 Check the waveform
Double click the file to open it in the Source panel to check the sound and waveform.
Step4 Check sounds
Play the audio file if you want to check the audio quality, volume, and overall sound.
Step5 Add audio to the video track
Hold the left click on your mouse to drag the audio file to the series in the Timeline panel. You can add any audio file to the video track listed in the panel window in this step.
Step6 Trim audio file
Select the Trim option to trim your audio file the same way you will edit the video file in the final step.
Part 2 How to adjust audio in Premiere Pro
Now that you have understood how to add audio to video in Adobe Premier Pro. Let’s know how to adjust audio in Premier Pro.

Step1 Activate the series
Press on the spacebar to activate your series in the Program panel (appears in the top right of the panel)
Step2 Stop playback
To stop the playback, press the space bar again.
Step3 Choose starting point of playback
Press down the left mouse button to hold and drag the Blue colored play head to wherever you desire the playback to start.
If you feel the audio track is mild or too harsh compared to the rest of the audio series, change each audio track’s volume separately.
Step1 Select Audio Track Mixer
Click Window selects Audio Track Mixer from the menu.
Step2 Click the series name to see the audio mixer
Click the series name of your audio file to show the audio mixer for your series.
Step3 Choose playback to play the audio
At the bottom of the panel is the Audio Track Mixer. Click on playback to star, pause or play your audio in-ring sequence.
Step4 Click on the slider
When your audio file plays or loops, click on the slider to move up or down. It will increase or reduce the volume of each separate audio track in your audio series.
Step5 Adjust the volume
Use the slider to adjust the overall audio volume
Tips
Always keep the audio projects within the -6 to 3 dB volume range to get the best quality of the audio effect. Any lower you won’t be able to hear the sound, or if it’s higher, the sound will hurt the listeners’ ears.
Professional advice to all beginner-level videographers is that as Premiere Pro is complex so you need more straightforward tools like Filmora for all your video editing work. Filmora is easy to use and much cheaper than Premiere Pro.
You may think now why or how Filmora can be the best as an alternative on how to add audio to video using Premiere Pro. Well! It will help you to transform your video into a piece of art incredibly by offering simple drag and drop options, including an easy-to-use interface and powerful editing tools. You can:
● Edit and create your videos with minimal effort
● Get a Music Library to add comedy, fear, tension, and love to every scene
● Get several royalty-free songs and sound effects
● Create videos with up to 800 stunning effects
● Unleash your creativity with its offered Hollywood effects
● Import and export in almost any type of video format
How to use Filmora to add audio to video
Adding sound to any video file enhances its viewability and the whole experience of watching any video. To do this, you need to add audio to video. The same can be done quickly in Filmora, a 3rd-party video editing software tool now the hot favorite of amateur and professional video editors. Below we describe how to add audio to video in Filmora.
Import Media
To start the process of adding audio to video follow these steps.
Step1 Select the audio, add using the Import option or drag and select
Import selected audio using the Filmora Media Panel and add it to your timeline. You can also choose and drag the audio file from the source folder to the Media Panel. Filmora supports multiple audio file formats to ease adding audio to video. The supported audio files are MP3, M4V, MPA, WAV, WMA.

Step2 Add and make the audio file
Adding the audio file to Filmora Media Panel makes it a media asset and can now be used multiple times in future projects. The original file remains as Filmora doesn’t change the original audio file.
Step3 Copying or deleting an audio file
In Filmora, using the feature of copying or deleting an audio file, you can work on the audio and video from any computer or remote PC.
Part 3 Adding Audio to Video files
Using Filmora, it is easy to sync or add audio to the video, which is separately recorded and stored on your device.
Using Filmora, it is easy to sync or add audio to the video, which is separately recorded and stored on your device.
Step1 Click on Import in the Media Panel
Select the audio and video files to import them into Filmora.
Step2 Click on the video file to add audio
Press the Ctrl key (Windows) or Cmd key (Mac OS) and click on the audio file.
Step3 Add audio to video
Right-click on the files selected and choose the Merge audio & video option to add audio to the video.
Filmora analyzes audio and video files and replaces the existing audio with the newly selected audio file. Once the synchronization process is over, the new merged file will be available in the Media Panel for future processing.
The synchronized file will have the same terminology as the original video file with a difference. It will get an extension Merged to its name.
The original file will not get affected in Filmora. This software tool only references the files to generate a new file. The new file created when you add audio to the video can now be added to the timeline and exported.
Wondershare Filmora
Get started easily with Filmora’s powerful performance, intuitive interface, and countless effects!
Try It Free Try It Free Try It Free Learn More about Filmora>

Conclusion
So, this article listed how to add audio to video in Premiere Pro via a step-by-step guide. The guide lets you know the easy method of adding audio to video in Adobe Premiere Pro to all potential videographers. Thus, you can now start your journey of video edition by putting your best click forward!
Look at any of the spot commercials, wedding videos, or even some family candid videos. Adding audio makes them appealing and likable. To catch a potential customer or create an emotional connection with the viewer combination of audio and video is a must. This makes the footage attractive and exceptional.
Read on to know more about the step-by-step approach how to add audio to video in Adobe Premiere Pro.
In this article
01 [How to add audio to video in Premiere Pro](#Part 1)
02 [How to adjust audio in Premiere Pro](#Part 2)
03 [Adding Audio to Video files](#Part 3)
Part 1 How to add audio to video in Premiere Pro
Some essential pointers for all would-be videographers are:
● Before you add audio to video in Premiere Pro, be ready to see your file size increase to a large extent. If you add a background score of 15MB, your total video file size will increase by the same amount of 15MB. The best way to take care of such a problem is to use additional compression techniques to get a suitable file size.
● Most videographers use lots of software tools to add audio to video professionally. One such trending software tool is the Adobe Premiere Pro. Its simple to add audio to video in Premiere Pro, edit your audio and video, and fine-tune the audio volume of each video project.
Let’s learn how.
Step1 Find out the Audio option
Navigate to the Audio workspace, select Audio at the top on the tools bar
Step2 Choose the Workspace
Click Window select Workspace click on Audio
Step3 Check toolbar
Within Audio, click on Choose Window Media Browser to show the Media Browser toolbar.
Step4 Select audio files
Go to your audio file; for Windows OS, right-click or control-click the selected audio file for macOS.
Step5 Import and add
Please select the desired audio file, then click import to add it to your Project.
An important tip is to keep the Ingest box selected if you want to copy your audio file concurrently to your project folder.
Adding audio to your series
Step1 Go to the Project panel
Select Window, click on Project to open the Project panel.
Step2 Select audio file
Click on the audio file you imported to select it.
Step3 Check the waveform
Double click the file to open it in the Source panel to check the sound and waveform.
Step4 Check sounds
Play the audio file if you want to check the audio quality, volume, and overall sound.
Step5 Add audio to the video track
Hold the left click on your mouse to drag the audio file to the series in the Timeline panel. You can add any audio file to the video track listed in the panel window in this step.
Step6 Trim audio file
Select the Trim option to trim your audio file the same way you will edit the video file in the final step.
Part 2 How to adjust audio in Premiere Pro
Now that you have understood how to add audio to video in Adobe Premier Pro. Let’s know how to adjust audio in Premier Pro.
Step1 Activate the series
Press on the spacebar to activate your series in the Program panel (appears in the top right of the panel)
Step2 Stop playback
To stop the playback, press the space bar again.
Step3 Choose starting point of playback
Press down the left mouse button to hold and drag the Blue colored play head to wherever you desire the playback to start.
If you feel the audio track is mild or too harsh compared to the rest of the audio series, change each audio track’s volume separately.
Step1 Select Audio Track Mixer
Click Window selects Audio Track Mixer from the menu.
Step2 Click the series name to see the audio mixer
Click the series name of your audio file to show the audio mixer for your series.
Step3 Choose playback to play the audio
At the bottom of the panel is the Audio Track Mixer. Click on playback to star, pause or play your audio in-ring sequence.
Step4 Click on the slider
When your audio file plays or loops, click on the slider to move up or down. It will increase or reduce the volume of each separate audio track in your audio series.
Step5 Adjust the volume
Use the slider to adjust the overall audio volume
Tips
Always keep the audio projects within the -6 to 3 dB volume range to get the best quality of the audio effect. Any lower you won’t be able to hear the sound, or if it’s higher, the sound will hurt the listeners’ ears.
Professional advice to all beginner-level videographers is that as Premiere Pro is complex so you need more straightforward tools like Filmora for all your video editing work. Filmora is easy to use and much cheaper than Premiere Pro.
You may think now why or how Filmora can be the best as an alternative on how to add audio to video using Premiere Pro. Well! It will help you to transform your video into a piece of art incredibly by offering simple drag and drop options, including an easy-to-use interface and powerful editing tools. You can:
● Edit and create your videos with minimal effort
● Get a Music Library to add comedy, fear, tension, and love to every scene
● Get several royalty-free songs and sound effects
● Create videos with up to 800 stunning effects
● Unleash your creativity with its offered Hollywood effects
● Import and export in almost any type of video format
How to use Filmora to add audio to video
Adding sound to any video file enhances its viewability and the whole experience of watching any video. To do this, you need to add audio to video. The same can be done quickly in Filmora, a 3rd-party video editing software tool now the hot favorite of amateur and professional video editors. Below we describe how to add audio to video in Filmora.
Import Media
To start the process of adding audio to video follow these steps.
Step1 Select the audio, add using the Import option or drag and select
Import selected audio using the Filmora Media Panel and add it to your timeline. You can also choose and drag the audio file from the source folder to the Media Panel. Filmora supports multiple audio file formats to ease adding audio to video. The supported audio files are MP3, M4V, MPA, WAV, WMA.
Step2 Add and make the audio file
Adding the audio file to Filmora Media Panel makes it a media asset and can now be used multiple times in future projects. The original file remains as Filmora doesn’t change the original audio file.
Step3 Copying or deleting an audio file
In Filmora, using the feature of copying or deleting an audio file, you can work on the audio and video from any computer or remote PC.
Part 3 Adding Audio to Video files
Using Filmora, it is easy to sync or add audio to the video, which is separately recorded and stored on your device.
Using Filmora, it is easy to sync or add audio to the video, which is separately recorded and stored on your device.
Step1 Click on Import in the Media Panel
Select the audio and video files to import them into Filmora.
Step2 Click on the video file to add audio
Press the Ctrl key (Windows) or Cmd key (Mac OS) and click on the audio file.
Step3 Add audio to video
Right-click on the files selected and choose the Merge audio & video option to add audio to the video.
Filmora analyzes audio and video files and replaces the existing audio with the newly selected audio file. Once the synchronization process is over, the new merged file will be available in the Media Panel for future processing.
The synchronized file will have the same terminology as the original video file with a difference. It will get an extension Merged to its name.
The original file will not get affected in Filmora. This software tool only references the files to generate a new file. The new file created when you add audio to the video can now be added to the timeline and exported.
Wondershare Filmora
Get started easily with Filmora’s powerful performance, intuitive interface, and countless effects!
Try It Free Try It Free Try It Free Learn More about Filmora>
Conclusion
So, this article listed how to add audio to video in Premiere Pro via a step-by-step guide. The guide lets you know the easy method of adding audio to video in Adobe Premiere Pro to all potential videographers. Thus, you can now start your journey of video edition by putting your best click forward!
Essential Compilation: Discovering the Top 11 Free Audio Customization Tools for iOS & Android Gadgets
Best Voice Changer Apps for iPhone and Android

Benjamin Arango
Mar 27, 2024• Proven solutions
Have you ever wondered what your voice would sound like if you were a cartoon character, a robot, or an older version of yourself? Changing how your voice sounds has never been easier, regardless of the Smartphone model you have, since voice changer apps can be used on both iPhone and Android devices.
Even though there is nothing wrong with modulating your voice to have fun with your friends, using voice changer apps to pull malicious pranks or bully strangers online is far from acceptable. Read on if you would like to find out more about the best voice changer apps for iPhone and Android devices and discover the one you enjoy using the most.
Best Voice Changer Apps for iPhone and Android
Creating a new ringtone, making a voice recording, or having fun with your friends are only a few reasons why so many people choose to try out voice changer apps. The vast majority of these apps feature well-equipped audio effects libraries that enable users to have fun with their friends and hear how they would sound if they were drunk or after inhaling helium. So, let’s take a look at some of the best voice changer apps on the market.


Changing video voice on Windows and Mac with Wondershare Filmora
Do you want to change the voice in video on Windows and Mac and don’t know which software can meet this requirement? Try Filmra video editor , which provides several ways to change voice over, such as changing the voice speed or changing the pitch. Download the trial version below and find out more possibility in video creation with Filmora.
1. Celebrity Voice Changer – Face
Price: Free, but offers in-app purchases
Compatibility: iOS 9.0 or later
User Rating: 4.0
In case you would like to sound like your favorite movie star of TV host, then Celebrity Voice Changer is one of the best choices you can make. Besides the standard set of options, the app also lets you request new voices since its machine learning technology can mimic virtually anyone’s voice. However, Celebrity Voice Changer is currently only available in English and it cannot modulate speech in other languages. In addition, you must make an in-app purchase in order to gain access to all of the app’s features or unlock the unlimited usage of the app.
Pros
- Automatic voice modulation
- Huge selection of voice filters
- The app generates video files that are better adjusted to the audience on social media than audio files
- Excellent impressions of celebrities
Cons
- Unreasonably expensive
- The app’s Deep Learning technology still has a lot of room for improvement
2. Snapchat
Price: Free, but offers in-app purchases
Compatibility: iOS 10.0 or later, Android 4.4 or up
User Rating: 3.8
With more than 203 million daily users, Snapchat is one of the largest messaging platforms on the market. Previously, we’ve shared how to change gender on Snapchat , beside that, the app lets its users capture short moments or the so-called Snaps and share them with friends. In addition to hundreds of video filters , Snapchat also features a broad spectrum of voice changing effects that make Snaps more entertaining. Even so, the audio recording options Snapchat offers are far from ideal, because the app doesn’t allow you to edit the files you create with it. Using Snapchat will drain your battery quickly, which is why you must pay attention to how frequently you use this app.
Pros
- The easy voice modulation process
- Excellent messaging options
- Grants you access to a large community of likeminded people
- Lenses and filters are updated on a daily basis
Cons
- Editing voice changes after you create a Snap is not possible
- Snapchat is not primarily a voice changer app
Check the detailed information about How to Change Voice on Snapchat with 2 Easy Methods >>
3. Voice Changer
Price: Free
Compatibility: Android 4.1 and up
User Rating: 4.3

Changing your voice with this app won’t take more than a few moments of your time. You just have to launch the app and hit the microphone button to record a message or a joke you would like to modulate. Once you’re happy with the audio recording you made, you can proceed to choose from more than twenty voice effects that will make you sound like a dwarf, a robot, or an alien. The app’s file-sharing capabilities enable you to post your audio recordings to any social media platform of your choosing or store your files and use them as many times as you want.
Pros
- Entertaining and easy to use
- The simple three-step voice modulation process
- Good selection of voice filters
- Excellent file sharing options
Cons
- The app displays ads
- No audio editing tools
4. Voicy: Celebrity Voice Changer
**Price:**Free, but offers in-app purchases
Compatibility: iOS 10 or later
User Rating: 4.3

Impersonating your favorite celebrity can be a fun way to prank your friends on social media. Voicy features a broad selection of celebrity voice impersonations you can use to make you sound like a famous actress or TV personality. The app utilizes a machine learning technology that can generate more than forty avatars and allows the users to experiment with different voice effects. The free version of the app offers only limited capabilities, so if you want to gain access to all of the Voicy’s features, you must choose a weekly, monthly or an annual subscription.
Pros
- Equipped with a powerful machine learning technology
- Offers a vast selection of voice avatars
- The quick voice modification process
- A great choice if you want to make a parody
Cons
- More expensive than the competition
- Support only the English language
5. Video Voice Changer – Fun Editor
Price: Free, but offers in-app purchases
Compatibility: iOS 8.0 or later
User Rating: 4.4

Changing the voices in the videos you record with your iPhones or iPads is a straightforward process that takes a minimum amount of effort. You can either use this iOS-based app to capture videos you’re going to dub or import them from the albums in which they are stored. The Video Voice Changer app is a great option if you want to dub videos directly from your phone because it enables you to change the voices in your videos and make them sound like mice, bears or ghosts. There are over thirty voice effects to choose from, so you can easily pick the one that best fits the video you’re editing.
Pros
- Equipped with video recording tools
- Excellent dubbing features
- A rich selection of voice effects
- Allows users to share their creations on Facebook, Instagram, and other social media platforms
Cons
- You must make an in-app purchase to unlock all of the app’s features
- No audio mixing options
6. Video Voice Changer FX
**Price:**Free, but offers in-app purchases
Compatibility: Android 4.1 and up
User Rating: 4.1

This is a simple app, anyone can use to change the voices in a video. Simply upload a video file from an SD card in your phone and choose an audio effect you want to apply. The app’s collection of funny voices includes options like echo, squirrel, space ship or chipmunk. As soon as you select the voice effect you want to add to a video, the app will start generating a new video that will be saved to your phone. Sharing the videos you edit with Video Voice Changer FX to social media directly from the app is not an option.
Pros
- Fun and easy to use
- Great price to performance ratio
- Changing a voice requires just a few taps
- Allows users to switch between effects while the video is playing
Cons
- No audio or video recording capability
- Doesn’t support social media sharing
7. Squeak Voice Changer
**Price:**Free, but offers in-app purchases
Compatibility: Android 4.3 and up
User Rating: 3.9

Every joke you want to share with your online friends is going to be a little funnier if you record it with Squeak Voice Changer. You just have to tap on the Record button and choose one of the available effects. Each voice changing effect this app offers is represented by a character so you should select Jamie the Jolly if you want to make your voice sound like you’re at a party or Bruce the Sentimental Bot if you want your voice to sound artificial. All the recordings you make with Squeak Voice Changer can be easily shared on social media.
Pros
- Equipped with audio recording options
- Cute and memorable characters that represent voice effects
- Inexpensive and fun to use
- Functional app design
Cons
- Poor selection of voice effects
- The AI only recognizes the English language
8. Voice Changer with Effects
**Price:**Free
Compatibility: Android 4.1 and up
User Rating: 4.5
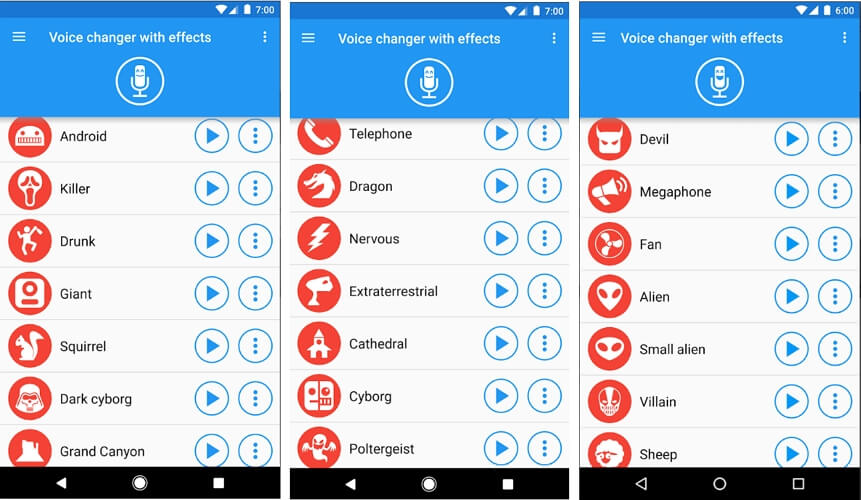
This Android-based app is designed to make fun and easy since voice modulation features enable you to play voice recording backward or change your voice to sound robotic or even alien. Besides recording your voice, the app also lets you modulate pre-recorded sounds and save them to your phone or use them as ringtones or notification sounds. Furthermore, the app lets you add sounds to images and share them to Facebook. The Voice Changer with Effects enables you to share all audio files you process with it to any of the most popular social media platforms.
Pros
- The app has over 50,000,000 installs
- Equipped with a text to voice feature
- Setting a new ringtone with this app is easy
- Supports editing of pre-recorded audio files
Cons
- Contains ads
- No audio or video editing options
9. Voice Changer
**Price:**Free
Compatibility: Android 4.1 and up
User Rating: 4.4

If you are looking for an Android app that lets you modulate your voice quickly and effortlessly, then Voice Changer may be one of the best options you can find on the market. You can record your voice by simply tapping on the microphone and speaking into your phone’s speaker and then apply one of the audio effects this app offers. Optionally, you can import an audio file you already recorded into the app and then apply Martian, Foreigner, Giant or Child effects to your voice recording. The best part is that you can apply each effect to the audio files you’re editing as many times as you want.
Pros
- Loads of funny effects
- Simple audio recording setup
- Intuitive and modernly designed interface
- Enables users to share audio files via Bluetooth or social media platforms
Cons
- No video editing tools
- The quality of output audio files can vary
10. Voice FX
**Price:**Free, but offers in-app purchases
Compatibility: Android 4.0.3 and up
User Rating: 3.8

Modulating voices in all types of audio files is a straightforward and fun process that can be completed in just a few taps. During the audio recording session, you can apply all voice effects to the sound you are recording and stream it live to your web browsers or media players you’re using. Voice FX changes your voice in real time, which enables you to preview your results before deciding if you want to save them. All files you export from this app will be saved in the MP3 format so you can use them as ringtones on your Android device.
Pros
- Allows users to modulate pre-recorded audio files
- Voice effects are applied in real time
- Offers live streaming features
- Exports files in the MP3 format
Cons
- Prone to glitches
- A limited selection of voice effects
11. Voice Changer Plus
**Price:**Free, but offers in-app purchases
Compatibility: iOS 8.0 or later
User Rating: 4.8
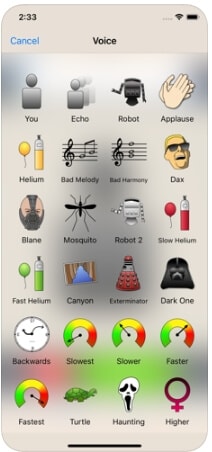
iPhone and iPad owners in need of a voice changer app that grants them complete creative freedom over the modulation of the voices they record, should consider using the Voice Changer Plus. The app features more than fifty voice effects and it provides support for voiceover recordings. Moreover, you can edit all your audio files even after you saved them, enabling you to find new ways to improve your recordings over time. Voice Changer Plus is also equipped with trim controls, so you can remove all parts of your audio files you don’t want to share with your friends on social media.
Pros
- Offers more voice effects than most of its competitors
- Provides voiceover recording options
- Users can trim their audio files
- All audio recordings can be edited after the voice modulation
Cons
- In-app purchase is required in order to unlock all of the app’s features
- Modulating audio in video files is not an option
Below is a quick comparison table among these voice changer apps, hope it will be helpful.
| App | Supported OS | User Rating | Voice Templates |
|---|---|---|---|
| Celebrity Voice Changer - Face | iOS 9.0 or later | 4.0 | Yes |
| Snapchat | iOS 10.0 or later, Android 4.4 or up | 3.8 | No |
| Voice Changer by e3games | Android 4.1 and up | 4.3 | Yes |
| Voicy: Celebrity Voice Changer | iOS 10 or later | 4.3 | Yes |
| Video Voice Changer – Fun Editor | iOS 8.0 or later | 4.4 | Yes |
| Video Voice Changer FX | Android 4.1 and up | 4.1 | Yes |
| Squeak Voice Changer | Android 4.3 and up | 3.9 | Yes |
| Voice Changer with Effects | Android 4.1 and up | 4.5 | Yes |
| Voice Changer | Android 4.1 and up | 4.4 | Yes |
| Voice FX | Android 4.0.3 and up | 3.8 | Yes |
| Voice Changer Plus | iOS 8.0 or later | 4.8 | Yes |
Conclusion
Everybody enjoys a good joke, and the apps we featured in this article enable you to have a lot of fun while experimenting with different voice modulation options. All of the voice effects these apps offer can change a voice automatically, but if you would like to alter the voices in your videos you must choose an app that supports this option. Which of the best voice changer apps for iPhone and Android devices are you going to choose? Leave a comment, and share your opinions with us.
Benjamin Arango
Benjamin Arango is a writer and a lover of all things video.
Follow @Benjamin Arango
Benjamin Arango
Mar 27, 2024• Proven solutions
Have you ever wondered what your voice would sound like if you were a cartoon character, a robot, or an older version of yourself? Changing how your voice sounds has never been easier, regardless of the Smartphone model you have, since voice changer apps can be used on both iPhone and Android devices.
Even though there is nothing wrong with modulating your voice to have fun with your friends, using voice changer apps to pull malicious pranks or bully strangers online is far from acceptable. Read on if you would like to find out more about the best voice changer apps for iPhone and Android devices and discover the one you enjoy using the most.
Best Voice Changer Apps for iPhone and Android
Creating a new ringtone, making a voice recording, or having fun with your friends are only a few reasons why so many people choose to try out voice changer apps. The vast majority of these apps feature well-equipped audio effects libraries that enable users to have fun with their friends and hear how they would sound if they were drunk or after inhaling helium. So, let’s take a look at some of the best voice changer apps on the market.
Changing video voice on Windows and Mac with Wondershare Filmora
Do you want to change the voice in video on Windows and Mac and don’t know which software can meet this requirement? Try Filmra video editor , which provides several ways to change voice over, such as changing the voice speed or changing the pitch. Download the trial version below and find out more possibility in video creation with Filmora.
1. Celebrity Voice Changer – Face
Price: Free, but offers in-app purchases
Compatibility: iOS 9.0 or later
User Rating: 4.0
In case you would like to sound like your favorite movie star of TV host, then Celebrity Voice Changer is one of the best choices you can make. Besides the standard set of options, the app also lets you request new voices since its machine learning technology can mimic virtually anyone’s voice. However, Celebrity Voice Changer is currently only available in English and it cannot modulate speech in other languages. In addition, you must make an in-app purchase in order to gain access to all of the app’s features or unlock the unlimited usage of the app.
Pros
- Automatic voice modulation
- Huge selection of voice filters
- The app generates video files that are better adjusted to the audience on social media than audio files
- Excellent impressions of celebrities
Cons
- Unreasonably expensive
- The app’s Deep Learning technology still has a lot of room for improvement
2. Snapchat
Price: Free, but offers in-app purchases
Compatibility: iOS 10.0 or later, Android 4.4 or up
User Rating: 3.8
With more than 203 million daily users, Snapchat is one of the largest messaging platforms on the market. Previously, we’ve shared how to change gender on Snapchat , beside that, the app lets its users capture short moments or the so-called Snaps and share them with friends. In addition to hundreds of video filters , Snapchat also features a broad spectrum of voice changing effects that make Snaps more entertaining. Even so, the audio recording options Snapchat offers are far from ideal, because the app doesn’t allow you to edit the files you create with it. Using Snapchat will drain your battery quickly, which is why you must pay attention to how frequently you use this app.
Pros
- The easy voice modulation process
- Excellent messaging options
- Grants you access to a large community of likeminded people
- Lenses and filters are updated on a daily basis
Cons
- Editing voice changes after you create a Snap is not possible
- Snapchat is not primarily a voice changer app
Check the detailed information about How to Change Voice on Snapchat with 2 Easy Methods >>
3. Voice Changer
Price: Free
Compatibility: Android 4.1 and up
User Rating: 4.3
Changing your voice with this app won’t take more than a few moments of your time. You just have to launch the app and hit the microphone button to record a message or a joke you would like to modulate. Once you’re happy with the audio recording you made, you can proceed to choose from more than twenty voice effects that will make you sound like a dwarf, a robot, or an alien. The app’s file-sharing capabilities enable you to post your audio recordings to any social media platform of your choosing or store your files and use them as many times as you want.
Pros
- Entertaining and easy to use
- The simple three-step voice modulation process
- Good selection of voice filters
- Excellent file sharing options
Cons
- The app displays ads
- No audio editing tools
4. Voicy: Celebrity Voice Changer
**Price:**Free, but offers in-app purchases
Compatibility: iOS 10 or later
User Rating: 4.3
Impersonating your favorite celebrity can be a fun way to prank your friends on social media. Voicy features a broad selection of celebrity voice impersonations you can use to make you sound like a famous actress or TV personality. The app utilizes a machine learning technology that can generate more than forty avatars and allows the users to experiment with different voice effects. The free version of the app offers only limited capabilities, so if you want to gain access to all of the Voicy’s features, you must choose a weekly, monthly or an annual subscription.
Pros
- Equipped with a powerful machine learning technology
- Offers a vast selection of voice avatars
- The quick voice modification process
- A great choice if you want to make a parody
Cons
- More expensive than the competition
- Support only the English language
5. Video Voice Changer – Fun Editor
Price: Free, but offers in-app purchases
Compatibility: iOS 8.0 or later
User Rating: 4.4
Changing the voices in the videos you record with your iPhones or iPads is a straightforward process that takes a minimum amount of effort. You can either use this iOS-based app to capture videos you’re going to dub or import them from the albums in which they are stored. The Video Voice Changer app is a great option if you want to dub videos directly from your phone because it enables you to change the voices in your videos and make them sound like mice, bears or ghosts. There are over thirty voice effects to choose from, so you can easily pick the one that best fits the video you’re editing.
Pros
- Equipped with video recording tools
- Excellent dubbing features
- A rich selection of voice effects
- Allows users to share their creations on Facebook, Instagram, and other social media platforms
Cons
- You must make an in-app purchase to unlock all of the app’s features
- No audio mixing options
6. Video Voice Changer FX
**Price:**Free, but offers in-app purchases
Compatibility: Android 4.1 and up
User Rating: 4.1
This is a simple app, anyone can use to change the voices in a video. Simply upload a video file from an SD card in your phone and choose an audio effect you want to apply. The app’s collection of funny voices includes options like echo, squirrel, space ship or chipmunk. As soon as you select the voice effect you want to add to a video, the app will start generating a new video that will be saved to your phone. Sharing the videos you edit with Video Voice Changer FX to social media directly from the app is not an option.
Pros
- Fun and easy to use
- Great price to performance ratio
- Changing a voice requires just a few taps
- Allows users to switch between effects while the video is playing
Cons
- No audio or video recording capability
- Doesn’t support social media sharing
7. Squeak Voice Changer
**Price:**Free, but offers in-app purchases
Compatibility: Android 4.3 and up
User Rating: 3.9
Every joke you want to share with your online friends is going to be a little funnier if you record it with Squeak Voice Changer. You just have to tap on the Record button and choose one of the available effects. Each voice changing effect this app offers is represented by a character so you should select Jamie the Jolly if you want to make your voice sound like you’re at a party or Bruce the Sentimental Bot if you want your voice to sound artificial. All the recordings you make with Squeak Voice Changer can be easily shared on social media.
Pros
- Equipped with audio recording options
- Cute and memorable characters that represent voice effects
- Inexpensive and fun to use
- Functional app design
Cons
- Poor selection of voice effects
- The AI only recognizes the English language
8. Voice Changer with Effects
**Price:**Free
Compatibility: Android 4.1 and up
User Rating: 4.5
This Android-based app is designed to make fun and easy since voice modulation features enable you to play voice recording backward or change your voice to sound robotic or even alien. Besides recording your voice, the app also lets you modulate pre-recorded sounds and save them to your phone or use them as ringtones or notification sounds. Furthermore, the app lets you add sounds to images and share them to Facebook. The Voice Changer with Effects enables you to share all audio files you process with it to any of the most popular social media platforms.
Pros
- The app has over 50,000,000 installs
- Equipped with a text to voice feature
- Setting a new ringtone with this app is easy
- Supports editing of pre-recorded audio files
Cons
- Contains ads
- No audio or video editing options
9. Voice Changer
**Price:**Free
Compatibility: Android 4.1 and up
User Rating: 4.4
If you are looking for an Android app that lets you modulate your voice quickly and effortlessly, then Voice Changer may be one of the best options you can find on the market. You can record your voice by simply tapping on the microphone and speaking into your phone’s speaker and then apply one of the audio effects this app offers. Optionally, you can import an audio file you already recorded into the app and then apply Martian, Foreigner, Giant or Child effects to your voice recording. The best part is that you can apply each effect to the audio files you’re editing as many times as you want.
Pros
- Loads of funny effects
- Simple audio recording setup
- Intuitive and modernly designed interface
- Enables users to share audio files via Bluetooth or social media platforms
Cons
- No video editing tools
- The quality of output audio files can vary
10. Voice FX
**Price:**Free, but offers in-app purchases
Compatibility: Android 4.0.3 and up
User Rating: 3.8
Modulating voices in all types of audio files is a straightforward and fun process that can be completed in just a few taps. During the audio recording session, you can apply all voice effects to the sound you are recording and stream it live to your web browsers or media players you’re using. Voice FX changes your voice in real time, which enables you to preview your results before deciding if you want to save them. All files you export from this app will be saved in the MP3 format so you can use them as ringtones on your Android device.
Pros
- Allows users to modulate pre-recorded audio files
- Voice effects are applied in real time
- Offers live streaming features
- Exports files in the MP3 format
Cons
- Prone to glitches
- A limited selection of voice effects
11. Voice Changer Plus
**Price:**Free, but offers in-app purchases
Compatibility: iOS 8.0 or later
User Rating: 4.8
iPhone and iPad owners in need of a voice changer app that grants them complete creative freedom over the modulation of the voices they record, should consider using the Voice Changer Plus. The app features more than fifty voice effects and it provides support for voiceover recordings. Moreover, you can edit all your audio files even after you saved them, enabling you to find new ways to improve your recordings over time. Voice Changer Plus is also equipped with trim controls, so you can remove all parts of your audio files you don’t want to share with your friends on social media.
Pros
- Offers more voice effects than most of its competitors
- Provides voiceover recording options
- Users can trim their audio files
- All audio recordings can be edited after the voice modulation
Cons
- In-app purchase is required in order to unlock all of the app’s features
- Modulating audio in video files is not an option
Below is a quick comparison table among these voice changer apps, hope it will be helpful.
| App | Supported OS | User Rating | Voice Templates |
|---|---|---|---|
| Celebrity Voice Changer - Face | iOS 9.0 or later | 4.0 | Yes |
| Snapchat | iOS 10.0 or later, Android 4.4 or up | 3.8 | No |
| Voice Changer by e3games | Android 4.1 and up | 4.3 | Yes |
| Voicy: Celebrity Voice Changer | iOS 10 or later | 4.3 | Yes |
| Video Voice Changer – Fun Editor | iOS 8.0 or later | 4.4 | Yes |
| Video Voice Changer FX | Android 4.1 and up | 4.1 | Yes |
| Squeak Voice Changer | Android 4.3 and up | 3.9 | Yes |
| Voice Changer with Effects | Android 4.1 and up | 4.5 | Yes |
| Voice Changer | Android 4.1 and up | 4.4 | Yes |
| Voice FX | Android 4.0.3 and up | 3.8 | Yes |
| Voice Changer Plus | iOS 8.0 or later | 4.8 | Yes |
Conclusion
Everybody enjoys a good joke, and the apps we featured in this article enable you to have a lot of fun while experimenting with different voice modulation options. All of the voice effects these apps offer can change a voice automatically, but if you would like to alter the voices in your videos you must choose an app that supports this option. Which of the best voice changer apps for iPhone and Android devices are you going to choose? Leave a comment, and share your opinions with us.
Benjamin Arango
Benjamin Arango is a writer and a lover of all things video.
Follow @Benjamin Arango
Also read:
- New How to Record Audio on PowerPoint? Windows and Mac
- Updated In 2024, Top 5 Effective Complimentary Audio Level Optimizers
- Updated In 2024, Auditory Balance Tips on Reducing Unwanted Sibilance and Whistles
- Updated Premier 8 Voice Recognition Tools Windows, macOS & Cloud Solutions Roundup
- New The MP4 Soundscape Guide Ten Straightforward Approaches to Accessing Audio for 2024
- Updated Advanced Audio Manipulation in Adobe Premiere Pro (Windows Platform)
- New 2024 Approved Techniques for Reducing Digital Audio File Sizes
- Updated Pushing Boundaries Top 15 Revolutionary Songs in Rock for 2024
- New Amp Up Your Projects Navigating to the Best 8 Free Sound FX Hubs
- New 2024 Approved The Future of Speech Recognition Audio Conversion Into Written Language
- Updated 10 Best Nature Sounds Apps for iOS and Android
- Updated The Ultimate Fix-It Manual Strategies and Methods for Correcting Deformed Audio for 2024
- 2024 Approved Digital Listening Made Simple Acquiring and Storing Online Broadcasts on Your PC
- New How to Remove Vocals From Any Song Top 8 Song Lyrics Removers
- Updated Unlocking Free Digital Audio Capture Top 8 Applications
- Updated 2024 Approved Audio Separation Strategies Isolating Sound From Video Clips
- 2024 Approved 10 Best Websites to Download Ding Sound Effect Easily
- Updated A Comprehensive Guide to 8 Preferred Audio Capture Solutions
- Updated Discover the Best Web-Based Solutions to Elevate Your MP3 Audio Amplitude for 2024
- New 2024 Approved Audio Eradication on iOS Devices A Complete Guide to Clearer Videos
- 2024 Approved Vibrant Soundscapes 10 Melodies That Elevate Your Video Montages
- Updated Discovering the Leading 8 Voice Command Programs for Desktop and Mobile Devices
- New Clearer Soundscape Achieving Clean Audio Beds via Wondershare Filmora for 2024
- In 2024, Integrating Moving Images with Sound A Comprehensive Guide
- New In 2024, Hear & Save Discovering the Best Audio Devices for Effortless Voice Recording
- Updated In 2024, Explore the Best Selection of 7 Internet-Based Audio Trimming Utilities
- Updated Top YouTube Audio Gems for Daily Listening for 2024
- New In 2024, Audiophiles Advice Eliminating Sounds From iPhone Visual Captures
- 2024 Approved Tune-Tracking Tools 10 Highly Rated Song Recognition Apps for Android Users
- New 2024 Approved The Audionists Toolkit for Silencing Unwanted Audio Elements
- Sustaining Sonic Excellence While Changing Octave Levels in Audacity for 2024
- New In 2024, Cutting-Edge Speech Recognition Apps A Review of the Best Options
- Updated Harmonious Soundscape Selection for Modern Matrimonial Cinematography
- New In 2024, How to Record Audio on Windows 10 5 Easy Steps
- 2024 Approved How to Fade Music and Audio in iMovie on Mac?
- In 2024, The Ultimate Compilation of the Five-Best Free Audio Intensity Harmonizers
- In 2024, 5 Best Websites to Download Royalty Free Comedy Background Music
- New 2024 Approved Master Background Banishment Tool Content Creators Sharpen Your Visual Narratives
- In 2024, Advanced Voice Communication Technology for Gamers Interaction
- Updated 2024 Approved Tutorial for Creating Mute AVI Video Files Edition
- Updated Taming the Sound Waves with Audacity Seamless Setup and Removal Processes in Ubuntu
- New Acoustic Mastery Techniques for Extracting Singers with Precision
- Clearer Audio Aesthetics Removing Distractions with iMovie on macOS
- Updated Professionals Choice The Best 8 Streaming Audio Capture Tools for 2024
- In 2024, Rhythmic Realm Find and Download Top-Tier DJ Mixes
- 8 Best Rain Sound Effect Resources to Download for 2024
- SonicShifter Empowering You to Redefine Identity in Online Conversations on Skype.
- Updated In 2024, Navigating the Best 8 Free Audio Files of Natural Rain Sounds - Your Guide
- In 2024, Can I use iTools gpx file to catch the rare Pokemon On Lava Blaze Curve 5G | Dr.fone
- In 2024, Overview of the Best Honor Play 7T Screen Mirroring App | Dr.fone
- How To Remove the Two Factor Authentication From iPhone XS Max
- Top 5 Car Locator Apps for Motorola Edge 2023 | Dr.fone
- In 2024, What Pokémon Evolve with A Dawn Stone For Xiaomi Redmi Note 12 Pro 4G? | Dr.fone
- In 2024, Universal Unlock Pattern for Vivo V30 Pro
- New Sizing Up Your Photos How to Use a Ratio Calculator Effectively
- In 2024, The Most Useful Tips for Pokemon Go Ultra League On Samsung Galaxy S23 | Dr.fone
- How to Reset Oppo Reno 11F 5G without Losing Data | Dr.fone
- New 2024 Approved Rotate Your iPhone Videos for Free Top 5 Apps
- 2024 Approved Uncover the Best Green Screen Software for Mac Video Editing
- New 10 of the Best Disney Animated Shows for 2024
- Updated In 2024, Top Reasons to Check Out This Mp3 Converter Windows Guide
- Guide to Mirror Your Xiaomi Redmi Note 12 Pro+ 5G to Other Android devices | Dr.fone
- For People Wanting to Mock GPS on Honor Magic5 Ultimate Devices | Dr.fone
- Recommended Best Applications for Mirroring Your Vivo Y02T Screen | Dr.fone
- New 2024 Approved Say Goodbye to Watermarks Top 10 Free Online Video Editing Software
- Updated Beginner-Friendly Free Video Editors Cut, Trim, and Merge for 2024
- Title: New Convert Text to MP3 on Windows, Mac, Android and iPhone for 2024
- Author: Kate
- Created at : 2024-05-05 07:48:30
- Updated at : 2024-05-06 07:48:30
- Link: https://audio-editing.techidaily.com/new-convert-text-to-mp3-on-windows-mac-android-and-iphone-for-2024/
- License: This work is licensed under CC BY-NC-SA 4.0.
