:max_bytes(150000):strip_icc():format(webp)/On-Line-Job-Search-aa2565e859bd43a2aa34dfa1537dbd50.jpg)
New A Detailed Walkthrough to Preserve Your iPhones Audio Recordings

A Detailed Walkthrough to Preserve Your iPhone’s Audio Recordings
We use audio recording at all most every stage of life. Sometimes we are in class, and we record any lecture. Sometimes, something is explained in detail to you. Now are days, people share audio recordings even in an office and professional environment.
Things are always different for iPhone users. If you want to record audio on iPhone, then this article will discuss the built-in audio recorder as well as, 5 best audio recording apps for iPhone will also be shared with you.
In this article
01 How to Record Voice on iPhone?
02 5 Best Voice Recorder App for iPhone
Part 1. How to Record Voice on iPhone?
As mentioned earlier, things are a little different for iPhone users compared to Android phones. In the same way, the audio recording process is slightly different. iPhone has a built-in audio recorder, Voice Memo , that could be used to record sound on iPhone. Voice Memo is a great voice recorder. A few of its attractive features are.
- You can choose between compressed and uncompressed on Voice Memo for audio formats.
- With the search feature of this recorder, you can easily find your recordings.
- You can mark your recordings with the same name so that they can be accessed easily.
You might have a question in your mind about how to make a voice recording on iPhone? The answer to this question is shared below.
Step 1: First of all, you should locate the ‘Voice Memo’ application on your iPhone.
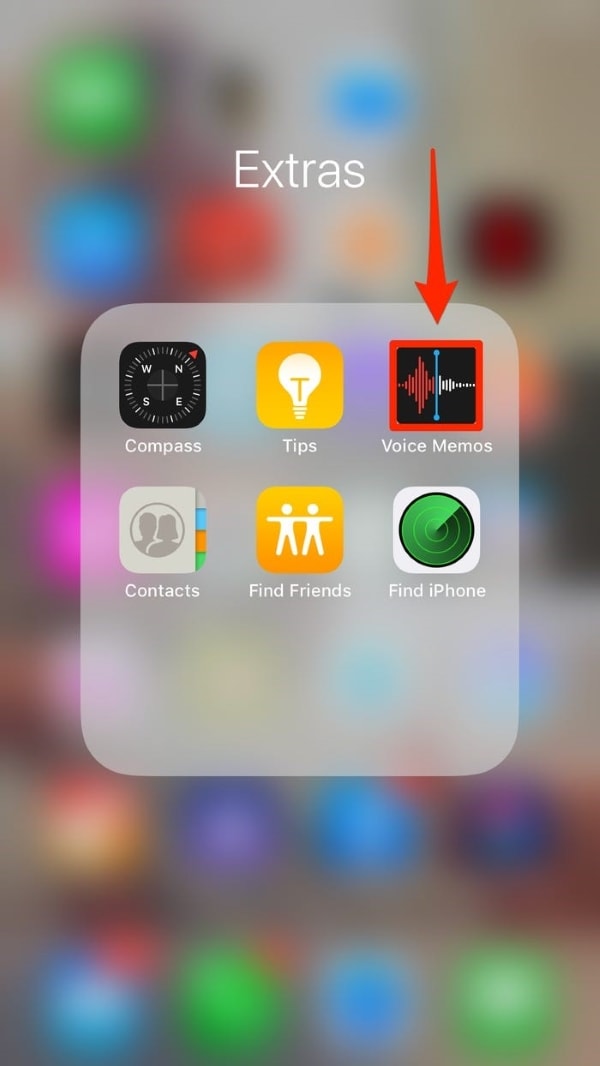
Step 2: Now, you should launch the application. You will see a big ‘Red’ button at the bottom of the screen. Simply hit that button to start the recording.
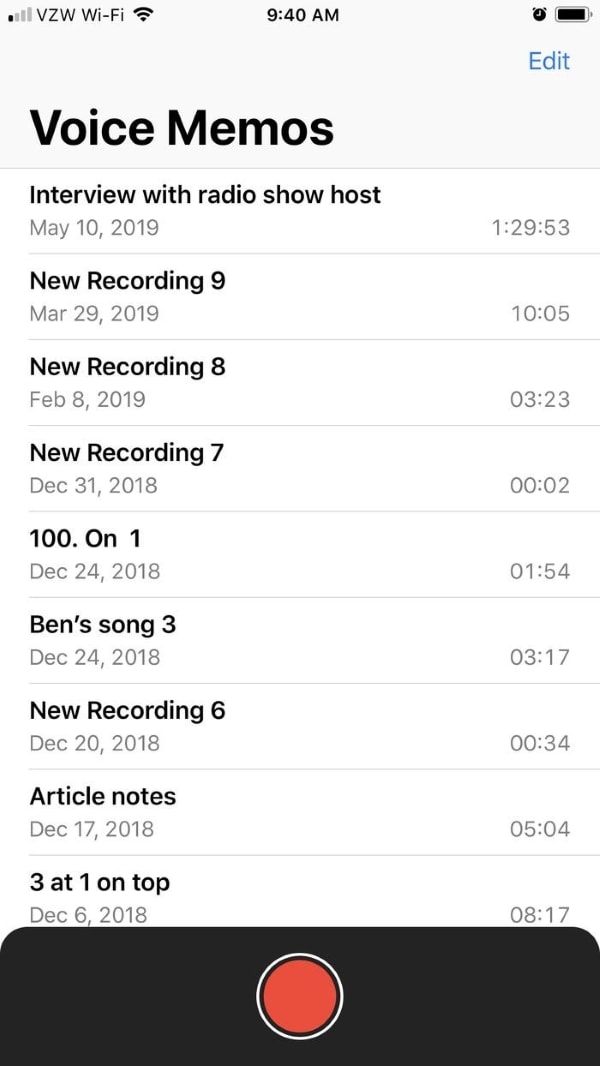
Step 3: After you are satisfied with the recording, you have to tap again on the big ‘Red’ square button to stop the audio recording.
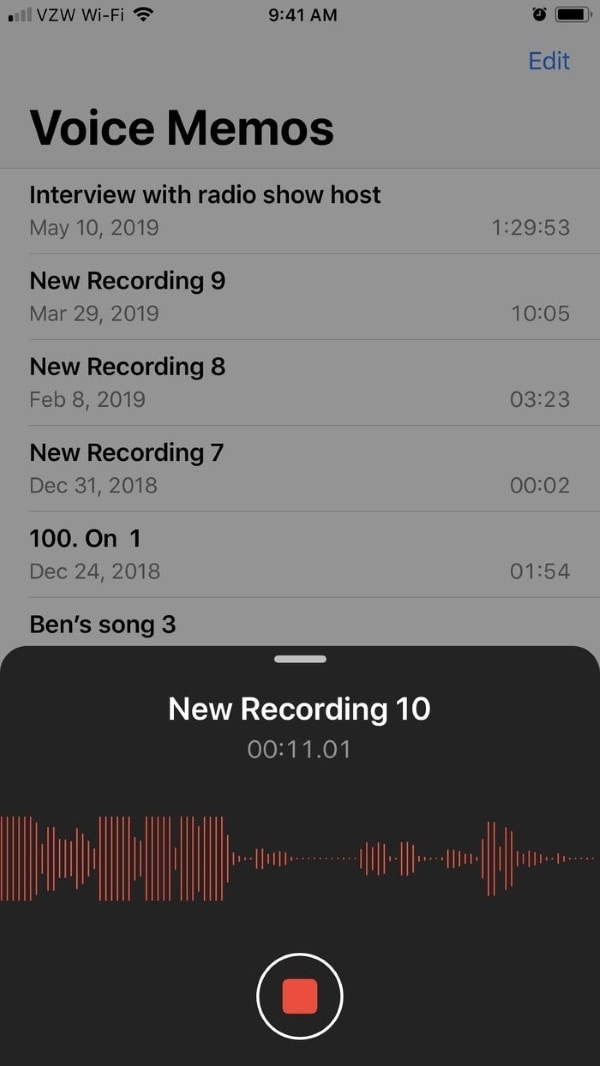
Step 4: Now, beneath the recording, you will see a ‘Delete’ option and the other option on the left side is to ‘Edit’ the recording. You can set the playback speed, skip silence and also Enhance Recording option.
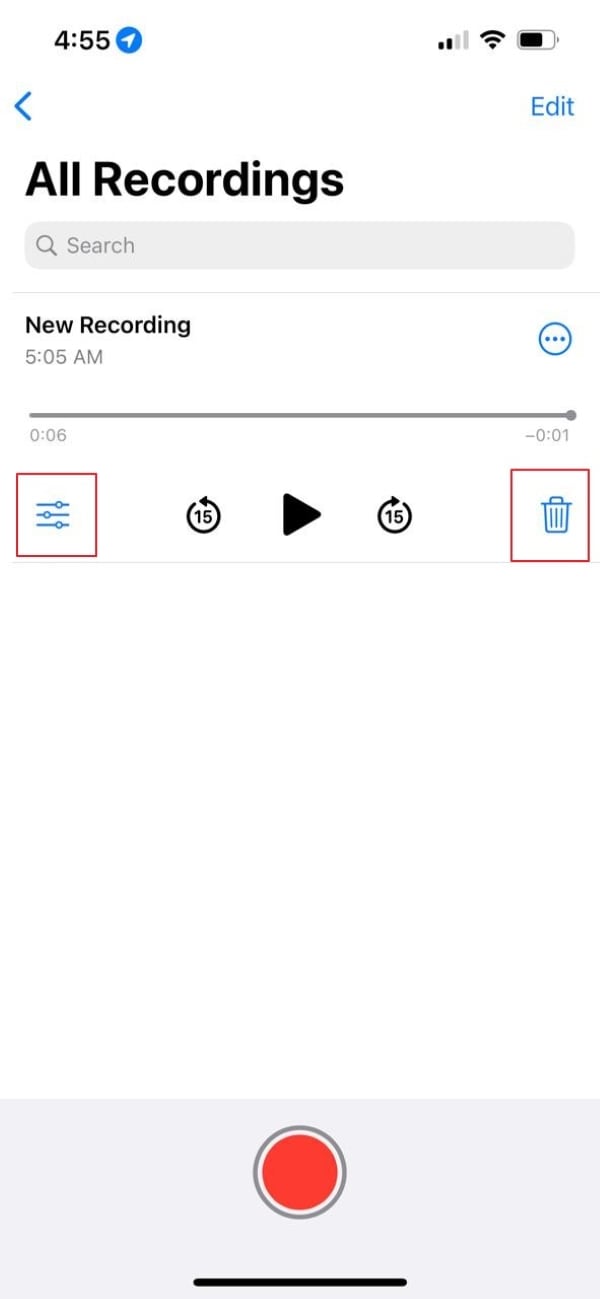
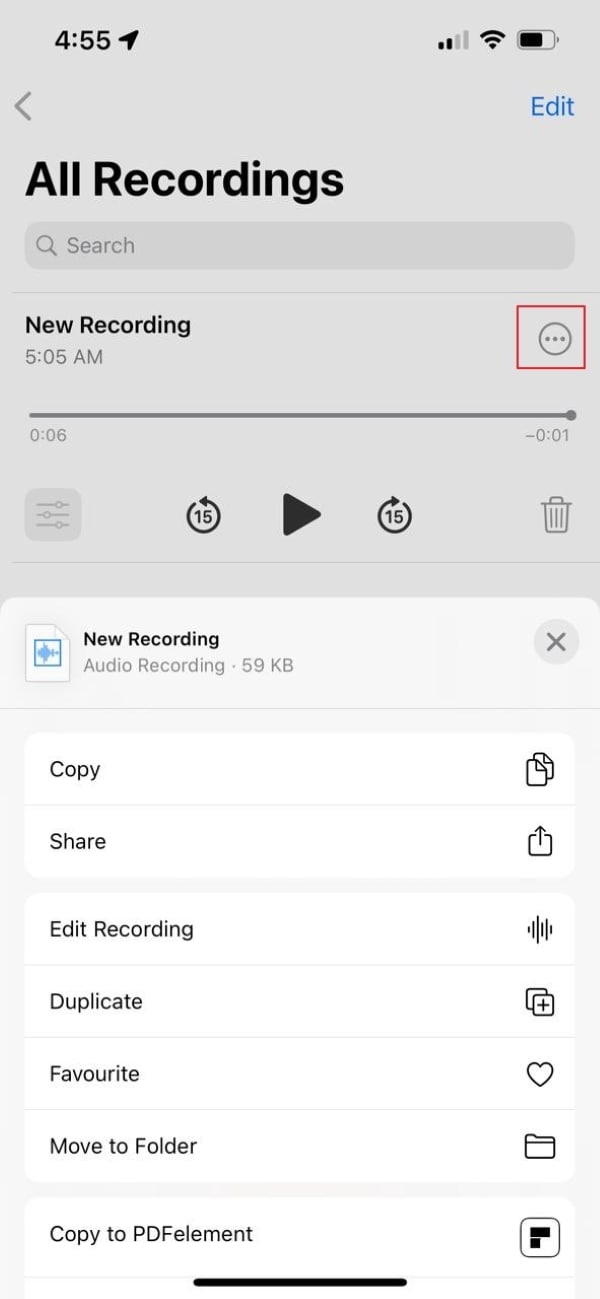
Step 5: Lastly, by clicking on the 3 vertical dots, you can copy and share your recording. The dialog box also allows you to edit, duplicate, etc.
Part 2. 5 Best Voice Recorder App for iPhone
Although iPhone has a built-in voice recorder, that has been discussed in the above section. We use different voice recording applications now and then. Here, a question arises: What could be the best audio recording app for iPhone? What could be done if you don’don’tt to use it?
There are alternative options for almost everything. In the same way, there are alternative applications that could be used to record sound on iPhone. The following section will shed light on the 5 best voice recorder iPhone applications.
1. Rev Voice Recorder & Memos
The first application to record audio on iPhone is Rev Voice Recorder. The voice recorder is customer-oriented with a very easy-to-understand interface. Rev has a very strong customer service team that deals immediately with problems if any problem is reported. Rev Voice Recorder is a free voice recorder for iPhone.
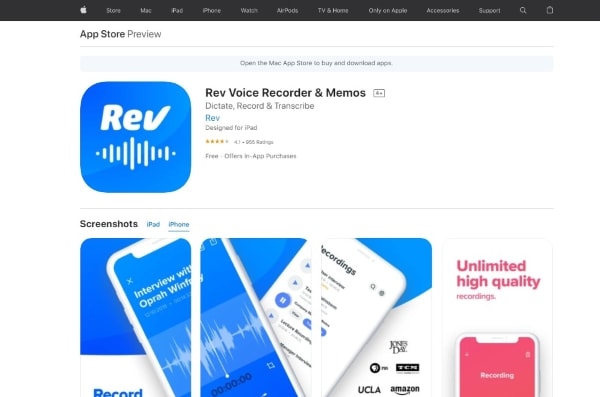
With Rev recorder, you don’don’te to struggle much as you can easily search for the recordings by name. It lets you view and then share your recordings. There are many more features of this voice recorder; let’let’sk about them.
- The most amazing thing about the Rev Voice Recorder is that it spontaneously pauses the recording for any incoming call or any other interruption.
- You can edit and trim the recording to remove any unwanted parts.
- The recorder is synced with Dropbox to backup your recordings.
- It offers high-quality voice recordings and playback.
2. Awesome Voice Recorder
The next recorder that comes in line that could be used as an alternative voice recorder iPhone is ‘Awe’ome Voice Recorder.’ Th’s recorder is great as it offers various voice recording tools. The interface is simple and basic. With Awesome Voice Recorder, you can pause your recording and then start again from where you left.
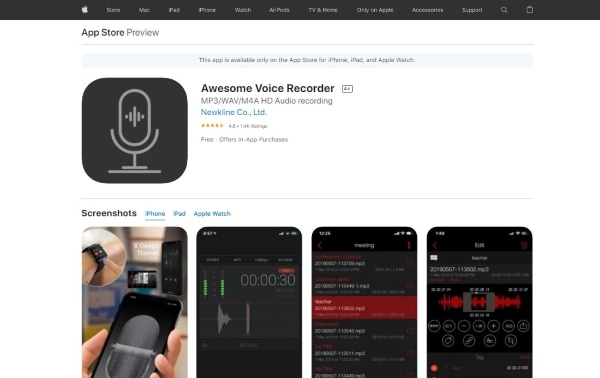
Like this, AVR has many crazy features that attract its users and facilitate them brilliantly at the same time. Let us share some of its features with you.
- The coolest thing about this recorder is that it stops in case there is any storage space problem or even a low battery.
- Awesome Voice Recorder supports Bluetooth.
- The fascinating factor of using AVR is its unlimited recording time.
- The recordings of this tool are playable in various media.
3. HT Professional Recorder
HT Professional Recorder is another awesome option to record audio on iPhone. The recorder is well known for its features and exceptional recording quality. HT Professional Recorder has this mind-blowing quality that it can record the audio even if the people talking are sitting several feet away from the iPhone.
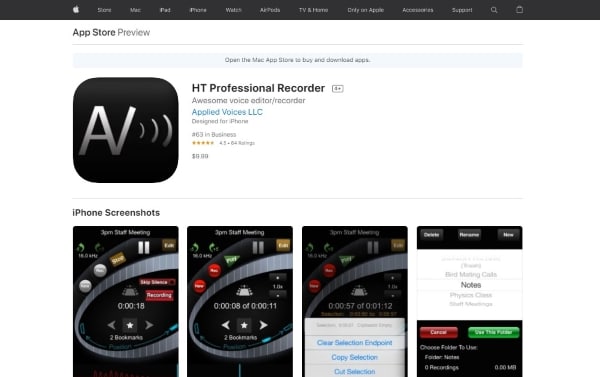
Like this, HT Professional Recorder is full of surprises. The recorder has a lot to offer. Allow us to highlight its features.
- An auto-record option automatically starts the recording as soon as the application is launched.
- This reorder offers a unique feature that you can bookmark important moments.
- The recorder spontaneously skips any silence between the recording.
- You can also transfer files to other computers via a Wi-Fi connection.
4. AudioNote 2 – Voice Recorder
Another alternate option for the audio recording app iPhone is AudioNote 2. The application is unmatchable as it uses Amplified audio recording, where the tool will adapt according to the volume level as well as the size of the room.
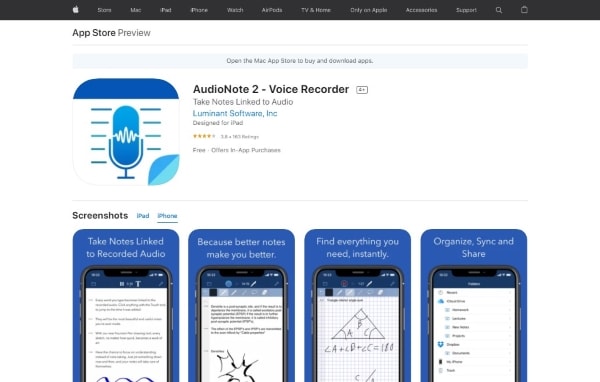
With AudioNote 2, you can pause or restart the recording any time you want to. You will learn more about this recorder after going through its features.
- The recorder lets you import any pre-recorded audio of yours, and then you can add notes to it.
- AudioNote 2 has a brilliant feature of ‘Noi’e Reduction Filter.’ Wi’h this filter, you can eliminate any extra and unwanted sound from the background.
- The recording application automatically syncs the devices with either Dropbox or iCloud.
- With this recorder, you can adjust the playback speed with pitch correction when it comes to playback.
5. Voice Recorder – Audio Record
Lastly, another best audio recording app for iPhone is Voice Recorder. The recording tool does auto-upload within seconds. You can also share your recordings on the cloud or Dropbox. Voice Recorder Audio Record has various features, few of its features are.
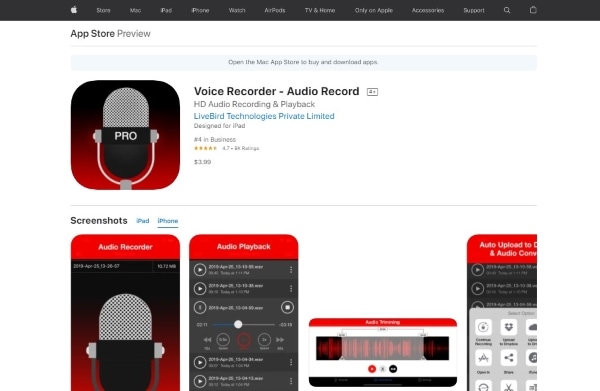
- You can easily edit and amend your recordings. It lets you trim the final version of your recording to remove any unwanted sound.
- The application is a quick audio player with multiple playback controls.
- You can easily share your recording via Dropbox or iCloud.
- The recording tool supports WAV, M4A, and CAF.
Ending Thoughts
The article is a detailed guide about the audio recording app iPhone. The audio recording for iPhone has been discussed from every possible aspect. The article also shared the steps to use the built-in voice recorder of the iPhone, and 5 amazing recording tools were also discussed.
After you have recorded the audio, there might be some problems with it. For such problems, we have Wondershare Filmora – Audio Editing. You can polish and edit your roughly recorded audio and make it smooth and flawless with Filmora.
For Win 7 or later (64-bit)
For macOS 10.12 or later
Filmora Audio Editor has multiple features. Among those, one feature is to Add Background Music to your recorded audio. Adding background music helps to maintain interest. Another feature of Audio Editing by Filmora is Split Audio. The feature is where you can split the original audio and use it like you want to. You can also Adjust Audio with Filmora Audio Editing.
Versatile Video Editor - Wondershare Filmora
An easy yet powerful editor
Numerous effects to choose from
Detailed tutorials provided by the official channel
02 5 Best Voice Recorder App for iPhone
Part 1. How to Record Voice on iPhone?
As mentioned earlier, things are a little different for iPhone users compared to Android phones. In the same way, the audio recording process is slightly different. iPhone has a built-in audio recorder, Voice Memo , that could be used to record sound on iPhone. Voice Memo is a great voice recorder. A few of its attractive features are.
- You can choose between compressed and uncompressed on Voice Memo for audio formats.
- With the search feature of this recorder, you can easily find your recordings.
- You can mark your recordings with the same name so that they can be accessed easily.
You might have a question in your mind about how to make a voice recording on iPhone? The answer to this question is shared below.
Step 1: First of all, you should locate the ‘Voice Memo’ application on your iPhone.

Step 2: Now, you should launch the application. You will see a big ‘Red’ button at the bottom of the screen. Simply hit that button to start the recording.

Step 3: After you are satisfied with the recording, you have to tap again on the big ‘Red’ square button to stop the audio recording.

Step 4: Now, beneath the recording, you will see a ‘Delete’ option and the other option on the left side is to ‘Edit’ the recording. You can set the playback speed, skip silence and also Enhance Recording option.

Step 5: Lastly, by clicking on the 3 vertical dots, you can copy and share your recording. The dialog box also allows you to edit, duplicate, etc.

Part 2. 5 Best Voice Recorder App for iPhone
Although iPhone has a built-in voice recorder, that has been discussed in the above section. We use different voice recording applications now and then. Here, a question arises: What could be the best audio recording app for iPhone? What could be done if you don’don’tt to use it?
There are alternative options for almost everything. In the same way, there are alternative applications that could be used to record sound on iPhone. The following section will shed light on the 5 best voice recorder iPhone applications.
1. Rev Voice Recorder & Memos
The first application to record audio on iPhone is Rev Voice Recorder. The voice recorder is customer-oriented with a very easy-to-understand interface. Rev has a very strong customer service team that deals immediately with problems if any problem is reported. Rev Voice Recorder is a free voice recorder for iPhone.

With Rev recorder, you don’don’te to struggle much as you can easily search for the recordings by name. It lets you view and then share your recordings. There are many more features of this voice recorder; let’let’sk about them.
- The most amazing thing about the Rev Voice Recorder is that it spontaneously pauses the recording for any incoming call or any other interruption.
- You can edit and trim the recording to remove any unwanted parts.
- The recorder is synced with Dropbox to backup your recordings.
- It offers high-quality voice recordings and playback.
2. Awesome Voice Recorder
The next recorder that comes in line that could be used as an alternative voice recorder iPhone is ‘Awe’ome Voice Recorder.’ Th’s recorder is great as it offers various voice recording tools. The interface is simple and basic. With Awesome Voice Recorder, you can pause your recording and then start again from where you left.

Like this, AVR has many crazy features that attract its users and facilitate them brilliantly at the same time. Let us share some of its features with you.
- The coolest thing about this recorder is that it stops in case there is any storage space problem or even a low battery.
- Awesome Voice Recorder supports Bluetooth.
- The fascinating factor of using AVR is its unlimited recording time.
- The recordings of this tool are playable in various media.
3. HT Professional Recorder
HT Professional Recorder is another awesome option to record audio on iPhone. The recorder is well known for its features and exceptional recording quality. HT Professional Recorder has this mind-blowing quality that it can record the audio even if the people talking are sitting several feet away from the iPhone.

Like this, HT Professional Recorder is full of surprises. The recorder has a lot to offer. Allow us to highlight its features.
- An auto-record option automatically starts the recording as soon as the application is launched.
- This reorder offers a unique feature that you can bookmark important moments.
- The recorder spontaneously skips any silence between the recording.
- You can also transfer files to other computers via a Wi-Fi connection.
4. AudioNote 2 – Voice Recorder
Another alternate option for the audio recording app iPhone is AudioNote 2. The application is unmatchable as it uses Amplified audio recording, where the tool will adapt according to the volume level as well as the size of the room.

With AudioNote 2, you can pause or restart the recording any time you want to. You will learn more about this recorder after going through its features.
- The recorder lets you import any pre-recorded audio of yours, and then you can add notes to it.
- AudioNote 2 has a brilliant feature of ‘Noi’e Reduction Filter.’ Wi’h this filter, you can eliminate any extra and unwanted sound from the background.
- The recording application automatically syncs the devices with either Dropbox or iCloud.
- With this recorder, you can adjust the playback speed with pitch correction when it comes to playback.
5. Voice Recorder – Audio Record
Lastly, another best audio recording app for iPhone is Voice Recorder. The recording tool does auto-upload within seconds. You can also share your recordings on the cloud or Dropbox. Voice Recorder Audio Record has various features, few of its features are.

- You can easily edit and amend your recordings. It lets you trim the final version of your recording to remove any unwanted sound.
- The application is a quick audio player with multiple playback controls.
- You can easily share your recording via Dropbox or iCloud.
- The recording tool supports WAV, M4A, and CAF.
Ending Thoughts
The article is a detailed guide about the audio recording app iPhone. The audio recording for iPhone has been discussed from every possible aspect. The article also shared the steps to use the built-in voice recorder of the iPhone, and 5 amazing recording tools were also discussed.
After you have recorded the audio, there might be some problems with it. For such problems, we have Wondershare Filmora – Audio Editing. You can polish and edit your roughly recorded audio and make it smooth and flawless with Filmora.
For Win 7 or later (64-bit)
For macOS 10.12 or later
Filmora Audio Editor has multiple features. Among those, one feature is to Add Background Music to your recorded audio. Adding background music helps to maintain interest. Another feature of Audio Editing by Filmora is Split Audio. The feature is where you can split the original audio and use it like you want to. You can also Adjust Audio with Filmora Audio Editing.
Versatile Video Editor - Wondershare Filmora
An easy yet powerful editor
Numerous effects to choose from
Detailed tutorials provided by the official channel
02 5 Best Voice Recorder App for iPhone
Part 1. How to Record Voice on iPhone?
As mentioned earlier, things are a little different for iPhone users compared to Android phones. In the same way, the audio recording process is slightly different. iPhone has a built-in audio recorder, Voice Memo , that could be used to record sound on iPhone. Voice Memo is a great voice recorder. A few of its attractive features are.
- You can choose between compressed and uncompressed on Voice Memo for audio formats.
- With the search feature of this recorder, you can easily find your recordings.
- You can mark your recordings with the same name so that they can be accessed easily.
You might have a question in your mind about how to make a voice recording on iPhone? The answer to this question is shared below.
Step 1: First of all, you should locate the ‘Voice Memo’ application on your iPhone.

Step 2: Now, you should launch the application. You will see a big ‘Red’ button at the bottom of the screen. Simply hit that button to start the recording.

Step 3: After you are satisfied with the recording, you have to tap again on the big ‘Red’ square button to stop the audio recording.

Step 4: Now, beneath the recording, you will see a ‘Delete’ option and the other option on the left side is to ‘Edit’ the recording. You can set the playback speed, skip silence and also Enhance Recording option.

Step 5: Lastly, by clicking on the 3 vertical dots, you can copy and share your recording. The dialog box also allows you to edit, duplicate, etc.

Part 2. 5 Best Voice Recorder App for iPhone
Although iPhone has a built-in voice recorder, that has been discussed in the above section. We use different voice recording applications now and then. Here, a question arises: What could be the best audio recording app for iPhone? What could be done if you don’don’tt to use it?
There are alternative options for almost everything. In the same way, there are alternative applications that could be used to record sound on iPhone. The following section will shed light on the 5 best voice recorder iPhone applications.
1. Rev Voice Recorder & Memos
The first application to record audio on iPhone is Rev Voice Recorder. The voice recorder is customer-oriented with a very easy-to-understand interface. Rev has a very strong customer service team that deals immediately with problems if any problem is reported. Rev Voice Recorder is a free voice recorder for iPhone.

With Rev recorder, you don’don’te to struggle much as you can easily search for the recordings by name. It lets you view and then share your recordings. There are many more features of this voice recorder; let’let’sk about them.
- The most amazing thing about the Rev Voice Recorder is that it spontaneously pauses the recording for any incoming call or any other interruption.
- You can edit and trim the recording to remove any unwanted parts.
- The recorder is synced with Dropbox to backup your recordings.
- It offers high-quality voice recordings and playback.
2. Awesome Voice Recorder
The next recorder that comes in line that could be used as an alternative voice recorder iPhone is ‘Awe’ome Voice Recorder.’ Th’s recorder is great as it offers various voice recording tools. The interface is simple and basic. With Awesome Voice Recorder, you can pause your recording and then start again from where you left.

Like this, AVR has many crazy features that attract its users and facilitate them brilliantly at the same time. Let us share some of its features with you.
- The coolest thing about this recorder is that it stops in case there is any storage space problem or even a low battery.
- Awesome Voice Recorder supports Bluetooth.
- The fascinating factor of using AVR is its unlimited recording time.
- The recordings of this tool are playable in various media.
3. HT Professional Recorder
HT Professional Recorder is another awesome option to record audio on iPhone. The recorder is well known for its features and exceptional recording quality. HT Professional Recorder has this mind-blowing quality that it can record the audio even if the people talking are sitting several feet away from the iPhone.

Like this, HT Professional Recorder is full of surprises. The recorder has a lot to offer. Allow us to highlight its features.
- An auto-record option automatically starts the recording as soon as the application is launched.
- This reorder offers a unique feature that you can bookmark important moments.
- The recorder spontaneously skips any silence between the recording.
- You can also transfer files to other computers via a Wi-Fi connection.
4. AudioNote 2 – Voice Recorder
Another alternate option for the audio recording app iPhone is AudioNote 2. The application is unmatchable as it uses Amplified audio recording, where the tool will adapt according to the volume level as well as the size of the room.

With AudioNote 2, you can pause or restart the recording any time you want to. You will learn more about this recorder after going through its features.
- The recorder lets you import any pre-recorded audio of yours, and then you can add notes to it.
- AudioNote 2 has a brilliant feature of ‘Noi’e Reduction Filter.’ Wi’h this filter, you can eliminate any extra and unwanted sound from the background.
- The recording application automatically syncs the devices with either Dropbox or iCloud.
- With this recorder, you can adjust the playback speed with pitch correction when it comes to playback.
5. Voice Recorder – Audio Record
Lastly, another best audio recording app for iPhone is Voice Recorder. The recording tool does auto-upload within seconds. You can also share your recordings on the cloud or Dropbox. Voice Recorder Audio Record has various features, few of its features are.

- You can easily edit and amend your recordings. It lets you trim the final version of your recording to remove any unwanted sound.
- The application is a quick audio player with multiple playback controls.
- You can easily share your recording via Dropbox or iCloud.
- The recording tool supports WAV, M4A, and CAF.
Ending Thoughts
The article is a detailed guide about the audio recording app iPhone. The audio recording for iPhone has been discussed from every possible aspect. The article also shared the steps to use the built-in voice recorder of the iPhone, and 5 amazing recording tools were also discussed.
After you have recorded the audio, there might be some problems with it. For such problems, we have Wondershare Filmora – Audio Editing. You can polish and edit your roughly recorded audio and make it smooth and flawless with Filmora.
For Win 7 or later (64-bit)
For macOS 10.12 or later
Filmora Audio Editor has multiple features. Among those, one feature is to Add Background Music to your recorded audio. Adding background music helps to maintain interest. Another feature of Audio Editing by Filmora is Split Audio. The feature is where you can split the original audio and use it like you want to. You can also Adjust Audio with Filmora Audio Editing.
Versatile Video Editor - Wondershare Filmora
An easy yet powerful editor
Numerous effects to choose from
Detailed tutorials provided by the official channel
02 5 Best Voice Recorder App for iPhone
Part 1. How to Record Voice on iPhone?
As mentioned earlier, things are a little different for iPhone users compared to Android phones. In the same way, the audio recording process is slightly different. iPhone has a built-in audio recorder, Voice Memo , that could be used to record sound on iPhone. Voice Memo is a great voice recorder. A few of its attractive features are.
- You can choose between compressed and uncompressed on Voice Memo for audio formats.
- With the search feature of this recorder, you can easily find your recordings.
- You can mark your recordings with the same name so that they can be accessed easily.
You might have a question in your mind about how to make a voice recording on iPhone? The answer to this question is shared below.
Step 1: First of all, you should locate the ‘Voice Memo’ application on your iPhone.

Step 2: Now, you should launch the application. You will see a big ‘Red’ button at the bottom of the screen. Simply hit that button to start the recording.

Step 3: After you are satisfied with the recording, you have to tap again on the big ‘Red’ square button to stop the audio recording.

Step 4: Now, beneath the recording, you will see a ‘Delete’ option and the other option on the left side is to ‘Edit’ the recording. You can set the playback speed, skip silence and also Enhance Recording option.

Step 5: Lastly, by clicking on the 3 vertical dots, you can copy and share your recording. The dialog box also allows you to edit, duplicate, etc.

Part 2. 5 Best Voice Recorder App for iPhone
Although iPhone has a built-in voice recorder, that has been discussed in the above section. We use different voice recording applications now and then. Here, a question arises: What could be the best audio recording app for iPhone? What could be done if you don’don’tt to use it?
There are alternative options for almost everything. In the same way, there are alternative applications that could be used to record sound on iPhone. The following section will shed light on the 5 best voice recorder iPhone applications.
1. Rev Voice Recorder & Memos
The first application to record audio on iPhone is Rev Voice Recorder. The voice recorder is customer-oriented with a very easy-to-understand interface. Rev has a very strong customer service team that deals immediately with problems if any problem is reported. Rev Voice Recorder is a free voice recorder for iPhone.

With Rev recorder, you don’don’te to struggle much as you can easily search for the recordings by name. It lets you view and then share your recordings. There are many more features of this voice recorder; let’let’sk about them.
- The most amazing thing about the Rev Voice Recorder is that it spontaneously pauses the recording for any incoming call or any other interruption.
- You can edit and trim the recording to remove any unwanted parts.
- The recorder is synced with Dropbox to backup your recordings.
- It offers high-quality voice recordings and playback.
2. Awesome Voice Recorder
The next recorder that comes in line that could be used as an alternative voice recorder iPhone is ‘Awe’ome Voice Recorder.’ Th’s recorder is great as it offers various voice recording tools. The interface is simple and basic. With Awesome Voice Recorder, you can pause your recording and then start again from where you left.

Like this, AVR has many crazy features that attract its users and facilitate them brilliantly at the same time. Let us share some of its features with you.
- The coolest thing about this recorder is that it stops in case there is any storage space problem or even a low battery.
- Awesome Voice Recorder supports Bluetooth.
- The fascinating factor of using AVR is its unlimited recording time.
- The recordings of this tool are playable in various media.
3. HT Professional Recorder
HT Professional Recorder is another awesome option to record audio on iPhone. The recorder is well known for its features and exceptional recording quality. HT Professional Recorder has this mind-blowing quality that it can record the audio even if the people talking are sitting several feet away from the iPhone.

Like this, HT Professional Recorder is full of surprises. The recorder has a lot to offer. Allow us to highlight its features.
- An auto-record option automatically starts the recording as soon as the application is launched.
- This reorder offers a unique feature that you can bookmark important moments.
- The recorder spontaneously skips any silence between the recording.
- You can also transfer files to other computers via a Wi-Fi connection.
4. AudioNote 2 – Voice Recorder
Another alternate option for the audio recording app iPhone is AudioNote 2. The application is unmatchable as it uses Amplified audio recording, where the tool will adapt according to the volume level as well as the size of the room.

With AudioNote 2, you can pause or restart the recording any time you want to. You will learn more about this recorder after going through its features.
- The recorder lets you import any pre-recorded audio of yours, and then you can add notes to it.
- AudioNote 2 has a brilliant feature of ‘Noi’e Reduction Filter.’ Wi’h this filter, you can eliminate any extra and unwanted sound from the background.
- The recording application automatically syncs the devices with either Dropbox or iCloud.
- With this recorder, you can adjust the playback speed with pitch correction when it comes to playback.
5. Voice Recorder – Audio Record
Lastly, another best audio recording app for iPhone is Voice Recorder. The recording tool does auto-upload within seconds. You can also share your recordings on the cloud or Dropbox. Voice Recorder Audio Record has various features, few of its features are.

- You can easily edit and amend your recordings. It lets you trim the final version of your recording to remove any unwanted sound.
- The application is a quick audio player with multiple playback controls.
- You can easily share your recording via Dropbox or iCloud.
- The recording tool supports WAV, M4A, and CAF.
Ending Thoughts
The article is a detailed guide about the audio recording app iPhone. The audio recording for iPhone has been discussed from every possible aspect. The article also shared the steps to use the built-in voice recorder of the iPhone, and 5 amazing recording tools were also discussed.
After you have recorded the audio, there might be some problems with it. For such problems, we have Wondershare Filmora – Audio Editing. You can polish and edit your roughly recorded audio and make it smooth and flawless with Filmora.
For Win 7 or later (64-bit)
For macOS 10.12 or later
Filmora Audio Editor has multiple features. Among those, one feature is to Add Background Music to your recorded audio. Adding background music helps to maintain interest. Another feature of Audio Editing by Filmora is Split Audio. The feature is where you can split the original audio and use it like you want to. You can also Adjust Audio with Filmora Audio Editing.
Versatile Video Editor - Wondershare Filmora
An easy yet powerful editor
Numerous effects to choose from
Detailed tutorials provided by the official channel
The Audio Architect’s Guide to Stripping Down Beats Online
Many drummers are interested in getting the best out of audio tracks. With drum remover online tools readily available, it is now easier to do this. A good drum extract online tool will help you practice playing the drums to your favorite songs. It is also a great way for DJs and beatmakers to make drum loops and fills. In this article, we explore the readily available drum extract free online tools that help in achieving this and more.
AI Vocal Remover A cross-platform for facilitating your video editing process by offering valuable benefits!
Free Download Free Download Learn More

Part 1. How to Remove Drums From Any Song: 2 Easy Methods
You’ve probably been there. Wanted to make a drum cover video of our favorite song, but did not know if a drumless version exists. You may have wondered whether there is a way to isolate and remove a drum track easily. Luckily, there are several drum extract free download tools that you can use to take the drums out of any song with just a few clicks. Tools like Media.io . UniConverter , Moises.ai , and LALAL.ai are known to effectively remove drums from audio files. Let’s have a look at the techniques that you can use:
1. Extract Drums from a Song Online With A Web App
Using an online web app is one of the easiest ways to extract drums from your song tracks. This is a great approach for beginners or people who do not have production experience. Probably you do not want to waste time finding the audio files, converting them from iTunes, and bringing them into a DAW. A digital audio workstation (DAW) is an electronic system that is designed for recording, editing, and playing back digital audio files. It usually plays the following functions:
- Loading and editing audio
- Recording new tracks
- Mixing and applying effects
- Mastering
- Exporting finished mixes
After bringing the files to the DAW, you still have to remove drums manually for the song. The process will have a lot of clicking and file management that will take time and extra effort. With a web app drum extractor, the process is super easy. Take Moises.ai , for instance, users extract drums from any public media URL in minutes.
This makes it a great choice when removing drums from music on SoundCloud or the latest video of YouTube. Why would you try Moises.ai?
- Cloud-based AI application – Effectively extracts drums from any public media URL
- User-friendly UI – The platform is simple and easy to use for all experience levels
- Keep Track of Progress – The Moises.ai dashboard keeps a library of all songs you have isolated, allowing you to playback and download on-demand
- Download Separate Files – Once your original audio file has been separated, you can download the vocals, drums, beats, and bass files to your local PC
- Free Version is Available – Try out the service on the free version before committing your money
Although some tracks will not isolate the best with this web app, it gets the work done. Once you download the files, it is easy to bring the songs into DAW to play along. The process makes it simple to create drum covers fast that you can play along with other web mixers.
2. Extract Drums from a Song Online with VST Plugins
For those who want to do more of the work, VST plugins for removing drums from music are a great option. These are software modules that take the form of real-time effects or instruments. They may also have MIDI effects, giving more freedom with audio editing, The inability to adjust or customize settings when extracting drums from a soundtrack is one of the major downfalls of a web-based application. With VST plugins, this issue is no longer a concern.
With VSTs, you are more flexible and able to deliver better results. They are often used in applications that support VST technology, including Cakewalk Sonar, Steinberg Cubase, Sound Forge Pro, Ableton Live, and many others. Some of the most common ones include:
- AudioSourceRe
- UNMIX Drums
- XTrax Stem 2
- Drum Extract
VST plugins are great for customizing your audio results. You have two ways to remove drums from a song using a VST plugin and DAW: using a compressor or an equalizer. When good results are not forthcoming, you can try to EQ or equalize frequencies that seem out of the soundtrack. This will lower the perceived volume of the drums, providing clearer vocals. Another approach is to use a parametric equalizer by reducing the frequencies by some dB for precise results.
- 4k (cymbals)
- 90 Hz (kick drum)
- 150 Hz (snare drum)
Just play around with the EQ, mixing your drum tracks above the recordings. The end will be your kit’s flaming against the original recording for perfect results.
Part 2. Remove and Edit Drums in Audio with Filmora
Removing drums from a song becomes easier with the right tools. In most cases, you will want to remove the drums and process your audio file further. Probably use the file to prepare for karaoke or editing videos on YouTube or TikTok. With Wondershare Filmora, you get to do all this and more. The most recent Filmora Version 13 is an excellent choice for editing audio files on the go. It comes with some amazing AI features that make it super simple to separate vocals, beats, drums, piano, and more in audio tracks.
Free Download For Win 7 or later(64-bit)
Free Download For macOS 10.14 or later
AI Vocal Remover
Extracting drums from songs is made easier with Filmora’s AI Vocal Remover. The AI feature accurately separates vocals and drums from any song in minutes. It is also a great tool for extracting acapella from audio tracks and dubbing videos freely by removing vocals. With the ability to keep the same high-quality for audio and video when removing the vocals, the feature is effective for different kinds of projects:
- Remove Vocals from Audio – With only one click, the feature removes vocals from audio while maintaining high-quality production. This means you can dub any video without covering up the current and create great drum soundtracks within minutes.
- Effective Vocal Separation – The AI-powered feature isolates vocals with exceptional quality without losing the fidelity of your audio. It saves you time and effort that you would have spent doing all that manually.
- Listen to Results Instantly: With Filmora, you do not have to download your processed files to listen to the results. Simply preview and listen to the results in the editor to make sure you are getting the results that you want.
- Remove Other Audio Elements from the Video: The AI Vocal Remover allows you to remove vocals and other audio elements, including drums. You may also go further to remove any unwanted audio elements to enhance your video editing process.
- Dub Videos with Minimal Efforts – The feature allows you to completely remove the original recording and input your own fresh ones. This helps you create highly professional and clearly dubbed videos.
How to Extract Drums from Songs with AI Vocal Remover
The AI Vocal Remover feature on Filmora offers a simple and easy way to extract drums from your favorite songs. Here is a quick guide on how to use the feature:
Step 1Launch Filmora
To start using the AI Vocal Remover feature, launch Filmora on your desktop. Then click “New Project” in the startup window to prepare the software for the next steps.
Step 2Import Your Song or Sound Track
On the customer toolbar, select “Media” and then click on the “Files” icon. This will allow you to import the files you want to edit with Filmora.
Step 3Start the AI Vocal Remover Feature
Drag and drop the files you have imported to Filmora to the timeline so you can start the editing process. Select the song you want to edit in the timeline and select “Audio” option. Then click AI Vocal Remover from the options available. Navigate the AI Vocal Remover to edit the audio as desired.
Conclusion
You may want to extract drums from your favorite songs for various reasons. Maybe you want to create a drum cover video on the latest song or have a drumless version of a certain soundtrack. There are several ways to isolate and remove drums from tracks with ease. Using a web-based drum remover tool or VST plugins is the most common option. However, Wondershare Filmora offers some amazing features that allow you to extract drums from your songs and do more. You get to edit your files further and achieve greater quality.
Free Download Free Download Learn More

Part 1. How to Remove Drums From Any Song: 2 Easy Methods
You’ve probably been there. Wanted to make a drum cover video of our favorite song, but did not know if a drumless version exists. You may have wondered whether there is a way to isolate and remove a drum track easily. Luckily, there are several drum extract free download tools that you can use to take the drums out of any song with just a few clicks. Tools like Media.io . UniConverter , Moises.ai , and LALAL.ai are known to effectively remove drums from audio files. Let’s have a look at the techniques that you can use:
1. Extract Drums from a Song Online With A Web App
Using an online web app is one of the easiest ways to extract drums from your song tracks. This is a great approach for beginners or people who do not have production experience. Probably you do not want to waste time finding the audio files, converting them from iTunes, and bringing them into a DAW. A digital audio workstation (DAW) is an electronic system that is designed for recording, editing, and playing back digital audio files. It usually plays the following functions:
- Loading and editing audio
- Recording new tracks
- Mixing and applying effects
- Mastering
- Exporting finished mixes
After bringing the files to the DAW, you still have to remove drums manually for the song. The process will have a lot of clicking and file management that will take time and extra effort. With a web app drum extractor, the process is super easy. Take Moises.ai , for instance, users extract drums from any public media URL in minutes.
This makes it a great choice when removing drums from music on SoundCloud or the latest video of YouTube. Why would you try Moises.ai?
- Cloud-based AI application – Effectively extracts drums from any public media URL
- User-friendly UI – The platform is simple and easy to use for all experience levels
- Keep Track of Progress – The Moises.ai dashboard keeps a library of all songs you have isolated, allowing you to playback and download on-demand
- Download Separate Files – Once your original audio file has been separated, you can download the vocals, drums, beats, and bass files to your local PC
- Free Version is Available – Try out the service on the free version before committing your money
Although some tracks will not isolate the best with this web app, it gets the work done. Once you download the files, it is easy to bring the songs into DAW to play along. The process makes it simple to create drum covers fast that you can play along with other web mixers.
2. Extract Drums from a Song Online with VST Plugins
For those who want to do more of the work, VST plugins for removing drums from music are a great option. These are software modules that take the form of real-time effects or instruments. They may also have MIDI effects, giving more freedom with audio editing, The inability to adjust or customize settings when extracting drums from a soundtrack is one of the major downfalls of a web-based application. With VST plugins, this issue is no longer a concern.
With VSTs, you are more flexible and able to deliver better results. They are often used in applications that support VST technology, including Cakewalk Sonar, Steinberg Cubase, Sound Forge Pro, Ableton Live, and many others. Some of the most common ones include:
- AudioSourceRe
- UNMIX Drums
- XTrax Stem 2
- Drum Extract
VST plugins are great for customizing your audio results. You have two ways to remove drums from a song using a VST plugin and DAW: using a compressor or an equalizer. When good results are not forthcoming, you can try to EQ or equalize frequencies that seem out of the soundtrack. This will lower the perceived volume of the drums, providing clearer vocals. Another approach is to use a parametric equalizer by reducing the frequencies by some dB for precise results.
- 4k (cymbals)
- 90 Hz (kick drum)
- 150 Hz (snare drum)
Just play around with the EQ, mixing your drum tracks above the recordings. The end will be your kit’s flaming against the original recording for perfect results.
Part 2. Remove and Edit Drums in Audio with Filmora
Removing drums from a song becomes easier with the right tools. In most cases, you will want to remove the drums and process your audio file further. Probably use the file to prepare for karaoke or editing videos on YouTube or TikTok. With Wondershare Filmora, you get to do all this and more. The most recent Filmora Version 13 is an excellent choice for editing audio files on the go. It comes with some amazing AI features that make it super simple to separate vocals, beats, drums, piano, and more in audio tracks.
Free Download For Win 7 or later(64-bit)
Free Download For macOS 10.14 or later
AI Vocal Remover
Extracting drums from songs is made easier with Filmora’s AI Vocal Remover. The AI feature accurately separates vocals and drums from any song in minutes. It is also a great tool for extracting acapella from audio tracks and dubbing videos freely by removing vocals. With the ability to keep the same high-quality for audio and video when removing the vocals, the feature is effective for different kinds of projects:
- Remove Vocals from Audio – With only one click, the feature removes vocals from audio while maintaining high-quality production. This means you can dub any video without covering up the current and create great drum soundtracks within minutes.
- Effective Vocal Separation – The AI-powered feature isolates vocals with exceptional quality without losing the fidelity of your audio. It saves you time and effort that you would have spent doing all that manually.
- Listen to Results Instantly: With Filmora, you do not have to download your processed files to listen to the results. Simply preview and listen to the results in the editor to make sure you are getting the results that you want.
- Remove Other Audio Elements from the Video: The AI Vocal Remover allows you to remove vocals and other audio elements, including drums. You may also go further to remove any unwanted audio elements to enhance your video editing process.
- Dub Videos with Minimal Efforts – The feature allows you to completely remove the original recording and input your own fresh ones. This helps you create highly professional and clearly dubbed videos.
How to Extract Drums from Songs with AI Vocal Remover
The AI Vocal Remover feature on Filmora offers a simple and easy way to extract drums from your favorite songs. Here is a quick guide on how to use the feature:
Step 1Launch Filmora
To start using the AI Vocal Remover feature, launch Filmora on your desktop. Then click “New Project” in the startup window to prepare the software for the next steps.
Step 2Import Your Song or Sound Track
On the customer toolbar, select “Media” and then click on the “Files” icon. This will allow you to import the files you want to edit with Filmora.
Step 3Start the AI Vocal Remover Feature
Drag and drop the files you have imported to Filmora to the timeline so you can start the editing process. Select the song you want to edit in the timeline and select “Audio” option. Then click AI Vocal Remover from the options available. Navigate the AI Vocal Remover to edit the audio as desired.
Conclusion
You may want to extract drums from your favorite songs for various reasons. Maybe you want to create a drum cover video on the latest song or have a drumless version of a certain soundtrack. There are several ways to isolate and remove drums from tracks with ease. Using a web-based drum remover tool or VST plugins is the most common option. However, Wondershare Filmora offers some amazing features that allow you to extract drums from your songs and do more. You get to edit your files further and achieve greater quality.
The Editor’s Manual: Mastering the Art of Attaching and Aligning Soundtracks in Final Cut Pro
Everyone does not have expertise in using the Final Cut Pro. Some are beginners and completely new to the tool. These are always looking for proper support and want to know how to add music to final cut pro. In case you are one of these individuals, you should be focused on proper procedure and follow it step-by-step. In the upcoming paragraphs, you will get complete information about it.

In this article
01 [Add Music To Final Cut Pro](#Part 1)
02 [Alternative For Final Cut Pro To Add Music To Video](#Part 2)
Part 1 Add Music To Final Cut Pro
Are you interested to figure out the best possible method to add music files to Final Cut Pro for video creation and other purposes? If you are looking for such an option, you should be focused on the following process.
Step1 Access Final Cut Pro
Firstly, you should focus on accessing the Final Cut Pro. You should check out the application on your desktop and open it.
Step2 Go To File
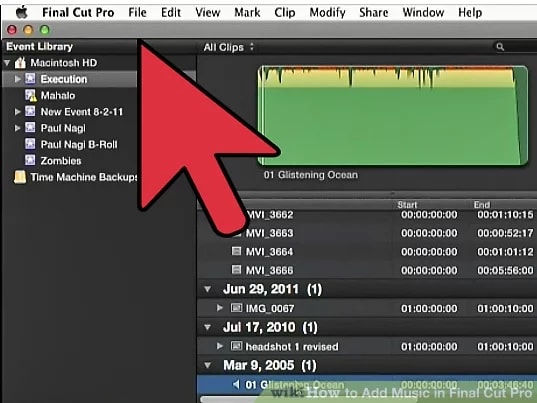
After accessing the Final Cut Pro, you can see multiple options and menus on the interface. Here, you should navigate to the ‘FILE’ option. You can find out this particular option on the top of the navigation bar.
Step3 Access File
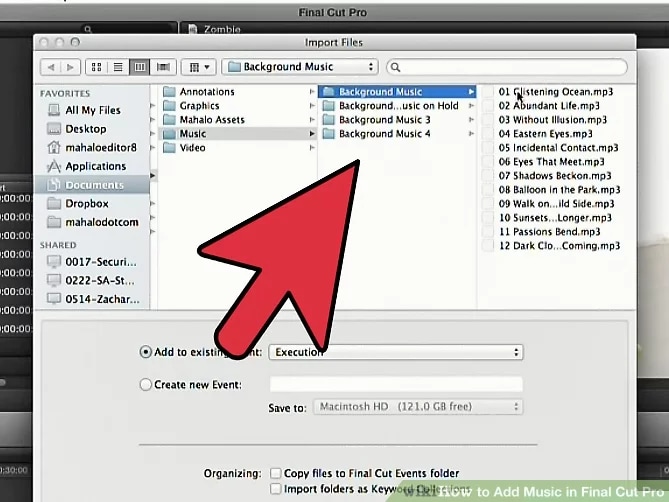
Now, you should access the FILE button. It will lead to a fully-featured menu with multiple options. You should find out the IMPORT button and proceed.
Step4 Import Button
When you click on the IMPORT button, it will provide some choices. You should go with the option of MEDIA.
Step5 Locate File
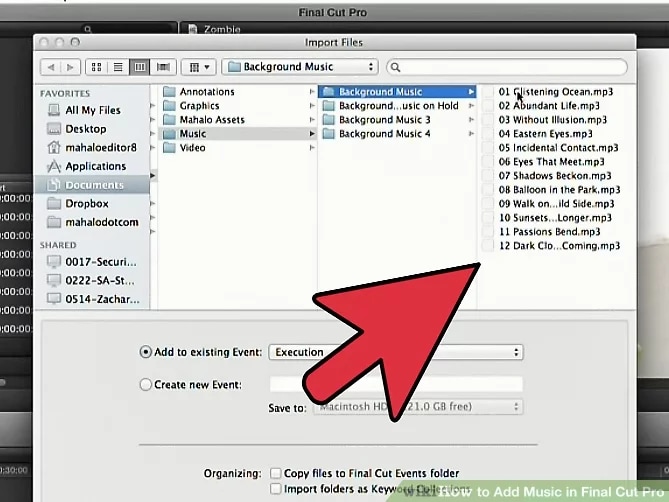
After clicking the media button, it will present a complete file and storage interface in front of you. You should find out the audio file on your device by using such an interface. Here, you need to access the targeted folder only. You should select the audio file and hit the IMPORT button. It will bring your desired audio file to the Final Cut Pro easily for further usage.
Step6 Add Audio to Video
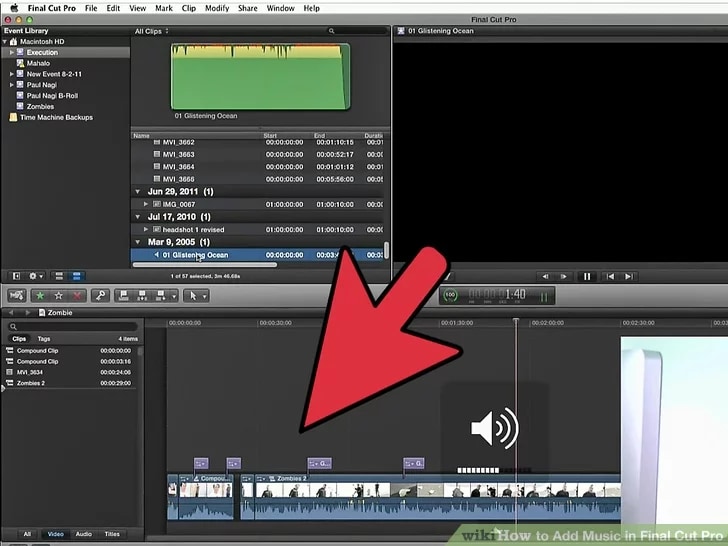
Once you get the audio file to the library of Final Cut Pro, after that, you should proceed by arranging it as per the video sequence and requirements. You should take the video timeline carefully and make all edits smartly. Here, you will find out drag and drop features are highly beneficial. It will help you synchronize the audio and video with ease.
It is the complete process by which you can easily add music to final cut pro. With it, you also have the option of accessing its built-in music library. By using this particular library, you can get multiple audio files with sound effects, songs, etc. You can access these files to add to the video as well. In case you don’t find something relevant to the content, you can consider the option of importing your own as per the procedure.
Part 2 Alternative For Final Cut Pro To Add Music To Video
No one can ignore the features and functionalities of Final Cut Pro. But, sometimes people don’t find it suitable or appropriate as per their video editing requirements. It is the main reason why they start looking for some alternatives that can help them in getting better results with top-notch edits.
Filmora
All individuals are not working as professional video editors or designers. Due to it, they lack technical knowledge and are also unaware of the tool’s interfaces and their usability. As a result, they start facing lots of problems with complicated tools. In case you want to access a video editor with a user-friendly interface that can be helpful in creating content easily, you can consider Filmora. It is the easiest video editor to use that can be useful in creating and editing videos with ease.
Both Windows and Mac users can access Filmora by downloading software on the system. On the other hand, Final Cut Pro is available only for the Mac.
Wondershare Filmora
Get started easily with Filmora’s powerful performance, intuitive interface, and countless effects!
Try It Free Try It Free Try It Free Learn More about Filmora>

Benefits
User-friendly interface
A big music library
Available for mobile platforms as well (Filmora)
Regular updates for features and functionalities
Drawbacks
Less audio editing features
By paying attention to these aspects, you can easily understand how important and useful Filmora is. It is also having some audio editing features. It will allow you to make changes in audio files as per the requirements and keep it perfect according to the video.
Premiere Pro
Premiere Pro is not new in the market. It is an old and famous editing tool. But, the main fact about this particular source is its usability. Everyone cannot consider the option of this particular video editor. There are multiple reasons behind it. Some people may find the tool difficult to use.
For some individuals, its charges are too high. Actually, Premiere Pro is paid source. Its plans are also too expensive. If you consider its option, you have two choices bill monthly or annually. In case you choose monthly billing, you will need to pay around $31.49 per month. Annual billing will help you save some money and it costs an average of $20.99 per month.
Benefits
Regular updates
Templates, plugins, and preset options available
Drawbacks
Too Expensive
Complicated
Premiere Pro is a complicated tool to use. It is mainly made for the professionals who master these types of skills and work on big projects. If a beginner tries to access it, they may find it irrelevant and hard to understand. It takes lots of time to process and complete some basic things as well.
CyberLink PowerDirector

It is also a paid option to consider. If you choose to use CyberLink PowerDirector for the first time, you can avail of its free trial services as well. It provides a free trial of 30 days that can help you access the tool’s capability and figure out it is worth buying or not. The following are some benefits and drawbacks of choosing this particular option.
Benefits
Regular updates
Multiple features
Drawbacks
Lack of color tools
CyberLink PowerDirector is a suitable option for video editing professionals with mid-level skills. Highly skilled individuals can consider its option but they may find it easy to use and don’t get some advanced feature as per their skill set.
Conclusion
By paying attention to all these details, you can easily figure out the best final cut pro add music method. It depends on your choice that you want to use some existing audio file or want to import your own. Along with it, you can also check out some alternatives that can help you figure out what kind of tools can be considered over Final Cut Pro for better results. Filmora holds the top-notch position with lots of features, functionalities, and complete accessibilities. You need to be smart while making a final decision regarding video editor selection for creating top-notch video content to entertain the audience perfectly.
02 [Alternative For Final Cut Pro To Add Music To Video](#Part 2)
Part 1 Add Music To Final Cut Pro
Are you interested to figure out the best possible method to add music files to Final Cut Pro for video creation and other purposes? If you are looking for such an option, you should be focused on the following process.
Step1 Access Final Cut Pro
Firstly, you should focus on accessing the Final Cut Pro. You should check out the application on your desktop and open it.
Step2 Go To File

After accessing the Final Cut Pro, you can see multiple options and menus on the interface. Here, you should navigate to the ‘FILE’ option. You can find out this particular option on the top of the navigation bar.
Step3 Access File

Now, you should access the FILE button. It will lead to a fully-featured menu with multiple options. You should find out the IMPORT button and proceed.
Step4 Import Button
When you click on the IMPORT button, it will provide some choices. You should go with the option of MEDIA.
Step5 Locate File

After clicking the media button, it will present a complete file and storage interface in front of you. You should find out the audio file on your device by using such an interface. Here, you need to access the targeted folder only. You should select the audio file and hit the IMPORT button. It will bring your desired audio file to the Final Cut Pro easily for further usage.
Step6 Add Audio to Video

Once you get the audio file to the library of Final Cut Pro, after that, you should proceed by arranging it as per the video sequence and requirements. You should take the video timeline carefully and make all edits smartly. Here, you will find out drag and drop features are highly beneficial. It will help you synchronize the audio and video with ease.
It is the complete process by which you can easily add music to final cut pro. With it, you also have the option of accessing its built-in music library. By using this particular library, you can get multiple audio files with sound effects, songs, etc. You can access these files to add to the video as well. In case you don’t find something relevant to the content, you can consider the option of importing your own as per the procedure.
Part 2 Alternative For Final Cut Pro To Add Music To Video
No one can ignore the features and functionalities of Final Cut Pro. But, sometimes people don’t find it suitable or appropriate as per their video editing requirements. It is the main reason why they start looking for some alternatives that can help them in getting better results with top-notch edits.
Filmora
All individuals are not working as professional video editors or designers. Due to it, they lack technical knowledge and are also unaware of the tool’s interfaces and their usability. As a result, they start facing lots of problems with complicated tools. In case you want to access a video editor with a user-friendly interface that can be helpful in creating content easily, you can consider Filmora. It is the easiest video editor to use that can be useful in creating and editing videos with ease.
Both Windows and Mac users can access Filmora by downloading software on the system. On the other hand, Final Cut Pro is available only for the Mac.
Wondershare Filmora
Get started easily with Filmora’s powerful performance, intuitive interface, and countless effects!
Try It Free Try It Free Try It Free Learn More about Filmora>

Benefits
User-friendly interface
A big music library
Available for mobile platforms as well (Filmora)
Regular updates for features and functionalities
Drawbacks
Less audio editing features
By paying attention to these aspects, you can easily understand how important and useful Filmora is. It is also having some audio editing features. It will allow you to make changes in audio files as per the requirements and keep it perfect according to the video.
Premiere Pro

Premiere Pro is not new in the market. It is an old and famous editing tool. But, the main fact about this particular source is its usability. Everyone cannot consider the option of this particular video editor. There are multiple reasons behind it. Some people may find the tool difficult to use.
For some individuals, its charges are too high. Actually, Premiere Pro is paid source. Its plans are also too expensive. If you consider its option, you have two choices bill monthly or annually. In case you choose monthly billing, you will need to pay around $31.49 per month. Annual billing will help you save some money and it costs an average of $20.99 per month.
Benefits
Regular updates
Templates, plugins, and preset options available
Drawbacks
Too Expensive
Complicated
Premiere Pro is a complicated tool to use. It is mainly made for the professionals who master these types of skills and work on big projects. If a beginner tries to access it, they may find it irrelevant and hard to understand. It takes lots of time to process and complete some basic things as well.
CyberLink PowerDirector

It is also a paid option to consider. If you choose to use CyberLink PowerDirector for the first time, you can avail of its free trial services as well. It provides a free trial of 30 days that can help you access the tool’s capability and figure out it is worth buying or not. The following are some benefits and drawbacks of choosing this particular option.
Benefits
Regular updates
Multiple features
Drawbacks
Lack of color tools
CyberLink PowerDirector is a suitable option for video editing professionals with mid-level skills. Highly skilled individuals can consider its option but they may find it easy to use and don’t get some advanced feature as per their skill set.
Conclusion
By paying attention to all these details, you can easily figure out the best final cut pro add music method. It depends on your choice that you want to use some existing audio file or want to import your own. Along with it, you can also check out some alternatives that can help you figure out what kind of tools can be considered over Final Cut Pro for better results. Filmora holds the top-notch position with lots of features, functionalities, and complete accessibilities. You need to be smart while making a final decision regarding video editor selection for creating top-notch video content to entertain the audience perfectly.
02 [Alternative For Final Cut Pro To Add Music To Video](#Part 2)
Part 1 Add Music To Final Cut Pro
Are you interested to figure out the best possible method to add music files to Final Cut Pro for video creation and other purposes? If you are looking for such an option, you should be focused on the following process.
Step1 Access Final Cut Pro
Firstly, you should focus on accessing the Final Cut Pro. You should check out the application on your desktop and open it.
Step2 Go To File

After accessing the Final Cut Pro, you can see multiple options and menus on the interface. Here, you should navigate to the ‘FILE’ option. You can find out this particular option on the top of the navigation bar.
Step3 Access File

Now, you should access the FILE button. It will lead to a fully-featured menu with multiple options. You should find out the IMPORT button and proceed.
Step4 Import Button
When you click on the IMPORT button, it will provide some choices. You should go with the option of MEDIA.
Step5 Locate File

After clicking the media button, it will present a complete file and storage interface in front of you. You should find out the audio file on your device by using such an interface. Here, you need to access the targeted folder only. You should select the audio file and hit the IMPORT button. It will bring your desired audio file to the Final Cut Pro easily for further usage.
Step6 Add Audio to Video

Once you get the audio file to the library of Final Cut Pro, after that, you should proceed by arranging it as per the video sequence and requirements. You should take the video timeline carefully and make all edits smartly. Here, you will find out drag and drop features are highly beneficial. It will help you synchronize the audio and video with ease.
It is the complete process by which you can easily add music to final cut pro. With it, you also have the option of accessing its built-in music library. By using this particular library, you can get multiple audio files with sound effects, songs, etc. You can access these files to add to the video as well. In case you don’t find something relevant to the content, you can consider the option of importing your own as per the procedure.
Part 2 Alternative For Final Cut Pro To Add Music To Video
No one can ignore the features and functionalities of Final Cut Pro. But, sometimes people don’t find it suitable or appropriate as per their video editing requirements. It is the main reason why they start looking for some alternatives that can help them in getting better results with top-notch edits.
Filmora
All individuals are not working as professional video editors or designers. Due to it, they lack technical knowledge and are also unaware of the tool’s interfaces and their usability. As a result, they start facing lots of problems with complicated tools. In case you want to access a video editor with a user-friendly interface that can be helpful in creating content easily, you can consider Filmora. It is the easiest video editor to use that can be useful in creating and editing videos with ease.
Both Windows and Mac users can access Filmora by downloading software on the system. On the other hand, Final Cut Pro is available only for the Mac.
Wondershare Filmora
Get started easily with Filmora’s powerful performance, intuitive interface, and countless effects!
Try It Free Try It Free Try It Free Learn More about Filmora>

Benefits
User-friendly interface
A big music library
Available for mobile platforms as well (Filmora)
Regular updates for features and functionalities
Drawbacks
Less audio editing features
By paying attention to these aspects, you can easily understand how important and useful Filmora is. It is also having some audio editing features. It will allow you to make changes in audio files as per the requirements and keep it perfect according to the video.
Premiere Pro

Premiere Pro is not new in the market. It is an old and famous editing tool. But, the main fact about this particular source is its usability. Everyone cannot consider the option of this particular video editor. There are multiple reasons behind it. Some people may find the tool difficult to use.
For some individuals, its charges are too high. Actually, Premiere Pro is paid source. Its plans are also too expensive. If you consider its option, you have two choices bill monthly or annually. In case you choose monthly billing, you will need to pay around $31.49 per month. Annual billing will help you save some money and it costs an average of $20.99 per month.
Benefits
Regular updates
Templates, plugins, and preset options available
Drawbacks
Too Expensive
Complicated
Premiere Pro is a complicated tool to use. It is mainly made for the professionals who master these types of skills and work on big projects. If a beginner tries to access it, they may find it irrelevant and hard to understand. It takes lots of time to process and complete some basic things as well.
CyberLink PowerDirector

It is also a paid option to consider. If you choose to use CyberLink PowerDirector for the first time, you can avail of its free trial services as well. It provides a free trial of 30 days that can help you access the tool’s capability and figure out it is worth buying or not. The following are some benefits and drawbacks of choosing this particular option.
Benefits
Regular updates
Multiple features
Drawbacks
Lack of color tools
CyberLink PowerDirector is a suitable option for video editing professionals with mid-level skills. Highly skilled individuals can consider its option but they may find it easy to use and don’t get some advanced feature as per their skill set.
Conclusion
By paying attention to all these details, you can easily figure out the best final cut pro add music method. It depends on your choice that you want to use some existing audio file or want to import your own. Along with it, you can also check out some alternatives that can help you figure out what kind of tools can be considered over Final Cut Pro for better results. Filmora holds the top-notch position with lots of features, functionalities, and complete accessibilities. You need to be smart while making a final decision regarding video editor selection for creating top-notch video content to entertain the audience perfectly.
02 [Alternative For Final Cut Pro To Add Music To Video](#Part 2)
Part 1 Add Music To Final Cut Pro
Are you interested to figure out the best possible method to add music files to Final Cut Pro for video creation and other purposes? If you are looking for such an option, you should be focused on the following process.
Step1 Access Final Cut Pro
Firstly, you should focus on accessing the Final Cut Pro. You should check out the application on your desktop and open it.
Step2 Go To File

After accessing the Final Cut Pro, you can see multiple options and menus on the interface. Here, you should navigate to the ‘FILE’ option. You can find out this particular option on the top of the navigation bar.
Step3 Access File

Now, you should access the FILE button. It will lead to a fully-featured menu with multiple options. You should find out the IMPORT button and proceed.
Step4 Import Button
When you click on the IMPORT button, it will provide some choices. You should go with the option of MEDIA.
Step5 Locate File

After clicking the media button, it will present a complete file and storage interface in front of you. You should find out the audio file on your device by using such an interface. Here, you need to access the targeted folder only. You should select the audio file and hit the IMPORT button. It will bring your desired audio file to the Final Cut Pro easily for further usage.
Step6 Add Audio to Video

Once you get the audio file to the library of Final Cut Pro, after that, you should proceed by arranging it as per the video sequence and requirements. You should take the video timeline carefully and make all edits smartly. Here, you will find out drag and drop features are highly beneficial. It will help you synchronize the audio and video with ease.
It is the complete process by which you can easily add music to final cut pro. With it, you also have the option of accessing its built-in music library. By using this particular library, you can get multiple audio files with sound effects, songs, etc. You can access these files to add to the video as well. In case you don’t find something relevant to the content, you can consider the option of importing your own as per the procedure.
Part 2 Alternative For Final Cut Pro To Add Music To Video
No one can ignore the features and functionalities of Final Cut Pro. But, sometimes people don’t find it suitable or appropriate as per their video editing requirements. It is the main reason why they start looking for some alternatives that can help them in getting better results with top-notch edits.
Filmora
All individuals are not working as professional video editors or designers. Due to it, they lack technical knowledge and are also unaware of the tool’s interfaces and their usability. As a result, they start facing lots of problems with complicated tools. In case you want to access a video editor with a user-friendly interface that can be helpful in creating content easily, you can consider Filmora. It is the easiest video editor to use that can be useful in creating and editing videos with ease.
Both Windows and Mac users can access Filmora by downloading software on the system. On the other hand, Final Cut Pro is available only for the Mac.
Wondershare Filmora
Get started easily with Filmora’s powerful performance, intuitive interface, and countless effects!
Try It Free Try It Free Try It Free Learn More about Filmora>

Benefits
User-friendly interface
A big music library
Available for mobile platforms as well (Filmora)
Regular updates for features and functionalities
Drawbacks
Less audio editing features
By paying attention to these aspects, you can easily understand how important and useful Filmora is. It is also having some audio editing features. It will allow you to make changes in audio files as per the requirements and keep it perfect according to the video.
Premiere Pro

Premiere Pro is not new in the market. It is an old and famous editing tool. But, the main fact about this particular source is its usability. Everyone cannot consider the option of this particular video editor. There are multiple reasons behind it. Some people may find the tool difficult to use.
For some individuals, its charges are too high. Actually, Premiere Pro is paid source. Its plans are also too expensive. If you consider its option, you have two choices bill monthly or annually. In case you choose monthly billing, you will need to pay around $31.49 per month. Annual billing will help you save some money and it costs an average of $20.99 per month.
Benefits
Regular updates
Templates, plugins, and preset options available
Drawbacks
Too Expensive
Complicated
Premiere Pro is a complicated tool to use. It is mainly made for the professionals who master these types of skills and work on big projects. If a beginner tries to access it, they may find it irrelevant and hard to understand. It takes lots of time to process and complete some basic things as well.
CyberLink PowerDirector

It is also a paid option to consider. If you choose to use CyberLink PowerDirector for the first time, you can avail of its free trial services as well. It provides a free trial of 30 days that can help you access the tool’s capability and figure out it is worth buying or not. The following are some benefits and drawbacks of choosing this particular option.
Benefits
Regular updates
Multiple features
Drawbacks
Lack of color tools
CyberLink PowerDirector is a suitable option for video editing professionals with mid-level skills. Highly skilled individuals can consider its option but they may find it easy to use and don’t get some advanced feature as per their skill set.
Conclusion
By paying attention to all these details, you can easily figure out the best final cut pro add music method. It depends on your choice that you want to use some existing audio file or want to import your own. Along with it, you can also check out some alternatives that can help you figure out what kind of tools can be considered over Final Cut Pro for better results. Filmora holds the top-notch position with lots of features, functionalities, and complete accessibilities. You need to be smart while making a final decision regarding video editor selection for creating top-notch video content to entertain the audience perfectly.
Also read:
- New In 2024, Hear the Difference Effective Strategies for Silencing Background Chatter Online
- Updated 2024 Approved Discover a World of Free Guitar Inspiration Imagery & Music Downloads
- Updated Innovative Discord Communication A Comprehensive Overview of DiscoVoice Features for 2024
- 2024 Approved Step-by-Step Guide to Harnessing the Power of Morphvox in Virtual Worlds
- Updated In 2024, Harmony Without Hassle Enjoy Pure Sound FREE Online
- Updated In 2024, Deciphering the Newest Advances in Nero WaveEdito
- New Unleashing Creativity in Mobile Sound Selection How to Design Ringtones
- New 2024 Approved Techniques for Regulating Audio Loudness in Video-Based Streaming with VLC
- 5 Best Backwards Music Videos
- Updated In 2024, How to Install and Uninstall Audacity for Chromebook
- Superior Audio Format Changer Instant MP3 Creation with Zero Hassle for 2024
- Updated Uncovering Thrilling Soundtracks Components for 2024
- New In 2024, Mastering the Aesthetics of Audio Design Examining Features, Benefits, Drawbacks, and Comparisons with Alternatives
- In 2024, How to Discern and Assess the Best in the Business for Audio Post-Production Excellence
- Updated In 2024, FreeTranscribe Your Way Android & iOS Apps for Effortless Audio Transcription
- In 2024, Discovering the Best 8 Bluetooth Audio Processors for Clear Streaming Sound
- 2024 Approved Sonic Enhancement Removing Unwanted Noise in Your Recordings Using Wondershare Filmora
- New 2024 Approved Plugging Into Precision The Guide to Free Plugins for AutoTuning Audio with Audacity
- Updated In 2024, The Ultimate List of Gratis Sound Effect Libraries Online
- 2024 Approved Digital Sound Shaping at No Charge The Best Free Online Trimming Experience
- Updated 2024 Approved Cutting-Edge Software Choices for Distorting and Enhancing Audio Quality
- In 2024, Elevating and Dimming Audio in Audacity A Step-by-Step Approach
- 2024 Approved Discovering the Best Websites for Acquiring High-Fidelity Whoosh Soundtracks
- Discovering Keepsake Bell Ringtone Implementations for 2024
- In 2024, Step-by-Step Process Disabling Video Sound in Latest MKV Format (MKV-2023)
- New In 2024, Navigating TikToks Volume Settings Essential Methods for Quiet Videos
- New Quieting the Gusts Innovative Approaches for Wind Noise Reduction in Acoustic Files for 2024
- Updated The Unlimited Soundscape Best Budget-Friendly Audio Mixer Software Ranked for 2024
- Updated 2024 Approved Best 8 Speech to Text Apps for Android and iPhone
- Updated Essential Free Laughter Music Collections for Easy-to-Use Film and Media Projects for 2024
- New The Ultimate Guide to Chrome Audio Recording – Top Picks Revealed for 2024
- Exploring the Archives A List of Resources for Horrifying Sound Tracks
- In 2024, Starting with iMovie Step-by-Step Guide to Incorporating Soundtracks
- Updated In 2024, Expert Picks Top Speech Transcription Tools for Android and iOS Users
- The Premier A-Tunes for Mobile Musicians Worldwide for 2024
- Ultimate Index of Podcast Syndication Directories for 2024
- New 2024 Approved Innovative Text-to-Speech Solutions Dominating the Market
- Updated 2024 Approved Virtual Sound Crafting Platform Split & Stitch MP3s
- Enhance Stereo Image Quality Using Sidechain Audio Processing
- In 2024, Ultimate List of 15 Audio-Enhancing Tools and Websites to Amplify Your Videos Music Score, Featuring Advantages & Disadvantages
- New 2024 Approved The Ultimate Selection Ranking the Premier Audio Dampening Software, Apps & Online Resources
- In 2024, Unveiling the Top 5 MP3 Converters and Mixers Optimized for macOS
- Mastering Audio Preservation From Home Top 8 Affordable Web-Based Recorders for 2024
- Mastering Sound Quality Eliminating Unwanted Audio From Recording Spaces for 2024
- New 2024 Approved The Complete Audio Enhancement Manual From Raw Footage to Final Cut 2023S Methodology
- 2024 Approved The Elite Selection of 8 Dictation Technologies for Desktop Operations on Various OS and Online Platforms
- New 2024 Approved Free and Fabulous The 5 Best Online Tone Generators Out There
- Top 10 Oppo A18 Android SIM Unlock APK
- New Unleash Fast-Paced Edits with Motion Blur in Final Cut Pro X
- How to Mirror Apple iPhone 12 mini to PC via USB? | Dr.fone
- How to Change Credit Card on Your iPhone 14 Plus Apple ID and Apple Pay
- How To Get Out of DFU Mode on iPhone XR? | Dr.fone
- Free Video Editing Software 10 Options Beyond Windows Movie Maker
- Which Pokémon can Evolve with a Moon Stone For Tecno Phantom V Fold? | Dr.fone
- Updated Make It a GIF 28 Recommended Video to GIF Converters for 2024
- Complete Guide to Hard Reset Your Honor Magic 5 Pro | Dr.fone
- Can I use iTools gpx file to catch the rare Pokemon On Vivo Y78+ | Dr.fone
- In 2024, How I Transferred Messages from Nokia G42 5G to iPhone 12/XS (Max) in Seconds | Dr.fone
- In 2024, A Step-by-Step Guide on Using ADB and Fastboot to Remove FRP Lock on your Samsung Galaxy S23+
- Can Life360 Track Or See Text Messages? What Can You Do with Life360 On OnePlus Nord CE 3 Lite 5G? | Dr.fone
- Top 4 Android System Repair Software for Asus ROG Phone 8 Pro Bricked Devices | Dr.fone
- Ultimate guide to get the meltan box pokemon go For Nokia 130 Music | Dr.fone
- How to convert AVCHD MTS to MP4 for Samsung Galaxy A15 4G?
- In 2024, Tutorial to Change Oppo A78 IMEI without Root A Comprehensive Guide
- Best Itel P40 Pattern Lock Removal Tools Remove Android Pattern Lock Without Losing Data
- New Make It a GIF 28 Video Conversion Tool Recommendations
- In 2024, Top 10 Password Cracking Tools For Vivo Y17s
- In 2024, How to Access Your iPhone 13 mini When You Forget the Passcode?
- New Best Video Stabilizer Apps iPhone and Android for 2024
- How To Reset Apple iPhone 12 mini? | Dr.fone
- How to Change Lock Screen Wallpaper on Samsung Galaxy F04
- How to Track Xiaomi Redmi Note 12T Pro Location without Installing Software? | Dr.fone
- Updated 2024 Approved From Novice to Pro Expert Tips and Tricks for Mastering the 16X9 Ratio Calculator
- New Premiere Pro CS6 for Mac Free Download From Adobe Systems
- In 2024, Top IMEI Unlokers for iPhone 11 Pro and Android Phones
- 4 Easy Ways for Your Samsung Galaxy A14 5G Hard Reset | Dr.fone
- Here are Some of the Best Pokemon Discord Servers to Join On Vivo Y36i | Dr.fone
- How to Remove Apple ID from iPhone 6 Plus without Password?
- In 2024, For People Wanting to Mock GPS on Lenovo ThinkPhone Devices | Dr.fone
- In 2024, AddROM Bypass An Android Tool to Unlock FRP Lock Screen For your Lava Agni 2 5G
- Title: New A Detailed Walkthrough to Preserve Your iPhones Audio Recordings
- Author: Kate
- Created at : 2024-05-20 02:42:17
- Updated at : 2024-05-21 02:42:17
- Link: https://audio-editing.techidaily.com/new-a-detailed-walkthrough-to-preserve-your-iphones-audio-recordings/
- License: This work is licensed under CC BY-NC-SA 4.0.


