
:max_bytes(150000):strip_icc():format(webp)/001_how-to-transfer-data-from-ps4-to-ps5-3392eb400af3482fabad65cabb2a1a91.jpg)
New 2024 Approved Audio Immersion in iMovie Techniques for Beginners to Master
“Audio Immersion in iMovie: Techniques for Beginners to Master”
Tutorials for Beginners: How to Add Audio to iMovie

Liza Brown
Jan 23, 2024• Proven solutions
iMovie is a video editing software program made by Apple. Capabilities include tools to alter and optimize video color settings, trim and pivot video clips, smooth shaky pictures, add video animations, and change the pace of recordings. you can also edit and enhance a project’s audio by eliminating background noise and increasing the audio levels of quiet segments. Or enjoy your films like never before with iMovie for iOS and macOS. It’s simple to search through your footage and make Hollywood-style trailers and gorgeous 4K-resolution movies.
You may even begin editing on your iPhone or iPad and finish on your Mac. It’s never been easier to implement it in the movies, whether you’re using a Mac or an iOS smartphone. Simply select your clips and then add titles, music, and effects. iMovie even supports 4K video, allowing you to create amazing cinema-quality videos. That’s all there is to it, ladies and gentlemen.
Create professional-looking films using iMovie even if you don’t have a degree in editing. Add images and videos to projects with a single click, cut clips with your finger, create flawless transitions, and fade sounds like a pro. Choose from 13 unique video filters to give a dramatic touch to your movie. Make your film look like it’s from the silent era, a classic western, or a fun comic book. Applying filters to specific segments or your entire video, as well as adjusting the strength, is straightforward on your iPhone or iPad. Slow down action pictures to make them more interesting. Allow viewers to soar across scenes by accelerating them. Alternatively, use picture-in-picture and split-screen techniques to give your school report a broadcast vibe.
In this tutorial, we’ll show you how to add audio to iMovie via different methods. Here we go.
If you want to add audio to video via your android phone , check this out.
Part 1. How to Add Audio to iMovie on iPhone/iPad?
Step #1. In your iMovie project, tap the ADD MEDIA (+ Symbol) button.
Step #2. Then, choose AUDIO.
You will now be given three options. Soundtracks, My Music, and Songs in iCloud. Make your choice.
To listen to a soundtrack, tap it. If a soundtrack is muted, press it to download it first, and then hit it again to preview it.
Step #3. To add a soundtrack to your project, hit the Add Audio icon next to it. iMovie will automatically insert the music at the beginning of the project and adjust it to match the duration of the project.
Adding sound effects
When you add a sound effect, it is linked to the video clip above it in the timeline. When you move the video clip, the sound effect moves with it. This differs from soundtracks, which are separate from the video segments in your production.
Scroll the timeline with your project open until the play head (the white vertical line) appears where you wish to add the sound effect.
To browse the built-in sound effects, press the Add Media button, then Audio, then Sound Effects.
To hear a sound effect, tap it.
Tap the Add Audio button next to the sound effect to add it.
Step #4. Adjust the volume of the clip
After you’ve added sound to your iMovie project, you may change the level of audio clips to achieve the ideal sound mix, or change the level of video clips that have sound. To change the volume of an audio or video clip, select it in the timeline, click the Volume button at the bottom of the window, and then drag the slider to raise or decrease the volume. When you completely reduce the volume of a clip, a Mute symbol displays on the clip in the timeline.
Part 2. How to Add Audio to iMovie on Mac?
iMovie for Mac comes with a library of music and sound clips that you may use in your project. In addition to sound effects such as rain and footsteps, iMovie includes audio clips such as ambiances and jingles.
Step #1. With your project open, go to the top of the browser and select Audio, followed by Sound Effects in the sidebar on the left. To access the Media Browser, you may need to click the Media Browser button.
Step #2. Hover the pointer over a jingle or sound clip in the list to preview it, and then click the play button next to the sound clip. You may also preview a song or sound clip by selecting it, clicking on the waveform at the top of the media browser, and then pressing the Spacebar.
Step #3. Drag jingles or other audio clips to the music well, represented by the musical note icon in the timeline, to create background music for your film. The video clips in the timeline have no effect on the audio in the music well.
Step #4. To add music or sound effects to a video clip, drag it under the video clip until a bar linking the clips appears. When you move the connected video clip, the audio follows.
Part 3. How to Add Audio to iMovie from iTunes?
If you want to add songs such as M4P music and Apple Music from iTunes to iMovie but discover that all of the music is protected, all you need is the Sidify Apple Music Converter. Sidify Apple Music Converter enables you to download music without quality loss. One of Sidify’s distinctive advantages is its ability to remove protection at an extremely quick rate – up to 20 times faster than any other similar program. The software’s user interface is straightforward. The program is simple to use even for inexperienced users. In this section, we’ll teach you how to add M4P music and Apple Music to an iMovie project as background music.
What you’ll need:
- A Mac or Windows computer running macOS or Windows OS
- The most recent version of iTunes
- Sidify Apple Music Converter is available
- Sidify Apple Music Converter can now play Apple Music
Launch Sidify Apple Music Converter, click the + button, and all the tunes you’ve downloaded from Apple Music will appear in the adding music window, as seen below. Select the song to be converted and click OK.
Step 1. Select a file type
A setting window would appear after clicking the setting button or the little gear icon on the upper right of the Sidify interface. You may select an output format such as MP3, M4A, WAV, FLAC, or AIFF, as well as a conversion speed of up to 10X and an output quality of up to 320 Kbps. Furthermore, the output path can be changed if necessary.
Step 2. Begin the conversion
Once all of the files have been added to the queue and all of the settings have been completed, click the Convert button.
Step 3. Find the best-converted music files for iMovie
Now, on your Mac computer, click the Menu button to locate the converted iTunes Music files in the target folder. The music may then be readily added to an iMovie project just like any other standard audio file.
Part 4. How to Add Audio to iMovie from Spotify?
Offline playback is possible with a Spotify Premium membership. You may save songs, playlists, or albums to listen to later. The essential element to remember is that Spotify music, whether online or offline, can only be accessed through the Spotify application. To put it another way, you do not have permission to import Spotify music into other third-party software programs. It comes with iMovie and other video editing software.
Step #1. Import music from Spotify into AudFree. The AudFree Spotify converter must be compatible with the Spotify app. When you run AudFree program from your computer’s desktop, Spotify will immediately load. You may now begin to uncover preferred Spotify tunes to add to iMovie. Import them into AudFree by copying and pasting or dragging and dropping.
Step #2. Set the output format and other preferences for iMovie. MP3, WAV, M4A, and AIFF are all supported by iMovie. You may go to the top menu and select ‘Preferences’ > ‘Convert’. A setting window will appear. You may select one of the iMovie-supported audio formats as the output format in the window. You can also change the output parameters.
Step #3. Spotify tracks may be converted for use in iMovie. To begin the download, click the ‘Convert’ button in the bottom-right corner of the main screen. AudFree program will download Spotify music to target iMovie files at up to 5X quicker speeds. You should disable your antivirus or firewall to make the converting process more stable.
Part 5. The Best Alternative to iMovie on Mac
Although iMovie has the amazing features anyone could wish to work with when crafting an interesting content, it has been seen to be limited in some ways. This is why Wondershare Filmora is the best alternative to iMovie. Filmora allows you to swiftly adjust audio effects and edit sound, ensuring that your demands are met.


Wrap Up
iMovie is an essential video editing tool, and that’s all there is to do when it comes to adding audio to iMovie videos.
iMovie, on the other hand, is limited if you want to test out new capabilities like editing films with amazing effects. This is where Filmora may come in handy in such cases.
Liza Brown
Liza Brown is a writer and a lover of all things video.
Follow @Liza Brown
Liza Brown
Jan 23, 2024• Proven solutions
iMovie is a video editing software program made by Apple. Capabilities include tools to alter and optimize video color settings, trim and pivot video clips, smooth shaky pictures, add video animations, and change the pace of recordings. you can also edit and enhance a project’s audio by eliminating background noise and increasing the audio levels of quiet segments. Or enjoy your films like never before with iMovie for iOS and macOS. It’s simple to search through your footage and make Hollywood-style trailers and gorgeous 4K-resolution movies.
You may even begin editing on your iPhone or iPad and finish on your Mac. It’s never been easier to implement it in the movies, whether you’re using a Mac or an iOS smartphone. Simply select your clips and then add titles, music, and effects. iMovie even supports 4K video, allowing you to create amazing cinema-quality videos. That’s all there is to it, ladies and gentlemen.
Create professional-looking films using iMovie even if you don’t have a degree in editing. Add images and videos to projects with a single click, cut clips with your finger, create flawless transitions, and fade sounds like a pro. Choose from 13 unique video filters to give a dramatic touch to your movie. Make your film look like it’s from the silent era, a classic western, or a fun comic book. Applying filters to specific segments or your entire video, as well as adjusting the strength, is straightforward on your iPhone or iPad. Slow down action pictures to make them more interesting. Allow viewers to soar across scenes by accelerating them. Alternatively, use picture-in-picture and split-screen techniques to give your school report a broadcast vibe.
In this tutorial, we’ll show you how to add audio to iMovie via different methods. Here we go.
If you want to add audio to video via your android phone , check this out.
Part 1. How to Add Audio to iMovie on iPhone/iPad?
Step #1. In your iMovie project, tap the ADD MEDIA (+ Symbol) button.
Step #2. Then, choose AUDIO.
You will now be given three options. Soundtracks, My Music, and Songs in iCloud. Make your choice.
To listen to a soundtrack, tap it. If a soundtrack is muted, press it to download it first, and then hit it again to preview it.
Step #3. To add a soundtrack to your project, hit the Add Audio icon next to it. iMovie will automatically insert the music at the beginning of the project and adjust it to match the duration of the project.
Adding sound effects
When you add a sound effect, it is linked to the video clip above it in the timeline. When you move the video clip, the sound effect moves with it. This differs from soundtracks, which are separate from the video segments in your production.
Scroll the timeline with your project open until the play head (the white vertical line) appears where you wish to add the sound effect.
To browse the built-in sound effects, press the Add Media button, then Audio, then Sound Effects.
To hear a sound effect, tap it.
Tap the Add Audio button next to the sound effect to add it.
Step #4. Adjust the volume of the clip
After you’ve added sound to your iMovie project, you may change the level of audio clips to achieve the ideal sound mix, or change the level of video clips that have sound. To change the volume of an audio or video clip, select it in the timeline, click the Volume button at the bottom of the window, and then drag the slider to raise or decrease the volume. When you completely reduce the volume of a clip, a Mute symbol displays on the clip in the timeline.
Part 2. How to Add Audio to iMovie on Mac?
iMovie for Mac comes with a library of music and sound clips that you may use in your project. In addition to sound effects such as rain and footsteps, iMovie includes audio clips such as ambiances and jingles.
Step #1. With your project open, go to the top of the browser and select Audio, followed by Sound Effects in the sidebar on the left. To access the Media Browser, you may need to click the Media Browser button.
Step #2. Hover the pointer over a jingle or sound clip in the list to preview it, and then click the play button next to the sound clip. You may also preview a song or sound clip by selecting it, clicking on the waveform at the top of the media browser, and then pressing the Spacebar.
Step #3. Drag jingles or other audio clips to the music well, represented by the musical note icon in the timeline, to create background music for your film. The video clips in the timeline have no effect on the audio in the music well.
Step #4. To add music or sound effects to a video clip, drag it under the video clip until a bar linking the clips appears. When you move the connected video clip, the audio follows.
Part 3. How to Add Audio to iMovie from iTunes?
If you want to add songs such as M4P music and Apple Music from iTunes to iMovie but discover that all of the music is protected, all you need is the Sidify Apple Music Converter. Sidify Apple Music Converter enables you to download music without quality loss. One of Sidify’s distinctive advantages is its ability to remove protection at an extremely quick rate – up to 20 times faster than any other similar program. The software’s user interface is straightforward. The program is simple to use even for inexperienced users. In this section, we’ll teach you how to add M4P music and Apple Music to an iMovie project as background music.
What you’ll need:
- A Mac or Windows computer running macOS or Windows OS
- The most recent version of iTunes
- Sidify Apple Music Converter is available
- Sidify Apple Music Converter can now play Apple Music
Launch Sidify Apple Music Converter, click the + button, and all the tunes you’ve downloaded from Apple Music will appear in the adding music window, as seen below. Select the song to be converted and click OK.
Step 1. Select a file type
A setting window would appear after clicking the setting button or the little gear icon on the upper right of the Sidify interface. You may select an output format such as MP3, M4A, WAV, FLAC, or AIFF, as well as a conversion speed of up to 10X and an output quality of up to 320 Kbps. Furthermore, the output path can be changed if necessary.
Step 2. Begin the conversion
Once all of the files have been added to the queue and all of the settings have been completed, click the Convert button.
Step 3. Find the best-converted music files for iMovie
Now, on your Mac computer, click the Menu button to locate the converted iTunes Music files in the target folder. The music may then be readily added to an iMovie project just like any other standard audio file.
Part 4. How to Add Audio to iMovie from Spotify?
Offline playback is possible with a Spotify Premium membership. You may save songs, playlists, or albums to listen to later. The essential element to remember is that Spotify music, whether online or offline, can only be accessed through the Spotify application. To put it another way, you do not have permission to import Spotify music into other third-party software programs. It comes with iMovie and other video editing software.
Step #1. Import music from Spotify into AudFree. The AudFree Spotify converter must be compatible with the Spotify app. When you run AudFree program from your computer’s desktop, Spotify will immediately load. You may now begin to uncover preferred Spotify tunes to add to iMovie. Import them into AudFree by copying and pasting or dragging and dropping.
Step #2. Set the output format and other preferences for iMovie. MP3, WAV, M4A, and AIFF are all supported by iMovie. You may go to the top menu and select ‘Preferences’ > ‘Convert’. A setting window will appear. You may select one of the iMovie-supported audio formats as the output format in the window. You can also change the output parameters.
Step #3. Spotify tracks may be converted for use in iMovie. To begin the download, click the ‘Convert’ button in the bottom-right corner of the main screen. AudFree program will download Spotify music to target iMovie files at up to 5X quicker speeds. You should disable your antivirus or firewall to make the converting process more stable.
Part 5. The Best Alternative to iMovie on Mac
Although iMovie has the amazing features anyone could wish to work with when crafting an interesting content, it has been seen to be limited in some ways. This is why Wondershare Filmora is the best alternative to iMovie. Filmora allows you to swiftly adjust audio effects and edit sound, ensuring that your demands are met.
Wrap Up
iMovie is an essential video editing tool, and that’s all there is to do when it comes to adding audio to iMovie videos.
iMovie, on the other hand, is limited if you want to test out new capabilities like editing films with amazing effects. This is where Filmora may come in handy in such cases.
Liza Brown
Liza Brown is a writer and a lover of all things video.
Follow @Liza Brown
The Ultimate List of Affordable Android Speech Capture and Audio Recording Tools
10 Best Voice Recording Apps for Android Devices [Free Included]

Benjamin Arango
Mar 27, 2024• Proven solutions
Memorizing every bit of information you need to perform your daily or weekly tasks becomes increasingly difficult as your workload rises. Students, journalists, and professionals from a wide array of industries can benefit from making audio notes or even recording entire conversations with their Smartphones.
A simple Android voice recorder can make this task easy since you can just tap on the Record button and create an audio note in seconds. However, with so many voice recorder apps for Android devices out there, finding the one best suited for your needs can be more complicated than it seems. So, in this article, we are going to help you discover some best free voice recorder for an Android device you are currently using.
Want to record voiceover and audio on iPhone? Check 10 Best Voice Recorder Apps for iPhones >>
10 Best Free Voice Recording Apps for Android Devices
Recording audio is no longer a highly technical process since now you can create an audio note or record an interview with an Android phone and a voice recorder app. The question is which voice recording app should you install on your device. So, let’s take a look at some of the most potent Android voice recorders you can find at Google Play Store.
1. Easy Voice Recorder Pro
Price: $3.99
Supported OS: Varies with the device
Best for: Students, musicians, and businessmen

App in Google Play
As the app’s name suggests making recordings for a broad range of purposes is easy. All you need to do is launch the app and start a new audio recording session. Easy Voice Recorder Pro doesn’t limit the duration of your recordings, and it also allows you to compress the recorded audio . That is perfect if you need to record long lectures or conversations. Besides, you can connect an external microphone with the app in case you want to increase the quality of the sound you are recording. The app also lets you store your recordings on Dropbox or Google Drive, while it also offers the possibility to send recordings via email.
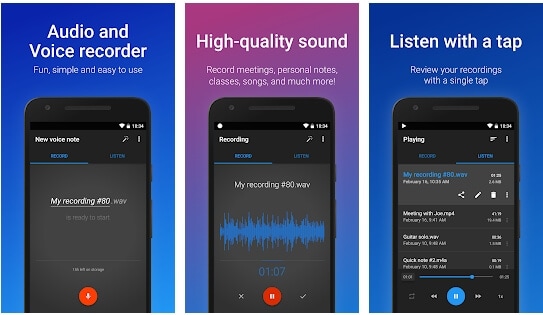
Easy Voice Recorder Pro Interface
Pros
- Allows users to manage and organize their recordings effortlessly
- Supports all standard output audio file formats
- Offers the option to record in stereo
- Recordings made with this app can be used as the ringtone
Cons
- Ads can be frustrating
- Limited basic audio editing tools
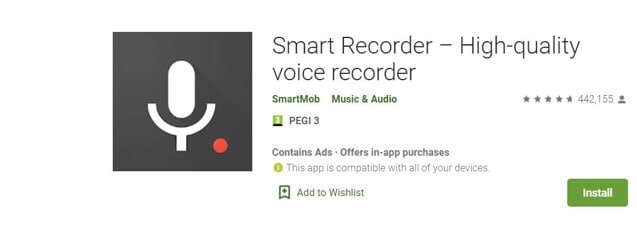
2. Smart Recorder – High-quality voice recorder
Price: Free, but contains ads and offers in-app purchases
Supported OS: Varies with the device
Best for: Students, musicians, and businessmen
App in Google Play
Capturing high-quality audio recordings effortlessly is the ultimate goal of all Android users who want to use voice recorders. As one of the best free voice recorders for Android, Smart Recorder app has a plethora of features that enable users to make high-quality audio recordings even in imperfect conditions. Options like Live Audio Spectrum Analyzer, microphone gain calibration or automatic and manual sensitivity control in Skip Silence mode are just a few reasons why this app has over 10 million installs. However, you should keep in mind that you cannot create audio files that are larger than 2 GB with this app.
Smart Recorder – High-quality voice recorder Interface
Pros
- Provides full control over the audio recording process
- Equipped with the Wave Lock feature that prevents the device from going into the sleep mode
- Features a live audio spectrum analyzer
- Preserves battery life
Cons
- No phone call recording options
- Limited file-sharing capabilities
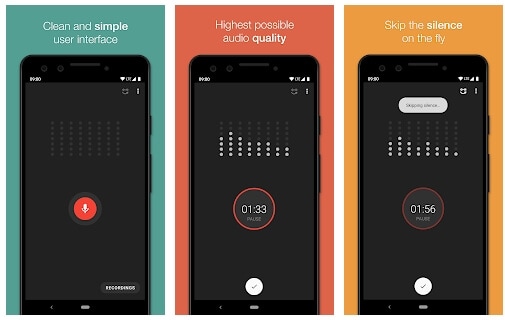
3. RecForge II Audio Recorder
Price: Free, but contains ads
Supported OS: Android 4.0 and up
Best for: Musicians
RecForge-audio-recorder App in Google Play
If you are looking for an Android voice recorder that allows you to customize bit rates, sample rates, choose codecs or record in mono or stereo mode, then you should consider installing RecForge II Audio Recorder on your device. The app allows you to schedule recordings, connect different types of external microphones or adjust the gain manually. In addition, you can also adjust the pitch , tempo and the playback rate of all audio files you record and edit with this app. RecForge II Audio Recorder continues working even while you are using other apps, and it keeps the battery consumption at the very minimum.
Pros
- Supports nearly all common audio file formats
- Offers a versatile set of audio editing tools
- Excellent file-sharing capabilities
- Allows users to increase the audio quality by disabling Automatic Gain Control
Cons
- The maximum duration of a recording is limited for some file formats
- Can be too complicated for inexperienced users
4. Hi-Q MP3 Voice Recorder
Price: Free
Supported OS: Varies with the device
Best for: Students, general use
Hi-Q MP3 Voice Recorder App in Google Play
You don’t need any previous audio recording experience to record long lectures, interviews and all other types of voice recordings with Hi-Q MP3 Voice Recorder. The free version of the app limits the maximum duration of a recording you can make to just 10 minutes. That is why you must upgrade to the Pro version of Hi-Q MP3 Voice Recorder if you want to capture hours of material directly from your phone. The best part is that all versions of the app automatically upload recordings to Google Drive or Dropbox which frees up space on your device.
Pros
- Intuitive and modernly designed interface
- Simple audio recording session setup
- Customizable audio quality
- Excellent file management capabilities
Cons
- Recording with external microphones is not an option
- The free version of the app limits the maximum duration of recordings
5. Voice Recorder
Price: Free, but contains ads
Supported OS: Android 4.1 and up
Best for: Students, musicians, and businessmen
Voice Recorder App in Google Play
If you are looking for an app you can use to record an interview, a business meeting or a lecture, then Voice Recorder may be one of your best options. You can record audio files without any restrictions and visualize the sounds with the Audio Spectrum Analyzer. The app continues recording from the background even while the phone’s screen is off which preserves battery life and enables you to perform other tasks while the recording session is in progress. Voice Recorder offers a broad range of file-sharing capabilities so that you can easily send your audio recordings via SMS, email and the Messenger app or share them on Facebook and WhatsApp.
Pros
- Available for free to all Android users
- Stopping, pausing or resuming a recording session is easy
- Allows users to adjust the sample rate
- Offers the microphone gain calibration tool
Cons
- Audio recordings can only be saved in two different file formats
- Doesn’t provide audio editing options
6. Music Maker JAM
Price: Free, but contains ads and offers in-app purchases
Supported OS: Varies with the device
Best for: Musicians
Music Maker JAM App in Google Play
With the selection of 300 mix packs, Music Maker JAM is one of the best android apps for aspiring musicians who want to compose their music even while they are on the go. You can choose from a variety of samples, audio loops and beats to create your next song or record live performances with the app’s 8-channel mixer. Music Maker JAM also enables you to record vocals, adjust the tempo of the audio files or apply effects to all recordings you edit with this app. Once your recording is ready, you can upload it to SoundCloud directly from the app or post it on Facebook and other social networks.
Pros
- Shake your Android phone to remix a song
- The app lets you choose from more than 300 mix packs
- Supports multi-channel recording
- Offers advanced audio editing options
Cons
- Music Maker JAM is not primarily a voice recorder
- No support for external microphones
7. LectureNotes
Price: Free
Supported OS: Android 3.0 and up
Best for: Students
LectureNotes App in Google Play
In case you take notes often, then this app can be an excellent choice for you as it allows you to use a stylus to create notes. However, the trial version limits the number of notebooks to just two, and neither of the notebooks can have more than eight pages. Moreover, if you would like to utilize the app’s voice recording features, you must install LectureRecordings plugin on your device. To capture videos, you must first install the LectureVideos plugin. Another disappointing thing is that you won’t be able to adjust the settings for your audio recording sessions or edit the recording you create with this app.
Pros
- An efficient tool for creating hand-written notes
- The app can be used while your Android phone is offline
- Allows users to export PDF files
- Compatible with OneNote and Evernote apps
Cons
- Underwhelming voice recording options
- You must install a plugin to record audio files
8. ASR Voice Recorder
Price: Free, but contains ads
Supported OS: Android 5.0 and up
Best for: Journalists, musicians, students

ASR Voice Recorder App in Google Play
A brief look at the list of features this app offers, you will find this is a well-rounded voice recorder because it offers all the tools you are going to need to create high-quality recordings. You can choose from a variety of file formats, add notes to recordings at recording or control the playback speed of all audio files you listen to in AVR Voice Recorder. You can also skip silences, connect a headset microphone to the app via Bluetooth or arrange your voice recordings in any way you want. The app lets you upload your audio files to Dropbox, Google Drive, and other file-hosting platforms.
Pros
- Provides excellent audio recording options for free
- Allows users to save recordings in different file formats
- Equipped with an audio playback controller
- Sharing multiple files is easy
Cons
- Offers only basic audio editing tools
- No audio transcription options
9. Call Recorder
Price: Free, but contains ads
Supported OS: Android 4.0 and up
Best for: Marketing professionals
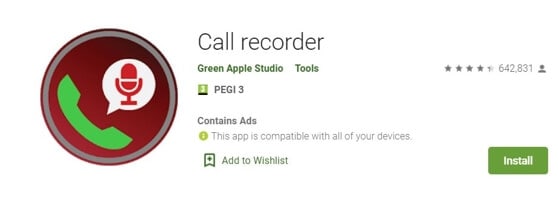
Call Recorder App in Google Play
If you would like to record all incoming and outgoing calls on your device, the Call Recorder app is one of the best options you have at your disposal. Besides recording all calls from whitelisted numbers automatically, this app also allows you to choose from a variety of different recording modes. Furthermore, Call Recorder lets you blacklist numbers from which you don’t want to receive calls and enables you to organize your recordings efficiently. All files created with this app can be sent via Skype, SMS, Dropbox and other messaging services, which makes Call Recorder app a perfect choice for marketing professionals.
Pros
- No previous experience required to start using the app
- Records an unlimited number of phone calls
- Simple audio file management
- Offers several recording modes
Cons
- No voice recording options
- Doesn’t provide audio editing tools
10. Otter Voice Meeting Notes
Price: Free, but offers in-app purchases
Supported OS: Android 5.0 and up
Best for: Large teams of professionals
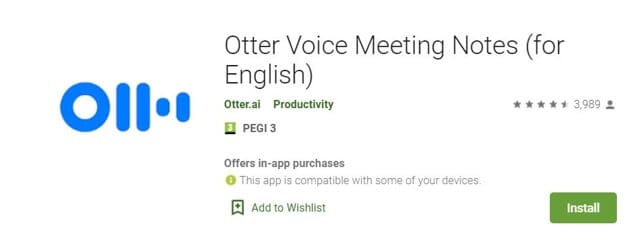
Otter Voice Meeting Notes App in Google Play
Besides being a powerful voice recorder, Otter Voice Meeting Notes is a collaborative tool that enables multiple team members to highlight and edit the transcripts this app generates in real-time. In addition to recording business meetings, you can also use Otter Voice Meeting Notes to record interviews, webinars or podcasts . Starting a new recording session takes only a second since you just have to tap on the Record button to capture the voices of all speakers in the room. What’s more, the app lets you add photos or slides to transcripts while the recording session is still in progress.
Pros
- Makes collaboration on a single transcript easier
- The app’s AI identifies different speakers automatically after the initial training
- Allows users to export MP3 audio files
- Compatible with the Call Recorder app
Cons
- In-app purchases are expensive
- Audio editing tools could be better
You may also like: 10 Best Free Discord Voice Changers
Conclusion
Creating an audio note or recording an entire interview with an Android device has never been easier. Each of the voice recorder apps we featured in this article enables you to create high-quality audio files you can share via email or store on the cloud.
Which of these Android voice recorders you are going to choose depends on a broad spectrum of factors, which range from the context in which you want to make the recording toaudio editing tools you want to use to process the audio files you created.
We’ve summarized the essential information in the table below. Hope that will help you to determine. What is your favorite Android voice recorder? Leave a comment and let us know.
| Voice recorder app | Price | Supported OS | User Rating | Best for |
|---|---|---|---|---|
| Easy Voice Recorder Pro | $3.99 | Varies with the device | 4.8 | Students, musicians, and businessmen |
| Smart Recorder – High-quality voice recorder | Free, but contains ads and offers in-app purchases | Varies with the device | 4.7 | Students, musicians, and businessmen |
| RecForge II Audio Recorder | Free, but contains ads | Android 4.0 and up | 4.0 | Musicians |
| Hi-Q MP3 Voice Recorder | Free | Varies with the device | 4.5 | Students |
| Voice Recorder | Free, but contains ads | Android 4.1 and up | 4.8 | Students, musicians, and businessmen |
| Music Maker JAM | Free, but contains ads and offers in-app purchases | Varies with the device | 4.6 | Musicians |
| LectureNotes | Free | Android 3.0 and up | 4.3 | Students |
| ASR Voice Recorder | Free, but contains ads | Android 5.0 and up | 4.4 | Journalists, musicians, students |
| Call Recorder | Free, but contains ads | Android 4.0 and up | 4.3 | Marketing professionals |
| Otter Voice Meeting Notes | Free, but offers in-app purchases | Android 5.0 and up | 4.5 | Large teams of professionals |
Benjamin Arango
Benjamin Arango is a writer and a lover of all things video.
Follow @Benjamin Arango
Benjamin Arango
Mar 27, 2024• Proven solutions
Memorizing every bit of information you need to perform your daily or weekly tasks becomes increasingly difficult as your workload rises. Students, journalists, and professionals from a wide array of industries can benefit from making audio notes or even recording entire conversations with their Smartphones.
A simple Android voice recorder can make this task easy since you can just tap on the Record button and create an audio note in seconds. However, with so many voice recorder apps for Android devices out there, finding the one best suited for your needs can be more complicated than it seems. So, in this article, we are going to help you discover some best free voice recorder for an Android device you are currently using.
Want to record voiceover and audio on iPhone? Check 10 Best Voice Recorder Apps for iPhones >>
10 Best Free Voice Recording Apps for Android Devices
Recording audio is no longer a highly technical process since now you can create an audio note or record an interview with an Android phone and a voice recorder app. The question is which voice recording app should you install on your device. So, let’s take a look at some of the most potent Android voice recorders you can find at Google Play Store.
1. Easy Voice Recorder Pro
Price: $3.99
Supported OS: Varies with the device
Best for: Students, musicians, and businessmen
App in Google Play
As the app’s name suggests making recordings for a broad range of purposes is easy. All you need to do is launch the app and start a new audio recording session. Easy Voice Recorder Pro doesn’t limit the duration of your recordings, and it also allows you to compress the recorded audio . That is perfect if you need to record long lectures or conversations. Besides, you can connect an external microphone with the app in case you want to increase the quality of the sound you are recording. The app also lets you store your recordings on Dropbox or Google Drive, while it also offers the possibility to send recordings via email.
Easy Voice Recorder Pro Interface
Pros
- Allows users to manage and organize their recordings effortlessly
- Supports all standard output audio file formats
- Offers the option to record in stereo
- Recordings made with this app can be used as the ringtone
Cons
- Ads can be frustrating
- Limited basic audio editing tools
2. Smart Recorder – High-quality voice recorder
Price: Free, but contains ads and offers in-app purchases
Supported OS: Varies with the device
Best for: Students, musicians, and businessmen
App in Google Play
Capturing high-quality audio recordings effortlessly is the ultimate goal of all Android users who want to use voice recorders. As one of the best free voice recorders for Android, Smart Recorder app has a plethora of features that enable users to make high-quality audio recordings even in imperfect conditions. Options like Live Audio Spectrum Analyzer, microphone gain calibration or automatic and manual sensitivity control in Skip Silence mode are just a few reasons why this app has over 10 million installs. However, you should keep in mind that you cannot create audio files that are larger than 2 GB with this app.
Smart Recorder – High-quality voice recorder Interface
Pros
- Provides full control over the audio recording process
- Equipped with the Wave Lock feature that prevents the device from going into the sleep mode
- Features a live audio spectrum analyzer
- Preserves battery life
Cons
- No phone call recording options
- Limited file-sharing capabilities
3. RecForge II Audio Recorder
Price: Free, but contains ads
Supported OS: Android 4.0 and up
Best for: Musicians
RecForge-audio-recorder App in Google Play
If you are looking for an Android voice recorder that allows you to customize bit rates, sample rates, choose codecs or record in mono or stereo mode, then you should consider installing RecForge II Audio Recorder on your device. The app allows you to schedule recordings, connect different types of external microphones or adjust the gain manually. In addition, you can also adjust the pitch , tempo and the playback rate of all audio files you record and edit with this app. RecForge II Audio Recorder continues working even while you are using other apps, and it keeps the battery consumption at the very minimum.
Pros
- Supports nearly all common audio file formats
- Offers a versatile set of audio editing tools
- Excellent file-sharing capabilities
- Allows users to increase the audio quality by disabling Automatic Gain Control
Cons
- The maximum duration of a recording is limited for some file formats
- Can be too complicated for inexperienced users
4. Hi-Q MP3 Voice Recorder
Price: Free
Supported OS: Varies with the device
Best for: Students, general use
Hi-Q MP3 Voice Recorder App in Google Play
You don’t need any previous audio recording experience to record long lectures, interviews and all other types of voice recordings with Hi-Q MP3 Voice Recorder. The free version of the app limits the maximum duration of a recording you can make to just 10 minutes. That is why you must upgrade to the Pro version of Hi-Q MP3 Voice Recorder if you want to capture hours of material directly from your phone. The best part is that all versions of the app automatically upload recordings to Google Drive or Dropbox which frees up space on your device.
Pros
- Intuitive and modernly designed interface
- Simple audio recording session setup
- Customizable audio quality
- Excellent file management capabilities
Cons
- Recording with external microphones is not an option
- The free version of the app limits the maximum duration of recordings
5. Voice Recorder
Price: Free, but contains ads
Supported OS: Android 4.1 and up
Best for: Students, musicians, and businessmen
Voice Recorder App in Google Play
If you are looking for an app you can use to record an interview, a business meeting or a lecture, then Voice Recorder may be one of your best options. You can record audio files without any restrictions and visualize the sounds with the Audio Spectrum Analyzer. The app continues recording from the background even while the phone’s screen is off which preserves battery life and enables you to perform other tasks while the recording session is in progress. Voice Recorder offers a broad range of file-sharing capabilities so that you can easily send your audio recordings via SMS, email and the Messenger app or share them on Facebook and WhatsApp.
Pros
- Available for free to all Android users
- Stopping, pausing or resuming a recording session is easy
- Allows users to adjust the sample rate
- Offers the microphone gain calibration tool
Cons
- Audio recordings can only be saved in two different file formats
- Doesn’t provide audio editing options
6. Music Maker JAM
Price: Free, but contains ads and offers in-app purchases
Supported OS: Varies with the device
Best for: Musicians
Music Maker JAM App in Google Play
With the selection of 300 mix packs, Music Maker JAM is one of the best android apps for aspiring musicians who want to compose their music even while they are on the go. You can choose from a variety of samples, audio loops and beats to create your next song or record live performances with the app’s 8-channel mixer. Music Maker JAM also enables you to record vocals, adjust the tempo of the audio files or apply effects to all recordings you edit with this app. Once your recording is ready, you can upload it to SoundCloud directly from the app or post it on Facebook and other social networks.
Pros
- Shake your Android phone to remix a song
- The app lets you choose from more than 300 mix packs
- Supports multi-channel recording
- Offers advanced audio editing options
Cons
- Music Maker JAM is not primarily a voice recorder
- No support for external microphones
7. LectureNotes
Price: Free
Supported OS: Android 3.0 and up
Best for: Students
LectureNotes App in Google Play
In case you take notes often, then this app can be an excellent choice for you as it allows you to use a stylus to create notes. However, the trial version limits the number of notebooks to just two, and neither of the notebooks can have more than eight pages. Moreover, if you would like to utilize the app’s voice recording features, you must install LectureRecordings plugin on your device. To capture videos, you must first install the LectureVideos plugin. Another disappointing thing is that you won’t be able to adjust the settings for your audio recording sessions or edit the recording you create with this app.
Pros
- An efficient tool for creating hand-written notes
- The app can be used while your Android phone is offline
- Allows users to export PDF files
- Compatible with OneNote and Evernote apps
Cons
- Underwhelming voice recording options
- You must install a plugin to record audio files
8. ASR Voice Recorder
Price: Free, but contains ads
Supported OS: Android 5.0 and up
Best for: Journalists, musicians, students
ASR Voice Recorder App in Google Play
A brief look at the list of features this app offers, you will find this is a well-rounded voice recorder because it offers all the tools you are going to need to create high-quality recordings. You can choose from a variety of file formats, add notes to recordings at recording or control the playback speed of all audio files you listen to in AVR Voice Recorder. You can also skip silences, connect a headset microphone to the app via Bluetooth or arrange your voice recordings in any way you want. The app lets you upload your audio files to Dropbox, Google Drive, and other file-hosting platforms.
Pros
- Provides excellent audio recording options for free
- Allows users to save recordings in different file formats
- Equipped with an audio playback controller
- Sharing multiple files is easy
Cons
- Offers only basic audio editing tools
- No audio transcription options
9. Call Recorder
Price: Free, but contains ads
Supported OS: Android 4.0 and up
Best for: Marketing professionals
Call Recorder App in Google Play
If you would like to record all incoming and outgoing calls on your device, the Call Recorder app is one of the best options you have at your disposal. Besides recording all calls from whitelisted numbers automatically, this app also allows you to choose from a variety of different recording modes. Furthermore, Call Recorder lets you blacklist numbers from which you don’t want to receive calls and enables you to organize your recordings efficiently. All files created with this app can be sent via Skype, SMS, Dropbox and other messaging services, which makes Call Recorder app a perfect choice for marketing professionals.
Pros
- No previous experience required to start using the app
- Records an unlimited number of phone calls
- Simple audio file management
- Offers several recording modes
Cons
- No voice recording options
- Doesn’t provide audio editing tools
10. Otter Voice Meeting Notes
Price: Free, but offers in-app purchases
Supported OS: Android 5.0 and up
Best for: Large teams of professionals
Otter Voice Meeting Notes App in Google Play
Besides being a powerful voice recorder, Otter Voice Meeting Notes is a collaborative tool that enables multiple team members to highlight and edit the transcripts this app generates in real-time. In addition to recording business meetings, you can also use Otter Voice Meeting Notes to record interviews, webinars or podcasts . Starting a new recording session takes only a second since you just have to tap on the Record button to capture the voices of all speakers in the room. What’s more, the app lets you add photos or slides to transcripts while the recording session is still in progress.
Pros
- Makes collaboration on a single transcript easier
- The app’s AI identifies different speakers automatically after the initial training
- Allows users to export MP3 audio files
- Compatible with the Call Recorder app
Cons
- In-app purchases are expensive
- Audio editing tools could be better
You may also like: 10 Best Free Discord Voice Changers
Conclusion
Creating an audio note or recording an entire interview with an Android device has never been easier. Each of the voice recorder apps we featured in this article enables you to create high-quality audio files you can share via email or store on the cloud.
Which of these Android voice recorders you are going to choose depends on a broad spectrum of factors, which range from the context in which you want to make the recording toaudio editing tools you want to use to process the audio files you created.
We’ve summarized the essential information in the table below. Hope that will help you to determine. What is your favorite Android voice recorder? Leave a comment and let us know.
| Voice recorder app | Price | Supported OS | User Rating | Best for |
|---|---|---|---|---|
| Easy Voice Recorder Pro | $3.99 | Varies with the device | 4.8 | Students, musicians, and businessmen |
| Smart Recorder – High-quality voice recorder | Free, but contains ads and offers in-app purchases | Varies with the device | 4.7 | Students, musicians, and businessmen |
| RecForge II Audio Recorder | Free, but contains ads | Android 4.0 and up | 4.0 | Musicians |
| Hi-Q MP3 Voice Recorder | Free | Varies with the device | 4.5 | Students |
| Voice Recorder | Free, but contains ads | Android 4.1 and up | 4.8 | Students, musicians, and businessmen |
| Music Maker JAM | Free, but contains ads and offers in-app purchases | Varies with the device | 4.6 | Musicians |
| LectureNotes | Free | Android 3.0 and up | 4.3 | Students |
| ASR Voice Recorder | Free, but contains ads | Android 5.0 and up | 4.4 | Journalists, musicians, students |
| Call Recorder | Free, but contains ads | Android 4.0 and up | 4.3 | Marketing professionals |
| Otter Voice Meeting Notes | Free, but offers in-app purchases | Android 5.0 and up | 4.5 | Large teams of professionals |
Benjamin Arango
Benjamin Arango is a writer and a lover of all things video.
Follow @Benjamin Arango
How To Record Your Computer Audio in Audacity
In modern times, it has become a common practice to record your audio files. This is usually beneficial for many purposes. Be it for business meetings, podcasts, or just an informative lecture you have taken down. You will always need to record computer audio from time to time in the year 2022.

Over the past decade or so, computer users have recorded their audio and converted it into a digital format with relative ease. However, users look to record computer audio at even the highest quality levels. And while the technology needed to achieve this is readily available in both software and hardware forms, it can be somewhat complex.
If you want to record any sound or audio on your computer, this article is meant for you. Whether you are looking to do a voice-over on a video or just want to record some random audio notes, you can easily make it happen. This article will guide you to record your computer audio using a PC easily. We will share different methods using which you can record computer audio.
This article is not directed at potential audio recorders but rather at those looking to improve the audio quality of their recordings. Users will already have their microphone and recording equipment, yet they may find this article useful.
Recording Voice On Windows
If you are using a pc or desktop, then keep in mind that most operating systems have their own default recording software that comes pre-installed. Most people don’t know about them, and they rush for 3rd party applications for sound recording purposes. It doesn’t matter if you use Windows 7, 8, 10, or 11. Windows operating system also has its recorder app. It will be available on your system, and all you need to do is find it and use it. If you are unsure how to do that, then follow the steps given below.
- Go to the search options of your windows and type “Voice Recorder” in it.
- Click on the search button, and the voice recorder app will appear in the top searches.

- Just open the app, and a recording button will appear on the screen. All you need to do is, click on the recording icon, and it will start recording your audio from your microphone, and when you are done recording, you click on the stop recording button, and it will automatically be saved on your computer.

Recording Voice On Mac
If you are using Mac operating system, then it also has its recording app. Just follow the steps given below:
Recordings can be created using the built-in microphone, an external microphone, or a headset with a supported microphone. If you’re signed in with the same Apple ID on your iPad, iPhone, or Mac, you can listen to your Voice Memos recordings on any of those devices.
- Click on the Record button (or use the Touch Bar) inside the Voice Memos app on your Mac.
- By clicking the Pause button, you can pause the video. You can resume the video by clicking Resume.
- At the bottom of the page, click Done when you are finished.
Record Voice Using Audacity
Although you can record the computer audio using built-in tools, many 3rd party tools like Audacity provide you with more features and better quality than the built-in tools. To use Audacity for recording your pc audio, follow the steps given below.
- First of all, you need to download the audacity software to your pc. Different versions of Audacity are available for different operating systems. So, you can try searching “audacity windows 7”, “audacity windows 8”, “audacity windows 10”, or “audacity mac” depending upon the operating system you are using.
- Once it is installed, run the software, and its interface will appear on your screen.
- Now you’ll need to customize the drop-down boxes above the timeline. The farthest thing on the left should be ‘Windows WASAPI’. From the next choice to the right, choose ‘Speakers (Realtek(R) Audio) (loopback)’.
- It’s important to set the Recording Channel to 2 (Stereo). Otherwise, an error message will likely appear. Verify that the output device is set to the appropriate speakers
- Once you have finished, click the red circle on top of your screen, and Audacity will record the audio that comes out of your speakers. If no audio is detected, the recording will be automatically paused. You can also stop by hitting the grey stop button at the top at any time
- Audio editing tools like Audacity allow you to edit your recording after recording it and export it in several formats based on what you recorded.
Final Verdict
That’s how it works. Here are two easy ways to record the audio coming from your PC. Record internal audio (such as what comes out of your microphone) with Windows/Mac 10’s built-in ‘Voice Recorder’ app or Audacity. These applications are both extremely simple to use. To get the best audio quality, we recommend trying our Filmora Audio tools. Although Audacity does the job pretty well with filmora audio tools and voice packs, you can add many voice effects and edit your audio professionally. Give it a try as it is free to use.
For Win 7 or later (64-bit)
For macOS 10.12 or later
Over the past decade or so, computer users have recorded their audio and converted it into a digital format with relative ease. However, users look to record computer audio at even the highest quality levels. And while the technology needed to achieve this is readily available in both software and hardware forms, it can be somewhat complex.
If you want to record any sound or audio on your computer, this article is meant for you. Whether you are looking to do a voice-over on a video or just want to record some random audio notes, you can easily make it happen. This article will guide you to record your computer audio using a PC easily. We will share different methods using which you can record computer audio.
This article is not directed at potential audio recorders but rather at those looking to improve the audio quality of their recordings. Users will already have their microphone and recording equipment, yet they may find this article useful.
Recording Voice On Windows
If you are using a pc or desktop, then keep in mind that most operating systems have their own default recording software that comes pre-installed. Most people don’t know about them, and they rush for 3rd party applications for sound recording purposes. It doesn’t matter if you use Windows 7, 8, 10, or 11. Windows operating system also has its recorder app. It will be available on your system, and all you need to do is find it and use it. If you are unsure how to do that, then follow the steps given below.
- Go to the search options of your windows and type “Voice Recorder” in it.
- Click on the search button, and the voice recorder app will appear in the top searches.
- Just open the app, and a recording button will appear on the screen. All you need to do is, click on the recording icon, and it will start recording your audio from your microphone, and when you are done recording, you click on the stop recording button, and it will automatically be saved on your computer.
Recording Voice On Mac
If you are using Mac operating system, then it also has its recording app. Just follow the steps given below:
Recordings can be created using the built-in microphone, an external microphone, or a headset with a supported microphone. If you’re signed in with the same Apple ID on your iPad, iPhone, or Mac, you can listen to your Voice Memos recordings on any of those devices.
- Click on the Record button (or use the Touch Bar) inside the Voice Memos app on your Mac.
- By clicking the Pause button, you can pause the video. You can resume the video by clicking Resume.
- At the bottom of the page, click Done when you are finished.
Record Voice Using Audacity
Although you can record the computer audio using built-in tools, many 3rd party tools like Audacity provide you with more features and better quality than the built-in tools. To use Audacity for recording your pc audio, follow the steps given below.
- First of all, you need to download the audacity software to your pc. Different versions of Audacity are available for different operating systems. So, you can try searching “audacity windows 7”, “audacity windows 8”, “audacity windows 10”, or “audacity mac” depending upon the operating system you are using.
- Once it is installed, run the software, and its interface will appear on your screen.
- Now you’ll need to customize the drop-down boxes above the timeline. The farthest thing on the left should be ‘Windows WASAPI’. From the next choice to the right, choose ‘Speakers (Realtek(R) Audio) (loopback)’.
- It’s important to set the Recording Channel to 2 (Stereo). Otherwise, an error message will likely appear. Verify that the output device is set to the appropriate speakers
- Once you have finished, click the red circle on top of your screen, and Audacity will record the audio that comes out of your speakers. If no audio is detected, the recording will be automatically paused. You can also stop by hitting the grey stop button at the top at any time
- Audio editing tools like Audacity allow you to edit your recording after recording it and export it in several formats based on what you recorded.
Final Verdict
That’s how it works. Here are two easy ways to record the audio coming from your PC. Record internal audio (such as what comes out of your microphone) with Windows/Mac 10’s built-in ‘Voice Recorder’ app or Audacity. These applications are both extremely simple to use. To get the best audio quality, we recommend trying our Filmora Audio tools. Although Audacity does the job pretty well with filmora audio tools and voice packs, you can add many voice effects and edit your audio professionally. Give it a try as it is free to use.
For Win 7 or later (64-bit)
For macOS 10.12 or later
Also read:
- New 2024 Approved Elevating Your Audio Experience on Android The Definitive M4A Playback Manual
- Updated In 2024, Beyond the Script Delving Into the World of Anime Dubbing and Its Impact
- In 2024, Remote MP3 Resizer and Fusion Software
- Updated The Pursuit of Pristine Sounds A Complete Guide to Utilizing Adobe Auditions Noise Reduction Features for 2024
- New Audiovisual Excellence Mastering the Art of Sound Design in Sony Vegas Pro 2023 for 2024
- Premium Video Noise Extraction Tool for PCs and Macs (2024 Version)
- 2024 Approved Innovative Text-to-Speech Solutions Dominating the Market
- Updated 2024 Approved Voice Your Ideas for Free! Explore Top 9 Text-to-Speech Tools Online
- New Pitch Perfect Cleanup The Best Affordable Applications for Removing Unwanted Vocals
- Updated 2024 Approved Essential List Top 10 Costless Online DAW Options to Explore
- In 2024, Unveiling an Assortment of Authentic Dog Noise Recordings
- Seeking Out Wolves Haunting Howls in Audio Form
- Updated Ensuring Cyber Wellness in Remote Relationships Tips to Shield Against Digital Risks for 2024
- Tips and Tricks to Listen or Download Soft Background Music for 2024
- Updated Rhythmic Editing Made Easy Aligning Video and Sound in Adobe Premiere Pro for 2024
- Updated Becoming a Savvy Sound Stealer Proven Strategies to Download, Save, and Access Your Favorite Podcasts on Computers
- Unique Vocal Plugins for Zoom The Top 6 Apps That Make Your Conversations Memorable
- Why Is My Honor X9a Offline? Troubleshooting Guide | Dr.fone
- Fix App Not Available in Your Country Play Store Problem on Honor Magic5 Ultimate | Dr.fone
- Realme Narzo 60 5G Stuck on Screen – Finding Solutions For Stuck on Boot | Dr.fone
- New 2024 Approved Stop Motion Made Easy Best Apps for Mobile Animation
- New In 2024, Unlock Efficiency Top Adobe Premiere Shortcuts for Faster Editing
- In 2024, Make Stunning Videos in Minutes WeVideo
- 3 Easy Solutions to Hard Reset Nubia Z50 Ultra | Dr.fone
- How to Unlock Nokia XR21 Phone Forgot Password
- Easy steps to recover deleted messages from Infinix Note 30 VIP Racing Edition
- In 2024, Ultimate Guide to Translating YouTube Videos Without CC
- New Free Video Shake Reduction Software for PC and Mac Users
- New High-Definition Video Made Easy A Beginners Guide to Pixel Size for 2024
- 2024 Approved Androids Best Kept Secrets Top iMovie Alternative Apps
- New In 2024, Ready to Animate Game Character From Scratch?
- Title: New 2024 Approved Audio Immersion in iMovie Techniques for Beginners to Master
- Author: Kate
- Created at : 2024-05-05 07:45:24
- Updated at : 2024-05-06 07:45:24
- Link: https://audio-editing.techidaily.com/new-2024-approved-audio-immersion-in-imovie-techniques-for-beginners-to-master/
- License: This work is licensed under CC BY-NC-SA 4.0.
