
:max_bytes(150000):strip_icc():format(webp)/dns-wordcloud-lifewire-2-0c92c02113cb4832870891ac0e13ccbc.png)
New 2023 Compilation of Top Free Music Software Produce, Edit & Record with Zero Cost Windows and macOS
“2023 Compilation of Top Free Music Software: Produce, Edit & Record with Zero Cost [Windows and macOS]”
13 Free Music Production Software for Windows/Mac/Online

Benjamin Arango
Mar 27, 2024• Proven solutions
13 Free Music Production Software for Windows/Mac/Online
Technology advances have spread through all fields of human activity, including music recording and development. The invention of music development tools has made it simpler for people engaged in the creation of music in one form or another.
Numerous applications for music development are on the market, and some are meant for musicians, and others are for educators and teachers. There is also a need to direct prospective customers to the right free music production software.
A comprehensive analysis of some of the best music development tools has been conducted to help you make the correct decision while you’re ready to purchase the app. This comprehensive Music Production Software Guide will provide solutions to many of your unanswered questions relating to the purchase of music production software.
- Part 1: Free Music Production Software for Windows
- Part 2: Free Music Production Software for Mac
- Part 3: Free Music Production Software Online
Part 1: Free Music Production Software for Windows
1. Audacity
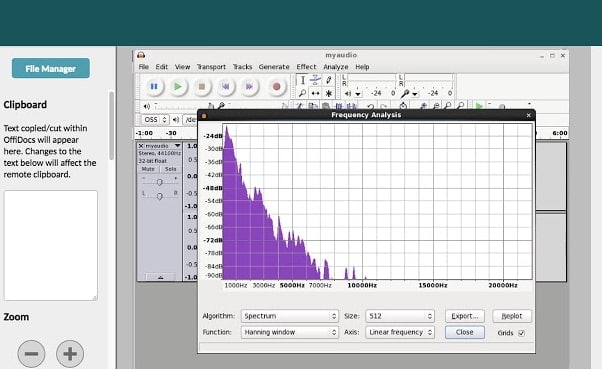
The system for music development is not complete without an audio editor. Audacity is the best free music creation software available on the market. Audacity is open-source and extensive and provides a wide range of tools and effects for performing all audio editing and recording activities. It is created by a community of volunteers and provides regular notifications almost every month. It’s lightweight, safe, and intuitive enough to be used by novice music makers.
Pros
- It is open-source
- It can load VST plugins
Cons
- Only 32-bit plugins are allowed
- Limited features
2. Ardour
Ardour is a highly integrated program of music production that allows users to record and edit on Mac, Linux, and Windows operating systems. Ardour Music Production Software was created by integrating the efforts of the world’s skilled team, such as recording technicians, programmers, and musicians. Such experienced technicians make their concerted and thorough efforts to build the program. Ardour is one of the few applications in music production that respects honesty. The accessibility of this program allows app developers to concentrate on functionality that matters to consumers rather than to construct compelling apps for advertising purposes. This is a system that should be celebrated for its user-focused functionality.
Pros
- It has excellent user-friendliness
- It is available on Mac, Linux, and Windows
Cons
- It lacks a few integral features
- It is difficult to operate for people new to audio editing

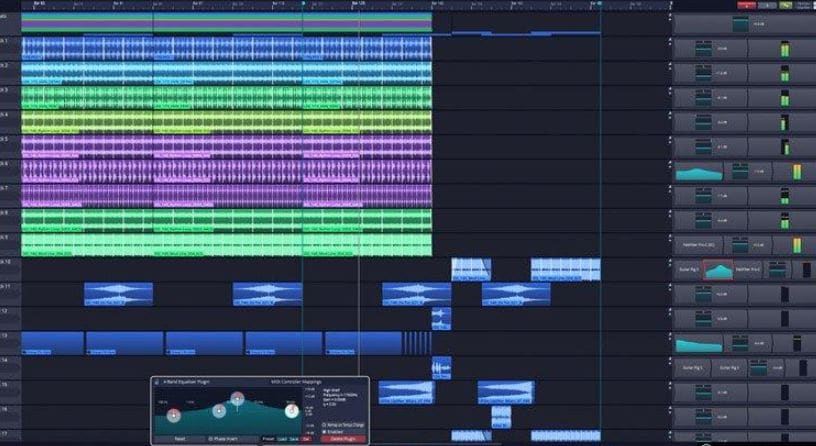
3. Tracktion T7
The people at Tracktion seem to have reached a reasonably canny business model by launching older DAW versions for free and without anything removed.
The convention appears to make it possible to access the edition without charge of two iterations before the new one. You will not be provided with all new functionality, but you will receive an update every time the company updates its flagship DAW, which it does nearly every year.
The growing section is adjustable to match the workflow, and the bottom panel adjusts so that any parameters anywhere on the screen can be seen.
Pros
- It features an unlimited number of audio and MIDI tracks
- It is able to host multiple plugin formats
Cons
- It doesn’t provide all the features at once
- It does not support many plugins
4. LMMS
LMMS is a fully free music production software for windows for music development. It is an open-source and also a project platform for the community. LMMS is a cross-platform device app. It makes it easier to manufacture beats, particularly when many music production professionals have to manufacture quality music with their computers.
Thanks to the powerful sample, beat and melody design, mixing and synthetic sound processes, and many other features, the LMMS music production software provides high-quality audio output. The product also features playback tools, plugins, and samples to produce powerful, high-quality sound.
Pros
- It is compatible with Linux, Windows, and Mac
- Hydrogen project files and MIDI can be imported easily for editing
Cons
- It eats a lot of memory and requires a high-end device to support it
- Some users complained that understanding its working is difficult

5. Cakewalk
This is an exciting app for music production to purchase. It is a fantastic tech to invest in music production. Cakewalk Sonar Artist Software is one of Cakewalk Sonar Artist ‘s great productions. Cakewalk is known for an excellent GUI, an excellent mixing console, an excellent commercial radio system, and limitless MIDI tracks.
A good device to use as part of your instruments for the development of music is the Cakewalk Sonar Artist Music Production program. It stands out as a program packed with excellent features amongst its counterparts. And the app is unmatched in the area of apps.
Pros
- You can share music compilation directly to social media
- You can easily add effects to your tracks
Cons
- It is priced, very high
- One window interface makes it hectic

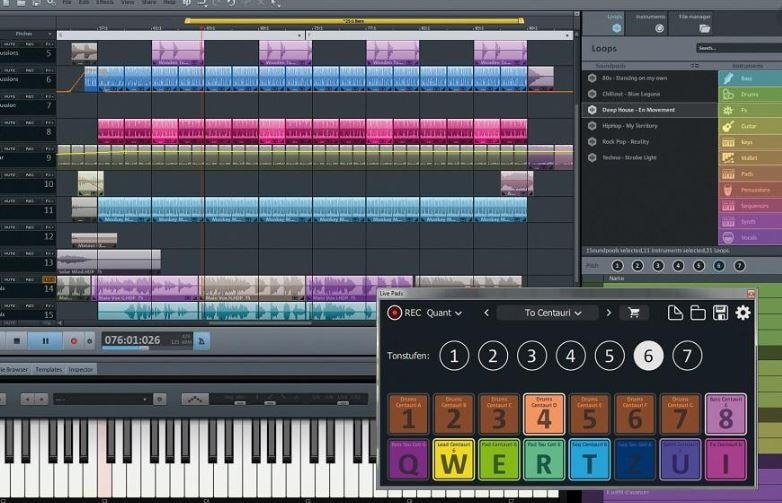
6. Music Maker by Magix
This app is a special program for sound engineers, skilled musicians, and accomplished music producers, developed by US Magix Entertainment. It offers an excellent forum for creative music development in music production professionals.
In reality, the software for music production is excellent software for the Music Maker by Magix. In the field of music post-production and music mastering, mixing and arrangement, recording, and more, the software achieved remarkable breakthroughs. Thanks to the successful combination of a technical device and highly flexible workflow, the Music Maker by Magix has achieved this groundbreaking success.
With creative algorithm and superb plugin effects, the Music Maker by Magix program enables music manufacturers to develop their ideas in line with the highest quality in this industry.
Pros
- It is great for EDM producers
Cons
- It is not suitable for newbies
- The GUI feels a bit cluttered
Part 2: Free Music Production Software for Mac
7. Garageband
This is a music development studio app that is designed to function on Mac. It is a great free music production software for Mac. This software has a full sound collection, which includes virtual instruments, voice, and guitar preset.
GarageBand is a well-known app for music development and is an excellent tool for music beginners. Many people have chosen GarageBand because it does not match the ease and ease of use for recording purposes in particular.
The user-friendly interface makes you easy to create music with a more unobstructed view of what you’re recording. Apps from GarageBand captured the attention of others because of their ease-to-use and user-friendliness.
Pros
- The software offers some nicely packaged preset for vocal and guitar recording
- Productive workflow
Cons
- It has limited plugins
- It is only supported for Mac platforms

8. Ableton Live
The Ableton Live 10 Suite is a dynamic and comprehensive program for the creation and performance of musical recordings.
An essential feature of this software is that it allows you to work on your time-based workflow without affecting the live session. This means that the software gives you a rare chance to get involved with the workflow without stopping live performance.
The Multitrack Recording Technology of Ableton Live10 Suite allows music producers to adjust the speed and pacing of any audio during the recording. To make these adjustments, you don’t have to pause the recording. This is one of the striking characteristics which makes this product a good option for all.
Pros
- Adjusting the speed and pace of audio is a delight
- Sophisticated MIDI/audio routing capabilities
Cons
- It has a traditional design
- Not enough updates to fix the buggy features

9. Boom 3D
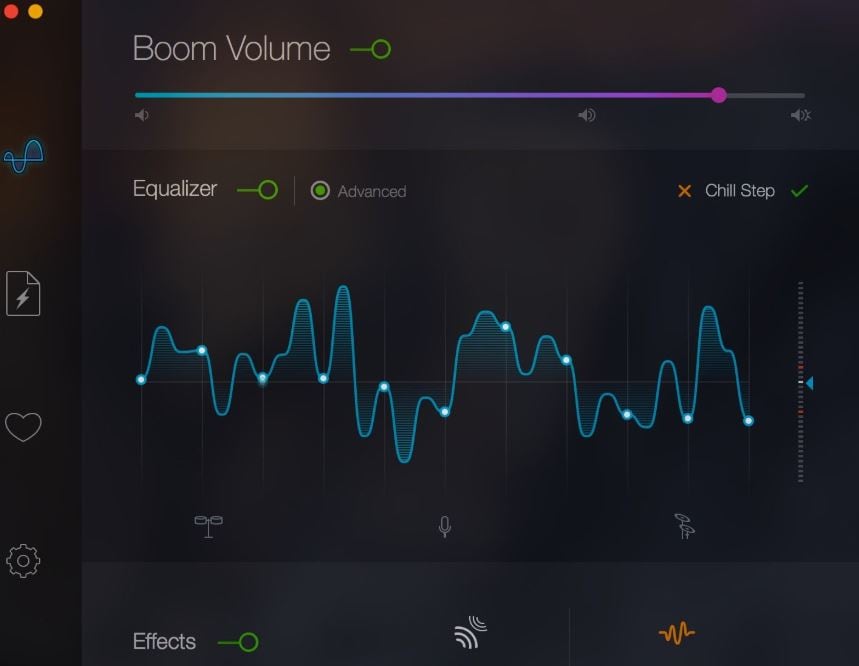
Boom 3D for Mac & Windows is an award-winning pro sound improvement software designed to play your media content on any and all of your devices, phones, or streaming services with amazing 3D effects. No costly headphones or sound boosters will be needed to make your music feel like it! Designed in a new immersive 3D surround sound technology, Boom 3D redefines how people listen to music, watch films, or play games with some headphones on their devices. 3D sound provides the option to check the LFE (subwoofer), and the audio intensity of each Virtual 3D Surround audio system speaker.
Pros
- It comes with loads of content
- Audio quality can be enhanced
Cons
- The design is not suitable for everybody
- It does not have a Linux version
10. Mixxx
For beginners, Mixxx is just another great device. This is also one of the best free music production software downloads for your music. This software supports all Mac, Windows, and Linux platforms.
The application provides you with a DJ-mixing environment and supports all standard formats such as Mp3 and many other formats.
Pros
- It is a great app for beginners
- Supported by Mac, Windows, and Linux
Cons
- It doesn’t support many plugins
- GUI isn’t that great

Part 3: Free Music Production Software Online
11. Soundation
Soundation is a platform that provides free music production software online only capabilities. The free version and three paid versions are offered. You can use this to build your tracks unless you have the resources to do so if you need a web-based music maker and editor.
If you pay, even after you have made your music, you can always cancel. Remember first to save them to your hard drive. If you need paid characteristics, pay for the monthly plan again through PayPal, and you have to use it for a month.
Pros
- Great SSL-modelled mixer
- You can use its devices as a plugin
Cons
- It works only online

12. Audiotool
Audiotool is a popular app for music production hosted online and can be used without installation from inside your browser. It uses a cloud-based network to store all your music and files wherever you are. It is also confirmed that you will share music and tracks directly with YouTube, SoundCloud, and Facebook on its own publishing site. They have premium releases from Loopmasters and some fantastic online VSTs, for example, Heisenberg, Machiniste, Bassline, and Beatbox 8 & 9.
Pros
- No installation needed
- You can directly share it to your social media
Cons
- It works only online
- No upgrades

13. Soundtrap
Soundtrap is not only an online music studio but a training site for students and instructors. The STEAM Curriculum is an online learning resource that helps students to follow music and podcasts, incorporated into the Web app. As we mentioned earlier, in addition to the online Web App, you can also use it on different devices, share it with other users, and work in innovative projects for your music.
The interface is simple, easy to use, and easy to understand. It is simply an instrument for innovation; you don’t have to learn how to apply VST or any other technical elements to music creation. You can also record your MIDI instruments directly from your machine or device’s mic.
Pros
- It provides a great platform for teachers to teach their students
- It is very easy to use
Cons
- It only has a limited number of plugins
- It cannot be used professionally

Conclusion
If you make music on a computer, the most important resource in your artistic arsenal is your DAW; in your home recording system, you ‘re probably going to have the MIDI keyboard, audio interface, studio monitor speakers, and maybe a microphone or two. But your program is at the core of it all. Not everyone can afford expensive DAWs, but one must not worry as free music production software are present to aid us.
It is important to have a DAW with which you are pleased and, perhaps more importantly, a DAW, which allows you to turn your ideas into music as quickly and painlessly as possible. So make sure you choose the best one for you according to your needs. Hopefully, this guide will aid you!


Benjamin Arango
Benjamin Arango is a writer and a lover of all things video.
Follow @Benjamin Arango
Benjamin Arango
Mar 27, 2024• Proven solutions
13 Free Music Production Software for Windows/Mac/Online
Technology advances have spread through all fields of human activity, including music recording and development. The invention of music development tools has made it simpler for people engaged in the creation of music in one form or another.
Numerous applications for music development are on the market, and some are meant for musicians, and others are for educators and teachers. There is also a need to direct prospective customers to the right free music production software.
A comprehensive analysis of some of the best music development tools has been conducted to help you make the correct decision while you’re ready to purchase the app. This comprehensive Music Production Software Guide will provide solutions to many of your unanswered questions relating to the purchase of music production software.
- Part 1: Free Music Production Software for Windows
- Part 2: Free Music Production Software for Mac
- Part 3: Free Music Production Software Online
Part 1: Free Music Production Software for Windows
1. Audacity
The system for music development is not complete without an audio editor. Audacity is the best free music creation software available on the market. Audacity is open-source and extensive and provides a wide range of tools and effects for performing all audio editing and recording activities. It is created by a community of volunteers and provides regular notifications almost every month. It’s lightweight, safe, and intuitive enough to be used by novice music makers.
Pros
- It is open-source
- It can load VST plugins
Cons
- Only 32-bit plugins are allowed
- Limited features
2. Ardour
Ardour is a highly integrated program of music production that allows users to record and edit on Mac, Linux, and Windows operating systems. Ardour Music Production Software was created by integrating the efforts of the world’s skilled team, such as recording technicians, programmers, and musicians. Such experienced technicians make their concerted and thorough efforts to build the program. Ardour is one of the few applications in music production that respects honesty. The accessibility of this program allows app developers to concentrate on functionality that matters to consumers rather than to construct compelling apps for advertising purposes. This is a system that should be celebrated for its user-focused functionality.
Pros
- It has excellent user-friendliness
- It is available on Mac, Linux, and Windows
Cons
- It lacks a few integral features
- It is difficult to operate for people new to audio editing
3. Tracktion T7
The people at Tracktion seem to have reached a reasonably canny business model by launching older DAW versions for free and without anything removed.
The convention appears to make it possible to access the edition without charge of two iterations before the new one. You will not be provided with all new functionality, but you will receive an update every time the company updates its flagship DAW, which it does nearly every year.
The growing section is adjustable to match the workflow, and the bottom panel adjusts so that any parameters anywhere on the screen can be seen.
Pros
- It features an unlimited number of audio and MIDI tracks
- It is able to host multiple plugin formats
Cons
- It doesn’t provide all the features at once
- It does not support many plugins
4. LMMS
LMMS is a fully free music production software for windows for music development. It is an open-source and also a project platform for the community. LMMS is a cross-platform device app. It makes it easier to manufacture beats, particularly when many music production professionals have to manufacture quality music with their computers.
Thanks to the powerful sample, beat and melody design, mixing and synthetic sound processes, and many other features, the LMMS music production software provides high-quality audio output. The product also features playback tools, plugins, and samples to produce powerful, high-quality sound.
Pros
- It is compatible with Linux, Windows, and Mac
- Hydrogen project files and MIDI can be imported easily for editing
Cons
- It eats a lot of memory and requires a high-end device to support it
- Some users complained that understanding its working is difficult
5. Cakewalk
This is an exciting app for music production to purchase. It is a fantastic tech to invest in music production. Cakewalk Sonar Artist Software is one of Cakewalk Sonar Artist ‘s great productions. Cakewalk is known for an excellent GUI, an excellent mixing console, an excellent commercial radio system, and limitless MIDI tracks.
A good device to use as part of your instruments for the development of music is the Cakewalk Sonar Artist Music Production program. It stands out as a program packed with excellent features amongst its counterparts. And the app is unmatched in the area of apps.
Pros
- You can share music compilation directly to social media
- You can easily add effects to your tracks
Cons
- It is priced, very high
- One window interface makes it hectic
6. Music Maker by Magix
This app is a special program for sound engineers, skilled musicians, and accomplished music producers, developed by US Magix Entertainment. It offers an excellent forum for creative music development in music production professionals.
In reality, the software for music production is excellent software for the Music Maker by Magix. In the field of music post-production and music mastering, mixing and arrangement, recording, and more, the software achieved remarkable breakthroughs. Thanks to the successful combination of a technical device and highly flexible workflow, the Music Maker by Magix has achieved this groundbreaking success.
With creative algorithm and superb plugin effects, the Music Maker by Magix program enables music manufacturers to develop their ideas in line with the highest quality in this industry.
Pros
- It is great for EDM producers
Cons
- It is not suitable for newbies
- The GUI feels a bit cluttered
Part 2: Free Music Production Software for Mac
7. Garageband
This is a music development studio app that is designed to function on Mac. It is a great free music production software for Mac. This software has a full sound collection, which includes virtual instruments, voice, and guitar preset.
GarageBand is a well-known app for music development and is an excellent tool for music beginners. Many people have chosen GarageBand because it does not match the ease and ease of use for recording purposes in particular.
The user-friendly interface makes you easy to create music with a more unobstructed view of what you’re recording. Apps from GarageBand captured the attention of others because of their ease-to-use and user-friendliness.
Pros
- The software offers some nicely packaged preset for vocal and guitar recording
- Productive workflow
Cons
- It has limited plugins
- It is only supported for Mac platforms
8. Ableton Live
The Ableton Live 10 Suite is a dynamic and comprehensive program for the creation and performance of musical recordings.
An essential feature of this software is that it allows you to work on your time-based workflow without affecting the live session. This means that the software gives you a rare chance to get involved with the workflow without stopping live performance.
The Multitrack Recording Technology of Ableton Live10 Suite allows music producers to adjust the speed and pacing of any audio during the recording. To make these adjustments, you don’t have to pause the recording. This is one of the striking characteristics which makes this product a good option for all.
Pros
- Adjusting the speed and pace of audio is a delight
- Sophisticated MIDI/audio routing capabilities
Cons
- It has a traditional design
- Not enough updates to fix the buggy features
9. Boom 3D
Boom 3D for Mac & Windows is an award-winning pro sound improvement software designed to play your media content on any and all of your devices, phones, or streaming services with amazing 3D effects. No costly headphones or sound boosters will be needed to make your music feel like it! Designed in a new immersive 3D surround sound technology, Boom 3D redefines how people listen to music, watch films, or play games with some headphones on their devices. 3D sound provides the option to check the LFE (subwoofer), and the audio intensity of each Virtual 3D Surround audio system speaker.
Pros
- It comes with loads of content
- Audio quality can be enhanced
Cons
- The design is not suitable for everybody
- It does not have a Linux version
10. Mixxx
For beginners, Mixxx is just another great device. This is also one of the best free music production software downloads for your music. This software supports all Mac, Windows, and Linux platforms.
The application provides you with a DJ-mixing environment and supports all standard formats such as Mp3 and many other formats.
Pros
- It is a great app for beginners
- Supported by Mac, Windows, and Linux
Cons
- It doesn’t support many plugins
- GUI isn’t that great
Part 3: Free Music Production Software Online
11. Soundation
Soundation is a platform that provides free music production software online only capabilities. The free version and three paid versions are offered. You can use this to build your tracks unless you have the resources to do so if you need a web-based music maker and editor.
If you pay, even after you have made your music, you can always cancel. Remember first to save them to your hard drive. If you need paid characteristics, pay for the monthly plan again through PayPal, and you have to use it for a month.
Pros
- Great SSL-modelled mixer
- You can use its devices as a plugin
Cons
- It works only online
12. Audiotool
Audiotool is a popular app for music production hosted online and can be used without installation from inside your browser. It uses a cloud-based network to store all your music and files wherever you are. It is also confirmed that you will share music and tracks directly with YouTube, SoundCloud, and Facebook on its own publishing site. They have premium releases from Loopmasters and some fantastic online VSTs, for example, Heisenberg, Machiniste, Bassline, and Beatbox 8 & 9.
Pros
- No installation needed
- You can directly share it to your social media
Cons
- It works only online
- No upgrades
13. Soundtrap
Soundtrap is not only an online music studio but a training site for students and instructors. The STEAM Curriculum is an online learning resource that helps students to follow music and podcasts, incorporated into the Web app. As we mentioned earlier, in addition to the online Web App, you can also use it on different devices, share it with other users, and work in innovative projects for your music.
The interface is simple, easy to use, and easy to understand. It is simply an instrument for innovation; you don’t have to learn how to apply VST or any other technical elements to music creation. You can also record your MIDI instruments directly from your machine or device’s mic.
Pros
- It provides a great platform for teachers to teach their students
- It is very easy to use
Cons
- It only has a limited number of plugins
- It cannot be used professionally
Conclusion
If you make music on a computer, the most important resource in your artistic arsenal is your DAW; in your home recording system, you ‘re probably going to have the MIDI keyboard, audio interface, studio monitor speakers, and maybe a microphone or two. But your program is at the core of it all. Not everyone can afford expensive DAWs, but one must not worry as free music production software are present to aid us.
It is important to have a DAW with which you are pleased and, perhaps more importantly, a DAW, which allows you to turn your ideas into music as quickly and painlessly as possible. So make sure you choose the best one for you according to your needs. Hopefully, this guide will aid you!
Benjamin Arango
Benjamin Arango is a writer and a lover of all things video.
Follow @Benjamin Arango
Advanced Audio Cleanup: Tactics to Remove Unwanted Elements From Your Video Content
Adobe Premiere Pro is a video editing tool. In the editing world, Premiere Pro has a separate fan base; people use this video editing tool because of its unmatchable features. People love the quality of editing that Premiere Pro delivers. Among its many features, few are color correction, safe margins, rulers, and audio assign.
Moreover, the video editor has an Auto Reframe feature. Along with this, Premiere Pro offers Comparison View and many other things. If you want to learn more about Premiere Pro and how to remove noise from video in Premiere Pro, then stay with us.
In this article
01 Remove Background Noise Premiere Pro
02 How to Mute A Clip in Premiere Pro
03 Tips and Tricks to Help You Better Editing Audio in Premiere Pro
Part 1. Remove Background Noise Premiere Pro
While recording a video, you cannot control every noise. Sometimes, you get disturbed by your doorbell. Sometimes, it’s your neighbor’s horn that might bother you or anything else. What do you do when this happens to you? Do you stop the recording and wait until it’s quiet?
If this is what you do, then let us share a smart solution with you. Background noise can be removed from your video using the remove background noise Premiere Pro feature. Allow us to share its steps to guide you more about it.
Step 1: Import the File
To remove background noise from your videos, you first need to import the media file to Premiere Pro. Then drag and drop the file onto the timeline. After that, you need to select and open the ‘Effects’ menu.

Step 2: Add Denoise Effect
On the right side of the Effects menu, type and search for ‘Denoise.’ Then, you should select the Denoise option and drag it onto the timeline over the media file. The Denoise feature removes nearly 50% of the noise automatically.

Step 3: Denoise Effects Control
The rest of the background noise can be customized. For that, head to the ‘Effects Control’ section. You will see Denoise-related options. There, click on ‘Edit’ for Custom Setup. You can adjust both the ‘Frequency’ and ‘Amount’ values.

Step 4: Voice Enhance Effect
Removing background noise damages the quality of voice. This quality can be improved by using ‘Vocal Enhance.’ You can search it from the search bar in the Effects tab and drag it over to the media file in the timeline. You can also customize this from the ‘Effects Control’ tab.

Part 2. How to Mute A Clip in Premiere Pro
Sometimes, you might need to mute a clip. You can use such clips as your status. You can also add your desired background music and then share the clips. In any case, you need to mute the clip, but what if you don’t know how to mute the clip in Premiere Pro?
Don’t worry because we are here to help you. The following section of this article will share different methods to mute clips in Adobe Premiere Pro.
Method 1: The first method is to mute an entire clip on the timeline. This could be done by checking the Mute Track ‘M’ button. You will find the mute button beside the track name.

Method 2: The next method is to mute a specific clip. For that, go to the ‘Audio’ section from the menu bar. Then, look at the ‘Essential Sound’ panel on the right side of the screen. From you will see various tags. Open your desired tag and check the box against the ‘Mute’ option.

Method 3: Another method that could be used to mute a clip is by right-clicking on the clip that you want to mute. A menu appears on the screen. From that menu, you need to uncheck the ‘Enable’ button. This mutes the clip.

Method 4: The next method demands you to first select the video clip. Then, from the menu bar, head over to the ‘Editing’ tab. There go to the ‘Audio Clip Mixer’ section. You will see volume sliders; drag down the Volume slider to negative to mute the clip.

Part 3. Tips and Tricks to Help You Better Editing Audio in Premiere Pro
As we have mentioned earlier, noise removal damages the overall quality of the audio. All your effort goes to waste if your voice is not clear or anything else. Now that you know how you can handle background noise removal, it’s time to talk about something new and different.
The following section of this article is going to share tips and tricks that could be adopted. These will help you to get better and improved quality while editing audio.
1. Restore Bass
The first tip that we are going to introduce is restoring the bass of the media file. You can do this by using the Parametric Equalizer and dragging it onto the timeline. With an equalizer, you can play with different audio frequencies. Whatsoever suits the best, you can set it.
2. Atmosphere Setting
Its essential to first of all create an atmosphere. For this, you can mix sounds, add reverb and even adjust the loudness. An ambiance audio tag can be used for background noise. You need to set the scene for your music or the dialogue.
3. Compress the Audio
To make the audio better and more consistent, it is essential to compress it. Like the name is presenting, compression lowers the volume of loud parts, increases the volume of fairly quiet parts, it compresses the waveform of audio. After compression, your audio sounds instantly better, especially the voices.
4. Dialogue Adjustments
You can unify different recordings for a common loudness if you tag audio clips as Dialogue. If you plan to add a voiceover to your video, then you must improve the clarity, reduce or remove any background noise and also, adjust the reverb. Subtitles could be added to make the conversation understandable in your video.
5. Remove Noise
The noise of the computer fan or the weird hissing noise of the microphone and other similar things are referred to as Background noise. This can become a distracting element. While editing the audio, it matters that you remove the background noise because it does not get automatically removed. So, to have good audio, always remove background noise.
Bottom Line
If background noise is bothering you, then this problem is resolved. The article above has shared how to remove noise from video in premiere pro. The easy step-by-step guide for removing background noise with Premiere Pro has been shared.
To remove background noise, Premiere Pro is not the only editor. Wondershare Filmora is another stunning and known video editor. You can use the tool to remove background noise from your videos. With this editor, you can also mute your clips.
Not just this, but the editor has many more classic features. Filmora allows keyframing, motion tracking, and doing cool edits with a split-screen. Color match is another offered feature among the many other features of Filmora. It also has an asset library. You can get fantastic effects, transitions, elements, and whatnot from its library.
For Win 7 or later (64-bit)
For macOS 10.12 or later
02 How to Mute A Clip in Premiere Pro
03 Tips and Tricks to Help You Better Editing Audio in Premiere Pro
Part 1. Remove Background Noise Premiere Pro
While recording a video, you cannot control every noise. Sometimes, you get disturbed by your doorbell. Sometimes, it’s your neighbor’s horn that might bother you or anything else. What do you do when this happens to you? Do you stop the recording and wait until it’s quiet?
If this is what you do, then let us share a smart solution with you. Background noise can be removed from your video using the remove background noise Premiere Pro feature. Allow us to share its steps to guide you more about it.
Step 1: Import the File
To remove background noise from your videos, you first need to import the media file to Premiere Pro. Then drag and drop the file onto the timeline. After that, you need to select and open the ‘Effects’ menu.
Step 2: Add Denoise Effect
On the right side of the Effects menu, type and search for ‘Denoise.’ Then, you should select the Denoise option and drag it onto the timeline over the media file. The Denoise feature removes nearly 50% of the noise automatically.
Step 3: Denoise Effects Control
The rest of the background noise can be customized. For that, head to the ‘Effects Control’ section. You will see Denoise-related options. There, click on ‘Edit’ for Custom Setup. You can adjust both the ‘Frequency’ and ‘Amount’ values.
Step 4: Voice Enhance Effect
Removing background noise damages the quality of voice. This quality can be improved by using ‘Vocal Enhance.’ You can search it from the search bar in the Effects tab and drag it over to the media file in the timeline. You can also customize this from the ‘Effects Control’ tab.
Part 2. How to Mute A Clip in Premiere Pro
Sometimes, you might need to mute a clip. You can use such clips as your status. You can also add your desired background music and then share the clips. In any case, you need to mute the clip, but what if you don’t know how to mute the clip in Premiere Pro?
Don’t worry because we are here to help you. The following section of this article will share different methods to mute clips in Adobe Premiere Pro.
Method 1: The first method is to mute an entire clip on the timeline. This could be done by checking the Mute Track ‘M’ button. You will find the mute button beside the track name.
Method 2: The next method is to mute a specific clip. For that, go to the ‘Audio’ section from the menu bar. Then, look at the ‘Essential Sound’ panel on the right side of the screen. From you will see various tags. Open your desired tag and check the box against the ‘Mute’ option.
Method 3: Another method that could be used to mute a clip is by right-clicking on the clip that you want to mute. A menu appears on the screen. From that menu, you need to uncheck the ‘Enable’ button. This mutes the clip.
Method 4: The next method demands you to first select the video clip. Then, from the menu bar, head over to the ‘Editing’ tab. There go to the ‘Audio Clip Mixer’ section. You will see volume sliders; drag down the Volume slider to negative to mute the clip.
Part 3. Tips and Tricks to Help You Better Editing Audio in Premiere Pro
As we have mentioned earlier, noise removal damages the overall quality of the audio. All your effort goes to waste if your voice is not clear or anything else. Now that you know how you can handle background noise removal, it’s time to talk about something new and different.
The following section of this article is going to share tips and tricks that could be adopted. These will help you to get better and improved quality while editing audio.
1. Restore Bass
The first tip that we are going to introduce is restoring the bass of the media file. You can do this by using the Parametric Equalizer and dragging it onto the timeline. With an equalizer, you can play with different audio frequencies. Whatsoever suits the best, you can set it.
2. Atmosphere Setting
Its essential to first of all create an atmosphere. For this, you can mix sounds, add reverb and even adjust the loudness. An ambiance audio tag can be used for background noise. You need to set the scene for your music or the dialogue.
3. Compress the Audio
To make the audio better and more consistent, it is essential to compress it. Like the name is presenting, compression lowers the volume of loud parts, increases the volume of fairly quiet parts, it compresses the waveform of audio. After compression, your audio sounds instantly better, especially the voices.
4. Dialogue Adjustments
You can unify different recordings for a common loudness if you tag audio clips as Dialogue. If you plan to add a voiceover to your video, then you must improve the clarity, reduce or remove any background noise and also, adjust the reverb. Subtitles could be added to make the conversation understandable in your video.
5. Remove Noise
The noise of the computer fan or the weird hissing noise of the microphone and other similar things are referred to as Background noise. This can become a distracting element. While editing the audio, it matters that you remove the background noise because it does not get automatically removed. So, to have good audio, always remove background noise.
Bottom Line
If background noise is bothering you, then this problem is resolved. The article above has shared how to remove noise from video in premiere pro. The easy step-by-step guide for removing background noise with Premiere Pro has been shared.
To remove background noise, Premiere Pro is not the only editor. Wondershare Filmora is another stunning and known video editor. You can use the tool to remove background noise from your videos. With this editor, you can also mute your clips.
Not just this, but the editor has many more classic features. Filmora allows keyframing, motion tracking, and doing cool edits with a split-screen. Color match is another offered feature among the many other features of Filmora. It also has an asset library. You can get fantastic effects, transitions, elements, and whatnot from its library.
For Win 7 or later (64-bit)
For macOS 10.12 or later
Blending Soundscape and Silhouettes: A Complete Approach to Multisensory Imagery
Almost everyone shoots videos and photos now. But sometimes, it’s hard to record videos while boring to capture images. What if a hybrid mingles still images with an audio file? You can add audio to photo easily.
Images with a soundtrack are simpler to create and more interactive than video; they naturally improve the project without time commitment or complexity. The question that appears is; how to add audio to a photo/image and create great multimedia photography?
In this post, we will describe and clear all your queries on how to add audio to photo. Whether you wish to combine audio and image on the computer or add audio to iPhone pictures, you can all find the answer.
In this article
01 [Can I add audio to the photo?](#Part 1)
02 [How to add audio to a photo?](#Part 2)
03 [Secret about adding audio to the photo?](#Part 3)
Part 1 Can I add audio to the photo?

Yes, it’s possible to add audio to photo, and we have various methods to do this. One of the simplest methods is arranging images into slideshows and adding audio.
Yes, there are different ways by which you can add audio to photo online or offline, including both the easiest and most brutal ways. Let’s list out some general courses as follows!
● The first and common way is by making a slideshow or photo collage like a video and adding background music as audio.
● You can use an image collage app or add audio to a photo app for Android or iPhone devices.
● Lastly, you can add audio to the photo online editor or online video editing program and include voiceover or background music.
All in all, it’s possible to add audio to photo provided you’ve to look straightforward and quick ways of doing so.
Part 2 How to add audio to a photo?
ACDSee supports images with embedded audio and photos with associated audio files. Images with embedded audio are JPEG or TIFF images saved inside the photo folder. You can embed audio inside the folder of photos by adding audio to the photo online.
Images with associated audio are photos are merged with individual WAV audio files. The photo folders and their associated audio files contain the same file name and are placed within the same folder.
You can associate any WAV file with a photo by assigning them the same name and locating them in the same folder or adding audio to the photo.
Note: If you rename or move either an audio file or an image file associated with it, you must rename both the folders or they will not associate for longer. It does not apply to photos with embedded audio.
Steps to add audio to photo via ACDSee
Do one of the following:
● Select an image in Manage mode.
● Open an image in View mode.
Step1 Click Tools | Image Audio | Edit
Step2 In the Edit Audio dialog box, click the Browse button
Step3 Select a WAV file and click Save
Step4 If you would like to truncate or clip the audio file, select the Use markers checkbox and drag the Start marker and End marker sliders. Do one of the following
● Click the Truncate button to remove the beginning and end of the audio file (the sections outside of the start and end markers).
● Click the Clip button to remove the audio file section inside the start and end markers.
Step5 To hear a preview of the file, click the Play button
Step6 Click OK
Part 3 Secret about adding audio to the photo?
If you’re looking to add audio to a photo in a straightforward manner, here’s a tip for you than going complex. It’s because the software or programs available are highly problematic when it comes to better understanding. Thus, using the ideal program is the best way out (and a secret)!
We have to admit that customization is quite trendy among the young generation. Customizing a unique album is a cool thing, too.
A professional editing tool would be an ideal helper to do this (hence, the reason you’re here). While a great variety of music management software and video editors support adding audio to images, Wondershare Filmora stands out for its efficiency, simplicity, and robust capability.
To get started, consider a free trial copy of Wondershare Filmora
Step1 Import Media
Hit the “Import” tab to load your songs from ripped CDs or downloaded from the internet.
Then drag and drop your image in a format like JPEG, JPG, JPE, GIF, BMP, DIB, PNG, JFIF, TIFF, TIF to the media library panel. Now you’ll consider using all the imported files displayed as thumbnails in the Media library.
Step2 Drag and Drop to add photos to audio
Drag songs and photos from the Media Library to the Timeline accordingly.
Filmora assists you in adding various photos to the audio. You can highlight the image and hover your mouse to the last section.
Click the “set duration” icon on the toolbar and set it to fit your music file’s length.
Tips: You can zoom-out or zoom-in on the Timeline in the top right corner by dragging the timeline slider to find the ideal position easily.
Check the effect in the preview window after this. If possible, you can ramp up your creation, e.g., add captions, apply special effects, transitions, and even create a picture-in-picture effect.

Step3 Save Music with Photos
When you’re satisfied with the outcomes, hit the Export tab.
Then, select MP4 under the format tab in the output window, or if you want to play the media on your phone, you can choose the device in the Export window and choose target devices among iPad, iPhone, or Apple TV, etc. Filmora will create a proper setting for phone device saving.

Bonus tips
Rip audio from video: If you wish to extract audio from a movie trailer, film, comedy, TV show, etc., highlight the video file in the Timeline tab, right-click it and choose the “Audio Detach” tab, then you can eliminate the original video stream and save in a new MP3 format, and now you can freely add your images to the ripped music.
Or, you can delete the original audio file and add a new one.
Conclusion
So, that’s all you had to know about adding audio to photo. We’ve discussed all the questions you’re wandering on how to add audio to photo online and mentioned the different ways by which you can do the same.
As the uploading speed is slow, we highly suggest using Filmora to add audio to photos. Besides, Filmora provides 50 plus sounds that you can use. Try it now!
02 [How to add audio to a photo?](#Part 2)
03 [Secret about adding audio to the photo?](#Part 3)
Part 1 Can I add audio to the photo?
Yes, it’s possible to add audio to photo, and we have various methods to do this. One of the simplest methods is arranging images into slideshows and adding audio.
Yes, there are different ways by which you can add audio to photo online or offline, including both the easiest and most brutal ways. Let’s list out some general courses as follows!
● The first and common way is by making a slideshow or photo collage like a video and adding background music as audio.
● You can use an image collage app or add audio to a photo app for Android or iPhone devices.
● Lastly, you can add audio to the photo online editor or online video editing program and include voiceover or background music.
All in all, it’s possible to add audio to photo provided you’ve to look straightforward and quick ways of doing so.
Part 2 How to add audio to a photo?
ACDSee supports images with embedded audio and photos with associated audio files. Images with embedded audio are JPEG or TIFF images saved inside the photo folder. You can embed audio inside the folder of photos by adding audio to the photo online.
Images with associated audio are photos are merged with individual WAV audio files. The photo folders and their associated audio files contain the same file name and are placed within the same folder.
You can associate any WAV file with a photo by assigning them the same name and locating them in the same folder or adding audio to the photo.
Note: If you rename or move either an audio file or an image file associated with it, you must rename both the folders or they will not associate for longer. It does not apply to photos with embedded audio.
Steps to add audio to photo via ACDSee
Do one of the following:
● Select an image in Manage mode.
● Open an image in View mode.
Step1 Click Tools | Image Audio | Edit
Step2 In the Edit Audio dialog box, click the Browse button
Step3 Select a WAV file and click Save
Step4 If you would like to truncate or clip the audio file, select the Use markers checkbox and drag the Start marker and End marker sliders. Do one of the following
● Click the Truncate button to remove the beginning and end of the audio file (the sections outside of the start and end markers).
● Click the Clip button to remove the audio file section inside the start and end markers.
Step5 To hear a preview of the file, click the Play button
Step6 Click OK
Part 3 Secret about adding audio to the photo?
If you’re looking to add audio to a photo in a straightforward manner, here’s a tip for you than going complex. It’s because the software or programs available are highly problematic when it comes to better understanding. Thus, using the ideal program is the best way out (and a secret)!
We have to admit that customization is quite trendy among the young generation. Customizing a unique album is a cool thing, too.
A professional editing tool would be an ideal helper to do this (hence, the reason you’re here). While a great variety of music management software and video editors support adding audio to images, Wondershare Filmora stands out for its efficiency, simplicity, and robust capability.
To get started, consider a free trial copy of Wondershare Filmora
Step1 Import Media
Hit the “Import” tab to load your songs from ripped CDs or downloaded from the internet.
Then drag and drop your image in a format like JPEG, JPG, JPE, GIF, BMP, DIB, PNG, JFIF, TIFF, TIF to the media library panel. Now you’ll consider using all the imported files displayed as thumbnails in the Media library.
Step2 Drag and Drop to add photos to audio
Drag songs and photos from the Media Library to the Timeline accordingly.
Filmora assists you in adding various photos to the audio. You can highlight the image and hover your mouse to the last section.
Click the “set duration” icon on the toolbar and set it to fit your music file’s length.
Tips: You can zoom-out or zoom-in on the Timeline in the top right corner by dragging the timeline slider to find the ideal position easily.
Check the effect in the preview window after this. If possible, you can ramp up your creation, e.g., add captions, apply special effects, transitions, and even create a picture-in-picture effect.
Step3 Save Music with Photos
When you’re satisfied with the outcomes, hit the Export tab.
Then, select MP4 under the format tab in the output window, or if you want to play the media on your phone, you can choose the device in the Export window and choose target devices among iPad, iPhone, or Apple TV, etc. Filmora will create a proper setting for phone device saving.
Bonus tips
Rip audio from video: If you wish to extract audio from a movie trailer, film, comedy, TV show, etc., highlight the video file in the Timeline tab, right-click it and choose the “Audio Detach” tab, then you can eliminate the original video stream and save in a new MP3 format, and now you can freely add your images to the ripped music.
Or, you can delete the original audio file and add a new one.
Conclusion
So, that’s all you had to know about adding audio to photo. We’ve discussed all the questions you’re wandering on how to add audio to photo online and mentioned the different ways by which you can do the same.
As the uploading speed is slow, we highly suggest using Filmora to add audio to photos. Besides, Filmora provides 50 plus sounds that you can use. Try it now!
Also read:
- Updated In 2024, Enhancing Accessibility Documenting Computer Audio in Audacity
- New In 2024, Exploring the Cost-Free Synergy of Sound and Video on the Internet
- Updated 2024 Approved Explore the Leading Websites for Legal Montage Music Downloads
- Updated In 2024, Mastering Safe Screen Time Expert Advice on Video Call Etiquette and Protection
- New The Ultimate List Best Royalty-Free Laughter Soundtracks for Your Videos
- Updated Reclaiming Fidelity Navigating the Maze of Deformed Audio Repair Techniques
- 2024 Approved Crafting the Perfect Soundtrack for Your Project Step-by-Step Audio Replacement Tactics
- Updated In 2024, Top-Rated Free Video-to-Audio Converters On-Demand Edition
- Fine-Tuning Film Soundtracks Strategies for Precise Audio Timing with Keyframes in Final Cut Pro X
- In 2024, The Cyber Soundscape Changing Audio Speeds and Tones on the Web
- New 2024 Approved Discovering High-Quality Bell Toll Recordings
- Updated 8 Best DAW Apps for Android to Boost Your Music Production 2023 for 2024
- In 2024, Mastering TikTok Sound Control Simple Methods for Quieting Videos
- In 2024, A Spectrum of Screams The Best Places to Download Terrifying Tones Online
- Synchronizing Sounds with Imagery The Quintet of Premium & Free Music Visualizers to Watch
- New The Investment in Sound Quality Ranked List of Excellent, No-Cost and Full-Priced Podcast Editors for 2024
- Updated Sourcing Eerie Audio Manipulations for 2024
- 2024 Approved Auditory Cuts and Segments Convenient Methods to Divide Your Music Files
- New Unveiling the Science of Digital Voice Mimicry A Dual-Method Approach for 2024
- New How to Make a Photo Collage on Mac/iPhone Using iPhoto?
- Top 15 Apps To Hack WiFi Password On ZTE Blade A73 5G
- In 2024, Best 3 Software to Transfer Files to/from Your Motorola Moto G 5G (2023) via a USB Cable | Dr.fone
- FRP Hijacker by Hagard Download and Bypass your Samsung Galaxy S23 Tactical Edition FRP Locks
- Some MP4 won't play on my Samsung Galaxy S23+
- How to Unlock Infinix Pattern Lock if Forgotten? 6 Ways
- Authentication Error Occurred on Realme 12 Pro+ 5G? Here Are 10 Proven Fixes | Dr.fone
- Fixes for Apps Keep Crashing on Lava Blaze 2 | Dr.fone
- In 2024, 3 Effective Ways to Unlock iCloud Account Without Password On Apple iPhone 8 Plus
- 2 Ways to Transfer Text Messages from Infinix Note 30 5G to iPhone 15/14/13/12/11/X/8/ | Dr.fone
- In 2024, How to get the dragon scale and evolution-enabled pokemon On Honor X50i? | Dr.fone
- 4 Solutions to Fix Unfortunately Your App Has Stopped Error on Oppo A78 | Dr.fone
- Updated In 2024, Final Cut Pro Offers Users Multiple Options to Adjust Video Speed Easily, Including Timelapse
- New In 2024, Edit 4K Videos Like a Pro without Spending a Dime Free Tools
- In 2024, Optimizing Video Output A Comprehensive Guide to Compressor in FCPX
- Title: New 2023 Compilation of Top Free Music Software Produce, Edit & Record with Zero Cost Windows and macOS
- Author: Kate
- Created at : 2024-05-20 02:42:17
- Updated at : 2024-05-21 02:42:17
- Link: https://audio-editing.techidaily.com/new-2023-compilation-of-top-free-music-software-produce-edit-and-record-with-zero-cost-windows-and-macos/
- License: This work is licensed under CC BY-NC-SA 4.0.
