:max_bytes(150000):strip_icc():format(webp)/dts-play-fi-lifestyle-aaa-5a4c211daad52b00366a3575.jpg)
How to Use Autotune in Audacity with Plugins for Free?

How to Use Autotune in Audacity with Plugins for Free?
Audacity is one of the well-known multi-track audio recorders with in-built audio editing tools. It allows adding effects to tweak audio recordings and songs. In short, it incorporates vocal effects to produce better quality audios. You might not find an autotune feature when correcting the pitch of the song in Audacity software. Moreover, there are no inbuilt tools for tuning recordings.
However, GSnap is one of the free plugins that enable you to autotune in Audacity. GSnap plugin is compatible with Windows, Mac, and Linux operating systems. So, you can download it on any one of them to adjust the pitch of audio recordings. The following article will give you in-depth information about Audacity autotune. Let’s begin.
In this article
01 What is Auto Tune and How Does It Work?
02 Top 3 Best Free Autotune Plugins for Audacity
03 How to AutoTune Your Voice for Free with GSnap on Audacity?
Part 1: What is Auto Tune and How Does It Work?
Autotune is a tool that enables you to adjust the pitch of the audio song or recording. It was launched in 1997. The plugin enjoys a trademark from Antares Audio Technologies. It automatically corrects the out-of-tune vocals in your recording.So, if you are struggling with tuning issues after recording a song in software like Audacity, this Audacity autotune tool can help.
Using autotune plugins is one of the best options to autotune songs in Audacity. They are becoming increasingly popular among singers, music producers, and others. Do you want to know why audio recordings need to be tuned and how they are adjusted using autotune? Here’s the answer.
There are high chances of multiple frequencies becoming intertwined when recording audio. Autotune detects the frequencies that are intertwined and splits them into single frequencies. So, the over-tuned vocals are isolated. In brief, autotune is the process of correcting vocal pitch. There are several plugins that can help you deal with tuning issues on piano, guitar, and other musical instruments.
Part 2: Top 3 Best Free Autotune Plugins for Audacity
Audacity comes with built-in audio recording and editing tools. It also allows you to mix different audios. Plus, you can also cut, split, and splice audio files in this amazing software. However, if you are recording a song in Audacity, it won’t be autotuned. Moreover, you cannot auto-correct the song’s pitch by default. So, you need to install autotune plugins for Audacity recording to enhance your vocal performance.
There are a number of plugins that enable you to fine-tune audios in Audacity. If you are interested in mastering the art of autotune using plugins, we have handpicked the following three best free autotune plugins for Audacity. Let’s get into them one by one.
1. GSnap
GSnap is a free audacity autotune plugin offered by GVST. It enables users to fine-tune the vocalist’s pitch, which is also a very easy and quick process. So, you can refine out-of-tune audio using GSnap. The correction mechanism is simple. First, it identifies over-tuned frequencies and then corrects them. Do you want to know more about GSnap and its advantages? If yes, we have summarized all its features in the list below.
Advantages
- GSnap enables you to configure both high and low frequency to offer the best pitch-correction mechanism.
- Background noise can be filtered out by configuring decibel settings.
- Allows controlling the parameters of a vocal performance through Musical Instrument Digital Interface (MIDI).
- GSnap lets you control the pace.
- Enables calibrating tune
- Free and easily accessible
- Available for Windows operating systems
- Maximum pitch bend can be set
- Customizable speed parameters
- Tune calibration

2. MAutoPitch
MAutoPitch provides automatic tuning for audio recording. This plugin comes with a simple yet intuitive interface to facilitate users. It supports pitch correction for all mainstream musical instruments and vocals. In addition to autotuning, MAuto Pitch is also known for offering creativity in your audio recordings. Stereo expansion is one of the creative features provided in this plugin. Furthermore, it also incorporates formant shift.
It applies the channel separation technique to tune the vocals. Moreover, it incorporates a MIDI controller that enables you to control parameters in real-time audio recording. MAutoPitch offers the following benefits to the users.
Advantages
- Offers safety brick wall limiters to limit audio output to a standardized threshold.
- Utilizes efficient and robust algorithms to cope up with fast computers.
- Advanced GUI to maximize flexibility.
- It includes automatic gain compensation to align input loudness with output loudness.
- Compatible with both Windows and Mac
- Easily accessible without internet
- Free updates
- Unique visualization engine

3. Graillon
Graillon is an auto-tuner with the capacity to take your vocal performance to the next level. It comes with unique features, such as pitch-tracking modulation. This can help you change the input voice. Moreover, it also enables users to create choruses. In short, it makes the voice recording pure. In addition to pitch correction, Graillon also performs the pitch-shifting function. So, it’s an ideal solution for people looking for autotuning tools. Here is a brief overview of the pros of Graillon.
Advantages
- Incorporates 23ms of latency
- Maximizes the sound quality of output
- Optimized pitch shifter
- Ability to produce robotic sounds
- Free access to the tool
- Allows altering the vocal pitch
- Compatibility with all mainstream operating systems including Windows, Mac, Linux, and others
- Simple interface
- Equipped with bit crusher
- A full edition version is also available, which provides state-of-the-art features

Part 3: How to AutoTune Your Voice for Free with GSnap on Audacity?
GSnap is a famous plugin for autotuning audio recordings in Audacity. This plugin is free and can be easily installed on Windows, Mac, and Linux operating systems. If you are wondering how to install and use this plugin to autotune your voice in Audacity, the step-by-step guide highlights the process below.
Step 1: Install GSnap
Access the web link https://www.gvst.co.uk/gsnap.htm and click on download GSnap. Choose the GSnap version that matches your operating system.
Note: Audacity must be installed on your computer before the GSnap plugin is downloaded. Plus, the plugin will be downloaded in a zipped file. So, make sure you have an application installed on your device to unzip the downloaded file.

Step 2: Copy GSnap
Navigate to the download folder and right-click on the zipped GSnap option. Select extract here from the menu and copy the file named GSnap.dll.

Step 3: Paste the copied file
Navigate the plugins folder of Audacity and paste the copied file into the folder.
Step 3: Add plugin
Open Audacity and locate the Effects tab on a recording window. Select add/remove plug-ins, click on the GSnap option, and press enable button.
Note: The GSnap plugin will appear in the list under the effects tab and let you autotune your voice recording. You need to configure settings in a GSnap to get the fine-tuned voice.

For the detailed information, you can check the tutorial about how to add and set up GSnap plugin in Audacity.
Conclusion
Human voices and inputs from musical instruments are not perfect by default. Voice recordings in Audacity are no exception. They also need to be processed to enhance the vocal presentation. So, you need to tune the vocals in one way or another. This article mentions free Audacity autotune tools like GSnap to produce better sounds.
02 Top 3 Best Free Autotune Plugins for Audacity
03 How to AutoTune Your Voice for Free with GSnap on Audacity?
Part 1: What is Auto Tune and How Does It Work?
Autotune is a tool that enables you to adjust the pitch of the audio song or recording. It was launched in 1997. The plugin enjoys a trademark from Antares Audio Technologies. It automatically corrects the out-of-tune vocals in your recording.So, if you are struggling with tuning issues after recording a song in software like Audacity, this Audacity autotune tool can help.
Using autotune plugins is one of the best options to autotune songs in Audacity. They are becoming increasingly popular among singers, music producers, and others. Do you want to know why audio recordings need to be tuned and how they are adjusted using autotune? Here’s the answer.
There are high chances of multiple frequencies becoming intertwined when recording audio. Autotune detects the frequencies that are intertwined and splits them into single frequencies. So, the over-tuned vocals are isolated. In brief, autotune is the process of correcting vocal pitch. There are several plugins that can help you deal with tuning issues on piano, guitar, and other musical instruments.
Part 2: Top 3 Best Free Autotune Plugins for Audacity
Audacity comes with built-in audio recording and editing tools. It also allows you to mix different audios. Plus, you can also cut, split, and splice audio files in this amazing software. However, if you are recording a song in Audacity, it won’t be autotuned. Moreover, you cannot auto-correct the song’s pitch by default. So, you need to install autotune plugins for Audacity recording to enhance your vocal performance.
There are a number of plugins that enable you to fine-tune audios in Audacity. If you are interested in mastering the art of autotune using plugins, we have handpicked the following three best free autotune plugins for Audacity. Let’s get into them one by one.
1. GSnap
GSnap is a free audacity autotune plugin offered by GVST. It enables users to fine-tune the vocalist’s pitch, which is also a very easy and quick process. So, you can refine out-of-tune audio using GSnap. The correction mechanism is simple. First, it identifies over-tuned frequencies and then corrects them. Do you want to know more about GSnap and its advantages? If yes, we have summarized all its features in the list below.
Advantages
- GSnap enables you to configure both high and low frequency to offer the best pitch-correction mechanism.
- Background noise can be filtered out by configuring decibel settings.
- Allows controlling the parameters of a vocal performance through Musical Instrument Digital Interface (MIDI).
- GSnap lets you control the pace.
- Enables calibrating tune
- Free and easily accessible
- Available for Windows operating systems
- Maximum pitch bend can be set
- Customizable speed parameters
- Tune calibration

2. MAutoPitch
MAutoPitch provides automatic tuning for audio recording. This plugin comes with a simple yet intuitive interface to facilitate users. It supports pitch correction for all mainstream musical instruments and vocals. In addition to autotuning, MAuto Pitch is also known for offering creativity in your audio recordings. Stereo expansion is one of the creative features provided in this plugin. Furthermore, it also incorporates formant shift.
It applies the channel separation technique to tune the vocals. Moreover, it incorporates a MIDI controller that enables you to control parameters in real-time audio recording. MAutoPitch offers the following benefits to the users.
Advantages
- Offers safety brick wall limiters to limit audio output to a standardized threshold.
- Utilizes efficient and robust algorithms to cope up with fast computers.
- Advanced GUI to maximize flexibility.
- It includes automatic gain compensation to align input loudness with output loudness.
- Compatible with both Windows and Mac
- Easily accessible without internet
- Free updates
- Unique visualization engine

3. Graillon
Graillon is an auto-tuner with the capacity to take your vocal performance to the next level. It comes with unique features, such as pitch-tracking modulation. This can help you change the input voice. Moreover, it also enables users to create choruses. In short, it makes the voice recording pure. In addition to pitch correction, Graillon also performs the pitch-shifting function. So, it’s an ideal solution for people looking for autotuning tools. Here is a brief overview of the pros of Graillon.
Advantages
- Incorporates 23ms of latency
- Maximizes the sound quality of output
- Optimized pitch shifter
- Ability to produce robotic sounds
- Free access to the tool
- Allows altering the vocal pitch
- Compatibility with all mainstream operating systems including Windows, Mac, Linux, and others
- Simple interface
- Equipped with bit crusher
- A full edition version is also available, which provides state-of-the-art features

Part 3: How to AutoTune Your Voice for Free with GSnap on Audacity?
GSnap is a famous plugin for autotuning audio recordings in Audacity. This plugin is free and can be easily installed on Windows, Mac, and Linux operating systems. If you are wondering how to install and use this plugin to autotune your voice in Audacity, the step-by-step guide highlights the process below.
Step 1: Install GSnap
Access the web link https://www.gvst.co.uk/gsnap.htm and click on download GSnap. Choose the GSnap version that matches your operating system.
Note: Audacity must be installed on your computer before the GSnap plugin is downloaded. Plus, the plugin will be downloaded in a zipped file. So, make sure you have an application installed on your device to unzip the downloaded file.

Step 2: Copy GSnap
Navigate to the download folder and right-click on the zipped GSnap option. Select extract here from the menu and copy the file named GSnap.dll.

Step 3: Paste the copied file
Navigate the plugins folder of Audacity and paste the copied file into the folder.
Step 3: Add plugin
Open Audacity and locate the Effects tab on a recording window. Select add/remove plug-ins, click on the GSnap option, and press enable button.
Note: The GSnap plugin will appear in the list under the effects tab and let you autotune your voice recording. You need to configure settings in a GSnap to get the fine-tuned voice.

For the detailed information, you can check the tutorial about how to add and set up GSnap plugin in Audacity.
Conclusion
Human voices and inputs from musical instruments are not perfect by default. Voice recordings in Audacity are no exception. They also need to be processed to enhance the vocal presentation. So, you need to tune the vocals in one way or another. This article mentions free Audacity autotune tools like GSnap to produce better sounds.
02 Top 3 Best Free Autotune Plugins for Audacity
03 How to AutoTune Your Voice for Free with GSnap on Audacity?
Part 1: What is Auto Tune and How Does It Work?
Autotune is a tool that enables you to adjust the pitch of the audio song or recording. It was launched in 1997. The plugin enjoys a trademark from Antares Audio Technologies. It automatically corrects the out-of-tune vocals in your recording.So, if you are struggling with tuning issues after recording a song in software like Audacity, this Audacity autotune tool can help.
Using autotune plugins is one of the best options to autotune songs in Audacity. They are becoming increasingly popular among singers, music producers, and others. Do you want to know why audio recordings need to be tuned and how they are adjusted using autotune? Here’s the answer.
There are high chances of multiple frequencies becoming intertwined when recording audio. Autotune detects the frequencies that are intertwined and splits them into single frequencies. So, the over-tuned vocals are isolated. In brief, autotune is the process of correcting vocal pitch. There are several plugins that can help you deal with tuning issues on piano, guitar, and other musical instruments.
Part 2: Top 3 Best Free Autotune Plugins for Audacity
Audacity comes with built-in audio recording and editing tools. It also allows you to mix different audios. Plus, you can also cut, split, and splice audio files in this amazing software. However, if you are recording a song in Audacity, it won’t be autotuned. Moreover, you cannot auto-correct the song’s pitch by default. So, you need to install autotune plugins for Audacity recording to enhance your vocal performance.
There are a number of plugins that enable you to fine-tune audios in Audacity. If you are interested in mastering the art of autotune using plugins, we have handpicked the following three best free autotune plugins for Audacity. Let’s get into them one by one.
1. GSnap
GSnap is a free audacity autotune plugin offered by GVST. It enables users to fine-tune the vocalist’s pitch, which is also a very easy and quick process. So, you can refine out-of-tune audio using GSnap. The correction mechanism is simple. First, it identifies over-tuned frequencies and then corrects them. Do you want to know more about GSnap and its advantages? If yes, we have summarized all its features in the list below.
Advantages
- GSnap enables you to configure both high and low frequency to offer the best pitch-correction mechanism.
- Background noise can be filtered out by configuring decibel settings.
- Allows controlling the parameters of a vocal performance through Musical Instrument Digital Interface (MIDI).
- GSnap lets you control the pace.
- Enables calibrating tune
- Free and easily accessible
- Available for Windows operating systems
- Maximum pitch bend can be set
- Customizable speed parameters
- Tune calibration

2. MAutoPitch
MAutoPitch provides automatic tuning for audio recording. This plugin comes with a simple yet intuitive interface to facilitate users. It supports pitch correction for all mainstream musical instruments and vocals. In addition to autotuning, MAuto Pitch is also known for offering creativity in your audio recordings. Stereo expansion is one of the creative features provided in this plugin. Furthermore, it also incorporates formant shift.
It applies the channel separation technique to tune the vocals. Moreover, it incorporates a MIDI controller that enables you to control parameters in real-time audio recording. MAutoPitch offers the following benefits to the users.
Advantages
- Offers safety brick wall limiters to limit audio output to a standardized threshold.
- Utilizes efficient and robust algorithms to cope up with fast computers.
- Advanced GUI to maximize flexibility.
- It includes automatic gain compensation to align input loudness with output loudness.
- Compatible with both Windows and Mac
- Easily accessible without internet
- Free updates
- Unique visualization engine

3. Graillon
Graillon is an auto-tuner with the capacity to take your vocal performance to the next level. It comes with unique features, such as pitch-tracking modulation. This can help you change the input voice. Moreover, it also enables users to create choruses. In short, it makes the voice recording pure. In addition to pitch correction, Graillon also performs the pitch-shifting function. So, it’s an ideal solution for people looking for autotuning tools. Here is a brief overview of the pros of Graillon.
Advantages
- Incorporates 23ms of latency
- Maximizes the sound quality of output
- Optimized pitch shifter
- Ability to produce robotic sounds
- Free access to the tool
- Allows altering the vocal pitch
- Compatibility with all mainstream operating systems including Windows, Mac, Linux, and others
- Simple interface
- Equipped with bit crusher
- A full edition version is also available, which provides state-of-the-art features

Part 3: How to AutoTune Your Voice for Free with GSnap on Audacity?
GSnap is a famous plugin for autotuning audio recordings in Audacity. This plugin is free and can be easily installed on Windows, Mac, and Linux operating systems. If you are wondering how to install and use this plugin to autotune your voice in Audacity, the step-by-step guide highlights the process below.
Step 1: Install GSnap
Access the web link https://www.gvst.co.uk/gsnap.htm and click on download GSnap. Choose the GSnap version that matches your operating system.
Note: Audacity must be installed on your computer before the GSnap plugin is downloaded. Plus, the plugin will be downloaded in a zipped file. So, make sure you have an application installed on your device to unzip the downloaded file.

Step 2: Copy GSnap
Navigate to the download folder and right-click on the zipped GSnap option. Select extract here from the menu and copy the file named GSnap.dll.

Step 3: Paste the copied file
Navigate the plugins folder of Audacity and paste the copied file into the folder.
Step 3: Add plugin
Open Audacity and locate the Effects tab on a recording window. Select add/remove plug-ins, click on the GSnap option, and press enable button.
Note: The GSnap plugin will appear in the list under the effects tab and let you autotune your voice recording. You need to configure settings in a GSnap to get the fine-tuned voice.

For the detailed information, you can check the tutorial about how to add and set up GSnap plugin in Audacity.
Conclusion
Human voices and inputs from musical instruments are not perfect by default. Voice recordings in Audacity are no exception. They also need to be processed to enhance the vocal presentation. So, you need to tune the vocals in one way or another. This article mentions free Audacity autotune tools like GSnap to produce better sounds.
02 Top 3 Best Free Autotune Plugins for Audacity
03 How to AutoTune Your Voice for Free with GSnap on Audacity?
Part 1: What is Auto Tune and How Does It Work?
Autotune is a tool that enables you to adjust the pitch of the audio song or recording. It was launched in 1997. The plugin enjoys a trademark from Antares Audio Technologies. It automatically corrects the out-of-tune vocals in your recording.So, if you are struggling with tuning issues after recording a song in software like Audacity, this Audacity autotune tool can help.
Using autotune plugins is one of the best options to autotune songs in Audacity. They are becoming increasingly popular among singers, music producers, and others. Do you want to know why audio recordings need to be tuned and how they are adjusted using autotune? Here’s the answer.
There are high chances of multiple frequencies becoming intertwined when recording audio. Autotune detects the frequencies that are intertwined and splits them into single frequencies. So, the over-tuned vocals are isolated. In brief, autotune is the process of correcting vocal pitch. There are several plugins that can help you deal with tuning issues on piano, guitar, and other musical instruments.
Part 2: Top 3 Best Free Autotune Plugins for Audacity
Audacity comes with built-in audio recording and editing tools. It also allows you to mix different audios. Plus, you can also cut, split, and splice audio files in this amazing software. However, if you are recording a song in Audacity, it won’t be autotuned. Moreover, you cannot auto-correct the song’s pitch by default. So, you need to install autotune plugins for Audacity recording to enhance your vocal performance.
There are a number of plugins that enable you to fine-tune audios in Audacity. If you are interested in mastering the art of autotune using plugins, we have handpicked the following three best free autotune plugins for Audacity. Let’s get into them one by one.
1. GSnap
GSnap is a free audacity autotune plugin offered by GVST. It enables users to fine-tune the vocalist’s pitch, which is also a very easy and quick process. So, you can refine out-of-tune audio using GSnap. The correction mechanism is simple. First, it identifies over-tuned frequencies and then corrects them. Do you want to know more about GSnap and its advantages? If yes, we have summarized all its features in the list below.
Advantages
- GSnap enables you to configure both high and low frequency to offer the best pitch-correction mechanism.
- Background noise can be filtered out by configuring decibel settings.
- Allows controlling the parameters of a vocal performance through Musical Instrument Digital Interface (MIDI).
- GSnap lets you control the pace.
- Enables calibrating tune
- Free and easily accessible
- Available for Windows operating systems
- Maximum pitch bend can be set
- Customizable speed parameters
- Tune calibration

2. MAutoPitch
MAutoPitch provides automatic tuning for audio recording. This plugin comes with a simple yet intuitive interface to facilitate users. It supports pitch correction for all mainstream musical instruments and vocals. In addition to autotuning, MAuto Pitch is also known for offering creativity in your audio recordings. Stereo expansion is one of the creative features provided in this plugin. Furthermore, it also incorporates formant shift.
It applies the channel separation technique to tune the vocals. Moreover, it incorporates a MIDI controller that enables you to control parameters in real-time audio recording. MAutoPitch offers the following benefits to the users.
Advantages
- Offers safety brick wall limiters to limit audio output to a standardized threshold.
- Utilizes efficient and robust algorithms to cope up with fast computers.
- Advanced GUI to maximize flexibility.
- It includes automatic gain compensation to align input loudness with output loudness.
- Compatible with both Windows and Mac
- Easily accessible without internet
- Free updates
- Unique visualization engine

3. Graillon
Graillon is an auto-tuner with the capacity to take your vocal performance to the next level. It comes with unique features, such as pitch-tracking modulation. This can help you change the input voice. Moreover, it also enables users to create choruses. In short, it makes the voice recording pure. In addition to pitch correction, Graillon also performs the pitch-shifting function. So, it’s an ideal solution for people looking for autotuning tools. Here is a brief overview of the pros of Graillon.
Advantages
- Incorporates 23ms of latency
- Maximizes the sound quality of output
- Optimized pitch shifter
- Ability to produce robotic sounds
- Free access to the tool
- Allows altering the vocal pitch
- Compatibility with all mainstream operating systems including Windows, Mac, Linux, and others
- Simple interface
- Equipped with bit crusher
- A full edition version is also available, which provides state-of-the-art features

Part 3: How to AutoTune Your Voice for Free with GSnap on Audacity?
GSnap is a famous plugin for autotuning audio recordings in Audacity. This plugin is free and can be easily installed on Windows, Mac, and Linux operating systems. If you are wondering how to install and use this plugin to autotune your voice in Audacity, the step-by-step guide highlights the process below.
Step 1: Install GSnap
Access the web link https://www.gvst.co.uk/gsnap.htm and click on download GSnap. Choose the GSnap version that matches your operating system.
Note: Audacity must be installed on your computer before the GSnap plugin is downloaded. Plus, the plugin will be downloaded in a zipped file. So, make sure you have an application installed on your device to unzip the downloaded file.

Step 2: Copy GSnap
Navigate to the download folder and right-click on the zipped GSnap option. Select extract here from the menu and copy the file named GSnap.dll.

Step 3: Paste the copied file
Navigate the plugins folder of Audacity and paste the copied file into the folder.
Step 3: Add plugin
Open Audacity and locate the Effects tab on a recording window. Select add/remove plug-ins, click on the GSnap option, and press enable button.
Note: The GSnap plugin will appear in the list under the effects tab and let you autotune your voice recording. You need to configure settings in a GSnap to get the fine-tuned voice.

For the detailed information, you can check the tutorial about how to add and set up GSnap plugin in Audacity.
Conclusion
Human voices and inputs from musical instruments are not perfect by default. Voice recordings in Audacity are no exception. They also need to be processed to enhance the vocal presentation. So, you need to tune the vocals in one way or another. This article mentions free Audacity autotune tools like GSnap to produce better sounds.
Pro MPEG Blender - Craft the Finest Mac MP3 Fusion
Choosing an auto music mixer for Mac and be difficult. This is because it needs to meet your requirements and resources, which can be difficult. Some of the auto music mixers are paid, while others are free. While some cater to a specific operating system, you can use others for several operating systems. You also need to consider the features it comes with and if they’re what you’re looking for. Knowing how complex finding the suitable auto music mixer for Mac can be, we’ve done the research, so you don’t have to. Below are some of the best software you can use to satisfy your needs.
Best Auto Music Mixers for Mac
Below, we’ll review some of the crucial features that these auto music mixers can offer you. Keep reading to find out all the crucial details you need to know and find the best auto music mixer for you.
Tractor Pro
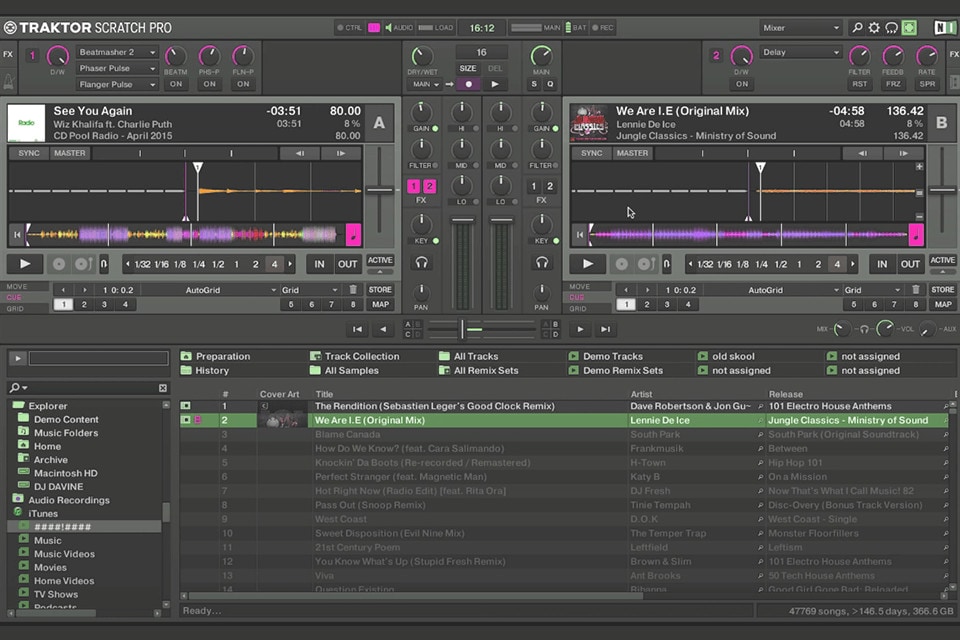
If you want an auto music mixer for Mac that allows you to seamlessly create musical compositions with samples, effects, and inbuilt filters, Tractor Pro is the best option. It is a popular software amongst DJs worldwide because of its impressive features. This auto music mixer allows you to create remixes and edit music easily. You can mix and edit up to four tracks at the same time.
One of the things we love about this software interface is its intuitiveness. Developers upgraded the previous version’s file manager to help you better organize your media library. It also allows you to include songs from music platforms like iTunes. In addition, it is one of the leading software for auto music mixing and features automatic functions and presets to simplify the process. It also has 40 quality effects and stability features to improve your audio tracks.
Pros
- It helps you rate songs to create a perfect and fluent mix
- Experiment with your mix using the sync button that automatically blends your songs
- You can remix with the best jumps, loops, and hot cues
- It comes with a complete FX suite
- There’s a native recording available for a harmonic mixing
Cons
- Not ideal for beginners
Mixxx
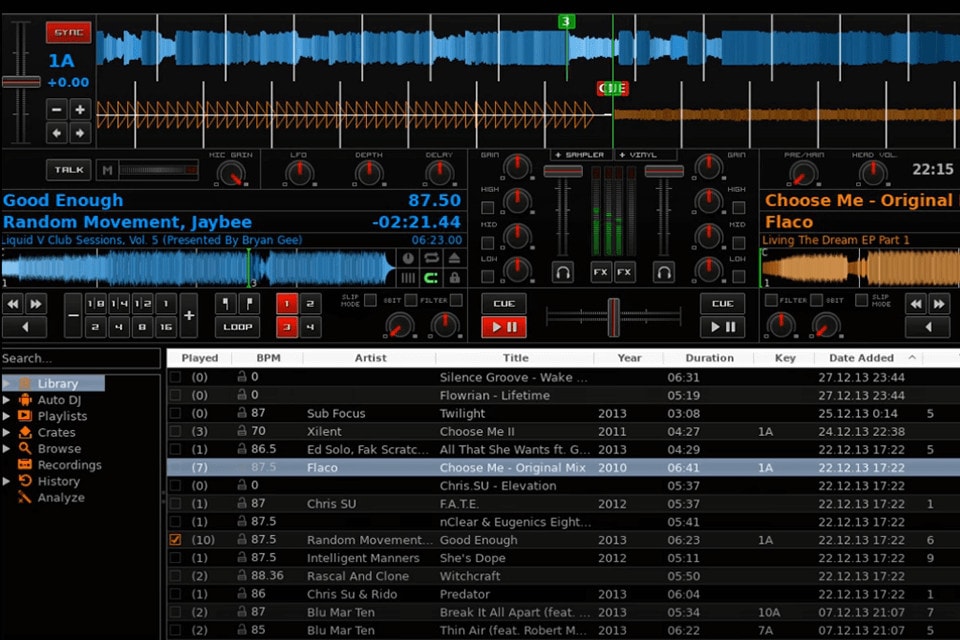
An easy-to-use software solution for your music files is Mixxx. It is an excellent option for mixing audio tracks and can be utilized by professionals and amateurs. The program works with playlists and can stimulate the noise of playing vinyl records. This auto music mixer also allows you to simulate analogue control. One of the crucial functions of this auto music mixer is the ability to synchronize tracks. To synchronize and listen to any track, all you have to do is hit the headphone icon.
Mixxx is a common choice for DJs worldwide, especially those still trying to get their footing in the DJ world. Its editing features include key control, pitch, hot cues, beat looping, quantization, crossfader control, four-deck mixing, and many more. It also allows you to explore a vast range of DJ hardware, so you don’t have issues connecting it to a modern DJ controller. When it comes to file management, Mixxx is an excellent option. It has an impressive and organized music library that allows you to organize your music tracks into playlists.
You can also create crates to build organizational systems that you prefer. Thanks to the iTunes integration features, you can import various tracks from iTunes right into your track. Another useful feature in Mixxx is the ability to record your mix. Its auto-DJ function also allows you to take a break while the software works for you. This software also has an impressive selection of customizable skins to make it more appealing to users. This free and open-sourced software is all you need to start mixing tracks.
Pros
- It features iTunes integration
- This tool comes with 85 MIDI DJ controllers that are supported
- Auto synchronization feature
- Auto DJ element allows you to take a break from editing
- It will enable you to edit and mix up to four tracks at the same time
Cons
- Not a great option for professionals
UltraMixer
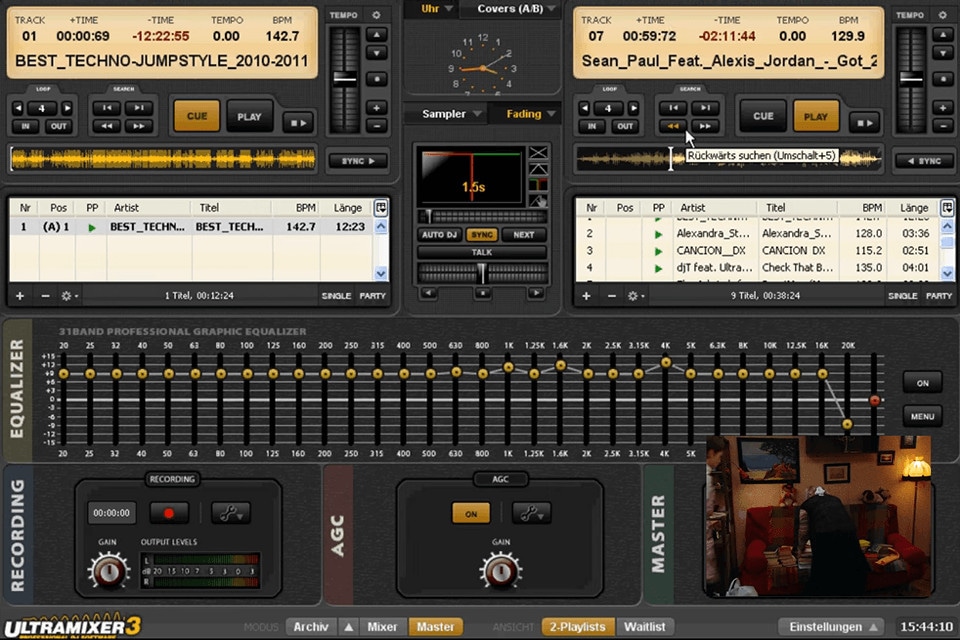
Free DJ software that you can use for free auto music mixing on Mac is UltraMixer. It allows you to seamlessly create and save custom beats on your Mac whenever possible. Some of the unique features this auto music mixer offers are record audio, live mix, and an impressive database offering you thousands of royalty-free sounds that you can utilize as you want.
If you want to improve your hip-hop, rock, or alternate music production, you should look no further than UltraMixer. This mixer supports up to 80 MIDI controllers and features a stylish and customizable interface that you can upgrade its skin and add widgets. It also features a database archive excellent for professional music management and makes it easy to sync and manage your music files. With this database, it’s much easier to navigate playlists and tracks.
Like every other premium tool, it has many features like auto music and video mixing. It also comes with sampling features. However, it can be quite hard for beginners to navigate at first. However, with practice and perseverance, anyone can figure out UltraMixer eventually.
Pros
- Extensive collection of royalty-free music
- Supports up to 80 MIDI controller
- Features a stylish and customizable user interface
- Offers auto-sync and auto music and video mixing
- Its database archive allows you to navigate your tracks and playlist easily
Cons
- It is difficult for beginners to navigate
VirtualDJ
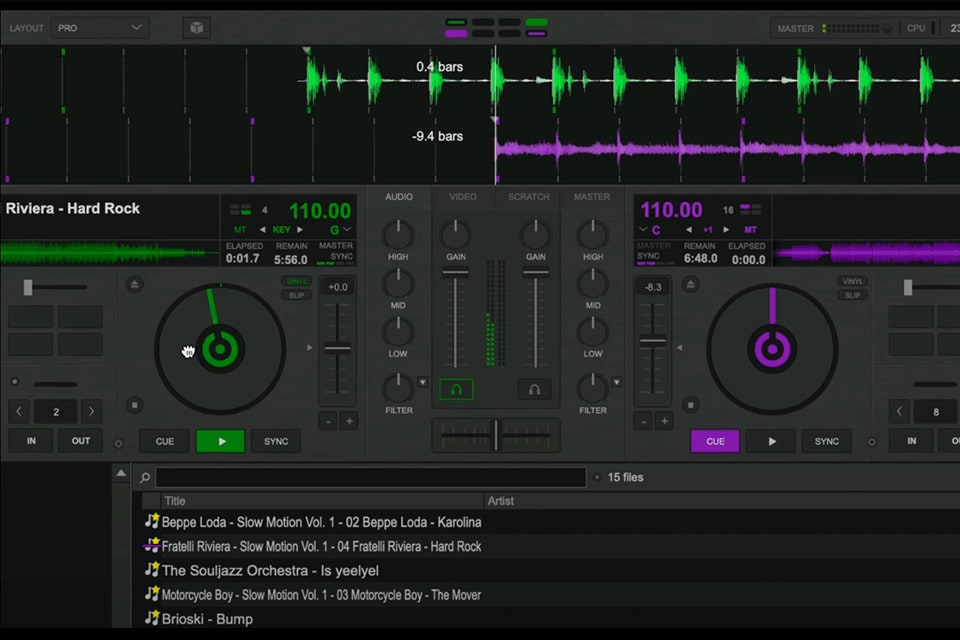
This is an auto music mixer that allows you to record tracks to share in live shows and with friends and seamlessly mix and edit songs on this platform. VirtualDJ allows you to easily import music from your computer or USB storage device and then playback using the VirtualDJ feature. Even better, it comes with a virtual keyboard that allows users to click pads and change keys when they want. You can also navigate through VirtualDJ easily to simplify your mixing process.
When you download and launch the app, it provides an impressive user interface divided into manageable and organized sections. It also offers you an advanced auto mixer, loops, effects, hot cues, track information, jog wheels, performance pads, smart sync, and many more valuable features DJs would love.
Although beginners might find this software a tad overwhelming, it is powerful and easy to learn. In no time, you’d be able to master all the features you need to enhance and effectively mix your audio files. Apart from an audio mix, its powerful mixing engine allows you to mix video content if that’s what you’re looking for. In terms of the music library management system, VirtualDJ is also quite impressive. You can create smart filter folders, virtual folders, playlists, and many more to organize all your tracks easily.
The best part is that if you’re in a hurry, you can easily utilize the toolbar to select folders as favorites and its fast search parameters when looking for a specific audio file. Although there’s a paid version, the free software is still an excellent option, especially if you’re new to music mixing.
Pros
- It offers you a fast search feature for easy accessing of files
- Its music library management is organized
- It comes with many impressive features for mixing audio and video files
- The software comes with a virtual keyboard
Cons
- Beginners find it complex
MixVibes Cross DJ
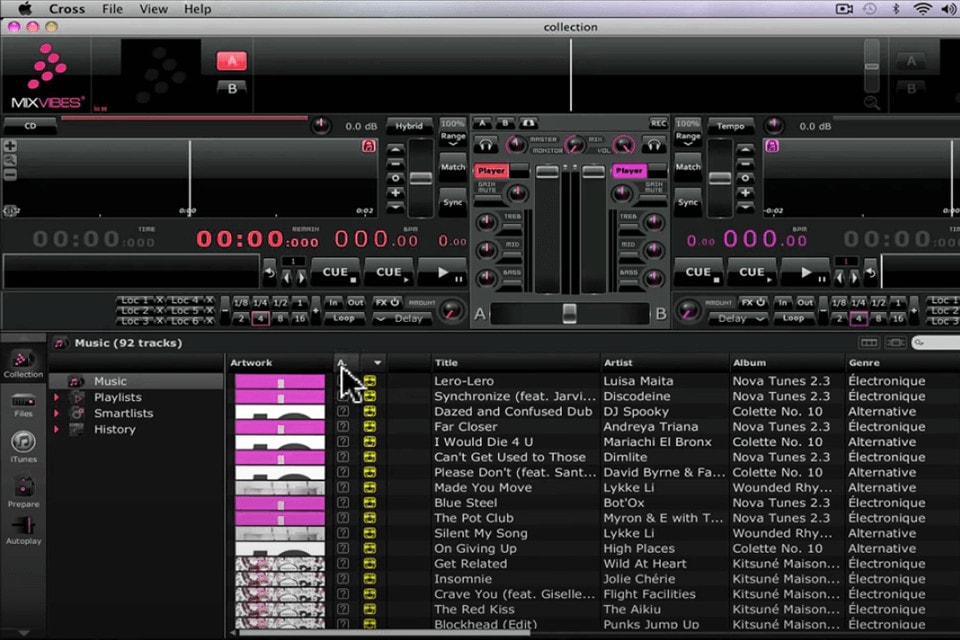
An excellent choice for auto music mixing for Mac is Cross DJ by Mixvibes. This software offers all you need to thrive in your career as a DJ. Although it is a paid application, the free version doesn’t limit the features you can access; it only prevents MIDI support for external hardware. This auto music mixer for Max is powerful and easy to use. It will effectively meet your needs as a professional or beginner. It comes with a functional and intuitive user interface that’s simple and, therefore, easy to use.
One of the things we love this auto music mixer for is the sound fusing feature it offers. This feature ensures that users hear precisely what’s happening in the room even if they’re not there. It is a special effect that can simulate different effects when mixing your music files. It also allows you to create underground music, popular hits, and many more. As a versatile tool, MixVibes Cross DJ software is compatible with iOS, Android, Windows, and Mac. It also effortlessly integrates with the software you need to import playlists, loops, and hot cues for your music file.
Pros
- The free version offers you all the features for auto music mixing
- It comes with a clean and straightforward interface
- It integrates easily with the software necessary to import loops, hot cues, and playlists
- Compatible with iOS as well
- Ideal for professionals and beginners alike
Cons
- The free version doesn’t come with MIDI support for external hardware
Alternative Option: Wondershare Filmora
An alternative option to the 5 best auto music mixers for Mac that you can explore is Wondershare Filmora. It is a great option that’s also suitable for auto music mixing and editing. This software has many impressive features to take your audio file to the next level, like auto beat sync. It will also add sound fade-in/fade-out features to your music file when needed. It also features speed and pitch adjustments, volume adjustments, and many more. The steps for using Wondershare Filmora for an auto mix are simple; we’ll break them down below.
Free Download For Win 7 or later(64-bit)
Free Download For macOS 10.14 or later
- Before you can start using Wondershare Filmora for auto music mixing, you have to download the app. It is available on the official site. Alternatively, you can download it from your app store.
- After downloading, install the file on your device following the guidelines, and launch the software to get started.
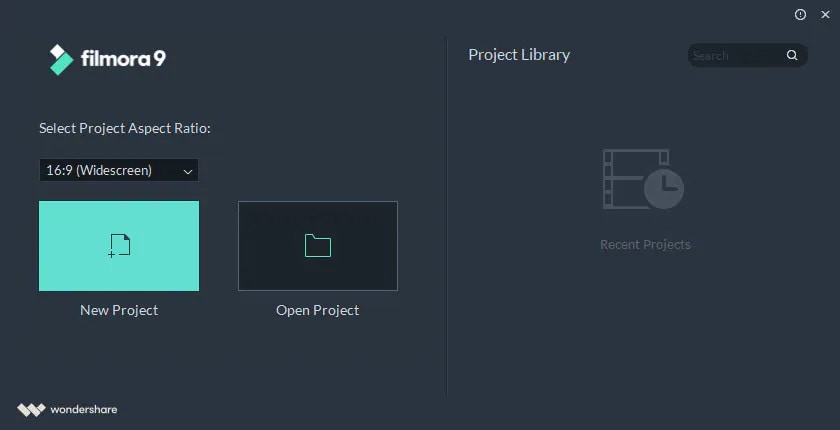
- Upon launch, the welcome page will ask you if you want to open an existing project or create a new one; opt for ‘create a new project.’
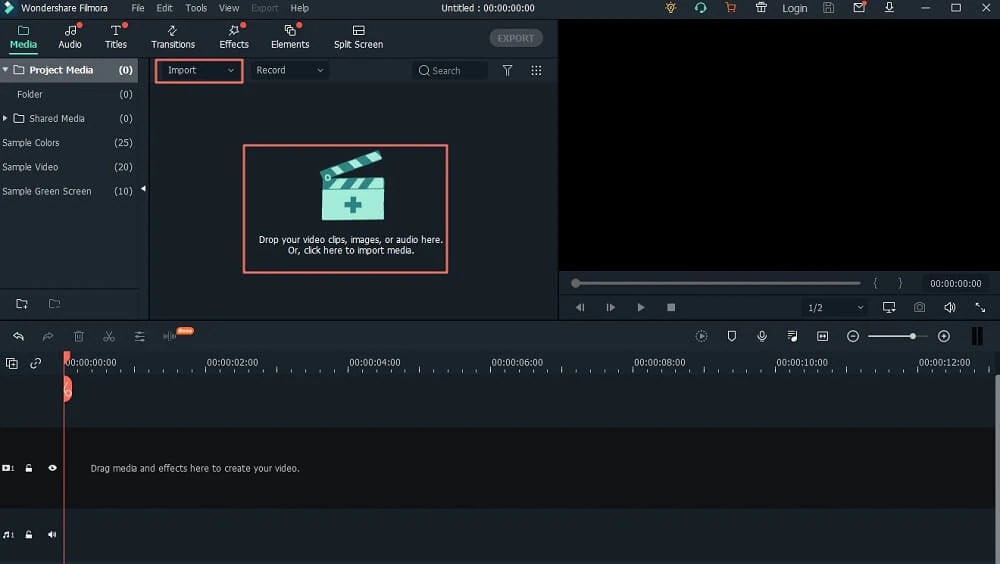
- This will lead you to the editing panel of the software. Click ‘import media files here’ on the media menu and navigate to your file location. Select the file you want to mix and then hit the ‘import media’ button.
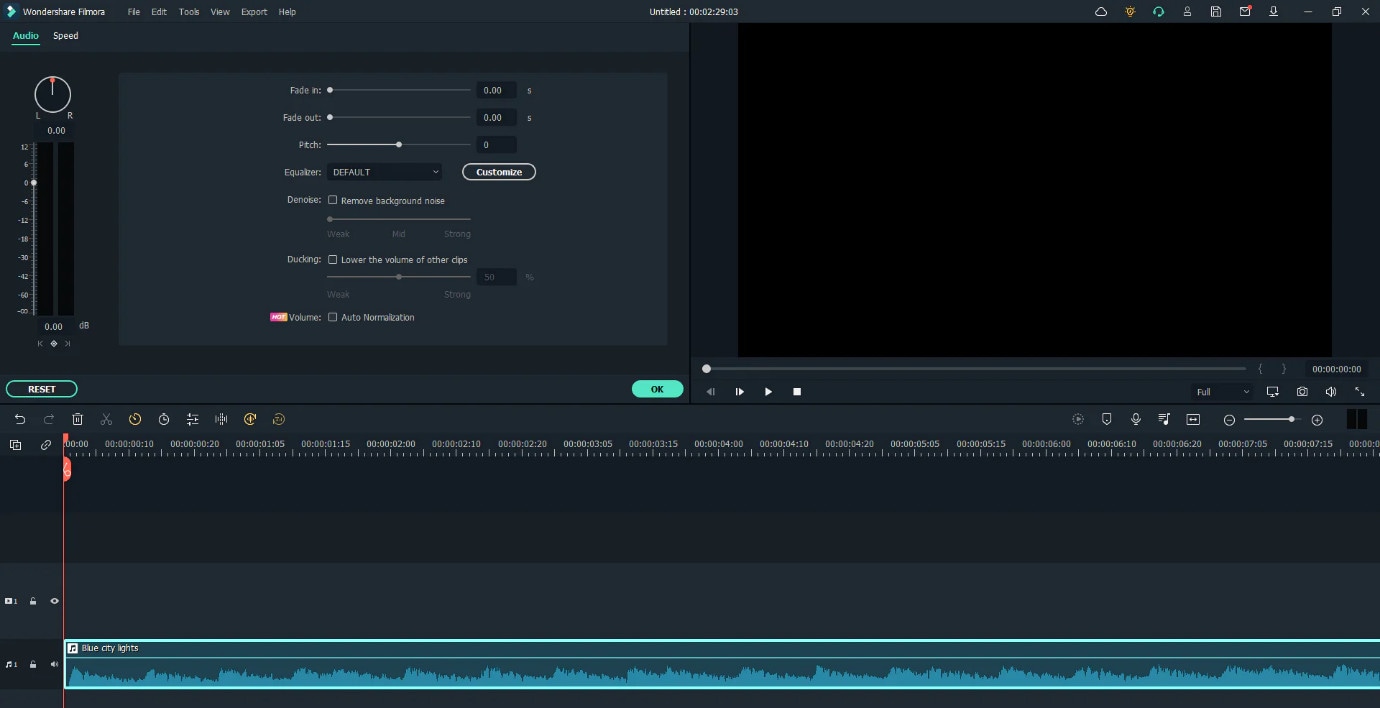
- Now, mix your audio file with the audio mixer tool available on the software. You can also use its silence detection and auto beat-sync feature for effective mixing.
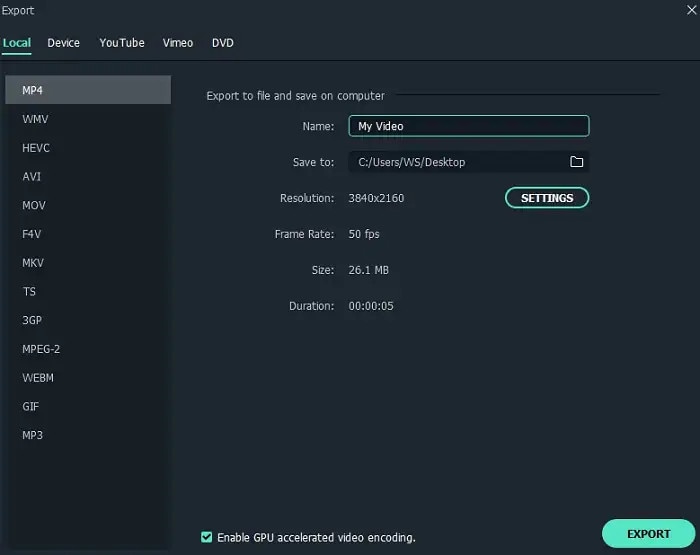
- After mixing and you’re satisfied with the result, click the ‘export’ button. Before you hit the ‘export’ button again, you can edit the file name, quality, and format.
Final Thoughts
We provided all the essential information you need about the best auto music mixer for Max in this article. Their unique features, pros, and cons will help you choose the ideal auto music mixer. Additionally, you can utilize any of these tools if you’re a beginner or a professional. However, Wondershare Filmora is also an excellent option for you. Again, it s a great option for beginners and professionals and will ensure that your music mix output is top quality.
Best Auto Music Mixers for Mac
Below, we’ll review some of the crucial features that these auto music mixers can offer you. Keep reading to find out all the crucial details you need to know and find the best auto music mixer for you.
Tractor Pro

If you want an auto music mixer for Mac that allows you to seamlessly create musical compositions with samples, effects, and inbuilt filters, Tractor Pro is the best option. It is a popular software amongst DJs worldwide because of its impressive features. This auto music mixer allows you to create remixes and edit music easily. You can mix and edit up to four tracks at the same time.
One of the things we love about this software interface is its intuitiveness. Developers upgraded the previous version’s file manager to help you better organize your media library. It also allows you to include songs from music platforms like iTunes. In addition, it is one of the leading software for auto music mixing and features automatic functions and presets to simplify the process. It also has 40 quality effects and stability features to improve your audio tracks.
Pros
- It helps you rate songs to create a perfect and fluent mix
- Experiment with your mix using the sync button that automatically blends your songs
- You can remix with the best jumps, loops, and hot cues
- It comes with a complete FX suite
- There’s a native recording available for a harmonic mixing
Cons
- Not ideal for beginners
Mixxx

An easy-to-use software solution for your music files is Mixxx. It is an excellent option for mixing audio tracks and can be utilized by professionals and amateurs. The program works with playlists and can stimulate the noise of playing vinyl records. This auto music mixer also allows you to simulate analogue control. One of the crucial functions of this auto music mixer is the ability to synchronize tracks. To synchronize and listen to any track, all you have to do is hit the headphone icon.
Mixxx is a common choice for DJs worldwide, especially those still trying to get their footing in the DJ world. Its editing features include key control, pitch, hot cues, beat looping, quantization, crossfader control, four-deck mixing, and many more. It also allows you to explore a vast range of DJ hardware, so you don’t have issues connecting it to a modern DJ controller. When it comes to file management, Mixxx is an excellent option. It has an impressive and organized music library that allows you to organize your music tracks into playlists.
You can also create crates to build organizational systems that you prefer. Thanks to the iTunes integration features, you can import various tracks from iTunes right into your track. Another useful feature in Mixxx is the ability to record your mix. Its auto-DJ function also allows you to take a break while the software works for you. This software also has an impressive selection of customizable skins to make it more appealing to users. This free and open-sourced software is all you need to start mixing tracks.
Pros
- It features iTunes integration
- This tool comes with 85 MIDI DJ controllers that are supported
- Auto synchronization feature
- Auto DJ element allows you to take a break from editing
- It will enable you to edit and mix up to four tracks at the same time
Cons
- Not a great option for professionals
UltraMixer

Free DJ software that you can use for free auto music mixing on Mac is UltraMixer. It allows you to seamlessly create and save custom beats on your Mac whenever possible. Some of the unique features this auto music mixer offers are record audio, live mix, and an impressive database offering you thousands of royalty-free sounds that you can utilize as you want.
If you want to improve your hip-hop, rock, or alternate music production, you should look no further than UltraMixer. This mixer supports up to 80 MIDI controllers and features a stylish and customizable interface that you can upgrade its skin and add widgets. It also features a database archive excellent for professional music management and makes it easy to sync and manage your music files. With this database, it’s much easier to navigate playlists and tracks.
Like every other premium tool, it has many features like auto music and video mixing. It also comes with sampling features. However, it can be quite hard for beginners to navigate at first. However, with practice and perseverance, anyone can figure out UltraMixer eventually.
Pros
- Extensive collection of royalty-free music
- Supports up to 80 MIDI controller
- Features a stylish and customizable user interface
- Offers auto-sync and auto music and video mixing
- Its database archive allows you to navigate your tracks and playlist easily
Cons
- It is difficult for beginners to navigate
VirtualDJ

This is an auto music mixer that allows you to record tracks to share in live shows and with friends and seamlessly mix and edit songs on this platform. VirtualDJ allows you to easily import music from your computer or USB storage device and then playback using the VirtualDJ feature. Even better, it comes with a virtual keyboard that allows users to click pads and change keys when they want. You can also navigate through VirtualDJ easily to simplify your mixing process.
When you download and launch the app, it provides an impressive user interface divided into manageable and organized sections. It also offers you an advanced auto mixer, loops, effects, hot cues, track information, jog wheels, performance pads, smart sync, and many more valuable features DJs would love.
Although beginners might find this software a tad overwhelming, it is powerful and easy to learn. In no time, you’d be able to master all the features you need to enhance and effectively mix your audio files. Apart from an audio mix, its powerful mixing engine allows you to mix video content if that’s what you’re looking for. In terms of the music library management system, VirtualDJ is also quite impressive. You can create smart filter folders, virtual folders, playlists, and many more to organize all your tracks easily.
The best part is that if you’re in a hurry, you can easily utilize the toolbar to select folders as favorites and its fast search parameters when looking for a specific audio file. Although there’s a paid version, the free software is still an excellent option, especially if you’re new to music mixing.
Pros
- It offers you a fast search feature for easy accessing of files
- Its music library management is organized
- It comes with many impressive features for mixing audio and video files
- The software comes with a virtual keyboard
Cons
- Beginners find it complex
MixVibes Cross DJ

An excellent choice for auto music mixing for Mac is Cross DJ by Mixvibes. This software offers all you need to thrive in your career as a DJ. Although it is a paid application, the free version doesn’t limit the features you can access; it only prevents MIDI support for external hardware. This auto music mixer for Max is powerful and easy to use. It will effectively meet your needs as a professional or beginner. It comes with a functional and intuitive user interface that’s simple and, therefore, easy to use.
One of the things we love this auto music mixer for is the sound fusing feature it offers. This feature ensures that users hear precisely what’s happening in the room even if they’re not there. It is a special effect that can simulate different effects when mixing your music files. It also allows you to create underground music, popular hits, and many more. As a versatile tool, MixVibes Cross DJ software is compatible with iOS, Android, Windows, and Mac. It also effortlessly integrates with the software you need to import playlists, loops, and hot cues for your music file.
Pros
- The free version offers you all the features for auto music mixing
- It comes with a clean and straightforward interface
- It integrates easily with the software necessary to import loops, hot cues, and playlists
- Compatible with iOS as well
- Ideal for professionals and beginners alike
Cons
- The free version doesn’t come with MIDI support for external hardware
Alternative Option: Wondershare Filmora
An alternative option to the 5 best auto music mixers for Mac that you can explore is Wondershare Filmora. It is a great option that’s also suitable for auto music mixing and editing. This software has many impressive features to take your audio file to the next level, like auto beat sync. It will also add sound fade-in/fade-out features to your music file when needed. It also features speed and pitch adjustments, volume adjustments, and many more. The steps for using Wondershare Filmora for an auto mix are simple; we’ll break them down below.
Free Download For Win 7 or later(64-bit)
Free Download For macOS 10.14 or later
- Before you can start using Wondershare Filmora for auto music mixing, you have to download the app. It is available on the official site. Alternatively, you can download it from your app store.
- After downloading, install the file on your device following the guidelines, and launch the software to get started.
- Upon launch, the welcome page will ask you if you want to open an existing project or create a new one; opt for ‘create a new project.’

- This will lead you to the editing panel of the software. Click ‘import media files here’ on the media menu and navigate to your file location. Select the file you want to mix and then hit the ‘import media’ button.

- Now, mix your audio file with the audio mixer tool available on the software. You can also use its silence detection and auto beat-sync feature for effective mixing.

- After mixing and you’re satisfied with the result, click the ‘export’ button. Before you hit the ‘export’ button again, you can edit the file name, quality, and format.

Final Thoughts
We provided all the essential information you need about the best auto music mixer for Max in this article. Their unique features, pros, and cons will help you choose the ideal auto music mixer. Additionally, you can utilize any of these tools if you’re a beginner or a professional. However, Wondershare Filmora is also an excellent option for you. Again, it s a great option for beginners and professionals and will ensure that your music mix output is top quality.
“Exploring the Capabilities of AVS Audio Software – A Deep Dive Into Features, Ratings, and Options”
You might have tried using the audio editor for fun. Have you ever tried using a fun kind of audio editor for both professional and non-professional purposes? We have an option for you! AVS Audio Editor is editing software that is used for fun as well as professional reasons. It is a great editor because of its features and ease of working.
You can use any audio editor to make your content better, but in this case of the article, we will be discussing AVS Audio Editor Software. Read the review and enjoy!
In this article
01 AVS Audio Editor Product Details
02 Key Features of AVS Audio Editor
03 Pros and Cons of AVS Audio Editor
04 How to Use AVS Audio Editor?
05 Alternatives for AVS Audio Editor
Part 1. AVS Audio Editor Product Details
What is AVS Audio Editor ? It is multi-functional audio editing software. You can use it to do basic editing like cut, paste, trim and merge different audio tracks. The editor allows the user to use multiple audio formats, including WMA, MP2, etc. AVS Audio Editor portable has a built-in audio equalizer which allows for editing volumes and performing Noise Reduction along with it.
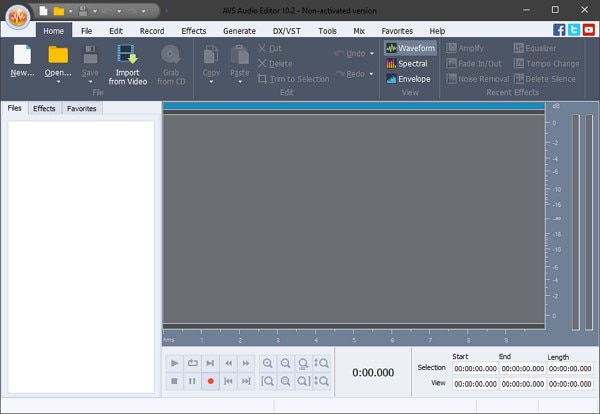
AVS Audio Editor is also an audio recorder. It has around 20 effects and filters that the user can choose from. Moreover, you can use the AVS sound editor to extract audio from videos and use them for different purposes.
Recommend System Requirements
| Operating System | Windows 7/10/11, Windows 8.x |
|---|---|
| Processor | Dual-Core (Intel i3 or AMD Equitant) |
| RAM | 2GB or Higher |
| Video | Windows 7/10/11, Windows 8.x compatible video card |
| Sound | Windows 7/10/11, Windows 8.x compatible sound card |
| File Size | 47.32 MB |
Part 2. Key Features of AVS Audio Editor
AVS Audio Editor portable is a brilliant choice for editing and transforming your audio files. The reason behind this is the features and editing options that one can avail of from this editor. If you are not aware of much of its features, then this section will prove helpful for you. Let’s talk about some features that you can get from AVS Audio Editor.
· Editing Options
What diverse editing options do you get from AVS Audio Editor? Well, you can easily Trim, Cut, Join, Delete, Split audio files. Moreover, mixing different audio tracks and blending them is also offered by this editor.
· Effects
AVS editor is a great editing option because of the effects it offers. While editing with AVS Audio Editor, don’t forget to try its sound effects like Echo, Chorus, Reverb, etc. In addition to that, use its Remove Noise, Change Sound Bitrate, Equalizer options.
· View Options
Do you know how many different view options AVS Audio Editor offers? After you open the tool, head to the View section from the top menu bar, you will see 3 different view options. With AVS editor, view your files in Waveform, Spectral View, and also Envelope View.
Part 3. Pros and Cons of AVS Audio Editor
Now that you know about AVS Audio Editor and its features, are you excited to learn something else about it? Well, the following section of this article will shed light on the pros and cons that you get if you use this editor. Let’s start!
Benefits
- If we talk about the ease of using this audio editor and its customer service quality, AVS Audio Editor is a 4-star audio editor.
- Do you love to create your ringtones? For anyone who loves to use customized ringtones, try AVS Audio Editor portable.
- This audio editor is perfect for enhancing audio quality, even from cassette tape recordings. Moreover, you can trim files with an AVS editor.
- Want to know the best thing about AVS Audio Editor? It offers a Text-to-Speech feature where you can get the natural-sounding voice of your written text.
Drawback
- The biggest downside of this audio editor is that AVS Audio Editor does not support Mac and Linux systems.
Part 4. How to Use AVS Audio Editor?
Do you have any idea how easy it is to use AVS Audio Editor? From easy editing, you can achieve audio files edited like professionals. If you are scared of using the editor for the first time, try these steps that are shared for your assistance. Let’s get started!
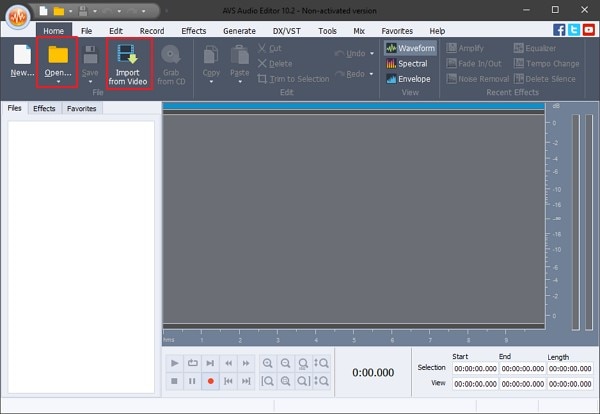
Step 1: Start by installing and launching the audio editor on your device. After that, you should import the media file. For that, tap on the ‘Open’ button to import from your device. Or else, you can also use the ‘Import from Video’ option.
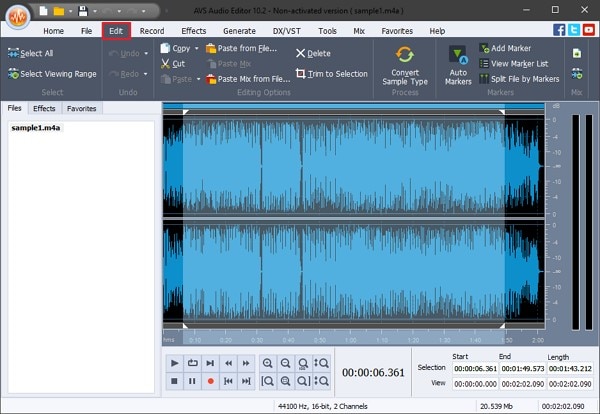
Step 2: As soon as the file has been imported to the editor, you should start the editing by accessing the ‘Edit’ tab. Different editing options like audio cut, mix, etc., are offered by AVS audio editor, which you can easily avail. You can also convert sample type.
Step 3: Are you ready to know about the different effects that you get from this editor? Well, AVS editor provides some stunning options like Amplify, AutoCorrect, Noise Removal, Delete Silence, Normalize, Compress, and much more. Head to the ‘Effects’ tab to access these options.
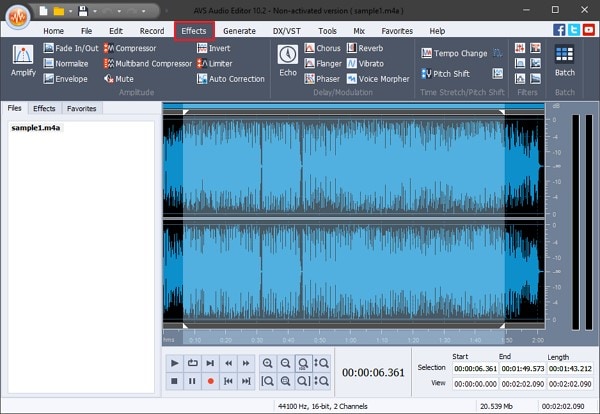
Step 4: After the fun and all the editing is over, save the final file. You can either save by hitting on the ‘Save’ icon. Or else, the file can also be saved by tapping on the ‘File’ tab and selecting the ‘Save’ option.

Part 5. Alternatives for AVS Audio Editor
AVS Audio Editor might not be used by some people due to some issues. There are alternatives for this editor as well. We are discussing two different alternatives for AVS Audio Editor. The two discussed editors are the best options available in the market that can replace AVS editors.
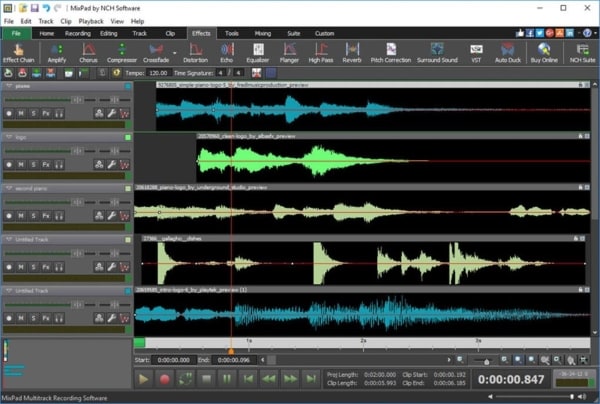
MixPad Multitrack Recording Software
MixPad is an intuitive and easy audio editing software. You can use it on Windows and macOS supported devices. It can mix an unlimited number of audio and can record new audio as well. You can use pre-recorded tracks for editing and mixing purposes. It has a built-in library full of sound effects and music. MixPad supports uploading to social media platforms; along with that, it supports audio in multiple formats.
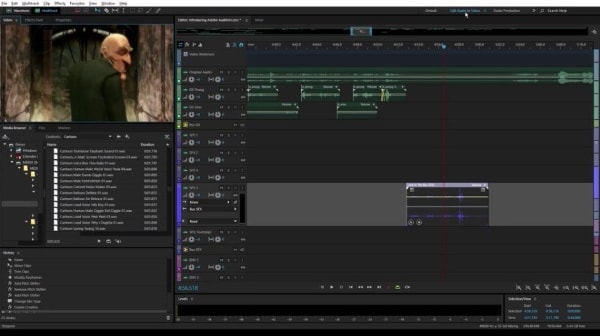
Adobe Audition
Adobe Audition is a top-notch audio editing software. You can use it for editing along with recording audio. It allows you to merge different tracks and remix them as per your needs. Audition also allows the users to restore and repair audios. You can use the editor to achieve professional finishing even if you are not a professional. Adobe Audition is a powerful software to work with.
Final Thoughts
After reading this detailed review on AVS Audio Editor, what have you learned? This article talked about the audio editor, its features, and a guideline for its steps has also been shared. If we ask you to name another great audio editor, can you? You probably don’t know about Wondershare Filmora Audio Editor if you can’t answer this question. Filmora is a great and powerful audio editor with so many different features.
If we talk about its features, you will never turn back to ordinary editors. The unmatched editor comes with features like Audio Ducking, Audio Equalizer, Audio Denoise, and so much more. You can name the feature, and Filmora has it. Some basic editing tools include Trim, Split, Cut, Adjust Audio, etc. You should surely look into this tool while managing your audio if you look forward to a seamless experience.
02 Key Features of AVS Audio Editor
03 Pros and Cons of AVS Audio Editor
04 How to Use AVS Audio Editor?
05 Alternatives for AVS Audio Editor
Part 1. AVS Audio Editor Product Details
What is AVS Audio Editor ? It is multi-functional audio editing software. You can use it to do basic editing like cut, paste, trim and merge different audio tracks. The editor allows the user to use multiple audio formats, including WMA, MP2, etc. AVS Audio Editor portable has a built-in audio equalizer which allows for editing volumes and performing Noise Reduction along with it.

AVS Audio Editor is also an audio recorder. It has around 20 effects and filters that the user can choose from. Moreover, you can use the AVS sound editor to extract audio from videos and use them for different purposes.
Recommend System Requirements
| Operating System | Windows 7/10/11, Windows 8.x |
|---|---|
| Processor | Dual-Core (Intel i3 or AMD Equitant) |
| RAM | 2GB or Higher |
| Video | Windows 7/10/11, Windows 8.x compatible video card |
| Sound | Windows 7/10/11, Windows 8.x compatible sound card |
| File Size | 47.32 MB |
Part 2. Key Features of AVS Audio Editor
AVS Audio Editor portable is a brilliant choice for editing and transforming your audio files. The reason behind this is the features and editing options that one can avail of from this editor. If you are not aware of much of its features, then this section will prove helpful for you. Let’s talk about some features that you can get from AVS Audio Editor.
· Editing Options
What diverse editing options do you get from AVS Audio Editor? Well, you can easily Trim, Cut, Join, Delete, Split audio files. Moreover, mixing different audio tracks and blending them is also offered by this editor.
· Effects
AVS editor is a great editing option because of the effects it offers. While editing with AVS Audio Editor, don’t forget to try its sound effects like Echo, Chorus, Reverb, etc. In addition to that, use its Remove Noise, Change Sound Bitrate, Equalizer options.
· View Options
Do you know how many different view options AVS Audio Editor offers? After you open the tool, head to the View section from the top menu bar, you will see 3 different view options. With AVS editor, view your files in Waveform, Spectral View, and also Envelope View.
Part 3. Pros and Cons of AVS Audio Editor
Now that you know about AVS Audio Editor and its features, are you excited to learn something else about it? Well, the following section of this article will shed light on the pros and cons that you get if you use this editor. Let’s start!
Benefits
- If we talk about the ease of using this audio editor and its customer service quality, AVS Audio Editor is a 4-star audio editor.
- Do you love to create your ringtones? For anyone who loves to use customized ringtones, try AVS Audio Editor portable.
- This audio editor is perfect for enhancing audio quality, even from cassette tape recordings. Moreover, you can trim files with an AVS editor.
- Want to know the best thing about AVS Audio Editor? It offers a Text-to-Speech feature where you can get the natural-sounding voice of your written text.
Drawback
- The biggest downside of this audio editor is that AVS Audio Editor does not support Mac and Linux systems.
Part 4. How to Use AVS Audio Editor?
Do you have any idea how easy it is to use AVS Audio Editor? From easy editing, you can achieve audio files edited like professionals. If you are scared of using the editor for the first time, try these steps that are shared for your assistance. Let’s get started!
Step 1: Start by installing and launching the audio editor on your device. After that, you should import the media file. For that, tap on the ‘Open’ button to import from your device. Or else, you can also use the ‘Import from Video’ option.

Step 2: As soon as the file has been imported to the editor, you should start the editing by accessing the ‘Edit’ tab. Different editing options like audio cut, mix, etc., are offered by AVS audio editor, which you can easily avail. You can also convert sample type.

Step 3: Are you ready to know about the different effects that you get from this editor? Well, AVS editor provides some stunning options like Amplify, AutoCorrect, Noise Removal, Delete Silence, Normalize, Compress, and much more. Head to the ‘Effects’ tab to access these options.

Step 4: After the fun and all the editing is over, save the final file. You can either save by hitting on the ‘Save’ icon. Or else, the file can also be saved by tapping on the ‘File’ tab and selecting the ‘Save’ option.

Part 5. Alternatives for AVS Audio Editor
AVS Audio Editor might not be used by some people due to some issues. There are alternatives for this editor as well. We are discussing two different alternatives for AVS Audio Editor. The two discussed editors are the best options available in the market that can replace AVS editors.
MixPad Multitrack Recording Software
MixPad is an intuitive and easy audio editing software. You can use it on Windows and macOS supported devices. It can mix an unlimited number of audio and can record new audio as well. You can use pre-recorded tracks for editing and mixing purposes. It has a built-in library full of sound effects and music. MixPad supports uploading to social media platforms; along with that, it supports audio in multiple formats.

Adobe Audition
Adobe Audition is a top-notch audio editing software. You can use it for editing along with recording audio. It allows you to merge different tracks and remix them as per your needs. Audition also allows the users to restore and repair audios. You can use the editor to achieve professional finishing even if you are not a professional. Adobe Audition is a powerful software to work with.

Final Thoughts
After reading this detailed review on AVS Audio Editor, what have you learned? This article talked about the audio editor, its features, and a guideline for its steps has also been shared. If we ask you to name another great audio editor, can you? You probably don’t know about Wondershare Filmora Audio Editor if you can’t answer this question. Filmora is a great and powerful audio editor with so many different features.
If we talk about its features, you will never turn back to ordinary editors. The unmatched editor comes with features like Audio Ducking, Audio Equalizer, Audio Denoise, and so much more. You can name the feature, and Filmora has it. Some basic editing tools include Trim, Split, Cut, Adjust Audio, etc. You should surely look into this tool while managing your audio if you look forward to a seamless experience.
02 Key Features of AVS Audio Editor
03 Pros and Cons of AVS Audio Editor
04 How to Use AVS Audio Editor?
05 Alternatives for AVS Audio Editor
Part 1. AVS Audio Editor Product Details
What is AVS Audio Editor ? It is multi-functional audio editing software. You can use it to do basic editing like cut, paste, trim and merge different audio tracks. The editor allows the user to use multiple audio formats, including WMA, MP2, etc. AVS Audio Editor portable has a built-in audio equalizer which allows for editing volumes and performing Noise Reduction along with it.

AVS Audio Editor is also an audio recorder. It has around 20 effects and filters that the user can choose from. Moreover, you can use the AVS sound editor to extract audio from videos and use them for different purposes.
Recommend System Requirements
| Operating System | Windows 7/10/11, Windows 8.x |
|---|---|
| Processor | Dual-Core (Intel i3 or AMD Equitant) |
| RAM | 2GB or Higher |
| Video | Windows 7/10/11, Windows 8.x compatible video card |
| Sound | Windows 7/10/11, Windows 8.x compatible sound card |
| File Size | 47.32 MB |
Part 2. Key Features of AVS Audio Editor
AVS Audio Editor portable is a brilliant choice for editing and transforming your audio files. The reason behind this is the features and editing options that one can avail of from this editor. If you are not aware of much of its features, then this section will prove helpful for you. Let’s talk about some features that you can get from AVS Audio Editor.
· Editing Options
What diverse editing options do you get from AVS Audio Editor? Well, you can easily Trim, Cut, Join, Delete, Split audio files. Moreover, mixing different audio tracks and blending them is also offered by this editor.
· Effects
AVS editor is a great editing option because of the effects it offers. While editing with AVS Audio Editor, don’t forget to try its sound effects like Echo, Chorus, Reverb, etc. In addition to that, use its Remove Noise, Change Sound Bitrate, Equalizer options.
· View Options
Do you know how many different view options AVS Audio Editor offers? After you open the tool, head to the View section from the top menu bar, you will see 3 different view options. With AVS editor, view your files in Waveform, Spectral View, and also Envelope View.
Part 3. Pros and Cons of AVS Audio Editor
Now that you know about AVS Audio Editor and its features, are you excited to learn something else about it? Well, the following section of this article will shed light on the pros and cons that you get if you use this editor. Let’s start!
Benefits
- If we talk about the ease of using this audio editor and its customer service quality, AVS Audio Editor is a 4-star audio editor.
- Do you love to create your ringtones? For anyone who loves to use customized ringtones, try AVS Audio Editor portable.
- This audio editor is perfect for enhancing audio quality, even from cassette tape recordings. Moreover, you can trim files with an AVS editor.
- Want to know the best thing about AVS Audio Editor? It offers a Text-to-Speech feature where you can get the natural-sounding voice of your written text.
Drawback
- The biggest downside of this audio editor is that AVS Audio Editor does not support Mac and Linux systems.
Part 4. How to Use AVS Audio Editor?
Do you have any idea how easy it is to use AVS Audio Editor? From easy editing, you can achieve audio files edited like professionals. If you are scared of using the editor for the first time, try these steps that are shared for your assistance. Let’s get started!
Step 1: Start by installing and launching the audio editor on your device. After that, you should import the media file. For that, tap on the ‘Open’ button to import from your device. Or else, you can also use the ‘Import from Video’ option.

Step 2: As soon as the file has been imported to the editor, you should start the editing by accessing the ‘Edit’ tab. Different editing options like audio cut, mix, etc., are offered by AVS audio editor, which you can easily avail. You can also convert sample type.

Step 3: Are you ready to know about the different effects that you get from this editor? Well, AVS editor provides some stunning options like Amplify, AutoCorrect, Noise Removal, Delete Silence, Normalize, Compress, and much more. Head to the ‘Effects’ tab to access these options.

Step 4: After the fun and all the editing is over, save the final file. You can either save by hitting on the ‘Save’ icon. Or else, the file can also be saved by tapping on the ‘File’ tab and selecting the ‘Save’ option.

Part 5. Alternatives for AVS Audio Editor
AVS Audio Editor might not be used by some people due to some issues. There are alternatives for this editor as well. We are discussing two different alternatives for AVS Audio Editor. The two discussed editors are the best options available in the market that can replace AVS editors.
MixPad Multitrack Recording Software
MixPad is an intuitive and easy audio editing software. You can use it on Windows and macOS supported devices. It can mix an unlimited number of audio and can record new audio as well. You can use pre-recorded tracks for editing and mixing purposes. It has a built-in library full of sound effects and music. MixPad supports uploading to social media platforms; along with that, it supports audio in multiple formats.

Adobe Audition
Adobe Audition is a top-notch audio editing software. You can use it for editing along with recording audio. It allows you to merge different tracks and remix them as per your needs. Audition also allows the users to restore and repair audios. You can use the editor to achieve professional finishing even if you are not a professional. Adobe Audition is a powerful software to work with.

Final Thoughts
After reading this detailed review on AVS Audio Editor, what have you learned? This article talked about the audio editor, its features, and a guideline for its steps has also been shared. If we ask you to name another great audio editor, can you? You probably don’t know about Wondershare Filmora Audio Editor if you can’t answer this question. Filmora is a great and powerful audio editor with so many different features.
If we talk about its features, you will never turn back to ordinary editors. The unmatched editor comes with features like Audio Ducking, Audio Equalizer, Audio Denoise, and so much more. You can name the feature, and Filmora has it. Some basic editing tools include Trim, Split, Cut, Adjust Audio, etc. You should surely look into this tool while managing your audio if you look forward to a seamless experience.
02 Key Features of AVS Audio Editor
03 Pros and Cons of AVS Audio Editor
04 How to Use AVS Audio Editor?
05 Alternatives for AVS Audio Editor
Part 1. AVS Audio Editor Product Details
What is AVS Audio Editor ? It is multi-functional audio editing software. You can use it to do basic editing like cut, paste, trim and merge different audio tracks. The editor allows the user to use multiple audio formats, including WMA, MP2, etc. AVS Audio Editor portable has a built-in audio equalizer which allows for editing volumes and performing Noise Reduction along with it.

AVS Audio Editor is also an audio recorder. It has around 20 effects and filters that the user can choose from. Moreover, you can use the AVS sound editor to extract audio from videos and use them for different purposes.
Recommend System Requirements
| Operating System | Windows 7/10/11, Windows 8.x |
|---|---|
| Processor | Dual-Core (Intel i3 or AMD Equitant) |
| RAM | 2GB or Higher |
| Video | Windows 7/10/11, Windows 8.x compatible video card |
| Sound | Windows 7/10/11, Windows 8.x compatible sound card |
| File Size | 47.32 MB |
Part 2. Key Features of AVS Audio Editor
AVS Audio Editor portable is a brilliant choice for editing and transforming your audio files. The reason behind this is the features and editing options that one can avail of from this editor. If you are not aware of much of its features, then this section will prove helpful for you. Let’s talk about some features that you can get from AVS Audio Editor.
· Editing Options
What diverse editing options do you get from AVS Audio Editor? Well, you can easily Trim, Cut, Join, Delete, Split audio files. Moreover, mixing different audio tracks and blending them is also offered by this editor.
· Effects
AVS editor is a great editing option because of the effects it offers. While editing with AVS Audio Editor, don’t forget to try its sound effects like Echo, Chorus, Reverb, etc. In addition to that, use its Remove Noise, Change Sound Bitrate, Equalizer options.
· View Options
Do you know how many different view options AVS Audio Editor offers? After you open the tool, head to the View section from the top menu bar, you will see 3 different view options. With AVS editor, view your files in Waveform, Spectral View, and also Envelope View.
Part 3. Pros and Cons of AVS Audio Editor
Now that you know about AVS Audio Editor and its features, are you excited to learn something else about it? Well, the following section of this article will shed light on the pros and cons that you get if you use this editor. Let’s start!
Benefits
- If we talk about the ease of using this audio editor and its customer service quality, AVS Audio Editor is a 4-star audio editor.
- Do you love to create your ringtones? For anyone who loves to use customized ringtones, try AVS Audio Editor portable.
- This audio editor is perfect for enhancing audio quality, even from cassette tape recordings. Moreover, you can trim files with an AVS editor.
- Want to know the best thing about AVS Audio Editor? It offers a Text-to-Speech feature where you can get the natural-sounding voice of your written text.
Drawback
- The biggest downside of this audio editor is that AVS Audio Editor does not support Mac and Linux systems.
Part 4. How to Use AVS Audio Editor?
Do you have any idea how easy it is to use AVS Audio Editor? From easy editing, you can achieve audio files edited like professionals. If you are scared of using the editor for the first time, try these steps that are shared for your assistance. Let’s get started!
Step 1: Start by installing and launching the audio editor on your device. After that, you should import the media file. For that, tap on the ‘Open’ button to import from your device. Or else, you can also use the ‘Import from Video’ option.

Step 2: As soon as the file has been imported to the editor, you should start the editing by accessing the ‘Edit’ tab. Different editing options like audio cut, mix, etc., are offered by AVS audio editor, which you can easily avail. You can also convert sample type.

Step 3: Are you ready to know about the different effects that you get from this editor? Well, AVS editor provides some stunning options like Amplify, AutoCorrect, Noise Removal, Delete Silence, Normalize, Compress, and much more. Head to the ‘Effects’ tab to access these options.

Step 4: After the fun and all the editing is over, save the final file. You can either save by hitting on the ‘Save’ icon. Or else, the file can also be saved by tapping on the ‘File’ tab and selecting the ‘Save’ option.

Part 5. Alternatives for AVS Audio Editor
AVS Audio Editor might not be used by some people due to some issues. There are alternatives for this editor as well. We are discussing two different alternatives for AVS Audio Editor. The two discussed editors are the best options available in the market that can replace AVS editors.
MixPad Multitrack Recording Software
MixPad is an intuitive and easy audio editing software. You can use it on Windows and macOS supported devices. It can mix an unlimited number of audio and can record new audio as well. You can use pre-recorded tracks for editing and mixing purposes. It has a built-in library full of sound effects and music. MixPad supports uploading to social media platforms; along with that, it supports audio in multiple formats.

Adobe Audition
Adobe Audition is a top-notch audio editing software. You can use it for editing along with recording audio. It allows you to merge different tracks and remix them as per your needs. Audition also allows the users to restore and repair audios. You can use the editor to achieve professional finishing even if you are not a professional. Adobe Audition is a powerful software to work with.

Final Thoughts
After reading this detailed review on AVS Audio Editor, what have you learned? This article talked about the audio editor, its features, and a guideline for its steps has also been shared. If we ask you to name another great audio editor, can you? You probably don’t know about Wondershare Filmora Audio Editor if you can’t answer this question. Filmora is a great and powerful audio editor with so many different features.
If we talk about its features, you will never turn back to ordinary editors. The unmatched editor comes with features like Audio Ducking, Audio Equalizer, Audio Denoise, and so much more. You can name the feature, and Filmora has it. Some basic editing tools include Trim, Split, Cut, Adjust Audio, etc. You should surely look into this tool while managing your audio if you look forward to a seamless experience.
Also read:
- The Complete Handbook to Adding Auditory Elements to AE Projects, Revised for 2024
- Where Can I Find MP3 Cat Sound Effect, In 2024
- Harnessing the Power of Suspenseful Music for Compelling and Memorable Score Development for 2024
- In 2024, MP4 Auditory Unlocking Nine Pathways to Seamless Sound Extraction in the Upcoming Year
- New 2024 Approved The Podcasters Blueprint for Smooth and Hassle-Free Audio Recording
- New Elevate Your Sound Production with These Five Elite Ducking Solutions for 2024
- New The Ultimate Guide to MP3 Modification Software for Mac Uncovering the Best Tools and Comparisons .
- New From Soft to Steel Teaching Yourself a Louder, Clearer Speech with Video Editing Tools
- Updated 2024 Approved Innovative Approaches to Minimize Audio and Video File Size
- Updated The Ultimate Selection 5 Premium Audio/Video Integration Tools
- Updated Top 200 Free Video Soundtrack Collections
- New In 2024, Woof & Howl Repertoire Dognoises for Filmmakers & Game Developers
- 2024 Approved Exploring the Best 9 Voice Technology Innovations That Promise a Perfect Day
- New The Premier Selection of Zero-Cost Sound Balancers for 2024
- 10 Best Speech to Text Software/Converters for Windows
- New The 10 Leading Free Online DAW Platforms You Must Check Out
- New 2024 Approved Top 8 Best DAW Apps for Android to Accelerate Your Music Production
- Updated In 2024, Explore Our Top 8 Selection of Aural Designs for Cutting-Edge Video Sound Integration
- Updated Where Can I Find Laughing Sound Effect, In 2024
- Ultimate Guide to the 9 Most Reliable Podcast Microphones
- 2024 Approved Audio Excellence Techniques for Clearer Sound in Video Editing Using Filmora
- The Finest 10 Unlimited Audio Harmonization Sites for 2024
- New Unveiling the Leading Mixers 5 Highest Rated Audio/Video Combiner Devices
- Updated In 2024, Beats & Bits Creating Seamless Synchronization Between Soundtracks and Visuals in the 2023 Edition of FCPX
- Updated Delve Into the Realm of Mirthful Noises for 2024
- In 2024, Instantaneous Techniques for Cutting Down Residual Hum in Recordings
- Updated 2024 Approved Top Picks for High-Quality Outdoor Audio Archives
- Updated Authoritative Hubs for Securing Lofi Melodies and Visual Backdrops
- New 2024 Approved Elite iOS Music Editing Tools The Top 4 Apps
- New Cutting Edge Audio Editing with Sony Vegas Pro – Complete Guide for 2024
- New 2024 Approved Something You Need to Know About YouTube Sound Library
- Updated AudioMastery The Definitive Guide to Choosing the Best Voice Recorders for 2024
- New Best 10 Voice Changer Apps Male to Female Powerful for 2024
- New Unveiling the Best Chromebook Voice Alteration Tools A Top 6 List for Auditory Playfulness - VisualEditPro
- New Dissecting the Spectrum Enhancing Audio Fidelity Through Adobe Auditions Filtering Capabilities
- 2024 Approved Guide to Visualizing Sound Integrating Audio Waves and Enhancing Them with Motion Effects in Adobe Premiere Pro
- New In 2024, Unlock Easy Audio Modification with These 7 Free Online Apps
- Updated How to Find the Best Spots on the Internet to Download High-Quality Ding Sounds (2023 Compilation)
- New Creating Cohesive Video Projects The Role of Sound Design in Adobe Premiere Pro for 2024
- Updated In 2024, The Elite Tone Tweaker Guidebook Top-Notch Tools, User Guides & Backup Voice Alteration Techniques
- New 2024 Approved MP4 to Audiophile Revolutionary Audio Extraction Techniques of 2 Written by a Software Engineer
- Updated In 2024, Top Tips for Integrating Auditory Elements with Visual Images
- New Design Your Dream Face Free Online Tools
- In 2024, A Guide Vivo Y100A Wireless and Wired Screen Mirroring | Dr.fone
- In 2024, Pattern Locks Are Unsafe Secure Your Samsung Galaxy A05 Phone Now with These Tips
- Things You Should Know When Unlocking Total Wireless Of iPhone 13 Pro Max | Dr.fone
- In 2024, 3 Effective Ways to Unlock iCloud Account Without Password From Apple iPhone 15 Plus
- A Step-by-Step Guide on Using ADB and Fastboot to Remove FRP Lock on your Xiaomi Redmi K70
- How To Change Samsung Galaxy XCover 6 Pro Tactical Edition Lock Screen Password?
- In 2024, How Can I Use a Fake GPS Without Mock Location On Sony Xperia 5 V? | Dr.fone
- In 2024, Tutorial to Change OnePlus IMEI without Root A Comprehensive Guide
- 2024 Approved The Best of Both Worlds 10 Free Android Video Editors Without Watermarks
- New Blur Faces or Objects in Videos Best Apps for iOS and Android
- 3uTools Virtual Location Not Working On Honor Magic Vs 2? Fix Now | Dr.fone
- Top 15 Apps To Hack WiFi Password On Vivo Y27s
- Updated 2024 Approved Top Explainer Video Tools to Boost Your Brand
- In 2024, Is pgsharp legal when you are playing pokemon On Itel P55? | Dr.fone
- In 2024, PassFab iPhone X Backup Unlocker Top 4 Alternatives
- Hassle-Free Ways to Remove FRP Lock from Oppo Reno 10 Pro+ 5G Phones with/without a PC
- Latest Guide How To Bypass Xiaomi Redmi K70 FRP Without Computer
- In 2024, 4 Methods to Turn off Life 360 On Vivo T2 Pro 5G without Anyone Knowing | Dr.fone
- New 2024 Approved Unleash Your Creativity Top Phone Apps for Animated Text in Videos
- In 2024, CatchEmAll Celebrate National Pokémon Day with Virtual Location On OnePlus Nord N30 5G | Dr.fone
- How To Transfer WhatsApp From Apple iPhone SE to Android? | Dr.fone
- Updated Reverse Your Videos Online The Best Tools
- Best 10 Mock Location Apps Worth Trying On Poco F5 5G | Dr.fone
- How to Track WhatsApp Messages on Apple iPhone 6s Without Them Knowing? | Dr.fone
- Full Guide to Bypass Tecno Spark 10 Pro FRP
- Android Safe Mode - How to Turn off Safe Mode on Honor 90 Lite? | Dr.fone
- Simple and Effective Ways to Change Your Country on YouTube App Of your Google Pixel 7a | Dr.fone
- In 2024, Top 5 Itel A60 Bypass FRP Tools for PC That Actually Work
- Looking For A Location Changer On Apple iPhone 11? Look No Further | Dr.fone
- In 2024, Guide to Mirror Your Realme 12+ 5G to Other Android devices | Dr.fone
- How do i sign a Word 2021 electronically
- How to Remove iPhone 15 Plus SIM Lock?
- Undelete lost music from Motorola
- In 2024, 3 Facts You Need to Know about Screen Mirroring Oppo Reno 8T | Dr.fone
- How To Reset the Security Questions of Your Apple ID From Your iPhone 6s
- Solved Bad and Corrupt Videos that won't Play on Spark Go (2024)
- Title: How to Use Autotune in Audacity with Plugins for Free?
- Author: Kate
- Created at : 2024-05-20 02:42:09
- Updated at : 2024-05-21 02:42:09
- Link: https://audio-editing.techidaily.com/how-to-use-autotune-in-audacity-with-plugins-for-free/
- License: This work is licensed under CC BY-NC-SA 4.0.

