
:max_bytes(150000):strip_icc():format(webp)/istabletworthit-a75b20684e5241b8a64efc0733092fcd.jpg)
Explore the Leading Gratis Digital Audio Workstations for Windows/Mac Devices
“Explore the Leading Gratis Digital Audio Workstations for Windows/Mac Devices “
13 Free Music Production Software for Windows/Mac/Online

Benjamin Arango
Mar 27, 2024• Proven solutions
13 Free Music Production Software for Windows/Mac/Online
Technology advances have spread through all fields of human activity, including music recording and development. The invention of music development tools has made it simpler for people engaged in the creation of music in one form or another.
Numerous applications for music development are on the market, and some are meant for musicians, and others are for educators and teachers. There is also a need to direct prospective customers to the right free music production software.
A comprehensive analysis of some of the best music development tools has been conducted to help you make the correct decision while you’re ready to purchase the app. This comprehensive Music Production Software Guide will provide solutions to many of your unanswered questions relating to the purchase of music production software.
- Part 1: Free Music Production Software for Windows
- Part 2: Free Music Production Software for Mac
- Part 3: Free Music Production Software Online
Part 1: Free Music Production Software for Windows
1. Audacity
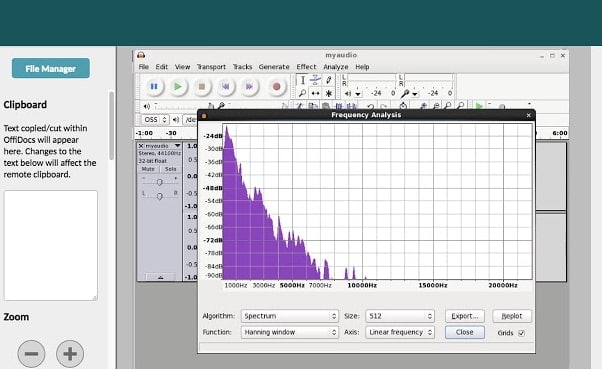
The system for music development is not complete without an audio editor. Audacity is the best free music creation software available on the market. Audacity is open-source and extensive and provides a wide range of tools and effects for performing all audio editing and recording activities. It is created by a community of volunteers and provides regular notifications almost every month. It’s lightweight, safe, and intuitive enough to be used by novice music makers.
Pros
- It is open-source
- It can load VST plugins
Cons
- Only 32-bit plugins are allowed
- Limited features
2. Ardour
Ardour is a highly integrated program of music production that allows users to record and edit on Mac, Linux, and Windows operating systems. Ardour Music Production Software was created by integrating the efforts of the world’s skilled team, such as recording technicians, programmers, and musicians. Such experienced technicians make their concerted and thorough efforts to build the program. Ardour is one of the few applications in music production that respects honesty. The accessibility of this program allows app developers to concentrate on functionality that matters to consumers rather than to construct compelling apps for advertising purposes. This is a system that should be celebrated for its user-focused functionality.
Pros
- It has excellent user-friendliness
- It is available on Mac, Linux, and Windows
Cons
- It lacks a few integral features
- It is difficult to operate for people new to audio editing

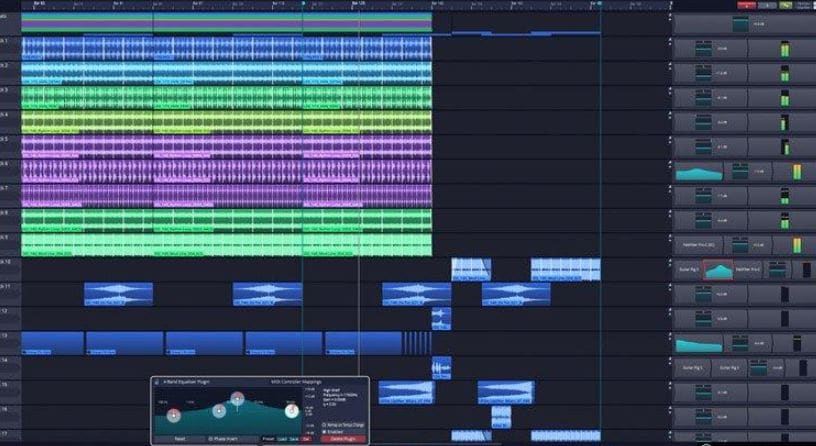
3. Tracktion T7
The people at Tracktion seem to have reached a reasonably canny business model by launching older DAW versions for free and without anything removed.
The convention appears to make it possible to access the edition without charge of two iterations before the new one. You will not be provided with all new functionality, but you will receive an update every time the company updates its flagship DAW, which it does nearly every year.
The growing section is adjustable to match the workflow, and the bottom panel adjusts so that any parameters anywhere on the screen can be seen.
Pros
- It features an unlimited number of audio and MIDI tracks
- It is able to host multiple plugin formats
Cons
- It doesn’t provide all the features at once
- It does not support many plugins
4. LMMS
LMMS is a fully free music production software for windows for music development. It is an open-source and also a project platform for the community. LMMS is a cross-platform device app. It makes it easier to manufacture beats, particularly when many music production professionals have to manufacture quality music with their computers.
Thanks to the powerful sample, beat and melody design, mixing and synthetic sound processes, and many other features, the LMMS music production software provides high-quality audio output. The product also features playback tools, plugins, and samples to produce powerful, high-quality sound.
Pros
- It is compatible with Linux, Windows, and Mac
- Hydrogen project files and MIDI can be imported easily for editing
Cons
- It eats a lot of memory and requires a high-end device to support it
- Some users complained that understanding its working is difficult

5. Cakewalk
This is an exciting app for music production to purchase. It is a fantastic tech to invest in music production. Cakewalk Sonar Artist Software is one of Cakewalk Sonar Artist ‘s great productions. Cakewalk is known for an excellent GUI, an excellent mixing console, an excellent commercial radio system, and limitless MIDI tracks.
A good device to use as part of your instruments for the development of music is the Cakewalk Sonar Artist Music Production program. It stands out as a program packed with excellent features amongst its counterparts. And the app is unmatched in the area of apps.
Pros
- You can share music compilation directly to social media
- You can easily add effects to your tracks
Cons
- It is priced, very high
- One window interface makes it hectic

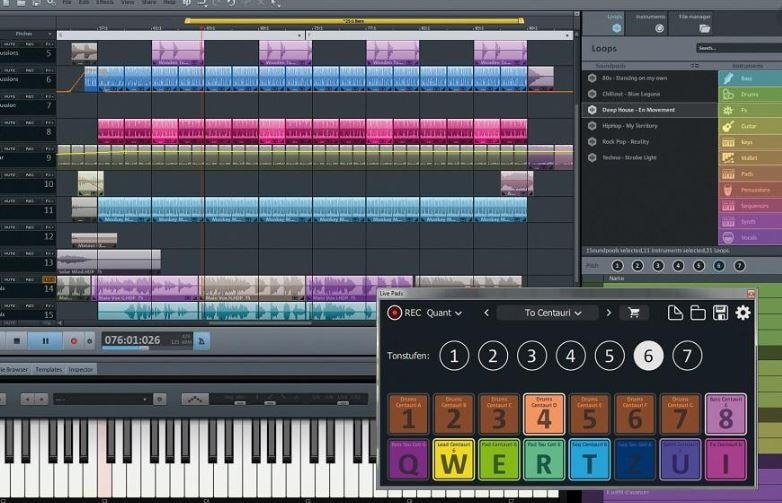
6. Music Maker by Magix
This app is a special program for sound engineers, skilled musicians, and accomplished music producers, developed by US Magix Entertainment. It offers an excellent forum for creative music development in music production professionals.
In reality, the software for music production is excellent software for the Music Maker by Magix. In the field of music post-production and music mastering, mixing and arrangement, recording, and more, the software achieved remarkable breakthroughs. Thanks to the successful combination of a technical device and highly flexible workflow, the Music Maker by Magix has achieved this groundbreaking success.
With creative algorithm and superb plugin effects, the Music Maker by Magix program enables music manufacturers to develop their ideas in line with the highest quality in this industry.
Pros
- It is great for EDM producers
Cons
- It is not suitable for newbies
- The GUI feels a bit cluttered
Part 2: Free Music Production Software for Mac
7. Garageband
This is a music development studio app that is designed to function on Mac. It is a great free music production software for Mac. This software has a full sound collection, which includes virtual instruments, voice, and guitar preset.
GarageBand is a well-known app for music development and is an excellent tool for music beginners. Many people have chosen GarageBand because it does not match the ease and ease of use for recording purposes in particular.
The user-friendly interface makes you easy to create music with a more unobstructed view of what you’re recording. Apps from GarageBand captured the attention of others because of their ease-to-use and user-friendliness.
Pros
- The software offers some nicely packaged preset for vocal and guitar recording
- Productive workflow
Cons
- It has limited plugins
- It is only supported for Mac platforms

8. Ableton Live
The Ableton Live 10 Suite is a dynamic and comprehensive program for the creation and performance of musical recordings.
An essential feature of this software is that it allows you to work on your time-based workflow without affecting the live session. This means that the software gives you a rare chance to get involved with the workflow without stopping live performance.
The Multitrack Recording Technology of Ableton Live10 Suite allows music producers to adjust the speed and pacing of any audio during the recording. To make these adjustments, you don’t have to pause the recording. This is one of the striking characteristics which makes this product a good option for all.
Pros
- Adjusting the speed and pace of audio is a delight
- Sophisticated MIDI/audio routing capabilities
Cons
- It has a traditional design
- Not enough updates to fix the buggy features

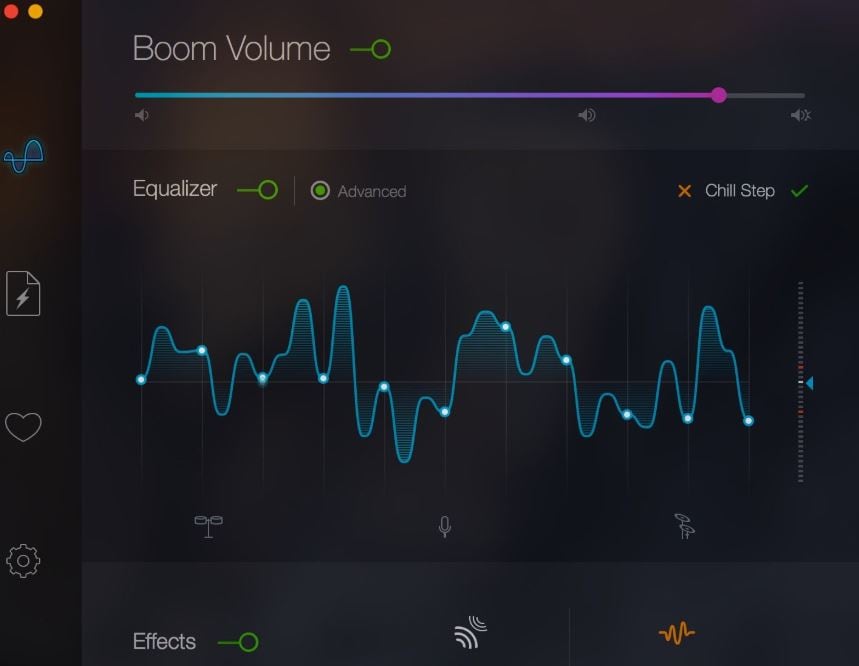
9. Boom 3D
Boom 3D for Mac & Windows is an award-winning pro sound improvement software designed to play your media content on any and all of your devices, phones, or streaming services with amazing 3D effects. No costly headphones or sound boosters will be needed to make your music feel like it! Designed in a new immersive 3D surround sound technology, Boom 3D redefines how people listen to music, watch films, or play games with some headphones on their devices. 3D sound provides the option to check the LFE (subwoofer), and the audio intensity of each Virtual 3D Surround audio system speaker.
Pros
- It comes with loads of content
- Audio quality can be enhanced
Cons
- The design is not suitable for everybody
- It does not have a Linux version
10. Mixxx
For beginners, Mixxx is just another great device. This is also one of the best free music production software downloads for your music. This software supports all Mac, Windows, and Linux platforms.
The application provides you with a DJ-mixing environment and supports all standard formats such as Mp3 and many other formats.
Pros
- It is a great app for beginners
- Supported by Mac, Windows, and Linux
Cons
- It doesn’t support many plugins
- GUI isn’t that great

Part 3: Free Music Production Software Online
11. Soundation
Soundation is a platform that provides free music production software online only capabilities. The free version and three paid versions are offered. You can use this to build your tracks unless you have the resources to do so if you need a web-based music maker and editor.
If you pay, even after you have made your music, you can always cancel. Remember first to save them to your hard drive. If you need paid characteristics, pay for the monthly plan again through PayPal, and you have to use it for a month.
Pros
- Great SSL-modelled mixer
- You can use its devices as a plugin
Cons
- It works only online

12. Audiotool
Audiotool is a popular app for music production hosted online and can be used without installation from inside your browser. It uses a cloud-based network to store all your music and files wherever you are. It is also confirmed that you will share music and tracks directly with YouTube, SoundCloud, and Facebook on its own publishing site. They have premium releases from Loopmasters and some fantastic online VSTs, for example, Heisenberg, Machiniste, Bassline, and Beatbox 8 & 9.
Pros
- No installation needed
- You can directly share it to your social media
Cons
- It works only online
- No upgrades

13. Soundtrap
Soundtrap is not only an online music studio but a training site for students and instructors. The STEAM Curriculum is an online learning resource that helps students to follow music and podcasts, incorporated into the Web app. As we mentioned earlier, in addition to the online Web App, you can also use it on different devices, share it with other users, and work in innovative projects for your music.
The interface is simple, easy to use, and easy to understand. It is simply an instrument for innovation; you don’t have to learn how to apply VST or any other technical elements to music creation. You can also record your MIDI instruments directly from your machine or device’s mic.
Pros
- It provides a great platform for teachers to teach their students
- It is very easy to use
Cons
- It only has a limited number of plugins
- It cannot be used professionally

Conclusion
If you make music on a computer, the most important resource in your artistic arsenal is your DAW; in your home recording system, you ‘re probably going to have the MIDI keyboard, audio interface, studio monitor speakers, and maybe a microphone or two. But your program is at the core of it all. Not everyone can afford expensive DAWs, but one must not worry as free music production software are present to aid us.
It is important to have a DAW with which you are pleased and, perhaps more importantly, a DAW, which allows you to turn your ideas into music as quickly and painlessly as possible. So make sure you choose the best one for you according to your needs. Hopefully, this guide will aid you!


Benjamin Arango
Benjamin Arango is a writer and a lover of all things video.
Follow @Benjamin Arango
Benjamin Arango
Mar 27, 2024• Proven solutions
13 Free Music Production Software for Windows/Mac/Online
Technology advances have spread through all fields of human activity, including music recording and development. The invention of music development tools has made it simpler for people engaged in the creation of music in one form or another.
Numerous applications for music development are on the market, and some are meant for musicians, and others are for educators and teachers. There is also a need to direct prospective customers to the right free music production software.
A comprehensive analysis of some of the best music development tools has been conducted to help you make the correct decision while you’re ready to purchase the app. This comprehensive Music Production Software Guide will provide solutions to many of your unanswered questions relating to the purchase of music production software.
- Part 1: Free Music Production Software for Windows
- Part 2: Free Music Production Software for Mac
- Part 3: Free Music Production Software Online
Part 1: Free Music Production Software for Windows
1. Audacity
The system for music development is not complete without an audio editor. Audacity is the best free music creation software available on the market. Audacity is open-source and extensive and provides a wide range of tools and effects for performing all audio editing and recording activities. It is created by a community of volunteers and provides regular notifications almost every month. It’s lightweight, safe, and intuitive enough to be used by novice music makers.
Pros
- It is open-source
- It can load VST plugins
Cons
- Only 32-bit plugins are allowed
- Limited features
2. Ardour
Ardour is a highly integrated program of music production that allows users to record and edit on Mac, Linux, and Windows operating systems. Ardour Music Production Software was created by integrating the efforts of the world’s skilled team, such as recording technicians, programmers, and musicians. Such experienced technicians make their concerted and thorough efforts to build the program. Ardour is one of the few applications in music production that respects honesty. The accessibility of this program allows app developers to concentrate on functionality that matters to consumers rather than to construct compelling apps for advertising purposes. This is a system that should be celebrated for its user-focused functionality.
Pros
- It has excellent user-friendliness
- It is available on Mac, Linux, and Windows
Cons
- It lacks a few integral features
- It is difficult to operate for people new to audio editing
3. Tracktion T7
The people at Tracktion seem to have reached a reasonably canny business model by launching older DAW versions for free and without anything removed.
The convention appears to make it possible to access the edition without charge of two iterations before the new one. You will not be provided with all new functionality, but you will receive an update every time the company updates its flagship DAW, which it does nearly every year.
The growing section is adjustable to match the workflow, and the bottom panel adjusts so that any parameters anywhere on the screen can be seen.
Pros
- It features an unlimited number of audio and MIDI tracks
- It is able to host multiple plugin formats
Cons
- It doesn’t provide all the features at once
- It does not support many plugins
4. LMMS
LMMS is a fully free music production software for windows for music development. It is an open-source and also a project platform for the community. LMMS is a cross-platform device app. It makes it easier to manufacture beats, particularly when many music production professionals have to manufacture quality music with their computers.
Thanks to the powerful sample, beat and melody design, mixing and synthetic sound processes, and many other features, the LMMS music production software provides high-quality audio output. The product also features playback tools, plugins, and samples to produce powerful, high-quality sound.
Pros
- It is compatible with Linux, Windows, and Mac
- Hydrogen project files and MIDI can be imported easily for editing
Cons
- It eats a lot of memory and requires a high-end device to support it
- Some users complained that understanding its working is difficult
5. Cakewalk
This is an exciting app for music production to purchase. It is a fantastic tech to invest in music production. Cakewalk Sonar Artist Software is one of Cakewalk Sonar Artist ‘s great productions. Cakewalk is known for an excellent GUI, an excellent mixing console, an excellent commercial radio system, and limitless MIDI tracks.
A good device to use as part of your instruments for the development of music is the Cakewalk Sonar Artist Music Production program. It stands out as a program packed with excellent features amongst its counterparts. And the app is unmatched in the area of apps.
Pros
- You can share music compilation directly to social media
- You can easily add effects to your tracks
Cons
- It is priced, very high
- One window interface makes it hectic
6. Music Maker by Magix
This app is a special program for sound engineers, skilled musicians, and accomplished music producers, developed by US Magix Entertainment. It offers an excellent forum for creative music development in music production professionals.
In reality, the software for music production is excellent software for the Music Maker by Magix. In the field of music post-production and music mastering, mixing and arrangement, recording, and more, the software achieved remarkable breakthroughs. Thanks to the successful combination of a technical device and highly flexible workflow, the Music Maker by Magix has achieved this groundbreaking success.
With creative algorithm and superb plugin effects, the Music Maker by Magix program enables music manufacturers to develop their ideas in line with the highest quality in this industry.
Pros
- It is great for EDM producers
Cons
- It is not suitable for newbies
- The GUI feels a bit cluttered
Part 2: Free Music Production Software for Mac
7. Garageband
This is a music development studio app that is designed to function on Mac. It is a great free music production software for Mac. This software has a full sound collection, which includes virtual instruments, voice, and guitar preset.
GarageBand is a well-known app for music development and is an excellent tool for music beginners. Many people have chosen GarageBand because it does not match the ease and ease of use for recording purposes in particular.
The user-friendly interface makes you easy to create music with a more unobstructed view of what you’re recording. Apps from GarageBand captured the attention of others because of their ease-to-use and user-friendliness.
Pros
- The software offers some nicely packaged preset for vocal and guitar recording
- Productive workflow
Cons
- It has limited plugins
- It is only supported for Mac platforms
8. Ableton Live
The Ableton Live 10 Suite is a dynamic and comprehensive program for the creation and performance of musical recordings.
An essential feature of this software is that it allows you to work on your time-based workflow without affecting the live session. This means that the software gives you a rare chance to get involved with the workflow without stopping live performance.
The Multitrack Recording Technology of Ableton Live10 Suite allows music producers to adjust the speed and pacing of any audio during the recording. To make these adjustments, you don’t have to pause the recording. This is one of the striking characteristics which makes this product a good option for all.
Pros
- Adjusting the speed and pace of audio is a delight
- Sophisticated MIDI/audio routing capabilities
Cons
- It has a traditional design
- Not enough updates to fix the buggy features
9. Boom 3D
Boom 3D for Mac & Windows is an award-winning pro sound improvement software designed to play your media content on any and all of your devices, phones, or streaming services with amazing 3D effects. No costly headphones or sound boosters will be needed to make your music feel like it! Designed in a new immersive 3D surround sound technology, Boom 3D redefines how people listen to music, watch films, or play games with some headphones on their devices. 3D sound provides the option to check the LFE (subwoofer), and the audio intensity of each Virtual 3D Surround audio system speaker.
Pros
- It comes with loads of content
- Audio quality can be enhanced
Cons
- The design is not suitable for everybody
- It does not have a Linux version
10. Mixxx
For beginners, Mixxx is just another great device. This is also one of the best free music production software downloads for your music. This software supports all Mac, Windows, and Linux platforms.
The application provides you with a DJ-mixing environment and supports all standard formats such as Mp3 and many other formats.
Pros
- It is a great app for beginners
- Supported by Mac, Windows, and Linux
Cons
- It doesn’t support many plugins
- GUI isn’t that great
Part 3: Free Music Production Software Online
11. Soundation
Soundation is a platform that provides free music production software online only capabilities. The free version and three paid versions are offered. You can use this to build your tracks unless you have the resources to do so if you need a web-based music maker and editor.
If you pay, even after you have made your music, you can always cancel. Remember first to save them to your hard drive. If you need paid characteristics, pay for the monthly plan again through PayPal, and you have to use it for a month.
Pros
- Great SSL-modelled mixer
- You can use its devices as a plugin
Cons
- It works only online
12. Audiotool
Audiotool is a popular app for music production hosted online and can be used without installation from inside your browser. It uses a cloud-based network to store all your music and files wherever you are. It is also confirmed that you will share music and tracks directly with YouTube, SoundCloud, and Facebook on its own publishing site. They have premium releases from Loopmasters and some fantastic online VSTs, for example, Heisenberg, Machiniste, Bassline, and Beatbox 8 & 9.
Pros
- No installation needed
- You can directly share it to your social media
Cons
- It works only online
- No upgrades
13. Soundtrap
Soundtrap is not only an online music studio but a training site for students and instructors. The STEAM Curriculum is an online learning resource that helps students to follow music and podcasts, incorporated into the Web app. As we mentioned earlier, in addition to the online Web App, you can also use it on different devices, share it with other users, and work in innovative projects for your music.
The interface is simple, easy to use, and easy to understand. It is simply an instrument for innovation; you don’t have to learn how to apply VST or any other technical elements to music creation. You can also record your MIDI instruments directly from your machine or device’s mic.
Pros
- It provides a great platform for teachers to teach their students
- It is very easy to use
Cons
- It only has a limited number of plugins
- It cannot be used professionally
Conclusion
If you make music on a computer, the most important resource in your artistic arsenal is your DAW; in your home recording system, you ‘re probably going to have the MIDI keyboard, audio interface, studio monitor speakers, and maybe a microphone or two. But your program is at the core of it all. Not everyone can afford expensive DAWs, but one must not worry as free music production software are present to aid us.
It is important to have a DAW with which you are pleased and, perhaps more importantly, a DAW, which allows you to turn your ideas into music as quickly and painlessly as possible. So make sure you choose the best one for you according to your needs. Hopefully, this guide will aid you!
Benjamin Arango
Benjamin Arango is a writer and a lover of all things video.
Follow @Benjamin Arango
“Detaching Sound Effects From Videos Using Adobe Premiere Pro – Step by Step”
Are you into the creative industry? Do you need to detach audio from a video? Are you a fan of Premiere Pro?
With the media industry progressing, advanced features are on the rise. Each upgrade is for the creator’s ease. The well-developed functions limit the stress at the workplace. Don’t you agree? The media production needs to detach audio from video. It is essential to censor audio out or eliminate unwanted background noise.
Most often, audio has to be detached for B-roll. One can detach audio Premiere Pro effortlessly. The article covers the procedure to extract and separate audio from a video. We shall also have a preview of Filmora. So, what are we waiting for? Let us commence this!
In this article
01 How Can You Extract, Separate, or Detach Audio from Video? [Premiere Pro]
02 Tips to Detach or Remove Audio From Video in Filmora
Part 1: How Can You Extract, Separate, or Detach Audio from Video? [Premiere Pro]
Premiere Pro detaches audio flawlessly. Adobe Premiere Pro is a video editing software. With creative tools, a flexible interface, and powerful capabilities, Premiere Pro turns your raw footage into something extraordinary. It enables you to perform color grading, color correction, and transitions effectively. The largest toolset has made life bearable for creators.
Additionally, Adobe Premiere Pro has an excellent range of collaboration tools. There are learning tools to guide the beginner towards a successful process. These tutorials have assisted the user in performing basic operations productively. The refined video editing tools have created a revolution in the market. The Auto Reframe feature changes the crop selection by keeping the attention where it is due.
Are you invested in detaching the audio process? Worry no more as we have got you. Premiere Pro doesn’t leave its users empty-handed. Audio extraction and separation both would be included in this section.
Audio Extraction Process
The audio extraction procedure is a great way to lubricate the editing process. The audio is extracted to add new audio master clips in this phenomenon. The channel mapping, duration, gain, speed, and footage adjustment are applied to the extracted clips. The original content remains preserved.
Before detaching audio, let us shift our focus to extracting it. So, are you with us? Follow the step-by-step below to extract audio from the video.
Step 1: Launching Premiere Pro
Open Adobe Premiere Pro. Press ‘New Project’ from the interface that appears. The default settings are good to go. However, make sure that the output location is appropriate. Hit ‘OK.’

Step 2: Importing the Clips
Now, click on ‘Media Browser’ from the middle panel. Import the targeted video clips to initiate the process. Select the videos whose audio has to be extracted. Head to the ‘Clip’ section and choose ‘Audio Options.’ Hit ‘Extract Audio’ afterward.

Step 3: File Extraction
In a couple of seconds, Premiere Pro creates duplicate audio files. The original video clips are not affected in any way. Moving on, let us move on to export the extracted audio clips.

Step 4: Exporting Process
Mark in and out points on your sequence for the session you wish to export. Mute the rest of the tracks. Now, navigate to the ‘File,’ press ‘Export,’ and then ‘Media.’ For encoding format, choose between MP3 and WAV form audio based on the original file format. Choose the output location. Hit ‘Export,’ and you are done.

Audio Detaching Process
Similarly, audio separation is another way to access a part of the audio. It permits you to use any audio section and make necessary edits to it. To detach audio in Premiere Pro, kindly follow the guidelines below.
Step 1: Importing the Media Files
Launch Premiere Pro from your computer. The interface opens up in seconds. The user is recommended to browse the targeted video with attached audio. Add it to the timeline of the Premiere Pro.

Step 2: Unlinking Process
After that, right-click on the clip. Choose ‘Unlink’ from the list of options that appear. The user can easily select and edit both the audio and video content. However, you can also separate audio using another faster process.

Step 3: Deleting Process
Hold down the ALT key from your keyboard and click on the audio clip to do this more effectively. Use the ‘Delete’ button and get rid of it once and for all. Now, make necessary edits, and you are done for the day!

Part 2: Tips to Detach or Remove Audio From Video in Filmora
Wondershare Filmora needs no introduction. Filmora has always had something refined to offer in a world full of video editors. Wouldn’t you agree? A content creator needs a video editing tool with an interactive interface with balanced functions.
Filmora knows different tricks to keep creative professionals invested in it. From keyframing to motion tracking and green screen to color matching, Wondershare Filmora wouldn’t disappoint you. The optimized GPU detection brings productivity to work. As far as audio editing is concerned, Filmora has advanced tools on the go.
The audio equalizer and audio mixer fine-tune the music and adjust the audio of separate tracks, respectively. You can split audio, adjust the audio volume, and perform audio ducking. The creative creators can also add a voiceover and trim the clips. The original audio of the video can also be replaced technically. Isn’t that the whole dream?
In short, Filmora has everything under one platform. There is no need to download extensive video editors for each functionality.
Moving on to the section, we shall discuss the procedure to detach or remove audio using this exceptional tool. So, let us try this!
For Win 7 or later (64-bit)
For macOS 10.12 or later
Step 1: Browsing the Video
Download Wondershare Filmora in your system. Launch it as soon as the process is concluded. Import the targeted video files into the program. Drag the video from the library onto the timeline.

Step 2: Removing Audio
To remove the audio, right-click on the video file from the timeline. Click on ‘Detach audio’ from the options that appear. The audio file is separated from the video file. It is displayed in another track below the video track.

Step 3: Final Process
Now, the user is free to make edits to the audio and perform modifications as deemed necessary. Delete the separated audio track if you wish to add a new voiceover or audio in the background. You can do so by clicking on the trash button above the timeline.

Conclusion
The raw videos undergo treatment to look ravishing. Don’t you think? Without the needed editing, these videos wouldn’t stand anywhere. After the original audio is detached, a better message is expressed to replace it with promising content.
The article introduced Premiere Pro. Moreover, how to detach audio from video Premiere Pro was also discussed in detail. If you want to extract audio from video, this write-up will help you. Wondershare Filmora is a video editing software with great tools to get the trick done in seconds.
Versatile Video Editor - Wondershare Filmora
An easy yet powerful editor
Numerous effects to choose from
Detailed tutorials provided by the official channel
02 Tips to Detach or Remove Audio From Video in Filmora
Part 1: How Can You Extract, Separate, or Detach Audio from Video? [Premiere Pro]
Premiere Pro detaches audio flawlessly. Adobe Premiere Pro is a video editing software. With creative tools, a flexible interface, and powerful capabilities, Premiere Pro turns your raw footage into something extraordinary. It enables you to perform color grading, color correction, and transitions effectively. The largest toolset has made life bearable for creators.
Additionally, Adobe Premiere Pro has an excellent range of collaboration tools. There are learning tools to guide the beginner towards a successful process. These tutorials have assisted the user in performing basic operations productively. The refined video editing tools have created a revolution in the market. The Auto Reframe feature changes the crop selection by keeping the attention where it is due.
Are you invested in detaching the audio process? Worry no more as we have got you. Premiere Pro doesn’t leave its users empty-handed. Audio extraction and separation both would be included in this section.
Audio Extraction Process
The audio extraction procedure is a great way to lubricate the editing process. The audio is extracted to add new audio master clips in this phenomenon. The channel mapping, duration, gain, speed, and footage adjustment are applied to the extracted clips. The original content remains preserved.
Before detaching audio, let us shift our focus to extracting it. So, are you with us? Follow the step-by-step below to extract audio from the video.
Step 1: Launching Premiere Pro
Open Adobe Premiere Pro. Press ‘New Project’ from the interface that appears. The default settings are good to go. However, make sure that the output location is appropriate. Hit ‘OK.’
Step 2: Importing the Clips
Now, click on ‘Media Browser’ from the middle panel. Import the targeted video clips to initiate the process. Select the videos whose audio has to be extracted. Head to the ‘Clip’ section and choose ‘Audio Options.’ Hit ‘Extract Audio’ afterward.
Step 3: File Extraction
In a couple of seconds, Premiere Pro creates duplicate audio files. The original video clips are not affected in any way. Moving on, let us move on to export the extracted audio clips.
Step 4: Exporting Process
Mark in and out points on your sequence for the session you wish to export. Mute the rest of the tracks. Now, navigate to the ‘File,’ press ‘Export,’ and then ‘Media.’ For encoding format, choose between MP3 and WAV form audio based on the original file format. Choose the output location. Hit ‘Export,’ and you are done.
Audio Detaching Process
Similarly, audio separation is another way to access a part of the audio. It permits you to use any audio section and make necessary edits to it. To detach audio in Premiere Pro, kindly follow the guidelines below.
Step 1: Importing the Media Files
Launch Premiere Pro from your computer. The interface opens up in seconds. The user is recommended to browse the targeted video with attached audio. Add it to the timeline of the Premiere Pro.
Step 2: Unlinking Process
After that, right-click on the clip. Choose ‘Unlink’ from the list of options that appear. The user can easily select and edit both the audio and video content. However, you can also separate audio using another faster process.
Step 3: Deleting Process
Hold down the ALT key from your keyboard and click on the audio clip to do this more effectively. Use the ‘Delete’ button and get rid of it once and for all. Now, make necessary edits, and you are done for the day!
Part 2: Tips to Detach or Remove Audio From Video in Filmora
Wondershare Filmora needs no introduction. Filmora has always had something refined to offer in a world full of video editors. Wouldn’t you agree? A content creator needs a video editing tool with an interactive interface with balanced functions.
Filmora knows different tricks to keep creative professionals invested in it. From keyframing to motion tracking and green screen to color matching, Wondershare Filmora wouldn’t disappoint you. The optimized GPU detection brings productivity to work. As far as audio editing is concerned, Filmora has advanced tools on the go.
The audio equalizer and audio mixer fine-tune the music and adjust the audio of separate tracks, respectively. You can split audio, adjust the audio volume, and perform audio ducking. The creative creators can also add a voiceover and trim the clips. The original audio of the video can also be replaced technically. Isn’t that the whole dream?
In short, Filmora has everything under one platform. There is no need to download extensive video editors for each functionality.
Moving on to the section, we shall discuss the procedure to detach or remove audio using this exceptional tool. So, let us try this!
For Win 7 or later (64-bit)
For macOS 10.12 or later
Step 1: Browsing the Video
Download Wondershare Filmora in your system. Launch it as soon as the process is concluded. Import the targeted video files into the program. Drag the video from the library onto the timeline.
Step 2: Removing Audio
To remove the audio, right-click on the video file from the timeline. Click on ‘Detach audio’ from the options that appear. The audio file is separated from the video file. It is displayed in another track below the video track.
Step 3: Final Process
Now, the user is free to make edits to the audio and perform modifications as deemed necessary. Delete the separated audio track if you wish to add a new voiceover or audio in the background. You can do so by clicking on the trash button above the timeline.
Conclusion
The raw videos undergo treatment to look ravishing. Don’t you think? Without the needed editing, these videos wouldn’t stand anywhere. After the original audio is detached, a better message is expressed to replace it with promising content.
The article introduced Premiere Pro. Moreover, how to detach audio from video Premiere Pro was also discussed in detail. If you want to extract audio from video, this write-up will help you. Wondershare Filmora is a video editing software with great tools to get the trick done in seconds.
Versatile Video Editor - Wondershare Filmora
An easy yet powerful editor
Numerous effects to choose from
Detailed tutorials provided by the official channel
“Streaming Audio Integration with Videos at No Cost: Top Six Techniques”
How to Add Music to a Video Online for Free

Liza Brown
Mar 27, 2024• Proven solutions
Creating a soundtrack for a video is one of the most overlooked steps of thevideo editing process . Music can make any video more dynamic and more entertaining to watch. Exporting a video without background music or voiceover included is generally considered a bad practice.
Adding music to video online is a good choice because you don’t need to install any video editing software on your computer. Sometimes, if the desktop video editing app installed doesn’t have a library of royalty-free music , you have to uninstall and try other software. With online solutions, you won’t worry about this. There are several online video editors you can use to add music to a video for free. In this article, I’ll share with you about how to add music to video online.
How to Add Music to a Video Online for Free [7 Ways]
Editing videos online has its downsides, since some platforms have video size limitations, while others offer only a basic set of video editing tools. Even so, adding music to a video online is a straightforward process that doesn’t require you to have advanced video editing skills. So, let’s take a look at different ways of adding music to videos online for free.
1. Add Music and Sound Effect to Videos in YouTube Studio
A few years ago, YouTube launched YouTube Studio that enables YouTubers to edit their videos after they’ve uploaded them to channels. The YouTube Studio currently doesn’t offer audio editing tools, although it features both music and audio effects libraries.
There are two different ways to add music to a video with a YouTube studio. After you upload a video file to your channel, unlisted it and then open the Creator Studio Classic tab which is located in the lower-left side of the page. You should select the Videos option under the Video Manager menu.

Select Audio Option
Click on the Edit drop-down menu next to the video to which you would like to add music and choose the Audio option. Start browsing through YouTube’s collection of royalty-free music and click on the ADD TO VIDEO button once you find a song that matches your video. You can use the Audio Saturation slider to decide if you want to favor the original sound of the video or the song you just added. Click on the Save Changes button when you are done and YouTube Studio will add the music to your video.
You can check the detailed information about how to add music to YouTube video here .

YouTube Audio Library Interface
Optionally you can also download music and audio effects from YouTube Studio’s Audio Library first, and then add the downloaded music to videos with the video editor you have installed on your computer.
3. Use Veed.io to Add Music to Videos
Adding music to a video file with Veed.io is a straightforward process that takes a minimum amount of effort. You should simply select if you want to upload a file from your computer, a camera, your Dropbox account or via a link and wait for your video to be uploaded. Keep in mind that you cannot upload video files larger than 50mb if you are using the free version of the platform.

Veed.io audio uploading and editing interface
After the upload of the video is completed you should click on the Audio icon that is located on the toolbar. You’ll be prompted to upload an audio file stored on your computer and once the upload process is completed you can adjust the volume level, set the start time for the song or trim the audio file so that it matches the length of the video file. Moreover, you can click on the Clean button if you would like to clean the video’s audio before downloading the file to your computer or share it online.

Veed.io video downloading page
Pros
- You can add to music to video without going through the registration process
- Trimming audio files is easy
- Adjusting volume or choosing the song’s start time requires minimum effort
Cons
- All videos you edit with the free version of Veed.io are watermarked
4. Add Music to Videos in Kapwing
Kapwing is probably one of the best online video editing platforms you can use to trim, resize or loop videos. That is why it is not surprising that adding music to videos in Kapwing is a simple three-step process.

Kapwing adding audio to video page
You cannot upload video files that are larger than 500mb to Kapwing from your computer or via URL, which is why you have to choose a file that doesn’t exceed the platform’s size limit. A new window will open as soon as the upload is completed where you can choose to record a voiceover or add an audio file to your video.
Once you upload an audio file to Kapwing, you can adjust the volume, trim the audio and set the point in the video at which the song should start. When done, click on the Create button, wait for the platform to add music to your video and then choose if you want to download the video or share it on social media.
Pros
- You can record voiceovers with Kapwing
- Trimming an audio file or adjusting its volume isn’t difficult
- You can loop music with Kapwing
Cons
- Editing video and audio from the same window is not an option
5. Merge Audio and Video Files with Online Converter
Even though this is primarily a file conversion platform that lets you convert video files, compress audio files or resize images, Online Converter can also be used to add music to videos. There is nothing complicated about combining an audio and a video file on this platform since you just have to select the files you want to merge. However, both files must be under 200mb in order to meet the Online Converter’s size limit.

Add Audio to Video with Online Converter
Afterward, you should click on the Options drop-down menu and choose if you want to replace audio in video or keep audio in the video. The Volume drop-down menu lets you increase or decrease the audio volume, so you just have to select by how much you would like to turn up or turn down the volume and then click on the Add button.
Pros
- You need an Internet connection to add music to a video for free
- No registration is required
Cons
- Offers only basic audio and video editing tools
- Online Converter needs a lot of time to combine audio and video files
6. Use voice2v.com to Add Music to Videos
If you are looking for a quick and easy way to add music to a video, then this is the right platform for you. You just have to select the video file from a folder on your computer, and then proceed to upload an audio file. As soon as you do this, voice2v.com will start merging the two files you selected and display the results on the screen once the process is completed.

Add Audio to Video with Voice2V Online Tool
After the platform merges the audio and video files, you can decide if you want to download the video you created or make another video.
Pros
- A quick way to combine audio and video files
Cons
- The music is added to videos automatically
7. Add Background Music to Videos on pixiko.com
In order to add music to a video with pixiko.com you just have to upload audio and video files to the platform. This process may take a while even though the platform limits the maximum size of the media files you can edit with it, which means that their duration cannot be too long. After the files are uploaded you should click on the Merge icon, and then click on the Merge button on the left side of the screen. The platform will automatically combine the two files so you just have to click on the Done button to complete the process.

Add Audio to Video with Pixiko Online Editor
Pros
- Offers a free way to add music to a video
Cons
- Outdated and confusing interface
- The upload process is slow
Conclusion
Music can help you set the atmosphere of a video and draw the viewer’s attention to it. However, it isn’t always possible to use video editing software that lets you manipulate audio files with ease. Online video editing platforms like Kapwing or Online Converter offer a quick solution to this problem, although with considerable limitations. Are you adding music to videos online? Which video editing platform are you using? Leave a comment below and share your opinions with us.
Liza Brown
Liza Brown is a writer and a lover of all things video.
Follow @Liza Brown
Liza Brown
Mar 27, 2024• Proven solutions
Creating a soundtrack for a video is one of the most overlooked steps of thevideo editing process . Music can make any video more dynamic and more entertaining to watch. Exporting a video without background music or voiceover included is generally considered a bad practice.
Adding music to video online is a good choice because you don’t need to install any video editing software on your computer. Sometimes, if the desktop video editing app installed doesn’t have a library of royalty-free music , you have to uninstall and try other software. With online solutions, you won’t worry about this. There are several online video editors you can use to add music to a video for free. In this article, I’ll share with you about how to add music to video online.
How to Add Music to a Video Online for Free [7 Ways]
Editing videos online has its downsides, since some platforms have video size limitations, while others offer only a basic set of video editing tools. Even so, adding music to a video online is a straightforward process that doesn’t require you to have advanced video editing skills. So, let’s take a look at different ways of adding music to videos online for free.
1. Add Music and Sound Effect to Videos in YouTube Studio
A few years ago, YouTube launched YouTube Studio that enables YouTubers to edit their videos after they’ve uploaded them to channels. The YouTube Studio currently doesn’t offer audio editing tools, although it features both music and audio effects libraries.
There are two different ways to add music to a video with a YouTube studio. After you upload a video file to your channel, unlisted it and then open the Creator Studio Classic tab which is located in the lower-left side of the page. You should select the Videos option under the Video Manager menu.
Select Audio Option
Click on the Edit drop-down menu next to the video to which you would like to add music and choose the Audio option. Start browsing through YouTube’s collection of royalty-free music and click on the ADD TO VIDEO button once you find a song that matches your video. You can use the Audio Saturation slider to decide if you want to favor the original sound of the video or the song you just added. Click on the Save Changes button when you are done and YouTube Studio will add the music to your video.
You can check the detailed information about how to add music to YouTube video here .
YouTube Audio Library Interface
Optionally you can also download music and audio effects from YouTube Studio’s Audio Library first, and then add the downloaded music to videos with the video editor you have installed on your computer.
3. Use Veed.io to Add Music to Videos
Adding music to a video file with Veed.io is a straightforward process that takes a minimum amount of effort. You should simply select if you want to upload a file from your computer, a camera, your Dropbox account or via a link and wait for your video to be uploaded. Keep in mind that you cannot upload video files larger than 50mb if you are using the free version of the platform.
Veed.io audio uploading and editing interface
After the upload of the video is completed you should click on the Audio icon that is located on the toolbar. You’ll be prompted to upload an audio file stored on your computer and once the upload process is completed you can adjust the volume level, set the start time for the song or trim the audio file so that it matches the length of the video file. Moreover, you can click on the Clean button if you would like to clean the video’s audio before downloading the file to your computer or share it online.
Veed.io video downloading page
Pros
- You can add to music to video without going through the registration process
- Trimming audio files is easy
- Adjusting volume or choosing the song’s start time requires minimum effort
Cons
- All videos you edit with the free version of Veed.io are watermarked
4. Add Music to Videos in Kapwing
Kapwing is probably one of the best online video editing platforms you can use to trim, resize or loop videos. That is why it is not surprising that adding music to videos in Kapwing is a simple three-step process.
Kapwing adding audio to video page
You cannot upload video files that are larger than 500mb to Kapwing from your computer or via URL, which is why you have to choose a file that doesn’t exceed the platform’s size limit. A new window will open as soon as the upload is completed where you can choose to record a voiceover or add an audio file to your video.
Once you upload an audio file to Kapwing, you can adjust the volume, trim the audio and set the point in the video at which the song should start. When done, click on the Create button, wait for the platform to add music to your video and then choose if you want to download the video or share it on social media.
Pros
- You can record voiceovers with Kapwing
- Trimming an audio file or adjusting its volume isn’t difficult
- You can loop music with Kapwing
Cons
- Editing video and audio from the same window is not an option
5. Merge Audio and Video Files with Online Converter
Even though this is primarily a file conversion platform that lets you convert video files, compress audio files or resize images, Online Converter can also be used to add music to videos. There is nothing complicated about combining an audio and a video file on this platform since you just have to select the files you want to merge. However, both files must be under 200mb in order to meet the Online Converter’s size limit.
Add Audio to Video with Online Converter
Afterward, you should click on the Options drop-down menu and choose if you want to replace audio in video or keep audio in the video. The Volume drop-down menu lets you increase or decrease the audio volume, so you just have to select by how much you would like to turn up or turn down the volume and then click on the Add button.
Pros
- You need an Internet connection to add music to a video for free
- No registration is required
Cons
- Offers only basic audio and video editing tools
- Online Converter needs a lot of time to combine audio and video files
6. Use voice2v.com to Add Music to Videos
If you are looking for a quick and easy way to add music to a video, then this is the right platform for you. You just have to select the video file from a folder on your computer, and then proceed to upload an audio file. As soon as you do this, voice2v.com will start merging the two files you selected and display the results on the screen once the process is completed.
Add Audio to Video with Voice2V Online Tool
After the platform merges the audio and video files, you can decide if you want to download the video you created or make another video.
Pros
- A quick way to combine audio and video files
Cons
- The music is added to videos automatically
7. Add Background Music to Videos on pixiko.com
In order to add music to a video with pixiko.com you just have to upload audio and video files to the platform. This process may take a while even though the platform limits the maximum size of the media files you can edit with it, which means that their duration cannot be too long. After the files are uploaded you should click on the Merge icon, and then click on the Merge button on the left side of the screen. The platform will automatically combine the two files so you just have to click on the Done button to complete the process.
Add Audio to Video with Pixiko Online Editor
Pros
- Offers a free way to add music to a video
Cons
- Outdated and confusing interface
- The upload process is slow
Conclusion
Music can help you set the atmosphere of a video and draw the viewer’s attention to it. However, it isn’t always possible to use video editing software that lets you manipulate audio files with ease. Online video editing platforms like Kapwing or Online Converter offer a quick solution to this problem, although with considerable limitations. Are you adding music to videos online? Which video editing platform are you using? Leave a comment below and share your opinions with us.
Liza Brown
Liza Brown is a writer and a lover of all things video.
Follow @Liza Brown
Also read:
- 2024 Approved The Foremost Silence Engineer App Enhance Video Clarity and Focus
- Updated 2024 Approved Exploring the Most Advanced Singing Synthesis Software on the Market
- New Investigative Summary The State-of-the-Art in Sound Forges Design
- Harmonizing Movement with Melody The Practical Approach to Adding Music to Mac-Created GIFs for 2024
- Updated In 2024, Innovative Insights A Curated List S Pivotal Social Media and Marketing Podcasts
- Updated 2024 Approved Mastering the Art of Deleting Percussive Sounds From Audio Tracks
- Updated Harmonized Audio Metadata Enhancer Cross-Platform MP3 Tagging Software
- Exploring Depth of Field for Giant Audio Waves for 2024
- In 2024, 5 Best Audio Editor for Android That You Shouldnt Miss
- Updated In 2024, Suspend Voice Recording Features & Embed Original Tunes Using Windows Movie Maker
- New 2024 Approved Mastering Silence A Comprehensive Tutorial on Stripping Audio From iOS Videos
- Updated 2024 Approved Mastering Video Sound Tips for Optimal Audio Control
- Rhythm Cleanser App Design Tailored Accompaniment Sets for 2024
- In 2024, A Step-by-Step Guide to Crafting Professional-Level Android Media With Audio Integration
- Sound Design Excellence Applying Audio Ducking Methods in PowerDirector for Non-Intrusive Volume Reduction
- New Hits of the Airwaves The Best Radio Sounds
- Updated Leading Platforms for Seamless MP3 Refinement and Cutting for 2024
- New In 2024, Seek Out Humorous Auditory Laughers
- Updated Auditory Delights Where to Get Comical Soundscapes
- New In 2024, Optimal Siri Acoustics Creator for Windows PCs and Apple Computers
- Updated Audiophiles Handbook Advanced iMovie Audio Editing Mastery for 2024
- Elevating Your Home Films Auditory Impact A 2023 Perspective for 2024
- Updated 2024 Approved Tasteful Audio Enhancer for Video-Based Platforms
- Updated Catalog of MP3 Sources Featuring Feline Noises for 2024
- Cutting Edge Techniques for Incorporating Smooth Audio Reduction for 2024
- 2024 Approved Unlock Free Vocal Manipulation Expertise with In-Depth Guide to Voice Editing via Filmora
- Updated Premier Digital Aids to Refine and Clean Up Sounds
- Updated The Uncharted Territory of Jazz Music Fundamentals
- Premier Audio Narrators Discovering the Best Tools for Your Projects
- Updated The Ultimate Catalog of Podcast Distribution Channels for 2024
- New 2024 Approved Top 10 Online Sources for Accessible Ding Tone Audio Files
- 2024 Approved Synchro-Sound Creation Merging Audio Tracks Into One Cohesive File
- Updated Voice as Armor Harnessing the Power of Morphvox to Amplify Your Gaming Persona Online for 2024
- 2024 Approved Expert Tips Efficiently Storing Conversations via iPhone Apps
- 2024 Approved Boost Visual Speakers Output Enhance Movie and Video Audibility
- Updated 2024 Approved Isolate Audible Wolf Howling Acoustic Presence
- Updated 2024 Approved Top-Tier Guidelines for Mastering Music Videos
- Precision in Perception Eliminating Background Buzz with Audacitys Tools
- Updated Tips for Synchronizing Volumes Across Tracks Using the VLC Media Player
- Updated How to Record on GarageBand? Step by Step Guide
- Updated Expertly Curated List of Music to Text Transcription Tools
- New The Vocal Navigator Discovering Premium Online Text to Speech Providers for 2024
- New The Ultimate Primer on the Wave Editor Pivotal Components, Audit Reports, and Tutorials
- Updated In 2024, The Soundless Shift How to Remove Audio From Video Projects Today
- Updated Expert Guide Top Linux Applications for High-Fidelity Sound Recording
- Updated Sovereign Soundstitcher - The Ultimate MP3 Merger for Mac Techies for 2024
- Updated In-Depth Evaluation The Capabilities and Features of Sound Forge
- Free and Easy Techniques to Cut Out Loud Elements From Windows 10 Videos for 2024
- In 2024, How to Watch Hulu Outside US On Huawei Nova Y91 | Dr.fone
- Simple ways to get lost files back from Lava Storm 5G
- New 2024 Approved Best 10 Free and Best Text-to-Speech Generators
- Updated Step-by-Step Guide How to Translate Twitter Video Easily for 2024
- In 2024, How to Screen Mirroring Poco X6 Pro? | Dr.fone
- In 2024, What You Want To Know About Two-Factor Authentication for iCloud From your iPhone 15 Plus
- How to Make Cool COD Warzone Thumbnail
- In 2024, Best Free iPhone 8 Plus IMEI Checker
- Updated Top 5 Best Free M4A Editor Software for 2024
- In 2024, How can I get more stardust in pokemon go On Oppo A56s 5G? | Dr.fone
- New In 2024, From Click to View The Art of Creating Effective YouTube Thumbnails (Size, Design, and More)
- The Complete Guide to Vivo Y78 5G FRP Bypass Everything You Need to Know
- Updated Unlocking the Power of Speech Recognition Text Conversion 101
- New In 2024, 7 Best Video Mergers Without Watermark
- How can I get more stardust in pokemon go On Realme 11 Pro? | Dr.fone
- Make Cartoon Characters From Photos for 2024
- In 2024, Which Pokémon can Evolve with a Moon Stone For Motorola Moto G24? | Dr.fone
- How to Hide/Fake Snapchat Location on Your Samsung Galaxy S23 Ultra | Dr.fone
- How to Mirror Your Honor 80 Pro Straight Screen Edition Screen to PC with Chromecast | Dr.fone
- Updated Best of the Web Top 10 Gaming Intro Creators for 2024
- In 2024, How to Change Credit Card on Your iPhone 11 Pro Max Apple ID and Apple Pay
- How to Activate Stellar Data Recovery for iPhone 12 Pro | Stellar
- In 2024, VLC Video Trimmer for Mac How to Cut Clips Without Losing a Single Pixel
- In 2024, A Quick Guide to Vivo V27 FRP Bypass Instantly
- New 2024 Approved 5 Tips for Faster Editing in Filmora
- New Multiple Ways How To Remove iCloud Activation Lock On your Apple iPhone 11 Pro Max
- Updated Top 10 Banned Anime Around the World and Why
- Three Ways to Sim Unlock Vivo Y200
- New In 2024, Discover the Top 10 Video Trimmers for Your PC and Browser
- In 2024, How to Transfer Data from Nokia C110 to Samsung Phone | Dr.fone
- 21 Top Free Anime Websites to Watch Anime Online-Anime for 2024
- How to Mirror PC Screen to Samsung Galaxy F34 5G Phones? | Dr.fone
- How to Reset your Samsung Galaxy S24 Ultra Lock Screen Password
- In 2024, Why is iPogo not working On Poco X6? Fixed | Dr.fone
- How To Transfer Data From iPhone 8 To Other iPhone 14 devices? | Dr.fone
- Undelete lost music from Itel A05s
- Title: Explore the Leading Gratis Digital Audio Workstations for Windows/Mac Devices
- Author: Kate
- Created at : 2024-05-20 02:42:08
- Updated at : 2024-05-21 02:42:08
- Link: https://audio-editing.techidaily.com/explore-the-leading-gratis-digital-audio-workstations-for-windowsmac-devices/
- License: This work is licensed under CC BY-NC-SA 4.0.
