:max_bytes(150000):strip_icc():format(webp)/reddit-app-for-andoird-652f6fcd646245e9807afbac25a072ee.jpg)
Effective 3 Ways to Convert a Podcast to MP3

Effective 3 Ways to Convert a Podcast to MP3
Converting podcasts to MP3 is simpler than many of you think. Whether you’re looking to convert a podcast to MP3 to make it available for playing on your mobile device or share it with a friend, there are various ways to get the job done within a few clicks.
To help you out, we’ve explored different reliable methods that can come in handy to convert podcasts to MP3 without requiring technical knowledge. Keep reading to find out more!
Part 1. Can You Convert Podcast to mp3?
Yes, of course. Podcasts can be converted to MP3 by using either your podcast player, an online audio conversion tool, audio converter software, or iTunes.
Part 2. Why Should You Convert Podcast to mp3?
The main reason why you might need to convert podcasts to MP3 is that MP3 is a widely accepted format. Although some podcast player supports WAV formats, it’s advisable to keep your podcast file in MP3 so you won’t be castigated over your podcast’s audio format by listeners.
Part 3. How To Convert Podcast to mp3?
As mentioned earlier, you can convert podcasts to MP3 directly from a podcast player, using an online converter, or with iTunes.
Regardless of what method you choose to use, we’ve explained the simple steps to help you operate smoothly. Keep reading!
Way 1: Convert podcast to mp3 directly by podcast payers - Spotify
Some podcast apps like Spotify, Google Podcast, Apple Podcast, and many others allow users to directly download their favorite podcast episodes in MP3 format for offline listening. So, if you’re looking to convert podcast to MP3 without using an online or third-party tool, you can easily download it from the podcast app you’re using.
We’ve outlined the steps to convert a podcast to MP3 directly from a podcast player like Spotify podcast player below;
For Android & iOS
Step1 Open the Spotify app on your smartphone and locate the Podcast you want to convert to MP3. Then, tap on See All Episodes.
Step2 Tap the Download icon next to the podcast to save it as MP3 to your device.
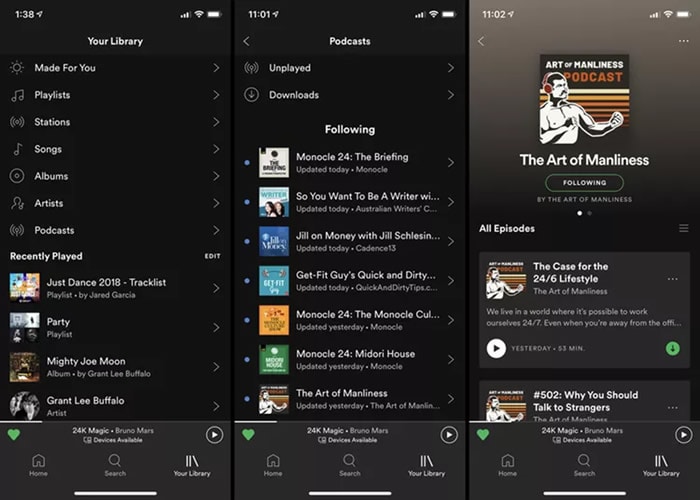
Step3 To find the downloaded podcast, go to Your Library > Podcasts. Then, select Downloads to see the podcast files.
For Computer
The process of converting podcasts to MP3 on Spotify via computer is similar to using a mobile device. You just need to do the following;
Step1 Open the Spotify app and login into your account.
Step2 Locate the Podcast that you wish to convert to MP3.
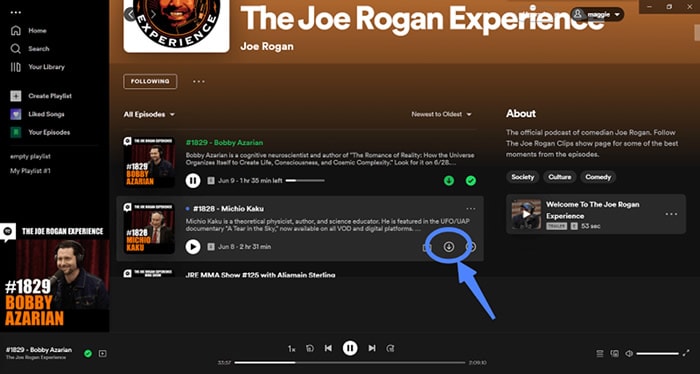
Step3 Move your cursor over the podcast episode you want to convert. Then, click the Download icon next to it to convert it to MP3.
![]()
Note: You must have a premium Spotify account to be able to download podcasts.
Way 2: Convert podcasts to mp3 by online converters or converting software
If the Podcast you’re looking to convert to MP3 is not on a podcast manager, don’t panic. Tech experts have innovated various online tools that can also be used to convert podcasts to MP3s. So, if the Podcast you want to convert to MP3 is saved as a file on your device, you can employ a reliable online converter to execute the operation without compromising the quality of the Podcast.
We’ve curated a list of some online converters you can use below;
1. Convert Podcasts to MP3 with Uniconverter
Wondershare Uniconverter is a video/audio conversion tool that allows the conversion of files in various formats to another format without compromising the file’s quality. The tool is used by professionals to convert podcasts to MP3, as it boasts fast conversion speed and has a clean interface that makes it very easy to use.
Here is how to use Uniconverter to convert podcasts to MP3;
Step1 Install the Uniconverter software on your PC or macOS.
Step2 Click the Convert function from the top-left side. Then, use the Add Fies button at the top left corner of the screen to upload the podcast file that you’re looking to convert.
![]()
Step3 Click the drop-down icon next to Output Format. Then, select Audio > MP3 and choose the quality you want the output file to be.
![]()
Step4 Click File Location from the bottom left corner and select the path where you want the output file to be saved. Then, click Convert to start converting the podcast to MP3. This will take only a few minutes to complete.
![]()
Pros
- Convert unlimited podcasts to MP3 for free.
- Fast conversion speed.
- Supports batch conversion.
- It’s safe.
Cons
- It requires installation.
- You need to upgrade to premium to access all its features.
2. Convert Podcasts to MP3 Online with Media.io
The above method requires you to install a third-party app. But if you prefer using an online podcast converter, then Media.io is one of the best choices that’s worth trying. The tool allows you to quickly convert audio files into various formats safely and securely online.
Follow the following steps to use Media.io to convert your podcast;
Step1 Open theMedia.io Online Audio Converter tool on your browser and click Choose Files to upload the podcast file(s) you’re looking to convert. You can also upload the file from Google Drive, Dropbox, or via YouTube URL.

Step2 Click the drop-down icon next to To and select Audio. Then, choose MP3 as the preferred output format and click Convert to begin the conversion process.
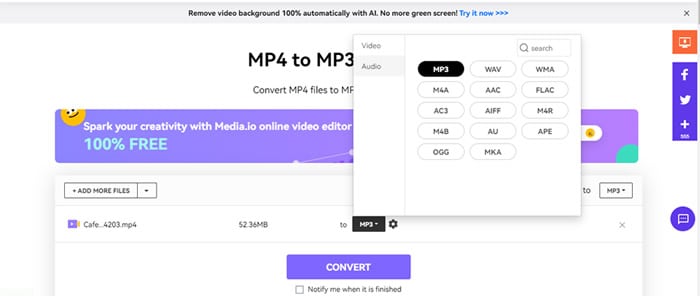
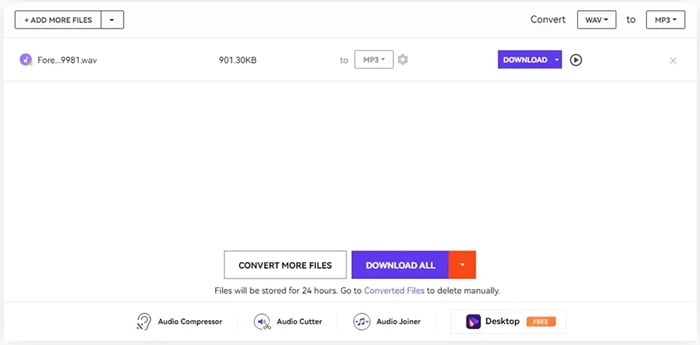
Step3 Once the file has been successfully converted to MP3, click the Download button to save it to your device’s local storage.
Pros
- It’s easy to operate.
- It’s safe and secure.
- No watermark.
- Fast conversion speed.
Cons
- It uploads files slowly.
3. Convert Podcast to MP3 With Online-Convert
If Media.io does not have what it takes to suit your requirements, Online-Convert is another excellent tool that can help you convert audio files from one format to another. Though it’s not 100% free like Media.io.
Here is how to use Online-Convert to convert podcast to MP3 online;
Step1 Open Online Convert online Audio to MP3 converter in your browser and click Choose File to upload the podcast file that you want to convert.

Step2 Click Start to begin the conversion.

Step3 Finally, click Download to save the converted file to your storage.

Pros
- Convert podcasts to MP3 without installing a third-party app.
- It’s easy to use.
- Supports simultaneous conversion of multiple podcast files.
Cons
- You must upgrade your account to be able to convert unlimited podcast files to MP3.
Way 3: Convert podcast to mp3 via iTunes
Besides music streaming, Apple iTunes also allows the conversion of audio files from one format to another. So, if you’ve got iTunes installed on your PC or Mac, you can easily employ it to convert the podcast to MP3. But this might not be a reliable option if you looking to convert many podcast episodes to MP3.
See the steps to convert podcast to MP3 with iTunes;
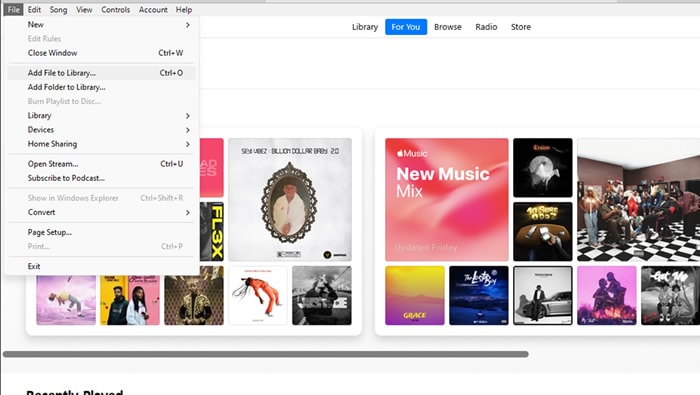
Step1 Open the iTunes app on your computer and click File from the top-left. Then, select Add File to Library to upload the podcast that you’re looking to convert.
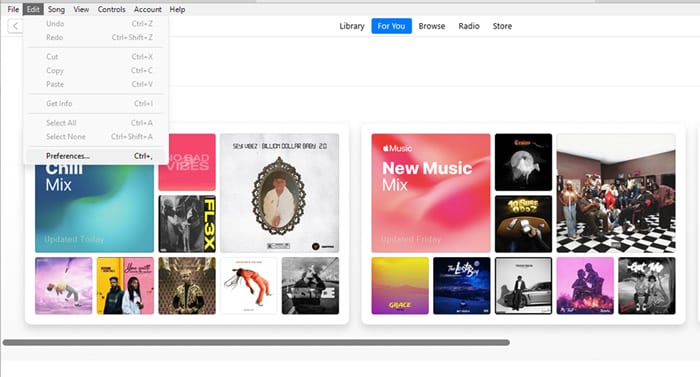
Step2 Once you upload the podcast, click Edit from the top bar. Then, select Preferences.
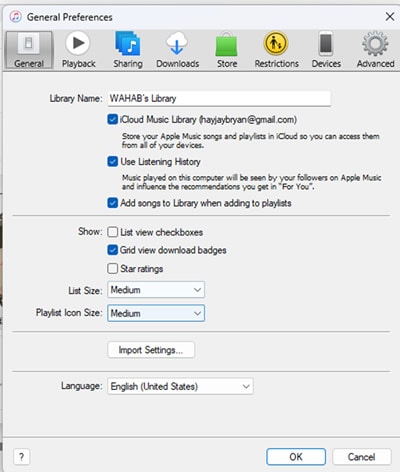
Step3 Click the General tab and select Import Settings.
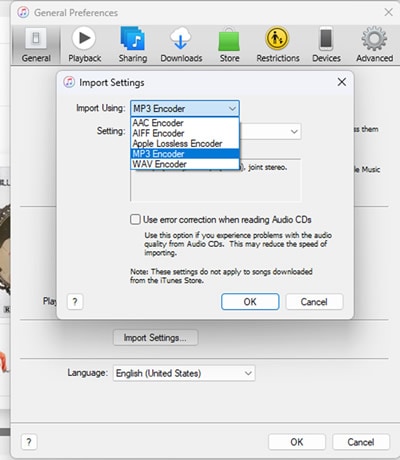
- Click the drop-down icon next to Import Using and select MP3 Encoder. Then, click OK.
Step4 Click File from the top-left side once again. Then, select Convert > Create MP3 version.
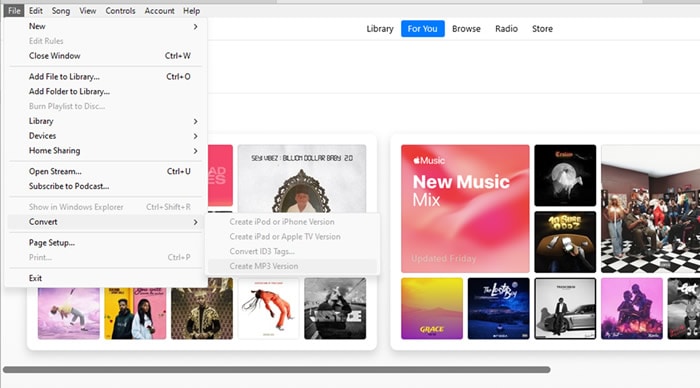
You’ve successfully converted the podcast to MP3!
Pros & Cons of using iTunes to Convert Podcasts to MP3
Pros
- It’s free.
- It’s easy to use.
- It does not reduce podcast quality.
Cons
- It’s not efficient for converting many podcast files.
Part 4. Tips & Tricks for Podcast to MP3 Conversion
- Convert Multiple Podcast Files Simultaneously: If you have a bunch of podcasts to convert to MP3, it’s advisable to use online tools or software like the ones mentioned in the article above to convert all of them at once. It saves you from unwanted stress and wasting your time.
- Add Podcasts to “My Favorites” or “Save to My Library: Add all podcasts you wish to convert to “My Favorites” or save them to your library so you can easily locate them.
- Ensure to have a stable internet connection when using an online tool: Make sure you have a stable internet connection when using online audio converters to convert podcasts to MP3. It makes the process smooth and straightforward.
Final Words
The above techniques are efficient for converting podcasts to MP3. As you can see, it does not matter whether you’re looking to use a podcast manager app like Spotify, online converter, software, or iTunes, the steps are very easy to employ.
Overall, make sure you read the pros and cons attached to using each method so you can choose the one that suits your requirements.
Way 2: Convert podcasts to mp3 by online converters or converting software
If the Podcast you’re looking to convert to MP3 is not on a podcast manager, don’t panic. Tech experts have innovated various online tools that can also be used to convert podcasts to MP3s. So, if the Podcast you want to convert to MP3 is saved as a file on your device, you can employ a reliable online converter to execute the operation without compromising the quality of the Podcast.
We’ve curated a list of some online converters you can use below;
1. Convert Podcasts to MP3 with Uniconverter
Wondershare Uniconverter is a video/audio conversion tool that allows the conversion of files in various formats to another format without compromising the file’s quality. The tool is used by professionals to convert podcasts to MP3, as it boasts fast conversion speed and has a clean interface that makes it very easy to use.
Here is how to use Uniconverter to convert podcasts to MP3;
Step1 Install the Uniconverter software on your PC or macOS.
Step2 Click the Convert function from the top-left side. Then, use the Add Fies button at the top left corner of the screen to upload the podcast file that you’re looking to convert.
![]()
Step3 Click the drop-down icon next to Output Format. Then, select Audio > MP3 and choose the quality you want the output file to be.
![]()
Step4 Click File Location from the bottom left corner and select the path where you want the output file to be saved. Then, click Convert to start converting the podcast to MP3. This will take only a few minutes to complete.
![]()
Pros
- Convert unlimited podcasts to MP3 for free.
- Fast conversion speed.
- Supports batch conversion.
- It’s safe.
Cons
- It requires installation.
- You need to upgrade to premium to access all its features.
2. Convert Podcasts to MP3 Online with Media.io
The above method requires you to install a third-party app. But if you prefer using an online podcast converter, then Media.io is one of the best choices that’s worth trying. The tool allows you to quickly convert audio files into various formats safely and securely online.
Follow the following steps to use Media.io to convert your podcast;
Step1 Open theMedia.io Online Audio Converter tool on your browser and click Choose Files to upload the podcast file(s) you’re looking to convert. You can also upload the file from Google Drive, Dropbox, or via YouTube URL.

Step2 Click the drop-down icon next to To and select Audio. Then, choose MP3 as the preferred output format and click Convert to begin the conversion process.

Step3 Once the file has been successfully converted to MP3, click the Download button to save it to your device’s local storage.

Pros
- It’s easy to operate.
- It’s safe and secure.
- No watermark.
- Fast conversion speed.
Cons
- It uploads files slowly.
3. Convert Podcast to MP3 With Online-Convert
If Media.io does not have what it takes to suit your requirements, Online-Convert is another excellent tool that can help you convert audio files from one format to another. Though it’s not 100% free like Media.io.
Here is how to use Online-Convert to convert podcast to MP3 online;
Step1 Open Online Convert online Audio to MP3 converter in your browser and click Choose File to upload the podcast file that you want to convert.

Step2 Click Start to begin the conversion.

Step3 Finally, click Download to save the converted file to your storage.

Pros
- Convert podcasts to MP3 without installing a third-party app.
- It’s easy to use.
- Supports simultaneous conversion of multiple podcast files.
Cons
- You must upgrade your account to be able to convert unlimited podcast files to MP3.
Way 3: Convert podcast to mp3 via iTunes
Besides music streaming, Apple iTunes also allows the conversion of audio files from one format to another. So, if you’ve got iTunes installed on your PC or Mac, you can easily employ it to convert the podcast to MP3. But this might not be a reliable option if you looking to convert many podcast episodes to MP3.
See the steps to convert podcast to MP3 with iTunes;
Step1 Open the iTunes app on your computer and click File from the top-left. Then, select Add File to Library to upload the podcast that you’re looking to convert.

Step2 Once you upload the podcast, click Edit from the top bar. Then, select Preferences.

Step3 Click the General tab and select Import Settings.

- Click the drop-down icon next to Import Using and select MP3 Encoder. Then, click OK.

Step4 Click File from the top-left side once again. Then, select Convert > Create MP3 version.

You’ve successfully converted the podcast to MP3!
Pros & Cons of using iTunes to Convert Podcasts to MP3
Pros
- It’s free.
- It’s easy to use.
- It does not reduce podcast quality.
Cons
- It’s not efficient for converting many podcast files.
Part 4. Tips & Tricks for Podcast to MP3 Conversion
- Convert Multiple Podcast Files Simultaneously: If you have a bunch of podcasts to convert to MP3, it’s advisable to use online tools or software like the ones mentioned in the article above to convert all of them at once. It saves you from unwanted stress and wasting your time.
- Add Podcasts to “My Favorites” or “Save to My Library: Add all podcasts you wish to convert to “My Favorites” or save them to your library so you can easily locate them.
- Ensure to have a stable internet connection when using an online tool: Make sure you have a stable internet connection when using online audio converters to convert podcasts to MP3. It makes the process smooth and straightforward.
Final Words
The above techniques are efficient for converting podcasts to MP3. As you can see, it does not matter whether you’re looking to use a podcast manager app like Spotify, online converter, software, or iTunes, the steps are very easy to employ.
Overall, make sure you read the pros and cons attached to using each method so you can choose the one that suits your requirements.
Top Audio Splitter on Mac - 2024 Update
Top Audio Splitter on Mac in 2024

Shanoon Cox
Mar 27, 2024• Proven solutions
There are times when you need to split audio files with the use of your Mac. The fastest and best way to do the task is with the use of an audio splitter for Mac. There are lots of programs made to split audio tracks. If you are looking for the best free apps for the Mac, then you are on the right page. Below are the top audio splitters for Mac users.
Part 1. Recommended Best Audio Splitting Tool: Wondershare Filmora
Although widely known as the best video editing software for beginners, Wondershare Filmora video editor for Mac also serves as a great audio editing tool. It can split, trim, fade-in or out, change the speed of your audio files, etc.
One surprising feature this tool offers is its multi-audio track feature. Sometimes we need to add not just background music, but also additional voiceovers for a home video we create. It is almost impossible to add both two audio tracks to a video at the same time. However, by using Filmora, you will be able to add up to 3 audio tracks at a time. That means your voiceover, background music, even some funny or emotional sound effects can be added to a video clip simultaneously with one click of the button. Download a free trial version to try it right now:
Below is a brief video introduction to this amazing program:
If you are Windows users, check this tutorial instead.
Part 2. Five Best Audio Trimming Tools You Can Choose
Below are the top 5 audio splitters for Mac devices you can choose to use. Read on to take a close look at them.
1. Mp3splt (Mac)
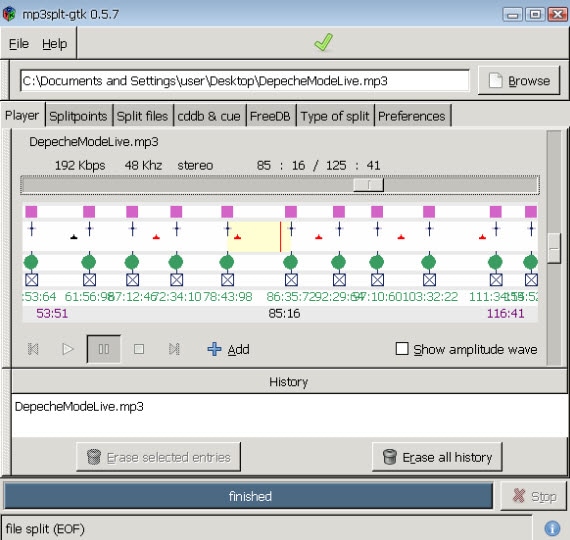
Mp3splt(Mac) is one of the best audio splitter software available. It is open-source software that has the ability to split MP3 and Ogg Vorbis audio files. It is not only useful to split large MP3 files into smaller files or to divide entire albums into individual tracks, but also easy to use. You just need to select a start and end time position.
The best thing about Mp3splt is that it doesn’t decode the file during the splitting process, which avoids loss due to digital degeneration. If you need to split an album, you can manually input the split points and the filenames, or you can get them through CDDB or .CUE files. The audio splitter Mac software also supports automatic silence split that can be utilized to adjust split points as well as supporting ID3v1 and ID3v2 tags. It is also available for Windows and Linux users.
2. Macsome Audio Splitter Freeware
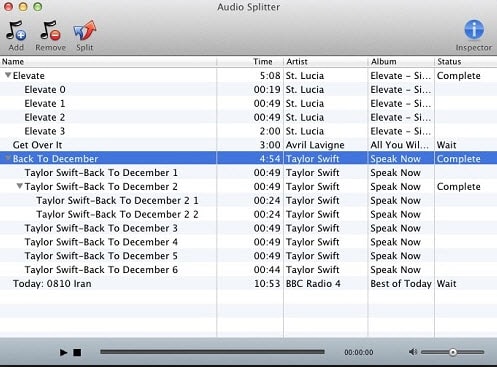
Another free audio splitting software running on Mac computer that you can use is Macsome Audio Splitter Freeware. It can be used to split MP3 files into smaller files in just a couple of seconds. It preserves the tags and the sound quality of the files while splitting them. It also allows batch splitting, which is good if you have several audio files that you need to split. To split audio files, you can select by time or number of pieces. You can also choose the start and end time to split.
Macsome Audio Splitter Freeware has a playback feature that allows you to play the audio file and adjust its volume. The audio splitter Mac software is compatible with Mac OSX 10.4.x or 10.5.x with at least 512 MB of physical RAM. The only downside is that it can only split audio files that are unprotected or DRM-free.
3. MP3TrueEdit for Mac
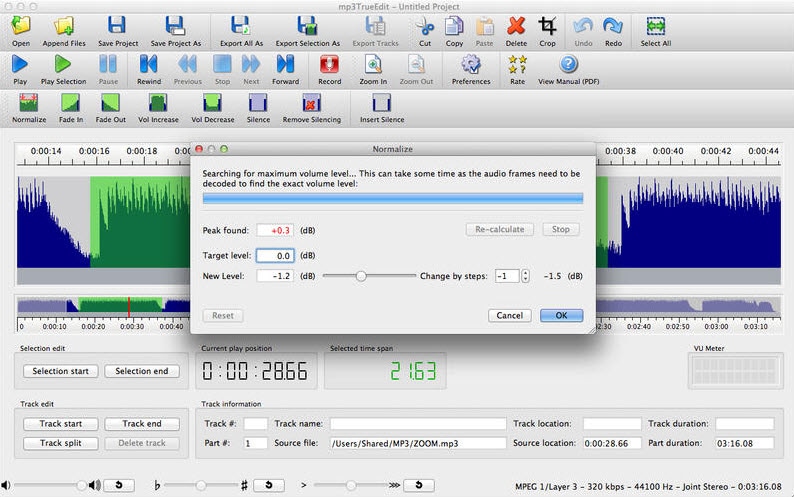
MP3TrueEdit is a simple audio splitter Mac tool that has been designed to edit MP3 audio files. While it costs $11.99 on the Mac App Store, you can download and try it for free. The developers have made the app to split or edit files without the need to decompress and recompress the audio. It guarantees that there is no loss in the quality. It is also designed to protect the audio file from becoming corrupt or invalid during the splitting process.
MP3TrueEdit is more than just an audio splitter Mac software. It is an audio editing tool that allows you to edit audio files. It can also be used to record meetings, talks or lectures so that you don’t have to miss a word. You can also record band practice sessions or choir rehearsals. Then you can edit the tempo or pitch of the recording to suit your needs.
4. MP3 Trimmer (Mac)
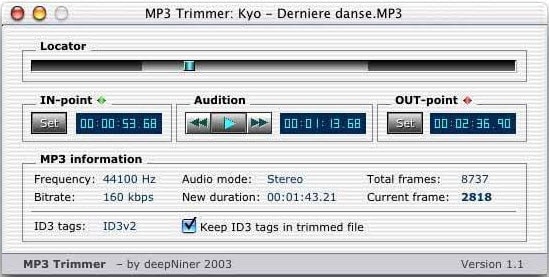
MP3 Trimmer (Mac) is a quite easy to use audio splitter Mac tool. Not only does it allow you to split MP3 files, it can also be used to edit, join, repair, analyze audio files, and a lot more. There’s no need to re-encode and convert file formats with the use of various applications. All you need is the MP3 Trimmer if you want to remove portions of your MP3 files without losing the quality.
With the MP3 Trimmer, you will be able to remove the undesired portion of the audio file, add some fade-in/fade-out effects, change gain and add silence. If you have a couple of large audio files that needs to be split, then you can benefit from the batch-edit feature of the MP3 Trimmer. It also has built-in tools that will help you analyze and repair broken audio files. It is free to use as long as you want.
5. AudioSlicer for Mac
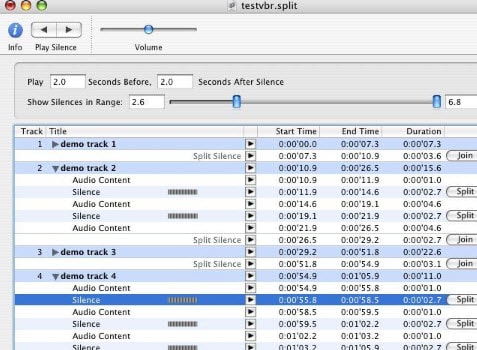
AudioSlicer is a Cocoa GUI app for Mac OS X. It’s designed to find all the silences in an MP3 file. It also allows you to split the audio file and tag them properly. While there are other audio splitter Mac apps that can do the tasks automatically according to specific criteria, AudioSlicer displays the silences within the specified duration. It allows you to listen to the audio before and after the silence. Then you can decide if you want to do the split at that point. Splitting of the file is done without any loss to the quality because there is no decoding or re-encoding of the audio file during the process. It is compatible with Mac OS X 10.3 and above and supports both Intel Macs and PowerPC.
That’s the best audio trimming software for Mac. The most recommended is Wondershare Filmora for Mac. If you have other good choices, welcome to share with us.

Shanoon Cox
Shanoon Cox is a writer and a lover of all things video.
Follow @Shanoon Cox
Shanoon Cox
Mar 27, 2024• Proven solutions
There are times when you need to split audio files with the use of your Mac. The fastest and best way to do the task is with the use of an audio splitter for Mac. There are lots of programs made to split audio tracks. If you are looking for the best free apps for the Mac, then you are on the right page. Below are the top audio splitters for Mac users.
Part 1. Recommended Best Audio Splitting Tool: Wondershare Filmora
Although widely known as the best video editing software for beginners, Wondershare Filmora video editor for Mac also serves as a great audio editing tool. It can split, trim, fade-in or out, change the speed of your audio files, etc.
One surprising feature this tool offers is its multi-audio track feature. Sometimes we need to add not just background music, but also additional voiceovers for a home video we create. It is almost impossible to add both two audio tracks to a video at the same time. However, by using Filmora, you will be able to add up to 3 audio tracks at a time. That means your voiceover, background music, even some funny or emotional sound effects can be added to a video clip simultaneously with one click of the button. Download a free trial version to try it right now:
Below is a brief video introduction to this amazing program:
If you are Windows users, check this tutorial instead.
Part 2. Five Best Audio Trimming Tools You Can Choose
Below are the top 5 audio splitters for Mac devices you can choose to use. Read on to take a close look at them.
1. Mp3splt (Mac)
Mp3splt(Mac) is one of the best audio splitter software available. It is open-source software that has the ability to split MP3 and Ogg Vorbis audio files. It is not only useful to split large MP3 files into smaller files or to divide entire albums into individual tracks, but also easy to use. You just need to select a start and end time position.
The best thing about Mp3splt is that it doesn’t decode the file during the splitting process, which avoids loss due to digital degeneration. If you need to split an album, you can manually input the split points and the filenames, or you can get them through CDDB or .CUE files. The audio splitter Mac software also supports automatic silence split that can be utilized to adjust split points as well as supporting ID3v1 and ID3v2 tags. It is also available for Windows and Linux users.

2. Macsome Audio Splitter Freeware
Another free audio splitting software running on Mac computer that you can use is Macsome Audio Splitter Freeware. It can be used to split MP3 files into smaller files in just a couple of seconds. It preserves the tags and the sound quality of the files while splitting them. It also allows batch splitting, which is good if you have several audio files that you need to split. To split audio files, you can select by time or number of pieces. You can also choose the start and end time to split.
Macsome Audio Splitter Freeware has a playback feature that allows you to play the audio file and adjust its volume. The audio splitter Mac software is compatible with Mac OSX 10.4.x or 10.5.x with at least 512 MB of physical RAM. The only downside is that it can only split audio files that are unprotected or DRM-free.

3. MP3TrueEdit for Mac
MP3TrueEdit is a simple audio splitter Mac tool that has been designed to edit MP3 audio files. While it costs $11.99 on the Mac App Store, you can download and try it for free. The developers have made the app to split or edit files without the need to decompress and recompress the audio. It guarantees that there is no loss in the quality. It is also designed to protect the audio file from becoming corrupt or invalid during the splitting process.
MP3TrueEdit is more than just an audio splitter Mac software. It is an audio editing tool that allows you to edit audio files. It can also be used to record meetings, talks or lectures so that you don’t have to miss a word. You can also record band practice sessions or choir rehearsals. Then you can edit the tempo or pitch of the recording to suit your needs.

4. MP3 Trimmer (Mac)
MP3 Trimmer (Mac) is a quite easy to use audio splitter Mac tool. Not only does it allow you to split MP3 files, it can also be used to edit, join, repair, analyze audio files, and a lot more. There’s no need to re-encode and convert file formats with the use of various applications. All you need is the MP3 Trimmer if you want to remove portions of your MP3 files without losing the quality.
With the MP3 Trimmer, you will be able to remove the undesired portion of the audio file, add some fade-in/fade-out effects, change gain and add silence. If you have a couple of large audio files that needs to be split, then you can benefit from the batch-edit feature of the MP3 Trimmer. It also has built-in tools that will help you analyze and repair broken audio files. It is free to use as long as you want.

5. AudioSlicer for Mac
AudioSlicer is a Cocoa GUI app for Mac OS X. It’s designed to find all the silences in an MP3 file. It also allows you to split the audio file and tag them properly. While there are other audio splitter Mac apps that can do the tasks automatically according to specific criteria, AudioSlicer displays the silences within the specified duration. It allows you to listen to the audio before and after the silence. Then you can decide if you want to do the split at that point. Splitting of the file is done without any loss to the quality because there is no decoding or re-encoding of the audio file during the process. It is compatible with Mac OS X 10.3 and above and supports both Intel Macs and PowerPC.

That’s the best audio trimming software for Mac. The most recommended is Wondershare Filmora for Mac. If you have other good choices, welcome to share with us.

Shanoon Cox
Shanoon Cox is a writer and a lover of all things video.
Follow @Shanoon Cox
Shanoon Cox
Mar 27, 2024• Proven solutions
There are times when you need to split audio files with the use of your Mac. The fastest and best way to do the task is with the use of an audio splitter for Mac. There are lots of programs made to split audio tracks. If you are looking for the best free apps for the Mac, then you are on the right page. Below are the top audio splitters for Mac users.
Part 1. Recommended Best Audio Splitting Tool: Wondershare Filmora
Although widely known as the best video editing software for beginners, Wondershare Filmora video editor for Mac also serves as a great audio editing tool. It can split, trim, fade-in or out, change the speed of your audio files, etc.
One surprising feature this tool offers is its multi-audio track feature. Sometimes we need to add not just background music, but also additional voiceovers for a home video we create. It is almost impossible to add both two audio tracks to a video at the same time. However, by using Filmora, you will be able to add up to 3 audio tracks at a time. That means your voiceover, background music, even some funny or emotional sound effects can be added to a video clip simultaneously with one click of the button. Download a free trial version to try it right now:
Below is a brief video introduction to this amazing program:
If you are Windows users, check this tutorial instead.
Part 2. Five Best Audio Trimming Tools You Can Choose
Below are the top 5 audio splitters for Mac devices you can choose to use. Read on to take a close look at them.
1. Mp3splt (Mac)
Mp3splt(Mac) is one of the best audio splitter software available. It is open-source software that has the ability to split MP3 and Ogg Vorbis audio files. It is not only useful to split large MP3 files into smaller files or to divide entire albums into individual tracks, but also easy to use. You just need to select a start and end time position.
The best thing about Mp3splt is that it doesn’t decode the file during the splitting process, which avoids loss due to digital degeneration. If you need to split an album, you can manually input the split points and the filenames, or you can get them through CDDB or .CUE files. The audio splitter Mac software also supports automatic silence split that can be utilized to adjust split points as well as supporting ID3v1 and ID3v2 tags. It is also available for Windows and Linux users.

2. Macsome Audio Splitter Freeware
Another free audio splitting software running on Mac computer that you can use is Macsome Audio Splitter Freeware. It can be used to split MP3 files into smaller files in just a couple of seconds. It preserves the tags and the sound quality of the files while splitting them. It also allows batch splitting, which is good if you have several audio files that you need to split. To split audio files, you can select by time or number of pieces. You can also choose the start and end time to split.
Macsome Audio Splitter Freeware has a playback feature that allows you to play the audio file and adjust its volume. The audio splitter Mac software is compatible with Mac OSX 10.4.x or 10.5.x with at least 512 MB of physical RAM. The only downside is that it can only split audio files that are unprotected or DRM-free.

3. MP3TrueEdit for Mac
MP3TrueEdit is a simple audio splitter Mac tool that has been designed to edit MP3 audio files. While it costs $11.99 on the Mac App Store, you can download and try it for free. The developers have made the app to split or edit files without the need to decompress and recompress the audio. It guarantees that there is no loss in the quality. It is also designed to protect the audio file from becoming corrupt or invalid during the splitting process.
MP3TrueEdit is more than just an audio splitter Mac software. It is an audio editing tool that allows you to edit audio files. It can also be used to record meetings, talks or lectures so that you don’t have to miss a word. You can also record band practice sessions or choir rehearsals. Then you can edit the tempo or pitch of the recording to suit your needs.

4. MP3 Trimmer (Mac)
MP3 Trimmer (Mac) is a quite easy to use audio splitter Mac tool. Not only does it allow you to split MP3 files, it can also be used to edit, join, repair, analyze audio files, and a lot more. There’s no need to re-encode and convert file formats with the use of various applications. All you need is the MP3 Trimmer if you want to remove portions of your MP3 files without losing the quality.
With the MP3 Trimmer, you will be able to remove the undesired portion of the audio file, add some fade-in/fade-out effects, change gain and add silence. If you have a couple of large audio files that needs to be split, then you can benefit from the batch-edit feature of the MP3 Trimmer. It also has built-in tools that will help you analyze and repair broken audio files. It is free to use as long as you want.

5. AudioSlicer for Mac
AudioSlicer is a Cocoa GUI app for Mac OS X. It’s designed to find all the silences in an MP3 file. It also allows you to split the audio file and tag them properly. While there are other audio splitter Mac apps that can do the tasks automatically according to specific criteria, AudioSlicer displays the silences within the specified duration. It allows you to listen to the audio before and after the silence. Then you can decide if you want to do the split at that point. Splitting of the file is done without any loss to the quality because there is no decoding or re-encoding of the audio file during the process. It is compatible with Mac OS X 10.3 and above and supports both Intel Macs and PowerPC.

That’s the best audio trimming software for Mac. The most recommended is Wondershare Filmora for Mac. If you have other good choices, welcome to share with us.

Shanoon Cox
Shanoon Cox is a writer and a lover of all things video.
Follow @Shanoon Cox
Shanoon Cox
Mar 27, 2024• Proven solutions
There are times when you need to split audio files with the use of your Mac. The fastest and best way to do the task is with the use of an audio splitter for Mac. There are lots of programs made to split audio tracks. If you are looking for the best free apps for the Mac, then you are on the right page. Below are the top audio splitters for Mac users.
Part 1. Recommended Best Audio Splitting Tool: Wondershare Filmora
Although widely known as the best video editing software for beginners, Wondershare Filmora video editor for Mac also serves as a great audio editing tool. It can split, trim, fade-in or out, change the speed of your audio files, etc.
One surprising feature this tool offers is its multi-audio track feature. Sometimes we need to add not just background music, but also additional voiceovers for a home video we create. It is almost impossible to add both two audio tracks to a video at the same time. However, by using Filmora, you will be able to add up to 3 audio tracks at a time. That means your voiceover, background music, even some funny or emotional sound effects can be added to a video clip simultaneously with one click of the button. Download a free trial version to try it right now:
Below is a brief video introduction to this amazing program:
If you are Windows users, check this tutorial instead.
Part 2. Five Best Audio Trimming Tools You Can Choose
Below are the top 5 audio splitters for Mac devices you can choose to use. Read on to take a close look at them.
1. Mp3splt (Mac)
Mp3splt(Mac) is one of the best audio splitter software available. It is open-source software that has the ability to split MP3 and Ogg Vorbis audio files. It is not only useful to split large MP3 files into smaller files or to divide entire albums into individual tracks, but also easy to use. You just need to select a start and end time position.
The best thing about Mp3splt is that it doesn’t decode the file during the splitting process, which avoids loss due to digital degeneration. If you need to split an album, you can manually input the split points and the filenames, or you can get them through CDDB or .CUE files. The audio splitter Mac software also supports automatic silence split that can be utilized to adjust split points as well as supporting ID3v1 and ID3v2 tags. It is also available for Windows and Linux users.

2. Macsome Audio Splitter Freeware
Another free audio splitting software running on Mac computer that you can use is Macsome Audio Splitter Freeware. It can be used to split MP3 files into smaller files in just a couple of seconds. It preserves the tags and the sound quality of the files while splitting them. It also allows batch splitting, which is good if you have several audio files that you need to split. To split audio files, you can select by time or number of pieces. You can also choose the start and end time to split.
Macsome Audio Splitter Freeware has a playback feature that allows you to play the audio file and adjust its volume. The audio splitter Mac software is compatible with Mac OSX 10.4.x or 10.5.x with at least 512 MB of physical RAM. The only downside is that it can only split audio files that are unprotected or DRM-free.

3. MP3TrueEdit for Mac
MP3TrueEdit is a simple audio splitter Mac tool that has been designed to edit MP3 audio files. While it costs $11.99 on the Mac App Store, you can download and try it for free. The developers have made the app to split or edit files without the need to decompress and recompress the audio. It guarantees that there is no loss in the quality. It is also designed to protect the audio file from becoming corrupt or invalid during the splitting process.
MP3TrueEdit is more than just an audio splitter Mac software. It is an audio editing tool that allows you to edit audio files. It can also be used to record meetings, talks or lectures so that you don’t have to miss a word. You can also record band practice sessions or choir rehearsals. Then you can edit the tempo or pitch of the recording to suit your needs.

4. MP3 Trimmer (Mac)
MP3 Trimmer (Mac) is a quite easy to use audio splitter Mac tool. Not only does it allow you to split MP3 files, it can also be used to edit, join, repair, analyze audio files, and a lot more. There’s no need to re-encode and convert file formats with the use of various applications. All you need is the MP3 Trimmer if you want to remove portions of your MP3 files without losing the quality.
With the MP3 Trimmer, you will be able to remove the undesired portion of the audio file, add some fade-in/fade-out effects, change gain and add silence. If you have a couple of large audio files that needs to be split, then you can benefit from the batch-edit feature of the MP3 Trimmer. It also has built-in tools that will help you analyze and repair broken audio files. It is free to use as long as you want.

5. AudioSlicer for Mac
AudioSlicer is a Cocoa GUI app for Mac OS X. It’s designed to find all the silences in an MP3 file. It also allows you to split the audio file and tag them properly. While there are other audio splitter Mac apps that can do the tasks automatically according to specific criteria, AudioSlicer displays the silences within the specified duration. It allows you to listen to the audio before and after the silence. Then you can decide if you want to do the split at that point. Splitting of the file is done without any loss to the quality because there is no decoding or re-encoding of the audio file during the process. It is compatible with Mac OS X 10.3 and above and supports both Intel Macs and PowerPC.

That’s the best audio trimming software for Mac. The most recommended is Wondershare Filmora for Mac. If you have other good choices, welcome to share with us.

Shanoon Cox
Shanoon Cox is a writer and a lover of all things video.
Follow @Shanoon Cox
A Beginner’s Guide to Setting Up Audacity in Ubuntu
Open-source audio editor Audacity is available for free download and usage. It is one of the most popular multi-track audio editing tools for Windows, Mac OS X, and Linux. Audio recordings may be recorded, edited, spliced, and altered with Audacity. How to install Audacity on your Ubuntu 20.04 LTS system is explained in this post.
Key Features of Audacity
- Creative Commons Attribution-NonCommercial-ShareAlike License
- It is a cross-platform program
- Sound files may be imported, edited, and combined. Use a variety of file types when exporting your recordings. You may even export many files at once.
- Record and playback live sound
- Audio Quality: Audacity can playback 16-bit, 24-bit, and 32-bit audio files, respectively.
- Accessible in 38 different dialects
- Assistive Listening Device
- Keyboard shortcuts are many
- A wide range of audio formats is supported, including AIFF, WAV, FLAC, and MP2.
- With the keyboard, tracks and choices may be handled to their greatest extent
- VST and Audio Unit effect plug-ins are supported. Plug-ins may even be written by you.
- Duplicate, chop, combine, or splice together several sound documents.
- There is a slew of others…
Installation
The official website for Audacity shows version 2.4.2 as the most recent release. Download the newest version of Audacity for Ubuntu 20.04 and then install it.
- Install Audacity via PPA
- Install Audacity via Snap Store
First, we’ll use the PPA approach to install Audacity.
Install Audacity via PPA
Installing Audacity on an Ubuntu system is as simple as entering the following line in the terminal to include the unofficial PPA developed by “ubuntuhandbook” to the Ubuntu system’s software sources, then rebooting.

You will be prompted to hit the Enter key to proceed with the process of adding your Audacity package to your sources list. To begin the process of introducing PPA to the sources list, press the Enter key.

After you’ve added the Audacity package to the system’s software sources, you’ll need to update the package repository in order to get Audacity to work.

As soon as you have updated the package repository, you should be able to successfully install Audacity.
Navigate to Activities & type in the word ‘audacity’ to find it.

As you can see in the picture, Audacity has been successfully installed and is ready for usage on my PC.

Installing Audacity from the Snap Store
A version of Audacity is also available for download via the Snap shop. Using a Snap is among the quickest and most straightforward methods of installing any program since it takes into account all of the application’s updates and dependencies. In order to install Audacity using Snap, you must first ensure that Snap is already installed on the Ubuntu system. Snap is pre-installed in the newest versions of Ubuntu and is available as a default. If Snap is not already installed on your system, you may do it by using the instructions shown below.


After safely installing Snap, you’ll be able to proceed to install Audacity by using the script provided in the next section.

It will just take a few minutes to download & install Audacity on your computer.

As soon as Audacity has been installed via the Snap method, launch the program by searching for the phrase ‘audacity’ in the Application menu.

To launch Audacity, click on the Audacity icon on your desktop.

How to uninstall Audacity Ubuntu
For whatever reason, if you wish to remove the Audacity program from your computer, you may follow these instructions.
Method 1
If you installed Audacity through the Snap method, execute the following command in your terminal: $ sudo snap remove Audacity
Method 2
If you have installed the application using the PPA, you may remove it by performing the instructions shown below.
>Step 1:
The first step is to
This indicates that the add-apt-repository command was used to add the PPA to your system. You may also use the same command to uninstall the PPA from your computer. Simply include the —remove option in your command.
$ sudo add-apt-repository –remove ppa:ubuntuhandbook1/audacity
>Step 2:
As of the right moment, the PPA has been withdrawn. What happens to the programs that are installed using these PPAs? Will they be eliminated as a consequence of the abolition of the Patriot Act? The answer is a resounding no.
Thus, PPA-purge enters the scene to help solve the problem. The PPA is disabled, but all of the apps installed by the PPA are also uninstalled, or they are reverted to the original versions given by your distribution.
Install the PPA-purge package and remove the Audacity package may be accomplished by running the following command.
$ sudo apt install ppa-purge && sudo ppa-purge ppa:ubuntuhandbook1/audacity
Conclusion
I hope you now have a clear grasp of installing and uninstalling Audacity on Ubuntu 20.04 LTS Focal Fossa. I hope this article has been helpful. Additionally, we cover Filmora’s voice effects & how users may use the program to improve and change their own voices. Filmora allows you to re-voice video/audio & previously recorded voiceovers. The Pitch option on the Timeline may be used with video/audio and voiceover files. Change the tone of a video and recording to make it sound unique. You may quickly alter the voices in the videos with Filmora. A story or video should accompany your viral. Allows you to alter the pitch of your voice by selecting the Changing Pitch option. You may adjust the video’s pace (Optional). Make a duplicate of the video or audio that has been altered.
For Win 7 or later (64-bit)
For macOS 10.12 or later
You will be prompted to hit the Enter key to proceed with the process of adding your Audacity package to your sources list. To begin the process of introducing PPA to the sources list, press the Enter key.

After you’ve added the Audacity package to the system’s software sources, you’ll need to update the package repository in order to get Audacity to work.

As soon as you have updated the package repository, you should be able to successfully install Audacity.
Navigate to Activities & type in the word ‘audacity’ to find it.

As you can see in the picture, Audacity has been successfully installed and is ready for usage on my PC.

Installing Audacity from the Snap Store
A version of Audacity is also available for download via the Snap shop. Using a Snap is among the quickest and most straightforward methods of installing any program since it takes into account all of the application’s updates and dependencies. In order to install Audacity using Snap, you must first ensure that Snap is already installed on the Ubuntu system. Snap is pre-installed in the newest versions of Ubuntu and is available as a default. If Snap is not already installed on your system, you may do it by using the instructions shown below.


After safely installing Snap, you’ll be able to proceed to install Audacity by using the script provided in the next section.

It will just take a few minutes to download & install Audacity on your computer.

As soon as Audacity has been installed via the Snap method, launch the program by searching for the phrase ‘audacity’ in the Application menu.

To launch Audacity, click on the Audacity icon on your desktop.

How to uninstall Audacity Ubuntu
For whatever reason, if you wish to remove the Audacity program from your computer, you may follow these instructions.
Method 1
If you installed Audacity through the Snap method, execute the following command in your terminal: $ sudo snap remove Audacity
Method 2
If you have installed the application using the PPA, you may remove it by performing the instructions shown below.
>Step 1:
The first step is to
This indicates that the add-apt-repository command was used to add the PPA to your system. You may also use the same command to uninstall the PPA from your computer. Simply include the —remove option in your command.
$ sudo add-apt-repository –remove ppa:ubuntuhandbook1/audacity
>Step 2:
As of the right moment, the PPA has been withdrawn. What happens to the programs that are installed using these PPAs? Will they be eliminated as a consequence of the abolition of the Patriot Act? The answer is a resounding no.
Thus, PPA-purge enters the scene to help solve the problem. The PPA is disabled, but all of the apps installed by the PPA are also uninstalled, or they are reverted to the original versions given by your distribution.
Install the PPA-purge package and remove the Audacity package may be accomplished by running the following command.
$ sudo apt install ppa-purge && sudo ppa-purge ppa:ubuntuhandbook1/audacity
Conclusion
I hope you now have a clear grasp of installing and uninstalling Audacity on Ubuntu 20.04 LTS Focal Fossa. I hope this article has been helpful. Additionally, we cover Filmora’s voice effects & how users may use the program to improve and change their own voices. Filmora allows you to re-voice video/audio & previously recorded voiceovers. The Pitch option on the Timeline may be used with video/audio and voiceover files. Change the tone of a video and recording to make it sound unique. You may quickly alter the voices in the videos with Filmora. A story or video should accompany your viral. Allows you to alter the pitch of your voice by selecting the Changing Pitch option. You may adjust the video’s pace (Optional). Make a duplicate of the video or audio that has been altered.
For Win 7 or later (64-bit)
For macOS 10.12 or later
You will be prompted to hit the Enter key to proceed with the process of adding your Audacity package to your sources list. To begin the process of introducing PPA to the sources list, press the Enter key.

After you’ve added the Audacity package to the system’s software sources, you’ll need to update the package repository in order to get Audacity to work.

As soon as you have updated the package repository, you should be able to successfully install Audacity.
Navigate to Activities & type in the word ‘audacity’ to find it.

As you can see in the picture, Audacity has been successfully installed and is ready for usage on my PC.

Installing Audacity from the Snap Store
A version of Audacity is also available for download via the Snap shop. Using a Snap is among the quickest and most straightforward methods of installing any program since it takes into account all of the application’s updates and dependencies. In order to install Audacity using Snap, you must first ensure that Snap is already installed on the Ubuntu system. Snap is pre-installed in the newest versions of Ubuntu and is available as a default. If Snap is not already installed on your system, you may do it by using the instructions shown below.


After safely installing Snap, you’ll be able to proceed to install Audacity by using the script provided in the next section.

It will just take a few minutes to download & install Audacity on your computer.

As soon as Audacity has been installed via the Snap method, launch the program by searching for the phrase ‘audacity’ in the Application menu.

To launch Audacity, click on the Audacity icon on your desktop.

How to uninstall Audacity Ubuntu
For whatever reason, if you wish to remove the Audacity program from your computer, you may follow these instructions.
Method 1
If you installed Audacity through the Snap method, execute the following command in your terminal: $ sudo snap remove Audacity
Method 2
If you have installed the application using the PPA, you may remove it by performing the instructions shown below.
>Step 1:
The first step is to
This indicates that the add-apt-repository command was used to add the PPA to your system. You may also use the same command to uninstall the PPA from your computer. Simply include the —remove option in your command.
$ sudo add-apt-repository –remove ppa:ubuntuhandbook1/audacity
>Step 2:
As of the right moment, the PPA has been withdrawn. What happens to the programs that are installed using these PPAs? Will they be eliminated as a consequence of the abolition of the Patriot Act? The answer is a resounding no.
Thus, PPA-purge enters the scene to help solve the problem. The PPA is disabled, but all of the apps installed by the PPA are also uninstalled, or they are reverted to the original versions given by your distribution.
Install the PPA-purge package and remove the Audacity package may be accomplished by running the following command.
$ sudo apt install ppa-purge && sudo ppa-purge ppa:ubuntuhandbook1/audacity
Conclusion
I hope you now have a clear grasp of installing and uninstalling Audacity on Ubuntu 20.04 LTS Focal Fossa. I hope this article has been helpful. Additionally, we cover Filmora’s voice effects & how users may use the program to improve and change their own voices. Filmora allows you to re-voice video/audio & previously recorded voiceovers. The Pitch option on the Timeline may be used with video/audio and voiceover files. Change the tone of a video and recording to make it sound unique. You may quickly alter the voices in the videos with Filmora. A story or video should accompany your viral. Allows you to alter the pitch of your voice by selecting the Changing Pitch option. You may adjust the video’s pace (Optional). Make a duplicate of the video or audio that has been altered.
For Win 7 or later (64-bit)
For macOS 10.12 or later
You will be prompted to hit the Enter key to proceed with the process of adding your Audacity package to your sources list. To begin the process of introducing PPA to the sources list, press the Enter key.

After you’ve added the Audacity package to the system’s software sources, you’ll need to update the package repository in order to get Audacity to work.

As soon as you have updated the package repository, you should be able to successfully install Audacity.
Navigate to Activities & type in the word ‘audacity’ to find it.

As you can see in the picture, Audacity has been successfully installed and is ready for usage on my PC.

Installing Audacity from the Snap Store
A version of Audacity is also available for download via the Snap shop. Using a Snap is among the quickest and most straightforward methods of installing any program since it takes into account all of the application’s updates and dependencies. In order to install Audacity using Snap, you must first ensure that Snap is already installed on the Ubuntu system. Snap is pre-installed in the newest versions of Ubuntu and is available as a default. If Snap is not already installed on your system, you may do it by using the instructions shown below.


After safely installing Snap, you’ll be able to proceed to install Audacity by using the script provided in the next section.

It will just take a few minutes to download & install Audacity on your computer.

As soon as Audacity has been installed via the Snap method, launch the program by searching for the phrase ‘audacity’ in the Application menu.

To launch Audacity, click on the Audacity icon on your desktop.

How to uninstall Audacity Ubuntu
For whatever reason, if you wish to remove the Audacity program from your computer, you may follow these instructions.
Method 1
If you installed Audacity through the Snap method, execute the following command in your terminal: $ sudo snap remove Audacity
Method 2
If you have installed the application using the PPA, you may remove it by performing the instructions shown below.
>Step 1:
The first step is to
This indicates that the add-apt-repository command was used to add the PPA to your system. You may also use the same command to uninstall the PPA from your computer. Simply include the —remove option in your command.
$ sudo add-apt-repository –remove ppa:ubuntuhandbook1/audacity
>Step 2:
As of the right moment, the PPA has been withdrawn. What happens to the programs that are installed using these PPAs? Will they be eliminated as a consequence of the abolition of the Patriot Act? The answer is a resounding no.
Thus, PPA-purge enters the scene to help solve the problem. The PPA is disabled, but all of the apps installed by the PPA are also uninstalled, or they are reverted to the original versions given by your distribution.
Install the PPA-purge package and remove the Audacity package may be accomplished by running the following command.
$ sudo apt install ppa-purge && sudo ppa-purge ppa:ubuntuhandbook1/audacity
Conclusion
I hope you now have a clear grasp of installing and uninstalling Audacity on Ubuntu 20.04 LTS Focal Fossa. I hope this article has been helpful. Additionally, we cover Filmora’s voice effects & how users may use the program to improve and change their own voices. Filmora allows you to re-voice video/audio & previously recorded voiceovers. The Pitch option on the Timeline may be used with video/audio and voiceover files. Change the tone of a video and recording to make it sound unique. You may quickly alter the voices in the videos with Filmora. A story or video should accompany your viral. Allows you to alter the pitch of your voice by selecting the Changing Pitch option. You may adjust the video’s pace (Optional). Make a duplicate of the video or audio that has been altered.
For Win 7 or later (64-bit)
For macOS 10.12 or later
Also read:
- Updated In 2024, Digital Sound Shaping at No Charge The Best Free Online Trimming Experience
- 2024 Approved Auditory Augmentation of Photo Projects A Comprehensive Guide
- Noise Reduction for Video Streams A Comprehensive Guide to Muting Background Audio Online
- New In 2024, Elevating Soundtracks on Mobile The Top 8 Android Apps Redefining Music Production
- New In 2024, Tuned in Truth Exploring How to Identify Songs on Apple Devices without Specialized Software
- 5 Best Audio Editor for Android That You Shouldnt Miss
- 2024 Approved Exploring Top-Rated Podcast Hosting Solutions
- Updated Mastering Audio Capture Androids Leading Voice Recorders Ranked in Top 10 for 2024
- In 2024, Top 11 No-Cost Audio Production Tools for PCs & Macs
- 2024 Approved Resonant Cheers A Journey Through Audible Excitement
- Updated In 2024, Embedding Audio Layers Into Moving Image Projects with Premiere Pro
- Cadence in Coding Envisioning the Leading Luminaries Amongst AI Music Architects
- Updated Proving Ground The Six Finest Voice Alteration Applications on Chromebooks to Test Out - PhotoShopProX for 2024
- Updated In 2024, Navigating the Voice Recorder App Samsung S10/S9 Edition
- Updated 2024 Approved Amplify Your Anonymity on Skype with Essential Voice Alteration Utilities
- Updated Accelerating Conversion of WhatsApp Audios to MP3 Format
- New 2024 Approved Excellence in Separating Silence and Signal Audio Extraction From Videos for Modern Tech
- New In 2024, Slowing Down Music Rhythmically Without Affecting Pitch Perception
- Updated The Future of Sound An In-Depth Look at the Top Six Cost-Free Video-to-Audio Transformation Techniques.
- 2024 Approved Top 10 Best Alternatives to Audacity on Windows/Mac/Linux
- New 9 Best Podcast Microphones for All Levels
- Updated 2024 Approved How to Locate and Apply a Kakáring Noise Effect
- Updated In 2024, The Ultimate Guide to Best Podcast Platforms
- Updated Harmonizing Sight and Sound How to Edit Videos Into a Perfect Rhythmic Dance Using Premiere Pro
- New In 2024, Hear the Difference Effective Strategies for Silencing Background Chatter Online
- Locating Hilarious Audio Effects Online
- New In 2024, Audiovisual Alchemy Expert Tips for Incorinasiting and Modifying Audio Timestamps for Cinematic Effects in Final Cut Pro X
- Masterclass Identifying the Best Vocal Effacement Tools and Programs for 2024
- Updated Essential Windows Audio Enhancers The Ultimate List for Instant Volume Upgrade for 2024
- New 2024 Approved Top 10 Premium Audio Editors for PCs and Macs Beyond Audacity
- Updated 2024 Approved Audiophiles Manual Advanced Methods for Rectifying Sound Distortion in Videos
- Updated 2024 Approved Step-by-Step Voice Resonance Modification Using Filmora
- Updated Pure Audio Processing The Art of Background Noise Elimination with Filmora by Wondershare
- In 2024, Advanced Listeners Playbook Essential Equalizer Tweaks
- Bypass iPhone 15 Pro activation lock without Apple ID
- How to Change Location On Facebook Dating for your Nokia C300 | Dr.fone
- In 2024, How and Where to Find a Shiny Stone Pokémon For Oppo Find X7? | Dr.fone
- Best 10 Mock Location Apps Worth Trying On Vivo X100 Pro | Dr.fone
- New In 2024, Top 10 Photo Editing Software Options Beyond Windows 10 Photos
- 2024 Approved Free Dailymotion to MP4 Converter - Fast and Easy
- Bokeh Mastery The Best Mobile Apps for Creative Blur for 2024
- How to Upgrade iPhone 15 Plus without Losing Any Data? | Dr.fone
- How Can We Bypass Samsung Galaxy M14 5G FRP?
- Unlock Realme GT Neo 5 SE Phone Password Without Factory Reset Full Guide Here
- New The Ultimate List Best Mac Speech-to-Text Apps That Dont Require a Download Free and Easy to Use
- New In 2024, Free Video Editing Software 10 Options Beyond Windows Movie Maker
- Complete Tutorial to Use GPS Joystick to Fake GPS Location On Tecno Spark 20 Pro | Dr.fone
- Android Unlock Code Sim Unlock Your Tecno Phantom V Flip Phone and Remove Locked Screen
- Is it Possible to Use Miracast with Apple iPhone 6s? | Dr.fone
- In 2024, Create a Kickass COD Warzone Thumbnail for Free
- In 2024, Top 5 Tracking Apps to Track Vivo Y100t without Them Knowing | Dr.fone
- Strategies for Apps That Wont Download From Play Store On Realme GT Neo 5 | Dr.fone
- Ultimate Guide to Free PPTP VPN For Beginners On Motorola Edge+ (2023) | Dr.fone
- Top 10 Vivo S18e Android SIM Unlock APK
- Updated Color Finale Is a Color Grading Plugin for Final Cur Pro. It Allows Users to Make Cinematic Looking Video Scenes by Adjusting the Color. Here Well Share You some Basic Information About This Plugin
- 4 Most-Known Ways to Find Someone on Tinder For Honor X50i by Name | Dr.fone
- New In 2024, The Ultimate Guide to LinkedIn Video Dimensions for Maximum Engagement
- 2 Ways to Transfer Text Messages from Vivo S17e to iPhone 15/14/13/12/11/X/8/ | Dr.fone
- Does Honor X50i Have Find My Friends? | Dr.fone
- Full Guide to Fix iToolab AnyGO Not Working On Infinix Note 30i | Dr.fone
- How to Unlock SIM Card on Xiaomi 14 online without jailbreak
- Title: Effective 3 Ways to Convert a Podcast to MP3
- Author: Kate
- Created at : 2024-05-20 02:42:08
- Updated at : 2024-05-21 02:42:08
- Link: https://audio-editing.techidaily.com/effective-3-ways-to-convert-a-podcast-to-mp3/
- License: This work is licensed under CC BY-NC-SA 4.0.


