:max_bytes(150000):strip_icc():format(webp)/178665671_HighRes-56a532a83df78cf77286de1b.jpg)
A Beginners Guide to Effective GarageBand Recording Processes

A Beginner’s Guide to Effective GarageBand Recording Processes
Apple GarageBand is an in-built tool in Mac that lets you make incredible music with or without an instrument. The software acts as a music creation tool that enables you to record, mix, and master the music world. GarageBand recording has become popular due to a diverse range of editing functions. Essentially, do you want to know how to record on GarageBand? Be our guest! We have covered your basis.
In this article
01 What is GarageBand Recording Software?
02 How to Download and Install GarageBand Recording Software?
03 Tutorial for How to Record on GarageBand
Part 1: What is GarageBand Recording Software?
GarageBand for podcasting and GarageBand voice recording is the two phenomenal usages of Apple GarageBand . The Mac users have access to a sound library constituting synths, loops, and instrument presets. The user can add a song, start a track, and develop a musical career effortlessly.
The app is free for iOS, macOS, and iPadOS; sharing and creating music is effortless. Additionally, the Apple iCloud integration plays a pivotal role in adding tracks across devices. The workability is as easy as it can get. Willing to know how to record on GarageBand? Keep following us!
As far as the interface is concerned, it has been designed to make music easier and compatible with beginners. The “Quick Help” function can be enabled to get useful hints every time you have to hover over the cursor. The music artist can also get creative with Transform Pad Smart Control. It helps produce morph and tweak sounds as you deem necessary.

Along with this, there is a great collection of lessons for piano and guitar. It makes the user get right into the feels. One can also get instant feedback on your playing to hone the skills flawlessly.
So, are you with us? Let us begin! Now that we have established the performance of Apple GarageBand, let us look at its features.
Groove Track Feature
The Groove Track feature is considered a spell checker for rhythm. It adjusts and synchronizes the timing of the chosen track to the groove under action.
Smart Controls
The smart controls are designed to shape any sound in the library with a customized set of buttons, sliders, and knobs—the look of the smart control changes with each instrument.
Logic Remote
The logic remote helps navigate the song to browse the Sound Library and access smart controls. One can also use the tool by using multi-touch gestures.
Drummer Feature
The “Drummer” plays a pivotal role in adding the virtual session drummer and producing beats. There are around 33 players from genres, including Hip Hop, Rock, and EDM. The different groove and fill combinations make the process effortless.
Amps and Stompboxes
The Bass Amp designer helps dial-up modern and classic tones. One can also build their guitar rig via 25 legendary amps and cabinets. Moreover, there are 35 creative and fun stompbox effects.
Are you willing to know how to record voice on GarageBand? Should we? Let us first understand the procedure to download and install Apple GarageBand.
Part 2: How to Download and Install GarageBand Recording Software?
Do you need to make a GarageBand podcast? Before getting done with the process, ensure that your Mac computer completes the minimum system requirements. The Mac computer requires MacOS 11.0 or later. Apple GarageBand covers the size of 783.1 MB; therefore, you should have this storage.

Image alt: install apple garageband
MacOS 11 requires at least 20GB of free hard drive storage to handle the installation process. A 4GB RAM and 1.1 GHz processor are also system requirements to download Apple GarageBand . The software comes in-built with the macOS computer. However, if you don’t find it, install it through the following procedure:
Step 1: Launching App Store
To begin, launch App Store from your macOS computer. After that, go to the search bar and type “GarageBand.”
Step 2: Installing GarageBand
Click on Apple GarageBand from there. The “Get” option appears. Click on it and get done with the process.
Part 3: Tutorial for How to Record on GarageBand
Want to know how to record on GarageBand? Do you have a concern about how to record voice on GarageBand? Worry no more! We are here at your disposal!
Apple GarageBand may offer ease of use for musicians and artists. However, understanding how it works is mandatory. The section of the article reflects upon the complete procedure to record on Apple GarageBand to conclude the process. Henceforth, let us not wait any longer! Time to dive in!
Step 1: Initiating the Project
Tempo and time signature can also be tailored as per need. Launch Apple GarageBand from your Mac computer and then plug in your external microphone. As soon as the interface pops up, click on “Voice.” Expand the “Details” menu located in the bottom left corner of the project selection box. Tap “Input Device” and choose the microphone from your list. Moving on, click on “Choose” in the bottom right corner.

Step 2: Adding the New Track
Moving on, you are expected to add a new track. To do this, click on the button with (+), located in the top left corner of the tracks panel. GarageBand offers four tracks. Pick one as you deem necessary. Tap the “Audio” option and then plug in the external microphone or guitar. Hit the “Input” dropdown and choose the list. Click on “Create” afterward.

Step 3: Recording the Sound
Now, it is time to record the sound. Pick the track that you will be recording by clicking on the track panel. Use the square bottom to stop it. Hit red circle to begin recording.

Step 4: Recording the Multiple Tracks
Moreover, you can record multiple tracks as well. To begin, choose the track where the first track was recorded through the track header. Navigate the play head to the start of the original take. Tap the red circle to initiate the recording process. Now, click on the number in the recorded segment in the top left corner. Pick the take you have to keep and then “Delete Unused Takes to get rid of other takes.

Step 5: Exporting the File
After you are done, it is time to export the finished project. Navigate to the top bar and click on “Share.” Choose “ Export Song to Disk “ from the context menu that appears, choose “Export Song to Disk.” A dialogue box appears.

Step 6: Saving Process
Rename the file, enter the file location, format, and sound quality—hit “Export” when you are done. The project can be saved in MP3 , WAV, and AIFF.

Wrapping Up
There is a diverse range of voice recorders and music-creating software in the business, creating chaos. Apple GarageBand recording is one such Mac recording studio doing wonders in the market. With advanced features and multiple functions, one can count on the tool to create magic in the music fraternity. The users are expected to test the features first before making the call.
02 How to Download and Install GarageBand Recording Software?
03 Tutorial for How to Record on GarageBand
Part 1: What is GarageBand Recording Software?
GarageBand for podcasting and GarageBand voice recording is the two phenomenal usages of Apple GarageBand . The Mac users have access to a sound library constituting synths, loops, and instrument presets. The user can add a song, start a track, and develop a musical career effortlessly.
The app is free for iOS, macOS, and iPadOS; sharing and creating music is effortless. Additionally, the Apple iCloud integration plays a pivotal role in adding tracks across devices. The workability is as easy as it can get. Willing to know how to record on GarageBand? Keep following us!
As far as the interface is concerned, it has been designed to make music easier and compatible with beginners. The “Quick Help” function can be enabled to get useful hints every time you have to hover over the cursor. The music artist can also get creative with Transform Pad Smart Control. It helps produce morph and tweak sounds as you deem necessary.

Along with this, there is a great collection of lessons for piano and guitar. It makes the user get right into the feels. One can also get instant feedback on your playing to hone the skills flawlessly.
So, are you with us? Let us begin! Now that we have established the performance of Apple GarageBand, let us look at its features.
Groove Track Feature
The Groove Track feature is considered a spell checker for rhythm. It adjusts and synchronizes the timing of the chosen track to the groove under action.
Smart Controls
The smart controls are designed to shape any sound in the library with a customized set of buttons, sliders, and knobs—the look of the smart control changes with each instrument.
Logic Remote
The logic remote helps navigate the song to browse the Sound Library and access smart controls. One can also use the tool by using multi-touch gestures.
Drummer Feature
The “Drummer” plays a pivotal role in adding the virtual session drummer and producing beats. There are around 33 players from genres, including Hip Hop, Rock, and EDM. The different groove and fill combinations make the process effortless.
Amps and Stompboxes
The Bass Amp designer helps dial-up modern and classic tones. One can also build their guitar rig via 25 legendary amps and cabinets. Moreover, there are 35 creative and fun stompbox effects.
Are you willing to know how to record voice on GarageBand? Should we? Let us first understand the procedure to download and install Apple GarageBand.
Part 2: How to Download and Install GarageBand Recording Software?
Do you need to make a GarageBand podcast? Before getting done with the process, ensure that your Mac computer completes the minimum system requirements. The Mac computer requires MacOS 11.0 or later. Apple GarageBand covers the size of 783.1 MB; therefore, you should have this storage.

Image alt: install apple garageband
MacOS 11 requires at least 20GB of free hard drive storage to handle the installation process. A 4GB RAM and 1.1 GHz processor are also system requirements to download Apple GarageBand . The software comes in-built with the macOS computer. However, if you don’t find it, install it through the following procedure:
Step 1: Launching App Store
To begin, launch App Store from your macOS computer. After that, go to the search bar and type “GarageBand.”
Step 2: Installing GarageBand
Click on Apple GarageBand from there. The “Get” option appears. Click on it and get done with the process.
Part 3: Tutorial for How to Record on GarageBand
Want to know how to record on GarageBand? Do you have a concern about how to record voice on GarageBand? Worry no more! We are here at your disposal!
Apple GarageBand may offer ease of use for musicians and artists. However, understanding how it works is mandatory. The section of the article reflects upon the complete procedure to record on Apple GarageBand to conclude the process. Henceforth, let us not wait any longer! Time to dive in!
Step 1: Initiating the Project
Tempo and time signature can also be tailored as per need. Launch Apple GarageBand from your Mac computer and then plug in your external microphone. As soon as the interface pops up, click on “Voice.” Expand the “Details” menu located in the bottom left corner of the project selection box. Tap “Input Device” and choose the microphone from your list. Moving on, click on “Choose” in the bottom right corner.

Step 2: Adding the New Track
Moving on, you are expected to add a new track. To do this, click on the button with (+), located in the top left corner of the tracks panel. GarageBand offers four tracks. Pick one as you deem necessary. Tap the “Audio” option and then plug in the external microphone or guitar. Hit the “Input” dropdown and choose the list. Click on “Create” afterward.

Step 3: Recording the Sound
Now, it is time to record the sound. Pick the track that you will be recording by clicking on the track panel. Use the square bottom to stop it. Hit red circle to begin recording.

Step 4: Recording the Multiple Tracks
Moreover, you can record multiple tracks as well. To begin, choose the track where the first track was recorded through the track header. Navigate the play head to the start of the original take. Tap the red circle to initiate the recording process. Now, click on the number in the recorded segment in the top left corner. Pick the take you have to keep and then “Delete Unused Takes to get rid of other takes.

Step 5: Exporting the File
After you are done, it is time to export the finished project. Navigate to the top bar and click on “Share.” Choose “ Export Song to Disk “ from the context menu that appears, choose “Export Song to Disk.” A dialogue box appears.

Step 6: Saving Process
Rename the file, enter the file location, format, and sound quality—hit “Export” when you are done. The project can be saved in MP3 , WAV, and AIFF.

Wrapping Up
There is a diverse range of voice recorders and music-creating software in the business, creating chaos. Apple GarageBand recording is one such Mac recording studio doing wonders in the market. With advanced features and multiple functions, one can count on the tool to create magic in the music fraternity. The users are expected to test the features first before making the call.
02 How to Download and Install GarageBand Recording Software?
03 Tutorial for How to Record on GarageBand
Part 1: What is GarageBand Recording Software?
GarageBand for podcasting and GarageBand voice recording is the two phenomenal usages of Apple GarageBand . The Mac users have access to a sound library constituting synths, loops, and instrument presets. The user can add a song, start a track, and develop a musical career effortlessly.
The app is free for iOS, macOS, and iPadOS; sharing and creating music is effortless. Additionally, the Apple iCloud integration plays a pivotal role in adding tracks across devices. The workability is as easy as it can get. Willing to know how to record on GarageBand? Keep following us!
As far as the interface is concerned, it has been designed to make music easier and compatible with beginners. The “Quick Help” function can be enabled to get useful hints every time you have to hover over the cursor. The music artist can also get creative with Transform Pad Smart Control. It helps produce morph and tweak sounds as you deem necessary.

Along with this, there is a great collection of lessons for piano and guitar. It makes the user get right into the feels. One can also get instant feedback on your playing to hone the skills flawlessly.
So, are you with us? Let us begin! Now that we have established the performance of Apple GarageBand, let us look at its features.
Groove Track Feature
The Groove Track feature is considered a spell checker for rhythm. It adjusts and synchronizes the timing of the chosen track to the groove under action.
Smart Controls
The smart controls are designed to shape any sound in the library with a customized set of buttons, sliders, and knobs—the look of the smart control changes with each instrument.
Logic Remote
The logic remote helps navigate the song to browse the Sound Library and access smart controls. One can also use the tool by using multi-touch gestures.
Drummer Feature
The “Drummer” plays a pivotal role in adding the virtual session drummer and producing beats. There are around 33 players from genres, including Hip Hop, Rock, and EDM. The different groove and fill combinations make the process effortless.
Amps and Stompboxes
The Bass Amp designer helps dial-up modern and classic tones. One can also build their guitar rig via 25 legendary amps and cabinets. Moreover, there are 35 creative and fun stompbox effects.
Are you willing to know how to record voice on GarageBand? Should we? Let us first understand the procedure to download and install Apple GarageBand.
Part 2: How to Download and Install GarageBand Recording Software?
Do you need to make a GarageBand podcast? Before getting done with the process, ensure that your Mac computer completes the minimum system requirements. The Mac computer requires MacOS 11.0 or later. Apple GarageBand covers the size of 783.1 MB; therefore, you should have this storage.

Image alt: install apple garageband
MacOS 11 requires at least 20GB of free hard drive storage to handle the installation process. A 4GB RAM and 1.1 GHz processor are also system requirements to download Apple GarageBand . The software comes in-built with the macOS computer. However, if you don’t find it, install it through the following procedure:
Step 1: Launching App Store
To begin, launch App Store from your macOS computer. After that, go to the search bar and type “GarageBand.”
Step 2: Installing GarageBand
Click on Apple GarageBand from there. The “Get” option appears. Click on it and get done with the process.
Part 3: Tutorial for How to Record on GarageBand
Want to know how to record on GarageBand? Do you have a concern about how to record voice on GarageBand? Worry no more! We are here at your disposal!
Apple GarageBand may offer ease of use for musicians and artists. However, understanding how it works is mandatory. The section of the article reflects upon the complete procedure to record on Apple GarageBand to conclude the process. Henceforth, let us not wait any longer! Time to dive in!
Step 1: Initiating the Project
Tempo and time signature can also be tailored as per need. Launch Apple GarageBand from your Mac computer and then plug in your external microphone. As soon as the interface pops up, click on “Voice.” Expand the “Details” menu located in the bottom left corner of the project selection box. Tap “Input Device” and choose the microphone from your list. Moving on, click on “Choose” in the bottom right corner.

Step 2: Adding the New Track
Moving on, you are expected to add a new track. To do this, click on the button with (+), located in the top left corner of the tracks panel. GarageBand offers four tracks. Pick one as you deem necessary. Tap the “Audio” option and then plug in the external microphone or guitar. Hit the “Input” dropdown and choose the list. Click on “Create” afterward.

Step 3: Recording the Sound
Now, it is time to record the sound. Pick the track that you will be recording by clicking on the track panel. Use the square bottom to stop it. Hit red circle to begin recording.

Step 4: Recording the Multiple Tracks
Moreover, you can record multiple tracks as well. To begin, choose the track where the first track was recorded through the track header. Navigate the play head to the start of the original take. Tap the red circle to initiate the recording process. Now, click on the number in the recorded segment in the top left corner. Pick the take you have to keep and then “Delete Unused Takes to get rid of other takes.

Step 5: Exporting the File
After you are done, it is time to export the finished project. Navigate to the top bar and click on “Share.” Choose “ Export Song to Disk “ from the context menu that appears, choose “Export Song to Disk.” A dialogue box appears.

Step 6: Saving Process
Rename the file, enter the file location, format, and sound quality—hit “Export” when you are done. The project can be saved in MP3 , WAV, and AIFF.

Wrapping Up
There is a diverse range of voice recorders and music-creating software in the business, creating chaos. Apple GarageBand recording is one such Mac recording studio doing wonders in the market. With advanced features and multiple functions, one can count on the tool to create magic in the music fraternity. The users are expected to test the features first before making the call.
02 How to Download and Install GarageBand Recording Software?
03 Tutorial for How to Record on GarageBand
Part 1: What is GarageBand Recording Software?
GarageBand for podcasting and GarageBand voice recording is the two phenomenal usages of Apple GarageBand . The Mac users have access to a sound library constituting synths, loops, and instrument presets. The user can add a song, start a track, and develop a musical career effortlessly.
The app is free for iOS, macOS, and iPadOS; sharing and creating music is effortless. Additionally, the Apple iCloud integration plays a pivotal role in adding tracks across devices. The workability is as easy as it can get. Willing to know how to record on GarageBand? Keep following us!
As far as the interface is concerned, it has been designed to make music easier and compatible with beginners. The “Quick Help” function can be enabled to get useful hints every time you have to hover over the cursor. The music artist can also get creative with Transform Pad Smart Control. It helps produce morph and tweak sounds as you deem necessary.

Along with this, there is a great collection of lessons for piano and guitar. It makes the user get right into the feels. One can also get instant feedback on your playing to hone the skills flawlessly.
So, are you with us? Let us begin! Now that we have established the performance of Apple GarageBand, let us look at its features.
Groove Track Feature
The Groove Track feature is considered a spell checker for rhythm. It adjusts and synchronizes the timing of the chosen track to the groove under action.
Smart Controls
The smart controls are designed to shape any sound in the library with a customized set of buttons, sliders, and knobs—the look of the smart control changes with each instrument.
Logic Remote
The logic remote helps navigate the song to browse the Sound Library and access smart controls. One can also use the tool by using multi-touch gestures.
Drummer Feature
The “Drummer” plays a pivotal role in adding the virtual session drummer and producing beats. There are around 33 players from genres, including Hip Hop, Rock, and EDM. The different groove and fill combinations make the process effortless.
Amps and Stompboxes
The Bass Amp designer helps dial-up modern and classic tones. One can also build their guitar rig via 25 legendary amps and cabinets. Moreover, there are 35 creative and fun stompbox effects.
Are you willing to know how to record voice on GarageBand? Should we? Let us first understand the procedure to download and install Apple GarageBand.
Part 2: How to Download and Install GarageBand Recording Software?
Do you need to make a GarageBand podcast? Before getting done with the process, ensure that your Mac computer completes the minimum system requirements. The Mac computer requires MacOS 11.0 or later. Apple GarageBand covers the size of 783.1 MB; therefore, you should have this storage.

Image alt: install apple garageband
MacOS 11 requires at least 20GB of free hard drive storage to handle the installation process. A 4GB RAM and 1.1 GHz processor are also system requirements to download Apple GarageBand . The software comes in-built with the macOS computer. However, if you don’t find it, install it through the following procedure:
Step 1: Launching App Store
To begin, launch App Store from your macOS computer. After that, go to the search bar and type “GarageBand.”
Step 2: Installing GarageBand
Click on Apple GarageBand from there. The “Get” option appears. Click on it and get done with the process.
Part 3: Tutorial for How to Record on GarageBand
Want to know how to record on GarageBand? Do you have a concern about how to record voice on GarageBand? Worry no more! We are here at your disposal!
Apple GarageBand may offer ease of use for musicians and artists. However, understanding how it works is mandatory. The section of the article reflects upon the complete procedure to record on Apple GarageBand to conclude the process. Henceforth, let us not wait any longer! Time to dive in!
Step 1: Initiating the Project
Tempo and time signature can also be tailored as per need. Launch Apple GarageBand from your Mac computer and then plug in your external microphone. As soon as the interface pops up, click on “Voice.” Expand the “Details” menu located in the bottom left corner of the project selection box. Tap “Input Device” and choose the microphone from your list. Moving on, click on “Choose” in the bottom right corner.

Step 2: Adding the New Track
Moving on, you are expected to add a new track. To do this, click on the button with (+), located in the top left corner of the tracks panel. GarageBand offers four tracks. Pick one as you deem necessary. Tap the “Audio” option and then plug in the external microphone or guitar. Hit the “Input” dropdown and choose the list. Click on “Create” afterward.

Step 3: Recording the Sound
Now, it is time to record the sound. Pick the track that you will be recording by clicking on the track panel. Use the square bottom to stop it. Hit red circle to begin recording.

Step 4: Recording the Multiple Tracks
Moreover, you can record multiple tracks as well. To begin, choose the track where the first track was recorded through the track header. Navigate the play head to the start of the original take. Tap the red circle to initiate the recording process. Now, click on the number in the recorded segment in the top left corner. Pick the take you have to keep and then “Delete Unused Takes to get rid of other takes.

Step 5: Exporting the File
After you are done, it is time to export the finished project. Navigate to the top bar and click on “Share.” Choose “ Export Song to Disk “ from the context menu that appears, choose “Export Song to Disk.” A dialogue box appears.

Step 6: Saving Process
Rename the file, enter the file location, format, and sound quality—hit “Export” when you are done. The project can be saved in MP3 , WAV, and AIFF.

Wrapping Up
There is a diverse range of voice recorders and music-creating software in the business, creating chaos. Apple GarageBand recording is one such Mac recording studio doing wonders in the market. With advanced features and multiple functions, one can count on the tool to create magic in the music fraternity. The users are expected to test the features first before making the call.
Elite Sound Weaver: The Ultimate Mac MP3 Experience
Choosing an auto music mixer for Mac and be difficult. This is because it needs to meet your requirements and resources, which can be difficult. Some of the auto music mixers are paid, while others are free. While some cater to a specific operating system, you can use others for several operating systems. You also need to consider the features it comes with and if they’re what you’re looking for. Knowing how complex finding the suitable auto music mixer for Mac can be, we’ve done the research, so you don’t have to. Below are some of the best software you can use to satisfy your needs.
Best Auto Music Mixers for Mac
Below, we’ll review some of the crucial features that these auto music mixers can offer you. Keep reading to find out all the crucial details you need to know and find the best auto music mixer for you.
Tractor Pro
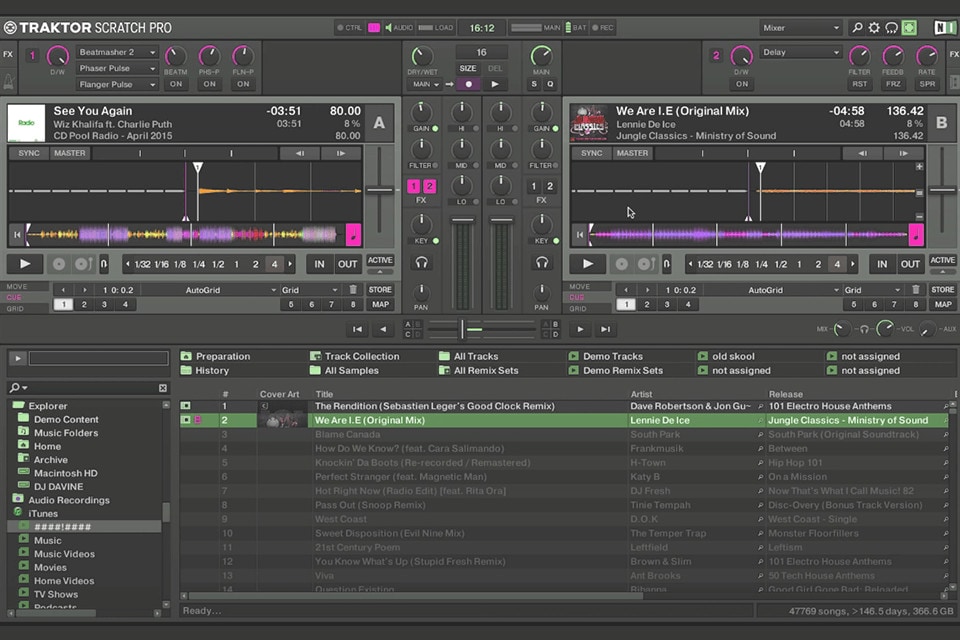
If you want an auto music mixer for Mac that allows you to seamlessly create musical compositions with samples, effects, and inbuilt filters, Tractor Pro is the best option. It is a popular software amongst DJs worldwide because of its impressive features. This auto music mixer allows you to create remixes and edit music easily. You can mix and edit up to four tracks at the same time.
One of the things we love about this software interface is its intuitiveness. Developers upgraded the previous version’s file manager to help you better organize your media library. It also allows you to include songs from music platforms like iTunes. In addition, it is one of the leading software for auto music mixing and features automatic functions and presets to simplify the process. It also has 40 quality effects and stability features to improve your audio tracks.
Pros
- It helps you rate songs to create a perfect and fluent mix
- Experiment with your mix using the sync button that automatically blends your songs
- You can remix with the best jumps, loops, and hot cues
- It comes with a complete FX suite
- There’s a native recording available for a harmonic mixing
Cons
- Not ideal for beginners
Mixxx
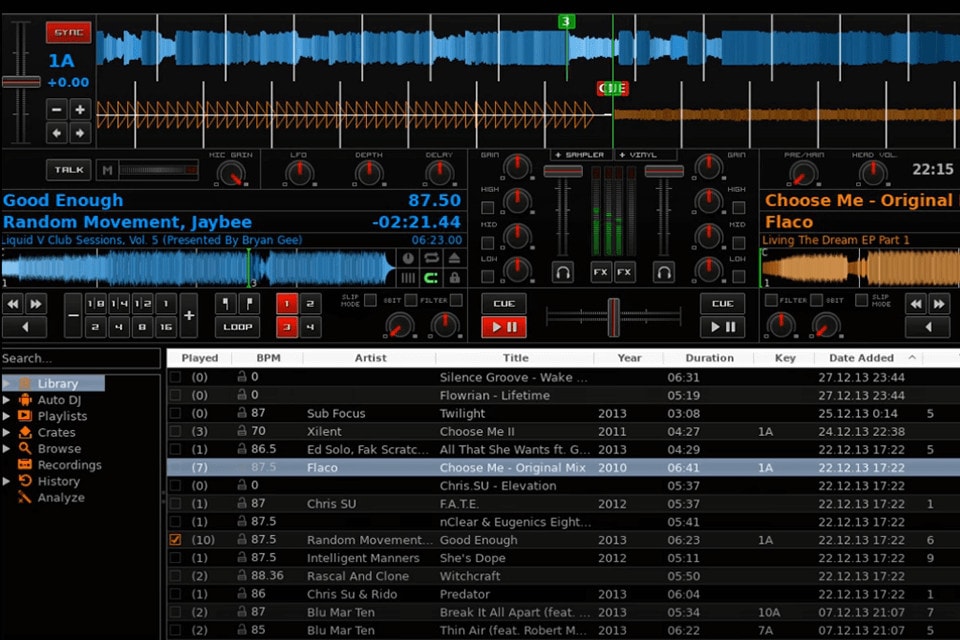
An easy-to-use software solution for your music files is Mixxx. It is an excellent option for mixing audio tracks and can be utilized by professionals and amateurs. The program works with playlists and can stimulate the noise of playing vinyl records. This auto music mixer also allows you to simulate analogue control. One of the crucial functions of this auto music mixer is the ability to synchronize tracks. To synchronize and listen to any track, all you have to do is hit the headphone icon.
Mixxx is a common choice for DJs worldwide, especially those still trying to get their footing in the DJ world. Its editing features include key control, pitch, hot cues, beat looping, quantization, crossfader control, four-deck mixing, and many more. It also allows you to explore a vast range of DJ hardware, so you don’t have issues connecting it to a modern DJ controller. When it comes to file management, Mixxx is an excellent option. It has an impressive and organized music library that allows you to organize your music tracks into playlists.
You can also create crates to build organizational systems that you prefer. Thanks to the iTunes integration features, you can import various tracks from iTunes right into your track. Another useful feature in Mixxx is the ability to record your mix. Its auto-DJ function also allows you to take a break while the software works for you. This software also has an impressive selection of customizable skins to make it more appealing to users. This free and open-sourced software is all you need to start mixing tracks.
Pros
- It features iTunes integration
- This tool comes with 85 MIDI DJ controllers that are supported
- Auto synchronization feature
- Auto DJ element allows you to take a break from editing
- It will enable you to edit and mix up to four tracks at the same time
Cons
- Not a great option for professionals
UltraMixer
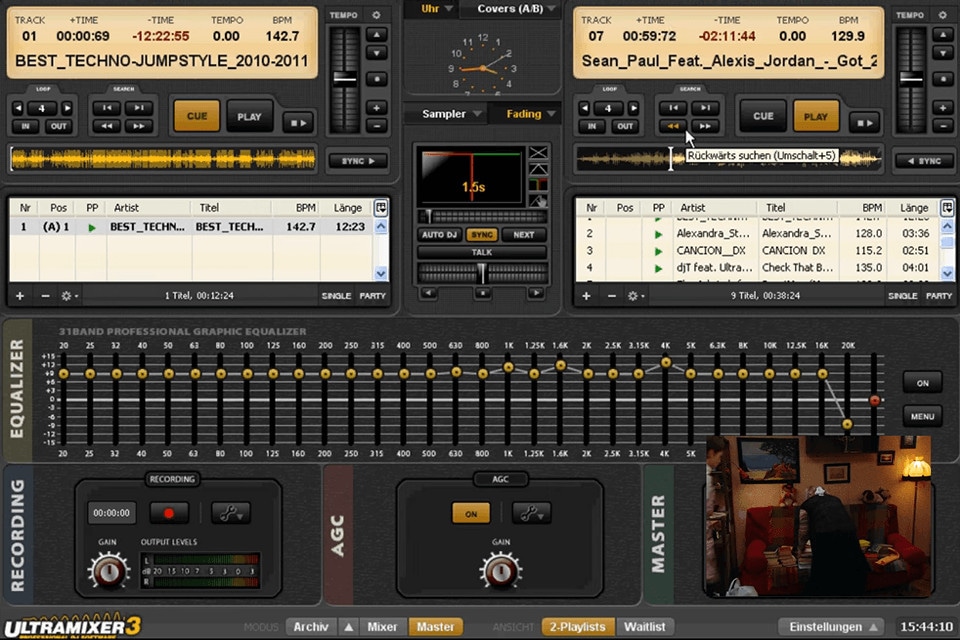
Free DJ software that you can use for free auto music mixing on Mac is UltraMixer. It allows you to seamlessly create and save custom beats on your Mac whenever possible. Some of the unique features this auto music mixer offers are record audio, live mix, and an impressive database offering you thousands of royalty-free sounds that you can utilize as you want.
If you want to improve your hip-hop, rock, or alternate music production, you should look no further than UltraMixer. This mixer supports up to 80 MIDI controllers and features a stylish and customizable interface that you can upgrade its skin and add widgets. It also features a database archive excellent for professional music management and makes it easy to sync and manage your music files. With this database, it’s much easier to navigate playlists and tracks.
Like every other premium tool, it has many features like auto music and video mixing. It also comes with sampling features. However, it can be quite hard for beginners to navigate at first. However, with practice and perseverance, anyone can figure out UltraMixer eventually.
Pros
- Extensive collection of royalty-free music
- Supports up to 80 MIDI controller
- Features a stylish and customizable user interface
- Offers auto-sync and auto music and video mixing
- Its database archive allows you to navigate your tracks and playlist easily
Cons
- It is difficult for beginners to navigate
VirtualDJ
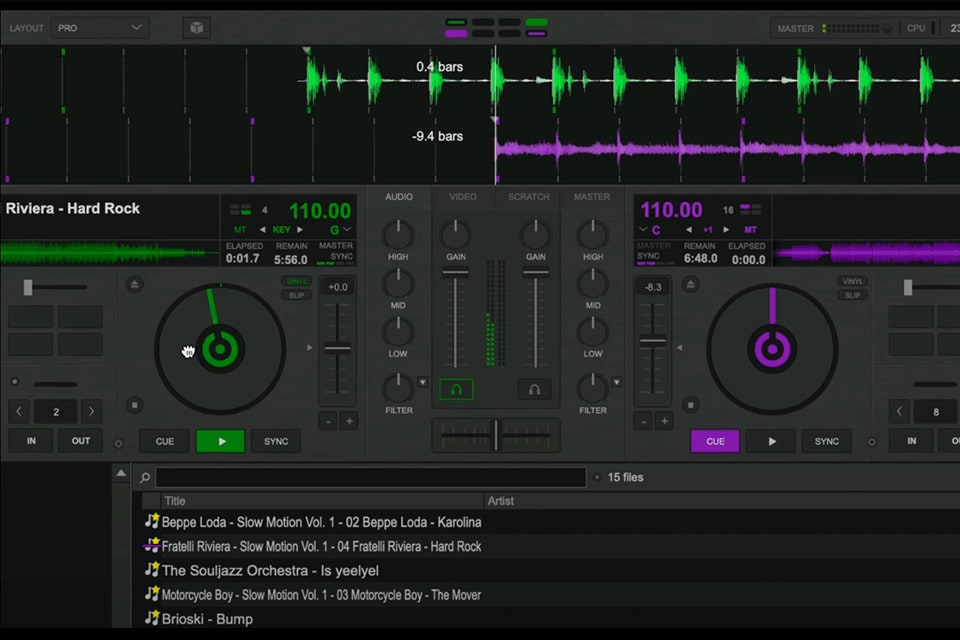
This is an auto music mixer that allows you to record tracks to share in live shows and with friends and seamlessly mix and edit songs on this platform. VirtualDJ allows you to easily import music from your computer or USB storage device and then playback using the VirtualDJ feature. Even better, it comes with a virtual keyboard that allows users to click pads and change keys when they want. You can also navigate through VirtualDJ easily to simplify your mixing process.
When you download and launch the app, it provides an impressive user interface divided into manageable and organized sections. It also offers you an advanced auto mixer, loops, effects, hot cues, track information, jog wheels, performance pads, smart sync, and many more valuable features DJs would love.
Although beginners might find this software a tad overwhelming, it is powerful and easy to learn. In no time, you’d be able to master all the features you need to enhance and effectively mix your audio files. Apart from an audio mix, its powerful mixing engine allows you to mix video content if that’s what you’re looking for. In terms of the music library management system, VirtualDJ is also quite impressive. You can create smart filter folders, virtual folders, playlists, and many more to organize all your tracks easily.
The best part is that if you’re in a hurry, you can easily utilize the toolbar to select folders as favorites and its fast search parameters when looking for a specific audio file. Although there’s a paid version, the free software is still an excellent option, especially if you’re new to music mixing.
Pros
- It offers you a fast search feature for easy accessing of files
- Its music library management is organized
- It comes with many impressive features for mixing audio and video files
- The software comes with a virtual keyboard
Cons
- Beginners find it complex
MixVibes Cross DJ
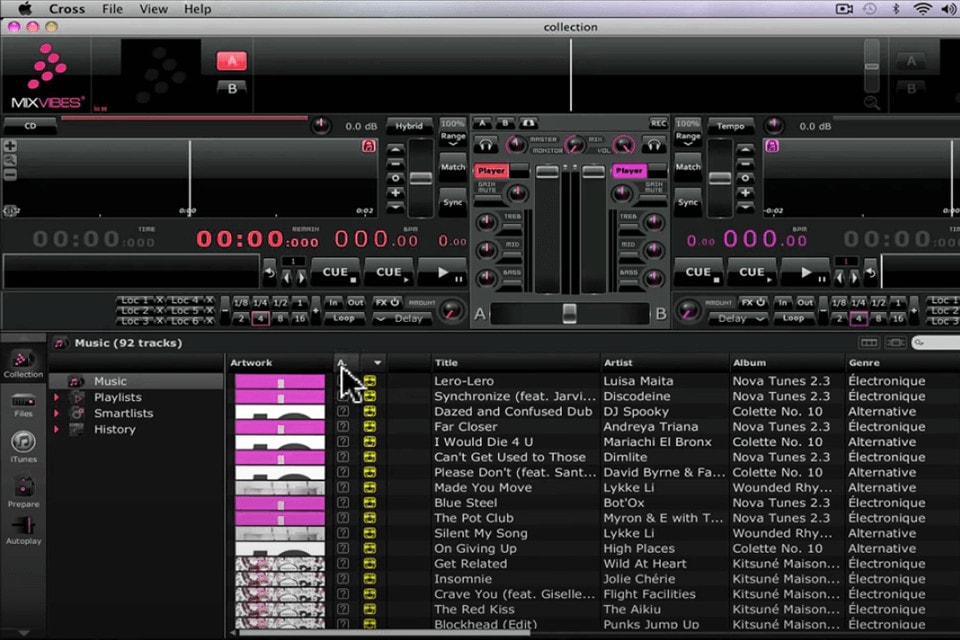
An excellent choice for auto music mixing for Mac is Cross DJ by Mixvibes. This software offers all you need to thrive in your career as a DJ. Although it is a paid application, the free version doesn’t limit the features you can access; it only prevents MIDI support for external hardware. This auto music mixer for Max is powerful and easy to use. It will effectively meet your needs as a professional or beginner. It comes with a functional and intuitive user interface that’s simple and, therefore, easy to use.
One of the things we love this auto music mixer for is the sound fusing feature it offers. This feature ensures that users hear precisely what’s happening in the room even if they’re not there. It is a special effect that can simulate different effects when mixing your music files. It also allows you to create underground music, popular hits, and many more. As a versatile tool, MixVibes Cross DJ software is compatible with iOS, Android, Windows, and Mac. It also effortlessly integrates with the software you need to import playlists, loops, and hot cues for your music file.
Pros
- The free version offers you all the features for auto music mixing
- It comes with a clean and straightforward interface
- It integrates easily with the software necessary to import loops, hot cues, and playlists
- Compatible with iOS as well
- Ideal for professionals and beginners alike
Cons
- The free version doesn’t come with MIDI support for external hardware
Alternative Option: Wondershare Filmora
An alternative option to the 5 best auto music mixers for Mac that you can explore is Wondershare Filmora. It is a great option that’s also suitable for auto music mixing and editing. This software has many impressive features to take your audio file to the next level, like auto beat sync. It will also add sound fade-in/fade-out features to your music file when needed. It also features speed and pitch adjustments, volume adjustments, and many more. The steps for using Wondershare Filmora for an auto mix are simple; we’ll break them down below.
Free Download For Win 7 or later(64-bit)
Free Download For macOS 10.14 or later
- Before you can start using Wondershare Filmora for auto music mixing, you have to download the app. It is available on the official site. Alternatively, you can download it from your app store.
- After downloading, install the file on your device following the guidelines, and launch the software to get started.
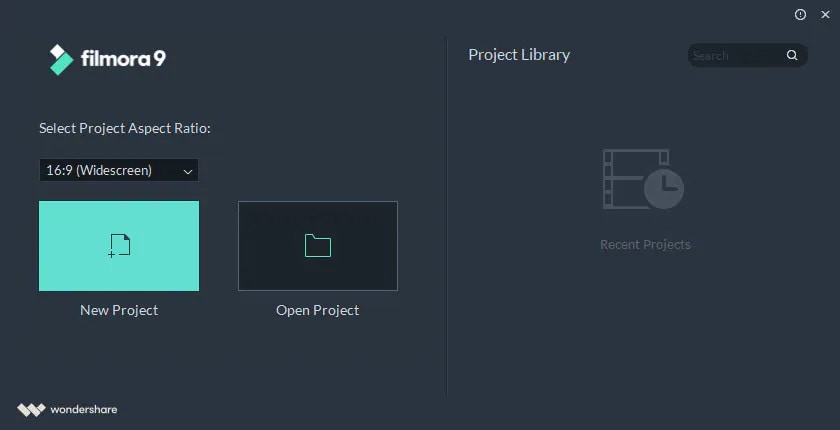
- Upon launch, the welcome page will ask you if you want to open an existing project or create a new one; opt for ‘create a new project.’
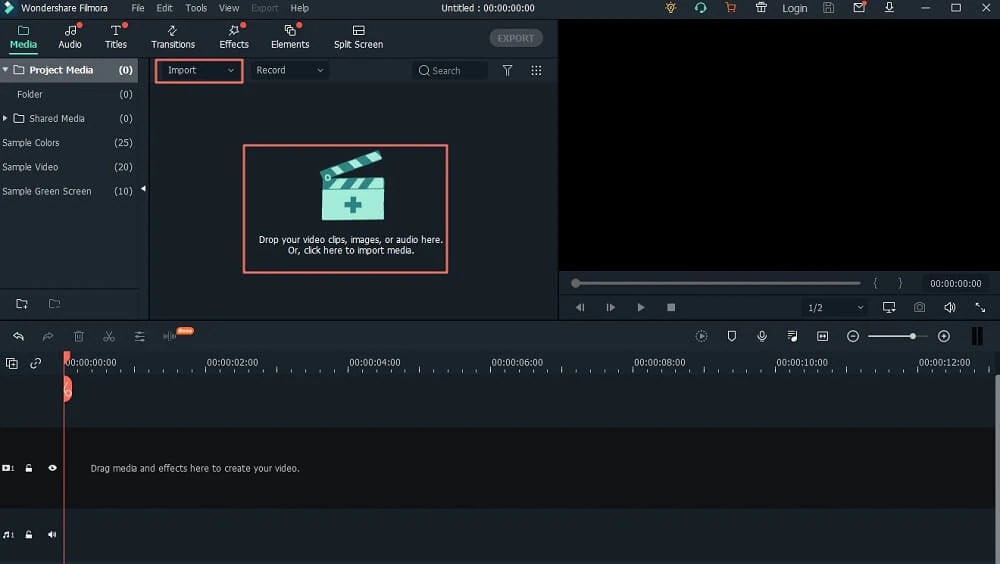
- This will lead you to the editing panel of the software. Click ‘import media files here’ on the media menu and navigate to your file location. Select the file you want to mix and then hit the ‘import media’ button.
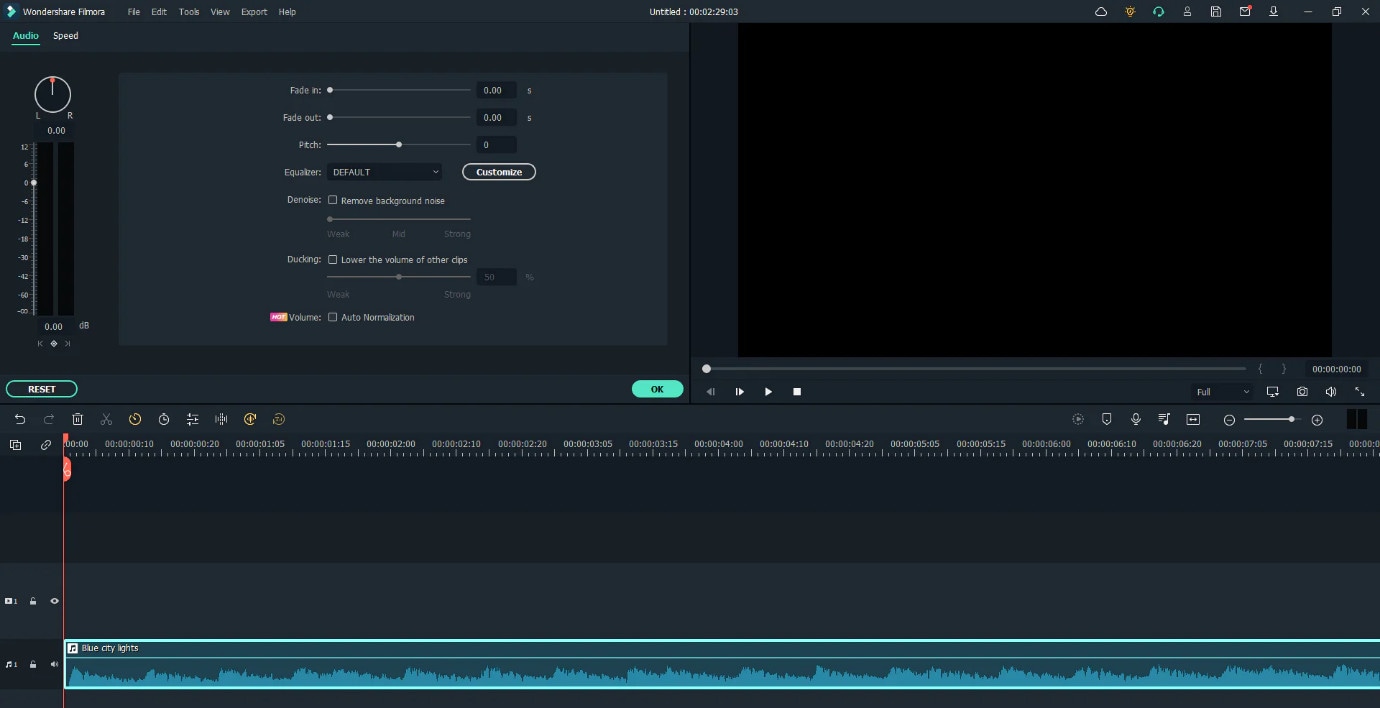
- Now, mix your audio file with the audio mixer tool available on the software. You can also use its silence detection and auto beat-sync feature for effective mixing.
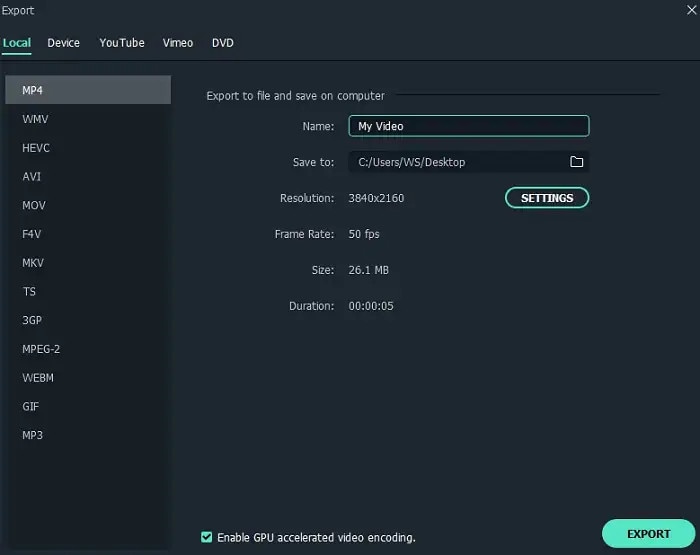
- After mixing and you’re satisfied with the result, click the ‘export’ button. Before you hit the ‘export’ button again, you can edit the file name, quality, and format.
Final Thoughts
We provided all the essential information you need about the best auto music mixer for Max in this article. Their unique features, pros, and cons will help you choose the ideal auto music mixer. Additionally, you can utilize any of these tools if you’re a beginner or a professional. However, Wondershare Filmora is also an excellent option for you. Again, it s a great option for beginners and professionals and will ensure that your music mix output is top quality.
Best Auto Music Mixers for Mac
Below, we’ll review some of the crucial features that these auto music mixers can offer you. Keep reading to find out all the crucial details you need to know and find the best auto music mixer for you.
Tractor Pro

If you want an auto music mixer for Mac that allows you to seamlessly create musical compositions with samples, effects, and inbuilt filters, Tractor Pro is the best option. It is a popular software amongst DJs worldwide because of its impressive features. This auto music mixer allows you to create remixes and edit music easily. You can mix and edit up to four tracks at the same time.
One of the things we love about this software interface is its intuitiveness. Developers upgraded the previous version’s file manager to help you better organize your media library. It also allows you to include songs from music platforms like iTunes. In addition, it is one of the leading software for auto music mixing and features automatic functions and presets to simplify the process. It also has 40 quality effects and stability features to improve your audio tracks.
Pros
- It helps you rate songs to create a perfect and fluent mix
- Experiment with your mix using the sync button that automatically blends your songs
- You can remix with the best jumps, loops, and hot cues
- It comes with a complete FX suite
- There’s a native recording available for a harmonic mixing
Cons
- Not ideal for beginners
Mixxx

An easy-to-use software solution for your music files is Mixxx. It is an excellent option for mixing audio tracks and can be utilized by professionals and amateurs. The program works with playlists and can stimulate the noise of playing vinyl records. This auto music mixer also allows you to simulate analogue control. One of the crucial functions of this auto music mixer is the ability to synchronize tracks. To synchronize and listen to any track, all you have to do is hit the headphone icon.
Mixxx is a common choice for DJs worldwide, especially those still trying to get their footing in the DJ world. Its editing features include key control, pitch, hot cues, beat looping, quantization, crossfader control, four-deck mixing, and many more. It also allows you to explore a vast range of DJ hardware, so you don’t have issues connecting it to a modern DJ controller. When it comes to file management, Mixxx is an excellent option. It has an impressive and organized music library that allows you to organize your music tracks into playlists.
You can also create crates to build organizational systems that you prefer. Thanks to the iTunes integration features, you can import various tracks from iTunes right into your track. Another useful feature in Mixxx is the ability to record your mix. Its auto-DJ function also allows you to take a break while the software works for you. This software also has an impressive selection of customizable skins to make it more appealing to users. This free and open-sourced software is all you need to start mixing tracks.
Pros
- It features iTunes integration
- This tool comes with 85 MIDI DJ controllers that are supported
- Auto synchronization feature
- Auto DJ element allows you to take a break from editing
- It will enable you to edit and mix up to four tracks at the same time
Cons
- Not a great option for professionals
UltraMixer

Free DJ software that you can use for free auto music mixing on Mac is UltraMixer. It allows you to seamlessly create and save custom beats on your Mac whenever possible. Some of the unique features this auto music mixer offers are record audio, live mix, and an impressive database offering you thousands of royalty-free sounds that you can utilize as you want.
If you want to improve your hip-hop, rock, or alternate music production, you should look no further than UltraMixer. This mixer supports up to 80 MIDI controllers and features a stylish and customizable interface that you can upgrade its skin and add widgets. It also features a database archive excellent for professional music management and makes it easy to sync and manage your music files. With this database, it’s much easier to navigate playlists and tracks.
Like every other premium tool, it has many features like auto music and video mixing. It also comes with sampling features. However, it can be quite hard for beginners to navigate at first. However, with practice and perseverance, anyone can figure out UltraMixer eventually.
Pros
- Extensive collection of royalty-free music
- Supports up to 80 MIDI controller
- Features a stylish and customizable user interface
- Offers auto-sync and auto music and video mixing
- Its database archive allows you to navigate your tracks and playlist easily
Cons
- It is difficult for beginners to navigate
VirtualDJ

This is an auto music mixer that allows you to record tracks to share in live shows and with friends and seamlessly mix and edit songs on this platform. VirtualDJ allows you to easily import music from your computer or USB storage device and then playback using the VirtualDJ feature. Even better, it comes with a virtual keyboard that allows users to click pads and change keys when they want. You can also navigate through VirtualDJ easily to simplify your mixing process.
When you download and launch the app, it provides an impressive user interface divided into manageable and organized sections. It also offers you an advanced auto mixer, loops, effects, hot cues, track information, jog wheels, performance pads, smart sync, and many more valuable features DJs would love.
Although beginners might find this software a tad overwhelming, it is powerful and easy to learn. In no time, you’d be able to master all the features you need to enhance and effectively mix your audio files. Apart from an audio mix, its powerful mixing engine allows you to mix video content if that’s what you’re looking for. In terms of the music library management system, VirtualDJ is also quite impressive. You can create smart filter folders, virtual folders, playlists, and many more to organize all your tracks easily.
The best part is that if you’re in a hurry, you can easily utilize the toolbar to select folders as favorites and its fast search parameters when looking for a specific audio file. Although there’s a paid version, the free software is still an excellent option, especially if you’re new to music mixing.
Pros
- It offers you a fast search feature for easy accessing of files
- Its music library management is organized
- It comes with many impressive features for mixing audio and video files
- The software comes with a virtual keyboard
Cons
- Beginners find it complex
MixVibes Cross DJ

An excellent choice for auto music mixing for Mac is Cross DJ by Mixvibes. This software offers all you need to thrive in your career as a DJ. Although it is a paid application, the free version doesn’t limit the features you can access; it only prevents MIDI support for external hardware. This auto music mixer for Max is powerful and easy to use. It will effectively meet your needs as a professional or beginner. It comes with a functional and intuitive user interface that’s simple and, therefore, easy to use.
One of the things we love this auto music mixer for is the sound fusing feature it offers. This feature ensures that users hear precisely what’s happening in the room even if they’re not there. It is a special effect that can simulate different effects when mixing your music files. It also allows you to create underground music, popular hits, and many more. As a versatile tool, MixVibes Cross DJ software is compatible with iOS, Android, Windows, and Mac. It also effortlessly integrates with the software you need to import playlists, loops, and hot cues for your music file.
Pros
- The free version offers you all the features for auto music mixing
- It comes with a clean and straightforward interface
- It integrates easily with the software necessary to import loops, hot cues, and playlists
- Compatible with iOS as well
- Ideal for professionals and beginners alike
Cons
- The free version doesn’t come with MIDI support for external hardware
Alternative Option: Wondershare Filmora
An alternative option to the 5 best auto music mixers for Mac that you can explore is Wondershare Filmora. It is a great option that’s also suitable for auto music mixing and editing. This software has many impressive features to take your audio file to the next level, like auto beat sync. It will also add sound fade-in/fade-out features to your music file when needed. It also features speed and pitch adjustments, volume adjustments, and many more. The steps for using Wondershare Filmora for an auto mix are simple; we’ll break them down below.
Free Download For Win 7 or later(64-bit)
Free Download For macOS 10.14 or later
- Before you can start using Wondershare Filmora for auto music mixing, you have to download the app. It is available on the official site. Alternatively, you can download it from your app store.
- After downloading, install the file on your device following the guidelines, and launch the software to get started.
- Upon launch, the welcome page will ask you if you want to open an existing project or create a new one; opt for ‘create a new project.’

- This will lead you to the editing panel of the software. Click ‘import media files here’ on the media menu and navigate to your file location. Select the file you want to mix and then hit the ‘import media’ button.

- Now, mix your audio file with the audio mixer tool available on the software. You can also use its silence detection and auto beat-sync feature for effective mixing.

- After mixing and you’re satisfied with the result, click the ‘export’ button. Before you hit the ‘export’ button again, you can edit the file name, quality, and format.

Final Thoughts
We provided all the essential information you need about the best auto music mixer for Max in this article. Their unique features, pros, and cons will help you choose the ideal auto music mixer. Additionally, you can utilize any of these tools if you’re a beginner or a professional. However, Wondershare Filmora is also an excellent option for you. Again, it s a great option for beginners and professionals and will ensure that your music mix output is top quality.
Mastering Mobile Audio Recordings: The 10 Leading iPhone Apps
10 Best Voice Recorder Apps for iPhones

Benjamin Arango
Mar 27, 2024• Proven solutions
Are you an aspiring musician or podcaster? Or maybe you just want to record some conversations for personal use. If so, then recording your voice via an iPhone is an easy way to capture these moments. But which voice recorder app should you use to get the best possible results?
iPhones typically come with a good quality microphone, so choosing a suitable voice recorder app can have a significant impact on the quality levels of your recordings. By selecting an app that prioritizes sound quality and ensures minimal audio clipping and distortion, you can ensure that all your recordings are captured in crystal clear clarity. That’s why we combed through the Internet in search of the best voice recorder apps for iPhones you can use in different contexts.
Best Voice Recording Apps for iPhone
There are several factors you should take into consideration before you choose to install a voice recorder app on your iPhone. Moreover, you can find many free options that can be quite effective if you are just looking for an easy way to record narration and dialogue with your iPhone or iPad. So, here are some of the best voice recording apps you can find on the App Store.
A cross-platform for making videos anywhere for all creators

Why your video editing isn’t good enough? How about some creative inspo?
- 100 Million+ Users
- 150+ Countries and Regions
- 4 Million+ Social Media Followers
- 5 Million+ Stock Media for Use
* Secure Download

1. Voice Memos
Price: Free
Supported OS: iOS 12.0 or later
Best For Recording notes for free
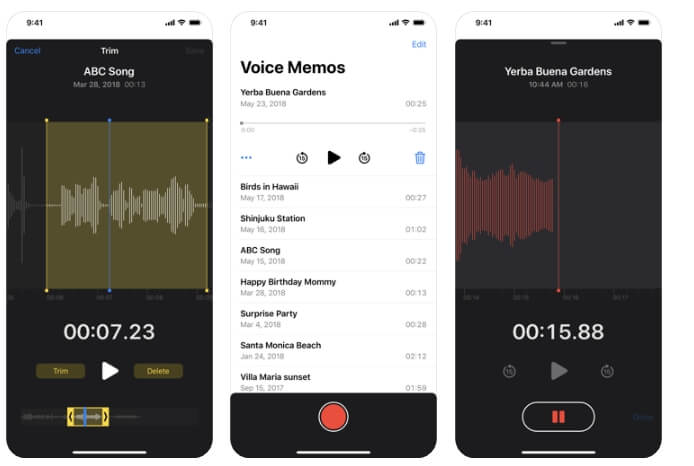
If you look into the folder named Extras on your iPhone’s home screen, you will find the Voice Memos app that lets you record audio without any restrictions. All you have to do to start recording your thoughts or a conversation is tap on the Record button. Voice Memos lets you pause and resume a recording whenever you want, and you can also record conversations while using other apps on your iPhone. After the recording session is completed, you can trim the audio file you created and save it to your device or delete it if you are not happy with the results.
Pros
- Easy to use
- Available to all iPhone and iWatch owners for free
Cons
- Equipped with only basic audio editing tools
- No file-sharing features
2. AudioShare
Price: $2.99
Supported OS: iOS 10.0 or later
Best for: Music industry professionals
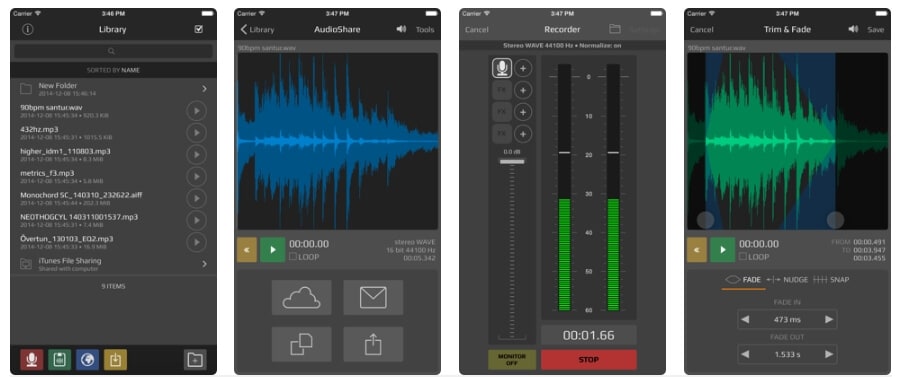
Musicians and all other creatives who work with large numbers of audio files are going to love using AudioShare. Besides powerful file management tools that enable you to transfer files from one app to another or to a computer, this app also allows you to record audio from an external microphone. Moreover, you can choose from a variety of bit and sample rates or record and play your recordings at different playback qualities.
You can import your own music into AudioShare and trim, fade in or fade out all audio recordings you make with this and other apps. Once you are done editing, you can export your files to all apps that are compatible with AudioShare.
Pros
- Excellent voice recording capabilities
- Makes audio file management easier
Cons
- Previous audio recording experience is necessary
- Selection of audio effects could be richer
3. Awesome Voice Recorder
Price: Free, but offers in-app purchases
Supported OS: iOS 9.0 or later
Best for: Music industry professionals
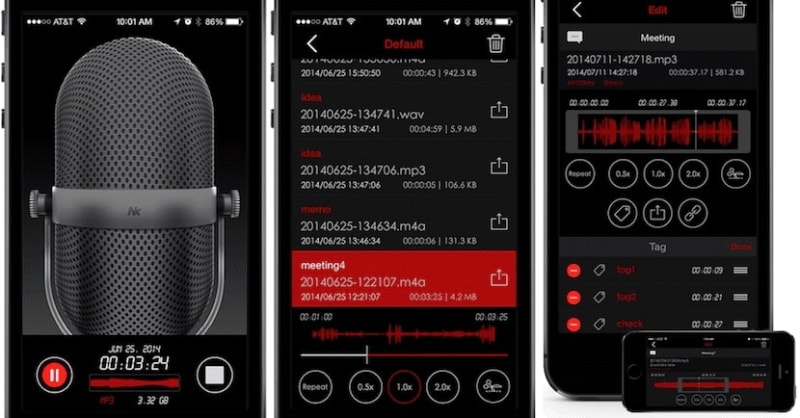
Recording a lecture or an interview is equally easy with AVR as you just have to select the quality of the recording you want to create, decide if you want the make a mono or stereo recording and choose if your file is going to be saved in MP3, M4A or WAV format. The app also lets you add tags that help you highlight the most important parts of the recording or resume a recording session after a maximum three-minute pause. AVR also reduces constant background noises that can impact the quality of the output audio files you create.
Pros
- Offers versatile voice recording tools
- Makes file management faster and easier
Cons
- Supports a limited number of audio file formats
- The steep learning curve for inexperienced users
4. Voice Recorder and Audio Editor
Price: Free, but offers in-app purchases
Supported OS: iOS 9.0 or later
Best for: Students
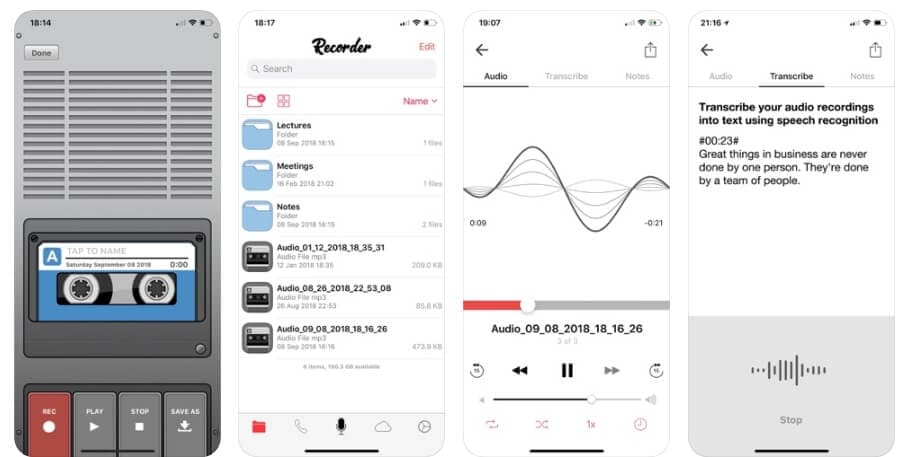
In case you are searching for a voice recorder that can also transcribe audio files accurately, you should look no further. The app doesn’t restrict the duration of your audio recordings, but if you want to transcribe your files or add text notes to them you must make in-app purchases. The free version of Voice Recorder and Audio Editor lets you select the file format of the audio files you are creating, alter their playback speed or trim the parts you don’t need. Once you’ve recorded and edited your voice recordings you can easily share them to social media or store them on the cloud.
Pros
- Unlimited recording times
- Supports WiFi transfer of recordings
Cons
- Offers only basic audio editing tools
- File transcription feature isn’t free
5. Voice Record Pro
Price: Free, but offers in-app purchases
Supported OS: iOS 10.3 or later
Best for: Journalists
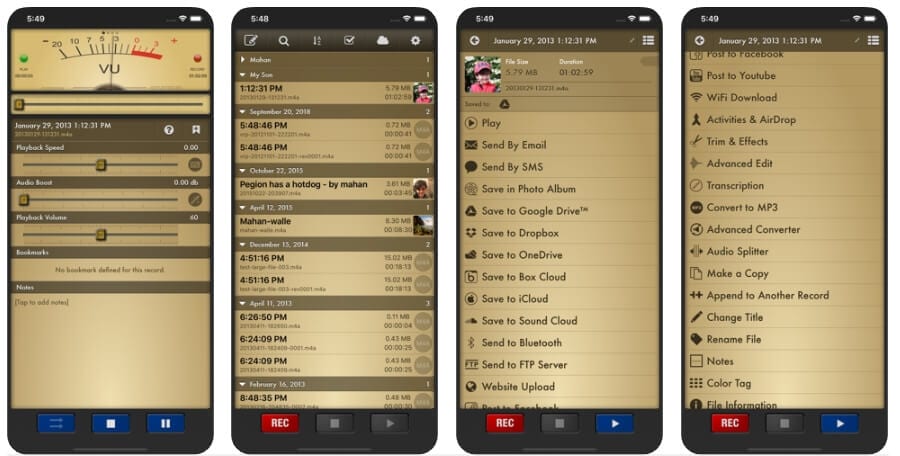
Starting a new voice recording session with this app is a straightforward process that can be completed in just a few quick taps. Voice Record Pro can capture voice recordings in all standard file formats and it enables you to convert your files to any format you choose. The app also allows you to add bookmarks, photos, and notes to your recordings or merge multiple audio recordings into a single file. Voice Record Pro offers a broad spectrum of export options so that you can easily upload your voice recordings to cloud storage services, a FTP server or post them on YouTube as movie clips.
Pros
- Excellent file export options
- Produces high-quality audio recordings
Cons
- You must make an in-app purchase to remove ads
- No audio file transcription options
6. HT Professional Recorder
Price: $9.99
Supported OS: iOS 9.0 or later
Best for: Students and professionals from different industries
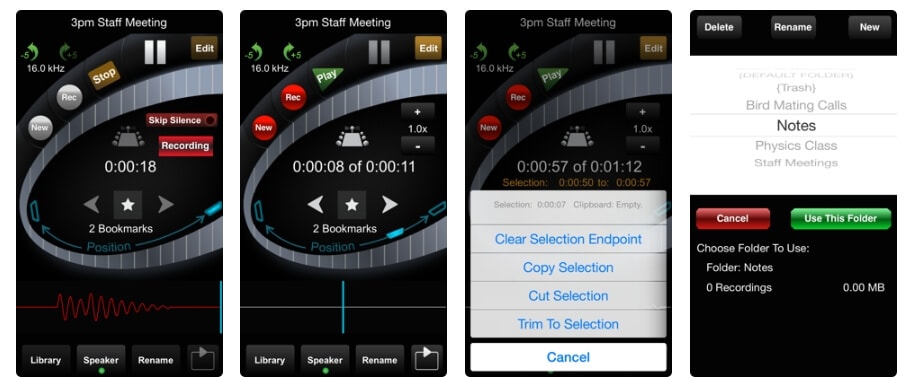
As the app’s name suggests, HT Professional Recorder is aimed at iPhone users who would like to record meetings, conferences, dictations or use it for other business purposes. HT Professional Recorder can pick up voices in superb quality from four feet away, and it easily recognizes soft voices and whispers. In addition, you can create 30-minute email recordings and it automatically splits recordings that exceed this time limit into multiple emails. You can also use this app to send recordings that last up to 15 hours via FTP servers or web browsers.
Pros
- Overwrite feature enables users to make corrections
- Offers three levels of microphone sensitivity
Cons
- No transcription options
- Poor selection of audio editing tools
7. Voice Recorder – Audio Record
Price: $3.99
Supported OS: iOS 9.0 or later
Best for: Students and businessmen
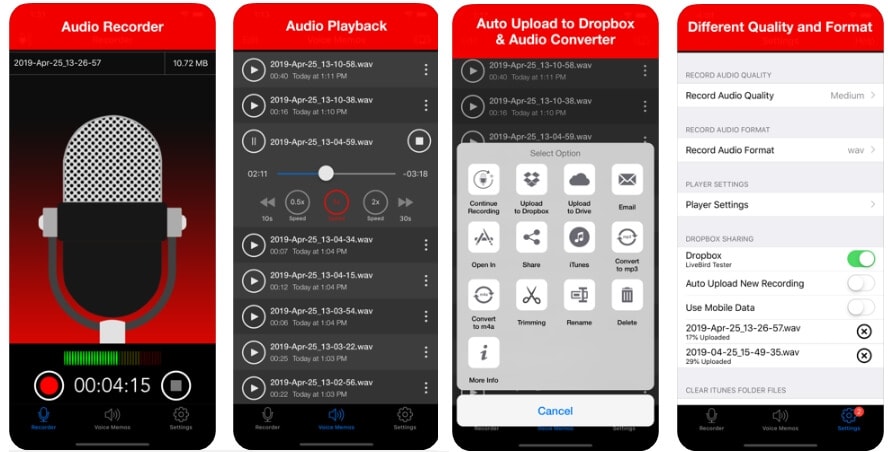
iPhone owners who often find themselves in rooms where recording a speaker from close proximity is not an option should try this voice recorder app. Voice Recorder – Audio Record can pick up voices that are as far as 300 hundred feet away and lets you select the quality of the audio recording or pick a format of the audio file. You can also connect external microphones and resume recordings after phone calls. Voice Recorder – Audio Record supports all standard sharing options, and it uploads each audio recording you create to Dropbox automatically.
Pros
- Allows users to record voices via an external microphone
- Picks up sounds over great distances
Cons
- Audio editing options could be better
- No noise reduction features
8. MultiTrack DAW
Price: $9.99, offers in-app purchases
Supported OS: iOS 9.0 or later
Best for: Music industry professionals
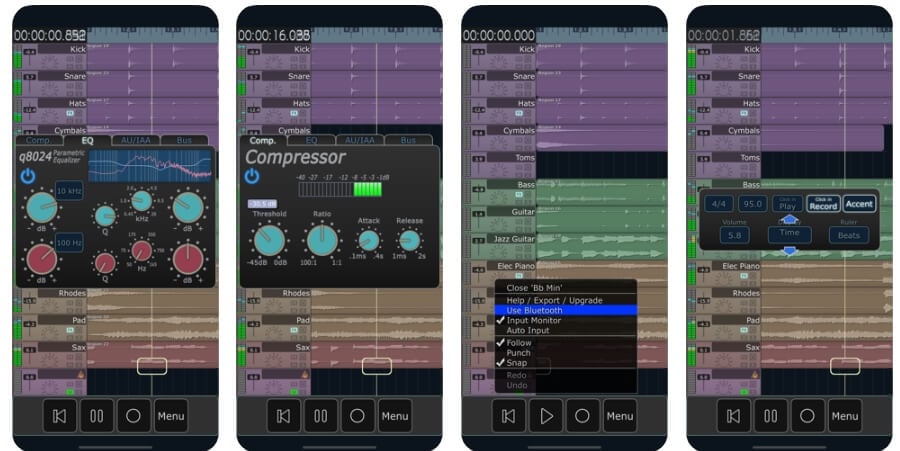
This app offers much more than simple voice recording options, as you can use it to manipulate audio files in virtually any way you want. The free version of MultiTrack DAW grants you access to eight stereo tracks, but you must make an in-app purchase if you want to add 8 or 16 more tracks. The app offers a variety of input options, which enables you to connect external microphones and use them to record voices or any other sound. The non-destructive editing utilizes Bins and Regions while the app also allows you to apply configurable bus effects.
Pros
- Powerful audio recording and audio editing features
- Supports a variety of input and output file formats
Cons
- More expensive than most voice recorder apps for iPhones
- Aimed only at seasoned sound recording professionals
9. Recorder Plus : Voice Recorder
Price: Free, but offers in-app purchases
Supported OS: iOS 9.0 or later
Best for: Recording notes
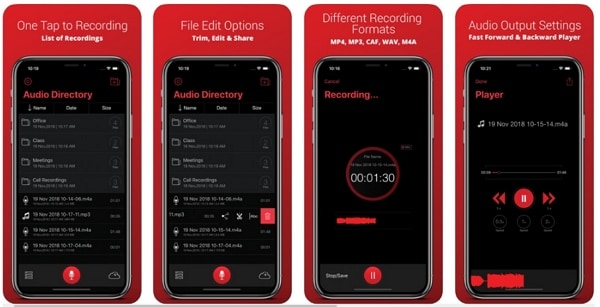
This is a simple voice recording app that doesn’t offer much more than basic audio recording options. You can use it to capture voice recordings that can last for a couple of seconds or a few hours, while the app is active or running in the background. You can start a new recording session with a single tap, which makes Recorder Plus : Voice Recorder a perfect choice if you want to record your thoughts, ideas or notes quickly. The free version of the app provides you with only limited voice recording and audio editing options and you must make in-app purchases if you want to create high-quality MP3 recordings or trim and play audio files.
Pros
- Quick voice recording setup
- Adjustable audio quality
Cons
- Sharing voice recording to cloud drives is only possible if you make an in-app purchase
- Audio editing options are basic
10. Otter Voice Meeting Notes
Price: Free, but offers in-app purchases
Supported OS: iOS 10.0 or later
Best for: Students, Journalists, Businessmen
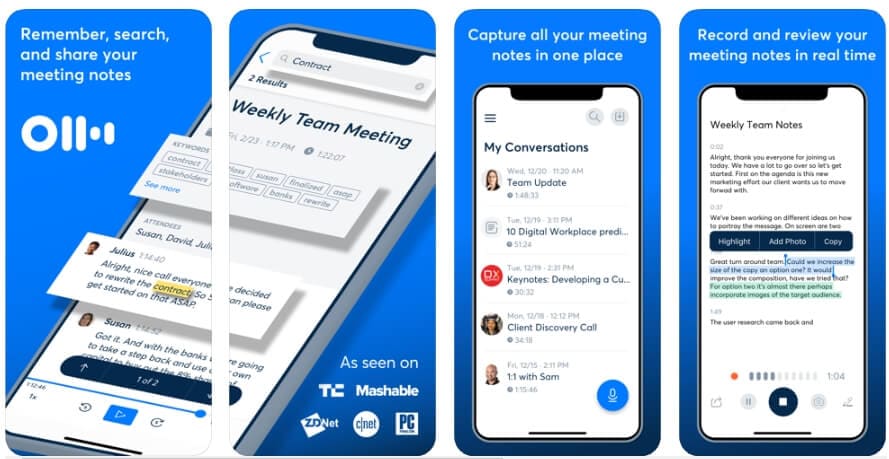
In most situations, the time you spend taking or transcribing notes can be utilized for more important tasks. Otter Voice Meeting Notes app offers an easy solution to this problem by recording and transcribing lectures, business meetings or interviews in real-time with near-perfect accuracy. The app’s AI can also recognize different speakers, although it requires some previous training, which allows you to transcribe entire conversations effortlessly. Moreover, you can create groups, share transcripts live with all members and invite them to view, edit or highlight the most important parts of the text.
Pros
- Automatic transcription of all voice recordings
- Offers a broad range of collaboration options
Cons
- Expensive monthly and annual subscriptions
- No voice recording settings
What is the Free Best Voice Recorder App for iPhones?
With so many voice recording apps on the App Store, finding the one you can use in every situation can be difficult. In addition, most of the apps you can install for free, require you to make in-app purchases in order to use all of the features they have to offer.
So, if you don’t want to spend money on a voice recording app, we suggest using the Voice Memos app that is already installed on your iPhone. This may not be the most powerful voice recording app you can find on the market, but it is still easy to use and it doesn’t limit the maximum duration of your audio recordings.
Below is a comparison table for the above 10 voice recording apps for iPhone.
| NO. | Voice Recorder | User Rating | Supported OS | Price | Best For |
|---|---|---|---|---|---|
| 1 | Voice Memos | Not available | iOS 12.0 or later | Free | Recording memos |
| 2 | AudioShare | 4.7 | iOS 10.0 or later | $2.99 | Music industry professionals |
| 3 | AVR | 4.6 | iOS 9.0 or later | Free, but offers in-app purchases | Music industry professionals |
| 4 | Voice Recorder and Audio Editor | 4.7 | iOS 9.0 or later | Free, but offers in-app purchases | Students |
| 5 | Voice Record Pro | 4.7 | iOS 10.3 or later | Free, but offers in-app purchases | Journalists |
| 6 | HT Professional Recorder | 4.7 | iOS 9.0 or later | $9.99 | Students and professionals |
| 7 | Voice Recorder – Audio Record | 4.6 | iOS 9.0 or later | $3.99 | Students and Businessmen |
| 8 | MultiTrack DAW | 4.5 | iOS 9.0 or later | $9.99 offers in-app purchases | Music industry professionals |
| 9 | Recorder Plus: Voice Recorder | 4.4 | iOS 9.0 or later | Free, but offers in-app purchases | Recording notes |
| 10 | Otter Voice Meeting Notes | 4.8 | iOS 10.0 | Free, but offers in-app purchases | Students, Journalists, Businessmen |
If you want to record voiceover and add it to a video , you may need a video editing software like Wondershare Filmora video editor .

Benjamin Arango
Benjamin Arango is a writer and a lover of all things video.
Follow @Benjamin Arango
Benjamin Arango
Mar 27, 2024• Proven solutions
Are you an aspiring musician or podcaster? Or maybe you just want to record some conversations for personal use. If so, then recording your voice via an iPhone is an easy way to capture these moments. But which voice recorder app should you use to get the best possible results?
iPhones typically come with a good quality microphone, so choosing a suitable voice recorder app can have a significant impact on the quality levels of your recordings. By selecting an app that prioritizes sound quality and ensures minimal audio clipping and distortion, you can ensure that all your recordings are captured in crystal clear clarity. That’s why we combed through the Internet in search of the best voice recorder apps for iPhones you can use in different contexts.
Best Voice Recording Apps for iPhone
There are several factors you should take into consideration before you choose to install a voice recorder app on your iPhone. Moreover, you can find many free options that can be quite effective if you are just looking for an easy way to record narration and dialogue with your iPhone or iPad. So, here are some of the best voice recording apps you can find on the App Store.
A cross-platform for making videos anywhere for all creators

Why your video editing isn’t good enough? How about some creative inspo?
- 100 Million+ Users
- 150+ Countries and Regions
- 4 Million+ Social Media Followers
- 5 Million+ Stock Media for Use
* Secure Download

1. Voice Memos
Price: Free
Supported OS: iOS 12.0 or later
Best For Recording notes for free

If you look into the folder named Extras on your iPhone’s home screen, you will find the Voice Memos app that lets you record audio without any restrictions. All you have to do to start recording your thoughts or a conversation is tap on the Record button. Voice Memos lets you pause and resume a recording whenever you want, and you can also record conversations while using other apps on your iPhone. After the recording session is completed, you can trim the audio file you created and save it to your device or delete it if you are not happy with the results.
Pros
- Easy to use
- Available to all iPhone and iWatch owners for free
Cons
- Equipped with only basic audio editing tools
- No file-sharing features
2. AudioShare
Price: $2.99
Supported OS: iOS 10.0 or later
Best for: Music industry professionals

Musicians and all other creatives who work with large numbers of audio files are going to love using AudioShare. Besides powerful file management tools that enable you to transfer files from one app to another or to a computer, this app also allows you to record audio from an external microphone. Moreover, you can choose from a variety of bit and sample rates or record and play your recordings at different playback qualities.
You can import your own music into AudioShare and trim, fade in or fade out all audio recordings you make with this and other apps. Once you are done editing, you can export your files to all apps that are compatible with AudioShare.
Pros
- Excellent voice recording capabilities
- Makes audio file management easier
Cons
- Previous audio recording experience is necessary
- Selection of audio effects could be richer
3. Awesome Voice Recorder
Price: Free, but offers in-app purchases
Supported OS: iOS 9.0 or later
Best for: Music industry professionals

Recording a lecture or an interview is equally easy with AVR as you just have to select the quality of the recording you want to create, decide if you want the make a mono or stereo recording and choose if your file is going to be saved in MP3, M4A or WAV format. The app also lets you add tags that help you highlight the most important parts of the recording or resume a recording session after a maximum three-minute pause. AVR also reduces constant background noises that can impact the quality of the output audio files you create.
Pros
- Offers versatile voice recording tools
- Makes file management faster and easier
Cons
- Supports a limited number of audio file formats
- The steep learning curve for inexperienced users
4. Voice Recorder and Audio Editor
Price: Free, but offers in-app purchases
Supported OS: iOS 9.0 or later
Best for: Students

In case you are searching for a voice recorder that can also transcribe audio files accurately, you should look no further. The app doesn’t restrict the duration of your audio recordings, but if you want to transcribe your files or add text notes to them you must make in-app purchases. The free version of Voice Recorder and Audio Editor lets you select the file format of the audio files you are creating, alter their playback speed or trim the parts you don’t need. Once you’ve recorded and edited your voice recordings you can easily share them to social media or store them on the cloud.
Pros
- Unlimited recording times
- Supports WiFi transfer of recordings
Cons
- Offers only basic audio editing tools
- File transcription feature isn’t free
5. Voice Record Pro
Price: Free, but offers in-app purchases
Supported OS: iOS 10.3 or later
Best for: Journalists

Starting a new voice recording session with this app is a straightforward process that can be completed in just a few quick taps. Voice Record Pro can capture voice recordings in all standard file formats and it enables you to convert your files to any format you choose. The app also allows you to add bookmarks, photos, and notes to your recordings or merge multiple audio recordings into a single file. Voice Record Pro offers a broad spectrum of export options so that you can easily upload your voice recordings to cloud storage services, a FTP server or post them on YouTube as movie clips.
Pros
- Excellent file export options
- Produces high-quality audio recordings
Cons
- You must make an in-app purchase to remove ads
- No audio file transcription options
6. HT Professional Recorder
Price: $9.99
Supported OS: iOS 9.0 or later
Best for: Students and professionals from different industries

As the app’s name suggests, HT Professional Recorder is aimed at iPhone users who would like to record meetings, conferences, dictations or use it for other business purposes. HT Professional Recorder can pick up voices in superb quality from four feet away, and it easily recognizes soft voices and whispers. In addition, you can create 30-minute email recordings and it automatically splits recordings that exceed this time limit into multiple emails. You can also use this app to send recordings that last up to 15 hours via FTP servers or web browsers.
Pros
- Overwrite feature enables users to make corrections
- Offers three levels of microphone sensitivity
Cons
- No transcription options
- Poor selection of audio editing tools
7. Voice Recorder – Audio Record
Price: $3.99
Supported OS: iOS 9.0 or later
Best for: Students and businessmen

iPhone owners who often find themselves in rooms where recording a speaker from close proximity is not an option should try this voice recorder app. Voice Recorder – Audio Record can pick up voices that are as far as 300 hundred feet away and lets you select the quality of the audio recording or pick a format of the audio file. You can also connect external microphones and resume recordings after phone calls. Voice Recorder – Audio Record supports all standard sharing options, and it uploads each audio recording you create to Dropbox automatically.
Pros
- Allows users to record voices via an external microphone
- Picks up sounds over great distances
Cons
- Audio editing options could be better
- No noise reduction features
8. MultiTrack DAW
Price: $9.99, offers in-app purchases
Supported OS: iOS 9.0 or later
Best for: Music industry professionals

This app offers much more than simple voice recording options, as you can use it to manipulate audio files in virtually any way you want. The free version of MultiTrack DAW grants you access to eight stereo tracks, but you must make an in-app purchase if you want to add 8 or 16 more tracks. The app offers a variety of input options, which enables you to connect external microphones and use them to record voices or any other sound. The non-destructive editing utilizes Bins and Regions while the app also allows you to apply configurable bus effects.
Pros
- Powerful audio recording and audio editing features
- Supports a variety of input and output file formats
Cons
- More expensive than most voice recorder apps for iPhones
- Aimed only at seasoned sound recording professionals
9. Recorder Plus : Voice Recorder
Price: Free, but offers in-app purchases
Supported OS: iOS 9.0 or later
Best for: Recording notes

This is a simple voice recording app that doesn’t offer much more than basic audio recording options. You can use it to capture voice recordings that can last for a couple of seconds or a few hours, while the app is active or running in the background. You can start a new recording session with a single tap, which makes Recorder Plus : Voice Recorder a perfect choice if you want to record your thoughts, ideas or notes quickly. The free version of the app provides you with only limited voice recording and audio editing options and you must make in-app purchases if you want to create high-quality MP3 recordings or trim and play audio files.
Pros
- Quick voice recording setup
- Adjustable audio quality
Cons
- Sharing voice recording to cloud drives is only possible if you make an in-app purchase
- Audio editing options are basic
10. Otter Voice Meeting Notes
Price: Free, but offers in-app purchases
Supported OS: iOS 10.0 or later
Best for: Students, Journalists, Businessmen

In most situations, the time you spend taking or transcribing notes can be utilized for more important tasks. Otter Voice Meeting Notes app offers an easy solution to this problem by recording and transcribing lectures, business meetings or interviews in real-time with near-perfect accuracy. The app’s AI can also recognize different speakers, although it requires some previous training, which allows you to transcribe entire conversations effortlessly. Moreover, you can create groups, share transcripts live with all members and invite them to view, edit or highlight the most important parts of the text.
Pros
- Automatic transcription of all voice recordings
- Offers a broad range of collaboration options
Cons
- Expensive monthly and annual subscriptions
- No voice recording settings
What is the Free Best Voice Recorder App for iPhones?
With so many voice recording apps on the App Store, finding the one you can use in every situation can be difficult. In addition, most of the apps you can install for free, require you to make in-app purchases in order to use all of the features they have to offer.
So, if you don’t want to spend money on a voice recording app, we suggest using the Voice Memos app that is already installed on your iPhone. This may not be the most powerful voice recording app you can find on the market, but it is still easy to use and it doesn’t limit the maximum duration of your audio recordings.
Below is a comparison table for the above 10 voice recording apps for iPhone.
| NO. | Voice Recorder | User Rating | Supported OS | Price | Best For |
|---|---|---|---|---|---|
| 1 | Voice Memos | Not available | iOS 12.0 or later | Free | Recording memos |
| 2 | AudioShare | 4.7 | iOS 10.0 or later | $2.99 | Music industry professionals |
| 3 | AVR | 4.6 | iOS 9.0 or later | Free, but offers in-app purchases | Music industry professionals |
| 4 | Voice Recorder and Audio Editor | 4.7 | iOS 9.0 or later | Free, but offers in-app purchases | Students |
| 5 | Voice Record Pro | 4.7 | iOS 10.3 or later | Free, but offers in-app purchases | Journalists |
| 6 | HT Professional Recorder | 4.7 | iOS 9.0 or later | $9.99 | Students and professionals |
| 7 | Voice Recorder – Audio Record | 4.6 | iOS 9.0 or later | $3.99 | Students and Businessmen |
| 8 | MultiTrack DAW | 4.5 | iOS 9.0 or later | $9.99 offers in-app purchases | Music industry professionals |
| 9 | Recorder Plus: Voice Recorder | 4.4 | iOS 9.0 or later | Free, but offers in-app purchases | Recording notes |
| 10 | Otter Voice Meeting Notes | 4.8 | iOS 10.0 | Free, but offers in-app purchases | Students, Journalists, Businessmen |
If you want to record voiceover and add it to a video , you may need a video editing software like Wondershare Filmora video editor .

Benjamin Arango
Benjamin Arango is a writer and a lover of all things video.
Follow @Benjamin Arango
Benjamin Arango
Mar 27, 2024• Proven solutions
Are you an aspiring musician or podcaster? Or maybe you just want to record some conversations for personal use. If so, then recording your voice via an iPhone is an easy way to capture these moments. But which voice recorder app should you use to get the best possible results?
iPhones typically come with a good quality microphone, so choosing a suitable voice recorder app can have a significant impact on the quality levels of your recordings. By selecting an app that prioritizes sound quality and ensures minimal audio clipping and distortion, you can ensure that all your recordings are captured in crystal clear clarity. That’s why we combed through the Internet in search of the best voice recorder apps for iPhones you can use in different contexts.
Best Voice Recording Apps for iPhone
There are several factors you should take into consideration before you choose to install a voice recorder app on your iPhone. Moreover, you can find many free options that can be quite effective if you are just looking for an easy way to record narration and dialogue with your iPhone or iPad. So, here are some of the best voice recording apps you can find on the App Store.
A cross-platform for making videos anywhere for all creators

Why your video editing isn’t good enough? How about some creative inspo?
- 100 Million+ Users
- 150+ Countries and Regions
- 4 Million+ Social Media Followers
- 5 Million+ Stock Media for Use
* Secure Download

1. Voice Memos
Price: Free
Supported OS: iOS 12.0 or later
Best For Recording notes for free

If you look into the folder named Extras on your iPhone’s home screen, you will find the Voice Memos app that lets you record audio without any restrictions. All you have to do to start recording your thoughts or a conversation is tap on the Record button. Voice Memos lets you pause and resume a recording whenever you want, and you can also record conversations while using other apps on your iPhone. After the recording session is completed, you can trim the audio file you created and save it to your device or delete it if you are not happy with the results.
Pros
- Easy to use
- Available to all iPhone and iWatch owners for free
Cons
- Equipped with only basic audio editing tools
- No file-sharing features
2. AudioShare
Price: $2.99
Supported OS: iOS 10.0 or later
Best for: Music industry professionals

Musicians and all other creatives who work with large numbers of audio files are going to love using AudioShare. Besides powerful file management tools that enable you to transfer files from one app to another or to a computer, this app also allows you to record audio from an external microphone. Moreover, you can choose from a variety of bit and sample rates or record and play your recordings at different playback qualities.
You can import your own music into AudioShare and trim, fade in or fade out all audio recordings you make with this and other apps. Once you are done editing, you can export your files to all apps that are compatible with AudioShare.
Pros
- Excellent voice recording capabilities
- Makes audio file management easier
Cons
- Previous audio recording experience is necessary
- Selection of audio effects could be richer
3. Awesome Voice Recorder
Price: Free, but offers in-app purchases
Supported OS: iOS 9.0 or later
Best for: Music industry professionals

Recording a lecture or an interview is equally easy with AVR as you just have to select the quality of the recording you want to create, decide if you want the make a mono or stereo recording and choose if your file is going to be saved in MP3, M4A or WAV format. The app also lets you add tags that help you highlight the most important parts of the recording or resume a recording session after a maximum three-minute pause. AVR also reduces constant background noises that can impact the quality of the output audio files you create.
Pros
- Offers versatile voice recording tools
- Makes file management faster and easier
Cons
- Supports a limited number of audio file formats
- The steep learning curve for inexperienced users
4. Voice Recorder and Audio Editor
Price: Free, but offers in-app purchases
Supported OS: iOS 9.0 or later
Best for: Students

In case you are searching for a voice recorder that can also transcribe audio files accurately, you should look no further. The app doesn’t restrict the duration of your audio recordings, but if you want to transcribe your files or add text notes to them you must make in-app purchases. The free version of Voice Recorder and Audio Editor lets you select the file format of the audio files you are creating, alter their playback speed or trim the parts you don’t need. Once you’ve recorded and edited your voice recordings you can easily share them to social media or store them on the cloud.
Pros
- Unlimited recording times
- Supports WiFi transfer of recordings
Cons
- Offers only basic audio editing tools
- File transcription feature isn’t free
5. Voice Record Pro
Price: Free, but offers in-app purchases
Supported OS: iOS 10.3 or later
Best for: Journalists

Starting a new voice recording session with this app is a straightforward process that can be completed in just a few quick taps. Voice Record Pro can capture voice recordings in all standard file formats and it enables you to convert your files to any format you choose. The app also allows you to add bookmarks, photos, and notes to your recordings or merge multiple audio recordings into a single file. Voice Record Pro offers a broad spectrum of export options so that you can easily upload your voice recordings to cloud storage services, a FTP server or post them on YouTube as movie clips.
Pros
- Excellent file export options
- Produces high-quality audio recordings
Cons
- You must make an in-app purchase to remove ads
- No audio file transcription options
6. HT Professional Recorder
Price: $9.99
Supported OS: iOS 9.0 or later
Best for: Students and professionals from different industries

As the app’s name suggests, HT Professional Recorder is aimed at iPhone users who would like to record meetings, conferences, dictations or use it for other business purposes. HT Professional Recorder can pick up voices in superb quality from four feet away, and it easily recognizes soft voices and whispers. In addition, you can create 30-minute email recordings and it automatically splits recordings that exceed this time limit into multiple emails. You can also use this app to send recordings that last up to 15 hours via FTP servers or web browsers.
Pros
- Overwrite feature enables users to make corrections
- Offers three levels of microphone sensitivity
Cons
- No transcription options
- Poor selection of audio editing tools
7. Voice Recorder – Audio Record
Price: $3.99
Supported OS: iOS 9.0 or later
Best for: Students and businessmen

iPhone owners who often find themselves in rooms where recording a speaker from close proximity is not an option should try this voice recorder app. Voice Recorder – Audio Record can pick up voices that are as far as 300 hundred feet away and lets you select the quality of the audio recording or pick a format of the audio file. You can also connect external microphones and resume recordings after phone calls. Voice Recorder – Audio Record supports all standard sharing options, and it uploads each audio recording you create to Dropbox automatically.
Pros
- Allows users to record voices via an external microphone
- Picks up sounds over great distances
Cons
- Audio editing options could be better
- No noise reduction features
8. MultiTrack DAW
Price: $9.99, offers in-app purchases
Supported OS: iOS 9.0 or later
Best for: Music industry professionals

This app offers much more than simple voice recording options, as you can use it to manipulate audio files in virtually any way you want. The free version of MultiTrack DAW grants you access to eight stereo tracks, but you must make an in-app purchase if you want to add 8 or 16 more tracks. The app offers a variety of input options, which enables you to connect external microphones and use them to record voices or any other sound. The non-destructive editing utilizes Bins and Regions while the app also allows you to apply configurable bus effects.
Pros
- Powerful audio recording and audio editing features
- Supports a variety of input and output file formats
Cons
- More expensive than most voice recorder apps for iPhones
- Aimed only at seasoned sound recording professionals
9. Recorder Plus : Voice Recorder
Price: Free, but offers in-app purchases
Supported OS: iOS 9.0 or later
Best for: Recording notes

This is a simple voice recording app that doesn’t offer much more than basic audio recording options. You can use it to capture voice recordings that can last for a couple of seconds or a few hours, while the app is active or running in the background. You can start a new recording session with a single tap, which makes Recorder Plus : Voice Recorder a perfect choice if you want to record your thoughts, ideas or notes quickly. The free version of the app provides you with only limited voice recording and audio editing options and you must make in-app purchases if you want to create high-quality MP3 recordings or trim and play audio files.
Pros
- Quick voice recording setup
- Adjustable audio quality
Cons
- Sharing voice recording to cloud drives is only possible if you make an in-app purchase
- Audio editing options are basic
10. Otter Voice Meeting Notes
Price: Free, but offers in-app purchases
Supported OS: iOS 10.0 or later
Best for: Students, Journalists, Businessmen

In most situations, the time you spend taking or transcribing notes can be utilized for more important tasks. Otter Voice Meeting Notes app offers an easy solution to this problem by recording and transcribing lectures, business meetings or interviews in real-time with near-perfect accuracy. The app’s AI can also recognize different speakers, although it requires some previous training, which allows you to transcribe entire conversations effortlessly. Moreover, you can create groups, share transcripts live with all members and invite them to view, edit or highlight the most important parts of the text.
Pros
- Automatic transcription of all voice recordings
- Offers a broad range of collaboration options
Cons
- Expensive monthly and annual subscriptions
- No voice recording settings
What is the Free Best Voice Recorder App for iPhones?
With so many voice recording apps on the App Store, finding the one you can use in every situation can be difficult. In addition, most of the apps you can install for free, require you to make in-app purchases in order to use all of the features they have to offer.
So, if you don’t want to spend money on a voice recording app, we suggest using the Voice Memos app that is already installed on your iPhone. This may not be the most powerful voice recording app you can find on the market, but it is still easy to use and it doesn’t limit the maximum duration of your audio recordings.
Below is a comparison table for the above 10 voice recording apps for iPhone.
| NO. | Voice Recorder | User Rating | Supported OS | Price | Best For |
|---|---|---|---|---|---|
| 1 | Voice Memos | Not available | iOS 12.0 or later | Free | Recording memos |
| 2 | AudioShare | 4.7 | iOS 10.0 or later | $2.99 | Music industry professionals |
| 3 | AVR | 4.6 | iOS 9.0 or later | Free, but offers in-app purchases | Music industry professionals |
| 4 | Voice Recorder and Audio Editor | 4.7 | iOS 9.0 or later | Free, but offers in-app purchases | Students |
| 5 | Voice Record Pro | 4.7 | iOS 10.3 or later | Free, but offers in-app purchases | Journalists |
| 6 | HT Professional Recorder | 4.7 | iOS 9.0 or later | $9.99 | Students and professionals |
| 7 | Voice Recorder – Audio Record | 4.6 | iOS 9.0 or later | $3.99 | Students and Businessmen |
| 8 | MultiTrack DAW | 4.5 | iOS 9.0 or later | $9.99 offers in-app purchases | Music industry professionals |
| 9 | Recorder Plus: Voice Recorder | 4.4 | iOS 9.0 or later | Free, but offers in-app purchases | Recording notes |
| 10 | Otter Voice Meeting Notes | 4.8 | iOS 10.0 | Free, but offers in-app purchases | Students, Journalists, Businessmen |
If you want to record voiceover and add it to a video , you may need a video editing software like Wondershare Filmora video editor .

Benjamin Arango
Benjamin Arango is a writer and a lover of all things video.
Follow @Benjamin Arango
Benjamin Arango
Mar 27, 2024• Proven solutions
Are you an aspiring musician or podcaster? Or maybe you just want to record some conversations for personal use. If so, then recording your voice via an iPhone is an easy way to capture these moments. But which voice recorder app should you use to get the best possible results?
iPhones typically come with a good quality microphone, so choosing a suitable voice recorder app can have a significant impact on the quality levels of your recordings. By selecting an app that prioritizes sound quality and ensures minimal audio clipping and distortion, you can ensure that all your recordings are captured in crystal clear clarity. That’s why we combed through the Internet in search of the best voice recorder apps for iPhones you can use in different contexts.
Best Voice Recording Apps for iPhone
There are several factors you should take into consideration before you choose to install a voice recorder app on your iPhone. Moreover, you can find many free options that can be quite effective if you are just looking for an easy way to record narration and dialogue with your iPhone or iPad. So, here are some of the best voice recording apps you can find on the App Store.
A cross-platform for making videos anywhere for all creators

Why your video editing isn’t good enough? How about some creative inspo?
- 100 Million+ Users
- 150+ Countries and Regions
- 4 Million+ Social Media Followers
- 5 Million+ Stock Media for Use
* Secure Download

1. Voice Memos
Price: Free
Supported OS: iOS 12.0 or later
Best For Recording notes for free

If you look into the folder named Extras on your iPhone’s home screen, you will find the Voice Memos app that lets you record audio without any restrictions. All you have to do to start recording your thoughts or a conversation is tap on the Record button. Voice Memos lets you pause and resume a recording whenever you want, and you can also record conversations while using other apps on your iPhone. After the recording session is completed, you can trim the audio file you created and save it to your device or delete it if you are not happy with the results.
Pros
- Easy to use
- Available to all iPhone and iWatch owners for free
Cons
- Equipped with only basic audio editing tools
- No file-sharing features
2. AudioShare
Price: $2.99
Supported OS: iOS 10.0 or later
Best for: Music industry professionals

Musicians and all other creatives who work with large numbers of audio files are going to love using AudioShare. Besides powerful file management tools that enable you to transfer files from one app to another or to a computer, this app also allows you to record audio from an external microphone. Moreover, you can choose from a variety of bit and sample rates or record and play your recordings at different playback qualities.
You can import your own music into AudioShare and trim, fade in or fade out all audio recordings you make with this and other apps. Once you are done editing, you can export your files to all apps that are compatible with AudioShare.
Pros
- Excellent voice recording capabilities
- Makes audio file management easier
Cons
- Previous audio recording experience is necessary
- Selection of audio effects could be richer
3. Awesome Voice Recorder
Price: Free, but offers in-app purchases
Supported OS: iOS 9.0 or later
Best for: Music industry professionals

Recording a lecture or an interview is equally easy with AVR as you just have to select the quality of the recording you want to create, decide if you want the make a mono or stereo recording and choose if your file is going to be saved in MP3, M4A or WAV format. The app also lets you add tags that help you highlight the most important parts of the recording or resume a recording session after a maximum three-minute pause. AVR also reduces constant background noises that can impact the quality of the output audio files you create.
Pros
- Offers versatile voice recording tools
- Makes file management faster and easier
Cons
- Supports a limited number of audio file formats
- The steep learning curve for inexperienced users
4. Voice Recorder and Audio Editor
Price: Free, but offers in-app purchases
Supported OS: iOS 9.0 or later
Best for: Students

In case you are searching for a voice recorder that can also transcribe audio files accurately, you should look no further. The app doesn’t restrict the duration of your audio recordings, but if you want to transcribe your files or add text notes to them you must make in-app purchases. The free version of Voice Recorder and Audio Editor lets you select the file format of the audio files you are creating, alter their playback speed or trim the parts you don’t need. Once you’ve recorded and edited your voice recordings you can easily share them to social media or store them on the cloud.
Pros
- Unlimited recording times
- Supports WiFi transfer of recordings
Cons
- Offers only basic audio editing tools
- File transcription feature isn’t free
5. Voice Record Pro
Price: Free, but offers in-app purchases
Supported OS: iOS 10.3 or later
Best for: Journalists

Starting a new voice recording session with this app is a straightforward process that can be completed in just a few quick taps. Voice Record Pro can capture voice recordings in all standard file formats and it enables you to convert your files to any format you choose. The app also allows you to add bookmarks, photos, and notes to your recordings or merge multiple audio recordings into a single file. Voice Record Pro offers a broad spectrum of export options so that you can easily upload your voice recordings to cloud storage services, a FTP server or post them on YouTube as movie clips.
Pros
- Excellent file export options
- Produces high-quality audio recordings
Cons
- You must make an in-app purchase to remove ads
- No audio file transcription options
6. HT Professional Recorder
Price: $9.99
Supported OS: iOS 9.0 or later
Best for: Students and professionals from different industries

As the app’s name suggests, HT Professional Recorder is aimed at iPhone users who would like to record meetings, conferences, dictations or use it for other business purposes. HT Professional Recorder can pick up voices in superb quality from four feet away, and it easily recognizes soft voices and whispers. In addition, you can create 30-minute email recordings and it automatically splits recordings that exceed this time limit into multiple emails. You can also use this app to send recordings that last up to 15 hours via FTP servers or web browsers.
Pros
- Overwrite feature enables users to make corrections
- Offers three levels of microphone sensitivity
Cons
- No transcription options
- Poor selection of audio editing tools
7. Voice Recorder – Audio Record
Price: $3.99
Supported OS: iOS 9.0 or later
Best for: Students and businessmen

iPhone owners who often find themselves in rooms where recording a speaker from close proximity is not an option should try this voice recorder app. Voice Recorder – Audio Record can pick up voices that are as far as 300 hundred feet away and lets you select the quality of the audio recording or pick a format of the audio file. You can also connect external microphones and resume recordings after phone calls. Voice Recorder – Audio Record supports all standard sharing options, and it uploads each audio recording you create to Dropbox automatically.
Pros
- Allows users to record voices via an external microphone
- Picks up sounds over great distances
Cons
- Audio editing options could be better
- No noise reduction features
8. MultiTrack DAW
Price: $9.99, offers in-app purchases
Supported OS: iOS 9.0 or later
Best for: Music industry professionals

This app offers much more than simple voice recording options, as you can use it to manipulate audio files in virtually any way you want. The free version of MultiTrack DAW grants you access to eight stereo tracks, but you must make an in-app purchase if you want to add 8 or 16 more tracks. The app offers a variety of input options, which enables you to connect external microphones and use them to record voices or any other sound. The non-destructive editing utilizes Bins and Regions while the app also allows you to apply configurable bus effects.
Pros
- Powerful audio recording and audio editing features
- Supports a variety of input and output file formats
Cons
- More expensive than most voice recorder apps for iPhones
- Aimed only at seasoned sound recording professionals
9. Recorder Plus : Voice Recorder
Price: Free, but offers in-app purchases
Supported OS: iOS 9.0 or later
Best for: Recording notes

This is a simple voice recording app that doesn’t offer much more than basic audio recording options. You can use it to capture voice recordings that can last for a couple of seconds or a few hours, while the app is active or running in the background. You can start a new recording session with a single tap, which makes Recorder Plus : Voice Recorder a perfect choice if you want to record your thoughts, ideas or notes quickly. The free version of the app provides you with only limited voice recording and audio editing options and you must make in-app purchases if you want to create high-quality MP3 recordings or trim and play audio files.
Pros
- Quick voice recording setup
- Adjustable audio quality
Cons
- Sharing voice recording to cloud drives is only possible if you make an in-app purchase
- Audio editing options are basic
10. Otter Voice Meeting Notes
Price: Free, but offers in-app purchases
Supported OS: iOS 10.0 or later
Best for: Students, Journalists, Businessmen

In most situations, the time you spend taking or transcribing notes can be utilized for more important tasks. Otter Voice Meeting Notes app offers an easy solution to this problem by recording and transcribing lectures, business meetings or interviews in real-time with near-perfect accuracy. The app’s AI can also recognize different speakers, although it requires some previous training, which allows you to transcribe entire conversations effortlessly. Moreover, you can create groups, share transcripts live with all members and invite them to view, edit or highlight the most important parts of the text.
Pros
- Automatic transcription of all voice recordings
- Offers a broad range of collaboration options
Cons
- Expensive monthly and annual subscriptions
- No voice recording settings
What is the Free Best Voice Recorder App for iPhones?
With so many voice recording apps on the App Store, finding the one you can use in every situation can be difficult. In addition, most of the apps you can install for free, require you to make in-app purchases in order to use all of the features they have to offer.
So, if you don’t want to spend money on a voice recording app, we suggest using the Voice Memos app that is already installed on your iPhone. This may not be the most powerful voice recording app you can find on the market, but it is still easy to use and it doesn’t limit the maximum duration of your audio recordings.
Below is a comparison table for the above 10 voice recording apps for iPhone.
| NO. | Voice Recorder | User Rating | Supported OS | Price | Best For |
|---|---|---|---|---|---|
| 1 | Voice Memos | Not available | iOS 12.0 or later | Free | Recording memos |
| 2 | AudioShare | 4.7 | iOS 10.0 or later | $2.99 | Music industry professionals |
| 3 | AVR | 4.6 | iOS 9.0 or later | Free, but offers in-app purchases | Music industry professionals |
| 4 | Voice Recorder and Audio Editor | 4.7 | iOS 9.0 or later | Free, but offers in-app purchases | Students |
| 5 | Voice Record Pro | 4.7 | iOS 10.3 or later | Free, but offers in-app purchases | Journalists |
| 6 | HT Professional Recorder | 4.7 | iOS 9.0 or later | $9.99 | Students and professionals |
| 7 | Voice Recorder – Audio Record | 4.6 | iOS 9.0 or later | $3.99 | Students and Businessmen |
| 8 | MultiTrack DAW | 4.5 | iOS 9.0 or later | $9.99 offers in-app purchases | Music industry professionals |
| 9 | Recorder Plus: Voice Recorder | 4.4 | iOS 9.0 or later | Free, but offers in-app purchases | Recording notes |
| 10 | Otter Voice Meeting Notes | 4.8 | iOS 10.0 | Free, but offers in-app purchases | Students, Journalists, Businessmen |
If you want to record voiceover and add it to a video , you may need a video editing software like Wondershare Filmora video editor .

Benjamin Arango
Benjamin Arango is a writer and a lover of all things video.
Follow @Benjamin Arango
Also read:
- New In 2024, Unveiling the 6 Finest Automatic Transcription Applications
- In 2024, Silent Elements Unveiled Techniques for Retrieving Sound From Videos
- Updated The Foremost Selection of 9 Breakthrough AI Voices Shaping the Future
- New Essential Websites to Access Pristine Free Audio FX
- Updated 2024 Approved Echoes of Clarity A Comprehensive Tutorial on Eliminating Background Distractions in Web Tools
- 2024 Approved Boost Visual Speakers Output Enhance Movie and Video Audibility
- Updated In 2024, The Ultimate List of Gratis Sound Effect Libraries Online
- In 2024, Elevating Your Speaking Style Expert Techniques for Changing Your Voice Characteristics
- Updated Discovering the Crash Audio Tone for 2024
- In 2024, Procuring Immersive Dragon Roar Soundscape
- Updated In 2024, PolyTuneHub Syncing Audio Across Scenes in Adobe Premiere Pro with Precision New 2023 Features
- New Top 11 Voice Modification Gadgets Your Comprehensive Guide
- New 2024 Approved Starting Off with Strains The Beginners Handbook to Selecting the Ideal Hip-Hop Accompaniment.
- Innovative Voice Tweaks 9 Ways to Spark Laughter in Your Conversations for 2024
- New Mastering Sound on Your Mac The Top 8 DAWs Ranked
- New Creative Freedom at No Cost Top Free Audio Engineering Tools of the Year
- In 2024, 10 Cost-Effective Online Platforms for Seamless MP3 to Text File Conversion - Powered by Magix Screenblast
- The Intricacies of Clubhouse Explored An Insiders Guide to Its Core Principles and Operations
- New Top 10 Revolutionary Singing Software for Soloists on the Move
- Updated In 2024, Aquatic Acoustics Transforming Your Virtual Dialogue with Discords Clownfish Voice Manipulation
- Updated 2024 Approved Top 10 Tools for Clearing Up Clutter in Audio Files A Comprehensive Guide
- Updated Combine Audio with Motion Graphics on Windows Platform for 2024
- New Leading Music Editors for iPhones and Android Devices – A Comprehensive Review for 2024
- Beyond FaceTime on Android Top 10 Virtual Communication Applications for 2024
- New 5 Best Zoom Sound Enhancers Personalize Your Speech for a Chuckle-Worthy Experience for 2024
- New In 2024, 9 Best Podcast Microphones for All Levels
- Updated In 2024, Precision Audio Cleanup Advanced Methods to Eradicate Echo and Hum
- Updated Comprehensive Guide to the Top 8 Free Cartoon Sound Effect Downloads for 2024
- Step Into the Future Our Curated List of the Top 9 Next-Gen AI Voice Systems to Revolutionize Your 2023 Experience
- New 2024 Approved Tips of Playing M4A Audio Files on Android Devices
- Updated 2024 Approved The Essential Summary 5 Superior, Cost-Free Audio Volume Correctors
- New Game On, Voice Reimagined Mastering Morphvox Sound Changes in Real-Time Gaming Streams for 2024
- Total Summary of Worldwide Podcast Repository Organizations
- Updated 10 Premier Windows-Based Textual Output Programs for Audio Input
- Top 8 Dictation Software for Windows, Mac and Online-2023 List for 2024
- In 2024, 3 Solutions to Find Your OnePlus Ace 3 Current Location of a Mobile Number | Dr.fone
- In 2024, 3 Effective Methods to Fake GPS location on Android For your Oppo Reno 9A | Dr.fone
- In 2024, Top 15 Apps To Hack WiFi Password On Poco F5 5G
- How To Restore Missing Photos Files from Honor Play 8T.
- Best Pokemons for PVP Matches in Pokemon Go For Vivo Y36 | Dr.fone
- In 2024, Unlock Apple iPhone 6 Without Passcode Easily
- Top Video Editing Tools with Audio Capabilities
- Updated In 2024, The Most Efficient Tools to Convert Text to MP3 With the Best Natural Voices
- All You Need To Know About Mega Greninja For Nokia 130 Music | Dr.fone
- New 2024 Approved 2 Effective Ways to Easily Convert VTT to SRT
- 3uTools Virtual Location Not Working On Tecno Spark 20? Fix Now | Dr.fone
- In 2024, How To Bypass the Required Apple Store Verification For Apple iPhone 15 Plus
- Title: A Beginners Guide to Effective GarageBand Recording Processes
- Author: Kate
- Created at : 2024-05-05 08:17:18
- Updated at : 2024-05-06 08:17:18
- Link: https://audio-editing.techidaily.com/a-beginners-guide-to-effective-garageband-recording-processes/
- License: This work is licensed under CC BY-NC-SA 4.0.


