
:max_bytes(150000):strip_icc():format(webp)/GettyImages-545995058-58ed21243df78cadab023f3c.jpg)
2024 Approved Top 10 Digital Audio Workstation Tools Free vs Paid Options
Top 10 Digital Audio Workstation Tools: Free vs Paid Options
FREE 10 Best Online Music Makers

Benjamin Arango
Apr 26, 2024• Proven solutions


Expressing ideas through music was never easy, and even today in the age of powerful digital audio stations like Ableton Live or FruityLoops , producing original music requires a certain set of skills. However, online content producers often need music for their videos, but they neither have the time or the budget to hire a professional musician to create a soundtrack for their project in studio conditions. If you are looking for a quick way to make your own music online, then you should keep reading, because in this article we are going to take you through the ten best online music makers you should check out in 2021.
10 Best Online Music Makers in 2021
The music-making platforms that are currently available online are still not as nearly as powerful as professional software products for music producers. Nonetheless, this doesn’t mean that you can’t use them to create the music you like or just have fun with them. Here are the ten best online music makers in 2019.
1. Typeatone
Price: Free
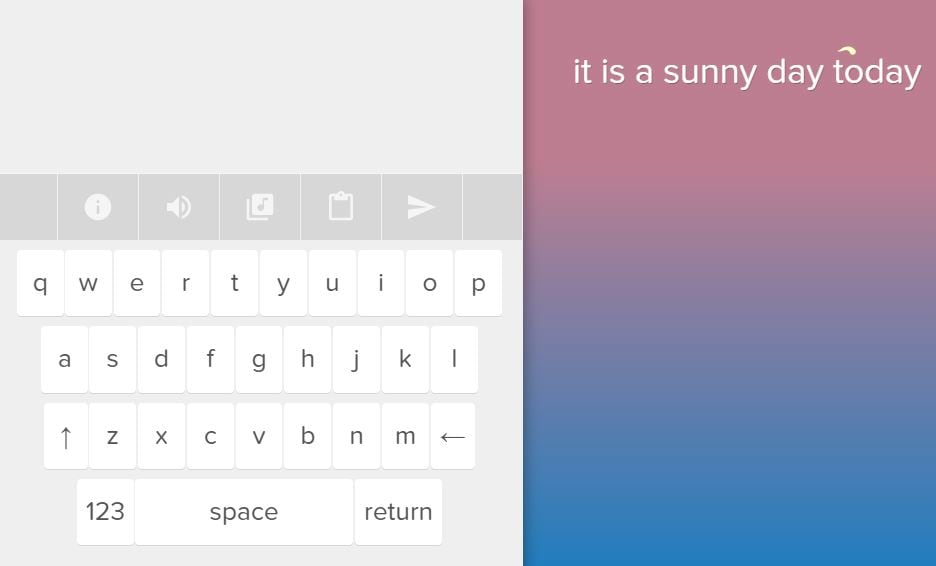
Image from Internet
Have you ever wondered what your words would sound like if they were turned into music? Head over to the Typeatone platform if you want to find out since all you have to do in order to start creating your own music is type in the text. As you type, the platform will automatically start playing your words and once you’re done, you’ll be able to hear your new song. You can also choose between different instruments to make the process of creating music with Typeatone even more entertaining. You can share all of your creations with your friends on social media.
![]()
A cross-platform for making videos anywhere for all creators

Why your video editing isn’t good enough? How about some creative inspo?
- 100 Million+ Users
- 150+ Countries and Regions
- 4 Million+ Social Media Followers
- 5 Million+ Stock Media for Use
* Secure Download

2. Audiotool
Price: Free
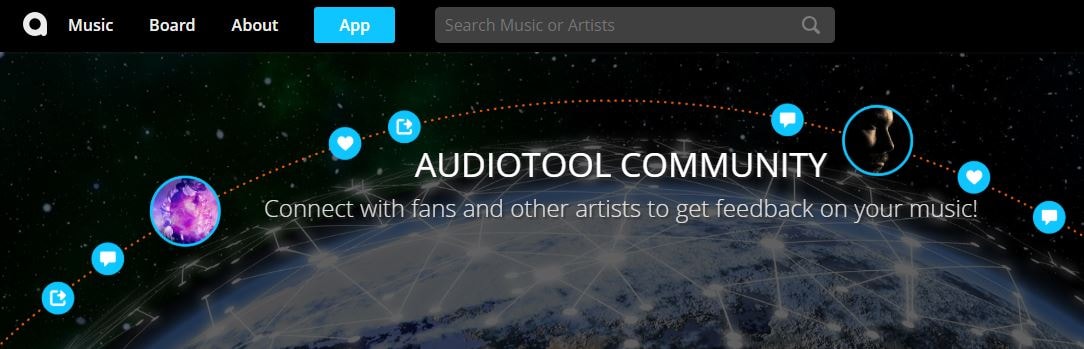
Image from Internet
Electronic music producers who often use synthesizers like Roland TB-303 or Roland TR-909 are going to love the features this online collaborative platform offers. Audiotool hosts a huge music library, you can explore even if you are not a registered user. In order to access the platform’s music studio, you first have to create an account and make sure that you are signed in. Audiotool is also a community of like-minded people where you can meet artists whose work you appreciate or hear what others think about your work. The only downside is that Audiotool’s abundance of features can be overwhelming for the newcomers to the world of electronic music production.
3. AudioSauna
Price: Free
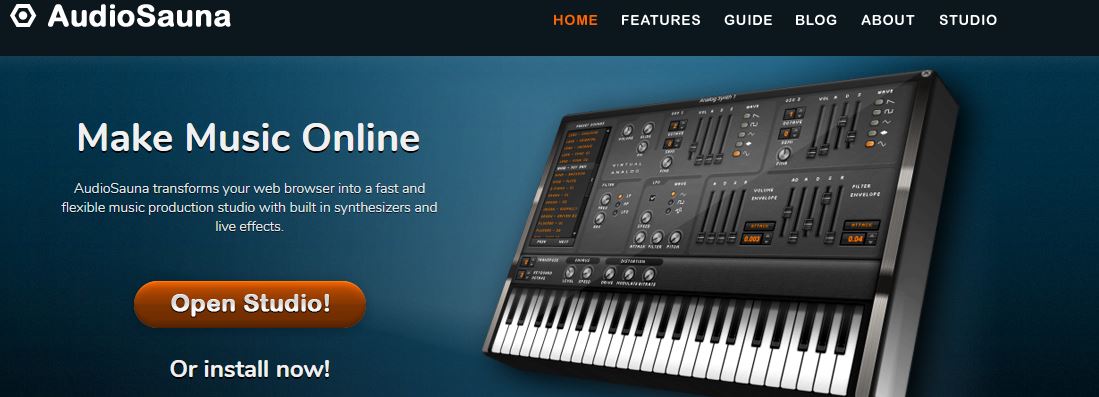
Image from Internet
AudioSauna seems to offer everything its users need to create inspiring music because it is equipped with frequency modulation synth, virtual analog synth and a sampler that provides layering features. Moreover, its intuitive interface makes the process of arranging the song structure or changing several note values simultaneously much easier. Creating an account on AudioSauna will enable to record all your projects and export them as audio files that can be uploaded to SoundCloud or any other audio distribution platform. AudioSauna is a perfect tool for skilled producers who want to create their music online.
4. Soundtrap
Price: Free trial available, subscription plans start at $3.99 per month

Image from Internet
Soundtrap offers a long list of features that enable professional musicians to create their music online. All you have to do is create an account and you will get access to the Sountrap’s studio that let you create new beat patterns, use a synthesizer or even invite friends to make music together. The platform also offers the possibility to connect your own instruments to the Soundtrap’s studio, so that you can record your music as you play it. This online platform also has an Education section where you can share your knowledge with others or learn valuable music lessons.
5. PatternSketch
Price: Free
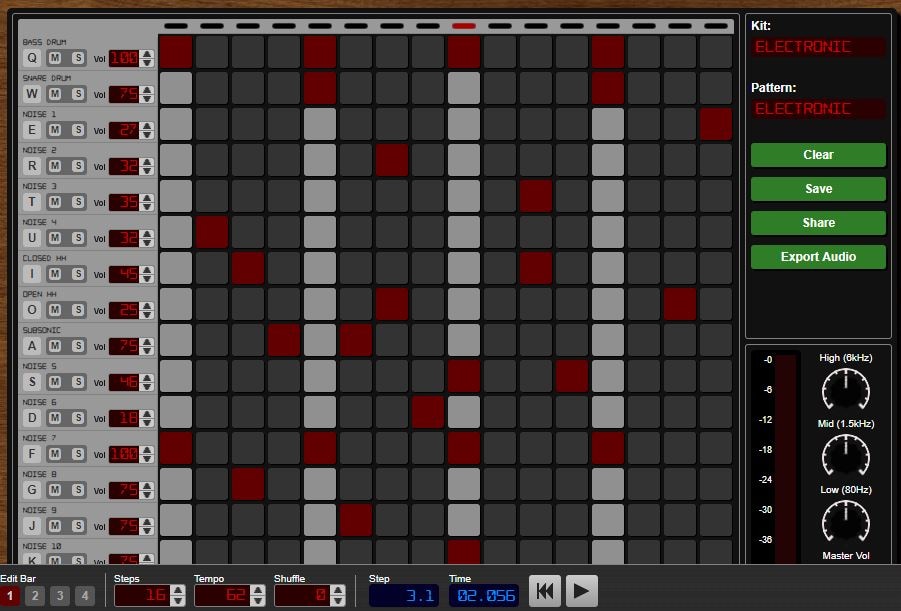
Image from Internet
This basic and yet effective drum machine can help you generate amazing beats for the songs you’re working on. Once you sign up, you will be able to choose from a number of different kits and patterns that are fully customizable or create your own original beats. After you create a pattern you like, you can save it with a single click or send it to your friends via email. Optionally, you can export all of your creations from PatternSketch and save them as wav, mp3 or ogg files, although in some cases mp3 audio files may not loop properly.
6. Soundation
Price: Free version available, pricing plans start at $1.99 per month

Image from Internet
If you choose to create music with the free version of Soundation, you’ll be able to work on up to ten projects, try out over 700 audio effects and loops, and export all your music in low quality. Purchasing the Intro pricing plan will enable you to work on an unlimited number of projects, make live audio recordings, import audio files smaller than 100MB or use an external midi controller. Moreover, opting for any of the annual or monthly subscription plans will allow you to export entire projects and audio files in high resolution from Soundation.
7. Text to Speech
Price: Free

online-music-maker-Text to Speech.jpg
Vocals are often overlooked in contemporary electronic music, but there are so many ways they can be used creatively. The platform lets you turn up to 50000 characters into speech at once, and it also offers several different voices you can choose from. Before you create an audio file you can determine how fast the text is going to be vocalized, so you should try different options and see which one fits your project the best. Text to Speech platform can be used during the process of creating a new song, but the tools it offers are not enough to make an entire song.
8. Looplabs
Price: Free
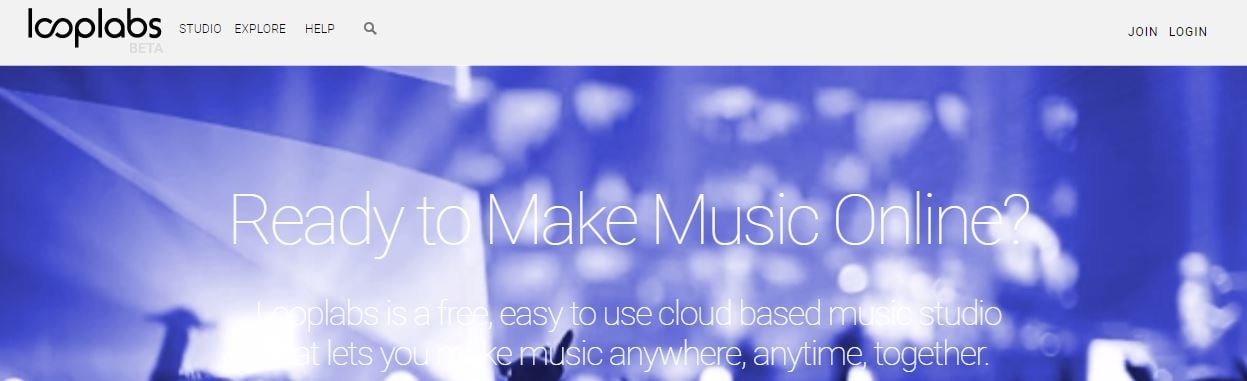
Music enthusiasts who would like to produce different genres of music online should definitely get familiar with Looplabs, as this online music maker lets its users remix songs or make music from scratch. Besides being one of the best places on the Internet to record music, Looplabs is also a community where you can meet people who like your music or discover artists whose work you admire. The Looplab’s studio features samples for a broad range of music genres and musical instruments, and you can use it to make Electro or Funk music equally effectively.
9. Online Sequencer
Price: Free
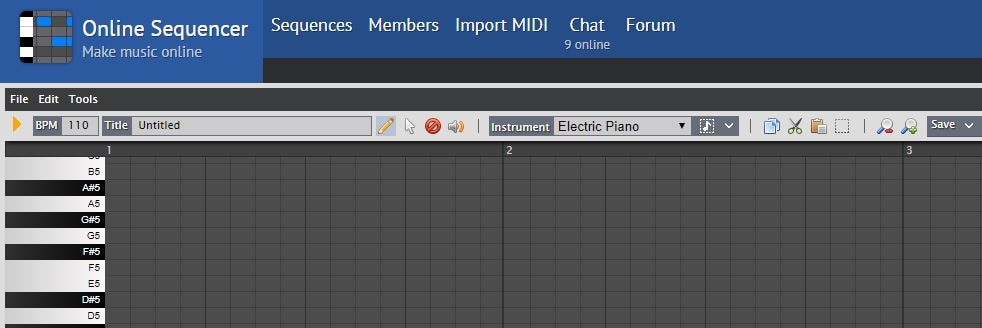
This is a perfect tool for developing an idea for a song, as you can create a sequence in just a few minutes. You can choose from Piano, Drums and Guitar categories of instruments or browse through a huge collection of fully customizable preset sequences that is updated on a daily basis. The platform also lets you import MIDI files and work on projects you’ve already started developing or you can export your sequences as MIDI files from the Online Sequencer and edit them with your DAW. Even though Online Sequencer is a useful tool for making music, the features it offers can’t really be compared with those on Soundation or AudioSauna.
10. Autochords
Price: Free
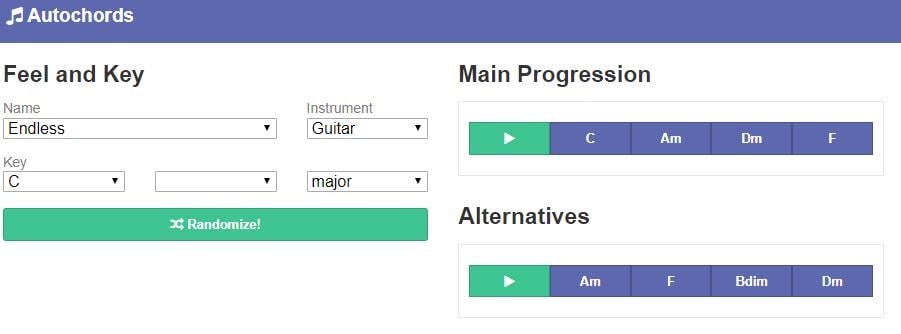
Finding new ideas for songs is often more difficult than it sounds, and if you ever face a creative block you should simply head over to Autochords. This platform suggests chord progressions based on the parameters you set, so you just have to select an instrument and the name of the song to set the feel, and the platform will show you the main progression and its alternatives. Rather than being an online music maker, Autochords is more a tool that helps piano and guitar players understand chord progressions better. iPhone and iPad users can download the Autochords app from the App Store for free.
Read More to Get : Best Free DAW for Windows and Mac for Beginners >>
Conclusion
You don’t have to be a professional musician in order to start making music online, you just have to love music, and an online music maker of your choice will take care of the rest. Do you use online music makers for entertainment or to express your creativity? Leave a comment below and share your opinions with us.
Benjamin Arango
Benjamin Arango is a writer and a lover of all things video.
Follow @Benjamin Arango
Benjamin Arango
Apr 26, 2024• Proven solutions
Expressing ideas through music was never easy, and even today in the age of powerful digital audio stations like Ableton Live or FruityLoops , producing original music requires a certain set of skills. However, online content producers often need music for their videos, but they neither have the time or the budget to hire a professional musician to create a soundtrack for their project in studio conditions. If you are looking for a quick way to make your own music online, then you should keep reading, because in this article we are going to take you through the ten best online music makers you should check out in 2021.
10 Best Online Music Makers in 2021
The music-making platforms that are currently available online are still not as nearly as powerful as professional software products for music producers. Nonetheless, this doesn’t mean that you can’t use them to create the music you like or just have fun with them. Here are the ten best online music makers in 2019.
1. Typeatone
Price: Free
Image from Internet
Have you ever wondered what your words would sound like if they were turned into music? Head over to the Typeatone platform if you want to find out since all you have to do in order to start creating your own music is type in the text. As you type, the platform will automatically start playing your words and once you’re done, you’ll be able to hear your new song. You can also choose between different instruments to make the process of creating music with Typeatone even more entertaining. You can share all of your creations with your friends on social media.
![]()
A cross-platform for making videos anywhere for all creators
Why your video editing isn’t good enough? How about some creative inspo?
- 100 Million+ Users
- 150+ Countries and Regions
- 4 Million+ Social Media Followers
- 5 Million+ Stock Media for Use
* Secure Download
2. Audiotool
Price: Free
Image from Internet
Electronic music producers who often use synthesizers like Roland TB-303 or Roland TR-909 are going to love the features this online collaborative platform offers. Audiotool hosts a huge music library, you can explore even if you are not a registered user. In order to access the platform’s music studio, you first have to create an account and make sure that you are signed in. Audiotool is also a community of like-minded people where you can meet artists whose work you appreciate or hear what others think about your work. The only downside is that Audiotool’s abundance of features can be overwhelming for the newcomers to the world of electronic music production.
3. AudioSauna
Price: Free
Image from Internet
AudioSauna seems to offer everything its users need to create inspiring music because it is equipped with frequency modulation synth, virtual analog synth and a sampler that provides layering features. Moreover, its intuitive interface makes the process of arranging the song structure or changing several note values simultaneously much easier. Creating an account on AudioSauna will enable to record all your projects and export them as audio files that can be uploaded to SoundCloud or any other audio distribution platform. AudioSauna is a perfect tool for skilled producers who want to create their music online.
4. Soundtrap
Price: Free trial available, subscription plans start at $3.99 per month
Image from Internet
Soundtrap offers a long list of features that enable professional musicians to create their music online. All you have to do is create an account and you will get access to the Sountrap’s studio that let you create new beat patterns, use a synthesizer or even invite friends to make music together. The platform also offers the possibility to connect your own instruments to the Soundtrap’s studio, so that you can record your music as you play it. This online platform also has an Education section where you can share your knowledge with others or learn valuable music lessons.
5. PatternSketch
Price: Free
Image from Internet
This basic and yet effective drum machine can help you generate amazing beats for the songs you’re working on. Once you sign up, you will be able to choose from a number of different kits and patterns that are fully customizable or create your own original beats. After you create a pattern you like, you can save it with a single click or send it to your friends via email. Optionally, you can export all of your creations from PatternSketch and save them as wav, mp3 or ogg files, although in some cases mp3 audio files may not loop properly.
6. Soundation
Price: Free version available, pricing plans start at $1.99 per month
Image from Internet
If you choose to create music with the free version of Soundation, you’ll be able to work on up to ten projects, try out over 700 audio effects and loops, and export all your music in low quality. Purchasing the Intro pricing plan will enable you to work on an unlimited number of projects, make live audio recordings, import audio files smaller than 100MB or use an external midi controller. Moreover, opting for any of the annual or monthly subscription plans will allow you to export entire projects and audio files in high resolution from Soundation.
7. Text to Speech
Price: Free

online-music-maker-Text to Speech.jpg
Vocals are often overlooked in contemporary electronic music, but there are so many ways they can be used creatively. The platform lets you turn up to 50000 characters into speech at once, and it also offers several different voices you can choose from. Before you create an audio file you can determine how fast the text is going to be vocalized, so you should try different options and see which one fits your project the best. Text to Speech platform can be used during the process of creating a new song, but the tools it offers are not enough to make an entire song.
8. Looplabs
Price: Free
Music enthusiasts who would like to produce different genres of music online should definitely get familiar with Looplabs, as this online music maker lets its users remix songs or make music from scratch. Besides being one of the best places on the Internet to record music, Looplabs is also a community where you can meet people who like your music or discover artists whose work you admire. The Looplab’s studio features samples for a broad range of music genres and musical instruments, and you can use it to make Electro or Funk music equally effectively.
9. Online Sequencer
Price: Free
This is a perfect tool for developing an idea for a song, as you can create a sequence in just a few minutes. You can choose from Piano, Drums and Guitar categories of instruments or browse through a huge collection of fully customizable preset sequences that is updated on a daily basis. The platform also lets you import MIDI files and work on projects you’ve already started developing or you can export your sequences as MIDI files from the Online Sequencer and edit them with your DAW. Even though Online Sequencer is a useful tool for making music, the features it offers can’t really be compared with those on Soundation or AudioSauna.
10. Autochords
Price: Free
Finding new ideas for songs is often more difficult than it sounds, and if you ever face a creative block you should simply head over to Autochords. This platform suggests chord progressions based on the parameters you set, so you just have to select an instrument and the name of the song to set the feel, and the platform will show you the main progression and its alternatives. Rather than being an online music maker, Autochords is more a tool that helps piano and guitar players understand chord progressions better. iPhone and iPad users can download the Autochords app from the App Store for free.
Read More to Get : Best Free DAW for Windows and Mac for Beginners >>
Conclusion
You don’t have to be a professional musician in order to start making music online, you just have to love music, and an online music maker of your choice will take care of the rest. Do you use online music makers for entertainment or to express your creativity? Leave a comment below and share your opinions with us.
Benjamin Arango
Benjamin Arango is a writer and a lover of all things video.
Follow @Benjamin Arango
Enhancing Your Soundtracks: The Do’s and Don’ts of Audio Volume Automation in Adobe Premiere Pro (Win)
The audio ducking technology aids the editors in creating a precise video as per their needs. In this article, you will discuss audio ducking Premiere Pro of Adobe to enhance the video’s audio quality optimally. Audio ducking is a feature that helps the audience to listen to every detail on the video flawlessly.

Here, you will be using Adobe Premiere Pro to establish this audio ducking feature precisely. This functionality is applicable on the Windows platform. To try on the Mac system, you can use the Filmora application to acquire precise results. In this article, you will learn how to use audio ducking concepts on Windows and Mac systems with the help of incredible tools in the digital space.
In this article
02 Use Audio Ducking in Adobe Premiere Pro on Win
03 Alternative ways to use Audio Ducking with Filmora
Part 1: What is audio ducking?
The concept of audio ducking is simple. In a soundtrack, you can find a wide range of music playing in the background. Audio ducking is the process of suppressing one type of audio signal and increasing the other movement simultaneously without causing any issues. Mostly audio ducking is processed for movies or any live sessions that reduce the background music when the characters or person speaks on the screen and increases the speaker’s volume. The scenario happens vice versa when the speaker completes its conversation. Here, the background music increases, and the speaker’s audio is reduced drastically. This type of audio ducking occurs to enhance the audio quality and reach the target audience without any issues.

The automatic changes with the audio volume are triggered by a common control using the audio ducking settings. When you enable this option in your device, this module is programmed to balance the volume settings as per the requirements. The audio ducking process allows the audio files to sound better by improving the quality of the audio signals. The audio parameters are adjusted at the specific track in the audio clippings to enhance the overall quality of the audio file.
You will be able to feel the difference when the audio tracks are played. Use the audio ducking feature optimally to strengthen the crucial audio signals when required. Identify the perfect sound spots at the audio file that requires this ducking feature. Implement this feature at particular spots to enjoy the benefits of this audio ducking functionality. It serves as a boon for sound editors and creates a positive impact on the audio files.
Part 2: Use Audio Ducking in Adobe Premiere Pro on Win
The Adobe Premiere Pro app helps to edit your media files professionally, and you can explore a wide range of settings to enhance the overall performance of the files. In the following content, you will study how to perform audio ducking in Adobe Premiere Pro at Windows space.
Step 1: Import the audio file and assign the audio type to the Essential Sound Panel. Next, auto-match the loudness level at the Essential Sound panel section.

Step 2: Choose the audio clip that requires audio ducking settings and adjusts values for sensitivity, amount of volume reduction, and the duration of fades along with the audio levels. These parameters determine the quality of audio ducking on the selected audio clips. Assign the perfect values as per your needs.

**Step 3: Finally, click Generate Keyframes to save the audio ducking settings on the chosen audio clips.

To modify the audio ducking settings, it is enough if you tap the Generate Keyframes option to create new audio ducking attributes. When you click Generate Keyframe, the older settings are erased and prompt for the new settings to be assigned for the audio ducking feature.
You can use the above instructions to perform the desired audio ducking feature at the selected audio clips.
Part 3: Alternative ways to use Audio Ducking with Filmora
If you are working with the Mac systems, worry not here is an incredible application that assists in performing the audio ducking at audio files in the Mac platform. The Filmora app from Wondershare is a sophisticated tool that carries out professional edits on media files based on your needs. The quality factors of the audio and video signals are retained, and the desired changes are implemented on the files precisely.
Versatile Video Editor - Wondershare Filmora
An easy yet powerful editor
Numerous effects to choose from
Detailed tutorials provided by the official channel
The Filmora application offers powerful features while editing audio files. You can apply audio ducking to enhance the vocals and use 100 audio effects to add flavors to the existing audio files. This app allows you to make any constructive changes to the file without disturbing the original elements set at the time of recording.
The remarkable features of the Filmora
- An exclusive audio file editor and improves the vocals using Audio Ducking strategy
- You can access the 100 audio effects built-in at its working ambiance to enhance your imported media files.
- The simple user interface helps you to discover awesome editing features effortlessly.
- All the changes in the audio signals are embedded without affecting the quality factors.
- The easy export option helps you to move the edited audio files to any storage space flawlessly.
These are the stunning functionalities of the Filmora app concerning audio files. You can perform a wide range of miraculous edits on the media tracks precisely in a professional way.
Here, you will be surfing the discussion about the effective usage of Filmora in implementing audio ducking functionality on the audio files. The Filmora offers an Audio Adjust module to perform the ducking operation efficiently without affecting the audio quality. It helps the audio to sound better and improves the clarity of vocals. The auto-adjust function modifies the volume of the audio files precisely as per the programmed algorithm. You do not have to write any code or perform manual adjustments in embedding this setting to your audio file. Few clicks are enough to enable the ducking functionality at the audio files.

The stepwise procedure to enable the audio ducking feature at Filmora application.
Step 1: Install the app and import the file.
First, download the application from its official webpage based on your system OS. Then, install the app and import the audio files into the working space of Filmora.

Step 2: Set Ducking parameters
Drag it to the timeline and choose the audio track that requires the audio ducking feature. After selecting the audio clip, right-click on it and choose ‘Adjust Audio’ from the pop-up message. The Audio Editor window appears, go to the Ducking menu and turn on ‘Lower the Volume of other clips. You can repeat this step to other audio clippings effortlessly.

Step 3: Save and Export
Next, save the changes by tapping the ‘OK’ button and clicking the Export button to store the edited audio files at any storage space. Filmora will adjust the volume on other audio clips as per the settings and export the file precisely.

The above guidelines help you to establish the audio ducking feature on your audio clips using the Filmora. Perform the appropriate clicks and set the attributes according to your needs to refine the audio ducking feature.
Conclusion
Thus, this article had given valuable insights on **audio ducking Premiere Pro of Adobe. Use Adobe Premiere Pro to perform the desired audio adjustments to enhance the vocal signal on your Windows system. The Filmora application assists in editing the audio clips at the Mac system effortlessly. The above instructions aid you in performing the audio ducking feature successfully. Connect with this article to discover unique editing options on media files to enhance their overall performance. Stay tuned to explore the features of the Filmora application in detail.
02 Use Audio Ducking in Adobe Premiere Pro on Win
03 Alternative ways to use Audio Ducking with Filmora
Part 1: What is audio ducking?
The concept of audio ducking is simple. In a soundtrack, you can find a wide range of music playing in the background. Audio ducking is the process of suppressing one type of audio signal and increasing the other movement simultaneously without causing any issues. Mostly audio ducking is processed for movies or any live sessions that reduce the background music when the characters or person speaks on the screen and increases the speaker’s volume. The scenario happens vice versa when the speaker completes its conversation. Here, the background music increases, and the speaker’s audio is reduced drastically. This type of audio ducking occurs to enhance the audio quality and reach the target audience without any issues.
The automatic changes with the audio volume are triggered by a common control using the audio ducking settings. When you enable this option in your device, this module is programmed to balance the volume settings as per the requirements. The audio ducking process allows the audio files to sound better by improving the quality of the audio signals. The audio parameters are adjusted at the specific track in the audio clippings to enhance the overall quality of the audio file.
You will be able to feel the difference when the audio tracks are played. Use the audio ducking feature optimally to strengthen the crucial audio signals when required. Identify the perfect sound spots at the audio file that requires this ducking feature. Implement this feature at particular spots to enjoy the benefits of this audio ducking functionality. It serves as a boon for sound editors and creates a positive impact on the audio files.
Part 2: Use Audio Ducking in Adobe Premiere Pro on Win
The Adobe Premiere Pro app helps to edit your media files professionally, and you can explore a wide range of settings to enhance the overall performance of the files. In the following content, you will study how to perform audio ducking in Adobe Premiere Pro at Windows space.
Step 1: Import the audio file and assign the audio type to the Essential Sound Panel. Next, auto-match the loudness level at the Essential Sound panel section.
Step 2: Choose the audio clip that requires audio ducking settings and adjusts values for sensitivity, amount of volume reduction, and the duration of fades along with the audio levels. These parameters determine the quality of audio ducking on the selected audio clips. Assign the perfect values as per your needs.
**Step 3: Finally, click Generate Keyframes to save the audio ducking settings on the chosen audio clips.
To modify the audio ducking settings, it is enough if you tap the Generate Keyframes option to create new audio ducking attributes. When you click Generate Keyframe, the older settings are erased and prompt for the new settings to be assigned for the audio ducking feature.
You can use the above instructions to perform the desired audio ducking feature at the selected audio clips.
Part 3: Alternative ways to use Audio Ducking with Filmora
If you are working with the Mac systems, worry not here is an incredible application that assists in performing the audio ducking at audio files in the Mac platform. The Filmora app from Wondershare is a sophisticated tool that carries out professional edits on media files based on your needs. The quality factors of the audio and video signals are retained, and the desired changes are implemented on the files precisely.
Versatile Video Editor - Wondershare Filmora
An easy yet powerful editor
Numerous effects to choose from
Detailed tutorials provided by the official channel
The Filmora application offers powerful features while editing audio files. You can apply audio ducking to enhance the vocals and use 100 audio effects to add flavors to the existing audio files. This app allows you to make any constructive changes to the file without disturbing the original elements set at the time of recording.
The remarkable features of the Filmora
- An exclusive audio file editor and improves the vocals using Audio Ducking strategy
- You can access the 100 audio effects built-in at its working ambiance to enhance your imported media files.
- The simple user interface helps you to discover awesome editing features effortlessly.
- All the changes in the audio signals are embedded without affecting the quality factors.
- The easy export option helps you to move the edited audio files to any storage space flawlessly.
These are the stunning functionalities of the Filmora app concerning audio files. You can perform a wide range of miraculous edits on the media tracks precisely in a professional way.
Here, you will be surfing the discussion about the effective usage of Filmora in implementing audio ducking functionality on the audio files. The Filmora offers an Audio Adjust module to perform the ducking operation efficiently without affecting the audio quality. It helps the audio to sound better and improves the clarity of vocals. The auto-adjust function modifies the volume of the audio files precisely as per the programmed algorithm. You do not have to write any code or perform manual adjustments in embedding this setting to your audio file. Few clicks are enough to enable the ducking functionality at the audio files.
The stepwise procedure to enable the audio ducking feature at Filmora application.
Step 1: Install the app and import the file.
First, download the application from its official webpage based on your system OS. Then, install the app and import the audio files into the working space of Filmora.
Step 2: Set Ducking parameters
Drag it to the timeline and choose the audio track that requires the audio ducking feature. After selecting the audio clip, right-click on it and choose ‘Adjust Audio’ from the pop-up message. The Audio Editor window appears, go to the Ducking menu and turn on ‘Lower the Volume of other clips. You can repeat this step to other audio clippings effortlessly.
Step 3: Save and Export
Next, save the changes by tapping the ‘OK’ button and clicking the Export button to store the edited audio files at any storage space. Filmora will adjust the volume on other audio clips as per the settings and export the file precisely.
The above guidelines help you to establish the audio ducking feature on your audio clips using the Filmora. Perform the appropriate clicks and set the attributes according to your needs to refine the audio ducking feature.
Conclusion
Thus, this article had given valuable insights on **audio ducking Premiere Pro of Adobe. Use Adobe Premiere Pro to perform the desired audio adjustments to enhance the vocal signal on your Windows system. The Filmora application assists in editing the audio clips at the Mac system effortlessly. The above instructions aid you in performing the audio ducking feature successfully. Connect with this article to discover unique editing options on media files to enhance their overall performance. Stay tuned to explore the features of the Filmora application in detail.
Rise Above the Rest: Enhancing Speech Clarity and Volume with Filmora
How to Make Your Voice Higher With Filmora

Liza Brown
Mar 27, 2024• Proven solutions
A video is nothing without a clear and smooth voice. It doesn’t matter if you have a high definition video quality but your video doesn’t have a clear and loud voice, it will be a failure. If you are recording a video and you don’t have the equipment to record your voice properly, low voice can become a big problem in your recorded videos. But some steps can help you and show you the ways of how to make your voice higher. Increasing one’s voice is not an as easy task as it may seem. Just like other skills, it is also a form of skill that requires a lot of practice and experience to master. There are o many factors to consider while recording a video with a high voice or pitch. In this article, we are going to describe how to make your voice higher with two steps. In the first step, we will talk about the factors that you must consider while recording your video. And in the 2nd step, we will be discussing the way of how to make your voice higher using Filmora. Both of these steps require patience and practice.
Step 1: How to make your voice higher while recording
Step 2: How to make your voice higher with Filmora
So let’s start with the first step to making your voice higher while you are recording your video. If you can successfully make your voice higher during this process, it will not require any hard work to make it higher in the post-production process.

You might be interested in:
How to make your Voice Higher while Recording
There are so many ways and exercises that can help change the pitch of your voice and make it higher even if you don’t have high pitch voice. We are going to discuss 5 exercises that can help you achieve this task. But remember that these exercises will practice and patience in order to show the required results.
- Focus on Breathing
The higher voice you want the more air it will need. To higher your voice, you have to take deep breathes from your nose and release them while speaking. It will boost the pitch of your voice and make it higher than your usual voice. Singers use this technique while they want to hit a high pitch. It gives your body and lungs the power to generate a higher voice. Breathing plays a very vital role in making your voice higher. If you are not breathing correctly, you can’t keep the voice higher for a longer period of time. Just like all other skills, this exercise also needs a lot of practice to master. Start practicing this technique by reading a sentence, then move forward to a paragraph, and so on. Following this process will make you master the process of highering your voice using your own breaths. Then you can start using this technique in all of your videos very easily.
- Listen to Your Voice
Do you find it amusing to know that you haven’t ever heard your own voice if you haven’t listened to your own recorded audio or video? You will find your voice very different on the recording than in reality. Because in reality, it is difficult to focus on listening to your own voice while you speak. You will probably hate your own voice the first time you listen to it as a recording. To make your voice higher, it is important to listen and observe your voice very carefully and analyze where it goes down and where it goes up. It will help you improve your voice after every try. This practice will help you master the process of highering your voice using your own analyzes.
- Remove the Obstacles
Since now we know that the main way to make your voice higher is to provide your lungs power with the help of your own breathes. But what makes it decrease its intensity is the obstacles that come in the way of your voice. The first and main obstacle that your voice faces is your tongue. Everyone knows the importance of tongue in helping you speak and generate words. But it sometimes works as a hindrance to block the sounds our lungs make. Therefore, it is very important to keep your tongue in the right position while generating high pitched voice. Try to keep your tongue as low as possible and don’t let it touch the upper part of your mouth to avoid creating a blockage for your voice. In the beginning, it will feel like an impossible task, but as you move forward and practice it more often, you will notice the difference. This will enhance your voice a lot and take it to a level, where you had never imagined it would reach. If you are failing again and again, then don’t worry. This is not an easy task to accomplish, it requires patience and consistency to master.
- Use Nasal Voice
There are multiple ways of generating voice in a human body. Just like the mouth, sometimes the nose is also used to release voices. Those who use Nasal voices while they speak have a higher voice than those who don’t. The gateway used by the nose to release voice is very narrow, producing a thinner voice resulting in high pitched sound. It is also not a good practice to use this technique very often. Because it can make you irritated and annoying. Try to mix the nasal voice only 50% to the voice of your mouth to keep it safe, and sound normal.
- Focus on your Posture
If you know anything about signing or you know any singer, you will come to know that your posture plays a very vital role in generating the sound of your choice. The ideal posture for a higher voice and proper tone is to sit with your back straight, keep your tongue as low as possible, rest your mouth and look slightly upward to make your neck relax a bit. This can completely transform your voice and make it sound like a professional.
How to make your Voice Higher with Filmora
If you have already recorded a video and that video has a very pathetic voice quality, then there is also a hope to make your voice higher by using Filmora. The previous step will help you improve your voice quality to a great extent, but if you don’t want to re-record the video and improve the existing video, you can follow these steps to make sound better.
Method 1: Low Bass
Step 1: Open Filmora, and export the video to a higher voice.

Step 2: Drag and drop the video into the timeline to enable its editing options.

Step 3: Right Click on the video, and select Adjust Audio from the list to open the option.

Step 4: It will open the settings related to the sound of your video, you make any required changes from here, in order to higher its voice.

Step 5: From the equalizer drop-down menu, select the low base option. It will make your voice heavy and will make it more audible than its original voice.

Method 2: High-Pitched Voice
Step 1: Open Filmora and export the video to a higher voice.

Step 2: Drag and drop the video into the timeline to enable its editing options.

Step 3: Right Click on the video, and select Adjust Audio from the list to open the option.

Step 4: It will open the settings related to the sound of your video, you make any required changes from here, in order to higher its voice.

Step 5: From these options, go to the pitch, and increase by two to three points. Now play your video and check the results. It will make the voice of your video higher with a high pitch.

Method 3: Low-Pitched Voice
Step 1: Open Filmora, and export the video to a higher voice.

Step 2: Drag and drop the video into the timeline to enable its editing options.

Step 3: Right Click on the video, and select Adjust Audio from the list to open the option.

Step 4: It will open the settings related to the sound of your video, you make any required changes from here, in order to higher its voice.

Step 5: From settings, go to the pitch settings, and decrease it by two to three points. It will make your voice sound intense and make it a bit higher than its original voice. Play the video and notice the changes. You can change the pitch settings accordingly after checking its results and choose a setting that best suits your video.

Both of these steps can help you enhance the quality of your voice to a great extent. For better results, follow both steps, higher your voice while recording and higher your voice with Filmora. The first step will let you make your voice higher using your own mouth and lungs. The second step will help you improve it more and you can choose any one method from the three available methods that best suits your video and voice of the video and make your videos more engaging and interesting video. So, let’s transform your videos to make them more engaging and appealing to the viewers.
Liza Brown
Liza Brown is a writer and a lover of all things video.
Follow @Liza Brown
Liza Brown
Mar 27, 2024• Proven solutions
A video is nothing without a clear and smooth voice. It doesn’t matter if you have a high definition video quality but your video doesn’t have a clear and loud voice, it will be a failure. If you are recording a video and you don’t have the equipment to record your voice properly, low voice can become a big problem in your recorded videos. But some steps can help you and show you the ways of how to make your voice higher. Increasing one’s voice is not an as easy task as it may seem. Just like other skills, it is also a form of skill that requires a lot of practice and experience to master. There are o many factors to consider while recording a video with a high voice or pitch. In this article, we are going to describe how to make your voice higher with two steps. In the first step, we will talk about the factors that you must consider while recording your video. And in the 2nd step, we will be discussing the way of how to make your voice higher using Filmora. Both of these steps require patience and practice.
Step 1: How to make your voice higher while recording
Step 2: How to make your voice higher with Filmora
So let’s start with the first step to making your voice higher while you are recording your video. If you can successfully make your voice higher during this process, it will not require any hard work to make it higher in the post-production process.
You might be interested in:
How to make your Voice Higher while Recording
There are so many ways and exercises that can help change the pitch of your voice and make it higher even if you don’t have high pitch voice. We are going to discuss 5 exercises that can help you achieve this task. But remember that these exercises will practice and patience in order to show the required results.
- Focus on Breathing
The higher voice you want the more air it will need. To higher your voice, you have to take deep breathes from your nose and release them while speaking. It will boost the pitch of your voice and make it higher than your usual voice. Singers use this technique while they want to hit a high pitch. It gives your body and lungs the power to generate a higher voice. Breathing plays a very vital role in making your voice higher. If you are not breathing correctly, you can’t keep the voice higher for a longer period of time. Just like all other skills, this exercise also needs a lot of practice to master. Start practicing this technique by reading a sentence, then move forward to a paragraph, and so on. Following this process will make you master the process of highering your voice using your own breaths. Then you can start using this technique in all of your videos very easily.
- Listen to Your Voice
Do you find it amusing to know that you haven’t ever heard your own voice if you haven’t listened to your own recorded audio or video? You will find your voice very different on the recording than in reality. Because in reality, it is difficult to focus on listening to your own voice while you speak. You will probably hate your own voice the first time you listen to it as a recording. To make your voice higher, it is important to listen and observe your voice very carefully and analyze where it goes down and where it goes up. It will help you improve your voice after every try. This practice will help you master the process of highering your voice using your own analyzes.
- Remove the Obstacles
Since now we know that the main way to make your voice higher is to provide your lungs power with the help of your own breathes. But what makes it decrease its intensity is the obstacles that come in the way of your voice. The first and main obstacle that your voice faces is your tongue. Everyone knows the importance of tongue in helping you speak and generate words. But it sometimes works as a hindrance to block the sounds our lungs make. Therefore, it is very important to keep your tongue in the right position while generating high pitched voice. Try to keep your tongue as low as possible and don’t let it touch the upper part of your mouth to avoid creating a blockage for your voice. In the beginning, it will feel like an impossible task, but as you move forward and practice it more often, you will notice the difference. This will enhance your voice a lot and take it to a level, where you had never imagined it would reach. If you are failing again and again, then don’t worry. This is not an easy task to accomplish, it requires patience and consistency to master.
- Use Nasal Voice
There are multiple ways of generating voice in a human body. Just like the mouth, sometimes the nose is also used to release voices. Those who use Nasal voices while they speak have a higher voice than those who don’t. The gateway used by the nose to release voice is very narrow, producing a thinner voice resulting in high pitched sound. It is also not a good practice to use this technique very often. Because it can make you irritated and annoying. Try to mix the nasal voice only 50% to the voice of your mouth to keep it safe, and sound normal.
- Focus on your Posture
If you know anything about signing or you know any singer, you will come to know that your posture plays a very vital role in generating the sound of your choice. The ideal posture for a higher voice and proper tone is to sit with your back straight, keep your tongue as low as possible, rest your mouth and look slightly upward to make your neck relax a bit. This can completely transform your voice and make it sound like a professional.
How to make your Voice Higher with Filmora
If you have already recorded a video and that video has a very pathetic voice quality, then there is also a hope to make your voice higher by using Filmora. The previous step will help you improve your voice quality to a great extent, but if you don’t want to re-record the video and improve the existing video, you can follow these steps to make sound better.
Method 1: Low Bass
Step 1: Open Filmora, and export the video to a higher voice.
Step 2: Drag and drop the video into the timeline to enable its editing options.
Step 3: Right Click on the video, and select Adjust Audio from the list to open the option.
Step 4: It will open the settings related to the sound of your video, you make any required changes from here, in order to higher its voice.
Step 5: From the equalizer drop-down menu, select the low base option. It will make your voice heavy and will make it more audible than its original voice.
Method 2: High-Pitched Voice
Step 1: Open Filmora and export the video to a higher voice.
Step 2: Drag and drop the video into the timeline to enable its editing options.
Step 3: Right Click on the video, and select Adjust Audio from the list to open the option.
Step 4: It will open the settings related to the sound of your video, you make any required changes from here, in order to higher its voice.
Step 5: From these options, go to the pitch, and increase by two to three points. Now play your video and check the results. It will make the voice of your video higher with a high pitch.
Method 3: Low-Pitched Voice
Step 1: Open Filmora, and export the video to a higher voice.
Step 2: Drag and drop the video into the timeline to enable its editing options.
Step 3: Right Click on the video, and select Adjust Audio from the list to open the option.
Step 4: It will open the settings related to the sound of your video, you make any required changes from here, in order to higher its voice.
Step 5: From settings, go to the pitch settings, and decrease it by two to three points. It will make your voice sound intense and make it a bit higher than its original voice. Play the video and notice the changes. You can change the pitch settings accordingly after checking its results and choose a setting that best suits your video.
Both of these steps can help you enhance the quality of your voice to a great extent. For better results, follow both steps, higher your voice while recording and higher your voice with Filmora. The first step will let you make your voice higher using your own mouth and lungs. The second step will help you improve it more and you can choose any one method from the three available methods that best suits your video and voice of the video and make your videos more engaging and interesting video. So, let’s transform your videos to make them more engaging and appealing to the viewers.
Liza Brown
Liza Brown is a writer and a lover of all things video.
Follow @Liza Brown
Also read:
- Updated Eliminating Background Rattle A Detailed Process to Enhance Clarity During Audio Capture
- 2024 Approved Mastering Silence A Comprehensive Tutorial on Stripping Audio From iOS Videos
- New In 2024, Add Background Melody to iMovie Sequence
- Updated 2024 Approved Crafting Masterpieces on Your Mac An In-Depth Look at the Leading DAWs of 2 Written in Markdown Format, with Each Title as a Separate Subheading. Heres How It Would Look Like
- Updated Mastering Microphone Use in PowerPoint A Step-by-Step Guide for PC and MAC Users for 2024
- New 2024 Approved Unveiling the 6 Finest Automatic Transcription Applications
- New Vanguard Platforms Transforming Audiovisual Industry with Next-Gen Voice Over Technology
- Updated The Vimeo Video Spectrum Examining the Role of Aspect Ratio in Content Quality for 2024
- Updated 2024 Approved The Beginners Guide to Cutting Out Background Loudness in Audacity and FilmoraPro
- Updated Windows Auditory Enhancement Tools Selecting the Prime Candidates for Decibel Reduction for 2024
- New 2024 Approved Revealing the Best Applications for Eliminating Background Disturbances From Audio
- In 2024, A Guide to Mixing Sound and Picture in QuickTime Format
- Updated In 2024, Recommendations for Music Video Editors
- New Aural Puzzle Pieces Unraveling the Sound Effects of Button Presses for 2024
- New 2024 Approved Your First Guide to iPhone Audio Transformation Voice Changer Plus Explained
- Deciphering Calm Techniques to Reduce Audio Disturbances From Natural Sources in Digital Recordings for 2024
- New 2024 Approved Unparalleled YouTube Soundscapes to Experience
- Harmony of the Wild Selecting the Very Best iOS & Android Nature Audio Apps for 2024
- New A Filmmakers Guide to Blending Sound and Visuals with Magix Pro Software
- Updated Uncover Belching Sound Simulation for 2024
- Updated 2024 Approved Find Laughing Sound Effect
- 2024 Approved Easy-to-Use Vocal Modification Tools Overview of Functions, Rules, and Substitutes
- New Best 10 Voice Changer Apps Male to Female Powerful for 2024
- New In 2024, Shifting Auditory Feedback Patterns in the Latest Adobe Rush Software Update
- In 2024, The Ultimate Guide to Popular Sound Capture Software
- 2024 Approved Adding Audio to Photo You Should Know
- New 2024 Approved Top 5 Mac-Compatible Auto Music Mixers Unleash Your Beat Potential
- Updated TOP 3 Online Services for Augmenting MP3 Sound Intensity and Clarity for 2024
- New In 2024, Androids Premier Voice Recorders A Ranked Selection of 10 Apps
- Harmonious Hollers Discovering Impactful Sound Effects for 2024
- New In 2024, Essential Digital Applications for Sounding Transformation
- In 2024, How Does Dynamic Range Processing Improve Audio Quality?
- New 10 Vocal Frequency Filters Transforming Home Studio Music-Making
- Updated Useful Tips How to Use Voxal Voice Changer on Discord?
- Updated 2024 Approved A Comprehensive Overview of Changing Speech and Music Levels in Files
- New Soundtrack Scavenger Hunt Discovering Free Music for Editors
- New Unmissable Web-Based MP3 Metadata Manipulators – Heres the List for 2024
- 2024 Approved Acoustic Extraction Protocols Taking Sound Out of Video Footage
- Updated Where Can I Find Applause Sound Effect for 2024
- New 2024 Approved Instantaneous Strategies for Silencing Auditory Ground Hum
- New 2024 Approved Crafting Immersive Podcast Episodes A Comprehensive Directory of Sound FX Providers
- New From Amateur to Pro Learning Audacitys Audio Recording Without Investment for 2024
- New Tips and Tricks to Use Clownfish Voice Changer on Discord/ Fortnite/ Skype for 2024
- Updated In 2024, The Foremost Silence Engineer App Enhance Video Clarity and Focus
- 2024 Approved Top 10 Free Browser-Based DAWs for Creatives
- The Ultimate Compilation Top 5 Budget-Friendly, Open-Source Windows Audio Editors
- From Visual to Audible Harness the Power of Audio Extraction Tools for Videos on Cross-Platform Systems (Windows, macOS & Mobile Devices - New Insights 2023) for 2024
- 3 Ways to Track Oppo F25 Pro 5G without Them Knowing | Dr.fone
- What To Do When Infinix Zero 30 5G Has Black Screen of Death? | Dr.fone
- In 2024, Bypass Activation Lock On iPhone 13 - 4 Easy Ways
- How to Reset Apple iPhone 11 Pro to Factory Settings? | Dr.fone
- Updated In 2024, Discover the Best Free Animation Software for Windows and Mac
- iSpoofer is not working On Realme Note 50? Fixed | Dr.fone
- Reasons for Motorola Moto G13 Stuck on Boot Screen and Ways To Fix Them | Dr.fone
- Methods on How to Speed Up Video on Splice
- In 2024, 9 Best Free Android Monitoring Apps to Monitor Phone Remotely For your Realme C55 | Dr.fone
- Undelete lost contacts from Honor X50 GT.
- In 2024, Apple ID is Greyed Out On iPhone 15 Pro How to Bypass?
- New How to Create Ken Burns Effect? Detaied Steps for 2024
- New The Only Guide Youll Ever Need to Learn GIF Design That Get Shared Like Crazy
- Unlock a disable iPhone 14 Pro using macOS finder
- In 2024, Top 10 Lava Yuva 3 Pro Android SIM Unlock APK
- In 2024, Is GSM Flasher ADB Legit? Full Review To Bypass Your Lava Blaze Curve 5GFRP Lock
- In 2024, Hassle-Free Ways to Remove FRP Lock from OnePlus 11R Phones with/without a PC
- Apple iPhone 12 mini Screen Mirroring You Must Know | Dr.fone
- How to retrieve erased messages from Xiaomi 13 Ultra
- In 2024, How to Transfer Contacts from Motorola Defy 2 to iPhone XS/11 | Dr.fone
- How To Transfer WhatsApp From Apple iPhone 8 Plus to other iPhone devices? | Dr.fone
- Updated Sync Up! 5 Essential Apps for Making Lip Sync Videos
- 2024 Approved Techniques for Creating Animated Logo That Few People Know About
- Home Button Not Working on OnePlus Ace 3? Here Are Real Fixes | Dr.fone
- Recover iPhone 15 Pro Max Data From iOS iTunes | Dr.fone
- Updated Best of the Best Top 16 Free AVI Video Rotation Software for Any Platform for 2024
- Updated FCP Essentials How to Give Your Footage a VHS Makeover
- Can I recover permanently deleted photos from Find X7
- In 2024, Latest Guide How To Bypass Infinix Note 30i FRP Without Computer
- 2024 Approved Refine Image Size and Shape
- Top 10 Best Spy Watches For your Oppo A58 4G | Dr.fone
- Updated Top Cartoon Video Creation Tools for PC and Online Use for 2024
- Pokemon Go No GPS Signal? Heres Every Possible Solution On Motorola Moto E13 | Dr.fone
- In 2024, Top 5 Samsung Galaxy XCover 6 Pro Tactical Edition Bypass FRP Tools for PC That Actually Work
- In 2024, How to Unlock iPhone 13 Passcode Screen? | Dr.fone
- New How to Make Architecture Animation
- In 2024, Unlock Your Device iCloud DNS Bypass Explained and Tested, Plus Easy Alternatives On iPhone 13 Pro Max
- How to Soft Reset Vivo Y27 4G phone? | Dr.fone
- What Legendaries Are In Pokemon Platinum On Vivo T2 5G? | Dr.fone
- iSpoofer is not working On ZTE Nubia Flip 5G? Fixed | Dr.fone
- Title: 2024 Approved Top 10 Digital Audio Workstation Tools Free vs Paid Options
- Author: Kate
- Created at : 2024-05-05 07:38:52
- Updated at : 2024-05-06 07:38:52
- Link: https://audio-editing.techidaily.com/2024-approved-top-10-digital-audio-workstation-tools-free-vs-paid-options/
- License: This work is licensed under CC BY-NC-SA 4.0.
